


Introduction to Skylake Overclocking
Overclocking: What and Why?
Overclocking began years ago as a way to get that little extra out of your computer hardware, "a free upgrade", as many have put it. Since the olden days, overclocking has changed. Overclocking has become not only a way to gain extra performance, but also a way for users to customize their hardware and make it their own. The truth is the inner feeling of accomplishment that comes with running your hardware faster than anything sold on the market is almost as important as the utility gained from the boosts in speeds. Many in the industry love to use the analogy of cars to explain usage models for enthusiast hardware, and in this case, that analogy holds true.
Those who upgrade, tweak, and modify their computer hardware do so for many of the same reasons people upgrade, tweak, and modify their cars. The feeling of accomplishment and the feeling of really making something your own is why people work so hard to make small changes, and in my opinion, the added performance boosts are a bonus. Overclocking your CPU not only improves raw horsepower in tasks such as video rendering, but it also helps alleviate possible bottlenecks in your system where the CPU might not be the focus. As games become more wonderful, GPUs become more masterful, and flash storage becomes more plentiful your system might require a CPU that is more powerful. This guide will not only show you how to overclock your CPU to its maximum potential for 24/7 use but also outline how to alleviate any system bottlenecks and stabilize the system. To start things off, I will cover the basics of overclocking Intel Skylake.
Attending IDF this past August provided some insight into Intel's stance and progress on overclocking. Intel's introduction of the "K" SKU and the Performance Tuning Protection Plan (PTPP) shows that Intel is supporting overclocking, but it's not free. While it is true that only Intel's K SKUs are meant for overclocking, something else comes with the extra letter. Intel has begun to focus on overclocking and has taken overclocking into consideration in the design stage of the CPU. I would bet that overclocking was a requirement for the new CPU, and we all know that requirements are only requirements when there is some potential for ROI. Theoretically speaking, if you bought a K-SKU CPU from Intel, that extra money didn't only go to the shareholders, but also back into producing CPUs with better overclocking features.
What's special about Intel Skylake?
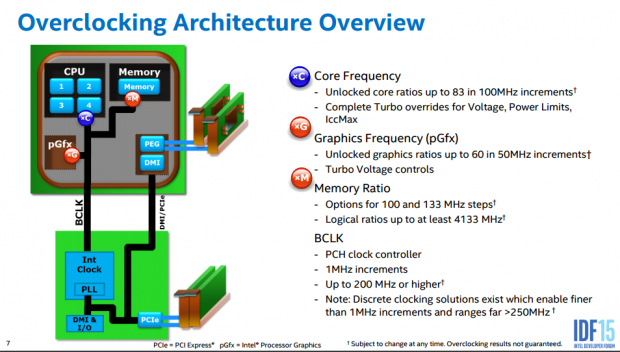
A high-level overview is provided by Intel on how the CPU is setup, there are a few multipliers missing (mainly cache and FCLK), but overall this is how Skylake is setup for overclocking. I will dig into this on the next page.
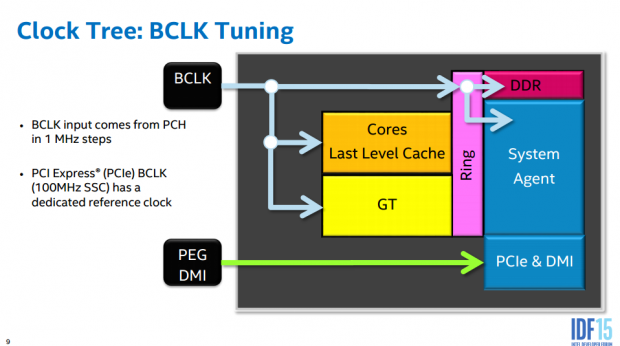
After discussions with some of the engineers who designed Skylake, it was apparent that they made some changes to improve overclocking. The most major was the decoupling of the PCI-E/DMI bus from the rest of the frequency domains (CPU core, cache, and memory), and allowing motherboard manufacturers to use an external clock generator for the BCLK. Other improvements are increased memory multiplier granularity (from 200/266MHz on Haswell to 100/133MHz increments), support for DDR4 4133MHz, and general overclocking improvements regarding unlocking voltages for end users.
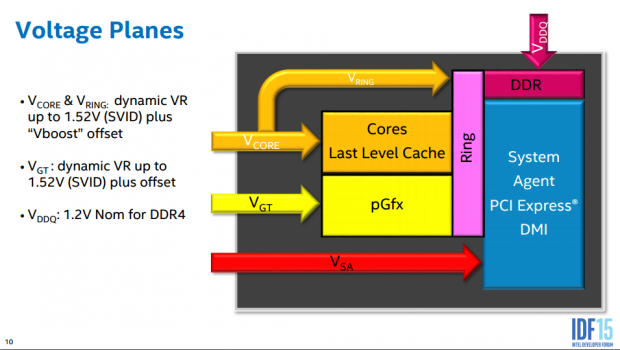
Haswell and Broadwell both employed an integrated silicon-based voltage regulator (FIVR), which allowed for single rail input from the motherboard and better control over internal voltage domains. While the FIVR isn't being used in Skylake, it does seem that an integrated linear regulator is present in Skylake (according to David Kanter of The Linley Group) but is disabled in the cores but not in the uncore (uncore means "not the core").
Regardless of the impact of this linear regulator, there are now many voltage rails the motherboard must provide the CPU instead of just one. Compared to pre-FIVR CPUs such as Ivy Bridge/Sandy Bridge, Skylake has a comparable number of input rails, five of which are pertinent to this guide.
Our Latest TweakTown Guides
- How to fix Wi-Fi Adapter Not Working on Windows laptops: troubleshooting tips
- 6 underrated Microsoft Word features worth using to boost your productivity
- 7 Windows settings to change right after installation for better privacy, security, and performance
- I stopped Windows 11 notifications from interrupting me with Do Not Disturb, Focus, and a priority list
- 7 ways to transfer data from Android to Windows PC quickly and easily
How this guide will work
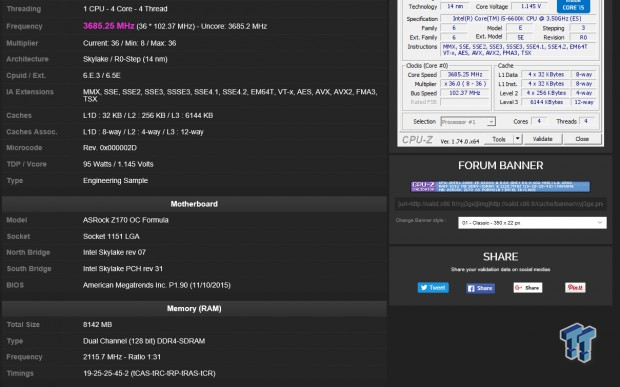
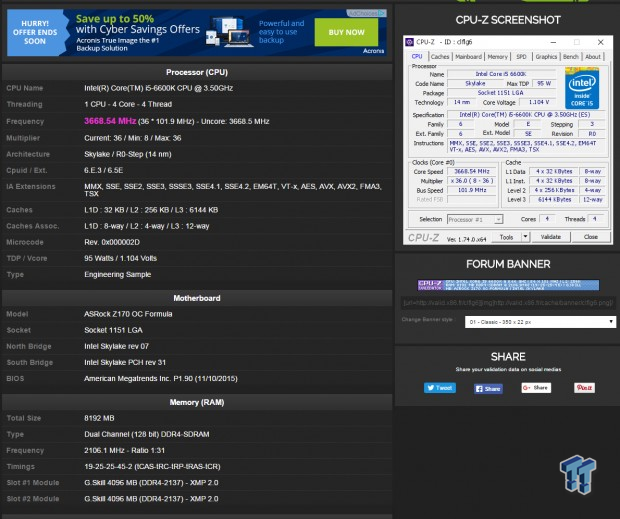
I have written overclocking guides for every single Intel CPU since Sandy Bridge, and usually made it easier on myself by using one motherboard and one CPU. For this guide, I decided to make things infinitely harder on myself by using five different high-end overclocking motherboards from five different companies (out of 20+ Z170 motherboards I have), four CPUs, and two very-high-speed memory kits. I spent almost two months testing and gathering data, a few weeks analyzing the data and making pretty charts, and I spent the better part of last week going through endless BIOS shots, screenshots, and datasheets to get all the information you might need.
I like to analyze overclocking semi-scientifically, and to do this, I spend a decent amount of time thinking up tests and how to run them to maintain consistency and reproducibility. To make things simpler, I have picked a few benchmarks, taken the scores, and then averaged and normalized. CPU Benchmark performance uses scores from CINEBENCH, HandBrake, and AIDA64 while memory performance uses AIDA64. The scores are then equally weighted (for CPU scores synthetics and real-world scores are weighted equally) and charts then utilize percentages starting from 100% to more easily show changes. I hope you enjoy and benefit in some way from this guide, and if you have any questions, please feel free to ask in the comments section below!
Disclaimer and Before You Begin Overclocking
Disclaimer: Overclocking your CPU technically voids your warranty. However, if you want to overclock and still be covered, Intel does provide an aftermarket overclocking warranty for about $20-$30 located here. The overclocking warranty is only provided on the 6600K and 6700K, and I would think future K series SKUs. Overclocking can also damage your CPU, especially if done incorrectly.
This guide is about how to overclock, and you are responsible for anything that might go wrong. I don't want to scare anyone, and be assured that if your CPU does die (very hard to cause damage if you stay within voltage and temperature limits), it won't do so in dramatic fashion (sorry, no fireworks). To be frank with you, the only times I have killed a CPU from overclocking have been under long LN2 sessions, and I have yet to kill a Haswell or Skylake CPU.
Have you Overclocked Before?
If you have overclocked before and understand hardware selection and the basics of overclocking, you should skip to the next page. I have listed the components used in this guide below. The first part of this guide is for those who want to know what to do before overclocking.
Where do I start?
Skylake Overclocking Guide Systems
- Motherboard: ASRock Z170 OC Formula (used for memory scaling testing), ASUS Maximus VIII Extreme (used for CPU/Cache/Memory scaling testing), EVGA Z170 Classified 4-way (used for CPU delid testing), GIGABYTE Z170X-SOC Force (used for CPU clock, power, and voltage testing), MSI Z170A XPOWER GAMING TITANIUM EDITION (used for stability testing)
- CPU: 2x Intel Core i7 6700K, 2x 6600K - Buy from Amazon / Read our review
- Cooler: Corsair H110i GT, Noctua NH-D15 - Buy from Amazon
- Memory: Corsair Vengeance LPX 8GB (2x4GB) 4000MHzC19, G.Skill TridentZ 8GB (2x4GB) 3733MHzC17 - Buy from Amazon
- Video Card: NVIDIA GeForce GTX 980 - Buy from Amazon / Read our review
- Storage - SATA6G Drive: Corsair Force LS 240GB - Buy from Amazon / Read our review
- Storage - USB Drive: Corsair Voyager GS 64GB - Buy from Amazon / Read our review
- Case: Corsair Obsidian 900D - Buy from Amazon / Read our review
- Power Supply: Corsair AX1200i - Buy from Amazon / Read our review
- OS: Microsoft Windows 10 Pro - Buy from Amazon
- BIOS: ASRock: P1.13 & 1.19, ASUS:1101 & 1202, EVGA: 1.05, GIGABYTE: F5a & F5, MSI: 1.2
- Drivers: Intel INF: 10.1.1.9, Intel ME: 11.1.1.1162, Intel USB 3.0 Adaptation Driver: 10.0.0.42, NVIDIA Graphics: 353.82, Audio: 6.0.1.7560, ASMedia USB 3.1: 3.1.6.0000, Intel LAN: 20.2
The first place you should start is determining what hardware you have and the limits that hardware can take. Rough estimations are better than nothing.
Step #1 - Determine Hardware Requirements: This part is crucial since your hardware is the ultimate limiter of your overclock (well in some cases maybe the guy sitting in the chair could be considered the bottleneck). Intel's K-series SKUs such as the 6700K and 6600K have unlocked multipliers that make overclocking much simpler. Motherboard selection is also important, and there are many features that can help speed things up such as a POST code display.
Motherboard quality (VRM, PCB, etc.), load line calibration, and general overclocking settings are also important to long term overclocking. Memory is also important, and you should pick a motherboard, then look at the motherboard's memory compatibility list and pick a kit, or just buy a kit and hope it works fine (a higher-end board will be compatible with more kits that aren't on its list). Many Z170 motherboards utilizing DDR4 will have to go through a training routine at cold boots where they might start and shutdown multiple times to calibrate things. Training behavior is widespread across all brands and models, but to different extents depending on specific setups.
A note about non-K SKUs: It also seems that non-K SKUs can now be overclocked on some boards with newer BIOSes through a BIOS hack. For the non-K CPUs, you will need to push the BCLK to overclock, and I would think the margins might be lower.
Step #2 - Determine Cooling: Cooling is very important for overclocking. I do recommend you buy a good cooler. The lowest I would go in terms of cooling for a decent overclock (like ~4.5GHz for Skylake) is something like a Hyper 212 EVO, but you might find yourself strapping on very powerful (and loud) fans to improve cooling for a higher clock speed. Coolers on the other side of the spectrum (around $80-120), such as high-end all-in-one water cooling units like Corsair's H110i GT or massive air towers like Noctua's NH-D15 will offer very good cooling performance for Skylake and not create too much noise.
Obviously, there are many tiers of cooling, and ultimately many enthusiasts end up with custom water-cooling. If you want real gains from cooling apart from less noise and a few more megahertz, there are subzero options. These options include TECs/Peltier blocks, chillers, phase change units, cold boxes, and of course, LN2 or dry ice for momentary subzero cooling. As you go up in cooling performance the price tag grows, your temperatures drop, and your overclock scales upwards.
Step #3 - Estimate Targets and Tactics: You should choose a target you would like to hit. Most people initially aim for 4.5GHz with Skylake, and all the CPUs I have come across can do 4.5GHz stable. Getting to 4.8GHz is much harder, and I would say only 10-15% of CPUs can actually do it without being de-lidded. I have seen some guys online say they can't get 4.5GHz stable, and if you look at the math, 4.5Ghz stable is 0.3GHz away from the top Turbo bin of the 6700K, but it's 0.6GHz away from the top Turbo bin of the 6600K.
However, I would start by aiming for a solid 4.5GHz overclock, see how hot the CPU gets, and then move forward. Temperature will be your ultimate speed limit. I have listed target voltages for CPU boot up at 4.5-4.8GHz+ in the flow chart. Your tactics will be to boot, test for stability, and then tweak voltage to attain maximum stability at the lowest temperature.
Step #4 - Enter the UEFI/BIOS and Change Settings: From what I hear, there is a lot of stigma around entering the BIOS (or UEFI) of the motherboard and changing settings. Honestly, when I was first getting into computers at a younger age, I didn't know what the BIOS was, and when I figured it out, and I went inside, I didn't touch anything out of fear. I am here to tell you it is okay, peek. I am here to help you get over your fear. I am here to show you exactly what to change, and I cover five popular overclocking motherboards from five different brands that tend to keep settings consistent within their product lines. So do not worry, be happy. As a bonus, all motherboards have either a jumper or a button to clear the CMOS memory. The CMOS memory stores changes made to the UEFI/BIOS, and clearing it will remove all your changes and always restore default values.
To enter the BIOS/UEFI, you will need to tap/smash delete or F2 (on most boards) during boot up right before and during the first image comes on the screen. For most boards you have basic and advanced modes, I always skip to the advanced mode and tend to navigate with the keyboard. To enter a setting you either type (or delete and then type), use +/- keys, or you click and scroll. Then you have to "Save & Exit" the BIOS/UEFI for the settings to apply.
Overclocking Flow Chart, Non-K SKUs, BCLK, and Multipliers
Order of Operations
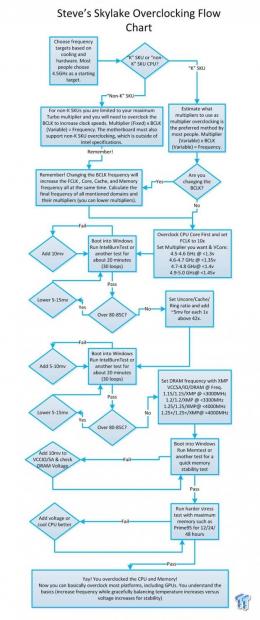
The flow chart is designed to get you to your targets and to spell out how you overclock. First you aim for the CPU core frequency, then add in FCLK (it is very easy to OC the FCLK), then Cache, and then memory. You can either overclock with multipliers (recommended for K-SKU CPUs) or BCLK (only way to OC non-K SKUs). If you overclock with BCLK then keep in mind BCLK increase will increase the CPU, Cache, FCLK, and Memory speeds. Remember that temperature is your ultimate speed limit (around 80-85C should be your maximum temperature under very heavy stress tests like IBT or Prime95).
Notes about Non-K SKU Overclocking
There are two ways to overclock frequency, either by increasing the multiplier or by increasing the BCLK. On "K" SKUs both the multiplier and BCLK are fully unlocked, but on "non-K" SKUs, Intel locked both. It turns out that while multiplier overclocking is fully locked down on "non-K SKUs", BIOS engineers have found a way to unlock BCLK overclocking. This recent development has many people very excited because now you can theoretically overclock all SKUs. There are a few caveats.
First, you must watch out and lower other multipliers because BCLK overclocking increases the final frequency of all domains (Core, Cache, FCLK, and Memory). Second, these new BIOSes are not perfect because the changes that allow overclocking not only screw up temperature sensor reporting but also break power savings features (your CPU will always run 100% frequency). Third, overclocking the BCLK can introduce jitter and might even require more VCore for stable overclocks than multiplier overclocking. Fourth, Intel does not support this, and it might be reversed soon. These issues might be mitigated in coming UEFI releases, but Intel might fight this by implementing locked UEFI updates, which do not allow flashing back to previous versions after upgrading.
The good news is that the BIOSes are already out there in the wild, and you can get away with overclocking non-K SKUs. However, if you have the money, I would recommend sticking with K-SKUs for 24/7 overclock at this time (because of BETA BIOSes with broken power savings features).
Base Clock and Multipliers
BCLK (Base Clock) x Multiplier = Frequency | e.g. 100MHz x 45 (CPU Multiplier) = 4.5GHz (or 4500MHz)
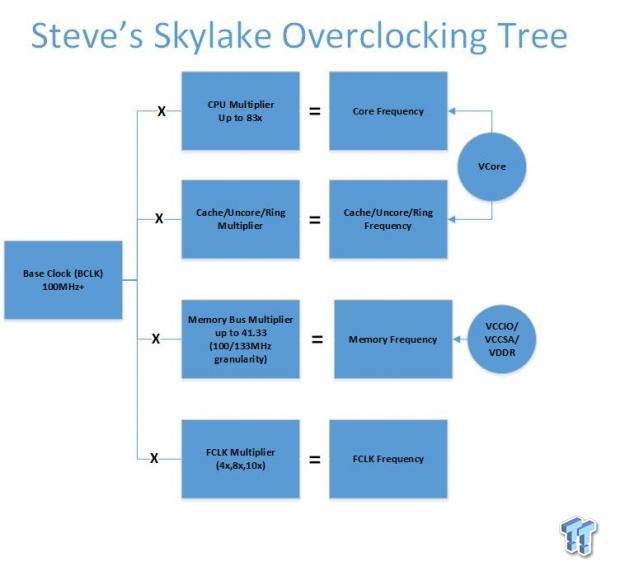
Skylake offers control over the CPU Cores, Cache/Uncore, Memory, FCLK, and the iGPU frequency domains. This guide won't cover the iGPU, but overclocking the iGPU is pretty straight forward just like CPU Core overclocking. The chart above displays how the base clock (BCLK) is multiplied with the multipliers of different CPU domains (Core, Cache/Uncore/Ring, Memory, and FCLK) to produce the final frequencies of each domain. The voltages shown are what you need to change to stabilize the different frequency domains after overclocking, and I will go into detail later. It is important to note that the FCLK is a minor frequency, the CPU cores and what people refer to as the cache/uncore/ring share the same input voltage, and the memory is impacted by multiple voltages.
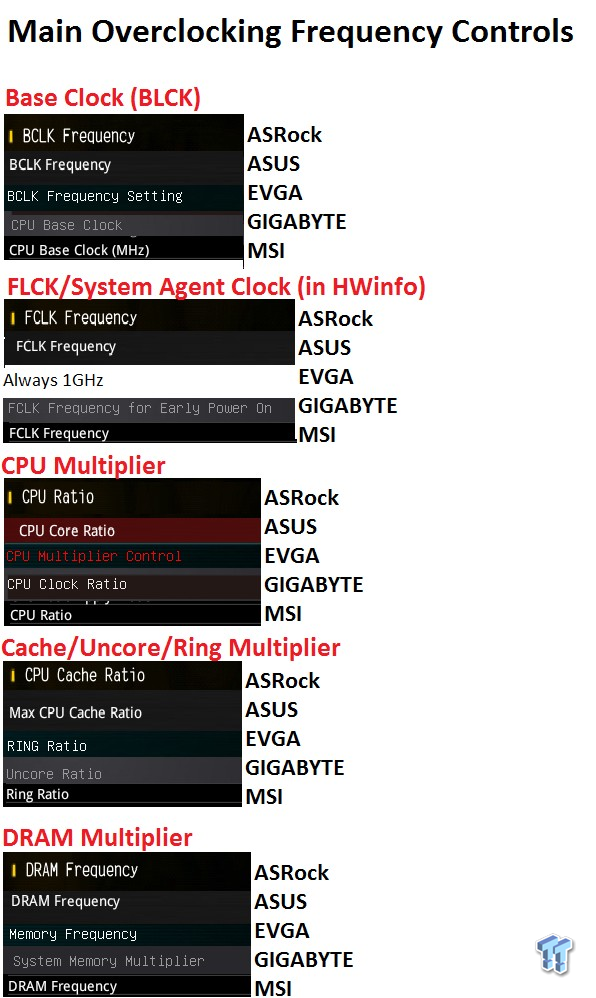
This guide utilizes five Z170 motherboards from five different manufacturers, what makes these boards special is that they are all primarily focused on overclocking. I have gone and found the equivalent settings in each manufacturer's BIOS and posted them in the image above. Many of the same buses are labeled differently depending on the manufacturer.BCLK and FCLK are labeled the same thing on all boards, but FCLK's effective clock frequency is called System Agent Clock in HWinfo (one of the few programs that report it).
While all boards have the ability to run 10x FCLK multiplier, EVGA's motherboard always runs at 10x and the option isn't present to lower it. I use certain terminology such as "Multiplier" to simplify things because you multiply these against the BCLK, but "Ratio" is the correct technical term. Many manufacturers call the cache/uncore/ring multiplier either cache or ring, and GIGABYTE calls it the uncore multiplier, but they all effectively control the speed of the cache, so I will call it the "Cache" from here.
I also want to take a second to discuss the DRAM/Memory frequency. The DRAM frequency is interesting because it is simple to set, but not as straightforward as you might think. On some boards, you have the ability to pick multipliers based on either a 100MHz or 133MHz bus, and the simplest way to visualize it is as a 1.00x or 1.33x multiplier for the DRAM/memory multiplier. Using 100MHz offers memory multipliers up to 31x, utilizing 133MHz offers 41.33x (Intel's maximum for Skylake). Since the setting does not affect the actual BCLKfor other domains and since you might increase the BCLK, thinking of the setting as an extra multiplier is just easier. So why do they give you the option? Some lower-end multipliers can work with either 100MHz or 133MHz, and sometimes that multiplier might work better with either 100 or 133.
BCLK, Core, Cache, Memory, and FCLK Scaling
Should I use a higher BCLK, what about FCLK?
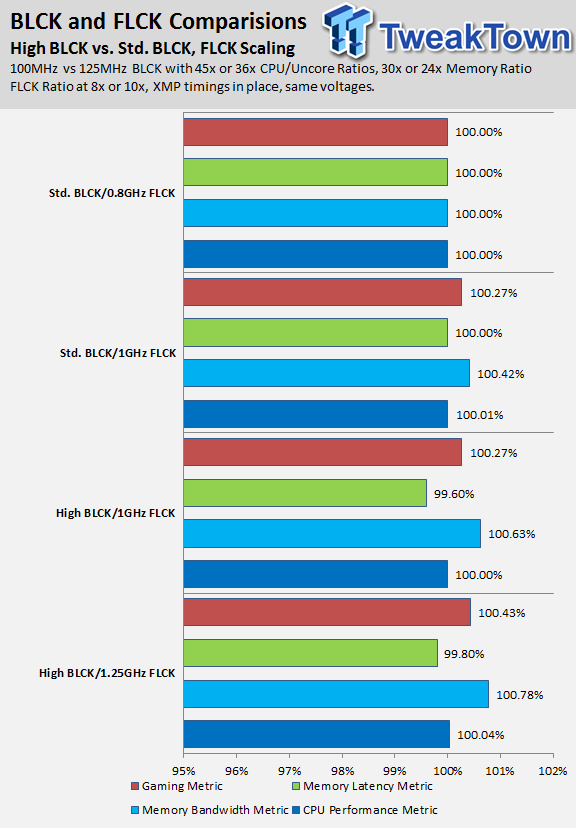
I decided to use a 100MHz BCLK with common multipliers and then 125MHz with reduced multipliers to match up to the 100MHz test multiplier. This effectively sets the same frequencies on all domains using two different BCLK settings so I can see if there is a benefit to running higher BCLK. I also decided to use this chance to test out the effect of FCLK clock since everything else was equal at a higher BCLK and since FCLK only has a few multipliers (4x, 8x, and 10x).
Take Away: Using higher BCLK at the same frequencies doesn't provide any noticeable gains, but also doesn't show any deficiencies. Running a higher FCLK does seem to boost 3D performance a little bit since it helps alleviate bottlenecks between the PCI-E controller (in the CPU's System Agent/Uncore) and the rest of the CPU.
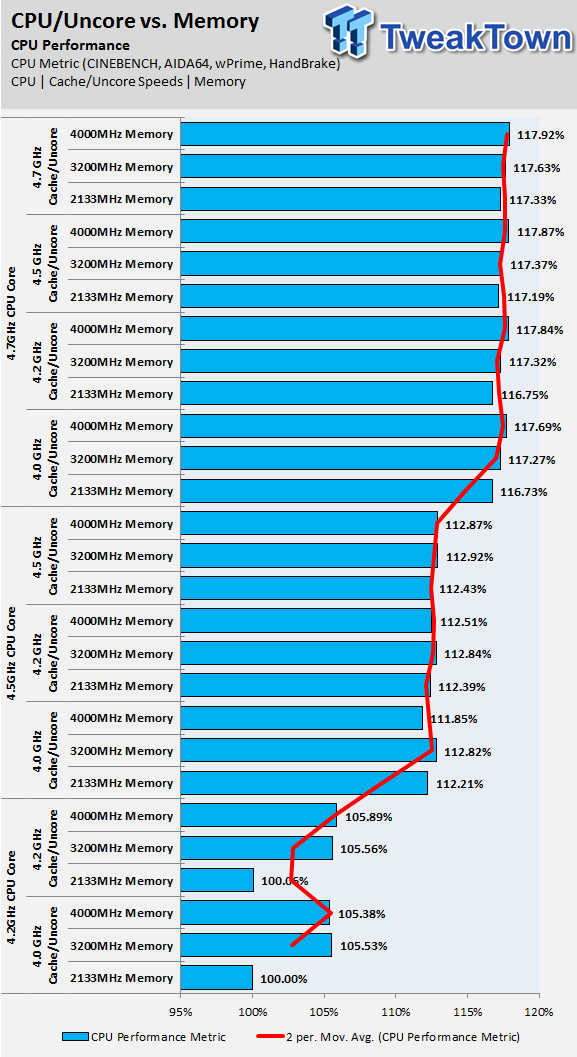
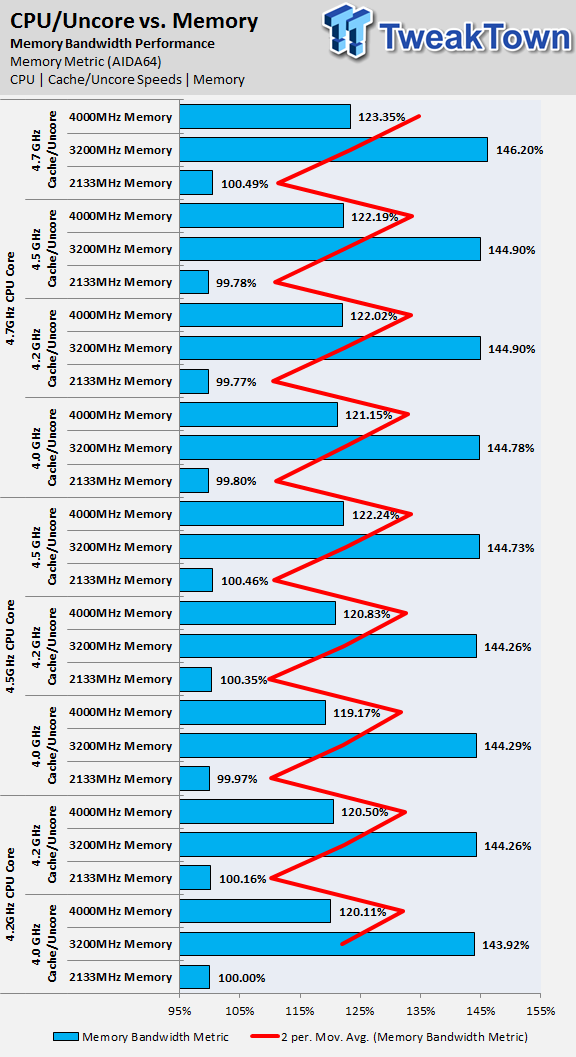
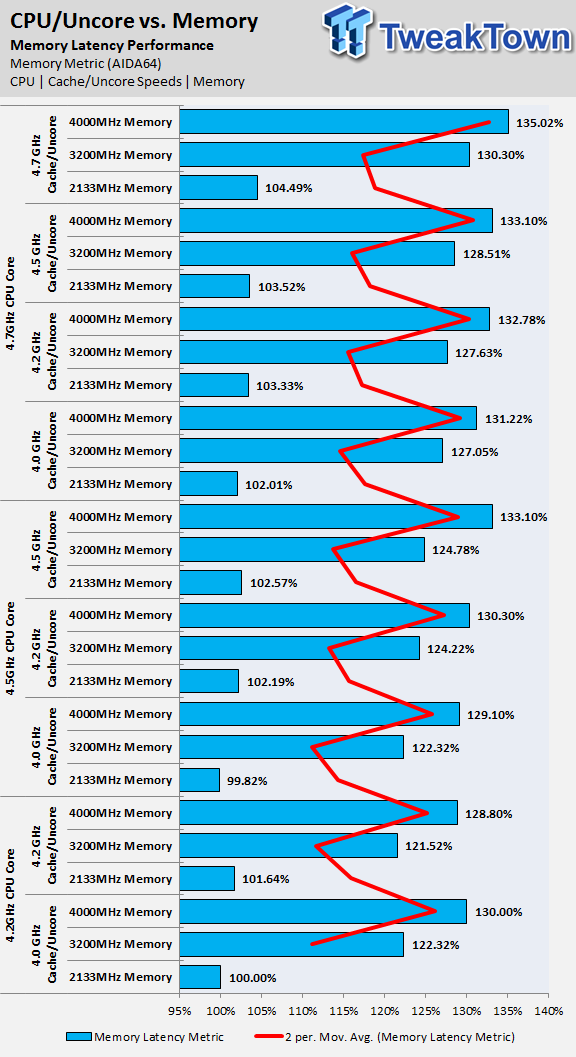
What effect does cache frequency have on Performance?
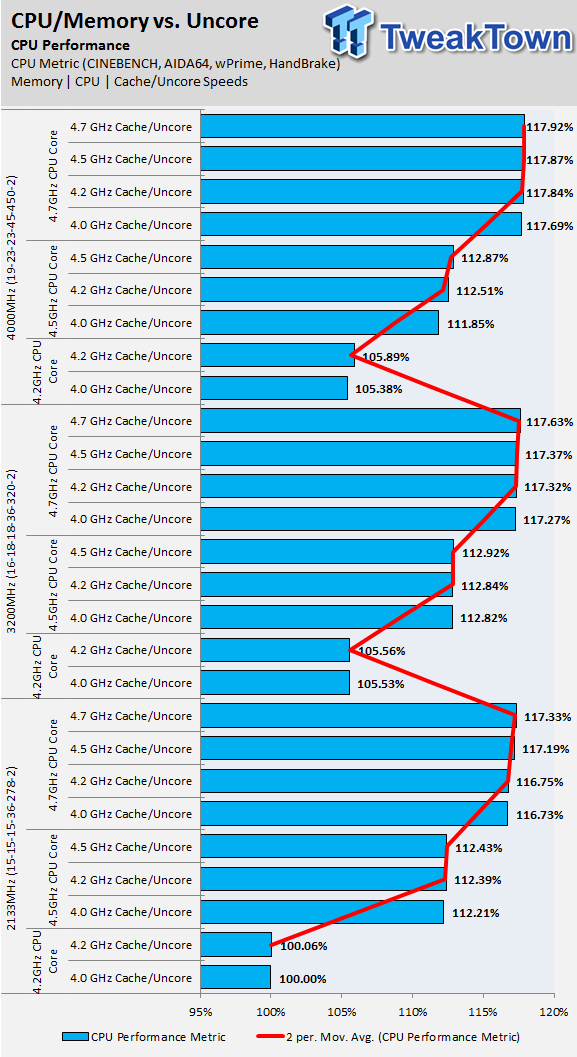
CPU Performance as a result of scaling Cache (same as Uncore or Ring on some boards) frequency.
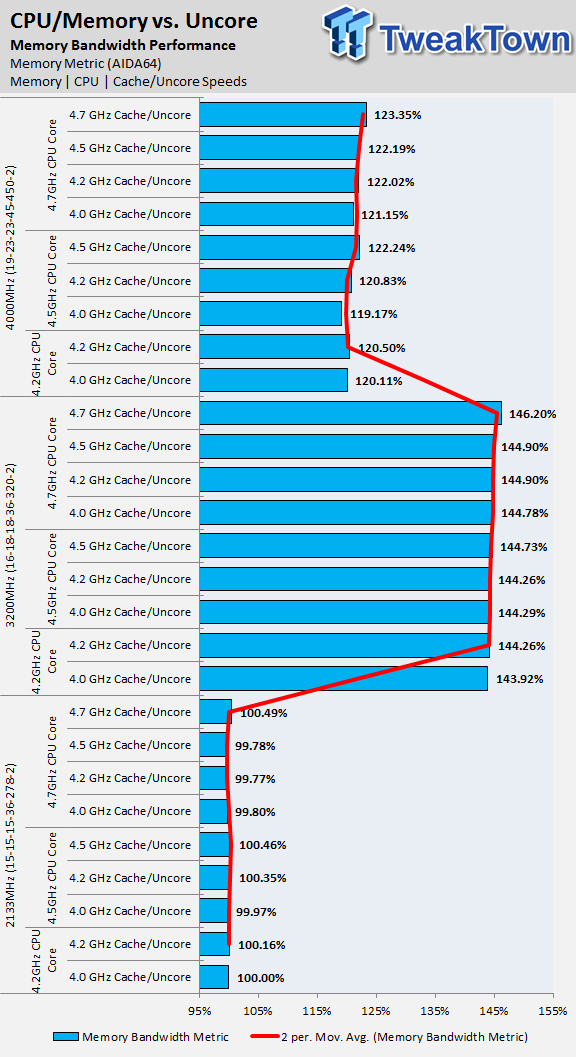
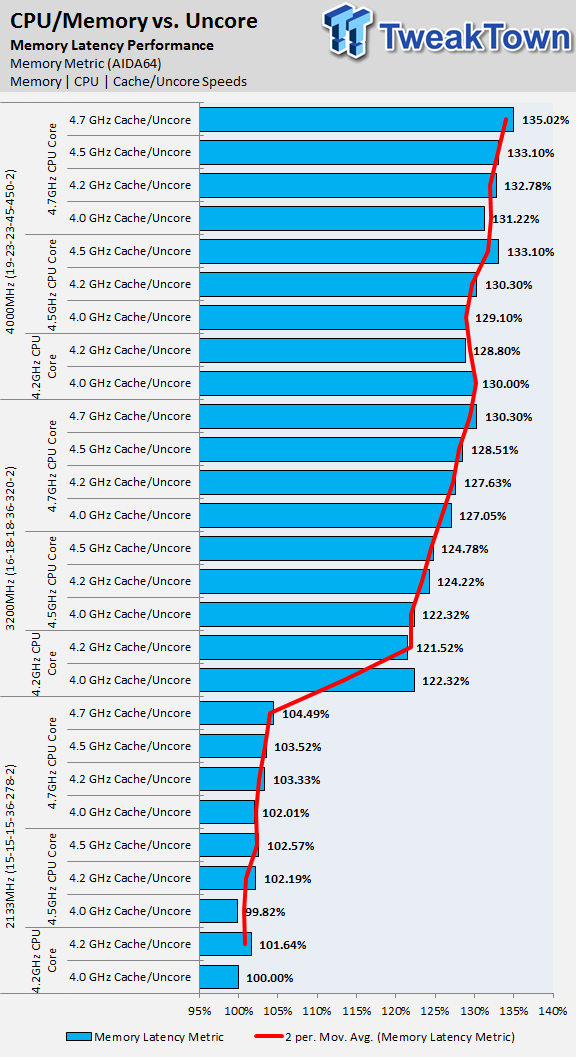
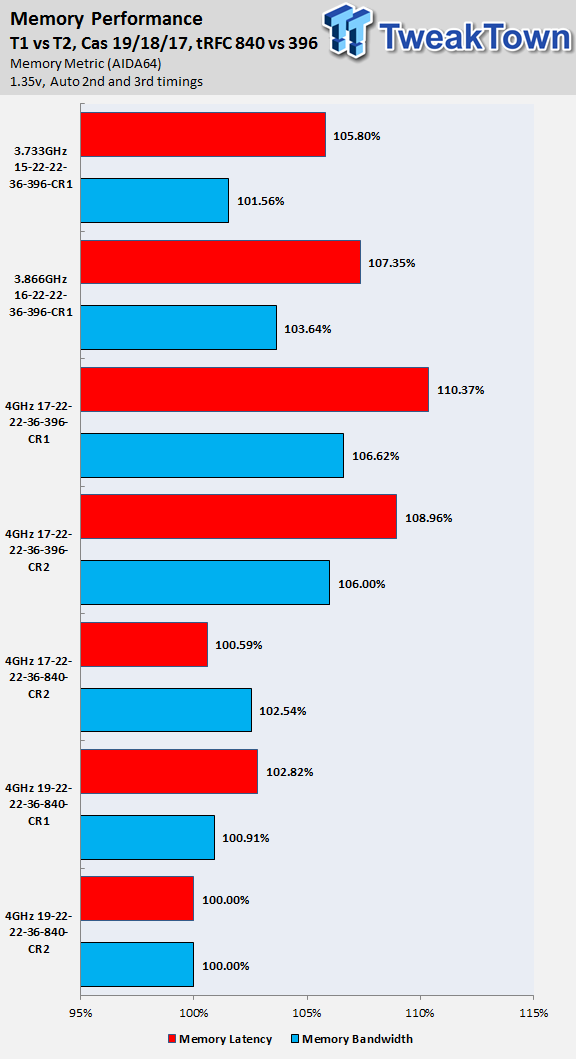
Memory Bandwidth and Latency Performance as a result of scaling Cache frequency.
In these tests, memory frequency and CPU frequency are kept the same and then the cache is changed; this is done at many relevant CPU and memory frequency ranges. Everything has been normalized so the findings can be distilled into something easily understood. While the cache frequency has negligible effects (< 1%) on CPU and memory, there does seem to be a notable increase of memory latency performance (increasing cache decreases memory latency by a small amount). This effect is increased when the memory frequency is increased (2133MHz saw ~1% increase, 3200MHz saw ~2% increase, and 4000MHz saw ~3% increase), so the importance of maintaining a higher cache frequency is more important at higher memory speeds, and negligible at lower memory frequencies.
Take Away: Cache frequency has very little impact on CPU performance, but can have a noticeable effect at higher memory frequencies by improving latency results. I would not expend too many resources (voltage/temperature) on maximizing cache over CPU or memory frequency.
What effect does scaling Memory frequency have on Performance?
CPU Performance as a result of scaling Memory frequency.
Memory Bandwidth and Latency Performance as a result of scaling Memory frequency.
In these tests, CPU frequency and Cache/Uncore/Ring are kept the same and then the memory frequency is changed, this is done at many relevant CPU and cache frequency bins. While the memory has negligible effects (< 1%) on CPU performance at higher speeds, it does seem to have an effect at lower CPU frequencies (~5% by increasing memory frequency to 3200MHz and negligible effects going from 3200MHz to 4000MHz). Scaling the memory frequency obviously increases memory bandwidth performance, and you can see that the increased primary, secondary, and tertiary timings from increasing frequency to 4GHz do negatively affect the memory bandwidth performance (I used XMP, but these timings can easily be tightened for better performance), but memory latency is improved by increasing the memory frequency (even with higher timings).
Take Away: Memory frequency has an obvious impact on the performance of memory bandwidth and latency. CPU performance benefits a lot at lower CPU frequency ranges from increasing memory frequency, and this effect is reduced as CPU frequency increases perhaps because 3.2GHz memory frequency is enough to remove any bottlenecks from stock memory frequency (2133MHz).
Skylake Overclocking Voltages
What to set?
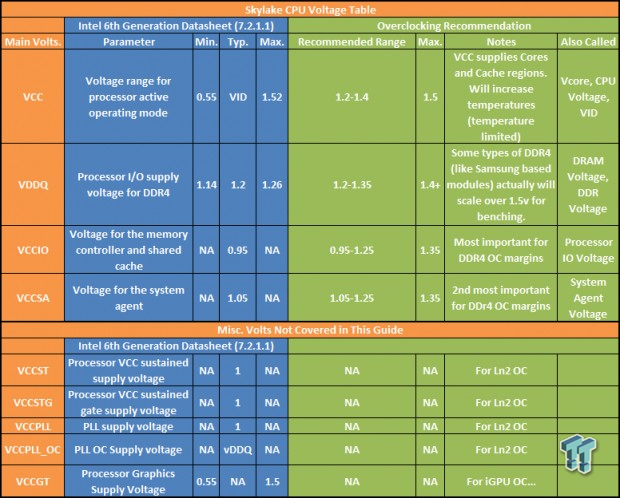
I have also taken Intel's recommended voltages for the Skylake CPU from their 6th Generation Datasheet (highlighted in blue) and added my recommended voltage ranges (in green) from experience (and looking at auto rules on motherboards). You are welcome to follow Intel's specifications, but for VCore, I don't recommend running over 1.5v even though Intel supports up to 1.52v, and I do recommend running the VCCSA/VCCIO/DRAM a bit higher for higher speed kits.
Serial Voltage Identification "SVID": A few generations back, Intel introduced serial voltage identification (SVID) which is a protocol the CPU uses to communicate with the voltage regulator. The power control unit inside the CPU uses SVID to communicate with the PWM controller that controls the voltage regulator. This allows the CPU to pick its optimum voltage depending on current conditions (temperature, frequency, load, etc.). You can actually use a combination of SVID and LLC to get an optimal VCore instead of manually setting it. If you start your system without making any changes, your VID (which some refer to as the stock voltage) might be 1.25v, but if you lower your CPU multiplier and restart, you will find your VID has dropped automatically. The reverse happens if you increase your clock and do not set any VCore. Intel's latest CPUs are able to pick their own voltage, and this comes into play if you want to utilize "offset" / "adaptive" voltage. The good news is that if you come from Haswell, you should look forward to a CPU that has the same or better durability.
UEFI "Auto Rules": Many motherboard manufacturers want you to overclock as far as possible; it helps with customer satisfaction as well as manufacturer reputation to support higher clocks. Since they know many users do not know how to overclock, they make things a bit easier by implementing "auto rules". These rules are pre-set voltages, timings, and even frequencies which are higher than stock, which are applied when you have the settings at "Auto" and a trigger is activated (example: you set 4GHz memory speed and leave VCCSA, VCCIO, and DRAM voltages on "Auto"). The CPU also does this on its own through SVID with the different VID for each frequency.
Motherboard manufacturers can override this with their own core voltage for a set multiplier, but this is not as common as it once was. Auto rules for DRAM overclocking are much more common. If you set XMP or set a high DRAM multiplier, and you keep track of the VCCSA and VCCIO, you will notice they rise, sometimes more than needed. On many boards, setting close to 4GHz DRAM frequency with or without XMP will trigger an auto-rule that pushes VCCIO and VCCSA upwards of 1.2-1.35v. Be aware that if you do not set a voltage, and that voltage is set to "Auto" then you are basically letting the board makers set what they feel is safe and stable.
I have not heard of any issues with CPU life or degradation because of this, but I do hear some people say, "well this board OCes this better", and many times it's because of auto rules or a lack of them (believe me, I have tested over 20 Z170 motherboards, some apply heavy LLC). Some UEFIs allow you to avoid "auto-rules" by setting the voltage labels to "normal". Normal is the Intel stock voltage. To totally avoid auto rules, you can either manually set things or set normal, but most of the time you will be okay with "auto-rules".
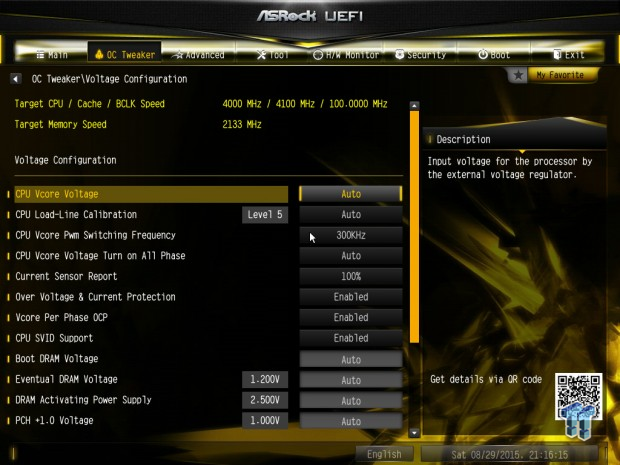
Setting VCore
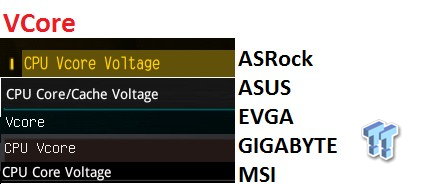
I have gone into the UEFI/BIOS of each of the five boards used in the guide so far and found the equivalent voltage labels. Like multiplier labels, the voltage labels also differ but control the same rails. Intel has combined the Core and Cache voltage rails, which is labeled as VCore or Core voltage in many UEFIs. Some boards offer different voltage operation modes for VCore covered below. I will cover power savings later in this guide, but power savings can allow for the drop of frequency and VCore. There are three major voltage modes present in the UEFIs of the different boards; Manual/Override, Offset, and Adaptive. In some UEFIs, you can either set a VCore, or you are required to choose the VCore mode (Manual/Override, Offset, and/or Adaptive).
Manual/Override Mode: This mode will override CPU power savings by disallowing voltage drop during idle and apply the voltage you type in (of course the VCore will drop depending on LLC settings covered later on). This mode of operation is what is always used for extreme overclocking since the core speed is always 100%. This mode is simple to setup. There is one caveat; the VCore does not drop if the CPU frequency drops. If you do want the CPU voltage to drop when the CPU is at a lower clock speed, then you need to use Offset or Adaptive mode.
Offset Mode: Offset utilizes the CPU's own self-VCore mechanism (like SVID or DVID) and then adds or subtracts a voltage level you choose. Offset mode is quite popular among those who want to let voltage drop along with CPU frequency, but because of Skylake's ability to change its VCore on-the-fly, you need to test exactly what the base CPU voltage is at your max frequency. Once you find that base voltage, you can determine the correct offset. Be aware that LLC also might play a negative role in offset overclocking, it can add too much to the offset during load or too little during idle, you need to test the VCore at idle and at load and possibly utilize a very low LLC level.
Adaptive Mode: Adaptive mode was introduced with Haswell because the integrated voltage regulator (FIVR) offered the CPU greater control of voltage over a large frequency range; it was much easier and much faster for the CPU to calculate how much voltage to apply at frequencies below the maximum set. Adaptive mode was basically an extension of the automatic CPU voltage mode and you could set a target voltage and/or an offset. Skylake doesn't offer exactly the same level of voltage regulation, so adaptive mode seems to have been implemented a bit differently (through SVID) and BIOS manipulation.
I tried it on multiple boards (three of the five in this guide have the option) and it seems broken on most of the boards. On the one board it works on there are some users who complain about it screwing up after recovering from sleep. Word on the street is that Intel's recent base UEFI firmware screwed up adaptive mode, and Intel has yet to implement a proper fix. If adaptive mode is not working for you and you want your CPU frequency and VCore to drop at idle, then I recommend you use offset mode or use SVID auto voltage with LLC levels (it's why some manufacturers provide so many LLC levels).
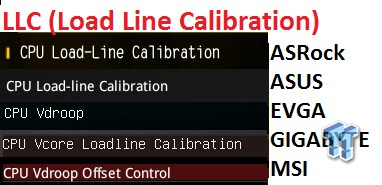
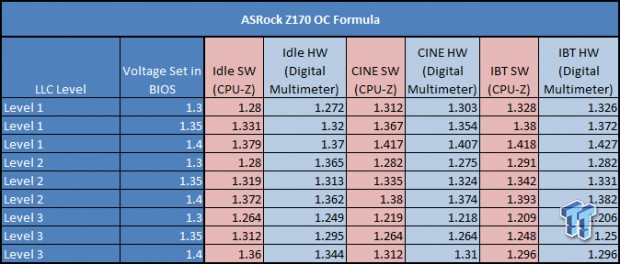
Load Line Calibration (LLC): During normal CPU operation, the CPU load will either go up or go down, and the auto CPU voltage goes in the opposite direction of the load. When the load is higher, current is also much higher, and staying at the same VCore would result in much higher power consumption since power is heavily dependent on voltage and current. To maintain the same power window and compensate for low quality VRMs, the VCore is dropped when current/load increases. LLC lessens, removes, or reverses the stock VCore behavior to increase stability. You can either set a higher VCore so that when it drops during load the CPU will still be stable, but you will reach a point where the low-load VCore is too high for comfort, and that is when you use LLC. LLC allows you to alter this voltage drop to increase stability without going too high at idle. For each board I have documented LLC at multiple levels in the motherboard section.
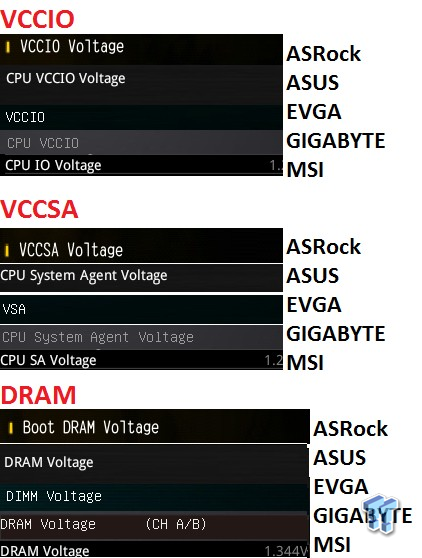
VCCIO, VCCSA, and DRAM Voltage: As I stated earlier, most motherboards have strong "auto rules" pertaining to these voltages. If you want to overclock your memory over 3GHz, you will probably have to tune these voltages, and I have outlined my results with 4GHz speeds on the next page. I recommend starting at 1.2v VCCIO and VCCSA and whatever DRAM voltage is written on your kit.
Power Savings and Voltage/Power Analysis
Power Savings and Voltage/Frequency Drop
Power savings consist of dropping the frequency, voltage, or both at idle or less-than-maximum load conditions to help save power and reduce temperatures. To ensure the frequency drops at idle, you need to do two things.
1. Make sure EIST and C-States are enabled in the UEFI. In the motherboard section of this guide, I have highlighted where the power savings options are located for each board.
2. Make sure you do not have "High Performance" chosen as your power plan in the "Power Options" menu in Windows Control Panel. Conversely, you can set "High Performance" to engage the maximum multiplier at all times on many boards even with EIST enabled in the UEFI.
If you want the voltage to drop depending on the CPU frequency (not load), then you will need to use Auto, Offset, or Adaptive mode for the VCore (and, of course, enable frequency power savings).
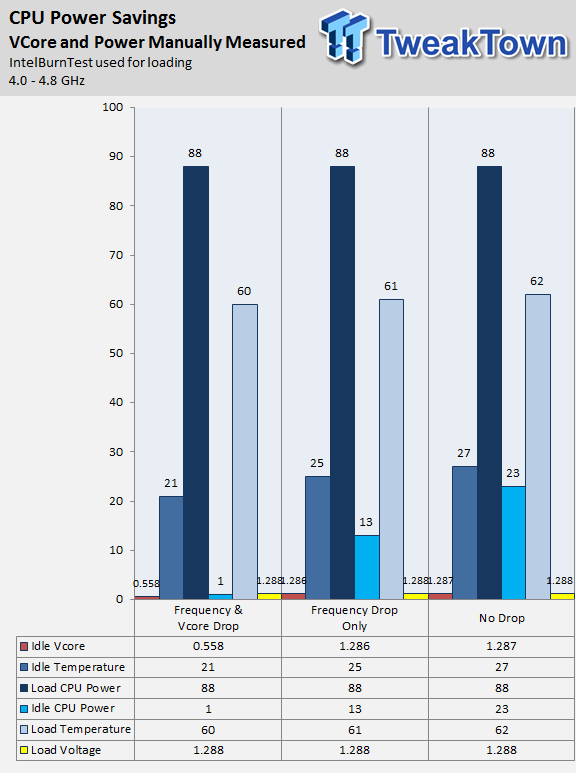
I wanted to see the impact of dropping the frequency without dropping the VCore (frequency power savings engaged, but VCore drop not engaged), dropping both frequency and VCore, and not dropping either. Maximum power, temperature, and voltage are equal, which is what I expected. Idle power is really what power savings is about, and there is a noticeable drop in CPU power draw when utilizing frequency drop and voltage drop, even with frequency drop alone you save about 10 Watts.
The temperature does not drop as readily as power. Without any power savings maximum idle temperature are 27C, and dropping frequency alone yielded 25C, while dropping both yielded 21C. Compared to the 35-40C increase from idle to load these gains are small. I should also note that dropping frequency and voltage together should help in terms of the life of the processor, but your processor will probably become obsolete before it dies considering how many CPUs from previous generations are still going strong.
Serial Voltage Identification
Technically, you can use CPU Auto VCore (SVID) and LLC to control your VCore instead of manually setting it, but your SVID results will vary from mine, and are different from CPU to CPU.
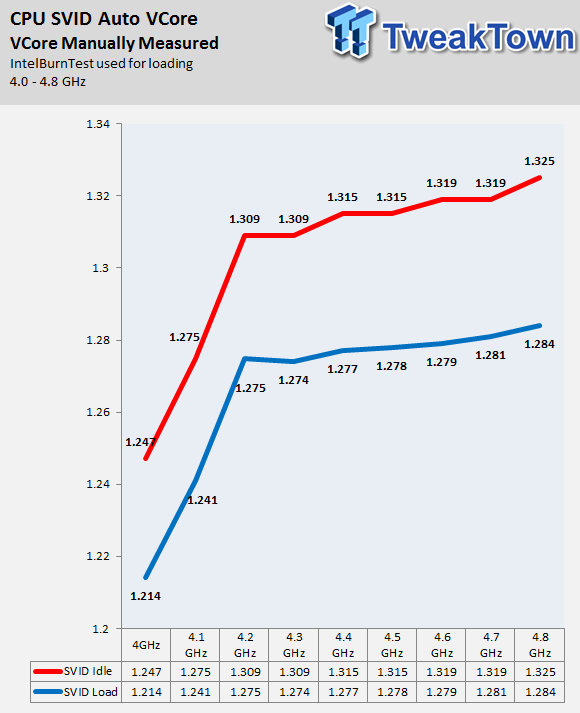
I wanted to see how high the VCore went on its own when I increased CPU frequency. The upper limit on SVID is 1.52v, which is very high on air and watercooling. Please realize that each CPU will pick a much different voltage at different frequency levels. In fact, the voltage the CPU reports for itself can be used to find better CPUs (usually lower VCore at stock frequency is a better chip). You can see the large drop from idle to load voltages. Also, the CPU is quite optimized at 4GHz (this is a 6700K).
CPU Temperature and Power Scaling
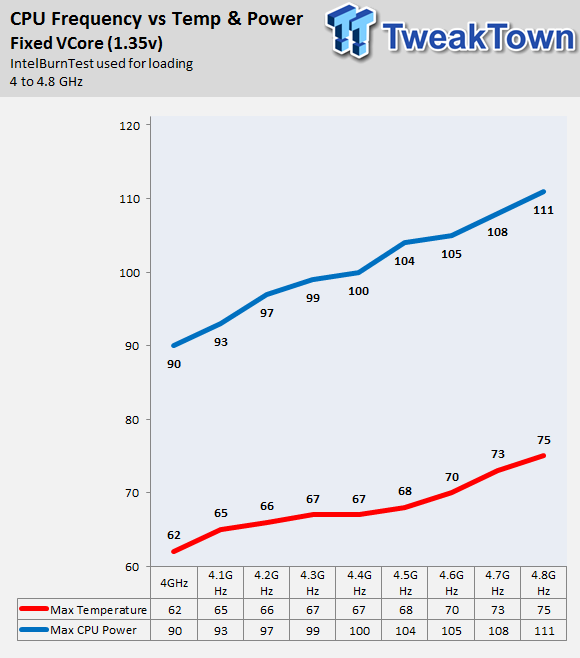
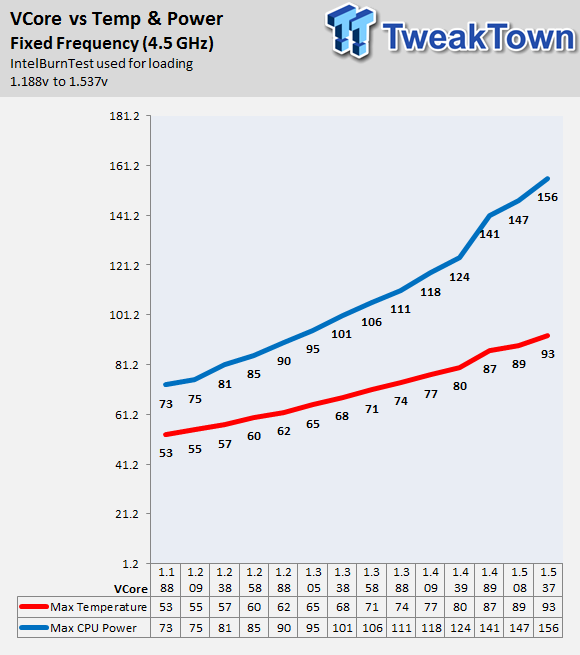
Now let's take a second and look at how frequency, temperature, and CPU power consumption are related. On the left, I kept the voltage fixed at 1.35v and increased frequency to check out power and temperature, and on the right I fixed the frequency and changed VCore in small increments and measured power and temperature. For those of you wondering how I measured power, I used an inline hall effect sensor on the 8-pin CPU power plug (all CPU power goes through it), and logged the maximum power draw and multiplied it by the measured 12v voltage. I usually see a much steeper exponential slope, but Skylake looks much more linear than previous platform results which is a good thing for overclocking. I think that this might be because of reduced leakage, which is also a good thing.
How much more VCore is needed for faster Cache?
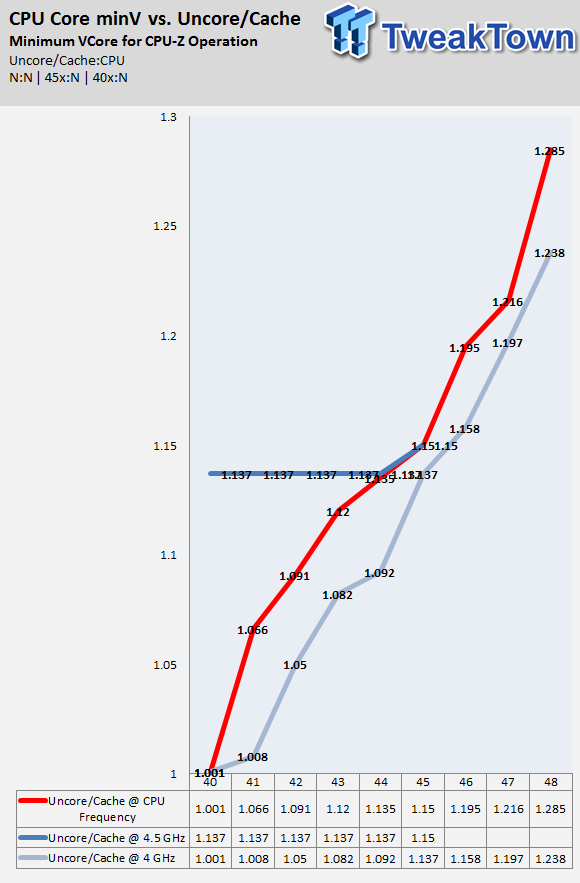
I tested Cache frequency at different levels (1:1 with the CPU frequency, fixed at 40x, fixed at 45x) and then scaled the CPU frequency. I then recorded the lowest voltage required to not crash in Windows with CPU-Z open; I corrupted Windows 10 more than once by doing this. A few trends do pop up. For starters, the Uncore/Cache/Ring seems to have its own required voltage level that doesn't change depending on the CPU core frequency, but it's small.
On average I required 0.03-0.05v more to run the Cache at 1:1 with CPU frequency. As we saw earlier the benefits of running faster cache are minimal, but higher VCore produces higher temperatures. I would say that you do not need to keep the Cache ratio at 1:1 with the CPU for 24/7 use, instead try to keep it at least 500MHz away, and only closer once you find your optimal CPU frequency and if you can afford a few extra degrees.
Maximizing DDR4 Frequency with VCCIO and VCCSA
By default, the VCCSA is higher than the VCCIO, but both are equally important. I took a closer look and tried different CPUs to see what I had to change, and I came across this one CPU, which showed the largest differences between VCCIO and VCCSA required voltage levels for highest 4GHz XMP overclock.
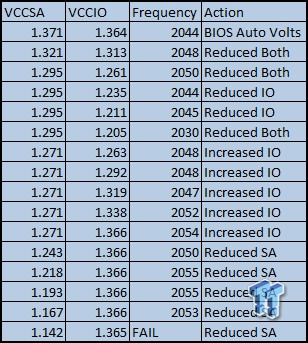
For this test, I did maximum CPU-Z validations using the same timings and DRAM voltage (1.375v), but different VCCSA and VCCIO. The results at the top of the list are the voltages that the "Auto-Rules" on the motherboard provided. I found that lowering the VCCSA too low causes a failure to even boot, but increasing it too high causes a negative effect to memory overclocking. I found that VCCIO just showed steady gains as it was increased, but these gains were very small for very large amounts of voltage. I would keep the VCCSA below 1.3v but above 1.2v and thinker with VCCIO to see if it helps your specific CPU sample. However, for normal usage, I would keep both of them at or below 1.25v.
The Durability of Intel's 14nm Node
If you are afraid of degrading your CPU from overclocking, then I would look into purchasing the Intel Tuning Protection Plan, which offers a one-time replacement as long as there is no physical damage to the CPU. Any time you increase a CPU Voltage above what is supplied at stock you run the risk of degrading the CPU.
Intel's Reporting on their 14nm Process
Intel published a study, "Transistor Aging and Reliability in 14nm Tri-Gate Technology", which can be accessed through IEEE online database. Intel's Tick-Tock method of introducing new processors entails using the same node on the Tock (Skylake) immediately following the pre-existing Tick (Broadwell). Since the article was published before Skylake launched, it would be a safe bet to assume that it pertains to Broadwell, but Skylake should have similar results.

The image is taken from the article linked above, and it shows that leakage has been reduced from 22nm to 14nm.
The chart above:
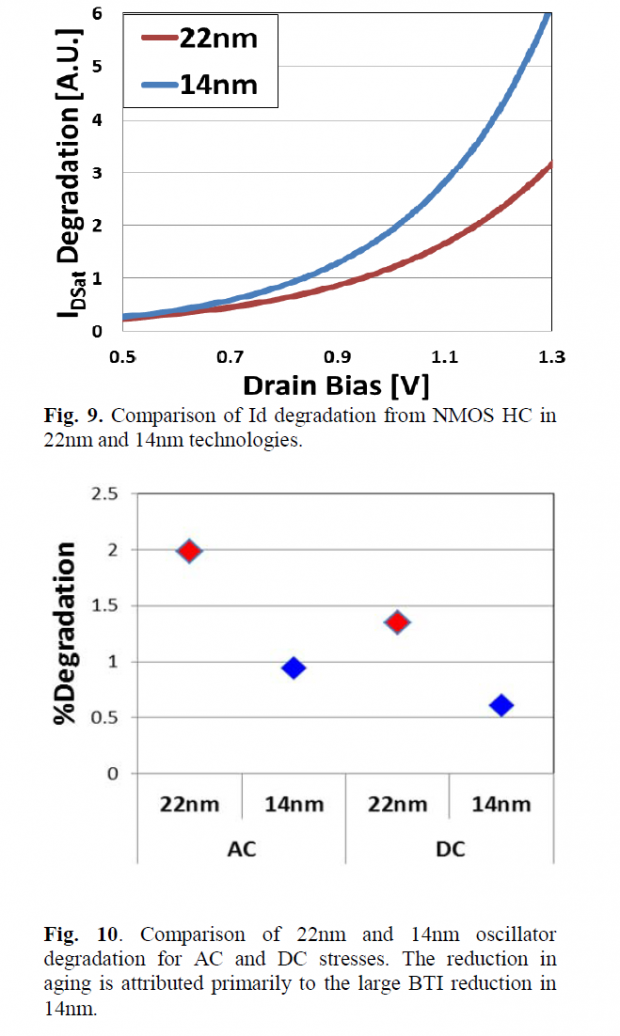
"It is well know that hot carrier effect become more severe as channel lengths are reduced and previous work showed that, in tri-gate technologies, reduction of the fin width can increase hot carrier degradation[2]. Intel's 14nm technology scales both the gate length and the fin width to allow for higher transistor densities, better gate control, and hence better control of short channel effects. As might be expected, hot carrier degradation for 14nm increases over what was observed in 22nm (Fig. 9). The increase is in line with the expected impact of the combination of both gate length scaling and fin width scaling. Comparing 14nm to 22nm, the increase in hot carrier degradation is relatively small compared to the reduction in BTI and the overall circuit degradation is expected to be low BTI and hot carrier degradation are just components of the total transistor aging, so the primary concern for the technology is the combined impact to circuit operation." Source
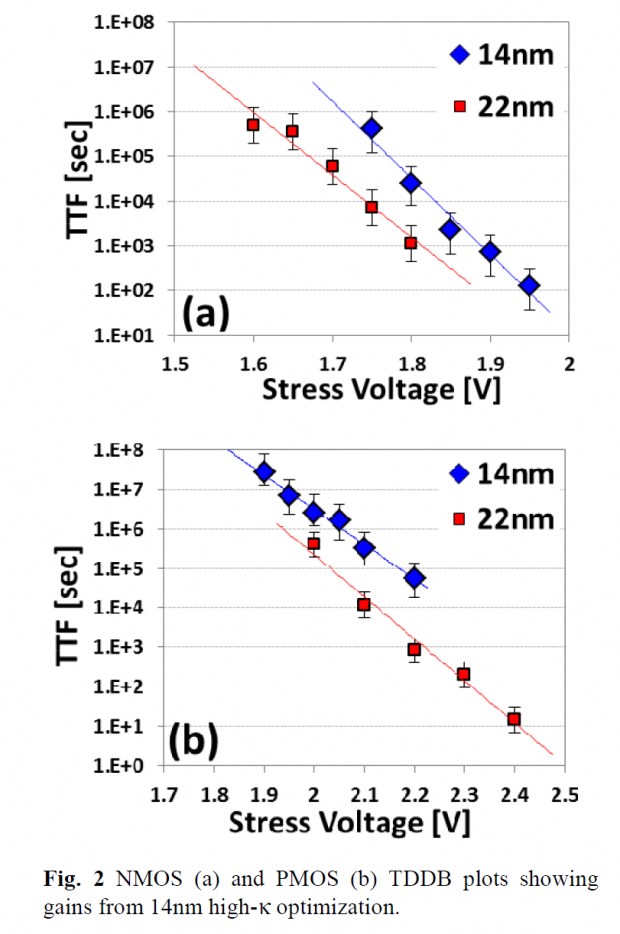
Here we see the logarithm of Time To Fail (TTF) compared to stress voltages on both the NMOS and PMOS, 14nm clearly has an advantage.
The conclusion states that under normal operating conditions, Intel's 14nm node is overall more resilient because of large improvements in some areas that outweigh the negative effects resulting from node shrinking. The article also states that the 14nm process can handle a higher operating voltage. However, you need to watch out, since the negative effects present from shrinking the node are present in Skylake, and that is why the Idsat degradation is higher on 14nm. Intel says that the improvements in BTI are so great that they offset the Idsat degradation during normal operation so that 14nm is more resilient than 22nm. Of course, overclocking is out of specification by definition, and as such accelerates degradation and time to failure.
New to Skylake: The Reliability Stress Restrictor (RSR)

What is the Reliability Stress Restrictor setting? According to a patent filed by Intel, which you can find here, it's a built-in mechanism designed to log CPU abuse and restrict parameters to ensure longer CPU lifetime. I would disable it, but only a few boards have the option. ASRock and GIGABYTE have the option for users (I also believe Supermicro and Biostar also have it in their UEFIs), and ASUS has confirmed that this setting is in the background and disabled whenever the UEFI detects overclocking. If the patent is correct, then this setting would reduce CPU maximum frequency or require higher CPU voltage for the same frequency setting. I just figured I would mention it here even though I have not heard any degradation stories yet.
Skylake Memory Overclocking: Corsair and Frequency Scaling
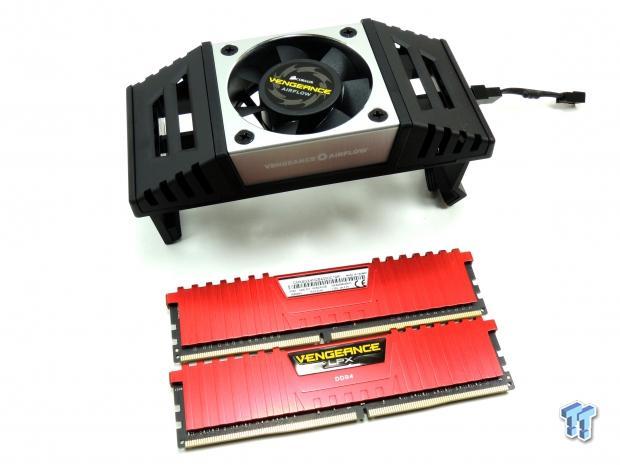
Corsair DDR4 4000MHz Cas 19 4GBx2 Kit
In this guide, I used two very nice high-speed DDR4 kits. The first is the Corsair Vengeance LPX 4000MHz C19 kit.
Corsair's kit is based on the latest Samsung die which is used by many overclockers. Through a very strenuous binning process Corsair has identified kits capable of running at 4000MHz (4GHz) and is now selling them through their own site. This kit costs $279.99, which might be a bit pricey, but you are guaranteed 4GHz if your motherboard supports the kit and your CPU can run it (most can).
This Corsair kit can do a maximum validation of 4231MHz (4.231GHz) which is awesome. Corsair also provides a cooling fan for active cooling, so if you can fit it on top I would, but the kit does not get very hot at 1.35v. Stability at high speeds is also more likely with a high bin kit such as this one from Corsair.
I do know that many users are pushing over 1.7v+ on their Samsung based kits. Running a higher voltage does not necessarily provide a clock speed that scales, but rather allows for the timings to be tightened, which increases performance.
Memory Frequency Scaling
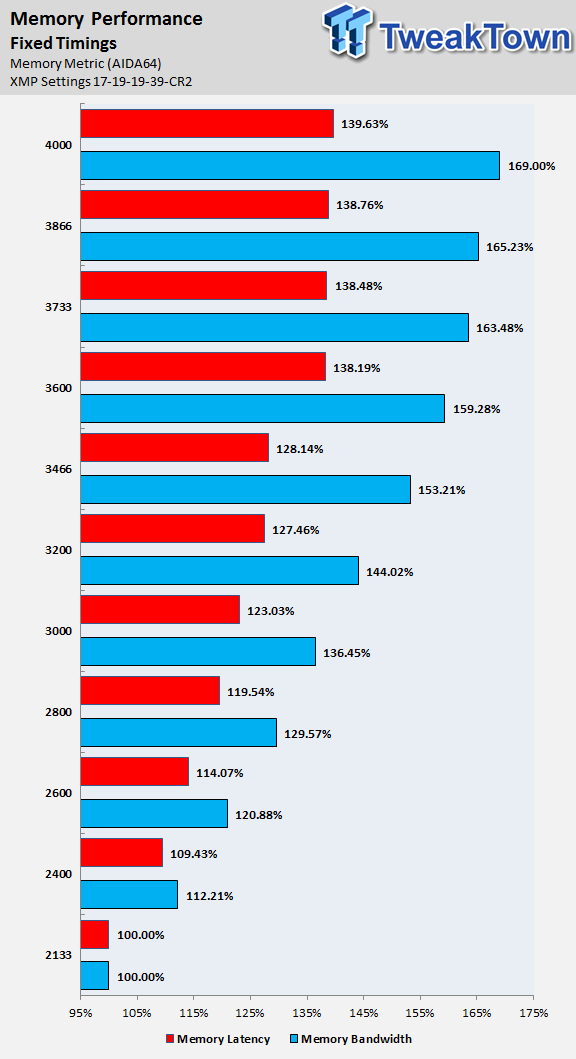
Here I set constant timings and scaled up memory frequency to see the impacts. Memory bandwidth is more greatly impacted by memory speed at higher frequencies, but below 3600MHz, it seems that memory latency performance is increased more greatly by increasing memory speed. I would try to aim for a 3600MHz+ memory kit for Skylake, which is compatible with your board (XMP compatible). Then I would try to see how much higher I could go with memory speed and tweak the latencies while maintaining a memory voltage at or under 1.35v for 24/7 operation. If you are benching, a higher-end kit like either of the ones here will provide you with a lot of fun as DDR4 overclocking is very complex and there is a lot to achieve with higher-end kits.
Skylake Memory Overclocking: G.Skill and Memory Timings
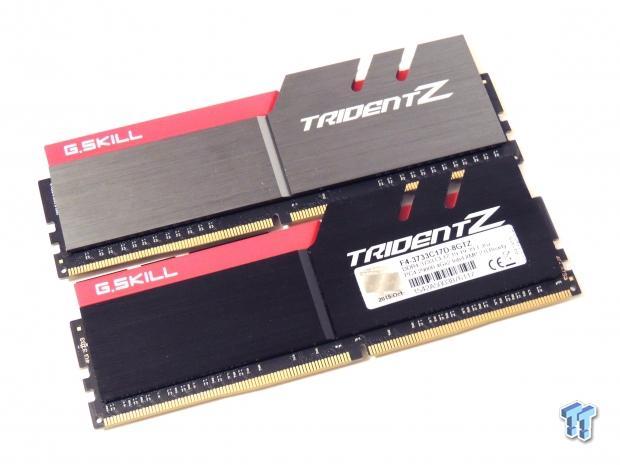
G.Skill DDR4 3733MHz Cas 17 4GBx2 Kit
G.Skills kit is a high speed kit, but one at a more affordable price. At only $134.99 I would consider it almost mainstream, since speeds at and right above 3600MHz are attainable by most Z170 motherboards.
I think that this G.Skill kit is based on Samsung's die as well, but I haven't confirmed it. I didn't push more than 1.4v when testing memory on this platform, but with this G.Skill kit I was able to tighten timings a bit even at 1.4v at 3733MHz. This kit also worked with all the motherboards in this guide without issue, and all I had to do was enable XMP.
This G.Skill kit was able to do 4212MHz, which is a pretty good overclock considering the stock speeds of the kit. Most benchers find the optimal spot at around 3600-3900MHz with CAS latencies around 11-13, which is outside the purview of this guide since I am not going to push 1.9v through the kit - it's not the type of crazy example I want to set in this guide.
The Effect of Memory Timings
Here I took a quick look at the effects of changing some important timing parameters and their impact on memory bandwidth and memory latency. Latency is not strictly equivalent to memory timings, and this article by Crucial explains the truth about memory latency. Overall, changing from command rate of 2 to command rate 1 has a minimal performance impact. Decreasing the tRFC and CAS latency has a more noticeable impact.
ASRock Z170 Overclocking: Z170 OC Formula
The Board


The ASRock Z170 OC Formula has a long legacy, and their Z170 OC Formula is easy to work with. I used this motherboard for memory testing in this guide.


ASRock's OC buttons are very useful for on-the-fly overclocking. If you would like a more in-depth look at the board, the review is here. One unique feature of the Z170 OC Formula is its ability to change VCore on-the-fly through "Rapid OC" buttons, which work off a software OSD and menu button.
LLC Performance
ASRock's LLC is quite aggressive.
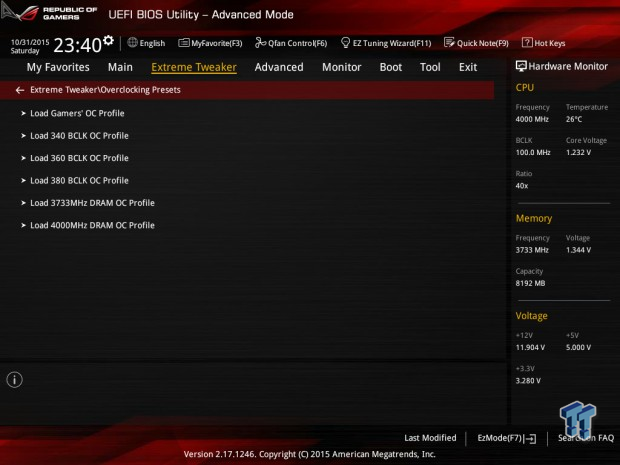
BIOS Special OC Profiles
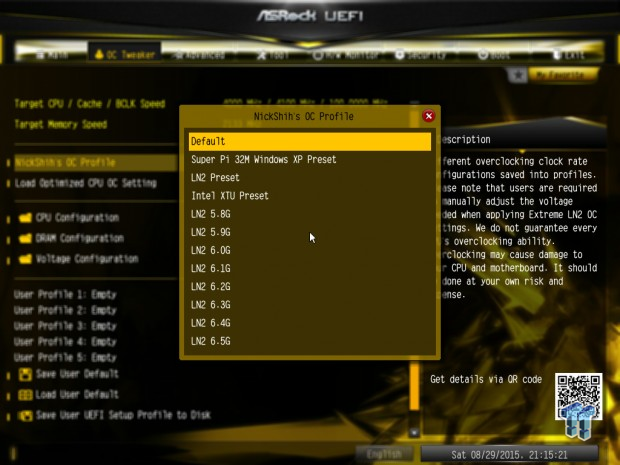
Here are some special profiles for extreme overclocking for the CPU, there are also "Optimized OC Setting" which are more tailored towards normal overclocks that use air/water cooling.


ASRock also provides a large number of extreme memory overclocking profiles for different types of memory.
BIOS Power Savings


ASRock's EIST and Turbo are located in their OC Tweaker area, but C States are located under CPU Configuration. I would not disable EIST or C-States to maintain constant maximum CPU clock in-Windows; instead, I would go to the control panel and change the power plan to "High Performance".
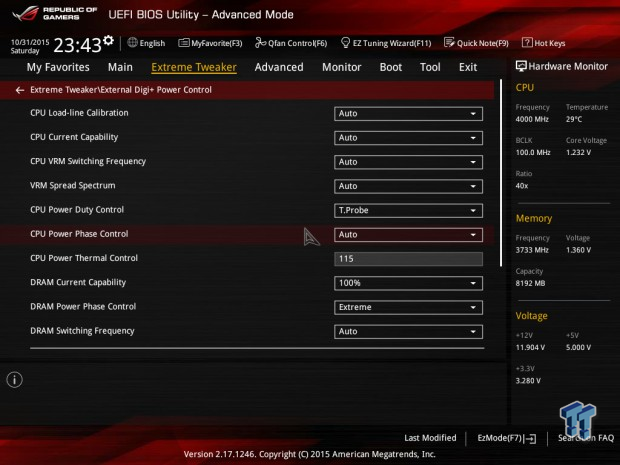
BIOS PWM Options
ASRock does provide PWM options to expand PWM switching frequency, phase control, and overcurrent protection (OCP). You can try expanding these if you do more extreme overclocking, but I didn't find any reason to adjust them. In fact, ASRock's UEFi is set to automatically adjust these by itself.
OC Software
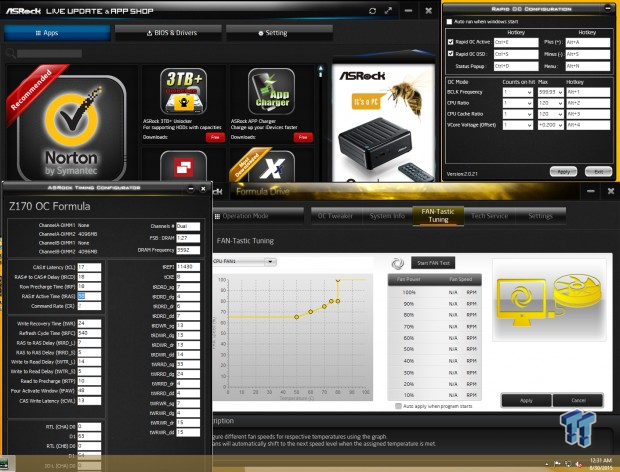
ASRock's Rapid OC provides functionality for the Menu, Plus, and Minus buttons on the motherboard. With the software installed and in the background you can increase and decrease CPU ratio, cache ratio, and VCore on-the-fly with the buttons. ASRock also provides other overclocking settings through their Formula Drive software. ASRock's Timings Configurator provides memory timing information.
ASUS Z170 Overclocking: Maximus VIII Extreme
The Board


ASUS's Z170 series Maximus VIII Extreme is loaded like most ROG Extreme series boards before it. It also matches quite well with both memory kits. The Maximus VIII Extreme was used for Cache/CPU/Memory scaling tests in this guide. The ROG UEFI has some of the most extensive options, and ASUS has two guides for figuring them out. ASUS has a 6700K OC Guide and a ROG Extreme OC Guide.


ASUS's OC Panel II is included with the board and has a plethora of uses. It allows for remote control of the motherboard and CPU through hardware. It does take a few minutes to get used to the menus and layout of the digital panel, but after you get the hang of it things become quite simple. One feature I found useful for extreme overclocking is ASUS's "Retry" button that allows for the reapplication of last settings in the UEFI so if you fail to boot once you can manually control how many times it attempts to boot. If you would like a more in-depth look at the board, the review is here.
LLC Performance
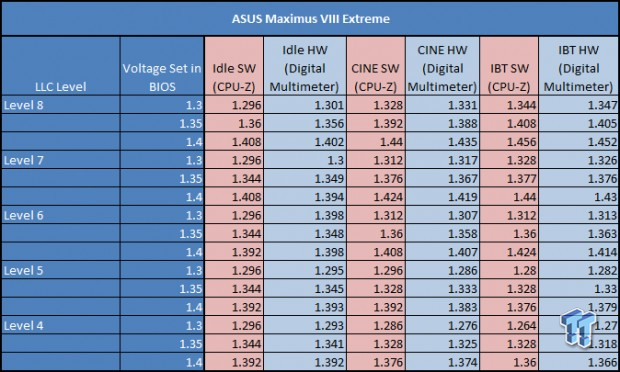
ASUS's LLC is quite good, and there are many levels.
BIOS Special OC Profiles
ASUS provides these OC Profiles for their ROG Series boards. They will change the settings in the UEFI so that you can see what ASUS changes with their custom settings and go from there.


ASUS also provides a large number of memory profiles, perhaps the most. First you choose the type of memory ICs present on your sticks then you are taken to a deeper menu with many different profiles for each type of memory IC (not shown).
BIOS Power Savings

ASUS's Turbo, EIST, and C-State options are available on a single page. I wouldn't touch them if you want the CPU frequency to stay at its maximum, instead, just change the power plan in the power options menu located in the control panel in Windows to "High performance".
BIOS PWM Options
ASUS has a wide variety of PWM options including over current protection, switching frequency, spread spectrum, power duty control, phase control, and thermal control. I did not need to expand any of these for normal air or water overclocking, and I don't think you will need to either. However, ASUS's guide specifies how to set these up properly for extreme overclocking with dry ice or LN2.
OC Software


Apart from ASUS's main software suite with auto overclocking (Dual Intelligent Processors 5), they also offer TurboVCore, which is a lightweight in-Windows OC program. MemTweakIt provides memory timings.
EVGA Z170 Overclocking: Z170 Classified 4-Way
The Board


EVGA's Classified series has been a favorite for enthusiasts for a while. It offers simplicity matched with quality. The EVGA Z170 Classified 4-Way was used in this review for systems and temperature testing. EVGA has their own overclocking guide here.


EVGA's Classified is one of a few Z170 motherboards with a PLX chip for 3 and 4-way SLI capability, something that makes it great for 3D overclockers who want many video cards. Overclocking features are prominent, and most everything you need for enthusiast overclocking is present. Voltage read points are through a provided fan out connector, but I do believe the board support EVGA's EVBOT. More information can be found here.
LLC Performance
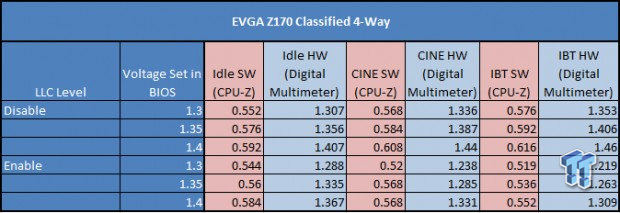
While EVGA's LLC implementation is a simple enable/disable option, it is still quite effective.
BIOS
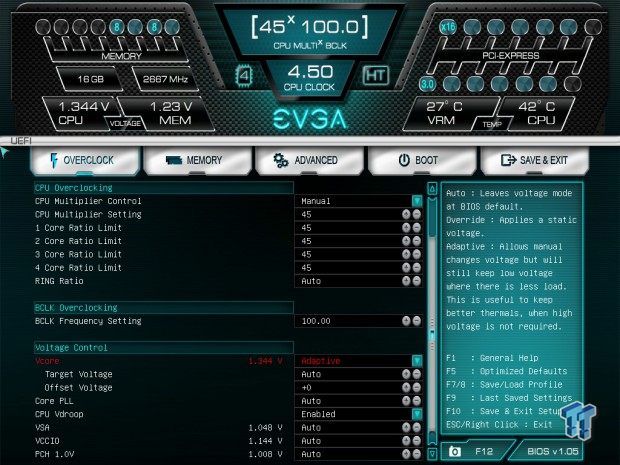
The UEFI is setup so that overclocking is very simple, everything is located on a single page. The simplicity of the UEFI means that novice overclockers will not be intimidated, but it does not have the most settings I have seen (for instance FLCK is hidden and set to 10x always).
BIOS Power Savings
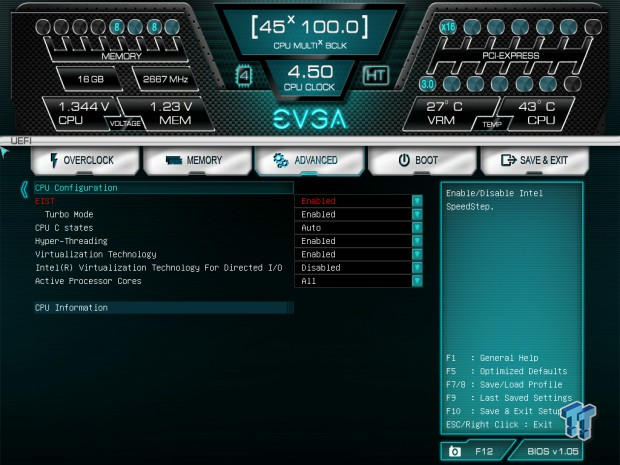
EVGA's power savings options are also all located on a single page.
OC Software
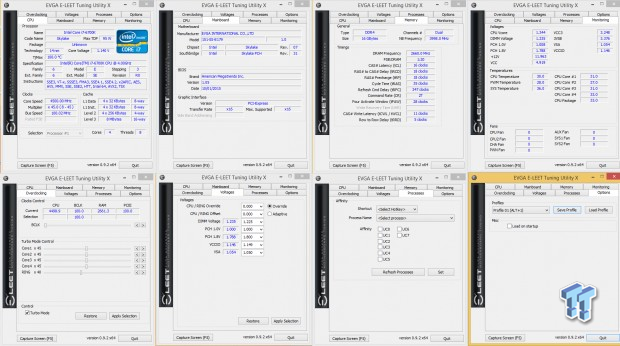
EVGA's eLEET program still exists to this day! It is like a much beefier CPU-Z with in-Windows tuning.
GIGABYTE Z170 Overclocking: Z170X-SOC Force
The Board


GIGABYTE's Z170X-SOC Force also has a legacy, and its orange and black color theme is unique. Surprisingly red accessories match the orange of the board, especially when inside a case. The Z170X-SOC Force was used for CPU and voltage scaling tests. GIGABYTE has a video OC guide here.


The GIGABYTE Z170X-SOC Force has the most buttons located on a motherboard for overclocking. The amount of overclocking features is quite intense, and most of them are targeted towards making overclocking quicker and easier. All of the overclocking features are neatly located in the area near the memory except their SOC Link feature, which allows a tethered device to remotely overclock the system.
The Z170X-SOC Force is also one of a handful of Z170 motherboards with a PLX bridge for 3-way and 4-way SLI, so it's great for 3D benchmarking with three or four GPUs. GIGABYTE's OC Ignition feature allows for power to be applied without actually turning on the CPU or PCH so that users can run power to fans and PSU connected devices (like water pumps). More information can be found here.
LLC Performance
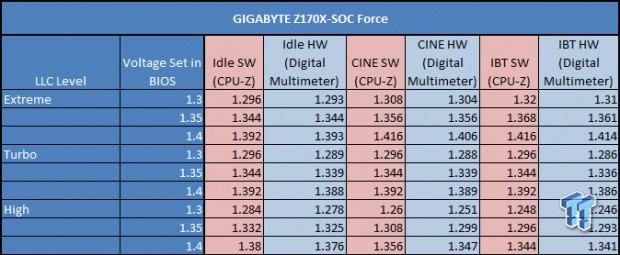
GIGABYTE's LLC is very good, the difference between idle and load is almost zero at certain LLC and voltage levels.
BIOS Special OC Profiles
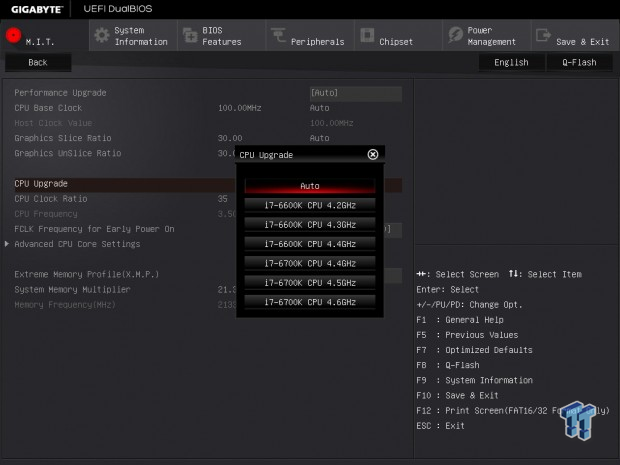
GIGABYTE does provide some profiles for air and water overclocking depending on the CPU installed.


GIGABYTE does not have specific memory OC profiles, but their Memory Enhancement Settings do make a difference, especially the new "Relax OC" setting that greatly improves DDR4 margins by maxing out timings. Interestingly enough GIGABYTE has provided IMC timings and other usually hidden features.
BIOS Power Savings
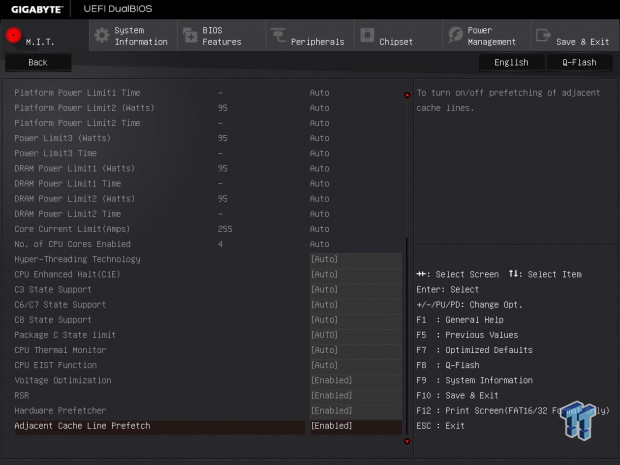
GIGABYTE's Turbo, EIST, and C-State options are available on a single page, you can disable the power states in GIGABYTE's BIOS and still maintain an overclock in Windows, and of course you can set your power plan to "High Performance" in Windows control panel under power options.
BIOS PWM Options
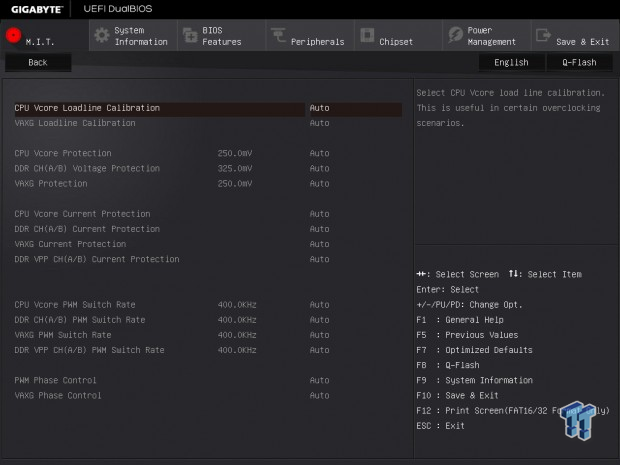
GIGABYTE's offers PWM setting as well; over voltage protection, over current protection, switching frequency, and phase control are present. I did not have to change any of these, in fact, I think auto rules do change some of them on-the-fly. If you do run into shutdown during heavy loads, then you should try increasing over current protection and perhaps set PWM phase control to extreme performance.
OC Software


GIGABYTE's EasyTune provides the novice with auto overclocking and preset profiles. GIGABYTE's TweakLauncher is provided on this platform for on-the-fly lightweight in-Windows overclocking.
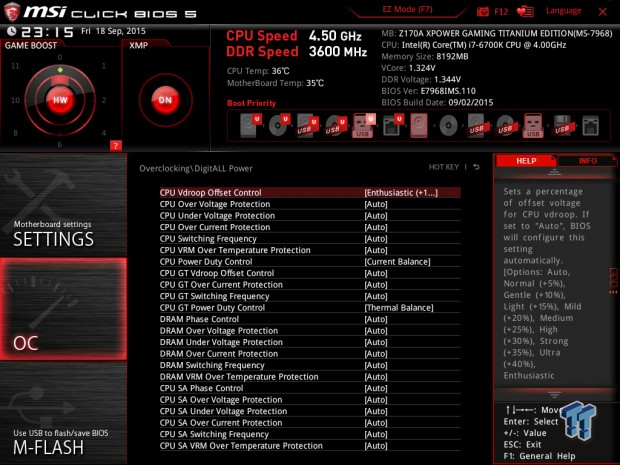
MSI Z170 Overclocking: Z170A XPOWER GAMING TITANIUM EDITION
The Board


MSI's Z170A XPOWER is unique with its white/silver PCB color. Most everything matches white, so if you want a unique overclocking board, the MSI offers something different. The MSI Z170A XPOWER was used for stability testing in this review. MSI has their own extreme overclocking guide here.


MSI's Z170A XPOWER has an external overclocking board, which is quite convenient, offering the simplicity of buttons on a secondary PCB. There is also a knob that controls auto overclocking. More information can be found here. There is one really nice thing I like about OC recovery on the Z170A XPOWER GAMING TITANIUM EDITION, the motherboard offers you multiple options after a failed overclock (if the board auto recovers) to speed things up when it comes to re-setting BIOS settings.
LLC Performance
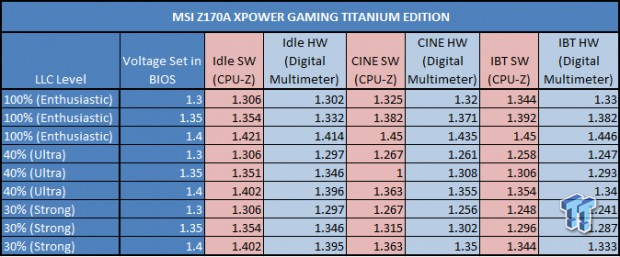
MSI's LLC implementation is interesting; they offer 100% and then 40%, but they are effective.
BIOS Memory OC Profiles


MSI offers a list of memory preset profiles, and also provides a "MemoryTryIt!" option to select the type of DDR used.
BIOS Power Savings


MSI provides a CPU Ratio Mode option that will setup Turbo and EIST so you can have a Fixed Frequency (without power savings) overclock or a Dynamic one (with power savings). C-States are located on another page.
BIOS PWM Options
MSI offers PWM control in their UEFI as well. Over/under voltage protection, over current protection, switching frequency, power duty control, and over temperature protection can help you maximize overclocks under extreme conditions. MSI's guide does a good job of maximizing these, but you can select LN2 mode under OC setup that will maximize these for you.
OC Software


MSI's Command Center offers novice users with GUI friendly overclocking. However, for the enthusiasts, MSI has provided Command Center Lite for quick in-Windows tuning.
Stability Testing, Delidding, Crashing, and Throttling
Stability Testing
Stability testing is perhaps the most debated part of overclocking. Some say you are not fully stable unless you prove it by running Prime95 with AVX for two days straight. And on the other side of the spectrum, others are fine with testing the applications they use (like a game or video encoding program) and then calling it a day. I have even had debates with other TweakTown staff who say stress testing with AVX and AVX2 isn't really needed considering most programs don't utilize the extension (it adds a lot of heat), of course more and more programs are utilizing the extension for things such as video transcoding (Handbrake).
I think the roots of the stability label are taken to heart because everyone wants to overclock further than everyone else. For many people, overclocking is a competition even when there isn't a real competition. Obviously, testing with a tough stress tester for a few days will definitely decrease your chances of a random crash, but it also puts the CPU through a lot of stress, and takes a lot of time. For instance, when people run benchmarks for HWbot, their stability is just enough to pass their benchmark.
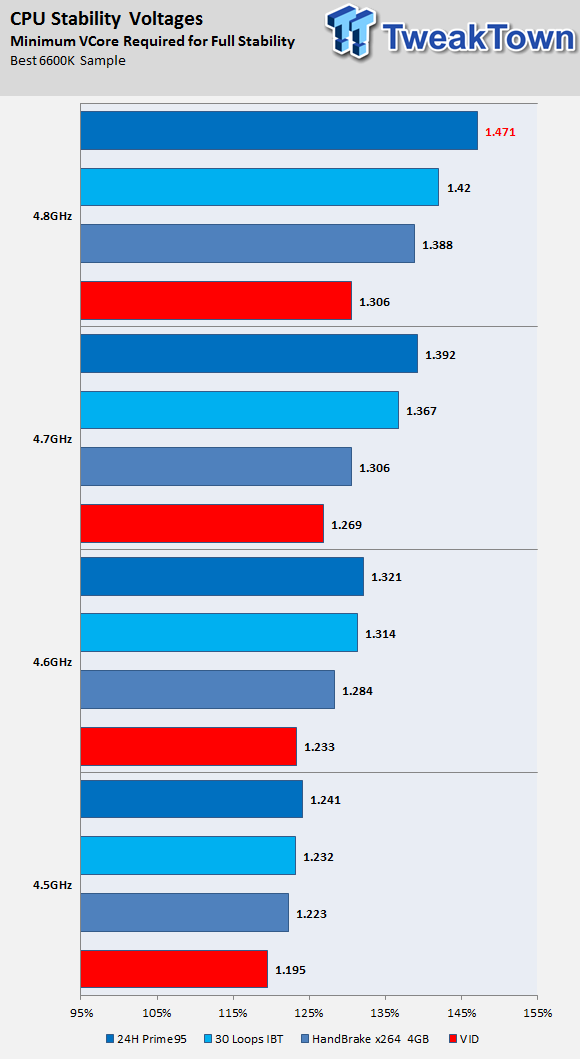
I tested stability on the best 6600K sample using three programs; Handbrake transcoding a 4GB video, 30 loops of Intel Burn Test, and Prime95 Small FFTs for 24 hours. This was perhaps the longest part of the OC guide when it comes to testing. I should also note that Handbrake doesn't raise temperatures like IBT or Prime95. In fact, you might not see the type of temperatures from Prime95 or IBT you might normally, and higher temperatures lead to lower stability as temperatures increase noise. Overall, it takes more voltage to pass harder stability tests as you reach the tipping point of your maximum CPU frequency on air.
Here are some Stability Tests:
- Intel Extreme Tuning Utility
- Intel Burn Test 2.54
- Prime95 28.7
- Memtest86
- MemTest HCI
- AIDA64 Extreme Edition (Free Trail)
- Custom X264 Test made by OCN members Angelotti and JackCY
- HandBrake (also need a video file)
CPU Delidding Results and Temperature
Warning: Delidding your CPU will immediately void the CPU's warranty, even if you have Intel's Performance Tuning Protection Plan.
It's no secret that Intel shifted from indium solder on Sandy Bridge to a polymer based paste for Ivy Bridge, Haswell, Broadwell, and Skylake. The reasons for this shift has been speculated to be cost related, but there is are much more scientific reasons which Intel explores in a paper from 2006 located here. The paper states that as the CPU die size decreases (which it has) to a certain point, indium/gold based solder for the thermal interface between the CPU die and the internal heat spreader (IHS) can cause the CPU die to crack after many thermal cycles. This study also makes sense because the server variants of these CPUs utilize solder based TIM instead of polymer paste like Skylake. Regardless, Skylake uses a paste which can be replaced with better paste to improve thermal performance.
There are multiple ways to remove the internal heatspreader and replace the TIM. Many people use a razor and others use the vice method (you can Google them). Caseking sells overclock der8auer's Delid-Die-Mate here, which is like a controlled vice method without a vice. The issue is that cost is high for single use purposes. There are services that offer CPU delidding for around $50 per CPU, but if you have a 3D printer or access to one, you can print a tool that can safely delid your CPU. I have printed the tool that can be found here and made a video of me using it (embedded above). If you want to print the tool, please use 50% or higher infill.
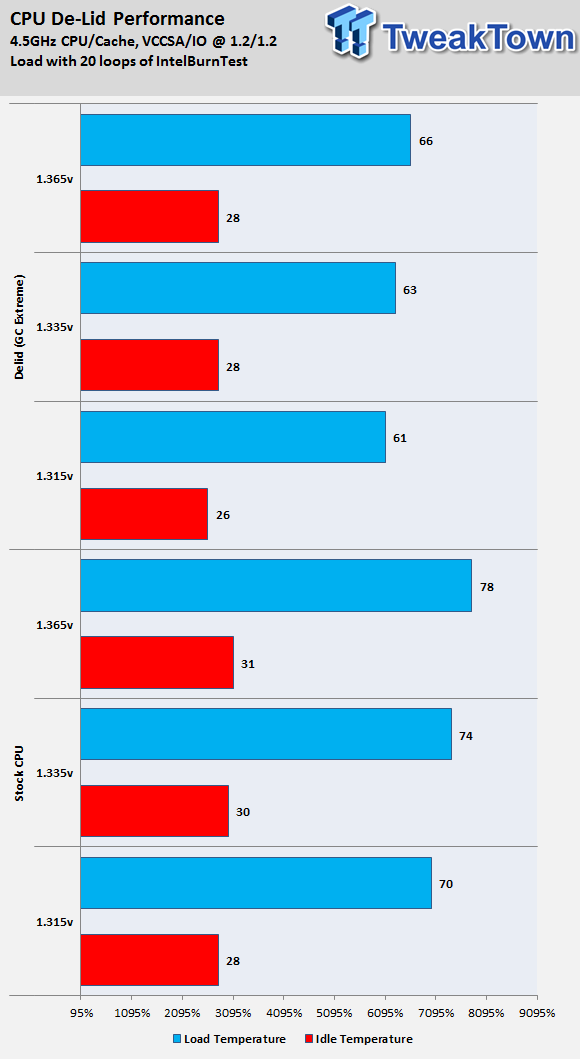
Results show that there is at least a 10C decrease in temperatures. A 10C drop in load temperatures is quite impressive, and this will improve as the thermal paste cures, and you can always use a liquid metal based paste like Liquid Pro or Liquid Ultra, which should provide lower temperatures. Rule of thumb for most platforms is that a 10C temperature drop can lead to a 50-100MHz CPU frequency gain, even when you are on the brink of your CPU's maximum stable overclock. High temperatures are a result of heat, and heat increases noise that decreases the ability for proper circuit operation. Noise can cause incorrect readings of high and low voltage levels.
Failure
You cannot succeed until you fail. The thing that people who succeed have in common is that when they fail, they learn from their mistakes.
If you cannot boot into Windows or even into the UEFI and your motherboard has a POST code display, your motherboard's manual can help you decode the listed two digit error code. Many times failing to post is a result of not enough voltage or failed memory overclocking. That is why I recommend you overclock the CPU core, followed by FCLK, cache, and memory - in that order.
Crashing: The motherboard, CPU, and PSU all have protection mechanisms in place to protect the hardware in your system. These protection mechanisms can cause crashing and throttling. If you system crashes suddenly, especially during load and just shuts down or restarts, then you have hit a trigger. The motherboard has trigger points in place when a trigger is breached the system is immediately shut down. Over current protection (OCP), over voltage protection (OVP), and over temperature protection (OTP) can immediately shut down the system if a trigger is tripped.
You can increase these triggers on most motherboards in their advanced VRM/PWM settings menu, and I have highlighted these menus earlier in this guide under each board's page. If your system is crashing by BSOD or an error code then that is usually instability rather than a trigger, you need to either increase voltage, drop frequency, or improve cooling.
Throttling: If your CPU frequency is throttling there are multiple causes. The first cause of throttling is high CPU temperature (usually over 90C), and that is a built-in CPU protection mechanism. The second cause of throttling is VRM temperature and/or current limits set in the UEFI under Turbo options. Many lower-end motherboards might have VRMs that don't have heat sinks and which are low in phase count, these boards are prone to overheating, and there isn't much you can do other than cool the VRMs.
Final Thoughts
Skylake overclocking is fun and is not too hard. Aim to keep temperatures below 80-85C when stressing with IBT or Prime95. Temperature will be your ultimate overclocking limit, and you will find that the maximum VCore you can set while staying under temperature limits is around 1.45v depending on cooling, and since Intel's operating maximum is 1.52v, I would stick under 1.4v for healthier 24/7 operation. If you want a quick OC, you can try 1.3-1.35v VCore with 4.5-4.7GHz with moderate LLC. I strongly recommend measuring VCore with a digital multimeter since CPU-Z is usually wrong depending on the board/brand.
I made this flow chart specifically for Skylake, and it has built-in recommended ranges. If you follow the flow chart, you should come out with a solid overclock. If you have any questions or concerns, please feel free to comment below.
Overclocking is more than just a way to increase speed and performance; it's a way to customize your hardware and run faster than anything sold on the market. However, be advised, overclocking can become addicting. It can become a journey that never ends, but one that can be very rewarding.
Stay classy my overclocking friends!
 How to fix Wi-Fi Adapter Not Working on Windows laptops: troubleshooting tips
 6 underrated Microsoft Word features worth using to boost your productivity
 7 Windows settings to change right after installation for better privacy, security, and performance
 I stopped Windows 11 notifications from interrupting me with Do Not Disturb, Focus, and a priority list
 Sony deleting over 500 movies from PS5 libraries is a reminder that you don't really own anything in the digital age
 Apple wants to buy memory from CXMT, a Chinese company that's currently blacklisted by the US government
 Analysts predict another massive memory price increase in Q3 2026, and another in Q4
 Sony President says live service games are still a big push for PlayStation's first-party studios
 Microsoft disputes claims that GTA 6 pre-orders on PS5 are out-selling Xbox 8-to-1
 Vanguard no longer has to run at startup thanks to Riot's new On-Demand mode
 A new battery restoration method can bring lithium-ion batteries back to 95% of their original capacity
 Vietnamese repair shop received an RTX 5090 with its 16-pin connector blown clean off
 Suspicious Steam Machine clone from China costs just $688, has a Ryzen 5 5500 with an RX 6750 GRE GPU
 A modder just got Windows 11 running on a DDR1 system from the early 2000s
 GIGABYTE GO27Q24G Gaming Monitor Review: Glossy OLED Gaming at 240Hz
 Lian Li B4-mATX Review: a compact mATX SFF case with excellent airflow and premium features
 MSI MPG 322UR QD-OLED X24 Review: A Brighter, Tougher 4K 240Hz QD-OLED for $1099
 UGREEN NASync DXP4800 GT Review: powerful 4-bay NAS with AMD Ryzen and dual 10GbE ports
 Dell XPS 14 (2026) Laptop Review - Premium Quality, Impressive Performance
 Ocypus Sigma F36 BK ARGB Cooling Fan Review: high airflow and unified design in one frame
 PCCooler CPS RZ820 Display Review: a flagship-level CPU air cooler with an LCD screen
 Speed Racer (2008) 4K Ultra HD Blu-ray Review: a stunning remaster of the cult classic
 MOAIPLAY ORA PRO G1 850W ATX 3.1 PSU Review: high efficiency and 10-year warranty for $119.99
 Hisense U7SG 4K TV: Modern Entertainment for the New Age
 Level Up Your PC Gaming with these Fantastic ASUS Prime Day Deals on GPUs, Motherboards, and More
 GIGABYTE Wants to Kickstart Your New Gaming PC or Upgrade with These Limited-Time Deals
 I read the Windows Backup app screen carefully, and it does not back up what most people think
 Low Sound Volume on Windows 11? How to fix audio issues and restore normal volume