


Our Verdict
Introduction, Specifications, and Pricing
Even though earlier on in the development of the Define cases, we may have missed a couple, what do know of these cases is on the verge of incredible. Throughout the phases of the latest Define chassis at the time, we have seen sturdy cases come through into which high importance was placed on reducing noise. Of course, these cases were essentially built tough as nails, and even though externally they looked a lot alike, on the inside, the layout has always been changing. Today, however, we have moved away from what started the Define Series of cases more than in any other instance of a Define chassis to date.
So what is it that makes this chassis so special? It is a long list of ideas and new features, as well as incorporating things which other cases offer, but doing it the way it should have been done in the first place. Air and water cooling options are as robust as we have seen in nearly any chassis, and this is done inside of the constraints of the mid-tower form factor.
Modularity is key here as well, but not in the sense of just being able to remove drive bays; it goes well beyond that. Tempered glass is all the rage right now, and with that addition, you are about to see one of the smartest uses of tempered glass on a chassis side panel, only seen rarely in much more expensive solutions. Silence is still key, but even with that said, there are options to remove sound deadening panels in favor of better airflow or cooling compatibility. Honestly, with an impressive list like we have only just begun to explain, we are just at the tip of the iceberg here.
For those of you out there who are not aware of the Fractal Design Define Series of cases, now is the perfect time to get acquainted. For many of us, fully aware of the type of chassis you get from Fractal Design, we think you are in for a surprise as well. While many impressive cases have been submitted by Fractal Design in the past, and checking just now to verify, what you are about to see is the best thing Fractal Design has done yet. We have a lot to cover, so get comfortable, as we take you on the ride that is the Fractal Design Define R6 Mid-Tower chassis, as the trip is certainly worth it.
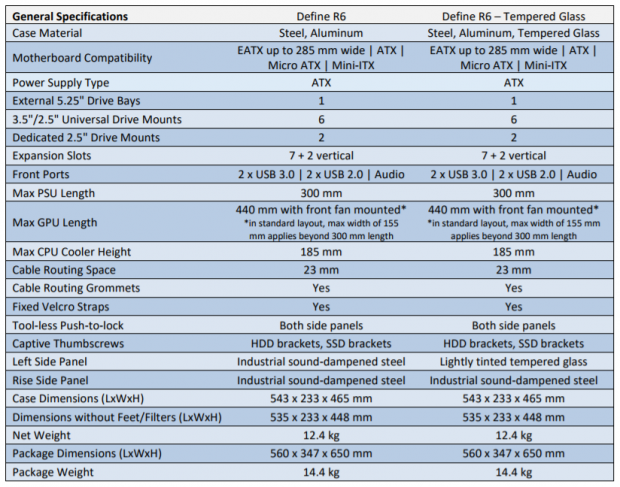
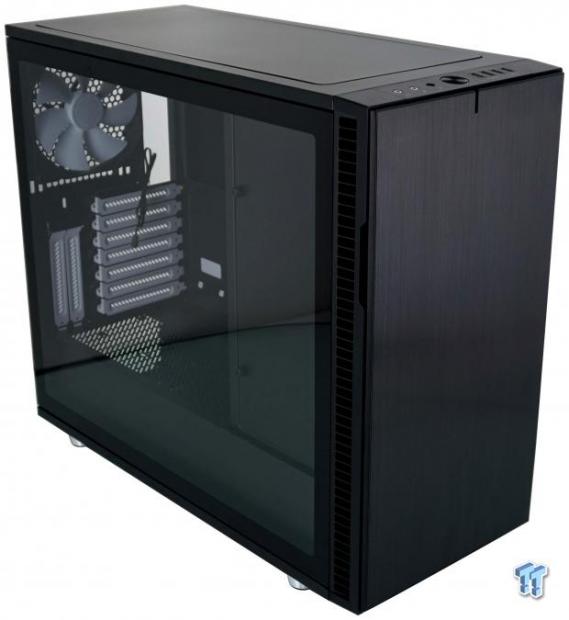
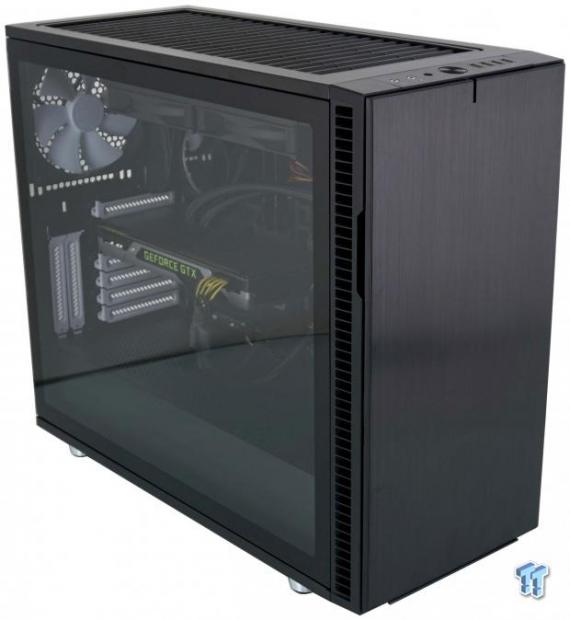
In four flavors, both with and without the tempered glass side panel, we can obtain the Define R6. There is the black version which we have, a blackout version, as well as a gunmetal and white option too. Both versions are made of steel and aluminum, but in the TG versions, the solid left side panel is replaced with lightly tinted, tempered glass. This specific chassis is black inside and out, and the front of the chassis has a bezel covered with brushed aluminum, which is also black. All told, the R6 is 543mm long, it is 233mm wide, it stands 465mm in height, and weighs 12.4 kg empty.
Motherboard support is good too. Not only can you install a Mini-ITX, Micro-ATX or ATX motherboard, but the Define R6 also has room for EATX boards as well. The front I/O panels are the same, with a pair of USB 3.0 ports, two USB 2.0 ports, and HD Audio jacks, there is also an option to buy an I/O panel with the latest USB standards present. At the back of the chassis, we are offered a 7+2 arrangement of PCI-E slots, and again, a PCI-E riser cable will be offered by Fractal Design to fill the void if the vertical GPU slots are intended to be used.
Cooling is handled with three fans which are found inside of the chassis. With two in the front of the chassis and another in the back, Fractal Design chose the Dynamic X2 GP-14 140mm fans to do the job. These fans are rated for 100,000 hours and deliver up to 68.4 CFM of airflow, each, into and out of the case. Optionally, Three 120mm or two 140mm fans of choice can go in the front of the chassis. The top of the R6 offers the same options, and the back can accept a 120mm fan instead of the pre-installed 140mm fan.
Our Latest Mid-Tower Cases Review Coverage
The bottom of the case, dependent on PSU size, can house a pair of 120mm or 140mm fans as well. Water cooling is the same as the fan options. At the top and front of the R6 you can go as large as a 280mm or 260mm radiator, but at the top, it is recommended to stay within 35mm as not to conflict with taller Phase heat sinks of larger memory. The rear of the chassis can also support a radiator, and the floor of the chassis will take a 240mm or 280mm radiator too.
Of course, the HDD trays are removable to make room for whatever is needed. The support system for the HDD bays is also removable to allow for a larger radiator in the top of the chassis, which opens the front of the case for a pump, reservoirs, and extra length for the GPUs. There is the third generation of ModuVent found in the R6 as well.
The top of the chassis has a button on the back, which releases tabs, allowing one side of the top panel to raise up for removal. The steel cover can be removed from this panel, and under it is mesh and angled vents, which opens up the R6 to fulfill all of the cooling possibilities. The front of the chassis has a cover which opens up, and this cover can also hinge on either side, to make access to the optical bay or to clean the filter much easier, no matter which side of you the chassis is on. No matter where you look at the Define R6, Fractal Design proves to be on point with this design, as literally, nothing has been left untouched, and no concessions have been made.
With all of the talk of how this is the best chassis to leave Fractal Designs warehouse and all of the things we have pointed out still not covering everything you will find in the Define R6, one might assume it will cost an arm and a leg. This is not the case at all. If you prefer the solid steel left panel version of any of the four color choices, expect to pay just $129.99 when it hits the shelves. If you, like us, prefer a well done tempered glass side panel on your chassis, any of the four options will be priced at just $149.99.
If you want the optional I/O panel or the PCI-E riser, you will find them a bit later, but they are said to be sold at $29.99 and $39.99, respectively. So if you want everything this chassis has to offer, at $219.97 you will surely own one of the sickest and most fully equipped mid-tower cases to ever hit the market. Even without the optional I/O panel and PCI-e riser card, what you are about to see in the Define R6 Mid-Tower Chassis is worth every stinking penny you have to dig out of the couch to get one of your own.
Chad's Chassis Test System Specifications
- Motherboard: ASUS Maximus IX Code Z270 (buy from Amazon)
- CPU: Intel Core i7 7700K (buy from Amazon)
- Cooler: NZXT Kraken X62 (buy from Amazon)
- Memory: Team T-Force Night Hawk RGB TF1D48G3000HC16CBK
- Video Card: NVIDIA GeForce GTX 980 (buy from Amazon)
- Storage: Samsung XP941 256GB (buy from Amazon)
- Power Supply: SilverStone SST-ST85F-G (buy from Amazon)
- OS: Microsoft Windows 10 Home 64-bit (buy from Amazon)
Packaging
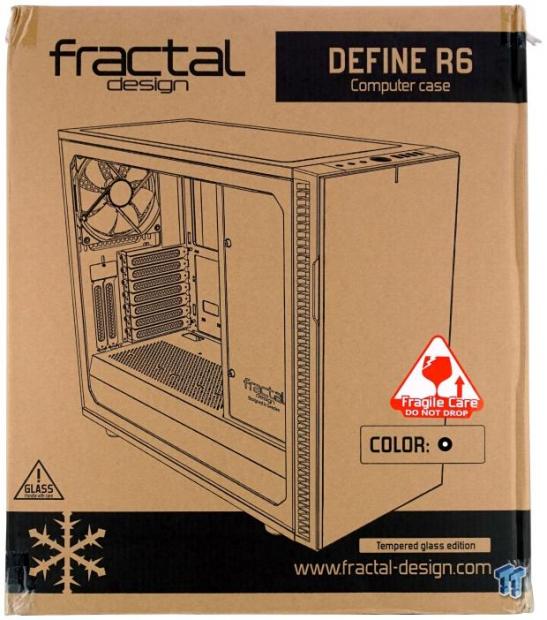
Even though Fractal Design uses plain cardboard to ship the chassis inside of, they don't hold back with what is offered in black screen printing. On the front of the box, the full name of the company and chassis can be found at the top, with the middle of the panel used up with the huge rendering of the chassis. At the bottom, we see the logo and the web address, but we also see that this is the R6 in black with white accents, and that we should be careful with handling it.

The right side of the box delivers the chassis name at the top, a handle, and then the specifications which include options for both the chassis as well as the cooling system. Under the Fractal Design logo there is some legal information in fine print, and below that, we see that the chassis was designed in Sweden, but made in China.

Around to the back of the box, we see the company and chassis name once again. Along with an exploded diagram of the chassis in the lower-left corner, there are eleven features shown in the diagram, which are explained above and to the right of it.

The second skinny panel shows us that this is the Tempered Glass Edition, with a rendering below it of the chassis from the left side of it, with an exposed view of the interior. What is left is a company usage barcode, with the model and serial number on it, as well as the EAN, UPC, and LAN codes.

While the cardboard used is on the thick side, Fractal Design took no chances of ensuring the Define R6 gets to you without a scratch. There is plastic on both sides of the tempered glass, and a bag which envelops the entire chassis to protect all of the finishes. Not only do they use thick Styrofoam caps on the top and bottom of the case, but they also use dense foam to cover the tempered glass. Like ours, and we could tell its trip to us was not gentle, our Define R6 still got here without a nick or a scratch.
Fractal Design Define R6 Mid-Tower Chassis
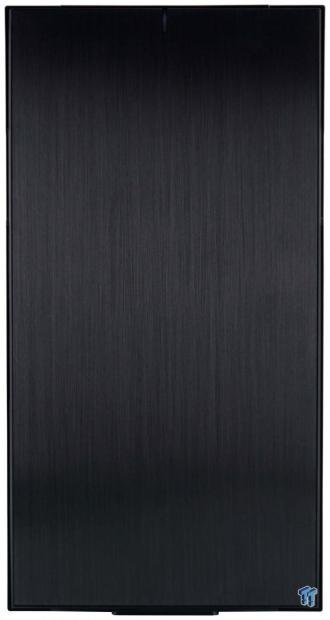
Looking at the front of the chassis is screams Fractal Design and Define. A very thin plastic bezel surrounds the sheet of unobstructed blushed aluminum. There is a thin slit at the top which exposed the HDD activity LED and at the bottom we see reflections of the natural aluminum feet.

Fresh out of the box, the front panel opens to the left, but keep in mind that with a little time and a Phillips screwdriver, the door swing can be reversed. Inside of the panel we see a use of industrial sound dampening material, on the front of the chassis we find a removable bay cover at the top and louvers in front of the fans.

At the top of the front bezel, we locate the front I/O panel. In it, we see the pair of HD Audio jacks and the reset button to the left of the highly stylized power button and power LED ring around it. To the right of those, we find the pair of USB 2.0 ports and those for use with USB 3.0 devices.

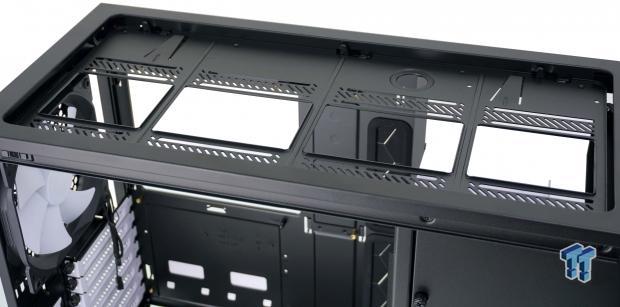
As shipped, the Define R6 has a closed top. By this, we mean to say that the panel in the middle of all that steel is also covered with a removable steel panel. This panel is backed with more industrial sound absorbing material, but the cover, as well as the entire inset section, is removable.

We want to make mention of the ventilation offered down the side of the front bezel, but as for the rest, it is more about what you don't see than what you do see. While Fractal Design does a terrific job with the trim paint inside of the tempered glass panel, we will point out that we are not seeing four thumbscrews holding it on. Fractal Design rethought the idea and had come up with a very pleasing result.

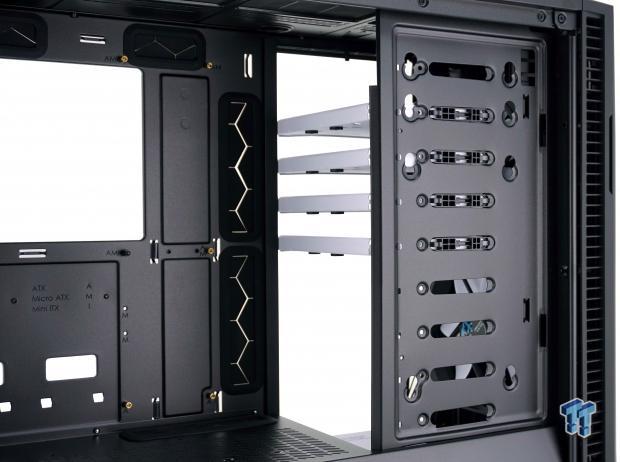
At the back of the Define R6, we must first point out the button at the top, which releases the top inset panel. We then see the rear I/O and exhaust areas filling the rest of the top section. Just below, we see seven horizontal expansion slots as well as a pair which are vertical. At the bottom is where the PSU resides but is installed through the back and uses the PSU mounting plate seen there.
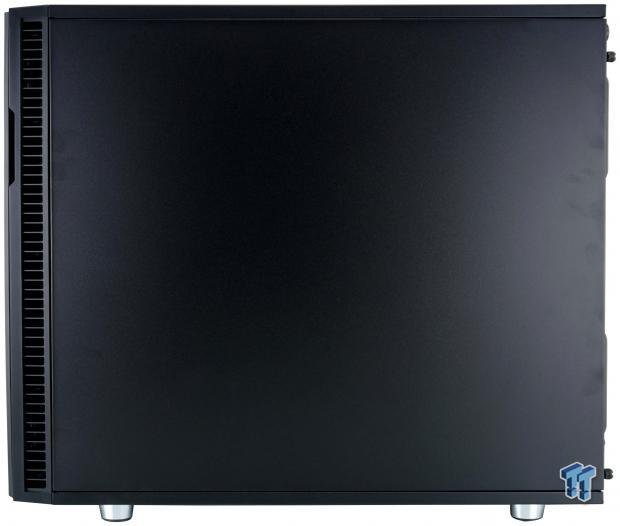
The right side of the chassis is a solid steel panel and is also what we assume the left side panel would look like if not opting for the TG Edition of the Define R6. Currently, thumbscrews hold both panels for shipping, but once you have it, you don't have to use these if you wish. Both doors open like they are on a car, and since "hinged" at the front, Fractal installed metal balls and sockets which can be used to hold the panels closed, while allowing easier access down the road.

Four round legs are used, internally made of plastic, with a polished metallic outer covering, and rubber feet used for grip. Four plastic brackets hold the dust filter in place, and this filter is removable from the front of the chassis. Also note, the top right dust cover bracket has holes in it, which allows access to screws holding in the drive bay support plate.
Inside the Define R6
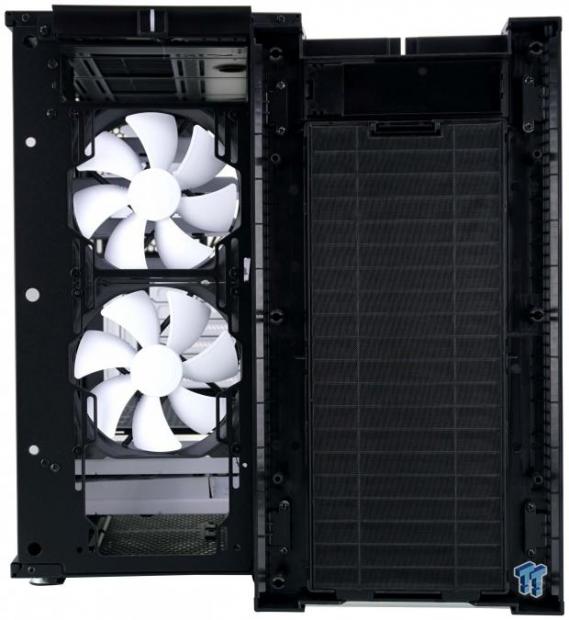
Now that we have removed the bezel, we can see the front of the chassis. There is a 5.25" bay at the top, but it is removable. Doing so expands the cooling seen here to be able to install three 120mm fans instead of just two, like the 140mm fans we see installed now. The dust cover found in the bezel is removable from the other side, and the mesh is fine as to clean the intake air thoroughly.
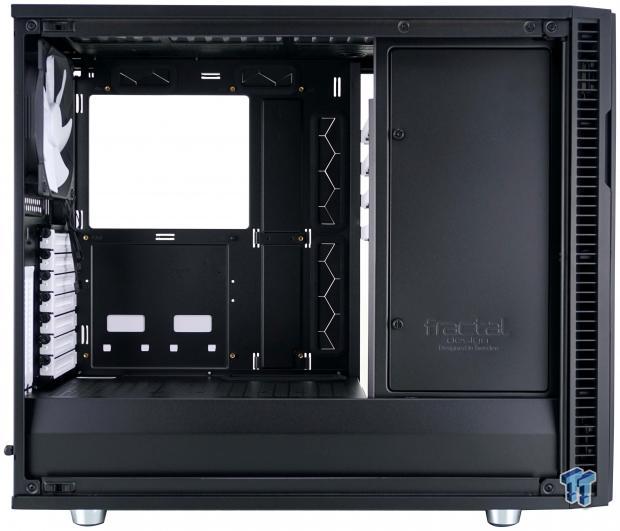
The inside of the Define R6 is closed off at the bottom, and the view of the right third is also blocked by a cover with the Fractal Design name pressed into it, which is held in place with thumbscrews at this time. The rest of the chassis is wide open to accept the main components, leaving the internal layout to change based on usage requirements.

The panel at the front of the chassis is held into a frame, and both cover the view of the four white HDD trays. Seeing screws here has us wondering, is there access to wires, or just what is it going on there to require thumbscrews?
Removing the panel, we find what appears to be a rack for optical drives or stacked, securely mounted hard drives. However, you could use this for surface mounting a drive to it, or rigging up a way for it to hold water cooling components, and keep them hidden from view. Taking it one step further, both the drive trays and the assembly seen here can all be removed too.
With the top inset panel removed, we can see the latches and metal tabs acting as springs to work with the panel. The steel section seen in the recess is removable so that you can install fans or water cooling components to it, and then drop it into the case.

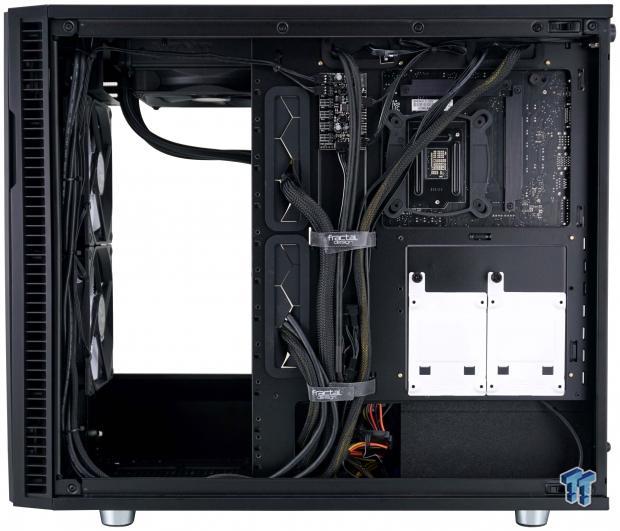
The motherboard tray gives us four holes with grommets in them, and three much smaller holes without them for wires to pass through. There are also eleven tie points which can be seen in just the tray, but there are a few more along the front as well.
Inside the Define R6 Continued

The PSU cover has two holes near the motherboard tray, the one at the back without a grommet, while the larger one does have a grommet in it. The entire top is vented to allow for optional airflow to come from the bottom of the chassis, and there are an angled section and the vertical section to completely cover the PSU and wires coming from it.

Just like the pair of 140mm fans do in the front, the exhaust fan has a black frame, white blades, and is powered by a 3-pin fan connection. To match both the fans and the HDD trays, the nine expansion slots seen here are also painted white. To secure the covers or expansions cards, they are accessed internally, and thumbscrews are provided.
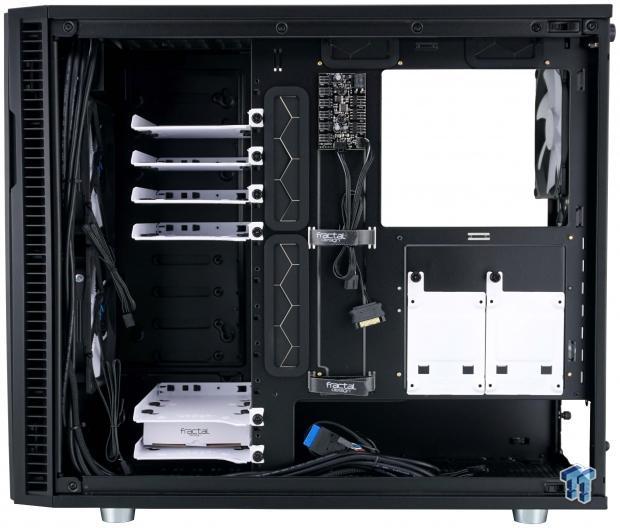
Looking at the right side of the Define R6, we find the front of the chassis is wide open from top to bottom and is where the six HDD trays are currently screwed into the edge of the motherboard tray. Behind the motherboard tray are 23mm of room, Velcro straps to tend to wires, and a pair of 2.5" drive trays under the CPU cooler access hole. The PSU is to go in the bottom-right corner, but the fame is too tall here, and is why the PSU slides in from the back.
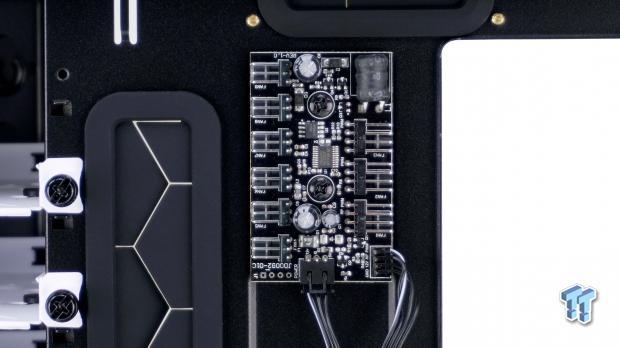
Near the top of the motherboard tray is where the Nexus + PWM fan hub is located. It requires one lead to connect to a PWM source on the motherboard as well as a SATA power connection to source power for the hub. Three PWM fans can be connected to the right side of it, while six case fans can all be connected on the left side. No power rating was offered, but we are told there is protection against overvoltage and other irregularities in power delivery.
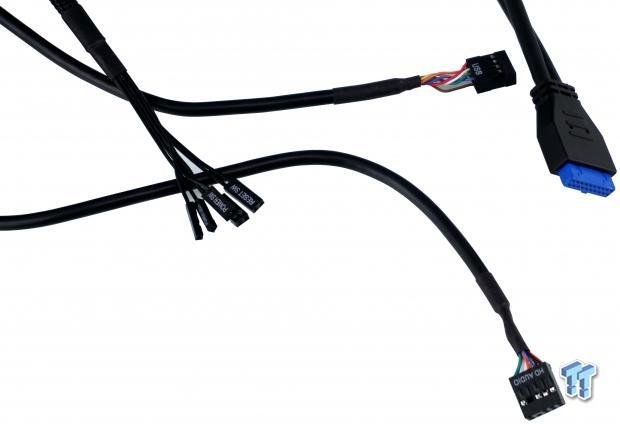
All of the wires from the front I/O panel are already routed down the front edge of the chassis and spill out to the right towards the motherboard tray. In the group, we find the HD Audio, UBS 3.0, and USB 2.0 connections, and all of the LED and switch wires are in a sleeved covering, with just enough for connectivity exposed at the end.
Hardware & Documentation

Fractal design ships the hardware inside of one of the HDD trays, and the box is marked with assignments and count for all of the hardware we see here. Bagged individually, we see the PSU screws, motherboard screws, 2.5" drive screws, and the HDD drive screws in the top row. Along the bottom are the extra standoff, HDD screws, chassis thumbscrews if one or more is lost, and a socket to drive in the standoffs where they are needed.

Also found inside of that same box are the six zip ties to manage wires along the front of the chassis or behind the motherboard tray. We also located a Fractal Design emblazoned cleaning cloth so that you can easily remove fingerprints from the steel, aluminum, and even the tempered glass.

The user guide begins with a parts list and moves right into panel removal and component fitment. Past that we are shown how to connect the front I/O panel, shown how the fan hub is to be connected and continues with more of the component installation. Next, we run into a section on options, like panel and drive securing for transport, as well as things like how to install the GPU or that the hole in the removable top panel is to install a fill port. The guide continues with optional cooling, where it can go and exactly how to do it, and concludes with fan and fan hub specifications and support information. No matter if you are a beginner or an expert, nothing is left to chance, as it is all there to be seen and read about. Also seen here is the bright red insert stating if the worst of things happens and your product is damaged, do not return it to the reseller, got through Fractal Design with the information provided.
Case Build & Finished Product
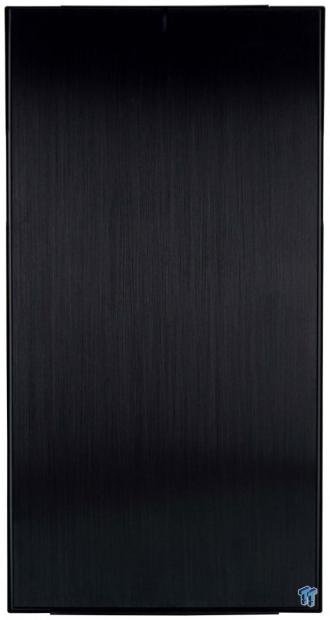
As we like it, nothing on the front of the chassis has changed, whether we added a bay device or an optical drive, we can't tell from outside the chassis, nor can we tell if the cooling has been changed. Nothing to see here but a sleek brushed aluminum panel, without even the company name to distract from the appeal of high-end materials.
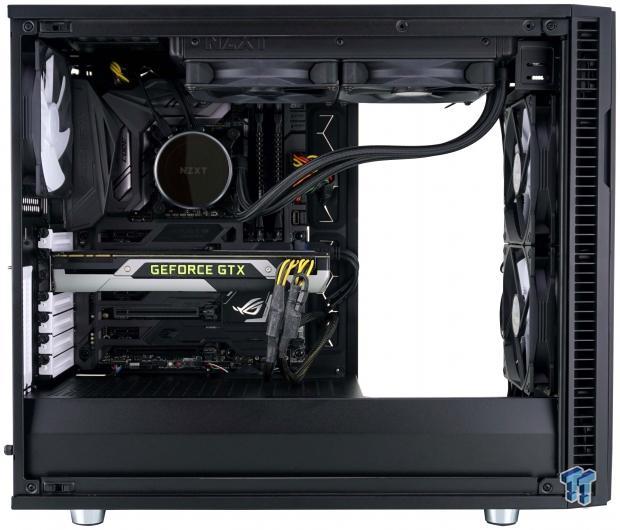
Things have drastically changed inside of the chassis to fit the components we wanted to use. The front of the chassis is now wide open, as the frame and panel had to be removed to allow for the 280mm radiator to go in at the top. Even so, the wire management of the chassis is so on point, that we see none of the wires there, only the slightest bits of them coming out of the grommets and connecting to the motherboard. The finished product is in our eyes, near perfect, and we had no issues with the fitment of a single component.

The dust shield snaps into place well, and the video card is level, nor did it require us to force the chassis inward to secure it. Sliding the PSU in from the back is tight for the PSU we used, but were still able to get it in there smoothly and secure it to the chassis with the PSU mounting plate.
While we did use two zip-ties to help manage the fan wires, all other wires were run through the Velcro straps. Not only is it able to hold the mass of wires to power our PC, but it makes maintenance with it later much easier than cutting a dozen or so zip-strips to free the wires. The nice thing is, this doesn't have to look spectacular either, as the panel that covers it is made of steel and has no view of this.
Now that the chassis is back together and ready for some power, we reflect on everything we just saw. From the front to the back, inside and out, we cannot find a single thing about the features or the layout what we would change or think needs addressed in any way. Fractal Design has delivered a chassis you could use as a step stool, and it comes with everything you want, and if it doesn't, they have extra goodies to help give you exactly what you desire.

With power added and the system now on and running, we appreciate the view inside, so we can see all of the various LED illuminated parts in the chassis. We loved that there is a cover for those wanting to fill the drive bays with 3.5" and 2.5" drives, but we also like that when gone, the view inside is still clean and professional in appearance. Also note that we now have the louvered top in place, by removing the steel cover, which may allow a bit more sound out of the chassis, but improves airflow of the ModuVent system.
Final Thoughts
What we said in the begging of this review rings true, as the Define R6 is the best chassis Fractal Design has ever produced. Its strong as an ox, it looks fantastic, and the cooling capabilities of this chassis are better than most. Silence is still the key components, and Fractal Design makes every attempt to eliminate sound as much as possible.
Whether it is angling the intake, use of solid covers, or use of industrial sound deadening materials, when idling, we never heard the Define R6. Even with the system ramped up in testing, the noise levels got to 35 dB, but mainly due to the NZXT fans cooling the radiator, not due to the fans provided by Fractal Design. Another point to this topic is the Nexus + PWM Fan Hub, which allows one point of control for all of the fans in your chassis, as long as that does not surpass ten used in the chassis. Aesthetically and audibly, the Define R6 is a champion.
We have to touch on the tempered glass panel, as it is the first flat side panel that does not require gaudy thumbscrews sticking out on top of the glass. The ball and socket idea has been seen before, but using it here is as brilliant as with any other we have seen use it. The modularity of the interior means that as long as you think things through, you can build a powerhouse of a system, and even sufficiently water cool a processor and a few video cards.
The trio of pre-installed fans are more than sufficient to cool the interior of the Define R6, and as such, our thermal testing proves better than that of many of the mainstream mid-tower cases we have seen previous to this. As we said, and it is worth repeating, No matter where you look, the design is near perfection to suit anyone.
Even if this is your first build ever, Fractal design not only provides you with everything you need, including hardware and instructional help but deliver a chassis that will last many builds to follow as well. When you build it right the first time, and customers get their hands-on them, the only real issue is trying to sell them another chassis, as once the Define R6 is in hand, Like the TJ11 we keep using, it's hard ever to let it go.
The base price for the Define R6 is appealing, and we do not feel that at $129.99 for the vanilla versions of the R6, or the $149.99 for the TG Editions is in any way out of line. We do wish the PCI-E riser came with the chassis, even if we had to fork out the $39.99 on top of the case price right from the gate. As for the optional I/O panel at $29.99, we feel that if USB 3.1 Gen 2 and USB Type-C is important, it is a no-brainer to get one for your chassis.
Granted, there are many $50 mid-tower options, but most are "build in once" and toss away cases. $100 options do get better, but even then, you will not find everything that Fractal Design offers in the Define R6. For the Fractal Design Fanboys out there, we already know you are saving right now for this chassis.
For everyone else out there, if you know of Fractal Design, but have yet to try one of their products, now is the perfect time to climb aboard. The Fractal Design Define R6 Mid-Tower Chassis is as good as it gets right now, and we see no reason anyone would be disappointed with the purchase of it.
Chad's Chassis Test System Specifications
- Motherboard: ASUS Maximus IX Code Z270 (buy from Amazon)
- CPU: Intel Core i7 7700K (buy from Amazon)
- Cooler: NZXT Kraken X62 (buy from Amazon)
- Memory: Team T-Force Night Hawk RGB TF1D48G3000HC16CBK
- Video Card: NVIDIA GeForce GTX 980 (buy from Amazon)
- Storage: Samsung XP941 256GB (buy from Amazon)
- Power Supply: SilverStone SST-ST85F-G (buy from Amazon)
- OS: Microsoft Windows 10 Home 64-bit (buy from Amazon)
 Lian Li B4-mATX Review: a compact mATX SFF case with excellent airflow and premium features
 Ocypus Sigma F36 BK ARGB Cooling Fan Review: high airflow and unified design in one frame
 PCCooler CPS RZ820 Display Review: a flagship-level CPU air cooler with an LCD screen
 MOAIPLAY ORA PRO G1 850W ATX 3.1 PSU Review: high efficiency and 10-year warranty for $119.99
 NZXT H6 RGB+ Compact Dual-Chamber Chassis Review
 Sony on PS6 pricing: 'it's not realistic for us to absorb all component cost increases'
 Nintendo Switch 2 rumor suggests revised screen is in play - and gamers are desperately hoping it cures ghosting issues
 WhatsApp is rolling out usernames for better privacy: here's what you need to know, and how to claim yours
 Amazon Swap Scam strikes again: Buyer orders Samsung 990 PRO, receives 970 EVO SSD with fake label instead
 Samsung, SK Hynix, and Micron are being sued for alleged DRAM price fixing and collusion
 South Korea is investing $520 billion in Samsung and SK Hynix to build more HBM fabs for AI
 Dbrand removes Steam Machine Companion Cube from sale due to copyright infringement
 New GeForce RTX 3060 cards go on sale in Germany, with prices sitting a little too close to $400 USD
 AMD's Adrenalin Edition 26.6.4 driver fixes Windows 10 and FSR 4.1 issues for RDNA 3 Radeon RX 7000 GPUs
 MetaPCs launches first SteamOS 3 prebuilt gaming PC with Ryzen 5 9600X, RX 7600 and 16GB of RAM
 ASUS TUF Gaming X870-Pro WiFi7 W NEO Review - Tuffed up
 GIGABYTE GO27Q24G Gaming Monitor Review: Glossy OLED Gaming at 240Hz
 MSI MPG 322UR QD-OLED X24 Review: A Brighter, Tougher 4K 240Hz QD-OLED for $1099
 UGREEN NASync DXP4800 GT Review: powerful 4-bay NAS with AMD Ryzen and dual 10GbE ports
 Dell XPS 14 (2026) Laptop Review - Premium Quality, Impressive Performance
 Speed Racer (2008) 4K Ultra HD Blu-ray Review: a stunning remaster of the cult classic
 How to fix Wi-Fi Adapter Not Working on Windows laptops: troubleshooting tips
 Hisense U7SG 4K TV: Modern Entertainment for the New Age
 6 underrated Microsoft Word features worth using to boost your productivity
 Level Up Your PC Gaming with these Fantastic ASUS Prime Day Deals on GPUs, Motherboards, and More
 GIGABYTE Wants to Kickstart Your New Gaming PC or Upgrade with These Limited-Time Deals
 7 Windows settings to change right after installation for better privacy, security, and performance
 I stopped Windows 11 notifications from interrupting me with Do Not Disturb, Focus, and a priority list
 I read the Windows Backup app screen carefully, and it does not back up what most people think
 Low Sound Volume on Windows 11? How to fix audio issues and restore normal volume