


Introduction
August of last year I was awe struck by my first submission from BitFenix. The original Colossus may have been referred to as the lava lamp of cases, but I for one was sold on the concept. That version of the chassis had lighting on the front door as well as both sides. This lighting scheme was very unique mixed in along with the Softouch exterior coating and black steel panels. The version of the Colossus I received was the all black version with optional blue or red LED lighting, with the controls hidden in a lockable front storage tray. On top of that, I haven't even gotten to the wire management on the front of the chassis or the tool-free interior.
One thing I really like about BitFenix is they aren't too proud to ask for help or take great ideas and try to implement these into their chassis'. I remember when this idea was sparked, and I was even privy to seeing some of the window design ideas long before now, and they were interested in my input. This along with comments on forums and their dedication to Facebook advertising and input from those who follow, help BitFenix give the customer exactly what they are looking for.
The version of the chassis we are going to be looking at today is the BitFenix Colossus Window. Now this chassis also comes in the white version, as did the original Colossus. The unit we are going to look at is the black version; even here you still have options. You can pick the Venom, or green LEDs with the black exterior and interior. The Colossus Window I was sent is black inside and out, but this one has red LEDs. Along with all the features we saw in the original Colossus we get a very cool windowed side panel, and the lights get stripped off of both door panels. If I have peaked your interest so far, stick around, as I am about to show you the ins and outs of the Colossus Window with optional red LEDs.
Specifications, Availability and Pricing
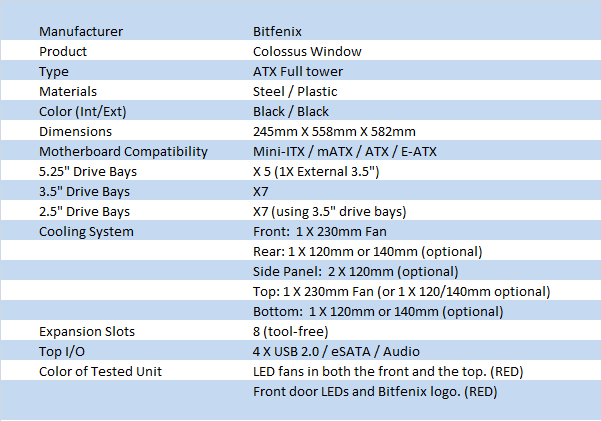
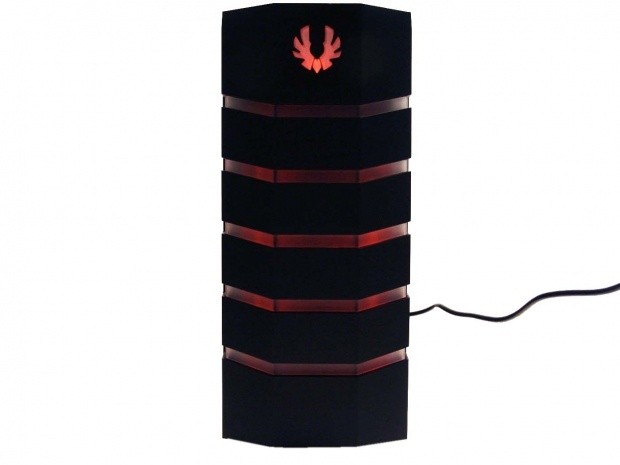
Just like the Colossus I received last year, the Colossus Window keeps the same, rather large size in this full ATX tower chassis. The top and front of the chassis receive the Softouch coating on top of the plastic base material. The panels and interior of the chassis are built from steel and are painted both internally and externally black in this example. Breaking up the black on the front of the chassis are five bars backed by LED lighting, and then gets topped with the "Fenix" logo. On the sides this time around is where things change. The rear panel no longer has the five strips of lighting; neither does the left side of the chassis that gives access to the interior. For the Window version there is obviously the addition of a window so you can peer inside of the case.
This window took a lot of time and thought. Not only did BitFenix go through a lot just to come up with an attractive design for the shape of the window, but there are many other facets to think about. First you have to devise an attractive solution to mounting the window to the steel panel. Then there is 'do we add fan holes, do we add a logo, do we add tinting, will all of this look good?' - The answer to these questions is a resounding yes, and you will be able to see for yourself if this version of the BitFenix Colossus with the window is more your style. On top of the features, tool-free installation, and a more main stream design, you still have options for LEDs. This version, the front panel and the top fan are backed with red LEDs. There is still the white version with blue LEDs, and the Venom which is black with green LEDs.
Looking as I type this, there are just a few places showing stock of any of the versions of the BitFenix Colossus Window. What I am seeing is three or four e-tailers that carry all three versions and a couple of lesser known places, but the pricing is all relatively the same across the board. Places like Xoxide.com and FrozenCPU.com are both listing the chassis at $149.95 and the others are closer to the $155 US dollar mark. Looking back to see what the Colossus is still getting, I see the high end is $180. As it sits, you do lose the lights on the sides, but you gain a large window and still save a bit of money to help with another upgrade.
Packaging
The Packaging

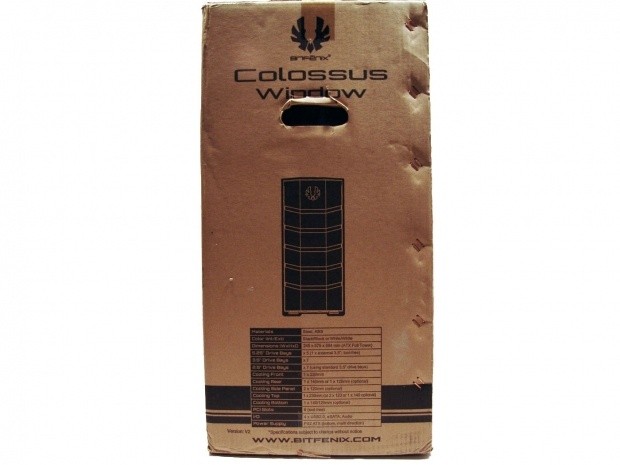
Gone is the fancy packaging of the predecessor. This time we get a plain brown box with black text and imaging. The same box gets used for all three colorations and gets marked at the bottom to note which is inside.
The right side has the image of the front of the Colossus window above the specifications chart.
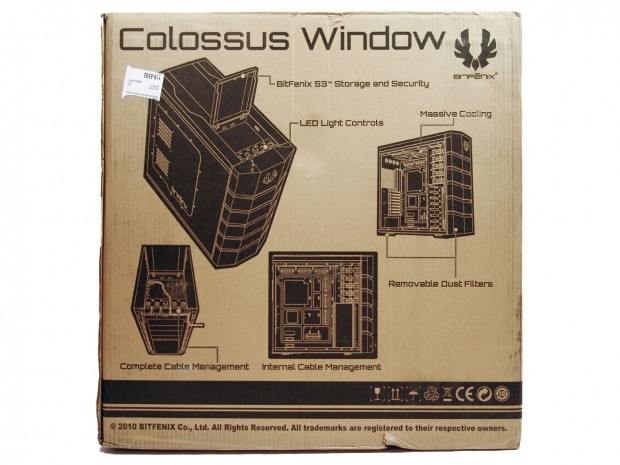
Most of the features inside and out of the Colossus Window get shown here. The S3 storage, LED controls, cooling and filters, and cable management are all covered here.
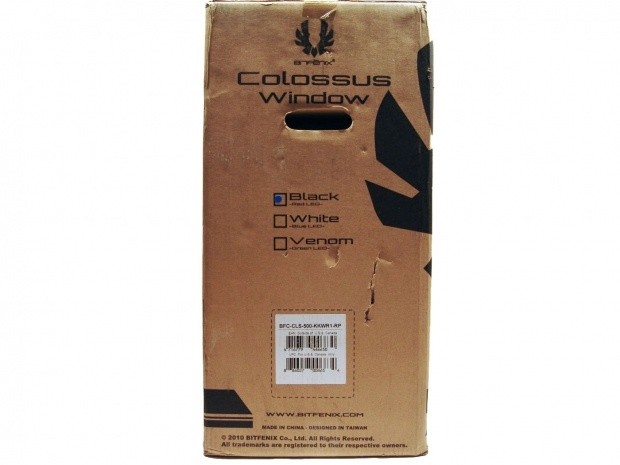
The last panel contains again a marking as to which version is included inside above the bar codes and product codes. At the bottom you can get the information for the website to go and have a closer look.
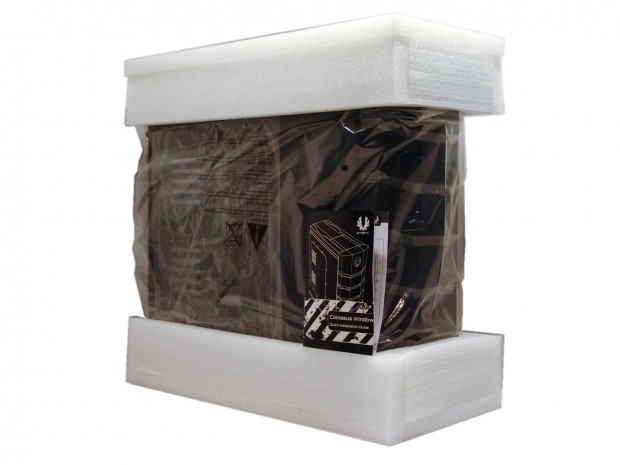
With the box removed I found the chassis supported with high density foam at the top and bottom with a plastic bag keeping small scratches away. The installation guide is found outside the case, loosely shipped in the box.
Once the outer layers of protection are removed there is still a static cling layer of plastic both inside and out of the window in the door panel.
The BitFenix Colossus Window Full Tower Case

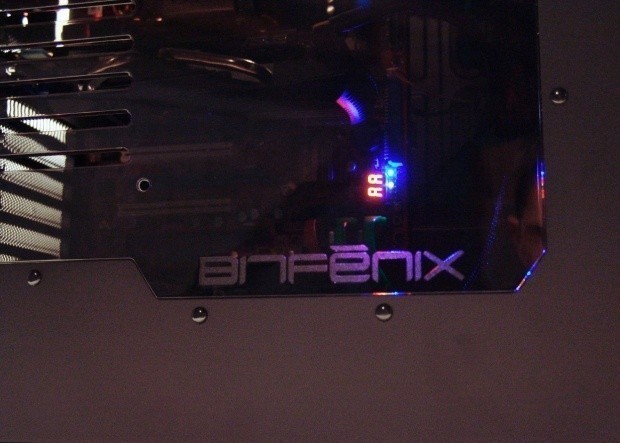
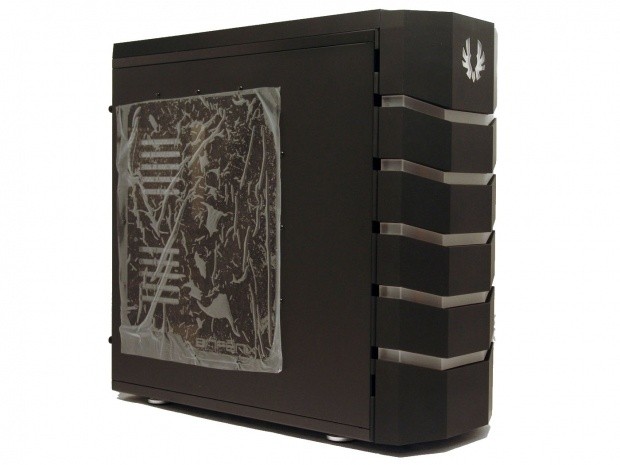
As I mentioned, the large black front door is broken up with the white stripes and the large winged logo at the top. When the case is powered, this version glows red, which you will get to see a bit later.
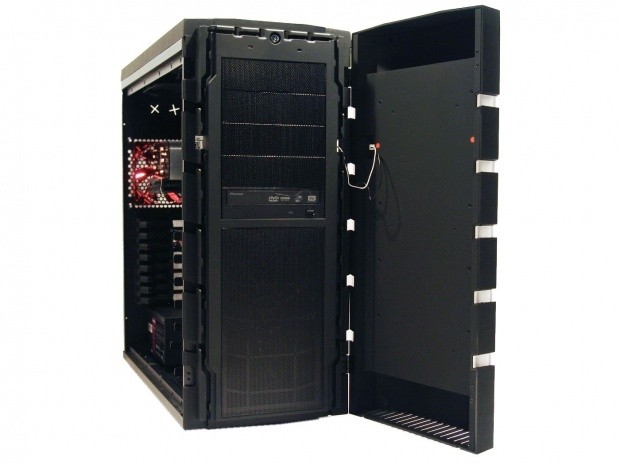
The original had the door hanging on the left, but with the window on this chassis being on the left it makes more sense for the door to swing to the right this time. If for some reason you want to reverse the swing that is still possible.
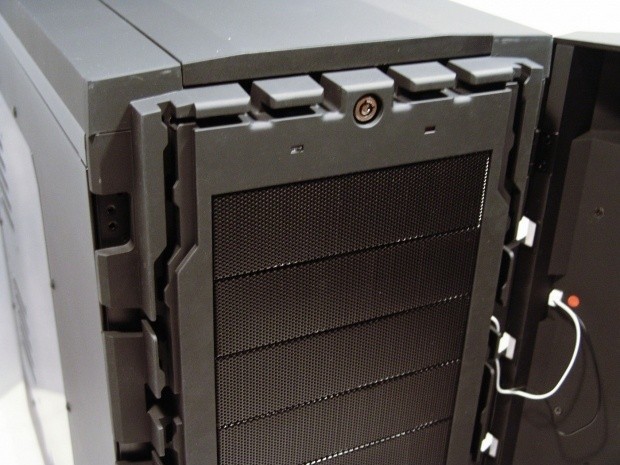
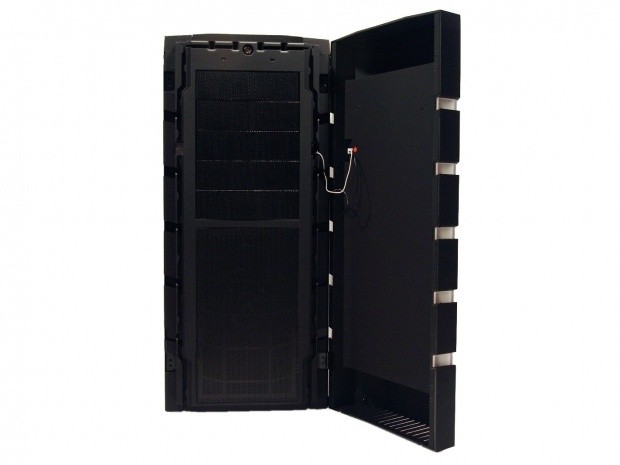
Around the steel mesh that covers the optical drive bays and the 230mm fan at the bottom, there are the same wire management options for mice, headphones, or whatever you don't want to lose that is front panel connected. The Lock you see opens the S3 storage area.
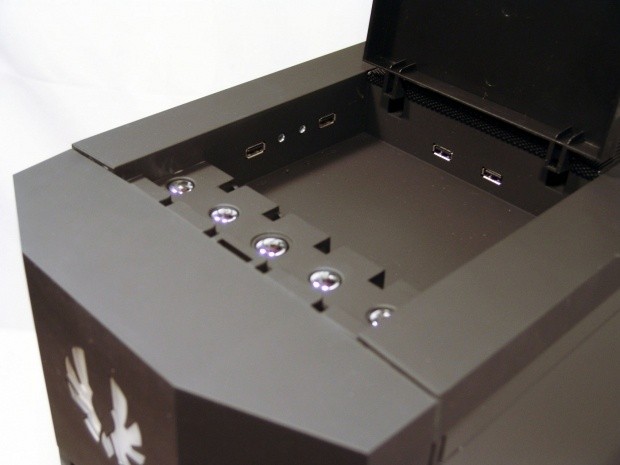
The S3 has all of the buttons for power, reset, and the LED lighting switch. Around the other three sides you will find the various USB, eSATA, and audio connections. Anything else that fits inside can be locked and secure when you are away from your PC.
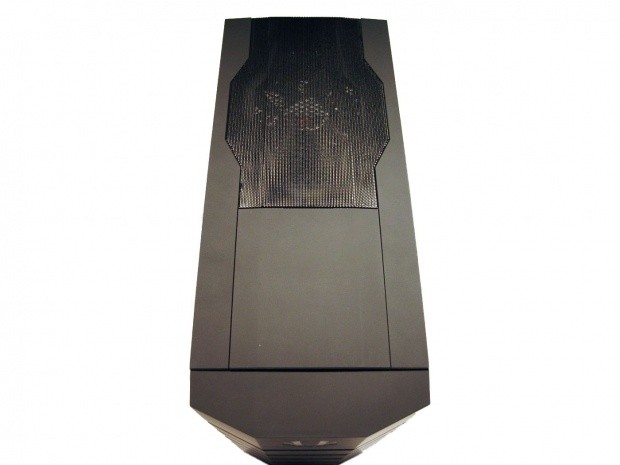
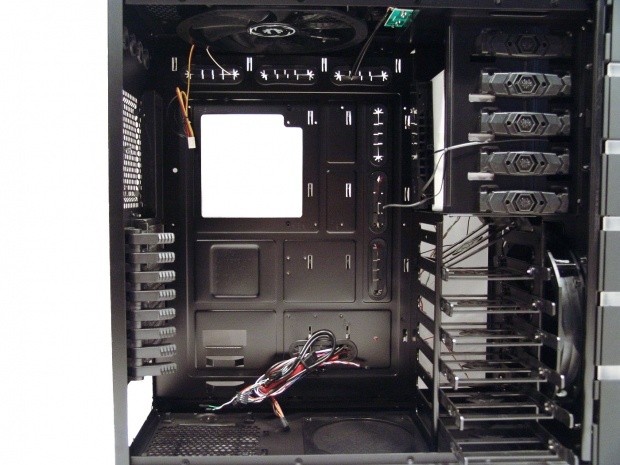
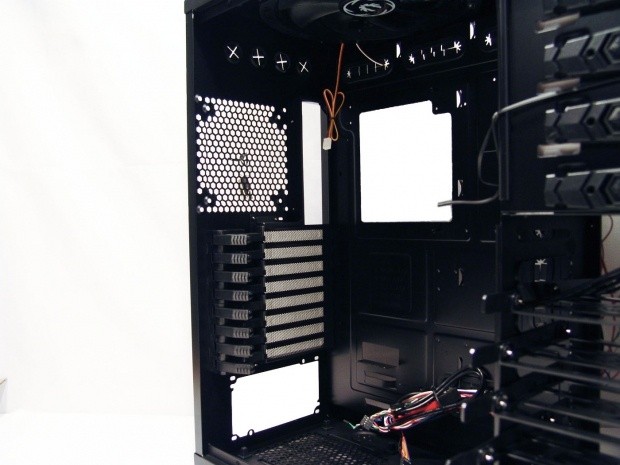
The S3 takes up the bulk of the top, but behind it is the large area that is covered in mesh. This allows the 230mm fan that is include to breathe, and allows the red LEDs to shine through. Optionally if you want to remove the 230mm fan, you can install a 140mm with holes already in the roof of the chassis.
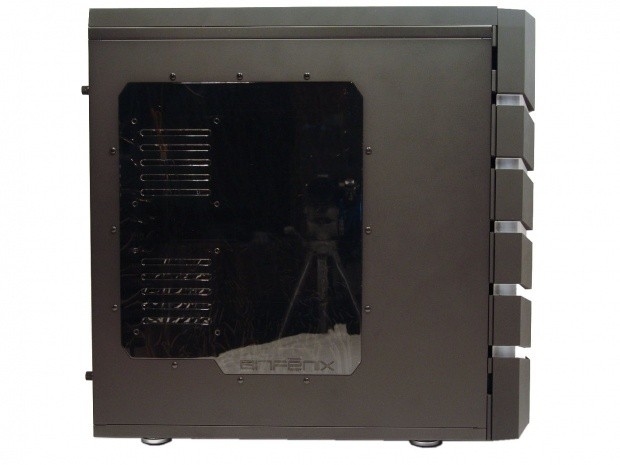
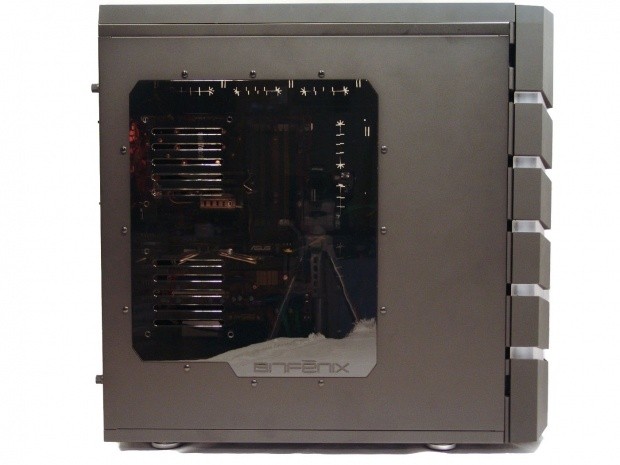
The lights are gone from the side and replaced with this large, tinted, window. The window allows for the placement of two 120mm fans as an option and places and etched "BitFenix" at the bottom right corner. Notice you don't have to look at the bays!
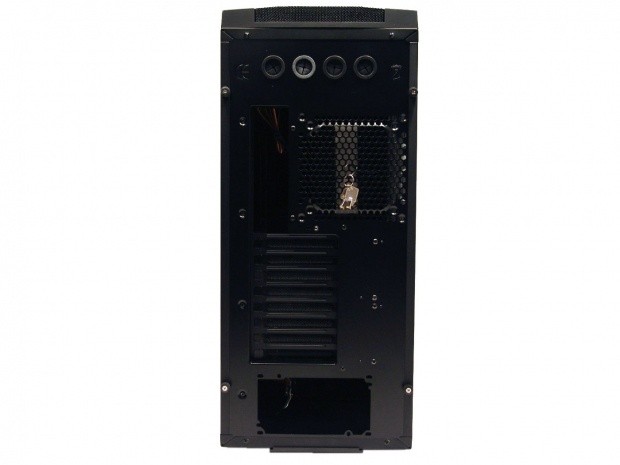
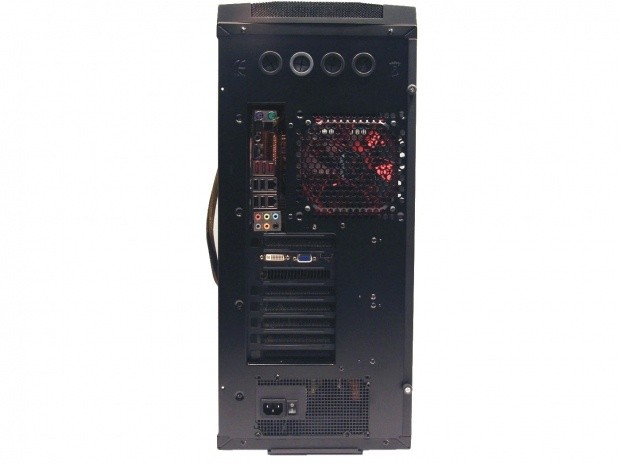
Around the back you will find four holes for water cooling above the 120mm/140mm fan hole that the keys got wired to. You then have eight ventilated expansion slots above the bottom mounted PSU hole.
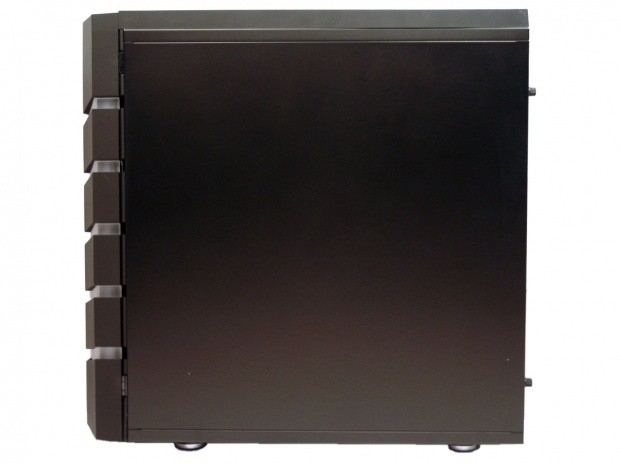
The right side panel looses the lighting as well, and is replaced with a solid steel panel painted to match the rest of the exterior.
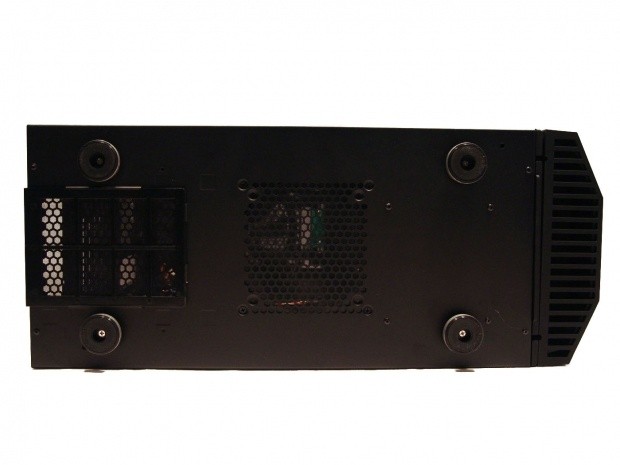
Under the chassis it gets supported by four large plastic feet with aluminum sides and rubber pads on the bottom. The PSU ventilation has a quick access dust filter, while the fan area in the front has an internal filter. This area will access either a 120mm fan or a 140mm fan.
Inside The BitFenix Colossus Window Full Tower Case
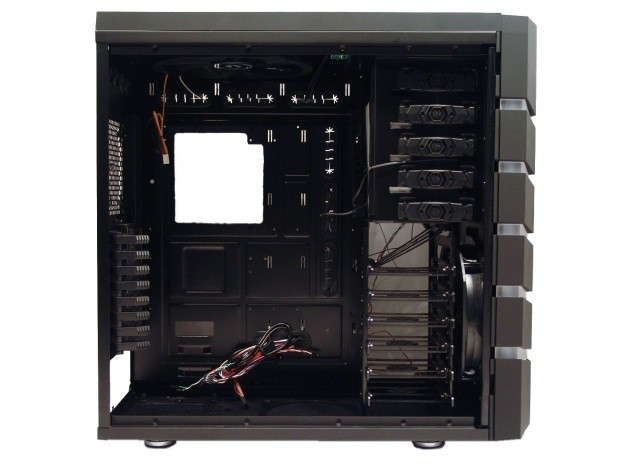
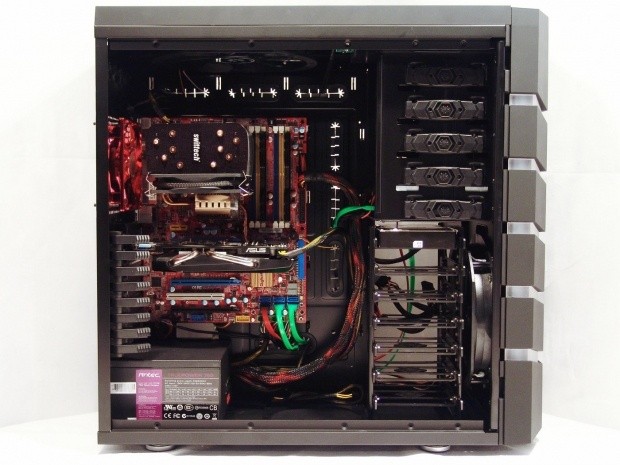
Inside the chassis there is an all black theme here. Every bit is painted or molded in black plastic to work inside the chassis. The wiring gets tied together and secured in the tray for shipping. The hardware can be found strapped in the optical drive bays.
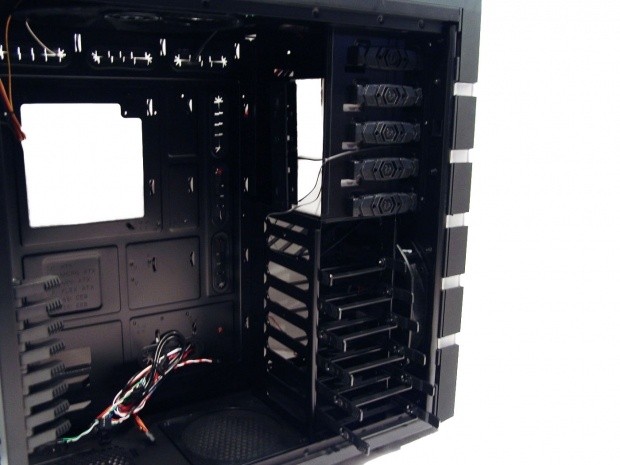
Behind the 230mm intake fan you have the drive bays. Five at the top will house 5.25" drives, one of which with an included tray can convert for a floppy drive. Below there is room for up to seven 3.5" drives, and with the holes in the trays you can also use them to mount 2.5" drives.
The motherboard tray comes with a few risers already in place, and depending on the motherboard type, the holes are clearly labeled to install the others if needed. The fest of the tray consists of a large CPU access hole with seven wire management holes with grommets and sixteen tabs to tie wires to.
It is a bit easier to see the 120/140mm mounting holes in the rear of the chassis from this angle. Below that you will find large plastic levers to lock expansion cards in place. These do make getting the lower two screws in an ATX motherboard troublesome, but not impossible.
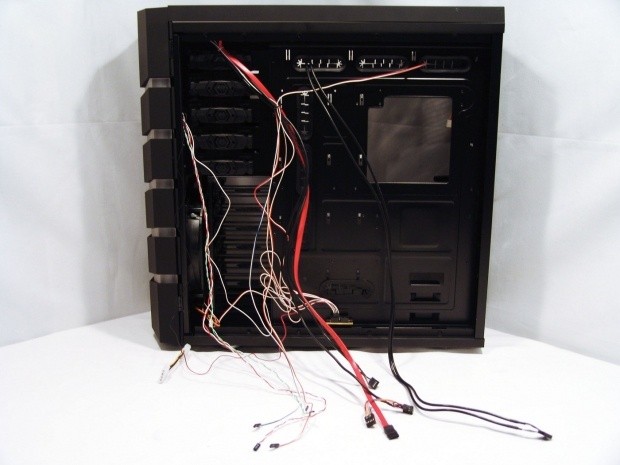
All of the front I/O and fan LED wiring all gets routed behind the motherboard tray from the factory. At this point you just have to tidy up the wiring and route all of these long cables to where they need to go.
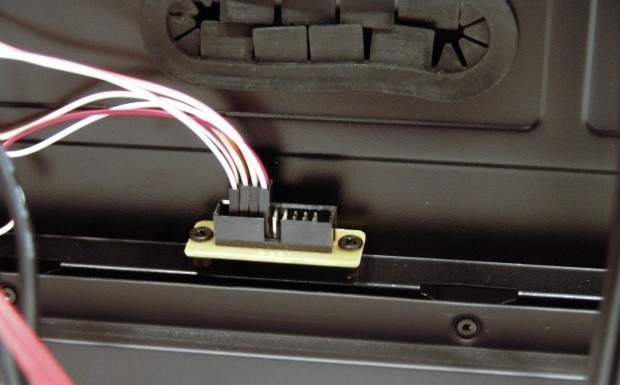
There is a built in LED controller for the chassis that also works with the Spectre LED fans from BitFenix. Do be sure to check out the wiring here in the manual, I found mine was not plugged in correctly.
Accessories and Documentation
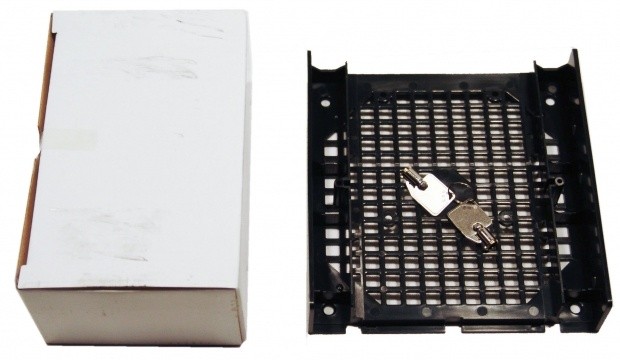
This is what was tied in the optical bays and the keys I pulled from the rear of the chassis. The keys go to the lock for the S3 compartment. Under it is the floppy drive adapter tray for the 5.25" bays. To the left is a white box that contains the rest of the hardware.
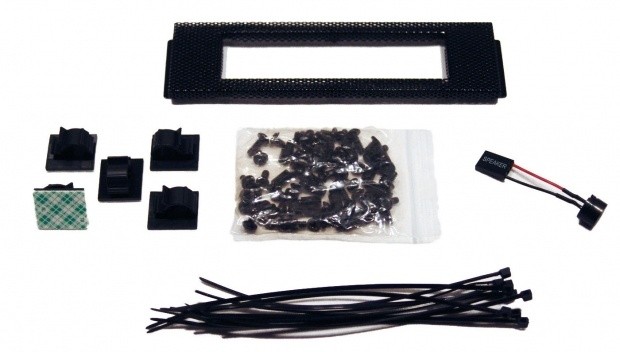
At the top there is a floppy drive adapter plate for the front of the chassis. Under it are five wire clips backed with tape so you can stick them anywhere you need them. The bag in the middle holds the risers and all the screws you will need to mount any and all devices in the chassis. Then you also get a motherboard speaker and a set of cable ties to keep things as clean as possible.

This manual is very well illustrated and shows handy things like the fan LED wiring diagram, how to remove the top of the chassis, and a full walk-through from beginning to end of a build.
The Build and Finished Product
Even with the drive in you aren't going to see it, as you simply close the door. I took a side angle shot to show you what 160mm of air cooler looks like inside as well. There is plenty of room for even the largest of air coolers inside.
All the wiring easily found a trail to run in and pop out where I needed them, leaving a very clean build inside. You have plenty of room to work, and plenty of room for water cooling if needed as well.
With all things the same as the last image, just placing the door back on, it really gives you an idea of the level of tinting it has. Until you light things up under power, the view inside is limited.
I know you never really see the back, but I do like when all things come together. With all the black components installed even the back of the chassis keeps that clean look.
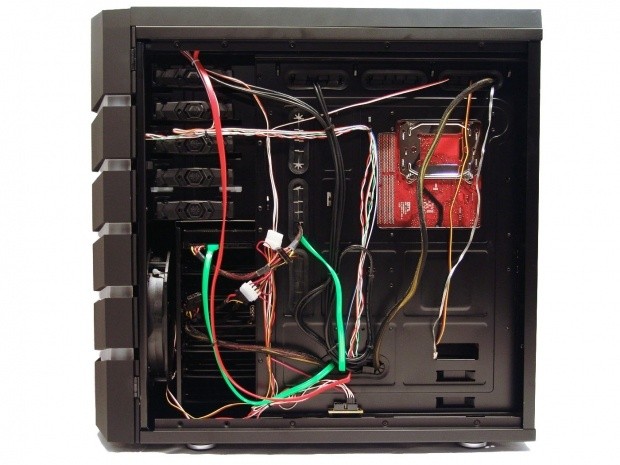
I took the wiring to extremes in this build, as it seems they are just going all over the place. I just wanted to show off a bit of how easy this chassis is to wire. Not only is there a ton of room to pass the thickest of wiring, all the punched out tabs keep them strapped in place.
Under power the chassis starts to glow. In this version the winged logo and the five bars turn red. The top fan also glows red but due to the tight mesh it is tougher to photograph. In the case of the Venom the lights will be green, and in the white version, these lights will be blue.
I don't have a ton of interior lighting so I figured I would just get a close-up of "potential"; as you can see the etched logo will brighten with LED lighting. Since the window is so dark, you can flood the interior with a lot of light before it wants to flood the room with those lights. If the LEDs bother you at night, the Spectre fans and the case LEDs can be shut off with a button in the S3 compartment.
Final Thoughts
I was sold on the original Colossus and I got one that was practically handled by everyone who went to their showings before they released to the public. Even with all the use and hands on it received, I still found that chassis to have all the right stuff to sell a chassis. It was unique, had a very cool lighting scheme in my opinion, and offered a tool-free installation. I like that the bulk of the chassis is kept from the original, and only a few options were done away with. There isn't a fan controller this time, or the option to change LED color or "pulse" them, and the Lockdown is not included. You do however get a very similar chassis without all the flash and a view of your components.
For those who referred to the original as a "lava lamp", here is your chance to get what most cases on the market today have. Even with this new release the Colossus Window does have a couple of downfalls. One is the lack of USB 3.0 connectivity; today it's almost a "must" in mid-range to high-end chassis design. While the 230mm fans are silent, and do a pretty good job at keeping the interior cooled, the tight mesh and a bunch of hard drives can really cut that flow down fast. I assume this is why there are so many options for fan positions and sizes so that you can customize the airflow with your choice of fans for the interior.
Simplifying the packaging, removing a bit of the "bling" of the Colossus while still offering us all the amenities and comforts of it, but this time with a view! In the end I found the chassis to be just as good as the original. Most of the added features I didn't use as I don't attend LAN events. The Colossus Window is more my style. I like the front lighting, I really like the window, and I still love the room to work that a well appointed full tower chassis offers. What makes this an even sweeter deal, is the potential savings even over the original Colossus. The Colossus Window in any of the tri of flavors can be found for a very reasonable $150. Most of the cases I tend to use day to day run in the $300 range, and this chassis offers what they have, with a unique twist on how it gets presented. It's a shame the availability is so limited, or this chassis would have scored much, much higher.

 MOAIPLAY ORA PRO G1 850W ATX 3.1 PSU Review: high efficiency and 10-year warranty for $119.99
 NZXT H6 RGB+ Compact Dual-Chamber Chassis Review
 Lian Li HYDROSHIFT II 360P OLED Curved Liquid CPU Cooler Review
 ID-Cooling FROZN A620 SLK CPU Cooler Review
 GAMDIAS Atlas P6 CG Dual Chamber Mid-Tower Chassis Review
 Assassin's Creed Hexe is reportedly going to launch earlier than expected
 NVIDIA's open-source NVK Vulkan driver gets experimental DLSS support in Mesa 26.2 for Linux gamers
 ASUS ROG Astral RTX 5090 reportedly causes discoloration on ASUS motherboard after six months
 Nothing has cancelled the CMF Phone 2 Pro's successor, blaming memory prices for making it unaffordable
 Intel Core 3 304 'Wildcat Lake' CPU appears on PassMark, matches the MacBook Neo
 Sony focuses heavily on AI in its recent summary, drops any mention of PC gaming
 Halo remake on PS5 requires two PS Plus subs for split-screen couch co-op
 Enthusiast attempts to install second 12V-2x6 connector on RTX 5090, is rewarded with a hole punched through the PCB
 Activision to release Black Ops 1 & 2 on PS4, PS5 to get past Sony's lack of PS3 backward compatibility
 AMD plans to increase the price of its graphics cards by 10-15% in the second half of 2026
 Speed Racer (2008) 4K Ultra HD Blu-ray Review: a stunning remaster of the cult classic
 Navman MiVue Smart True 4K Surround Dashcam Review - Seeing In All Directions At Once
 IQUNIX Magi96 Pro Aluminum Low Profile Mechanical Keyboard Review - Premium Build, Satisfying Sound
 Asetek Forte S-Series Racing Simulator Bundle Review
 Razer Pro Type Ergo Wireless Split Ergonomic Keyboard Review - Built for Comfort and Support
 ASUS ROG Strix Morph 96 Wireless Gaming Keyboard Review - Great Performance, More Affordable
 SAPPHIRE Radeon RX 9070 GRE PULSE OC Review - A New 1440p Challenger Has Arrived
 I stopped Windows 11 notifications from interrupting me with Do Not Disturb, Focus, and a priority list
 I read the Windows Backup app screen carefully, and it does not back up what most people think
 Low Sound Volume on Windows 11? How to fix audio issues and restore normal volume
 8 Critical Warning Signs You Should Never Ignore in Windows 11
 This Windows security feature protects Documents from ransomware, but it is off by default
 Windows 11 already has a voice typing tool, and it is the one most people are not using
 Quick Assist is the only remote-support tool I open when a relative calls about their PC
 The PowerToys utilities I keep enabled on every Windows 11 PC, and the ones I turned off within a week
 TweakTown's Best of Computex 2026 Awards - The Best Hardware, Gaming Gear, and AI