


Our Verdict
Introduction, Specifications, and Pricing
As we do, we tend to have a thorough look around the product page of a sample to see what sort of light the manufacturer puts the product in. Doing the same for this chassis, we found a dozen talking points about why someone should want to gravitate towards it. XPG brings up things like an Exoskeleton Design Language, innovative removable dust filters, ARGB elements sprinkled about, efficient airflow, optional vertical VGA installation, and they even mention cable management, which means there is something special going on there as well. XPG continues forward, explaining the compact nature of this mid-tower design, and again, goes on about the sleek front panel and its exoskeleton looks while at the same time explaining the ARGB lighting lends to its gaming DNA.
All of what you have read above is true, even if it is a bit of marketing spin to make it enjoyable to read. At first, we assumed the chassis we have in hand would be a rehash of the Battlecruiser or Invader that Shannon reviewed for us and did not expect too much. However, once we dug into the box, had a look online, and went back to Shannon's reviews, we soon realized how wrong we were. Of course, some things carry over, and on a functional level, they can do similar things, but how XPG has packaged the options they offer in this latest chassis is not typical of what we saw before. While this may seem like just another mid-tower chassis with tempered glass on the left side, we feel that XPG steps up and offers a chassis that is a notch above their earlier samples and is well worth a look.
Even if, at first glance, you look at the Starker Mid Tower chassis from XPG and, like us, you assume, you will be wrong. The Battlecruiser is in a different league, as it offers a ton of glass, a few fans, and costs a ton. The Starker is more of an evolution to the Invader, where it is similar in specs, although a bit bigger than the Starker, both are similarly priced and are direct competition in the market. In what the Starker Mid-Tower Chassis is billed to be, we cannot say it enough, take the time to get to know this chassis, as we feel that you may be surprised at just how much you get, with such little money invested in obtaining it.
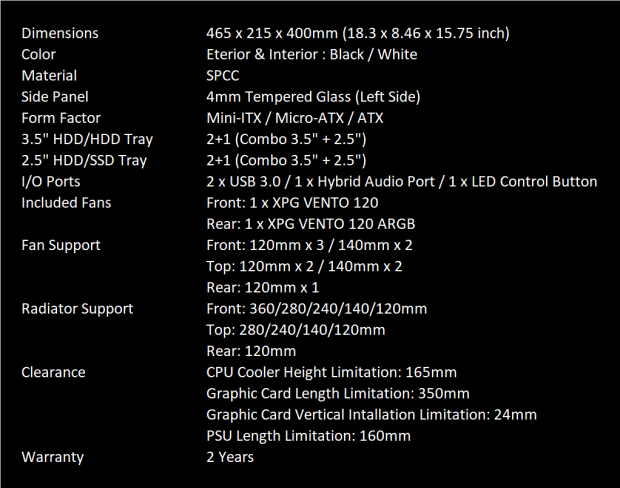
While we made this chart, it follows what can be seen on the product page in every detail. At the top of this chart, we find the measurements laid out, where we can see the chassis is 465mm tall, it is 215mm wide, and it is 400mm from front to back, and while technically correct, the height value does not include the feet, which takes the tower to 482.6mm overall. There is a choice of color, where XPG makes these in black, and like the one, we have, in white. The majority of the chassis is made of SPCC steel, which means that XPG opted for cold-rolled steel with properties that resist bending and warping and adding the chassis' structural stability. Other parts are made from various plastics, but the left side of the chassis is made from 0.4mm thick tempered glass, with just the slightest hint of tint added.
Best Deals: XPG STARKER Mid-Tower Chassis
You can install an ATX, Micro-ATX, or mini-ITX motherboard inside the main compartment, but storage is somewhat limited. XPG offers a 2+1 configuration, as they call it, but let us clear this up. If you wish to use a 3.5" drive, three locations support it. There is a drive cage under the PSU cover, which holds one 3.5" drive. There is also a plate hanging behind the motherboard tray, which can hold one 3.5" drive as well. The third location is on top of the PSU cover. For those who want to use 2.5" drives, the same drive cage that holds an HDD also supports a 2.5" drive on top of the cage. You can also use the plate behind the motherboard tray to house a pair of 2.5" drives, but only if you do not need a 3.5" drive there. As to the top of the PSU cover, there are a few options if you do not use all four screws to mount it. Still, otherwise, we see two locations for 2.5" drives there, again, if you are not filling it with a 3.5" drive.
The cooling of the Starker is handled with a pair of fans, as shipped. The front of the chassis has a VENTO 120 fan, a black on black 120mm fan, and not the gray-bladed model seen on the XPG site. What we see for the VENTO fans, whether vanilla or ARGB, they seem to share specifications. You get a 3-pin, non-PWM connector which allows the fans to spin at 1200 RPM, delivering 45.3 CFM at just 23 dB(A). The second of the two fans is an ARGB version hanging in the back of the Starker. The ARGB version has nine LEDs in the hub, and white fan blades carry the lighting out into the chassis. Carrying on with what can be done beyond the provided cooling, we will start in the front. You can use three 120mm fans or a pair of 140mm fans in the front, and radiator support matches the fan population. The top of the chassis is similar to the front, but here only two 120mm fans will fit, or you can go with a pair of 140mm fans, and again, radiator support matches the fans. The back of the chassis is the last place for fans, and here we are limited to just a single 120mm fan or radiator.
XPG also lists their chassis limitations. They tell us that 165mm is the tallest a CPU air cooler can be. Next comes the GPU length restriction at 350mm, but we also see another restriction called vertical installation limitation, which took us a minute to absorb. What this measurement is, is the measurement from the fingers on the GPU to the PSU cover. In essence, you have 24mm of height to connect the PCI-e extension cable to the GPU and not have it cause installation issues. The last restriction is for the PSU, which is 160mm, but depending on your storage needs, that can get much longer.
Our Latest Mid-Tower Cases Review Coverage
As many cases are, the Starker Mid-tower chassis from XPG is also backed with a two-year warranty against defects in workmanship, missing parts, damage during shipping, or premature death of the fans.
On paper, we have a reasonably decent set of specifications, descriptions from XPG make this chassis seem outstanding, and from what we have already seen, the Starker is a solid contender in the mid-tower market. Unlike either of the cases TweakTown has reviewed from XPG, the Starker is the most affordable so far. Current pricing at Amazon has the Starker selling for $79.99, and that holds true for the black version or the white one. Knowing the chassis market over the last decade, under $80 for a gamer chassis versus a builder chassis is a good deal and does not set the bar high for XPG. However, even without that bit, we feel you will be impressed with everything that can be done and just how good it looks when full of gear and on your desk!
Packaging
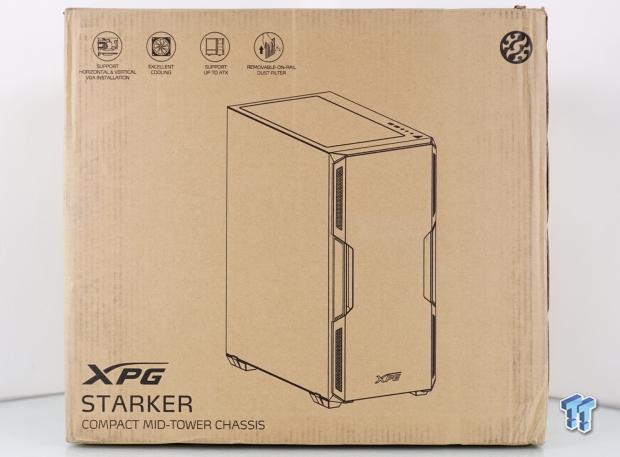
The XPG Starker Compact Mid-Tower Chassis is shipped in a plain brown box, where black screen printing is used to deliver information. At the top, we see the mention of horizontal and vertical GPU mounting, excellent cooling, support for up to ATX motherboards, a removable on-rail dust filter, and way off to the right is a tiny XPG logo. The bulk of the panel shows us the rendering of the Starker but leaves much to the imagination.
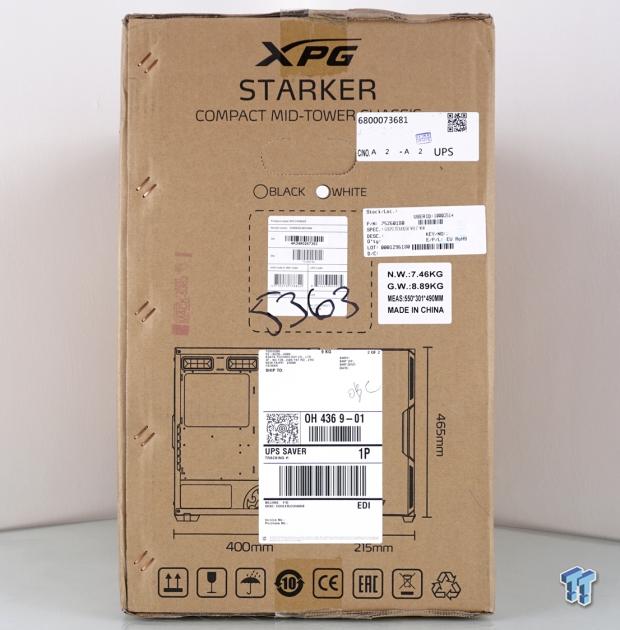
The company name and product name top this panel, and we see a sticker in the circle next to white, denoting the color of the chassis inside of this box. While shipping labels litter this panel, we can see bits of the pair of renderings with dimensions of the chassis shown. Notice the 465mm height stops at the top of the foot.
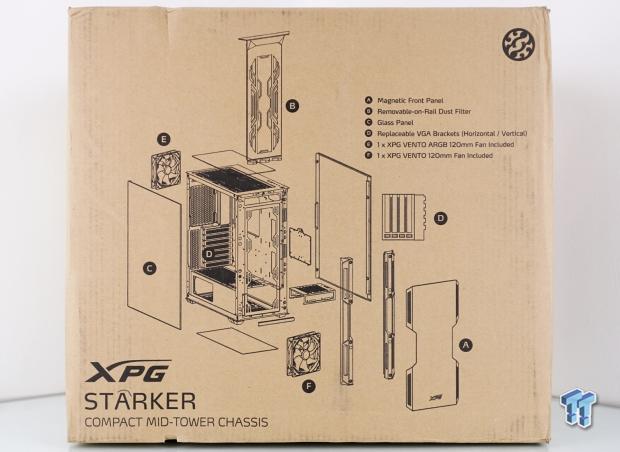
Looking at the back of the box, we see a small logo at the top-right, and the chassis name at the bottom-left, with an exploded diagram of the chassis using up the rest of the panel. All of the essential parts are labeled, and corresponding descriptions can be found to the right of the rendering, explaining what each component is.

The specifications offered on the side of the box differ slightly from what we saw online. The first is an addition, where we now see seven expansion slots when used horizontally, but when opting for the vertical mounting bracket, slots are reduced to four. The other difference is that the warranty is not mentioned anywhere on the box.
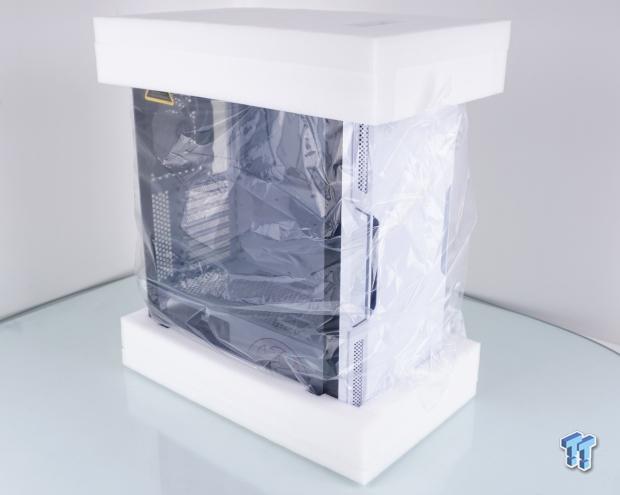
To keep the Starker safe in transit, XPG employed dense open-cell foam for the caps at the top and bottom of the chassis, which can absorb bigger hits, and the foam does not break on impact. The paint and plastic bits are protected by the clear bag enclosing its entirety. The tempered glass gets an additional outer layer of protection from a cling film applied to it, and on that is a warning sticker covering the fact that the glass you are looking through is indeed made of glass and should be treated gently. All told, everything worked as intended, as our Starker showed up to our door in perfect condition.
XPG STARKER Mid-Tower Chassis
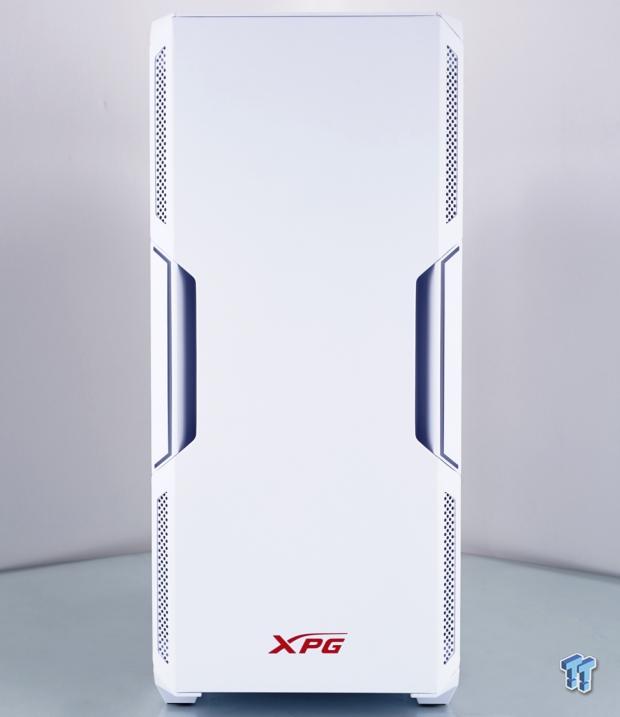
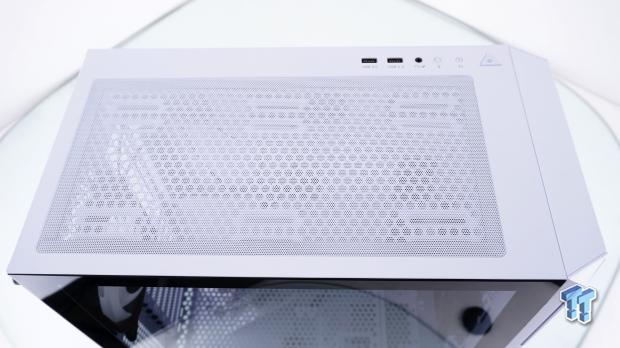
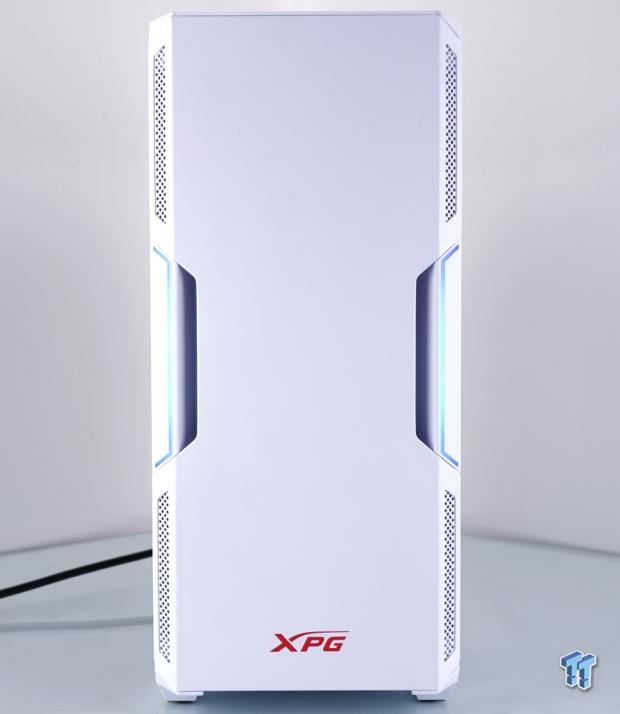
The front of the XPG Starker delivers a near-solid front panel, painted white, with just the XPG name in red at the bottom. Both sides are angled away from the midsection, where we see round-holed ventilation at the top and bottom of either side. In the middle, on both sides, we first see an opening of intake, but as we move towards the edges, we also see a skinny strip of plastic following the opening shape, which are bits that can be illuminated later.
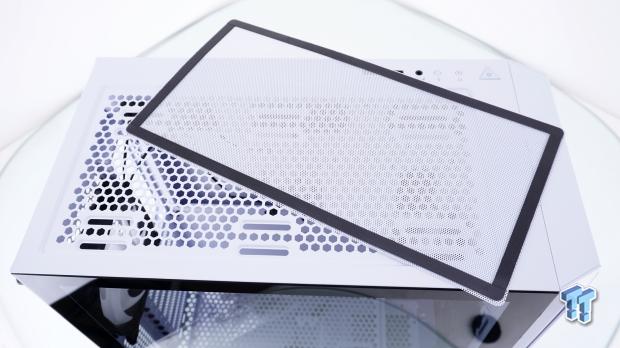
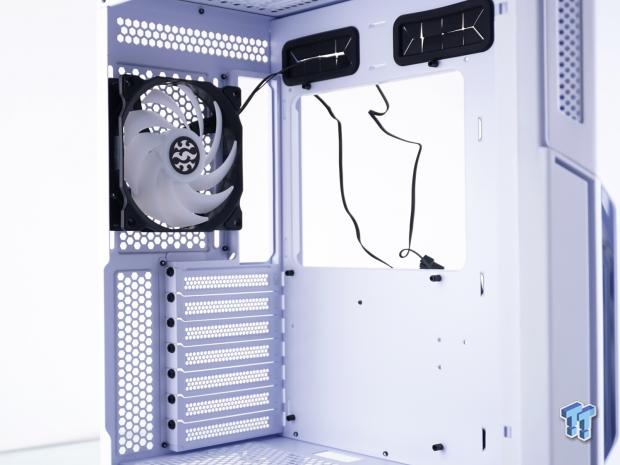
The metal cover plate that gives the front all of its aesthetic appeal is magnetically attached to the chassis and is easily removed. Behind the cover is an extended one-piece dust filter, which rides in rails and is removed by pulling the filter out of the top of the chassis. Just behind the filter is the intake fan, mounted in rails that accept 120mm and 140mm fans.
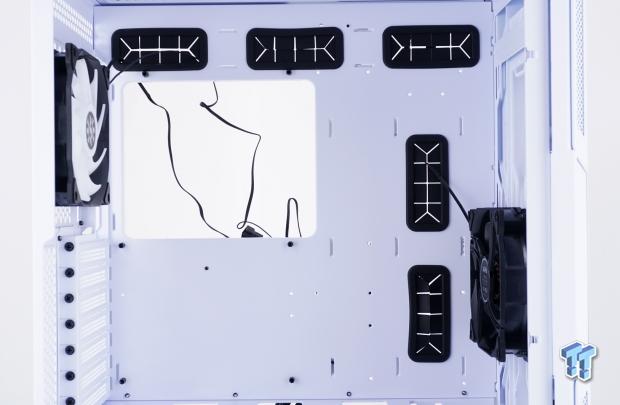
The bulk of the top of the Starker is opened up for ventilation and has a cover over it, made of plastic, with the same-sized round-holes we saw on the front. To allow for so much open area, XPG moved the front I/O panel off to the side, fitted it into the gap behind the motherboard tray, leaving the front of the chassis wide open.
The cover is magnetically attached to the top of the chassis, making it easy to remove and clean when needed. However, one downside to this type of cover is that when you use rounded screws for AIO installation, it distorts the look of the surface once placed back on over them.
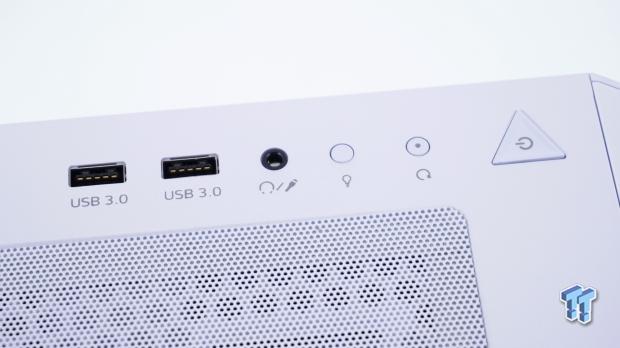
The front I/O panel offers up a pair of USB 3.0 ports at the left, immediately followed by the headphones and microphones single 3.5mm jack. We then hit buttons as we continue to the right. The first button is to change the optional eight static colors, one of four modes, or turn them off. The next button is the reset button, and the triangular-shaped button is a blue LED backlit power button.
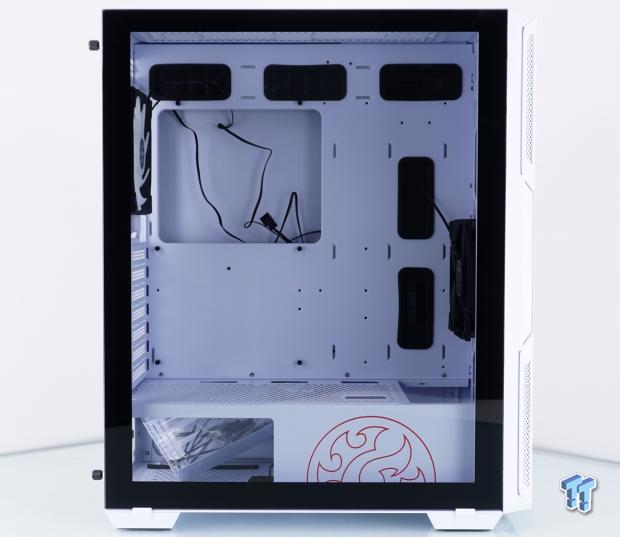
This view of the left side of the chassis shows us that there is nothing to block the view of the interior. The tempered glass panel does have a painted edge to block the view of the frame, and around the exterior, all we see are the feet and the front of the chassis, and we can tell there is the slightest bit of tint added to the glass. The panel rests in ledges built into the feet and is secured with thumbscrews at the back.
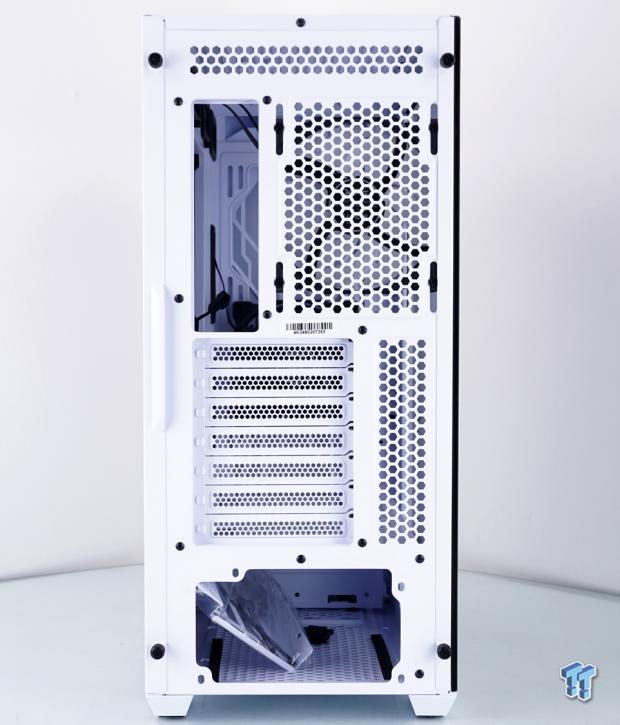
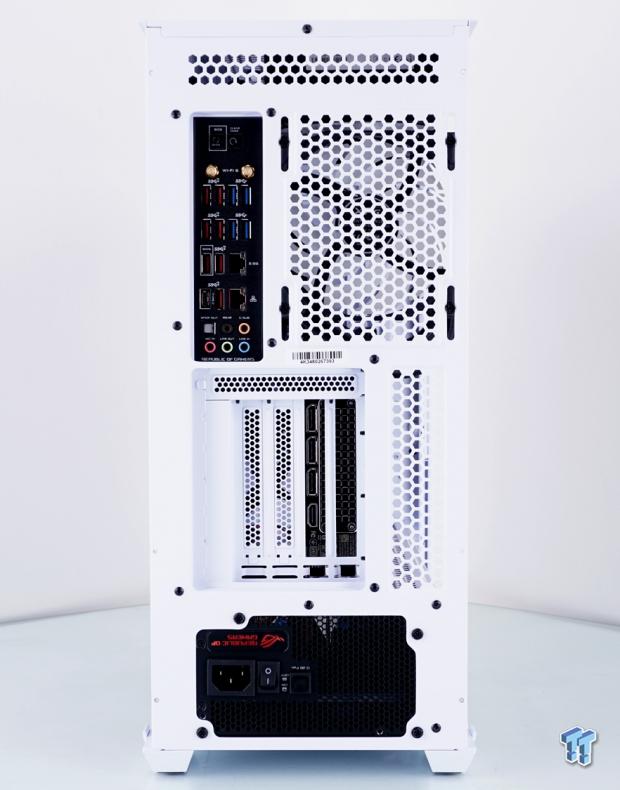
The back of the chassis starts with a section of ventilation at the top, which offers the offset to allow for liquid cooling to not conflict with the motherboard. We then see the rear I/O opening and the exhaust fan location, which sits above the seven expansion slots, with passive ventilation next to them. The bottom of the case is used to house a PSU, but as you can see, it does not install from the back of the chassis.
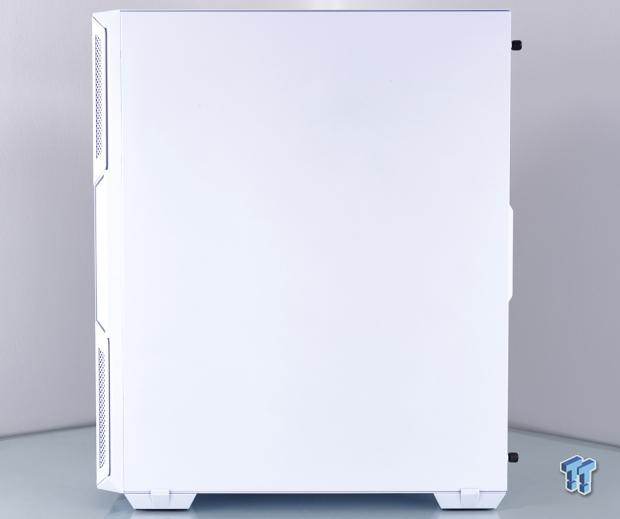
The right side of the chassis is made from a solid steel panel, which in this instance, has been painted white to match the rest of the case. Not only is it attached to the chassis at the back via thumbscrews, but it also has a finger grab built-in for the steel panel, and we love how tight the body lines are along the top, front, and bottom edges.
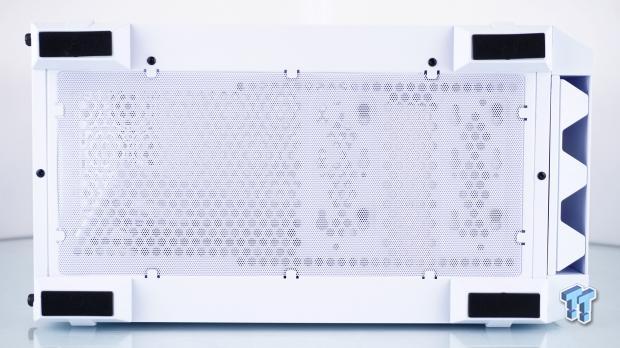
Under the Starker, we find some things we don't care for that much. Rather than using rubber for the feet, XPG opts for a foam foot, much like the consistency of foam tape. While it will protect surfaces, it may also get torn off much easier. We also see that the bulk of the bottom of the Starker is open for ventilation, which is good, but we feel the tabbed style filter is a bit last decade and a pain to deal with when full of gear. We would much rather have a matching removable on-rail filter.
Inside the STARKER
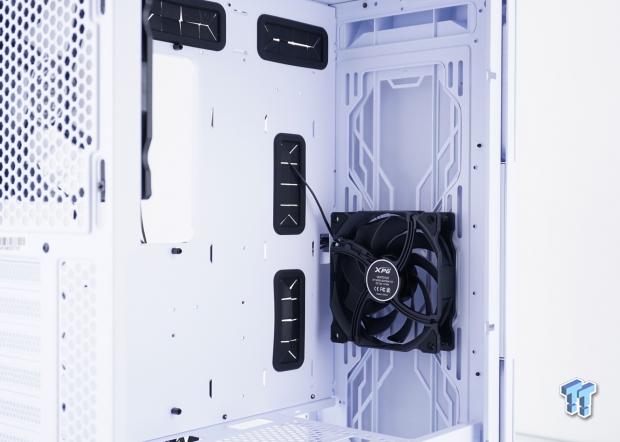
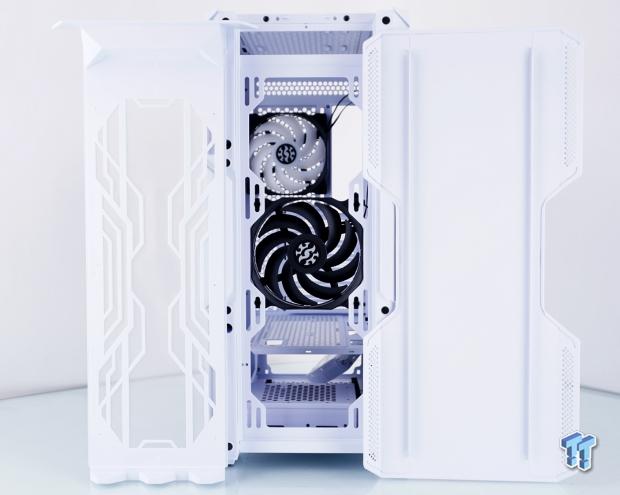
The inside of the front of the chassis shows us the single VENTO 120 DF12025S-12LFS3A-03 120mm fan that is pre-installed. As we mentioned, you can use three 120mm fans here or a pair of 140mm fans. But also notice that the PSU cover has been cut to install thick radiators and fans without much trouble.
The motherboard tray offers us five large access holes around the motherboard, which have grommets in them. All of the motherboard mounting holes are there, although they are not labeled. The CPU backplate access hole is large, and we can see sixteen wire tie points to help with wire management.
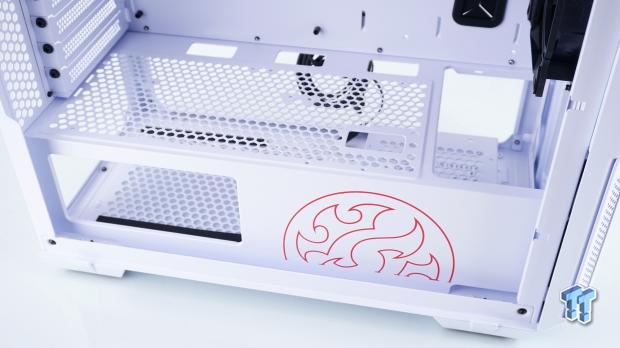
The PSU cover has a ton of ventilation on the top, and over that, one can install storage drives if desired but is also open near the motherboard tray to wire the bottom of the board, and there is even a hole in the top for GPU leads to go through it. On the vertical side of the PSU cover, the left end is open so that you can show off the PSU behind it, and near the front is the majority of the XPG logo, again in red, to match the front of the chassis.
The back of the chassis shows us a few things. First, looking above the rear I/O opening, we can gauge how tall the case is above the board for water cooling. Second, we noticed that the 120mm fan in the back is not just ARGB, but it is also adjustable to help with pulling air from where it is needed most. The third thing to mention is the expansion slots. As shipped, we get to use seven slots for video cards, sound cards, and storage, whatever you need.
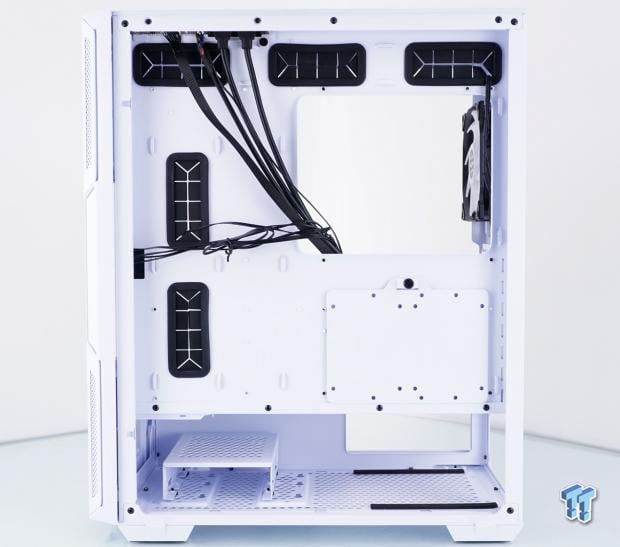
A view behind the motherboard tray shows us a few things as well. Starting at the top, where we see the I/O cables coming down from the top, they will almost wire manage themselves. Speaking of wire management, the sixteen tabs to tie up wires are bent this way and not usable from the other side. We also see a storage plate below the CPU cooler access hole and that the bottom of the chassis is wide open for PSU and storage access. Oh, right, we almost forgot. The depth behind the motherboard tray is 23mm at maximum, some places less.
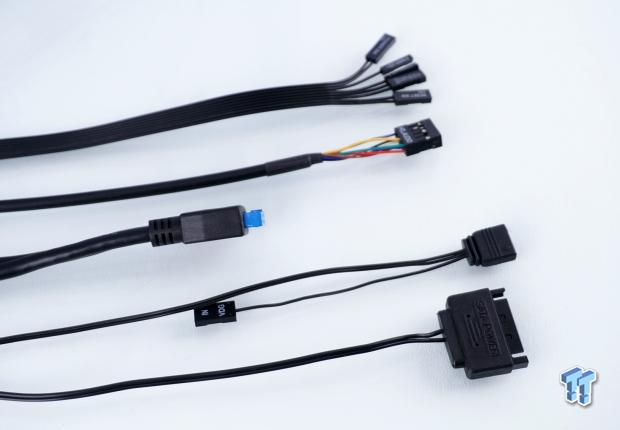
We did omit the fan power, and ARGB connection leads from this image, but we show all of the front I/O cabling. Nearest to us is the SATA power lead to power the ARGB lighting controls via the chassis, and just above is the 3-pin 5V ARGB connector for motherboard control. We then get the native USB 3.0 connector with the HD Audio connector above that. At the top is the ribbon cable of reset, power, HDD LED, and power LED connections.
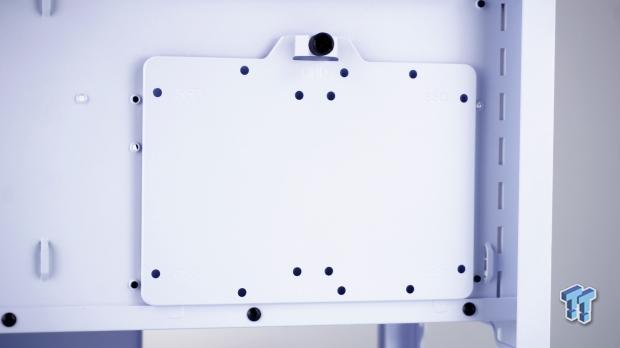
The tray that hangs just below the CPU cooler access hole is held in place with tabs at the bottom and a thumbscrew at the top. On the flat surface facing us, we see spots to mount an HDD on its side, or two 2.5" drives next to each other.
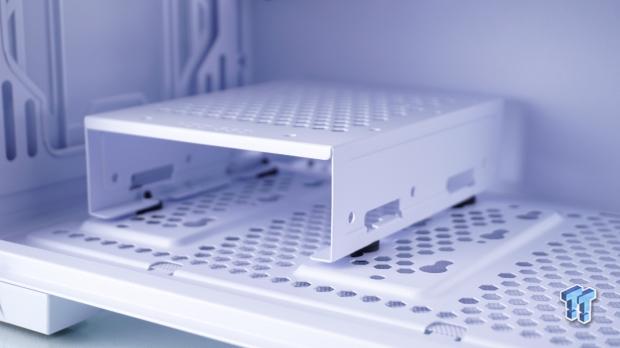
The HDD cage is not permanently mounted, as it uses grommets and screws with keyholes in the floor of the chassis to be slid out this side of the chassis, and as we can see, it shifts left or right, depending on the PSU length. This cage will house a 3.5" drive inside of it, but it can also hold a 2.5" drive on the top. Keep in mind, if you run into issues with too much PSU length and the water cooling is taking up the front, this cage can be removed to allow it all to happen.
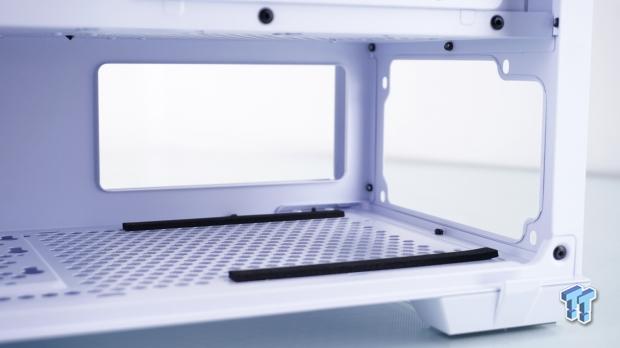
When it comes to the PSU installation, you will need to slide the PSU in from this side of the chassis. Make sure to be gentle when sliding it in, as the foam strips taped to the floor are squishy, and sliding the SPU across them can rough them up and tear them. They work great for sound absorption, but care is advised.
Accessories and Documentation
Installation and Finished Product
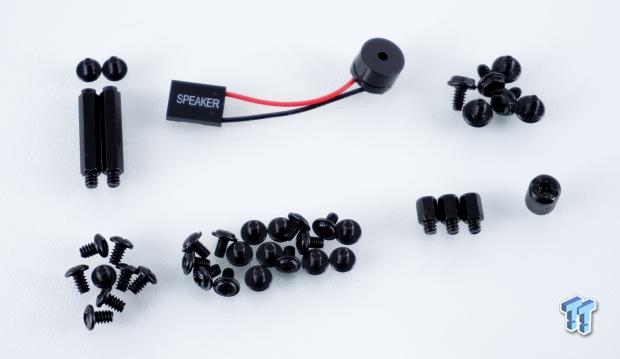
Even though they came in the box, ignore the bits to the left of the motherboard speaker, as they are not used in any way with this chassis. On the right of the speaker is a set of six hex-head screws used to mount the PSU. In the bottom row are the eight HDD screws, the seventeen motherboard screws, three standoffs, and a socket to help you install them using a Phillips screwdriver.

If you remove the bottom six horizontally installed expansion slot covers and then replace them with the bracket on the left, you can transform those horizontal slots into four vertical slots. However, you will also need to purchase a PCI-e extender cable to use this bracket, as one is not included in the box. To the right is a group of eight long wire ties to help with cable management, but you may also want a few more, as there are sixteen places we can tie wires to.
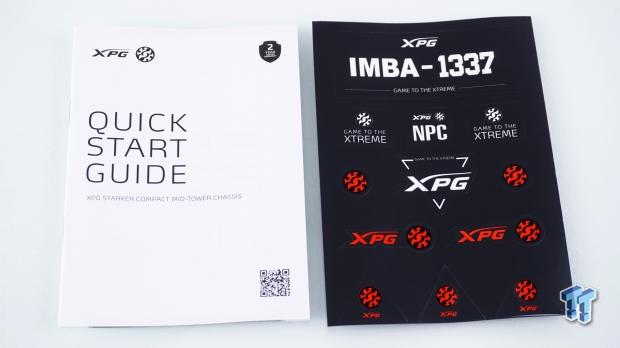
The manual at the left is thorough. It starts with the contents and accessories, moves into an exploded diagram, delivers specifications, covers the I/O buttons and cables, explains the chassis ARGB lighting and how it works, and even covers the limitations again. Short text descriptions and many renderings move you through the build process, ending with the cleaning, safety, and warranty information, which are repeated many times in this guide. Along with the manual, in the same bag, we also found a sheet of stickers on the back of a card welcoming you to the XPG team.
Test System, Installation, and Finished Product
- Motherboard: ASUS ROG DARK HERO (AMD X570) - Buy from Amazon
- CPU: AMD Ryzen 5 3700X - Buy from Amazon
- Memory: Team T-Force XTREEM ARGB 3600MHz 2X8GB
- Graphics Card: NVIDIA GeForce RTX 3070 FE - Buy from Amazon
- Storage: Sandisk SDSSDXP120G SSD
- Case: Hydra Bench Standard
- Power Supply: ASUS ROG Thor 850W - Buy from Amazon
- OS: Microsoft Windows 10 Home 64-bit - Buy from Amazon
- Software: AMD Ryzen Master, AIDA64 Engineer 6.32.5600, and CPU-z 1.94.0 x64

We opted to use our AIO at the top of the chassis, and in doing so, nothing changes with the front of the chassis to show by opening things up. We left the pre-installed fan right where it was, taking advantage of the open vents in the middle to gain access to the most airflow it can get.
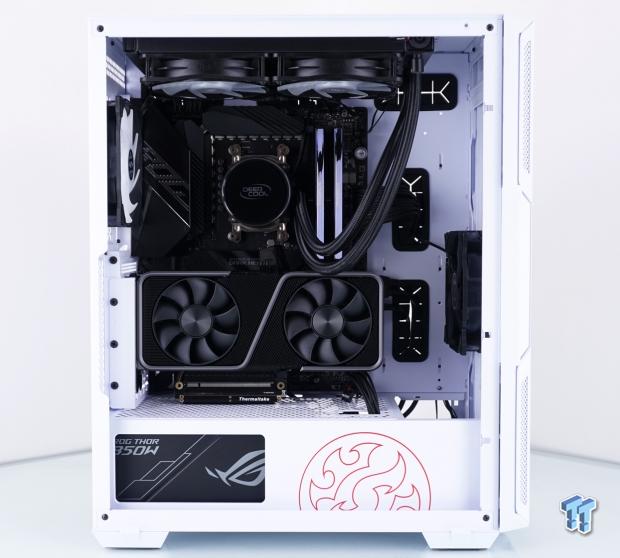
Beyond loving the high contrast of a white chassis and black components, we found no issues along the way with the build process. Our AIO fits in the top without any conflict to the motherboard or the RAM, and as for the motherboard, it aligns with the help of a studded standoff in the middle, allowing you to hold the board in place while using the other hand to screw it in. We did opt for the vertical GPU mount, as we have a PCI-e extender cable, and found it just fit that 24mm limitation. Even at the bottom, while not the best side of the Thor PSU to view, it is a wide opening that allows all of the text and most of the logo to appear.
The fan wires tend to try to get in the way of the rear I/O panel, but that wasn't anything we could not overcome. We tried the horizontal mounting and found nothing wrong with it, and the sag was kept at a minimum. The vertical GPU system does not offer support at the far end; it is the bracket that takes all of the weight, so be sure to use all of the screws when mounting it into place. The PSU slides into place with just a bit of effort not to slide them on the foam strips, but once aligned and mounted; we have nothing to complain about.
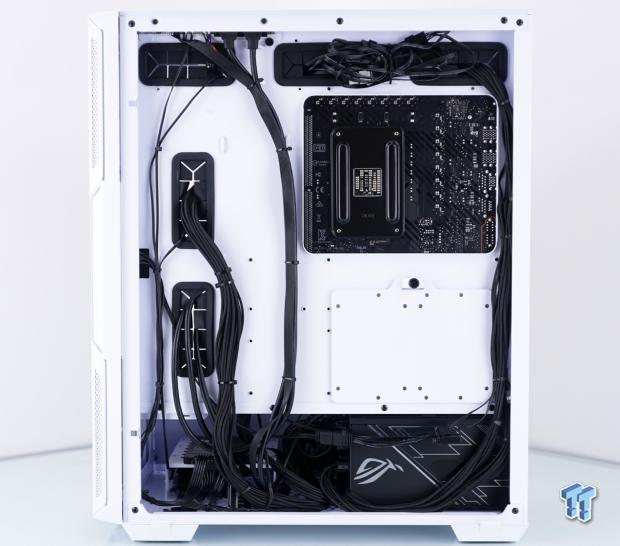
Behind the motherboard tray, the wire management tabs are set up so that you can wire the case, wire the PSU, and keep it separated, should you need access to swap parts later. With 24mm of room, we can easily bundle the AIO lighting and fan power wires at the top, run the 8-pin leads down the right side, and even have the 24-pin lead running without conflict to the door panel. If you plan to use the HDD/SSD plate, the wires will either come off the left edge or, when using smaller drives, the SATA power, and data cables will hang down next to the PSU.
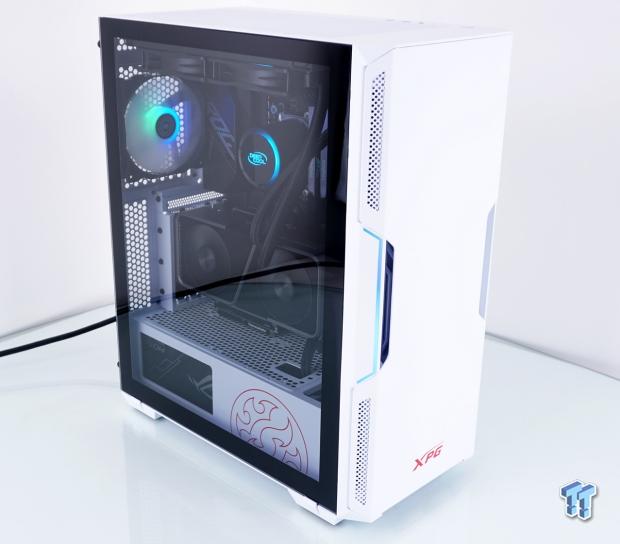
With the rip around the Starker completed, the next obvious thing to do was to add power to the system and see what shakes. Doing so has the ARGB stripes at either side of the chassis flowing from the bottom to the top as it cycles through colors.

From this angle, we can see that the front of the chassis, the AIO head unit, and the rear chassis fan are all in sync and delivering a fair amount of glow inside and outside the chassis. If you do not want the chassis to be in rainbow mode or synced to anything else, you still have the chassis button that can use one of eight colors, one of four modes, or can be turned off altogether.
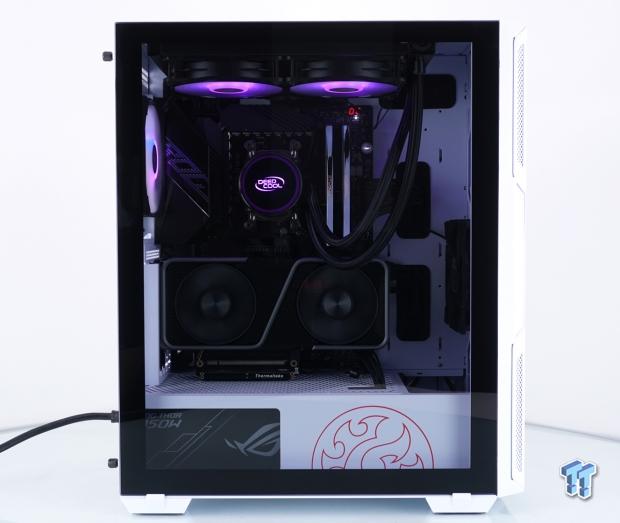
If you were wondering what the chassis looks like as you are gaming on it, we snapped this image to help show it in that sense. In all honesty, we would likely flip the PSU over so we can see the power display, which, just like everything else, shows nicely through the tempered glass panel.
Final Thoughts
All we can say is that from our early assumptions to the chassis we got to at the end were two completely different things. We built a spare PC with the Battlecruiser and built another in the Invader for a friend. In our mind, both were decent cases, each with minor niggles here and there depending on how you wanted to use the case, but both are respectable in their own right. However, we feel that the Starker has them both beat when building the average gaming system. We tried every option, all of the storage configurations, the GPU orientations, and the only issue we ran into in these resects was finding a short screwdriver if we wanted to mount storage drives on the PSU cover.
Everything else works as it is intended. All of the wiring for the fans comes connected in a daisy-chain fashion, and we advise you to pay attention or mark the wires, as you will need to pull them apart for clean wire management, as out came twisted and intertwined with other cables. The HDD cage is movable and removable, and with two additional locations for drives, you can use a long PSU and a 360mm radiator in the front at the same time.
The Starker is solid, not just overall with the doors closed, but when gutted as well. We have seen quite a few budget-friendly cases in this price range, and we feel that XPG offered up a good feature set for the cost. Are there parts we would change? The simple answer is yes, but only three things. The bottom dust filter is lame. Using tabs makes it a pain in the rear to remove when the case is upright and even harder to replace. They made such efforts for the front of the case, then falls flat at the bottom.
The top cover is also one thing that irks us, as many will use that area as we did for liquid cooling. Once the radiator is installed, the rounded screw heads will make the cover wavy, which we do not like. The last thing is less of a change and more of an addition. If you offer vertical GPU orientation, you should either include or supply upon request for the parts needed to take advantage of said options.
Beyond our takes on certain parts, we have thermal results and noise levels to cover. When we loaded the system, the delta for the CPU was a +7.7°Δ over open-air results, and in doing so, the fans on the AIO had to increase 150 RPM to help offset that increase, which means more noise from the AIO fans. When testing, we looked at the VRM temperature and were shocked to find that inside of the Starker, the PWM has a -5.4°Δ over open air. The last thing to consider is our GPU, which runs at a 0.4°Δ over open-air, with similar fan speed. Although the noise level of the AIO increased to cope with the extra heat, the chassis fans run off of a 3-pin header, which means they run at full speed all of the time they are powered. The fans in our Starker were spinning at 1333 RPM but deliver only 33 dB to the office, at idle, or at full load.
Considering that one can build something very similar to what we did and take advantage of the included ARGB to help spread the lighting system-wide is something many will enjoy. While this idea is nothing new, we feel that XPG hit the nail on the head in many respects. It is nice to look at, offers ARGB, and they took the essence of what is needed, kept to the KISS principle, and came up with something that is all of these things and affordable.
One thing that needs addressing is the CPU thermal results, which are higher than those we have tested. It is not a deal-breaker. Should you opt for stock cooling or an inferior aftermarket cooler, this issue could compound and needs to be discussed. Beyond that, there is much to like with the XPG Starker, which is a case we have no problems recommending, even if we advise a more robust CPU cooler to go with it.
 Lian Li B4-mATX Review: a compact mATX SFF case with excellent airflow and premium features
 Ocypus Sigma F36 BK ARGB Cooling Fan Review: high airflow and unified design in one frame
 PCCooler CPS RZ820 Display Review: a flagship-level CPU air cooler with an LCD screen
 MOAIPLAY ORA PRO G1 850W ATX 3.1 PSU Review: high efficiency and 10-year warranty for $119.99
 NZXT H6 RGB+ Compact Dual-Chamber Chassis Review
 Apple is preparing 11 new Macs, including touchscreen OLED MacBooks
 Bethesda union files legal complaint calling Fallout announcements a smokescreen for labor law violations
 Sony silenced developers with a social media gag order over PlayStation disc backlash
 NVIDIA confirms the first RTX Spark laptops and when they will release
 You no longer need a Steam account to buy someone a Steam game
 Ubisoft adds 80+ games to the Xbox PC Store without Xbox achievements
 Hacked NVIDIA RTX Spark drivers make an RTX 4060 run on Windows 11 Arm
 Microsoft is changing the classic File Explorer 'right-click' Properties in Windows 11
 iPhone Fold vs Galaxy Z Fold 8: Apple's first foldable could be $600 more
 MSI launches its epic $7,000 Titan 18 HX Dragon Edition Draco Epic gaming laptop
 Thrustmaster T.Flight HOTAS 5 MSFS Edition Review
 SteelSeries Arctis Nova Pro Omni Wireless Headset Review - One Headset to Rule Them All
 SteelSeries Arctis Nova 7 Wireless Gen 2 Headset Review - New and Improved, But Is It Enough?
 AMD Ryzen 7 7700X3D Review - Days of Future Past
 Samsung 990 2TB SSD Review - Ninth Gen QLC at PCIe Gen4 Speeds
 ASUS ExpertBook Ultra (Panther Lake) 14" Business Laptop Review
 ASUS ROG Raikiri II Xbox Wireless Controller Review - Ready to Take Control
 MOZA FMP18 Panel Bundle Review: authentic F/A-18 Hornet cockpit controls for flight sims
 Micron 6600 ION 245.76TB Enterprise SSD Review - Best in Class Programming Speeds
 MOZA MA3F EFCM Flight Control Module Review: authentic Airbus A320 autopilot panel for simulators
 6 Mistakes to Avoid When Buying a Windows Laptop
 I capped Windows Update's bandwidth with Delivery Optimization, and my downloads stopped choking
 I use this decade-old free tool that finds files faster than Windows Search does
 I install and update most of my apps with this Windows command now, and I stopped downloading sketchy installers
 Hisense U6SF 65-inch MiniLED TV: High Performance Meets Leisurely Convenience
 I stopped digging through Windows menus after I set up this one folder
 Don't sell your Windows laptop until you do these things
 6 PC cleaning mistakes to avoid for safer hardware maintenance
 Phison and Intel Take Aim at Local AI's Memory Wall with aiDAPTIV
 How to Remap Keyboard Keys in Windows using Microsoft PowerToys