


Our Verdict
Introduction, Specifications, and Pricing
With a huge surge in the market for anything streaming related, Corsair has been on top of the situation after gobbling up Elgato and pushing these products to the forefront. However, not everyone wants a stream deck, not because it cannot do what they want it to, but because of the size and the room, it can take up on the desk. While what we have in hand is not specifically a dedicated stream deck, it can be used as one, along with a ton of other features to keep any iCUE product user happy for a long time to come.
The most basic gist of this sort of a product is to allow users to not only have access to iCUE software functionality without the need to stop what it is you are doing, opening iCUE, which is not the fastest software to load and be able to control any connected iCUE device just by reaching to the back edge of any of the current Corsair keyboards! However, the touchscreen Corsair has developed is not just for software control, as it is fully customizable for things like Macros, G-key usage for keyboards without that functionality, as well as many other things, very similar to the likes of the Logitech G19, but rather than to be locked into specific tasks, with limited functionality, this time around, your imagination is the only limiting factor!
Even if you are one who is already part of the iCUE environment, or you do not have a compatible Corsair keyboard, the iCUE Nexus Companion Touch Screen is still a worthy investment, as it can also be used as a standalone device with an optional base that also comes in the box. With the use of a spare USB 2.0 port for power, anyone can have a five-inch diagonal LCD screen that allows for not only a full assortment of programmable options but one can simply swipe through a multitude of screens and, with a touch, can enjoy the benefits of extending the functionality of the PC in gaming or while working, all while eating up as little real estate as possible!
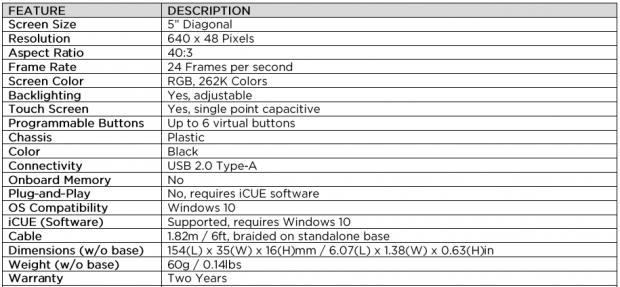
Following the specifications chart found in the reviewer's guide, as what is located on the product page is laughable at best, we see that Corsair measures this 640 by 48-pixel screen as a five-inch diagonally measured model, with a 40:3 aspect ratio. Even the frame rate is covered, albeit only 24 FPS, but the color options are RGB with 262,000 colors. Backlighting is adjustable, and as the name of the product suggests, this is a single point capacitive touchscreen, which offers up to six virtual buttons per screen, with a cap of 200 screens overall!
The touchscreen is surrounded by black textured plastic, and so are the optional base and brackets, which allow the iCUE Nexus to be attached directly to Corsair keyboards! Connectivity is handled with a very short USB 2.0 cable, which is braided, intended to be plugged into the keyboard's pass-through port. Still, with the optional base, you plug the iCUE Nexus into the base, and the base comes with a six-foot cable as any other peripheral would. While the iCUE Nexus requires iCUE software for functionality, the unit, by itself, is only 6.07 inches wide, 1.38 inches deep, and a thickness of 0.63 inches. The base is only slightly wider, deeper, and thicker, as the base is very form fittings to the iCUE Nexus. All told, the iCUE Nexus weighs in at 60 grams and is backed with a two-year warranty!
Best Deals: Corsair iCUE Nexus Companion Touch Screen
Pricing is something that may shock you at first, as the $99.99 cost is a bit on the high-end for such a small product. However, once you see what can be done with the iCUE Nexus, the price is less abusive than first assumed! With the ability to do just about anything, using either a swipe or a tap to surf through and use, not only predefined options for other iCUE devices but over 200 screens in total that you can set up and customize, the possibilities and abilities of the iCUE Nexus are truly astounding!
Chad's Peripherals Test System Specifications
- Motherboard: MSI B450M Bazooka Plus - Buy from Amazon
- CPU: Intel Core i7 8700 - Buy from Amazon
- Cooler: Corsair H100i Pro - Buy from Amazon
- Memory: Corsair Vengeance RGB Pro 2666MHz 16GB - Buy from Amazon
- Video Card: MSI GeForce RTX 2080 Ventus 8G OC - Buy from Amazon
- Storage: Corsair Force MP300 480GB - Buy from Amazon
- Case: Corsair Crystal Series 280X - Buy from Amazon
- Power Supply: Corsair CX750 80 Plus Bronze - Buy from Amazon
- OS: Microsoft Windows 10 Professional 64-bit - Buy from Amazon
Packaging, Accessories, and Documentation
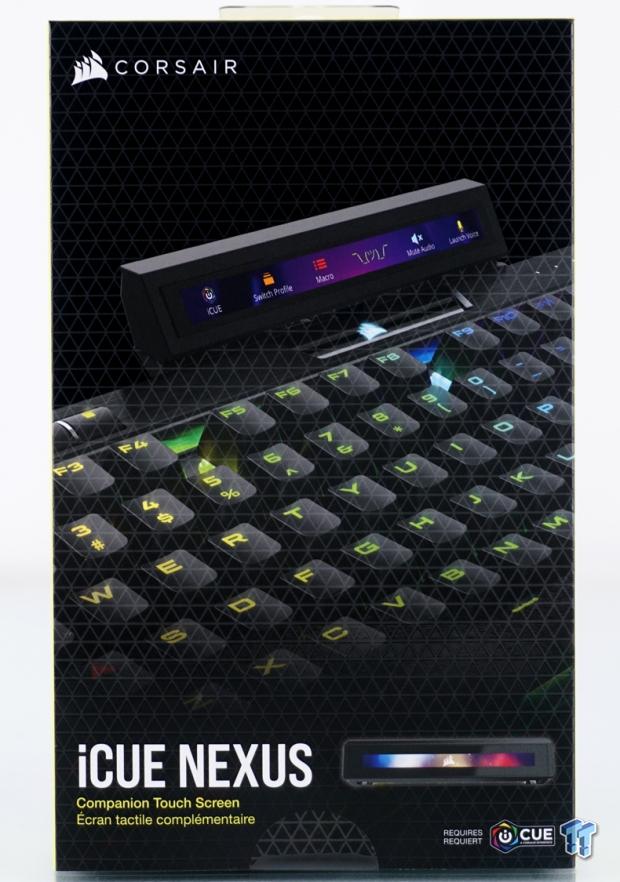
Even though the box is small, Corsair went all out on the packaging. The triangular overlay comes on all of their latest iCUE parts, but the bulk of the front panel is used to display the iCUE Nexus attached to one of their keyboards, showing the Nexus in its intended placement. At the bottom of the front panel, we see the device's full name, a much smaller image of the Nexus, and a notation of the required iCUE software for functionality and customizations.
Our Latest Accessories Review Coverage
- AVerMedia Elite Go and Core Go Review - Innovative Power Delivery with Video and Capture
- AVerMedia X'TRA GO GC515 Review - An essential capturing tool for handheld gamers
- AVerMedia Live Gamer ULTRA 2.1 GC553G2 External Capture Card Review
- Corsair PBT DOUBLE-SHOT PRO Keycap Mod Kit Review
- HyperX Gaming Spectre React Eyewear Review

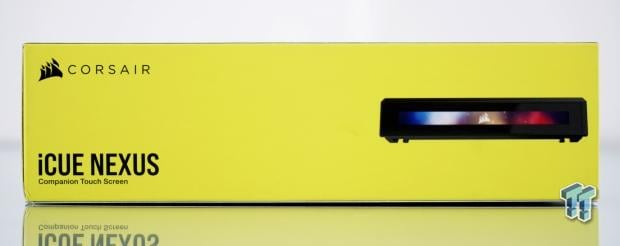
Suing the newer and brighter Corsair yellow for this side of the packaging, in the black text, we get the company name and logo on the left, above the product's name. To the right, we find another catchy tagline, which this time is "get connected!"
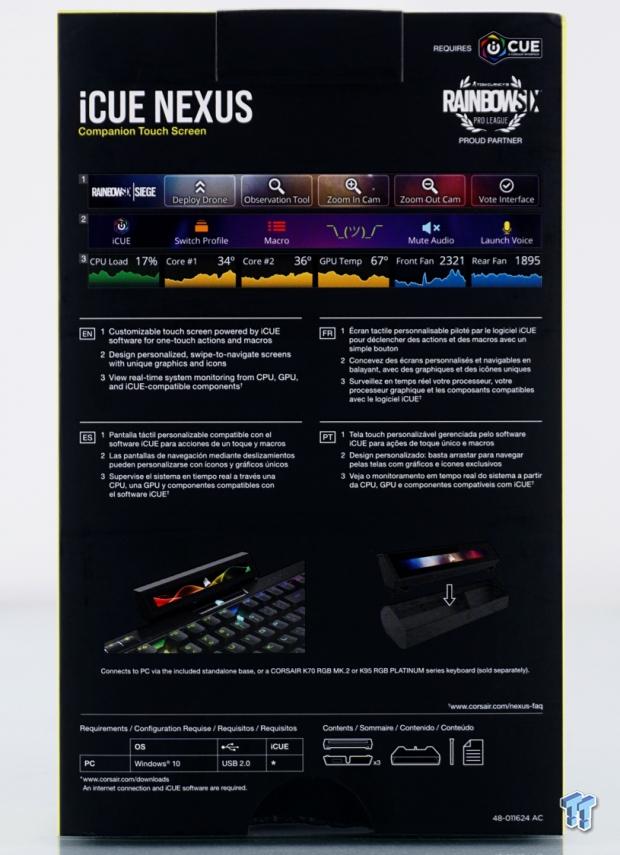
The back of the box covers some of the things we already went over at the top and shows a tie into Rainbow Six. We then see a trio of screens, where you can download game files to allow game functionality, a custom made screen for profile switching and the like, and a third which enables the user to watch loads and temperatures of the PC components if you set it up to do so that is! The text explains what we have just gone over. Simultaneously, a pair of images near the bottom shows that it can be attached directly to the keyboard or used with the included base. Should you not own a Corsair keyboard, or do not want to secure the Nexus to your expensive Corsair mechanical keyboard!
At the very bottom, we see users must have Windows 10 for this device to function, along with a spare USB 2.0 port and iCUE software, while to the right, we see a list of contents covering the Nexus, three brackets, the base, a removal tool, and literature.
The second of the smaller sides is a lot like the previous one we saw, with the company and product information to the left, but this time, rather than a tagline, we see an image of the iCUE Nexus displaying the default screen.
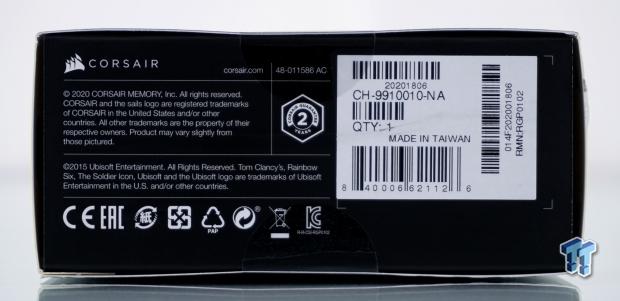
The bottom of the box also has some information. We see the Corsair legal information, the first mention of the two-year warranty, and is also where the product sticker is, which displays the model and serial numbers for our iCUE Nexus.

After sliding the much thicker inner cardboard box out of the external sleeve we just looked at, it can be opened to expose the iCUE Nexus inside it, which is shipped in a plastic bag and has a film applied to the screen for maximum protection. We can get a glimpse of the base sitting slightly behind and under the Nexus, as well as seeing the short cable of the Nexus, and the much longer one for the base, both of which are braided for aesthetics.
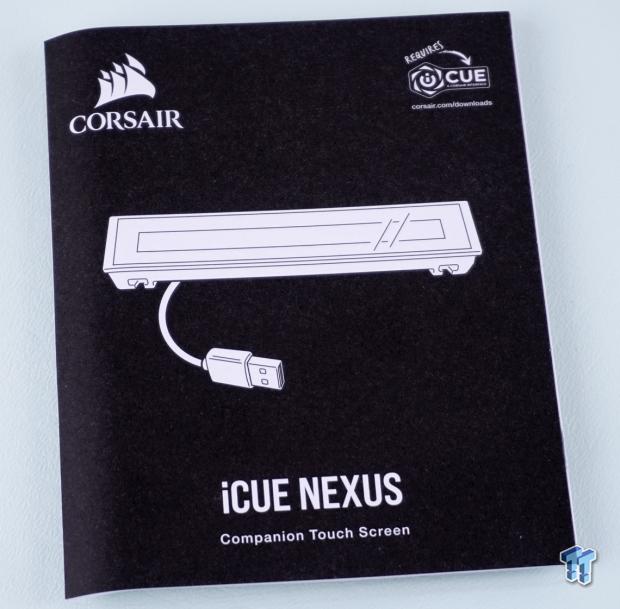
To obtain the view we saw in the previous image, we did have to remove the literature, which has to be folded slightly to fit inside the small packaging. Inside this booklet, there is everything from connectivity and mounting instructions on through where to obtain the software and how to use it. Keep this manual handy at first, as it will aid in using iCUE to set up, customize, and use the iCUE Nexus!
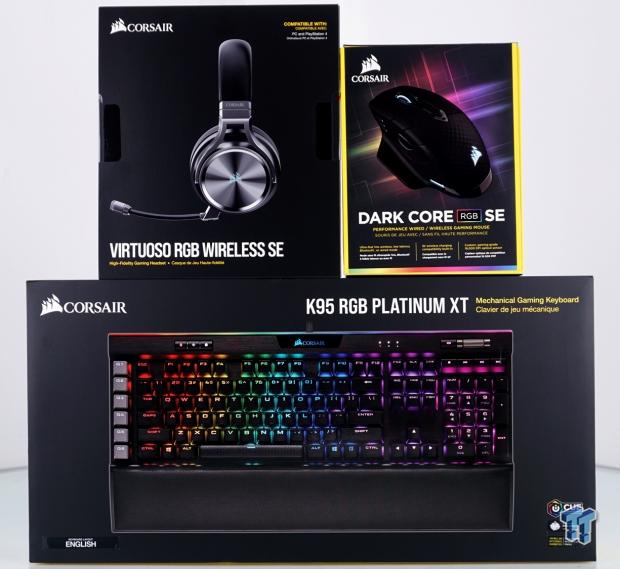
Along with the Nexus, Corsair also sent over an assortment of gear so that we can see how they play along. We have the Virtuoso RGB Wireless SE headset, the Dark Core RGB SE mouse, and the K95 RGB platinum XT mechanical keyboard to test the iCUE Nexus functionality of other iCUE devices connected to the system!
Corsair iCUE Nexus Companion Touch Screen
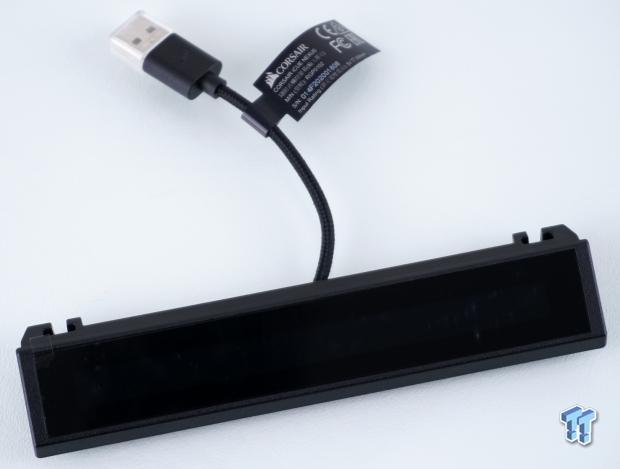
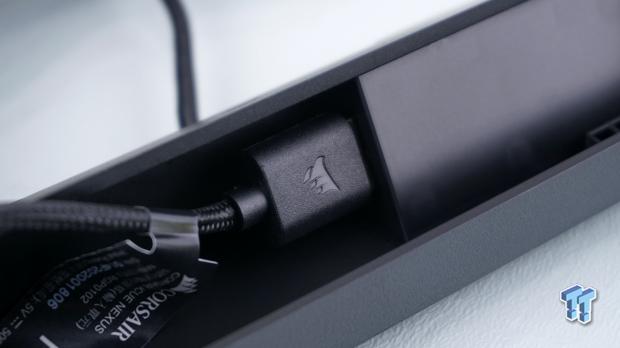
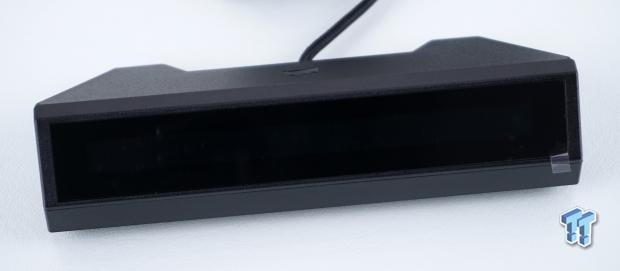
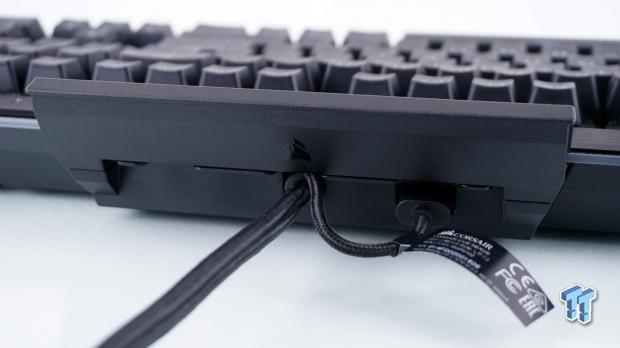
Fresh out of the box, we see the base iCUE Nexus in all of its glory. The unit's frame is made of black textured plastic, with a thin bezel around the screen. There is still the plastic film covering the screen, but you can distinguish between the actual screen size and the black surround. At the back is the roughly four-inch long USB cable, and you can also see a slot at either side, which is used to install the iCUE Nexus to a keyboard bracket, or into the base unit.
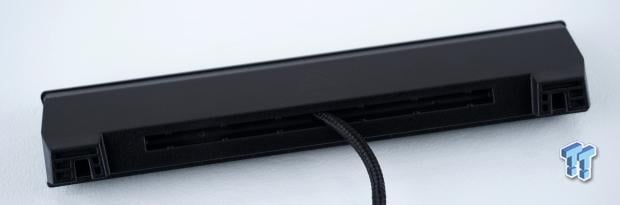
Flipping the iCUE Nexus onto its face, we see that there is a short wire routing channel to help hide the cable, as well as being able to see the slots on either end in their entirety.
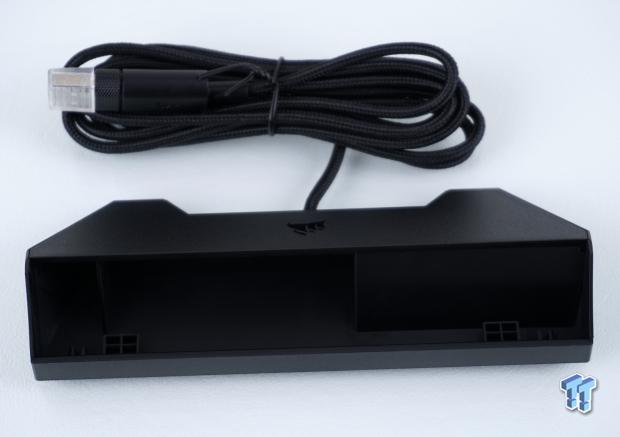
For those that use the iCUE Nexus without a Corsair keyboard or those that do not wish to attach it to a Corsair keyboard, the base found in the box is now in full view. It has an angled back with the Corsair logo in the middle, just in front of where the six-foot cable exits the base. Inside of the base is a section to the right which comes out to the opening, and the cable of the Nexus sits inside at the left. Along the front are tabs for the grooves to lock into and square supports to keep the Nexus level with the edges of the base.
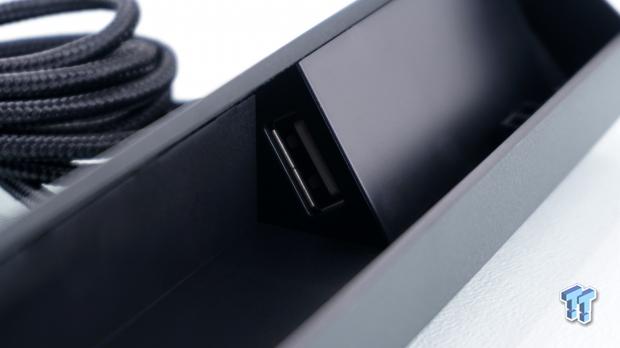
In the thicker section of the base's inside, there is a USB 2.0 port, which allows the Nexus to pass-through the base, and into the much longer cable.
To use the base, simply plug in the short USB 2.0 cable from the Nexus into the base, and you can either tuck the cable into the open space at the left or press it into the groove on the back of the Nexus.
Once the cable is connected, orient the grooves on the Nexus with the tabs inside of the base, and the iCUE Nexus is not ready to be used in its standalone form.
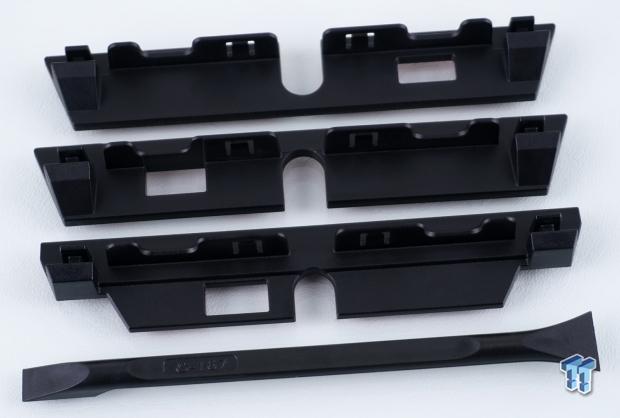
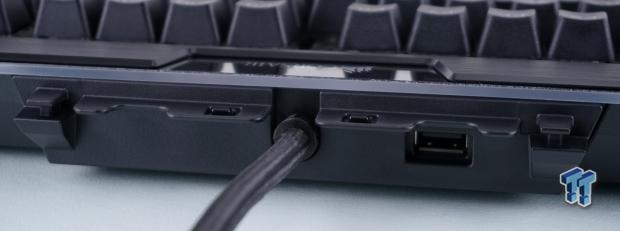
Many of the Corsair keyboards either have a pass-through port to the right or the left of the cable, which is offset to the tune of close to an inch away from the cable, which is what the top two brackets are for. The third bracket is specific to the K100 RGB, and being that the iCUE Nexus released before the K100, this bracket confused many reviewers initially. We also were sent a prying tool, which is used to help remove these brackets later.
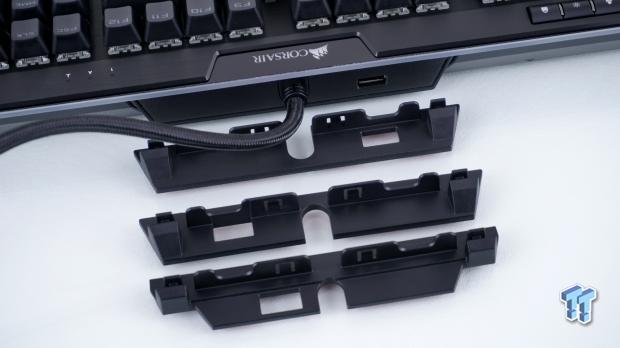
With our K95, we show how the brackets line up with the back edge of the keyboard. Depending on the model, you will have to line them up and see which bracket suits your specific Corsair keyboard.
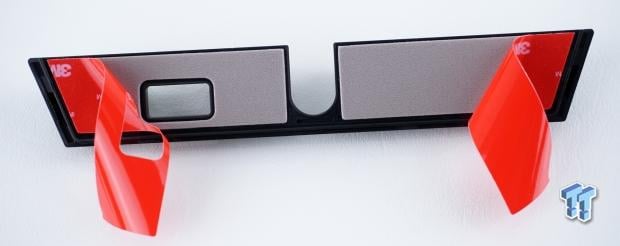
You will find large sections of 3M foam tape on the other side of all three brackets. Simply peel off the red plastic covering, align the bracket, and secure it into place. Be aware that this tape is extremely tacky, and once applied, it will be nearly impossible to remove without destroying the foam tape. It is pretty much a one-shot application, so make sure it is aligned properly before pressing it into place too much!
On that same note, not only does the cable and the pass-through port help with alignment, the shape of the brackets also match the area around it. All told, you have the top and bottom edges, the angled insets on either side, as well as the cable and the USB port to ensure it is placed properly.
Once the bracket has been firmly pressed into place, you can simply slide the grooves over the tabs on the bracket, and be sure to connect the short cable to the pass-through ports. It may without saying, but for the iCUE Nexus to function, the pass-through USB 2.0 connector from the keyboard cable must also be connected to the PC.
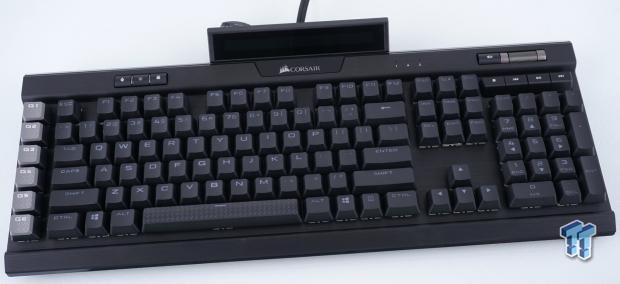
With our iCUE Nexus mounted to the K95 RGB Platinum XT, it does have that Logitech feel from years gone by and is something many in forums complain they have lost over time. While this time it is offered by Corsair, the feel is similar, and the appearance may be similar as well, but the functionality is on a whole other level!
iCUE software
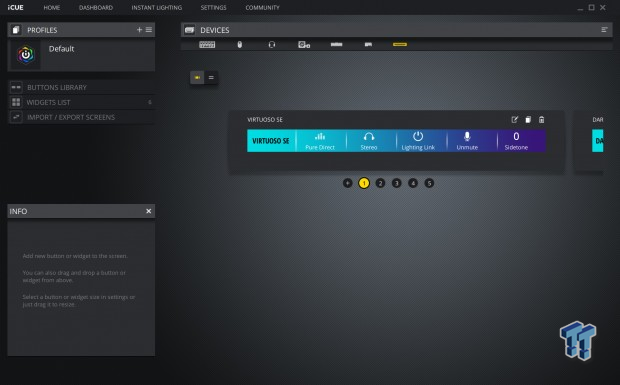
With the iCUE Nexus connected, software updated, and a check to the device's firmware, we can now dive into iCUE software to see what it offers. We clicked on the Nexus icon at the top of the software window, which delivers what we see now. In the main portion of the window, we can see the Virtuoso SE is populating the first of five windows to the right of a "+," which allows additional windows to be added, with a total of 200, or 195 more than what we have now!
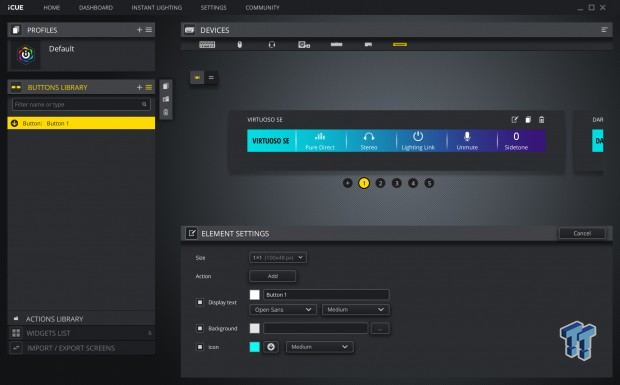
The buttons library is where you address what is shown on each page. While the current page at the top can be customized, you will want to create a new window for use with the lower section of options. First comes the buttons' size, where they can be a single block wide like what we see for the headset but can be adjusted as wide as desired. The button's action is next, and clicking on the "add" button displays a dropdown menu or predefined options and offers Macros and blank slots to add whatever it is you are looking to present on the screen.
You can then pick the color of the button, type in what it is you wish it to show, change the font, and even the font size. The background section is to change the color of the entire window, and there is an icon section where you can scroll through predefined options to go with the text, and you can also change the icons' size.
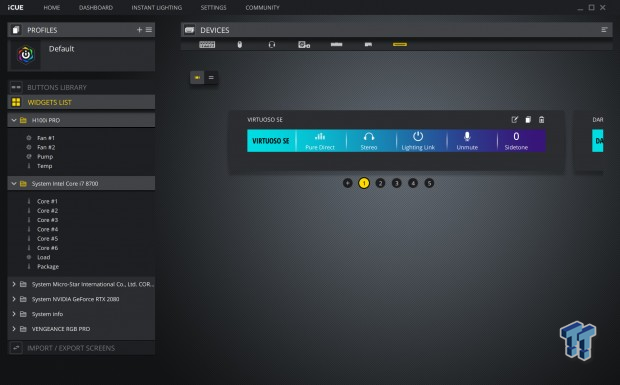
The next tab on the left is for adding widgets, which reminds us of older Windows 7 options, but these get displayed on the Nexus rather than the monitor. On the left, we see that the H100i PRO is listed, along with the CPU, motherboard, GPU, system information, and the Vengeance RGB Pro lighting system. It is here that you can select various predefined options to display in the windows.
If we were to click on the plus symbol, creating a new window, we could slide the windows left and right on-the-fly, so we can keep tabs on thermals, fan speeds, loads, and even change lighting effects without ever needing to return to iCUE to do any of those things.
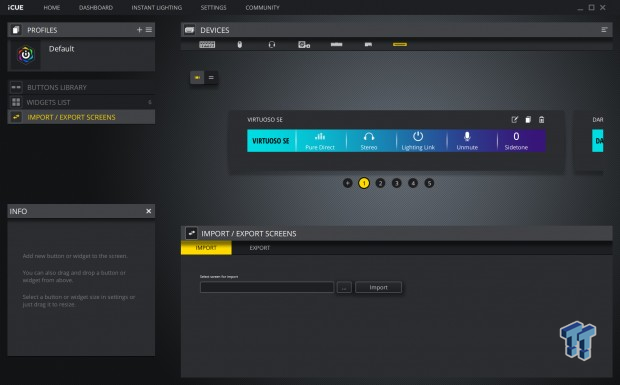
As iCUE does for all of its products, you can store windows on the PC that you may now wish to have active all of the time. However you want to use the iCUE Nexus with its 200 potential windows, importing them is as simple as selecting the window, telling it where to save, and clicking on export. Importing is the opposite, where you choose where to look, choose the window you wish to use again, and click import to put it in the Nexus list of windows.
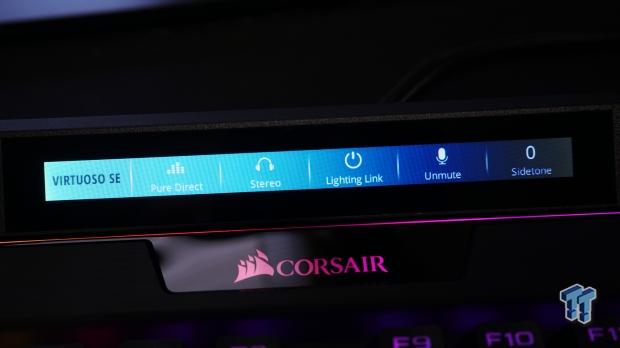
We also wanted to show what the iCUE Nexus looks like in reality. While the glossy screen is much larger than the display, the bright colored background is easy to see, and the default white used for the buttons is easy to see over the backdrop. Customizing these things can make it harder or more obvious, should the current display not have enough contrast for you. Keep in mind, for the headset, we can change the modes, swap from stereo to 7.1, change the lighting, mute the mic, and adjust the "sidetone," all without returning to iCUE software.
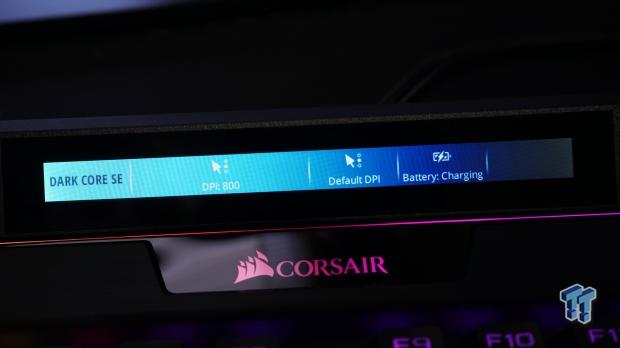
Swiping our finger on the screen to the left, we then see the Dark Core SE window. By default, we see the currently used DPI, we can change the DPI, and it also shows us the charging status, although it does not have a battery meter.
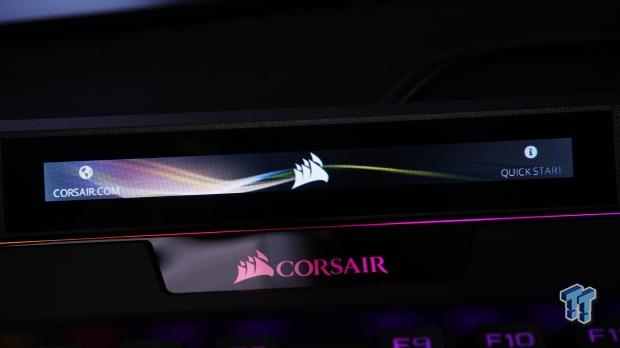
In the middle of the five windows that iCUE set up for us is the default Nexus window with an animated background. With one touch at the left, we can go to Corsair.com, and with a touch to the right side, we are delivered to the quick start guide, should you lose the manual.

With the H100i PRO cooling the system, we can change the fan mode, address the lighting, see the current coolant temperature, see one of the CPU core temperatures, and at the right end, we can change the pump mode.
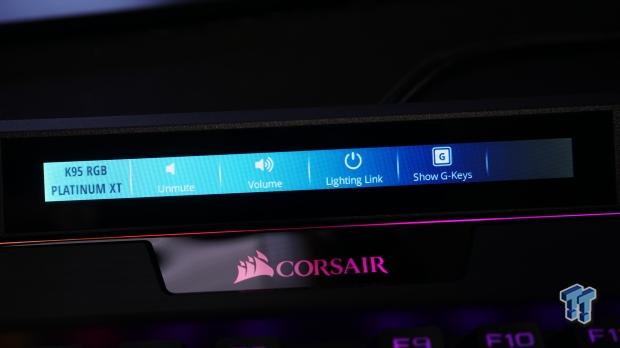
With another swipe to the left, we then run into the K95 Platinum XT controls. We can mute the PC volume, adjust the PC volume, change the lighting, and even show the G-keys, which opens yet another window to use the Nexus rather than the keyboard to activate whatever it is you have set in software for them to do.
Keep in mind; these are just the default options for the connected devices. You can do anything from Macros to text displays, Elgato stream deck controls if you agree to install that portion of the software, any widgets, and anything you program through the buttons menu! The options are nearly endless, and all of this is controllable with a single finger! Just the fact that all of this can be done through the Nexus and not through iCUE is a huge leap forward in what the iCUE environment offers users!
At this time, we can think of no other company that provides this level of customization and control with a flick of a finger or a well-placed touch on a screen that does not eat up any real estate when mounted to a Corsair keyboard. Even if used with the base, this is the most compact form of control we have seen to date!
Final Thoughts
Initially, we did have some issues with the functionality of the iCUE Nexus, but it appears that the problems lay with our test system, as once we were connected to the new Vengeance PC, all of our previous issues were gone! Once we got good power to the device, the Companion Touchscreen did nothing but impress us! While we initially thought that the price was a bit on the high side for such a small and compact device, once we saw all of the options with mounting and control, it did not take long before the cost of this device waned in our mind!
We were huge fans of the older Logitech screens that came on a couple of old keyboards, but they felt the need to discontinue the series for some reason. Corsair may not have originated this basic concept, but they certainly evolved it to something that any gamer or day-to-day PC users can take their system to new levels!
Keep in mind; we showed just the tip of the iceberg. The amount of options and controls possible through iCUE software for the iCUE Nexus is mind-boggling! Not only can this be a terrific companion for those that like to change options on other devices connected to the iCUE environment or those that love to watch and monitor all of the components of the PC, but we are also just getting started. Whether you want to make keyboard shortcuts, launch programs or games, set up multiple Macros screens for various games, or work-related endeavors, we are still just scratching the surface of what the potential is with the iCUE Nexus!
As mentioned, you can also do anything through the iCUE Nexus that the Elgato products offer. You can go to the Corsair site and download game controls, both from Corsair and the user base, and we still have yet to hit the limit of what Corsair envisioned for the iCUE Nexus! With the potential to fill up to 200 various windows with controls for whatever you wish to put the work into, with something the size of a roll of quarters, your entire way of looking at PC control has changed!
Since we are a bit late to the party with our review of the iCUE Nexus, along with just about everything else PC related, stock at the stores may be an issue! At this time, Newegg and Amazon are currently out of stock, and even on the Corsair product page, the stock is shown to be nonexistent. Even so, we can say with certainty, which the wait is worth it! If you are already using multiple Corsair products, buying the iCUE Nexus at $99.99 is a no brainer, as it takes what you are used to, to a level you may have never thought possible. While it does take an initial investment of time to program the iCUE Nexus, once done, you may never need to return to iCUE software unless it needs a software or firmware update, which is a huge advantage in our minds.
For those who do not already own Corsair iCUE environment products, this is a perfect opportunity to dive in and see what is possible, for roughly the cost of a high-end mouse or half the cost of their high-end keyboards, and reap the benefits that the iCUE Nexus Companion Touch Screen brings to the world! In our minds, this is the perfect evolution to the peripherals game, which delivers endless possibilities with a minimal investment!
 Logitech G316 X 98 Wired Gaming Keyboard Review - Retro-Inspired Board that Falls a Little Short
 Logitech G512 X 98 Analog Mechanical Gaming Keyboard Review - An Innovative Two-in-One
 ASUS ROG Raikiri II Xbox Wireless Controller Review - Ready to Take Control
 IQUNIX Magi96 Pro Aluminum Low Profile Mechanical Keyboard Review - Premium Build, Satisfying Sound
 Razer Pro Type Ergo Wireless Split Ergonomic Keyboard Review - Built for Comfort and Support
 Victim of first autonomous agent cyberattack explains what happened and why
 Valve promises Steam Machine reservation holders will get their chance to buy before 2027
 KIOXIA's UFS 5.0 embedded flash memory opens the door to powerful, compact, on-device AI
 KIOXIA's next-gen NX1 Series SSDs for AI deliver close to 40% more performance with support for direct liquid cooling
 NVIDIA is giving away 3-Month Discord Nitro subscriptions to all GeForce gamers
 AMD Software Adrenalin 26.7.1 WHQL driver adds support for a brand-new RDNA 4 GPU
 Xbox Helix's biggest feature may be what hurts the Xbox console the most
 ASRock, PowerColor, and SAPPHIRE launch new entry-level Radeon RX 9050 GPUs
 AMD launches new entry-level Radeon RX 9050 8GB GPU for $279
 Pope's official prayer app exposed data of more than 700,000 users
 Biwin M560 2TB SSD Review - Best Overall Retail-Ready DRAMless SSD
 Thrustmaster T.Flight HOTAS 5 MSFS Edition Review
 SteelSeries Arctis Nova Pro Omni Wireless Headset Review - One Headset to Rule Them All
 SteelSeries Arctis Nova 7 Wireless Gen 2 Headset Review - New and Improved, But Is It Enough?
 AMD Ryzen 7 7700X3D Review - Days of Future Past
 Samsung 990 2TB SSD Review - Ninth Gen QLC at PCIe Gen4 Speeds
 ASUS ExpertBook Ultra (Panther Lake) 14" Business Laptop Review
 Printer Not Working in Windows? How to fix detection, print queues and drivers
 The Ultimate Guide to Personalizing Your Windows 11 Taskbar
 How to Turn Your Windows Laptop Into a Second Monitor with Miracast and Wireless Display in Minutes
 6 Mistakes to Avoid When Buying a Windows Laptop
 I capped Windows Update's bandwidth with Delivery Optimization, and my downloads stopped choking
 I use this decade-old free tool that finds files faster than Windows Search does
 I install and update most of my apps with this Windows command now, and I stopped downloading sketchy installers
 Hisense U6SF 65-inch MiniLED TV: High Performance Meets Leisurely Convenience
 I stopped digging through Windows menus after I set up this one folder
 Don't sell your Windows laptop until you do these things