


Our Verdict
Introduction, Specifications, and Pricing
While we have looked at other Z390 motherboards from GIGABYTE, today we take a look at our first one designed for content creators; the Z390 Designare. The Designare line targets content creators and modders, and for the most part has a white and black color theme as well as features for content creators, such as Thunderbolt 3.
In this case, GIGABYTE actually thought ahead and designed what we assume is the first Z-series motherboards to actually allow external input DisplayPort for Thunderbolt 3, specifically for the upcoming Intel consumer SKUs without integrated graphics. Let's see what this motherboard has in store for us.
Specifications

The Z390 Designare features two M.2 slots, WIFI, dual Intel LAN, USB 3.1, and SATA6Gb/s.
Pricing
The Z390 Designare costs $269.99.
Packaging and Z390 Designare Overview
Packaging and Overview


The box art is different from GIGABYTE's Aorus branded motherboards; it's sleek and reflects the colors of the motherboard. The packaging is good enough to protect your motherboard.
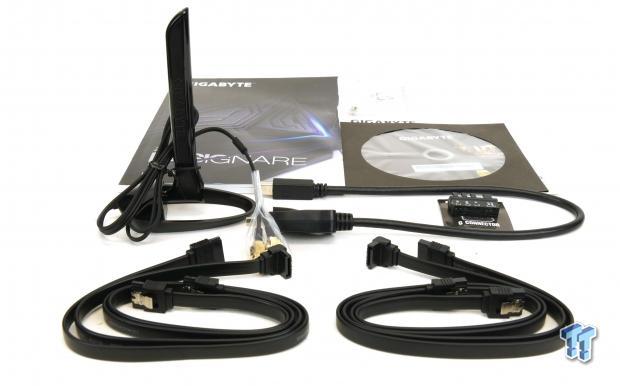
The accessory package includes four SATA6Gb/s cables, G-connector, WIFI Antenna, DisplayPort input cable, DVD, and manual.


GIGABYTE has five fan headers on this motherboard, they are all hybrid DC/PWM mode headers so they can control both 3-pin and 4-pin fans. The one header circled in blue is also a water pump header, so we assume it runs at full speed at default or provides more current, but none of that is confirmed by GIGABYTE's marketing materials or manual.
Our Latest Socket LGA 1150/1151 Review Coverage
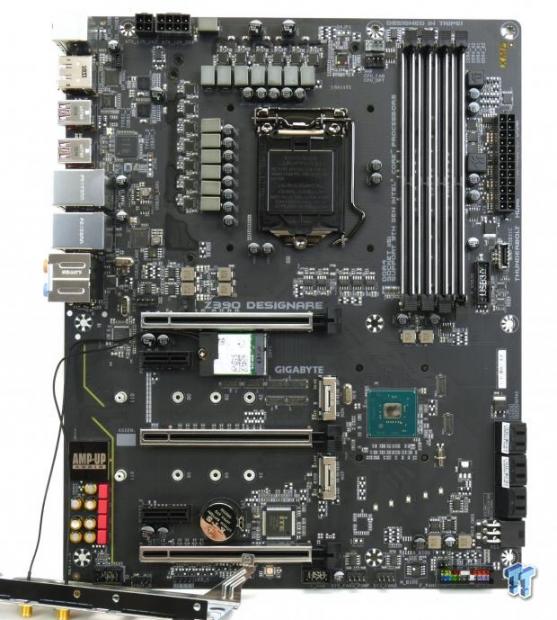
The motherboard has a silver and black color theme to it, which is more professional than some of the other themes we have witnessed. The rear of the PCB is bare of major chips.
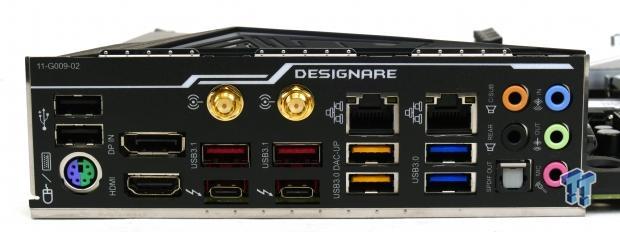
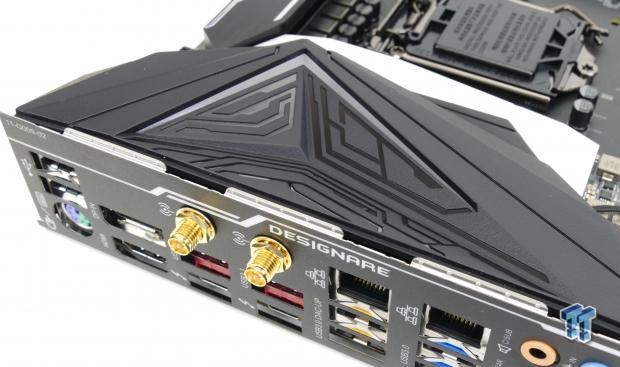
The rear IO panel features two USB 2.0 ports, PS/2 keyboard/mouse, DisplayPort in (for TB3), HDMI out, two USB 3.1 type-A ports, two ThunderBolt 3 (also double as USB 3.1 type-C), two USB 3.0 DAC UP ports, two USB 3.0 ports, dual Gbit LAN, and 7.1 audio with S/PDIF out.


The PCI-E layout is as follows, x16/x0/x0, x8/x8/x0, or x8/x4/x4. However, the last x4 slot has the ability to connect to the PCH or CPU for its bandwidth, a unique feature that allows for users to pick their best configuration. The x1 slots don't share bandwidth. There are two M.2 slots that operate in either x4 PCI-E 3.0 or SATA mode, and they share some lanes with some of the SATA ports. Both M.2 slots have heat sinks on them.


The six SATA6Gb/s ports sit at the edge of the motherboard along with a PCI-E power connector to enhance PCI-E slot power. There is a USB 3.0 internal header near a USB 3.1 type-C header that supports one port at 10Gb/s.


We find a standard 8-pin CPU power connector located near a 4-pin CPU extra power plug. An RGB LD header is located at the bottom of the motherboard.

The motherboard features a heat sink for the VRMs that uses a heat pipe.
GIGABYTE Z390 Designare Circuit Analysis
Circuit Analysis
The Z390 Designare shows us the goods with the heat sinks removed!


The VRM is a large 12+1 phase VRM consisting of 50A Vishay SiC634 DrMOS for the CPU phases and a single SiC620 60A DrMOS for the iGPU. It is controlled by an Intersil ISL69138 digital PWM controller in 6+1 phase mode, and six ISL6617 doublers are used to balance phase currents between each set of doubled phases.
The doublers are in synchronous mode, so a PWM readout would look like a large 6-phase VRM instead of a 12-phase one, so the doublers are used exclusively to balance the current between pairs of phases. The design compromise was made on these boards to improve transient response. On GIGABYTE's IR-based Z390 VRMs, the PWM readout would look like a 12-phase VRM because of IR's transient algorithms, so asynchronous mode is engaged on this board. Either way, the VRMs are very nice.


The VCCSA and VCCIO are controlled by Richtek RT8120 single phase PWMs with integrated drivers, and they control some miniature On Semiconductor PowerPAKs labeled "4C06". The memory VRM uses the same Richtek PWMs, but with larger On Semiconductor "4C06N" N-channel PowerPAKs in a two low single high configuration.
GIGABYTE Z390 Designare Circuit Analysis Continued
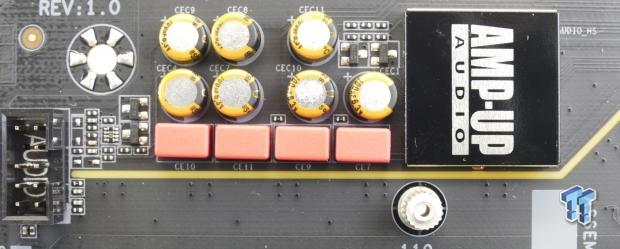
The audio solution consists of a Realtek ALC1220 rated up to 120dB, and they added Gold series capacitors and WIMA film capacitors.


We get an i219v PHY for the first Gbit LAN controller and the Intel i211AT for the second. GIGABYTE did a solid and is using Intel's latest Wireless AC 9560 2x2 WIFI chip rated up to 1.733Gbps.


GIGABYTE is using the JHL7640 newer generation Thunderbolt 3 controller, which uses two PCI-E 3.0 lanes and offers two type-C ThunderBolt 3 ports, and features DP 1.4 output. The control these type-C ports and provide proper power delivery negotiation, two Texas Instruments TPS65983 type-C controllers are used, these are part of Intel's reference design.
So typically on Z-series motherboards with Thunderbolt we don't need an external video input since all the CPUs for the platform have an integrated graphics controller with DisplayPort (which is required for Thunderbolt).
However, the integrated graphics only offers DP 1.2, and there are newer KF and K SKUs coming out without integrated graphics. So GIGABYTE has added a Texas Instruments HD3SS215 DP differential switch, so users can use Thunderbolt 3 even without an iGPU and get a DP 1.4 input from an external GPU. The front panel type-C internal header uses a Pericom PI3EQX re-driver for native USB 3.1 and a Texas Instruments HD3220 type-C switch.


The rear USB 3.1 type-A ports each get a PI3EQX re-driver for chipset's native USB 3.1.


There is a Realtek RTS5411 USB 3.0 hub on the motherboard for the rear IO ports, and there is also a Realtek based power system for the two DAC-UP ports, so you can control the power to those two ports. The Realtek IT8688E is used as the main SuperIO on the motherboard.


An NXP level shifter is used to provide an HDMI output on the rear IO panel. The motherboard Has six PCI-E quick switches to move PCI-E bandwidth between the three PCI-E x16 slots, you will notice two of these quick switches are made by Pericom instead of ASMedia, and that's because Pericom's product is a 3:1 mux/demux, so it can offer different sources for the bandwidth.
BIOS and Software
BIOS
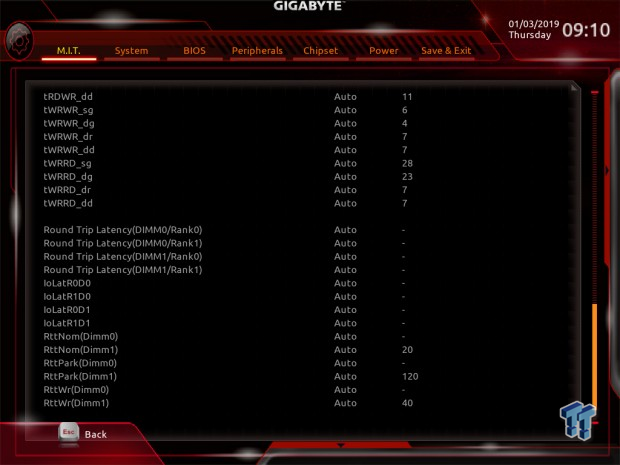
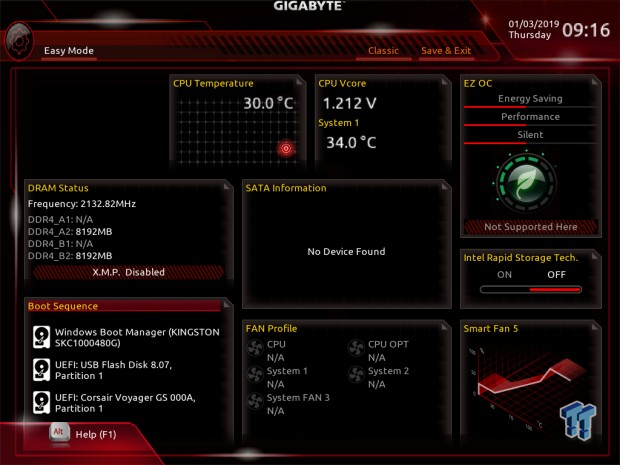
Here we have GIGABYTE's UEF with both an easy mode and a class mode. The Classic mode is where you should do all your overclocking, and if you are familiar with GIGABYTE's layout, you will be just fine. Fan control is present in the form of a GUI.


Software
You get GIGABYTE's application suite that you can access through the APP Center. These include 3D OSD, @BIOS, Ambient LED, AutoGreen, Cloud Station, EasyTune, EasyRAID, Fast Boot, Game Boost, ON/OFF Charge, Platform Power Management, Smart Backup, Smart Keyboard, Smart TimeLock, Smart HUD, Smart Survey, System Information Viewer, USB Blocker, and USB DAC-UP 2.
Test System Setup
Steven's Motherboard Test System Specifications
- Motherboard: GIGABYTE Z390 Designare
- CPU: Intel Core i9 9900K
- Cooler: Corsair H110 - Buy from Amazon
- Memory: Corsair Dominator Platinum (2x8GB) 3200MHz
- Video Card: NVIDIA GeForce GTX 1080 Ti FE - Buy from Amazon / Read our review
- Storage - Boot Drive: Kingston KC1000 480GB - Buy from Amazon / Read our review
- Storage - SATA6G Drive: Corsair Force LS 240GB - Buy from Amazon / Read our review
- Storage - M.2 Drive: Intel 750 400GB U.2
- Storage - USB Drive: Corsair Voyager GS 64GB - Buy from Amazon / Read our review
- Case: Corsair Obsidian 900D - Buy from Amazon / Read our review
- Power Supply: Corsair RM1000 - Buy from Amazon / Read our review
- OS: Microsoft Windows 10 - Buy from Amazon
- Monitor: EVGA PA328 ProArt 32" 4K - Buy from Amazon
- Keyboard: Corsair K70 LUX - Buy from Amazon
- Mouse: Corsair M65 PRO RGB - Buy from Amazon / Read our review
- Headset: Corsair VOID RGB Wireless - Buy from Amazon / Read our review


The Z390 Designare has very few RGB LEDs, but they look good.
Overclocking
Overclocking Results
CPU Overclocking
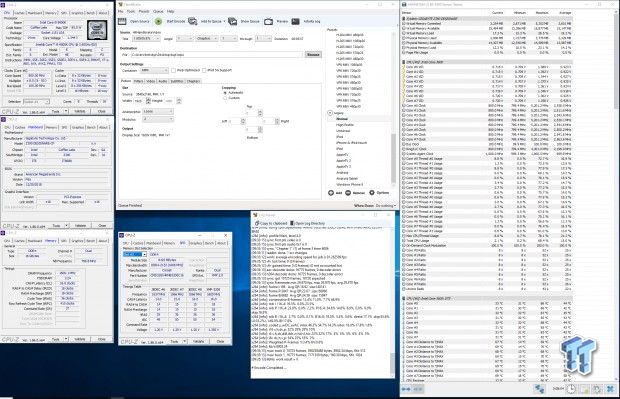
The Z390 Designare overclocked our CPU to 5.2GHz and temperatures didn't exceed 90C, which is our new standard. We set VCore of 1.332v, LLC of Turbo, and enabled XMP. We also disabled C-States. We had no issue. Overall, the VRM here allows the CPU to attain the 5.2GHz OC without an AVX offset and run through our quick and Handbrake AVX real-world OC test.
CPU, Memory, and System Benchmarks
CINEBENCH 15

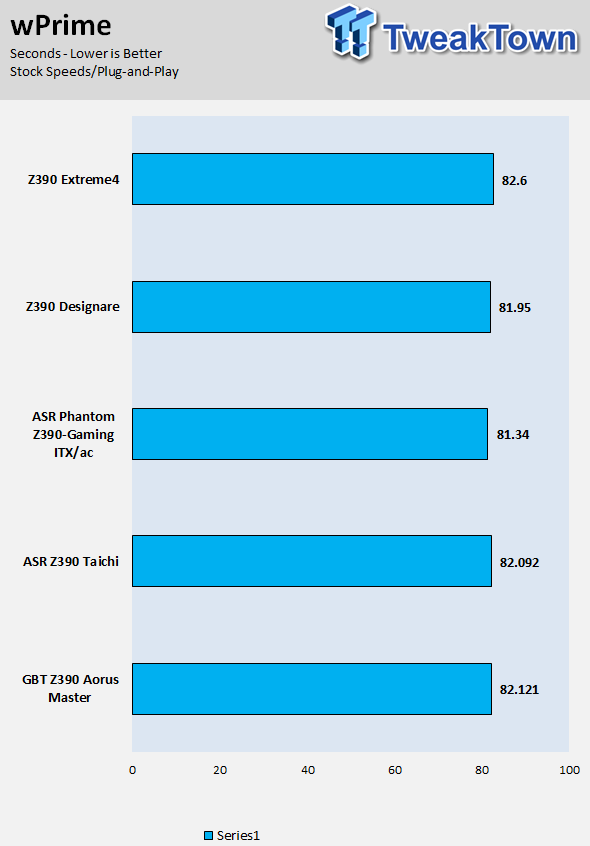
wPrime
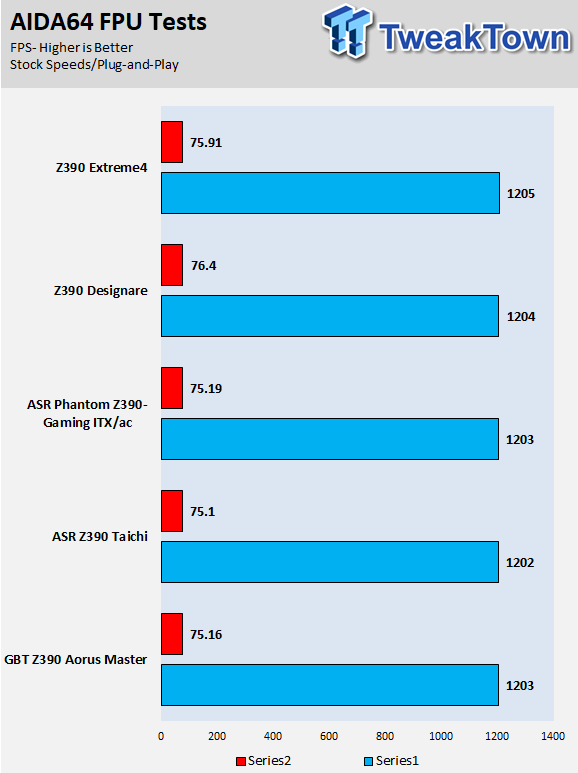
AIDA64 FLOPS and IOPS
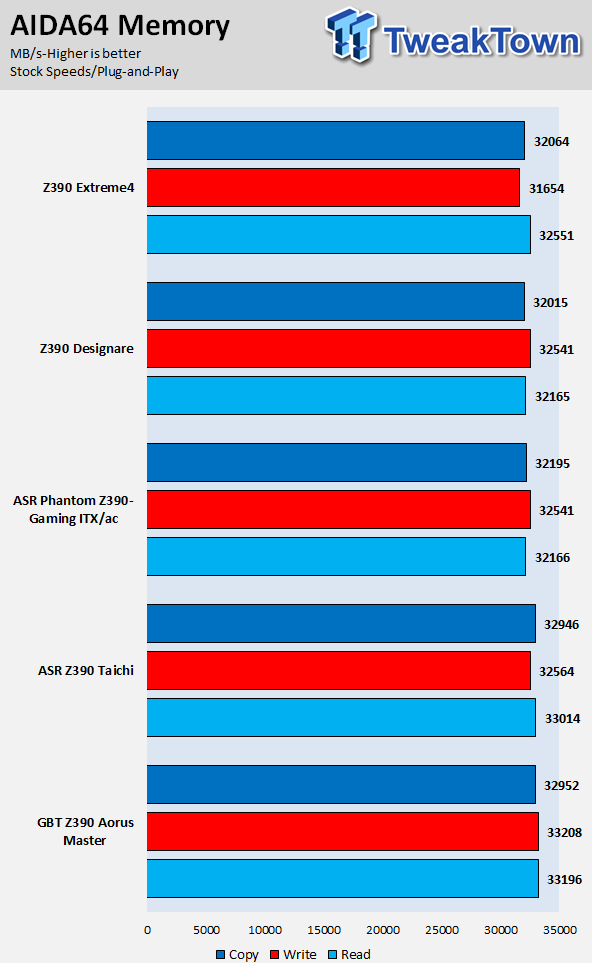
AIDA64 Memory
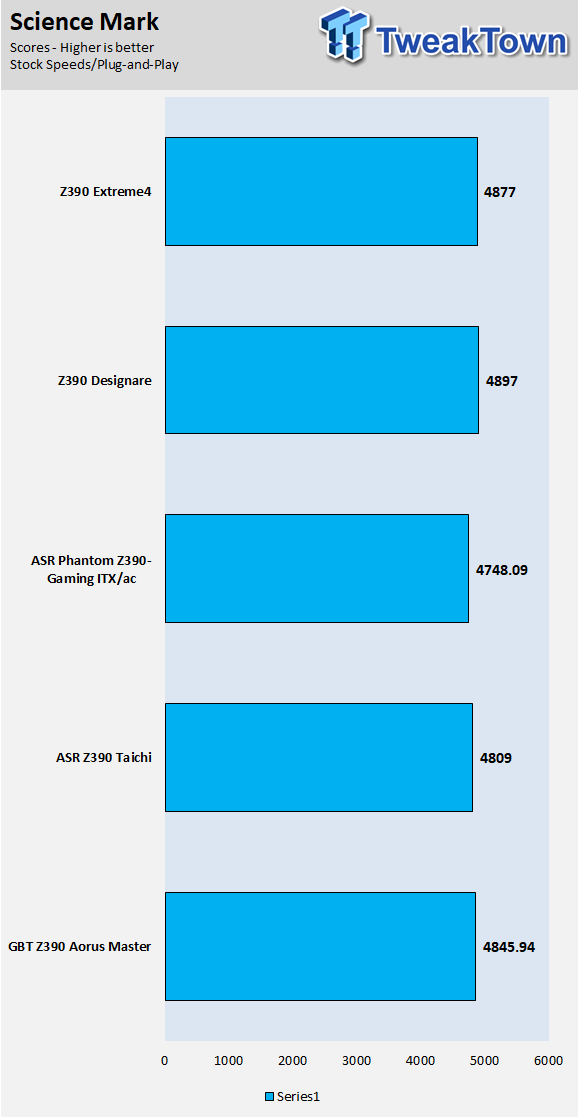
ScienceMark
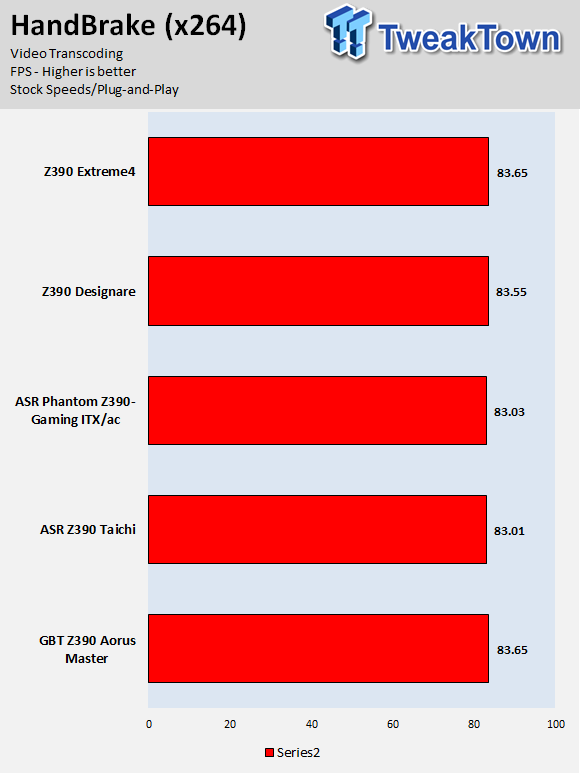
HandBrake
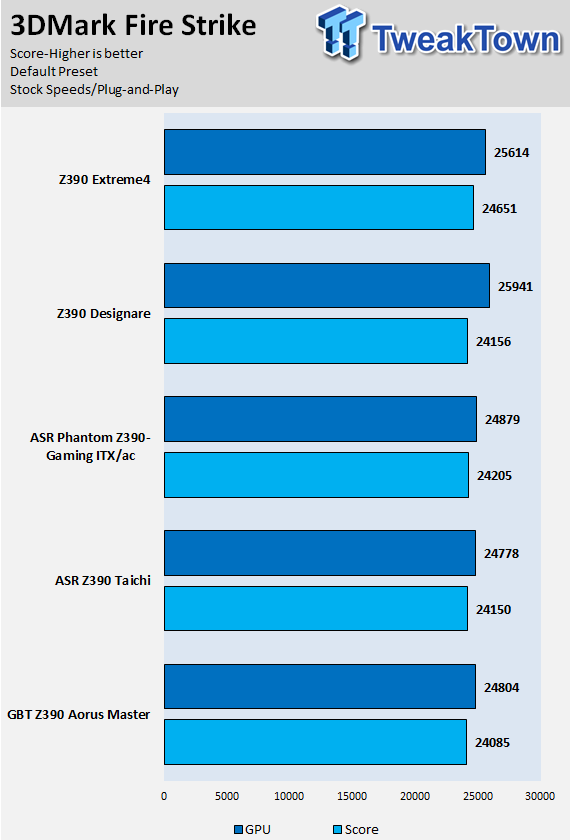
3DMark: Fire Strike
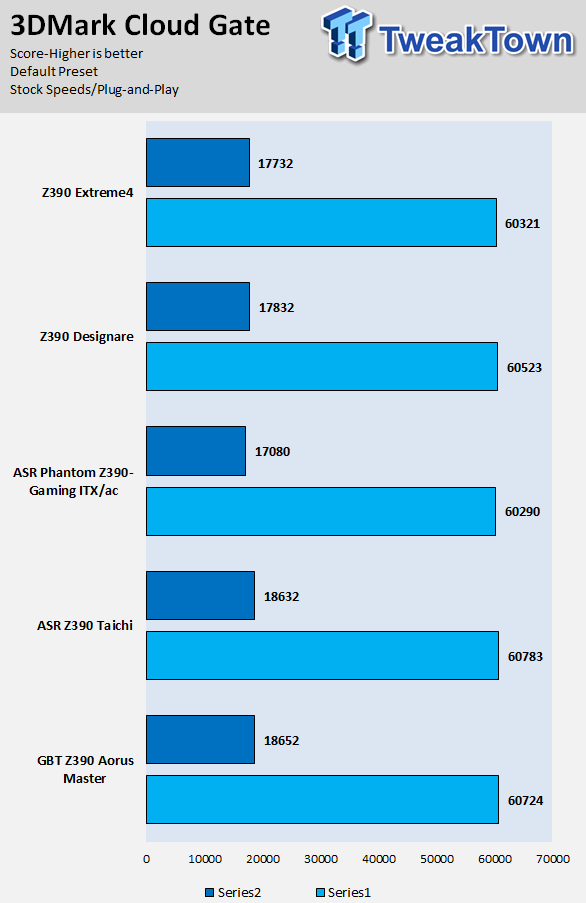
3DMark: Cloud Gate
ResidentEvil 6
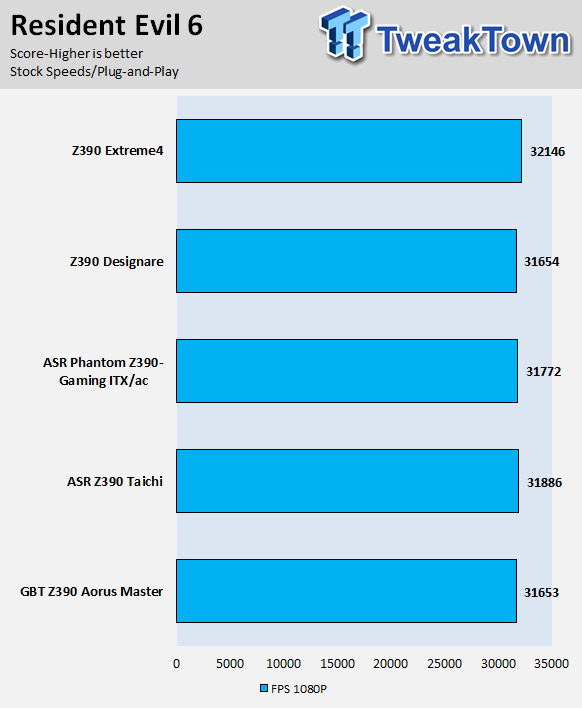
Overall, performance is solid. Everything is working as it should.
System IO Benchmarks
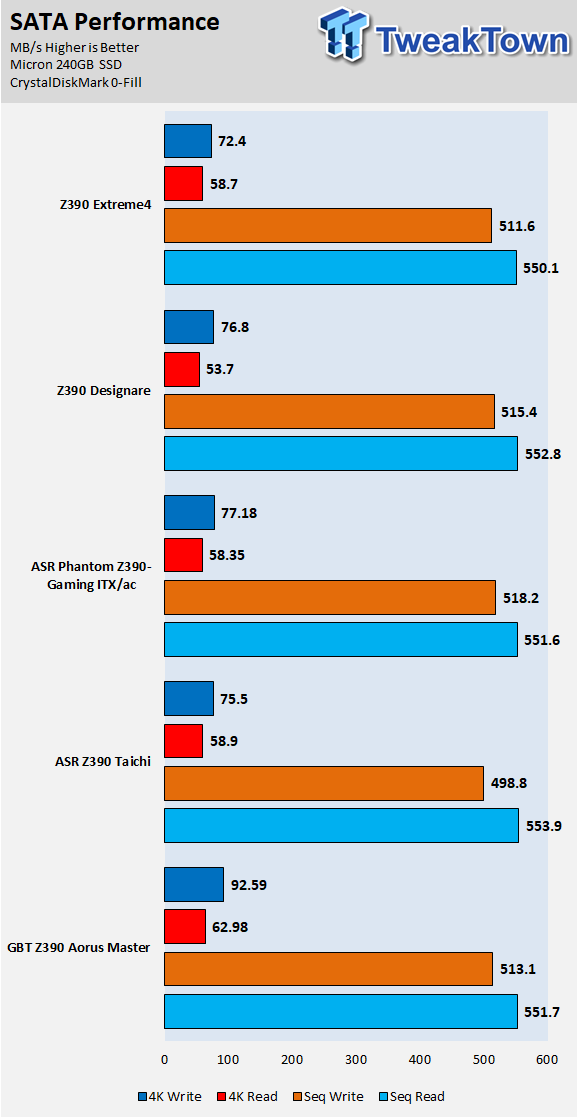
CrystalDiskMark SATA6G:
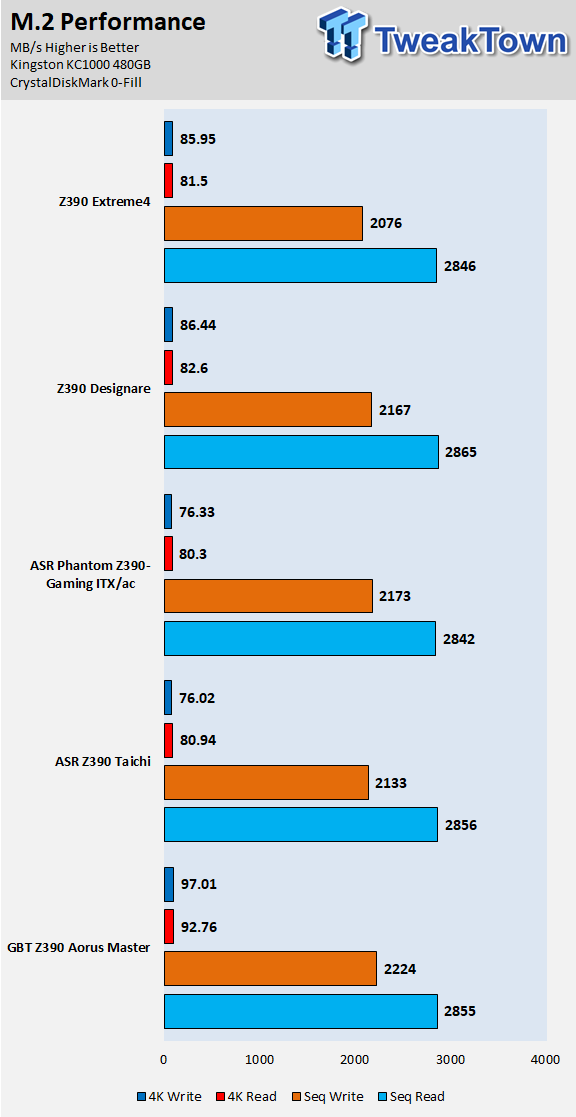
CrystalDiskMark M.2:
ixChariot Network Throughput:
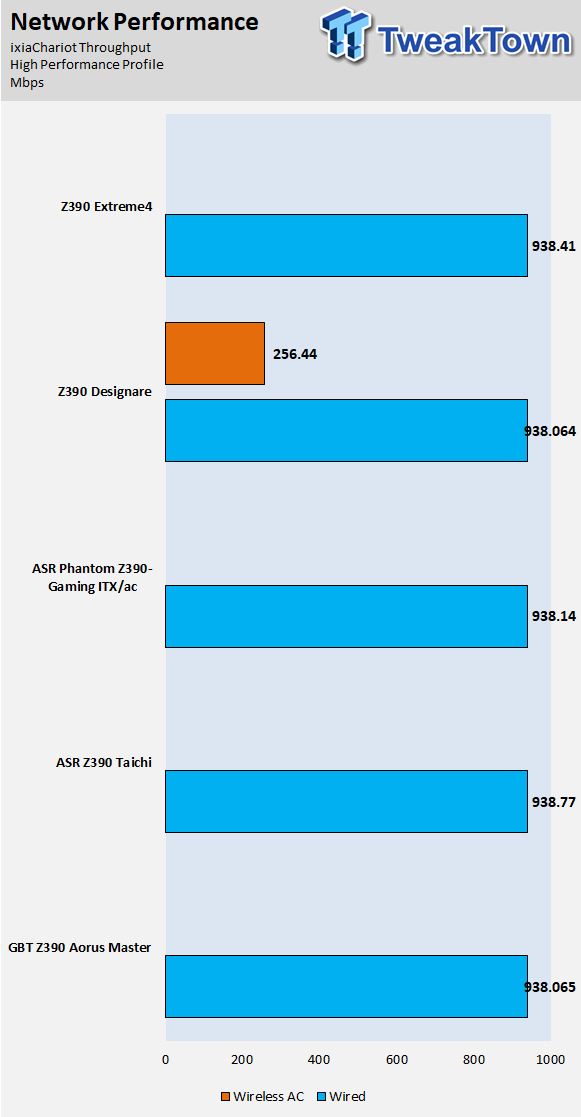
The storage and networking performance is solid.
Audio RMAA 5.5:
I disable all audio features, set the correct bitrates, and then test the audio with a loopback test.
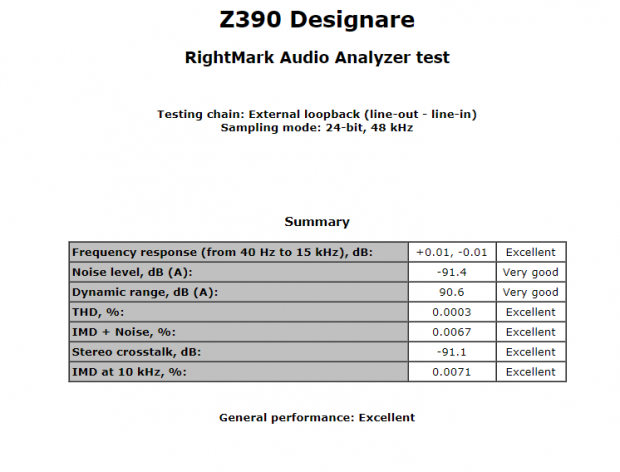
Sound Judgment by Ear: Excellent, quite good. There are five ratings for audio: 1. Problems, 2. Okay, 3. Acceptable, 4. Very good, 5. Excellent
Thermal Imaging and Power Consumption
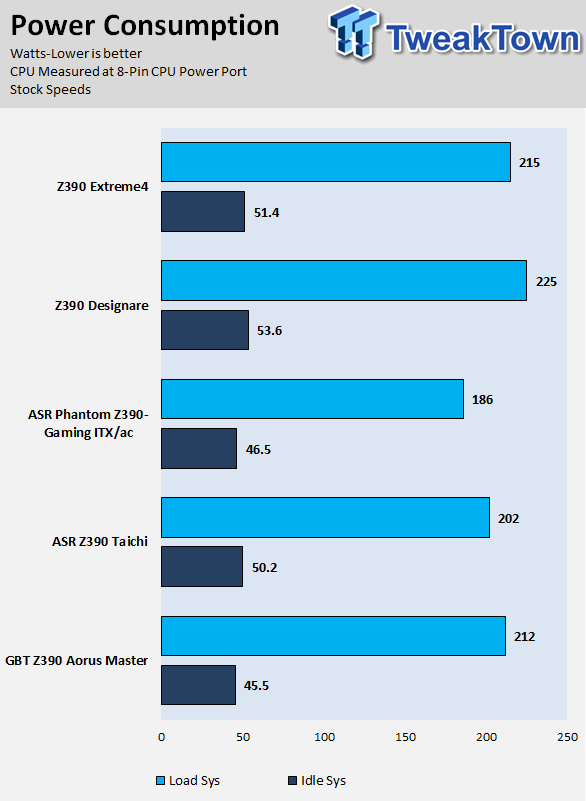
System power is measured at the wall with an AC power meter.
Note on Thermal Images: In the temperature section, we use our Seek thermal imaging camera to capture the surface temperatures of major components on the board. I look at the VRM and then all other things that light up the screen. If there is something to worry about, then I will state it. Otherwise, I will just show the hotter running parts of the board for fun. Unless some component is over 80-90C, then there isn't anything to worry about.
All systems will act differently, so I will look for commonalities, such as how far from the VRM the heat spreads through the PCB and the difference in temperature between the front side and back side of the PCB. Keep in mind, the majority of the heat from the VRM goes into the PCB as it is a giant soldered on copper heat sink. A larger difference in temperature between the back and front of the PCB points towards a more effective heat sink.
Thermal Testing at Stock Speeds:
The image on the left is always at idle, and the image on the right is at load. During ALL TESTS, fans to the right of the motherboard from the (Corsair H110i) radiator are left on automatic mode (ramps with internal block temperature). Additionally, a 120mm fan is situated right above the VRM, and it blows down at a medium rate (very quiet). Thermal Images are taken at loop 15 of Intel Burn Test


Full frontal.


Up-close of the front of the VRM.


Up-close of the back of the VRM.
The Z390 Designare has an excellent VRM. Anything under 60C is great, 60-80C is acceptable, and anything above 80C is a bit worrisome (if at stock).
What's Hot, What's Not & Final Thoughts
What's Hot
Strong VRM: GIGABYTE did very well this round with VRMs, and in this case we have a full 12 phases of 50A DrMOS. The VRM is more than enough to overclock and unleash the full potential of the 9900K.
Thunderbolt 3: The Thunderbolt 3 controller here is based off Intel's Titan Ridge, and supports two Thunderbolt 3 type-C outputs with low power consumption. GIGABYTE also went a step ahead and added in the ability to use Thunderbolt 3 on the motherboard even if you are using one of Intel's unreleased CPUs without iGPUs. The ability to do that also allow you to plug into a GPU that supports DP 1.4, as the iGPU only supports 1.2, so you can take advantage of the 8K support from the new generation controller.
Flexibility of x4 Slot: GIGABYTE added in a unique feature ability, where you can choose where the bandwidth for the bottom x16 (x4 electrical) slot can come from (between CPU and PCH). We saw two types of quick switches used for the bandwidth of the slot. So why would GIGABYTE do this? Simple, if you want to run three GPUs, it's best to do it with CPU connected lanes, but if you want to run a x4 capture card instead, then it's best to be attached to the PCH so GPU bandwidth isn't reduced to x8 on the first slot. The ability also allows CPU attached dual NVMe PCI-E AIC RAID.
What's Not
No POST: On any non-mini-ITX motherboard I like to see a POST code display, but this motherboard doesn't have one.
Final Thoughts
The Z390 Designare has many secrets hidden under the hood. It has a 3:1 MUX feeding two quick switches providing the ability to choose where the bottom x4 comes from. That allows for easier configurations, and it seems also helps with AIC CPU RAID. On top of that, to take full advantage of the Titan Ridge Thunderbolt 3 controller, GIGABYTE adds in an external DP input, so you aren't limited to version 1.2 the iGPU supports and instead can take advantage of DP 1.4.
The motherboard is designed for content creators, and has a healthy serving of USB 3.0 and USB 3.1. GIGABYTE went above and beyond on the VRM, especially compared to competitor overclocking motherboards, and we didn't have issues clocking the CPU. Although the lack of a POST code bothered us, we would still highly recommend this motherboard to content creators.
 ASUS TUF Gaming X870-Pro WiFi7 W NEO Review - Tuffed up
 ASRock Z890 Taichi Aqua Motherboard Review - Flagship features without the flagship price
 GIGABYTE Z890I AORUS Ultra Motherboard Review - Mini-ITX with surprisingly good thermals
 GIGABYTE Z890 AORUS Elite WiFi7 Plus Motherboard Review - Right in the sweet spot
 ASUS ROG Strix X870E-E Gaming WiFi7 NEO - A Crosshair by any other name
 First 'agentic ransomware' run entirely by a large language model discovered
 PlayStation disc phaseout petition hits 120,000 signatures in just four days
 Epic Games settles court case against ex-contractor over Fortnite leaks
 Cyberpunk 2077 hits 100,000 concurrent players on Steam, highest since 2023
 KIOXIA begins sampling 10th-generation BiCS FLASH technology, more efficient and with an impressive 332 layers
 Razer unveils Wuthering Waves collection with a custom keyboard, mouse, and premium gaming chair
 Intel prepping Ryzen X3D rivals with new 22-core Nova Lake-S CPUs with 108MB of cache for PC gaming
 Lenovo starts shipping laptops with Chinese-made YMTC SSDs due to skyrocketing NAND Flash prices
 Gen Z would like esports and professional gaming taught in school, study finds
 OpenAI sued after man says ChatGPT fed his religious delusions before suicide attempt
 The Super Mario Galaxy Movie (2026) 4K Ultra HD Blu-ray Review
 KTC H49S66 5K2K (5120x1440) 49-inch 180Hz Gaming Monitor Review
 HighPoint Rocket 1604L Gen5 x16 NVMe Software RAID AIC Review: half the price with full 59 GB/s speed
 Next Level Racing ERS3 Haptic Seat Review: immersive sim racing comfort with integrated haptics
 GIGABYTE GO27Q24G Gaming Monitor Review: Glossy OLED Gaming at 240Hz
 Lian Li B4-mATX Review: a compact mATX SFF case with excellent airflow and premium features
 MSI MPG 322UR QD-OLED X24 Review: A Brighter, Tougher 4K 240Hz QD-OLED for $1099
 UGREEN NASync DXP4800 GT Review: powerful 4-bay NAS with AMD Ryzen and dual 10GbE ports
 Dell XPS 14 (2026) Laptop Review - Premium Quality, Impressive Performance
 How to Remap Keyboard Keys in Windows using Microsoft PowerToys
 7 tips to organize your Windows files for faster, easier access
 Intel Arc G3 Extreme first impressions with MSI's Claw 8 EX AI+ - Incredible power for an extreme price
 How to fix Wi-Fi Adapter Not Working on Windows laptops: troubleshooting tips
 Hisense U7SG 4K TV: Modern Entertainment for the New Age
 6 underrated Microsoft Word features worth using to boost your productivity
 Level Up Your PC Gaming with these Fantastic ASUS Prime Day Deals on GPUs, Motherboards, and More
 GIGABYTE Wants to Kickstart Your New Gaming PC or Upgrade with These Limited-Time Deals
 7 Windows settings to change right after installation for better privacy, security, and performance
 I stopped Windows 11 notifications from interrupting me with Do Not Disturb, Focus, and a priority list