
The Bottom Line
Introduction, Specifications, and Pricing
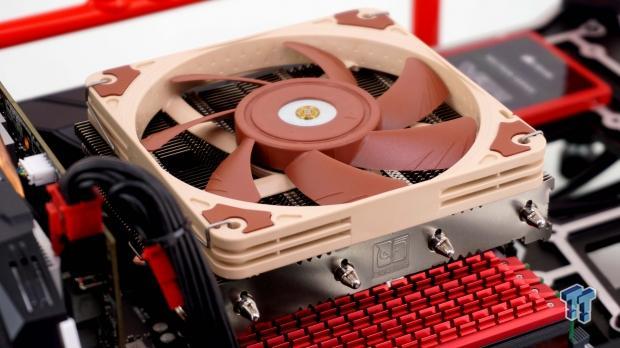
We are always pleased when it comes time for Noctua to release samples, and we get the email asking if we want to test it. Mainly, this is because out of all of the CPU coolers making products, it is hard to beat the build quality, efficiency, and even the looks of what they produce. Some may prefer coated or painted fins, and it seems all the rage to flog Noctua for their fan colors; call us old-school if you must, but we dig exposed aluminum and the way a Noctua fan colors set their coolers aside from all the rest.
With one glance, there is no need to ask who makes the cooler, and you are only left to guess the model and cost associated with it. Honestly, we give Noctua praise for sticking to their guns amidst all the hate, and for those who want change, they have the Redux, Industrial, and Chromax lines to get a fan from if it is that big of a deal.
Rather than develop something entirely new to the market, we find Noctua is revisiting a cooler we last saw in 2012. It was them when we first got our hands-on the NH-L12. The idea then is much the same as it is now, to offer cooling options for those restricted to small cases with little headroom for tower CPU coolers. Some changes have been made with the latest version though. Rather than a pair of fans, this time we are sent only one.
TDP for all of the processor sockets has remained the same, however. The cooler is slightly smaller this time around, and this is due to the fan change mostly, as the new cooler stands just 70mm tall, where the NH-L12 was 93mm tall. That being said, we are lead to believe that we should see similar performance to the original, while being more compact, as well as updating the mounting hardware.
We have you here now to discuss the newest of the Noctua CPU coolers, the NH-L12S. As we mentioned, changes are afoot in the design, which should improve things for the user along the way. There are options to put the fan above or below the fins, and we saw this as NH-L coolers lie over on their side, running parallel to the motherboard.
For those of you using an HTPC chassis, a Mini-ITX chassis, or anyone not planning to overclock their processors in any other chassis will find the NH-L12S to be right up your alley. If low noise, much thought into the design, and buying a solid cooler that will last you years with free hardware as sockets change, Noctua and their NH-L12S may be what you are searching for.
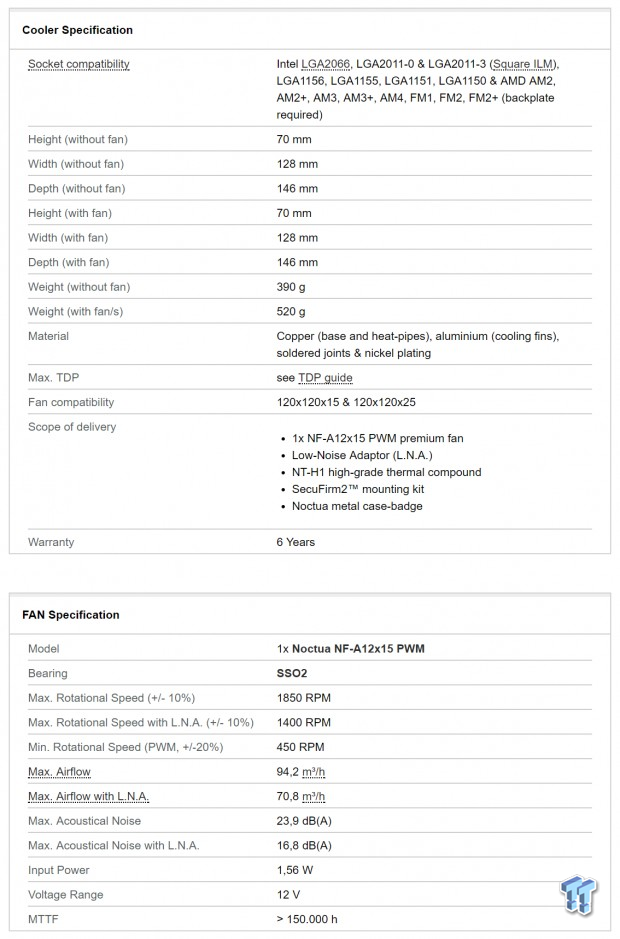
Looking at the compatibility of the NH-L12S, it does not appear that any current and many older sockets are not included, and as long as your processor falls within the TDP chart found on site, you should be good to go. The height of the cooler may vary, as the fan comes shipped with the fins, gives the overall height of 70mm. However, the fan can also go above the fins, but doing so will increase the height to 85mm.
The 146mm depth is down from 150mm in the previous model, but the 128mm width has stayed the same. Without the fan the NH-L12S weighs just 390 grams, and even if the fan is added, it only weighs 520 grams at that point. The base is made of copper, and so are the four 6mm diameter heat pipes, but both have been nickel plated. The pipes are soldered into the base but are also soldered to each of the fifty-eight thick aluminum fins.
Rather than using the NF-F12 PWM fan and the NF-FB9 PWM fans the NH-L12 offered, this time we find the tower cooled with a single NF-A12x15 PWM fan. This 120mm fan is only 15mm thick, but boasts some impressive specifications. The fan will top out at 1850 RPM while pushing 94.2 cubic meters of air an hour. There is no mention of static pressure in the chart, but looking up the fan we saw it is listed at 1.53 mmH2O. With a 23.9 dBA rating, this fan is built upon an SSO2 bearing, and is built to last 150,000 hours.
With a premium product, we do expect the price to have a premium added to it as well. However, the NH-L12S is not that far up the scale when it comes to competitive pricing. Newegg has a listing for the cooler, but at this time, shows them to be out of stock. We then looked to Amazon to see what they have going on, and it is there we found the NH-L12S listed at just $49.90.
Compared to the typical 120mm tower cooler, this is a great price for one of those. While many of the compact coolers can be had for less of an investment, many of them cannot complete our testing without failure. What if we told you that not only can you have a compact cooler that is a top-tier product, but it can also do the job it is intended to do, and that keeps the CPU cool, even if you want to push your luck a wee bit.
Packaging
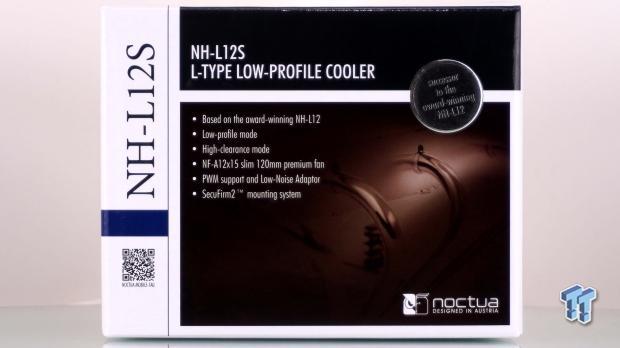
Typical of Noctua, the box for the NH-L12S looks like all the rest. At the top, we are shown that this is an L-Type low-profile cooler, and a sticker mentions that this is the successor to the award-winning NH-L12. We also find features listed, where you can either run low-profile or in a high-clearance mode with the NF-A12x15 PWM fan and that the cooler uses SecuFirm2 mounting.
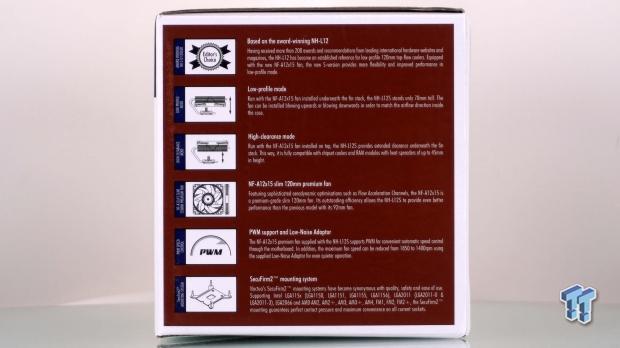
The right side of the box discusses all of the features found on the front, but this time with much detail involved. Not only are there images showing what is being mentioned, but there is description discussing the advantages of each feature.
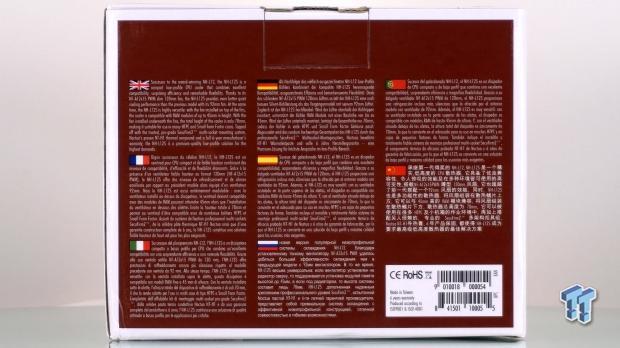
In eight languages, on the back of the box, we are offered the theory behind why Noctua designed the NH-L12S, and why. Along with the UPC and EAN codes, we see the cooler is made in Taiwan and comes with a six-year warranty.
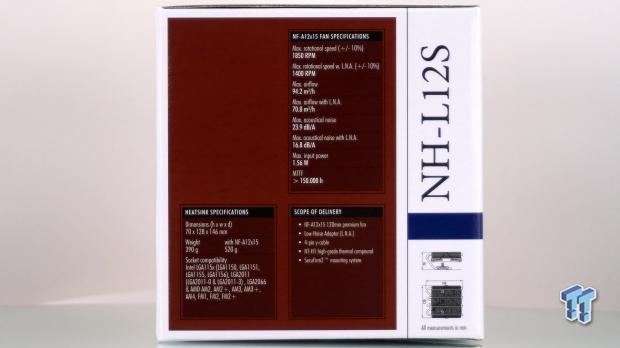
The last of the panels is what we are looking at in this picture. The larger section of the panel is used to offer specifications on the heat sink and the NF-A12x15 PWM fan, as well as to show what comes in the box. To the right, under the name of the product, we find a pair of renderings, which are used to show the dimensions of the CPU cooler.
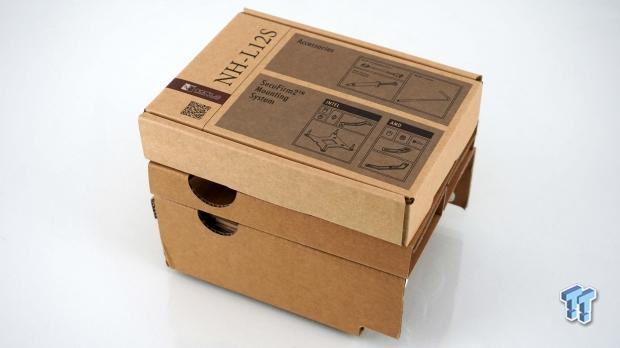
Inside of the box, the first thing you will run into is the marked hardware and accessories box. This contains all of the mounting hardware for both camps, as well as a few extra bits to help with installation. Under it is a section of cardboard which is made to surround the base of the cooler and keep the hardware from touching it.
The lowest section houses the fin stack and fan, while the pipes are exposed on this side. Overkill works well, and with such elaborate packaging, we are not shocked that our NH-L12S is in terrific condition right out of the box.
Noctua NH-L12S CPU Cooler
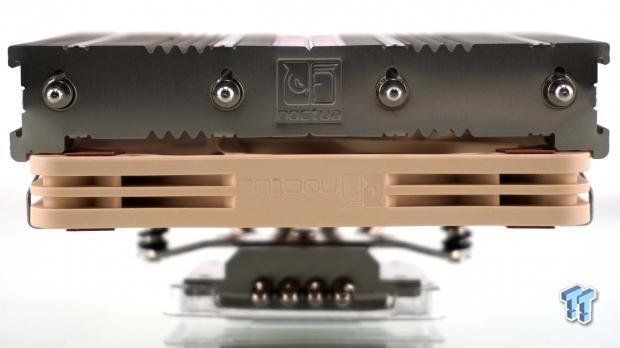
This edge of the NH-L12S is where the fin stack stops, and we can see the Noctua logo punched into the natural, brushed aluminum, fin, with the four pipe tips sticking through it. The fan hanging below has the Noctua name upside down, which means the fan blows up through the stack.
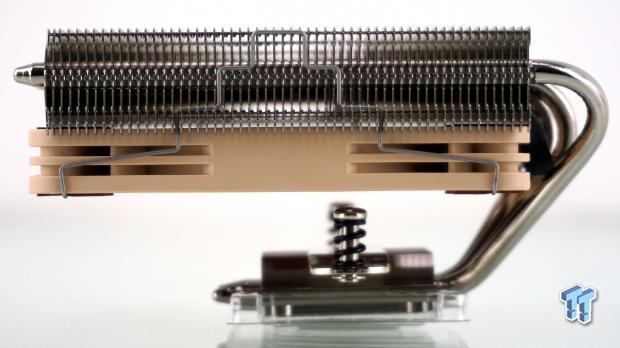
Spinning the cooler to the left, we now have a view of all fifty-eight fins in the stack, and we can also see each fin is spaced with a tab bend over at the side. The wire fan clip latches to grooves on the side, and is not taller than the top of the fins.
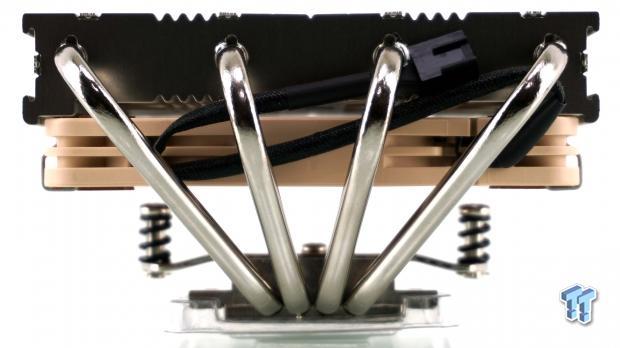
When the pipes leave the base, there are very close together. As the rise to the fin stack, they are evenly angled, to distribute the heat load into the fins evenly, so that the fan has a better chance of removing it. We can also see the cloth braid covered fan lead, which ends in a 4-pin PWM connection.
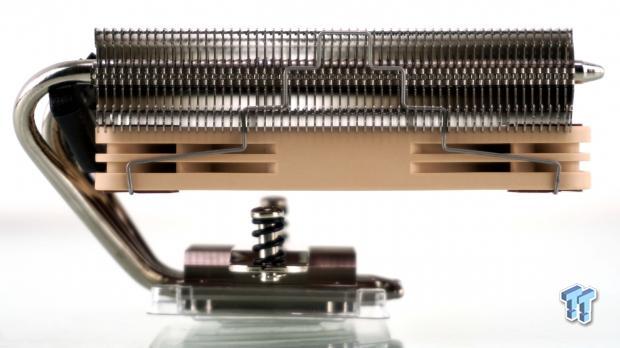
Even though the cooler needs the pipes to start in one direction, and be bent twice to get back through the fins, we find elegant bends. The bottom bends are gentle, while the top ones have to make it to ninety degrees, but do it with a graceful curve.
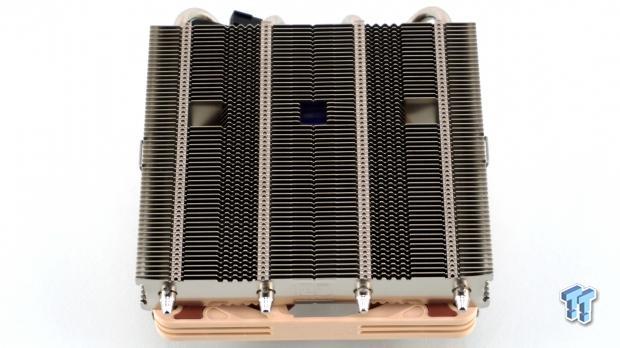
The view from above the NH-L12S is one of aluminum. Not only are the sides of the fins supported, but we also find four strips on the leading and trailing edges, where each fin is kept spaced equidistant from the others. There are three square tunnels in the fins, and these are for access to mounting the hardware to the base in the middle (done at the factory) and the pair on either side to mount the cooler to the SecuFirm2 hardware.
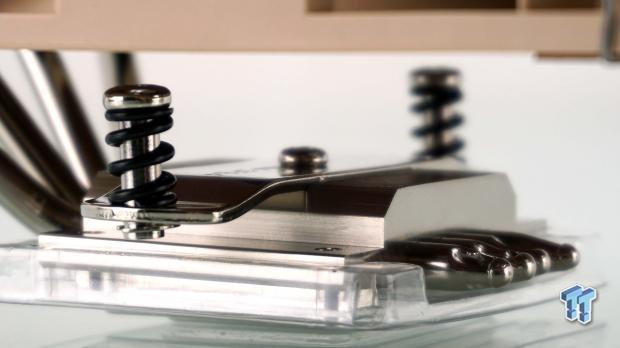
Moving in closer to the base, we can not only see the aluminum top section of the base, and how tightly it fits the heat pipes, but we can also see the cross-bar mounting solution and the spring loaded screws already attached to the base.
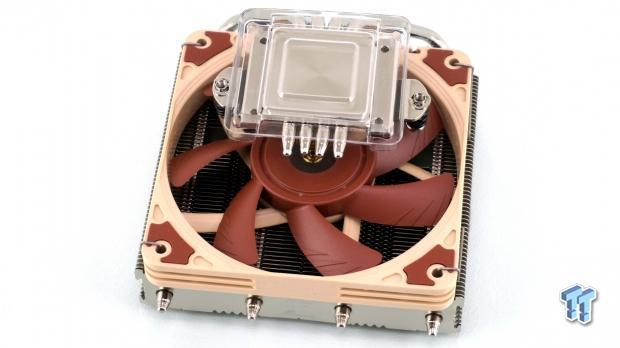
Under the NH-L12S we see the NF-A12x15 PWM fan in all of its bold colored glory. We can also see the hard plastic base protection cap use on this cooler, which locks onto the base of the cooler, and ensures no damage occurs to it.
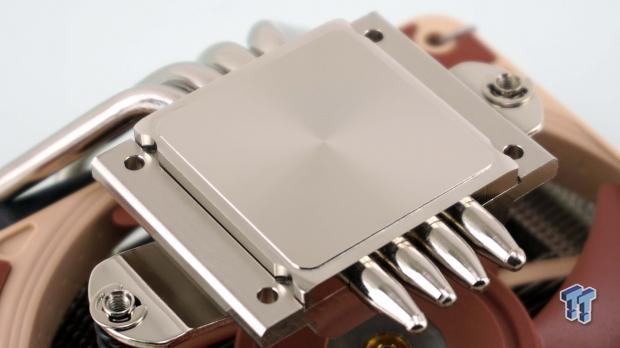
The copper base had been nickel plated after the milling process, but if you look closely we can still see fine lines left in the finish. The base is slightly convex, and will deliver superior contact in combination with the foolproof SecuFirm2 hardware.
Accessories and Documentation
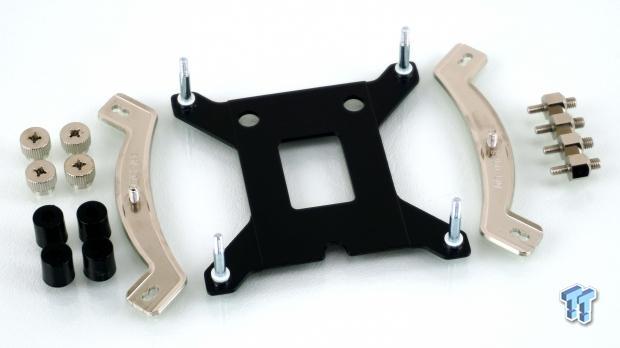
For those with an Intel motherboard, you will need the hardware we have spread out in this image. On the left are knurled nuts to lock the top brackets to the backplate, along with the spacers used under said brackets. The backplate has nylon washers to isolate it from the motherboard, and to the right, we see the LGA20xx standoffs.
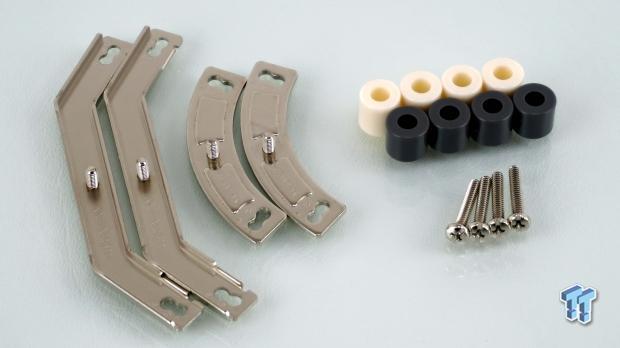
AMD installations will need the hardware seen here. Four screws go through the optional top brackets, through one of the sets of spacers dependent on socket type, and screw into the factory backplate on the motherboard.
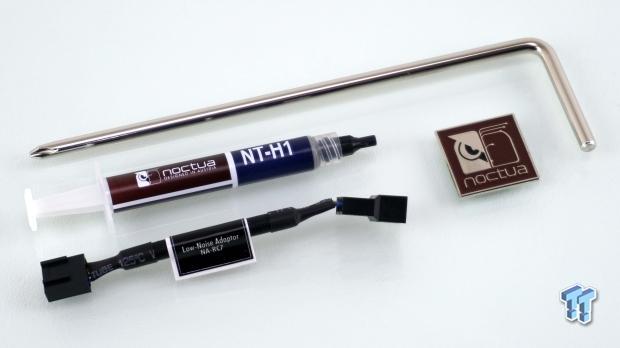
Also found in the hardware box is the long #2 Phillips screwdriver to help with mounting. There is also a decent sized tube of NT-H1 thermal paste, enough for many application attempts, the NA-RC7 low-noise fan adapter, and a metal case badge sporting the Noctua name and logo.
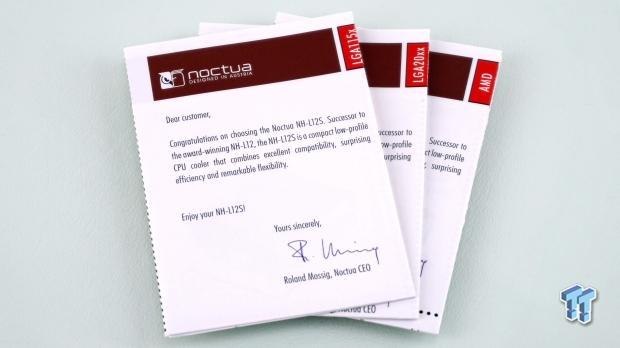
Noctua ensures there is no confusion when it comes to mounting by delivering three manuals, one for each socket type. Whether using LGA115x, an LGA20xx, or AMD motherboards, pick the appropriate manual, and follow the directions closely. All of the information you need to mount the NH-L12S properly is in here, just take your time and follow each step and you will be golden.
Installation and Finished Product
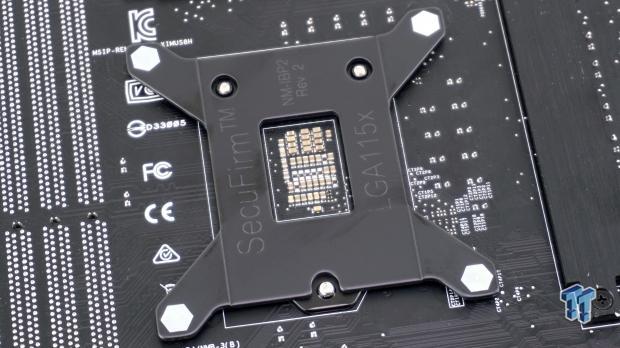
The NM-IBP2 has been installed on the back of the motherboard, being mindful of the arrangement of the socket mounting screws which pass through it. We also love that the studs in the corners are press fit into the steel, so they will never loosen or complicate the mounting process.
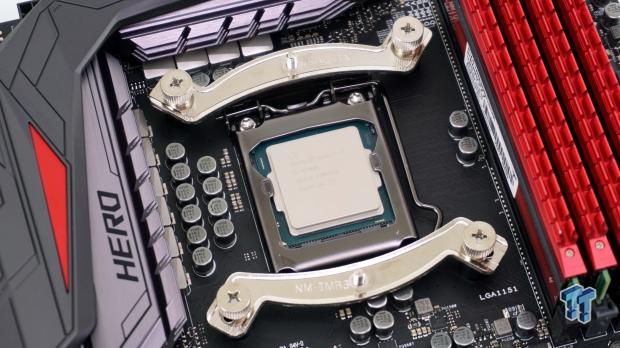
To arrive at this point, we flipped the motherboard over, slid on the black plastic spacers, and then set the brackets on top of them. The knurled nuts lock everything into place, and with the supplied screwdriver, you can screw them in until the threads run out.
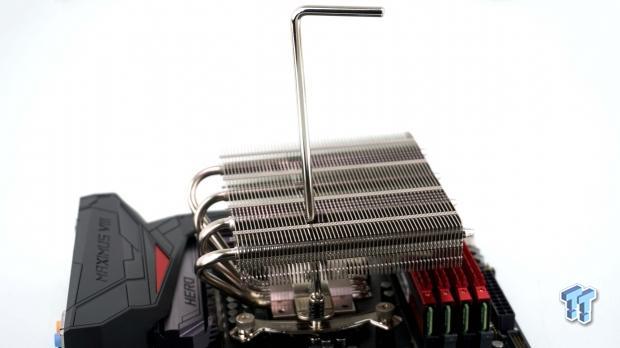
When it comes time to mount the MH-L12S, be sure to remove the plastic cover, and then apply thermal paste to the CPU. Once that is done, set the cooler on the CPU, and use the screwdriver again to access the pair of mounting screws, though the body of the cooler. Alternate screws every few turns, and again, go until it stops.
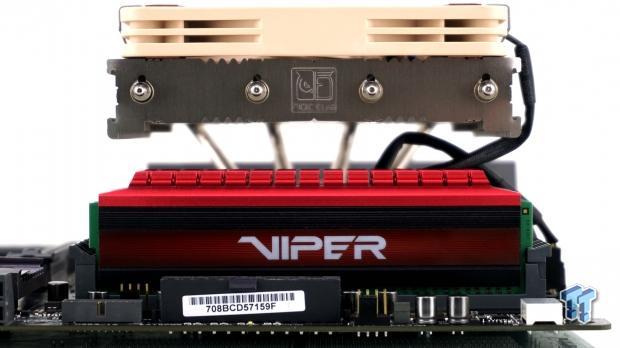
We were not able to leave the tops on the RAM sticks in low-profile mode, so we decided to show off the high-clearance mode instead. Those planning to use the NH-L12S in low-profile mode, be sure to also choose the low-profile memory to go under it.
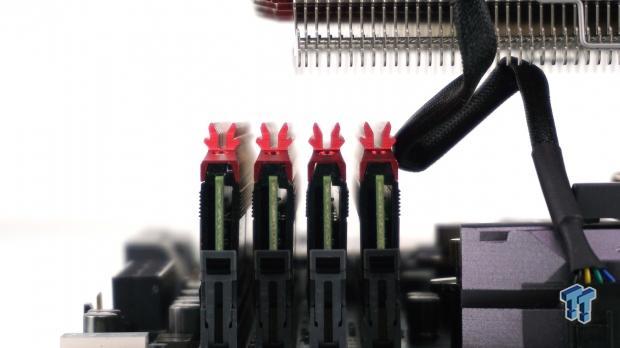
While we have plenty of room in this arrangement for the DDR4, even enough that we can still remove and replace RAM if needed, we need to address the overhang. The NH-L12S does reach over three of the DIMM slots, and if used in low-profile mode, this will rest on most sticks, and remove any ability to remove them.
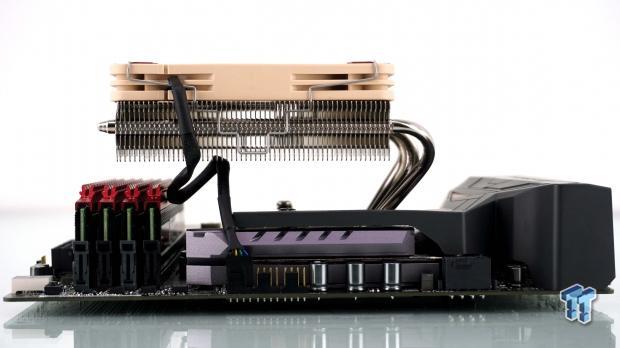
Moving away from the cooler, capturing the whole ATX motherboard for perspective, the NH-L12S is even short as it is installed now, but can also be shorter still by installing the fan below the fins. However, at the same time, it spreads out across the motherboard, yet does not block access to anything we need to get to, to complete the build.
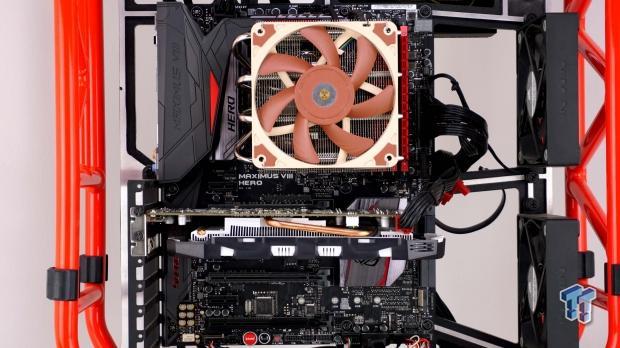
Inside of the chassis, a view many will see every day, we can see the NF-A12x15 PWM fan mostly, with fins showing through its gaps. We see the pipes to the left, and they cleared the heat sink with ease, leaving room to connect the 8-pin EPS cable. To the right, we can see the smallest bit of the pipe tips, and the memory is also partially visible.
Test System Setup, Thermal Tests, and Noise Results
Chad's CPU Cooler Test System Specifications
- Motherboard: ASUS ROG Maximus VIII HERO (Intel Z170) - Buy from Amazon / Read our review
- CPU: Intel Core i7 6700K - Buy from Amazon / Read our review
- Memory: Patriot Viper 4 3000MHz 4X4GB - Buy from Amazon / Read our review
- Graphics Card: MSI GeForce GTX 1060 6GB OC - Buy from Amazon / Read our review
- Storage: Corsair Neutron XTi 480GB - Buy from Amazon / Read our review
- Case: INWIN D-Frame - Read our review
- Power Supply: Thermaltake Toughpower DPS 1050W - Buy from Amazon / Read our review
- OS: Microsoft Windows 10 Home 64-bit - Buy from Amazon
- Software: RealTemp 3.70, AIDA64 Engineer 5.75.3900, and CPU-z 1.77.0 x64
To see our testing methodology and to find out what goes into making our charts, please refer to our CPU Cooler Testing and Methodology article (October 2016) for more information.
Thermal Results
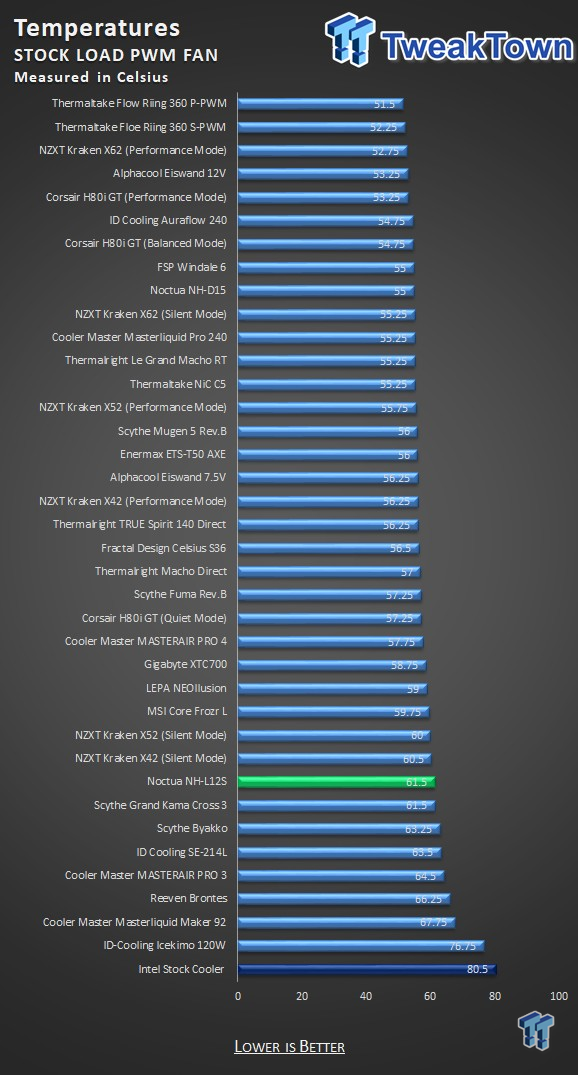
Well within the TDP limits, the stock testing of the CPU results in temperatures that are 61.5-degrees, averaged across all cores. At first glance, it does not seem to favor Noctua, but look at how close to an AIO it is, and consider the size of a few coolers it is better than.
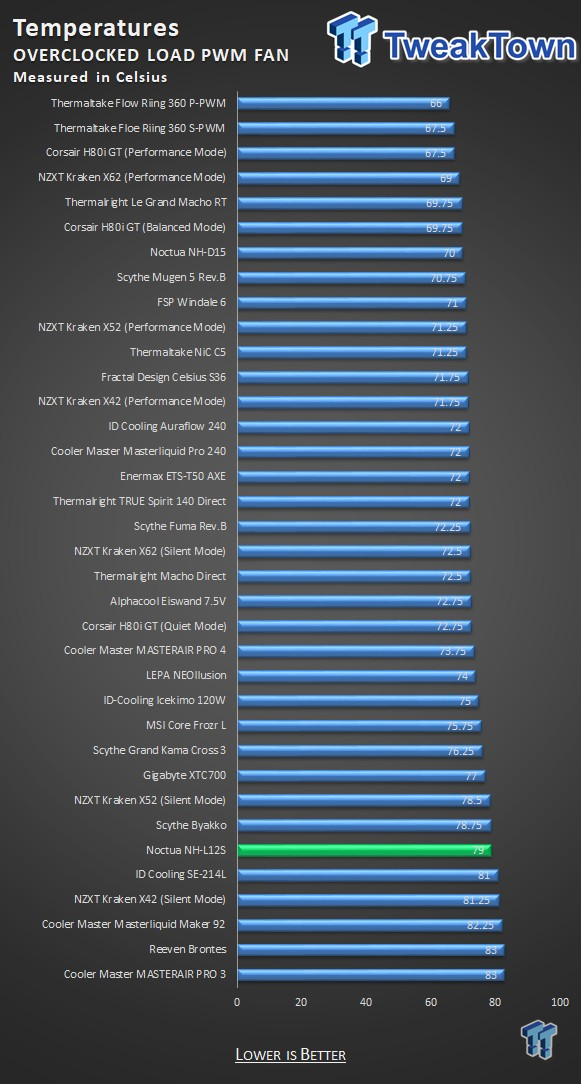
We did not have high hopes for the overclocked testing of the CPU, as we know we were going beyond the TDP. However, even with the fan still in PWM mode for power, we stopped just short of eighty degrees. Considering the facts and recommendations from Noctua about the TDP, we feel the results are pretty darn good for a cooler such as this.
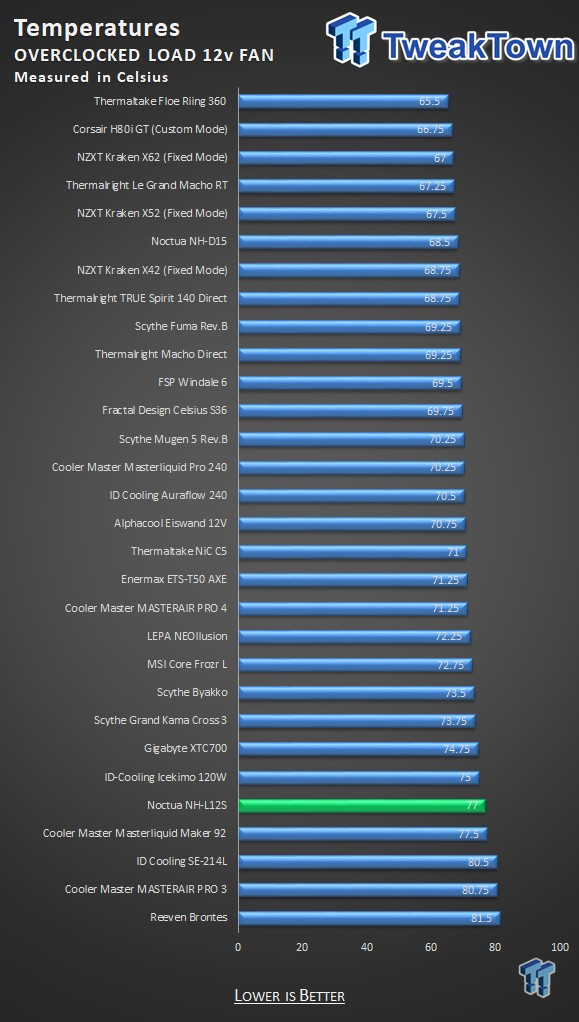
Noctua has set the PWM curve to favor less noise, but we feel they use a happy medium. The reason we say this is that with a 500 RPM bump in speed, and the noise that comes with it, we feel the two-degree advantage is not worth the effort, and Noctua does not leave much on the table.
Noise Level Results
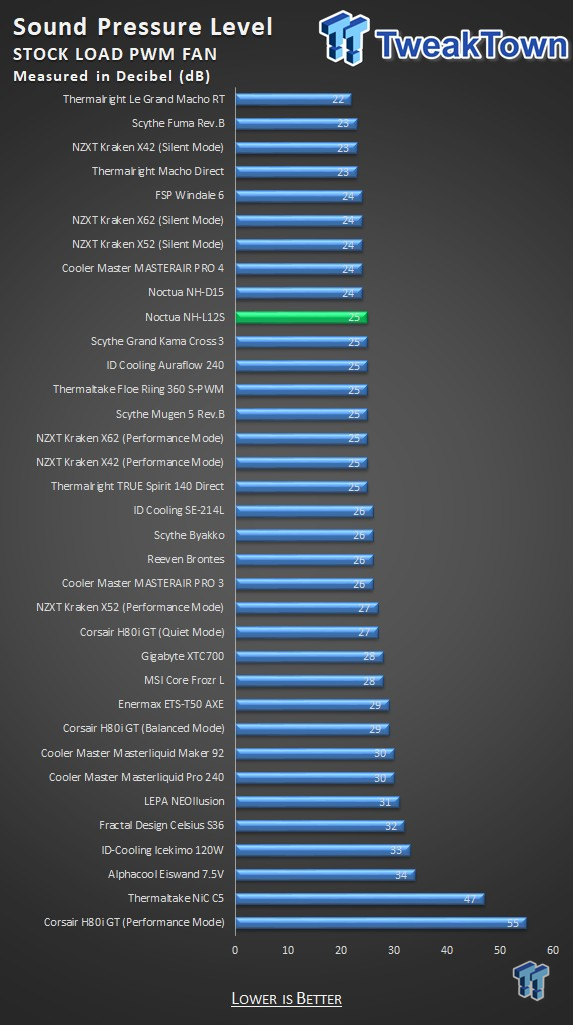
The fan will idle at 645 RPM, and is only 23 dB at that time. During testing at stock settings, the fan needed to increase to 1000 RPM to deliver the results we saw, and showing at 25 dB on the meter. Not bad for a 15mm thick fan, most other similar fans are much louder at this point.
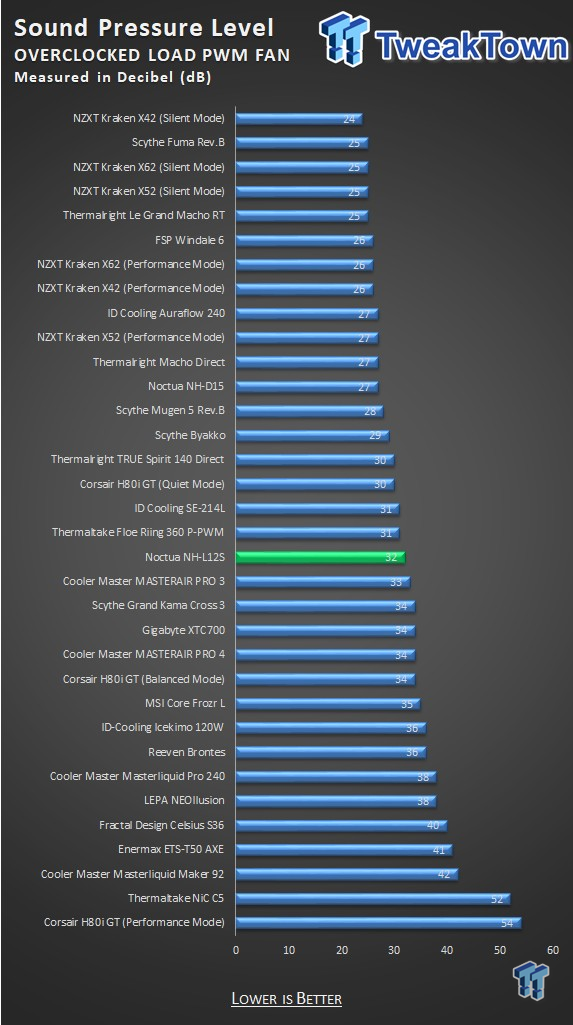
Using larger or thicker fans makes it much easier to keep noise levels low for many other Noctua Coolers, but the 32 dB we heard when the PWM circuit had the fan at 1289 RPM. The results are very acceptable; it is just a bit more than we have gotten in the past from Noctua Coolers.
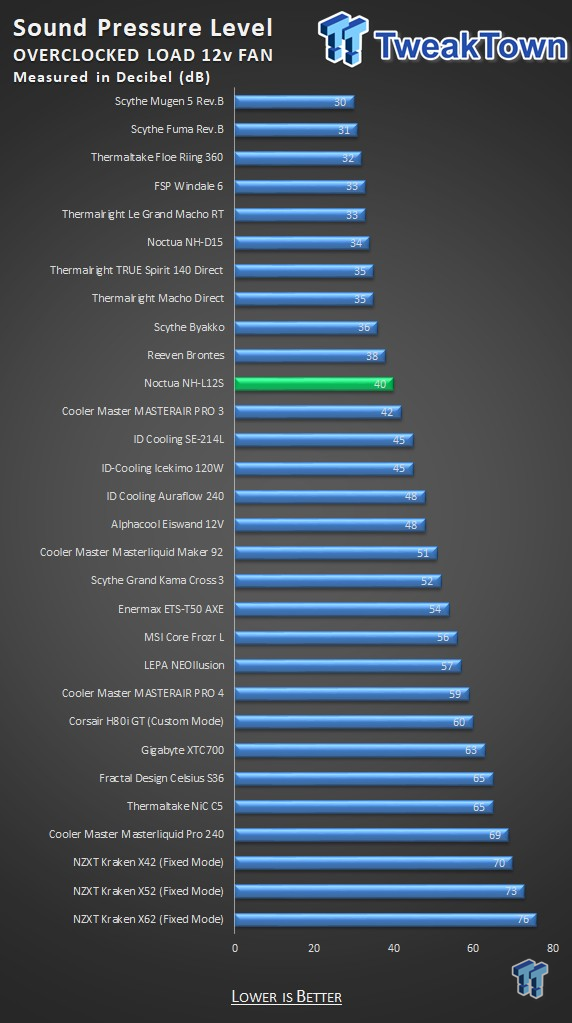
If for some reason, you need those extra two degrees of cooling power, or just want to run the fan at full speed, you will get two things to happen. The fan spins up to 1739 RPM, and it delivers 40 dB of noise. The only reason we are making a stink about noise, even though results are quite competitive, is that Noctua to us means silence along with all the other factors we expect to see.
Final Thoughts
All in all, we are pleased with the results the Noctua NH-L12S. Starting off with high-end materials, delivering superior build quality, soldering pipes to the base as well as the fins, using thicker fins, and ending with a cooler that can increase airflow around the CPU, or be used in a low-profile mode, makes it all worthwhile.

As long as you pay attention when purchasing the RAM to go under the MH-L12S, we foresee no issues in your future. It clears the PCI-e slot, there is access all around it, and the airflow direction can be changed based on needs. For those tiny boxes with a PSU on top of the CPU cooler, blowing air through the cooler and into the PSU is the best course of action.
For cases with a bit more room to draw air from, you can blow the fan down, which in our testing offered a two-degree drop on the sticks under the fan, and the same drop is found on the VRM section. Whatever layout you may encounter inside of your compact chassis, as long as things start off with slightly more than 70mm clearance, the Noctua MH-L12S is a great option.
Yes, we did exaggerate the amount of noise as we discussed the charts, but this is only because Noctua coolers are typically chart-topping when it comes to silent cooling options. Of course, they are starting with a 120mm fan, to begin with, and a 15mm thick one at that.
Compared to other similar fans, the noise level is still quite low and even compared to all the ones we tested, the NH-L12S still performs better than the averages. The fact that we took a cooler with a relatively low TDP cap, gave the processor the beans, and were still able to pass tests with results we were shocked by, in a good way, this compact Noctua cooler keeps looking better the more we discuss it.

In the end, whether limited by space or not, the NH-L12S is an affordable cooler with produces pleasing results. What more can you ask of a cooler designed to fit where others cannot?
When it comes time to deliver a verdict, we give the Noctua NH-L12S two big thumbs up. Able to run close to an AIO at near half the cost, and even with the 95W TDP limit advised, we were able to take this cooler to that point and beyond, and our CPU was still well in the safe zone.
Since we can sit here from the comfort of our desk and type in Amazon to the search bar and within a few seconds have the $49.90 CPU cooler a click away from a purchase, we have no issues with the price point either. Noctua makes enough changes to the NH-L12 to offer a new way of seeing the possibility of their compact CPU cooling solutions with the NH-L12S, and we have no reasons why anyone with the clearance should not opt for this cooler over all the other choices in this category.

| Performance | 92% |
| Quality | 100% |
| Features | 98% |
| Value | 97% |
| Overall | 97% |
The Bottom Line: The NH-L12S is a terrific option for those with limited space! Our testing went beyond the TDP limit and still passed with flying colors! With a minimal investment, this secure, easy to install cooler can be yours, and with all the latest motherboard hardware, Noctua leaves nobody out!
PRICING: You can find products similar to this one for sale below.
 United
States: Find other tech and computer products like this
over at Amazon.com
 United
Kingdom: Find other tech and computer products like this
over at Amazon.co.uk
 Australia:
Find other tech and computer products like this over at Amazon.com.au
 Canada:
Find other tech and computer products like this over at Amazon.ca
 Deutschland:
Finde andere Technik- und Computerprodukte wie dieses auf Amazon.de
What's in Chad's PC?
- CPU: Intel Core i7 13700K
- MOTHERBOARD: ASUS ROG Maximus Z690 Hero Eva
- RAM: TEAM DDR5-7200 32GB
- GPU: ASUS GeForce RTX 3090 Eva
- SSD: addlink m.2 2TB
- OS: Windows 11 Pro
- COOLER: Fractal Lumen S36
- PSU: be quiet! Dark Power Pro 1500W
- KEYBOARD: ASUS ROG Strix Scope TKL Electro Punk
- MOUSE: ASUS ROG Strix Impact Electro Punk
- MONITOR: ASUS ROG Swift OLED PG42UQ
Related Tags

