


Our Verdict
Introduction, Specifications, and Pricing
Ever since we were introduced to In Win, we have seen that they have run the gamut with chassis design, and are not afraid to try anything that looks great on paper. That being said, we have seen "econobox" cases that were not all that impressive and were designed for cost savings and those who appreciate odd styling, although, on that note, many of them have been phased out. On the flip side of that coin, In Win has also come up with quite a few show-stopping designs which have taken the world by storm, which is where the D-Frame, X-Frame, H-Frame, and others of this caliber come into play. However, there is still the middle ground, where many customers shop for products, where all they want is a terrific chassis which has a ton of features, but it won't break the bank obtaining it.
The latter of the three groups is why we have you all here today, and in what we have seen from In Win in the past, they appear to have a good grip on what customers want. We have seen many stylish additions come out as of late, some with tempered glass, some now with RGB lighting, but the basic concept is to deliver a chassis which is roomy inside but not huge, stylish but not aggressive, and offering many of the latest and greatest features inside and out. Many of the cases from In Win fall into this category, and even though the market is flooded with such chassis designs, In Win wants to give it another go and see if they can come up with something which fits the needs of the masses. This time in a different light than many we have seen from them before this.
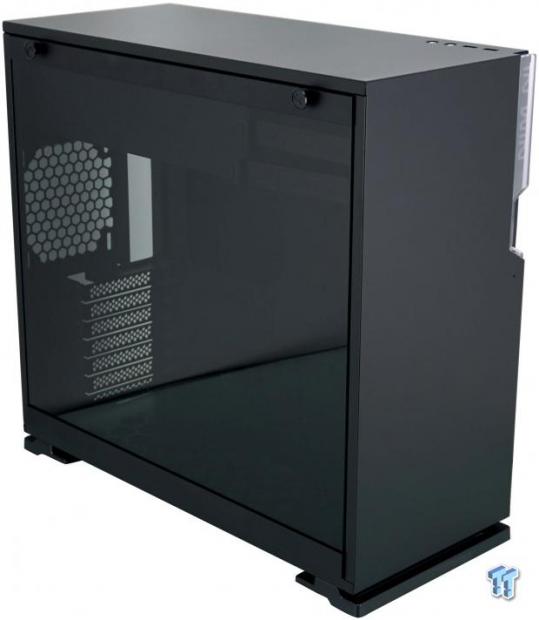
The chassis that brings us all together today is the In Win 101 Mid-Tower Chassis. While this chassis does deliver with an easy to remove, tempered glass side panel, sleek aesthetics, and a roomy interior, the entire design is a bit retro. This is not to say we find a bare metal interior with bays running down the entire front of the chassis, but rather In Win moved the PSU to the top like many we saw quite a few years ago. However, In Win is still able to offer a chassis which is roomy enough for many users, even those with dreams of packing an E-ATX motherboard into a mid-tower, and at the same time, hide everything we do not want to see, while highlighting everything sexy inside of the case. If you like options, but do not want a huge full-tower chassis, it is quite possible that the In Win 101 may be the chassis you are looking for when it comes time for your next build.


By looking at the chart, we can see In Win calls this chassis the 101, but be aware that there is also an RGB lit version called the 101C, and these mid-tower cases can be had in black or white paint. The materials used to build the chassis are SECC steel for the majority of the parts, some use of ABS plastic in the dust filter, drive bays, and the feet, and tempered glass for the left side panel. However, we also noticed that on the product page, you could request an acrylic and steel side panel for this chassis too. Dimensionally, the 101 is 445mm tall, it is 220mm wide, it is 480mm deep, and it weighs in at 7.25 kg when empty.
In, on, and around the chassis, there are a few things to discuss. Motherboard compatibility is shown to support ATX, Micro-ATX, and Mini-ITX motherboards, however, the motherboard tray does have holes in it for standoffs to support some E-ATX motherboards as well. There are seven expansion slots at the back of the chassis, while on top of the chassis there is a pair of USB 3.0 ports and 3.5mm HD Audio jacks. The power button is blended into a clear plastic component in the front bezel, and there is also a tiny hole just below it where the HDD activity LED shines through it. There are two bays att he top of the chassis which are made to support a pair of 3.5" drives, but can also be used for 2.5" drives. Beyond that, we also find that there is a pair of hidden 2.5" drive trays on the back of the motherboard tray as well.
There is not a single fan to be found inside of the In Win 101, but there are sufficient cooling options. The back of the chassis can house a 120mm fan or radiator. The right side of the chassis will house two 120mm fans or a 240mm radiator. There is also a third option, which is the floor of the chassis, where three 120mm fans or a 360mm radiator can be installed.
Clearances are also listed in the chart. It is there where we see that the video cards can be 421mm long. However, if you install a radiator on the right side of the chassis, that length is then reduced to 305mm. CPU air coolers can be 160mm tall, which does eliminate some of the largest solutions, but will fit nearly every 120mm tower and many 140mm towers too. As for the PSU, the only thing that could cause a limit is the pair of HDD bays, but with them still, in place, there is 200mm of room for the PSU and wires to reside.
Our Latest Mid-Tower Cases Review Coverage
In our heads, we were figuring out what the cost should be, and we thought that this would be a $50 case if built by anyone else on the market, but we will add another $20 because there is a tempered glass side panel. That being said, we were not far off the mark at all. When it came time to locate the In Win 101, we found it on both Amazon and Newegg, where it is listed for just $69.99. If you want to opt to move into the 101C with its RGB LED front panel section, the cost only increases $10 to $79.99, but it is only sold at Newegg and not at Amazon. That being said, with the chassis we have for you in hand, we feel that the $69.99 price is on point, and it should be of little concern when it comes to the decision of if this is the right chassis for your components.
Chad's Chassis Test System Specifications
- Motherboard: ASUS Maximus IX Code Z270 (buy from Amazon)
- CPU: Intel Core i7 7700K (buy from Amazon)
- Cooler: NZXT Kraken X62 (buy from Amazon)
- Memory: Team T-Force Night Hawk RGB TF1D48G3000HC16CBK
- Video Card: NVIDIA GeForce GTX 980 (buy from Amazon)
- Storage: Samsung XP941 256GB (buy from Amazon)
- Power Supply: SilverStone SST-ST85F-G (buy from Amazon)
- OS: Microsoft Windows 10 Home 64-bit (buy from Amazon)
Packaging

Even though the plain cardboard box delivers a minimalist approach to packaging, we do see three important things here. First of all, we see the In Win logo to tell us who makes it, and we also see the 101 product name. The hexagonal shapes on the left may initially just look like package styling; it is a nod to the ventilation offered in the right-side panel of this chassis.

Moving to the thinner side panel of the box, we see that the sticker is found in the Black box, but there are white ones, and Others leaves room for options which may come later. Styling, detail-oriented design, versatile cooling options, top PSU mounting, and extra GPU support are all listed as features, with a specifications chart and renderings of features and included bits end what is shown on this side.

The back of the box is identical in every way to what we found on the front of the box.

The last of the exterior panels deliver the company name, logo, tag-line, and site address at the top. In the middle is a sticker which has where the case was shipped from, what is in the box, the color of it, as well as a couple of barcodes for company use. The bottom has four icons on how to handle the package while in transit.

Inside of the box, we find that the In Win 101 is wrapped inside of a clear plastic bag, which protects the paint and glass from being scratched. The front and back of the chassis are where In Win opts to put the Styrofoam caps to protect the chassis from being crushed or when heavy items are set on top of it and worked perfectly to deliver us a flawless example of the In Win 101 Mid-Tower Chassis.
In Win 101 Mid-Tower Chassis

The front bezel of the 101 is solid, sleek, and simplistic in its design. The entire panel is covered in steel which has been painted black to match the rest of the chassis. In the top-right corner, we do see the clear plastic section with the In Win name carved into it, with a space near the bottom to access the power button.

As we move in much closer to what we see under the In Win name, we can see the clear plastic power button which needs to be pressed downwards to function. Just below the power button, we can see a tiny hole in the steel, and behind it is a red LED which denotes HDD activity.

The rest of the I/O panel is found on top of the chassis, near the front, on the right side. It is here where you can connect to the pair of USB 3.0 ports or make 3.5mm connections with headphones and a microphone to connect to HD Audio.

Taking a step back, we can now view the top of the chassis in its entirety. Like the front, the top of the chassis is solid with no ventilation. This has everything to do with the interior layout and nothing to do with trying to close off options for airflow inside of the chassis.

The left side of the case has the slightest bit of steel frame showing, as the bulk of the view is taken up with the tempered glass. The top of the panel is held in place with plastic tabs which lock into the steel frame, and once unlocked allows the top to move outward so the panel can be lifted from the bottom of the frame.
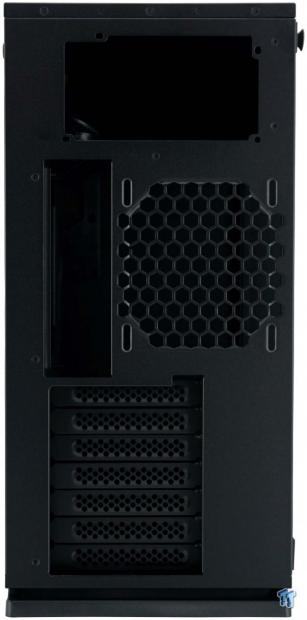
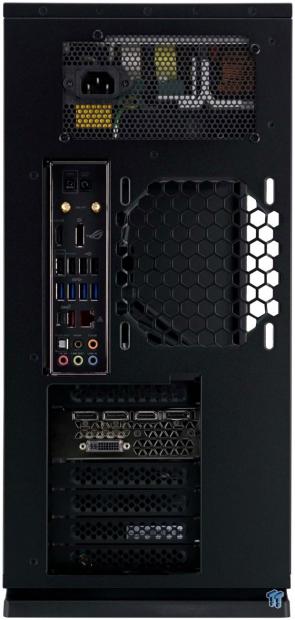
The view from behind the chassis is retro, where the PSU is mounted above everything else. After the PSU we find the rear I/O area and room for a 120mm fan, with seven expansion slots further down the back of the case.

The right side of the case has a panel made of steel, which has thumbscrews to release it in the same fashion as the left side panel. Much like what we saw on the packaging, the design points to the ventilation offered in the right-side panel, which is how one of the cooling locations breathes through the chassis.

Under the 101 we find that In Win opted for large plastic feet which are as wide as the case, one at the front, and one at the back. The feet are designed to capture the dust filter, allowing it to come out just below the glass side panel, but they offer very small rubber pads to give grip.
Inside the 101

Glancing into the 101 once the glass is removed gives us a view of a wide-open interior, separated only by the SPU cover and bays at the top of it. We also left the back panel on at this time, so that you can see how the ventilation in the right side of the chassis aligns with the optional cooling location.

Just behind the bezel are a pair of 3.5" drive bays, which unlock and slide out the left side of the case. We also noticed the Phillips screws to the left of them, which allows this pair of bays to be removed if that is desired in your build.
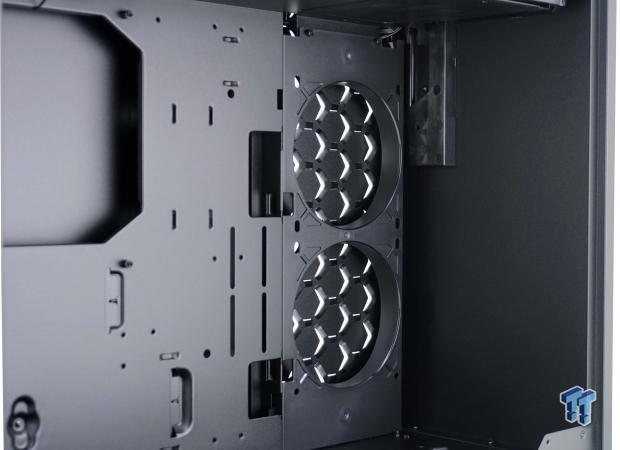
Inside of the front panel, there is only the plastic cover for the wires and LEDs for the clear plastic outside of it. Otherwise, the view is of steel. Addressing the optional cooling location, there is room for a pair of 120mm fans or a 240mm radiator, and the direction of airflow is up to you. We suggest out, as there is no dust filter.

The PSU cover not only blocks the view of the power supply and most of its wires, but it also has the In Win logo embossed on the side of it. Under the cover, we see a large opening for the PSU fan to breathe through, and in front of that is a smaller opening to pass wires through.

The motherboard tray has a large opening for access to CPU cooler backplates, as well as offering three holes where wires can be sent to the front for connectivity. Sadly, there are no grommets in these holes, but we do find eight places we can tie wires to.

The floor of the chassis is completely unimpeded and is a great place to add optional cooling. The openings in the mesh are large, but only 120mm cooling solutions can be used with secure mounting.

The back of the chassis has an optional location for another 120mm fan or radiator, and to the right of it is where the dust shield goes. Oddly, there is no top and bottom stop for the rear I/O, which allows the shield to move up and down. As for the expansion slots, they are accessed internally and use hex head screws.

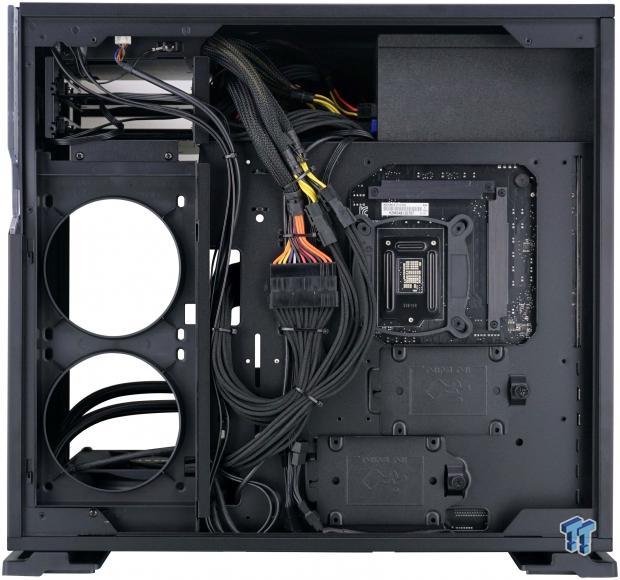
Behind the motherboard tray, we find the front panel wires are tied up in the PSU area after they drape over the back of the HDD bays. There is a steel rib which runs down the left side, to help keep wires out of the cooling area, with small gaps to pass wires through. We also see the pair of 2.5" drive trays, offset from one another, just below the backplate access hole.

The wires from the front I/O panel have enough length to connect to any motherboard layout, and all of the wires are black to blend in with the chassis. Here we see the native USB 3.0 connector on the left, thin wires for the power button and HDD activity LED, and on the right, is the lead for HD Audio connectivity.
Hardware & Documentation

In Win ships all of the hardware in separate bags, which are labeled as to what their use is. At the top-left, we see twelve M3 screws for 2.5" drive mounting, and to the right of them are twelve standard fan screws to aid in mounting optional fans inside of the 101. The bottom row offers a bag with the motherboard and PSU screws, standoffs, and the socket to drive them, while the bag to the right offers eight thin washers noted for use with water cooling.

Inside of a larger, thicker, slide-lock style bag, we also located the GPU support bar and the pair of Phillips head screws to secure it to slots found in the motherboard tray. In that same bag is where we also grabbed the ten zip-ties seen here, which is enough to please any wire management ideas.

The manual is multilingual and starts with a product story of how the 101 came to be. The case structure section follows, where features are pointed out, at which time we then move onto what should be found in the box, and what the purpose for each of them is. The specifications, notices, and warranty are next, which takes us nineteen pages into the manual. At the end of the manual is where you will then find only two pages of images and text descriptions of how to install components and the options for cooling.
Case Build & Finished Product

Once the build is completed and we make our way back to the front of the chassis, we are pleased to see that nothing has changed. We still see the sleek and sophisticated simplicity that In Win offers right out of the box.
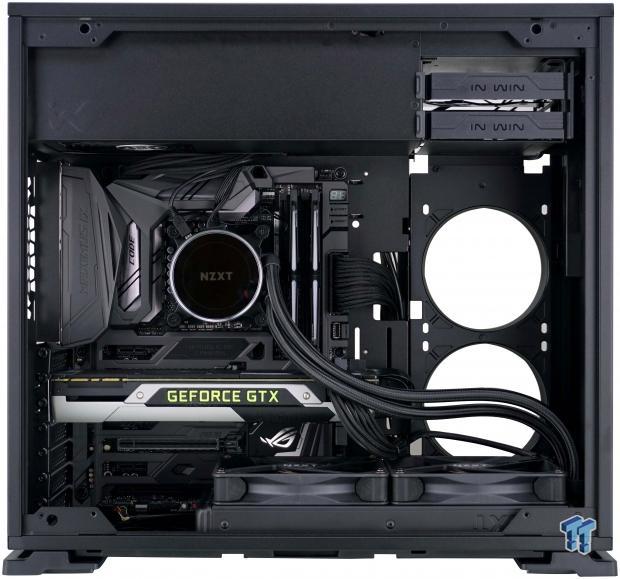
Installing the motherboard and video card is as easy as can be in the In Win 101, and while only two screws are securing the AIO, we were able to fit a 280mm radiator on the floor. The cable routing holes are placed well, and the finished product is clean and attractive to look at.
The PSU slides into place without much fuss, but the rear I/O cover isn't locked into place, it slides up and down, which can cause a slight slowdown in placing the motherboard into the chassis while you align it. As for the card, it aligns without needing for flex the chassis and sits level as expected.
Behind the motherboard tray, since we used cable extensions, we did have to get creative with the tie points, but even so, we were able to manage. Wiring is kept to the right of the fan locations to the left, and we found lots of room by the PSU to tuck in excess wires.

Now that the chassis is all back together, and we stepped back to take it all in, we like what we are seeing. The window is tinted slightly, but not enough to keep us from seeing inside of the chassis and looking at all of the main components.
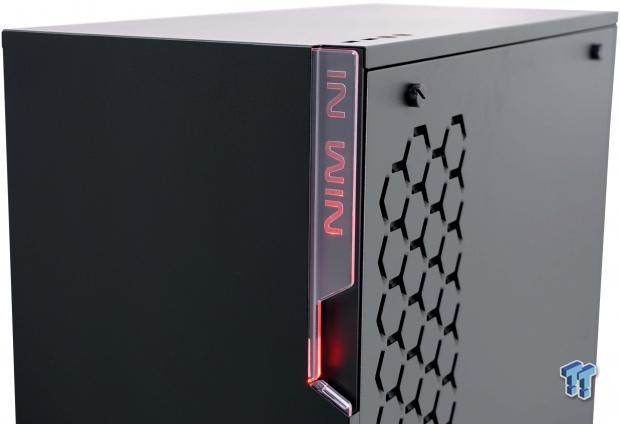
Adding the power cable to the PSU and pressing the power button brings the In Win 101 to life. The front of the chassis begins to glow with red LED light in the clear plastic section, and is attractive without being flashy or gaudy in appearance.

Our last image of the In Win 101 shows that once powered, the LED lighting on the memory, the head unit, the motherboard, as well as on the side of the video card are all clearly visible. Many may want to add some interior chassis lighting to improve upon the view of the internal components, but we have no complaints about what we are seeing.
Final Thoughts
The In Win 101 brings many things to the table that buyers will appreciate. The aesthetics are clean and sleek, the clear plastic section on the face of it is backlit (RGB backlit for the 101C), and who does not like tempered glass on the side of their chassis. The pull tabs on the left panel make getting inside of the chassis simple, and even with thumbscrews used on the right side, In Win has removed the issue of flat steel panels aligning with tabs and locks as many others have. The interior is spacious for such a small mid-tower, the PSU at the top helps with airflow, and since there are no fans preinstalled, the amount of cooling and noise from it can be defined by the user, and you aren't stuck with loud or insufficient fans already in the chassis. We like the hidden drive trays, the wire management is sufficient for most builds, and with three locations to choose from for 120mm cooling options, including AIOs, we feel the In Win 101 is a solid candidate for your hard-earned dollars.
We did run across a couple of things we would have done differently though. First is the way in which the rear I/O cover locks into place. In Win likely saved five cents not using a top and bottom stop plate in this area, and to our recollection, this is the first chassis we have seen where all four sides of the cover are not locked into the chassis. It is not a huge deal breaker, but with the cover allowed to move up and down, when placing the motherboard inside, you will have to jockey the plate to align it with the motherboard. The second thing is the lack of 140mm fan support. While we can fit a 280mm radiator on the floor of the chassis, there are no screw holes to secure it completely. We feel this is a missed opportunity for In Win and the 101. If you do not plan to move the chassis around, you can do like we did and align two of the screws to secure it, and with limited mounting, vibration was not an issue for us.
With all of that being said, we feel that the pros outweigh the cons in this chassis. In Win has put much thought into the design, and has delivered on many of the latest and greatest features too. We have a chassis with a lot of room inside for all of the components that need to be there, with plenty of room for custom water cooling or AIO support. What takes the In Win 101 from an average chassis to one that will make many out there pine to get on for themselves is the cost though. Consider the fact that you get a chassis the covers the wants and desires of the masses, but costs just $69.99. Even if you wish to opt for RGB LED illumination of the front panel, it will only cost you $10 more to add that feature. The math is right on a chassis such as this, it just comes down to personal tastes, but for us, the In Win 101 Mid-Tower Chassis is worth a look, as it will likely win you over for your next build.
Chad's Chassis Test System Specifications
- Motherboard: ASUS Maximus IX Code Z270 (buy from Amazon)
- CPU: Intel Core i7 7700K (buy from Amazon)
- Cooler: NZXT Kraken X62 (buy from Amazon)
- Memory: Team T-Force Night Hawk RGB TF1D48G3000HC16CBK
- Video Card: NVIDIA GeForce GTX 980 (buy from Amazon)
- Storage: Samsung XP941 256GB (buy from Amazon)
- Power Supply: SilverStone SST-ST85F-G (buy from Amazon)
- OS: Microsoft Windows 10 Home 64-bit (buy from Amazon)
 Lian Li B4-mATX Review: a compact mATX SFF case with excellent airflow and premium features
 Ocypus Sigma F36 BK ARGB Cooling Fan Review: high airflow and unified design in one frame
 PCCooler CPS RZ820 Display Review: a flagship-level CPU air cooler with an LCD screen
 MOAIPLAY ORA PRO G1 850W ATX 3.1 PSU Review: high efficiency and 10-year warranty for $119.99
 NZXT H6 RGB+ Compact Dual-Chamber Chassis Review
 Samsung's 2026 profit to surpass its entire 40-year cumulative earnings
 First 'agentic ransomware' run entirely by a large language model discovered
 PlayStation disc phaseout petition hits 120,000 signatures in just four days
 Epic Games settles court case against ex-contractor over Fortnite leaks
 Cyberpunk 2077 hits 100,000 concurrent players on Steam, highest since 2023
 KIOXIA begins sampling 10th-generation BiCS FLASH technology, more efficient and with an impressive 332 layers
 Razer unveils Wuthering Waves collection with a custom keyboard, mouse, and premium gaming chair
 Intel prepping Ryzen X3D rivals with new 22-core Nova Lake-S CPUs with 108MB of cache for PC gaming
 Lenovo starts shipping laptops with Chinese-made YMTC SSDs due to skyrocketing NAND Flash prices
 Gen Z would like esports and professional gaming taught in school, study finds
 GIGABYTE X870E Aero X3D Dark Wood Review - A woody goody
 The Super Mario Galaxy Movie (2026) 4K Ultra HD Blu-ray Review
 KTC H49S66 5K2K (5120x1440) 49-inch 180Hz Gaming Monitor Review
 HighPoint Rocket 1604L Gen5 x16 NVMe Software RAID AIC Review: half the price with full 59 GB/s speed
 Next Level Racing ERS3 Haptic Seat Review: immersive sim racing comfort with integrated haptics
 ASUS TUF Gaming X870-Pro WiFi7 W NEO Review - Tuffed up
 GIGABYTE GO27Q24G Gaming Monitor Review: Glossy OLED Gaming at 240Hz
 MSI MPG 322UR QD-OLED X24 Review: A Brighter, Tougher 4K 240Hz QD-OLED for $1099
 UGREEN NASync DXP4800 GT Review: powerful 4-bay NAS with AMD Ryzen and dual 10GbE ports
 How to Remap Keyboard Keys in Windows using Microsoft PowerToys
 7 tips to organize your Windows files for faster, easier access
 Intel Arc G3 Extreme first impressions with MSI's Claw 8 EX AI+ - Incredible power for an extreme price
 How to fix Wi-Fi Adapter Not Working on Windows laptops: troubleshooting tips
 Hisense U7SG 4K TV: Modern Entertainment for the New Age
 6 underrated Microsoft Word features worth using to boost your productivity
 Level Up Your PC Gaming with these Fantastic ASUS Prime Day Deals on GPUs, Motherboards, and More
 GIGABYTE Wants to Kickstart Your New Gaming PC or Upgrade with These Limited-Time Deals
 7 Windows settings to change right after installation for better privacy, security, and performance
 I stopped Windows 11 notifications from interrupting me with Do Not Disturb, Focus, and a priority list