


Our Verdict
Introduction, Specifications, and Pricing
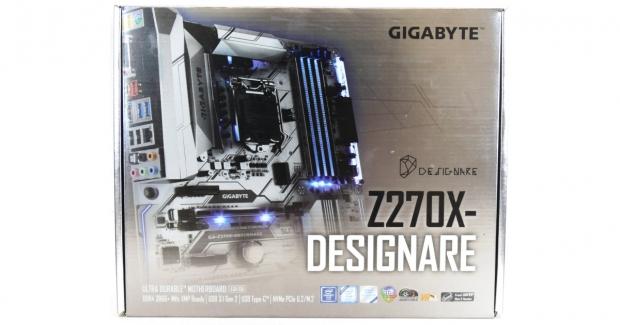
GIGABYTE teased their Z270X-Designare earlier this year at CES, but we had no idea when it would come to market, but it seems that it has finally landed. While Designare is not a word in the English language, we can see where GIGABYTE was going with it. It's a design of the word design, and it's unique, just like the motherboard.
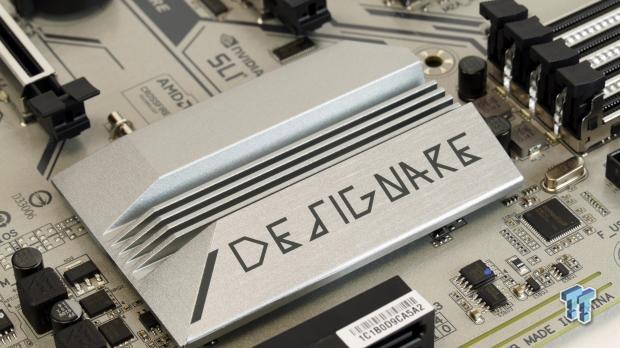
The Z270X-Designare is the first time GIGABYTE has done a white/silver PCB, and I actually like how it looks in person. The motherboard is also plastered with RGB LEDs, and if you don't like them, you can just disable them. The Designare line of motherboards is marketed towards modders and those who just want something that looks different, and that market is bigger than most think.
Let's see what the Z270X-Designare has to offer!
Specifications

The Z270X-Designare offers M.2, U.2, USB 3.1 on the rear IO and through an internal header, USB 3.0, SATA6Gb/s, and an Intel NIC.
Pricing
The Z270X-Designare costs $174.99.
Packaging and Z270X-Designare Overview
Packaging and Overview


GIGABYTE's first white/silver PCB design motherboard comes with a matching box. Packaging is similar to that of GIGABYTE's other Z270 mid-range offerings and protects the motherboard and accessories from the elements.
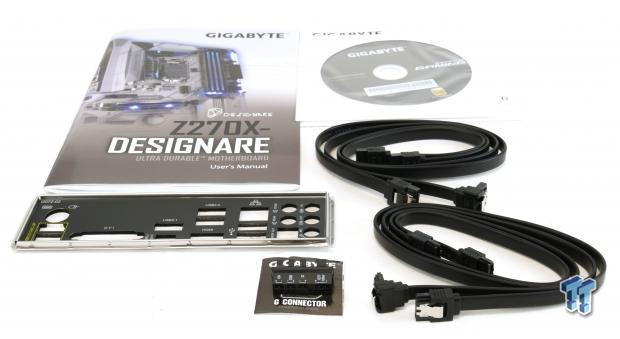
The accessory package includes four SATA6Gb/s cables, G-Connector, driver DVD, manual, and IO panel.
Our Latest Socket LGA 1150/1151 Review Coverage


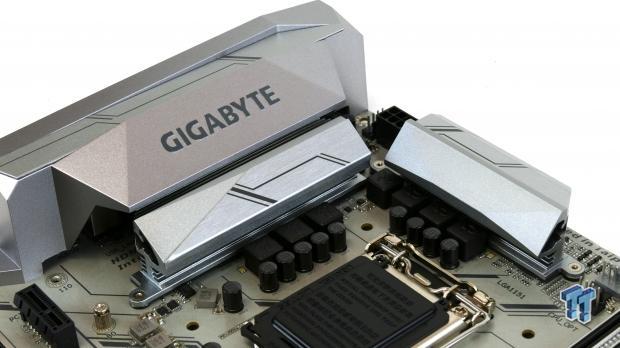
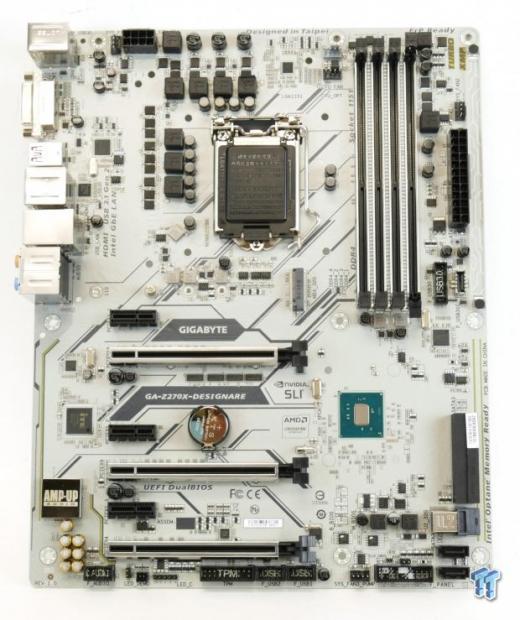
The Z270X-Designare has five four-pin fan headers; each header can support either PWM or DC mode of operation. All the headers are 1A except for the two circled in blue, which support up to 2A of output for water pumps and high-performance fans. You can control all the fan headers through the UEFI or Windows.
GIGABYTE's UEFI based fan control has improved over previous generations, so if you are coming from a two-year-old or older GIGABYTE motherboard, you will be pleasantly surprised. The back of the motherboard is bare of most components so that you won't have much trouble installing the motherboard.
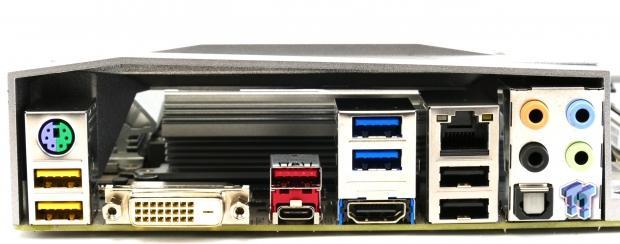
The rear IO panel features PS/2 Keyboard/Mouse two USB 3.0 ports with DAC-UP 2 (yellow) DVI, USB 3.1 type-A, USB 3.1 type-C, two USB 3.0 ports, HDMI, two USB 2.0 ports, 1Gbit LAN, and 7.1 audio outputs with S/PDIF out.


There are three full sized x16 PCI-E 3.0 slots; the first two are routed to the CPU and operate at x16/x0 or x8/x8. The last x4 slot is routed to the PCH and shared bandwidth with the bottom two PCI-E 3.0 x1 slots. A single 32Gb/s M.2 slot is located below the CPU socket.


The motherboard features six SATA6Gb/s ports, four of them are combo SATA Express ports and angled 90-degrees. A U.2 port is located to the left of the 90-degree SATA ports. A USB 3.0 header is located below the 24-pin power connector, in front of it is a type-C internal header that supports USB 3.1.


The two last SATA6Gb/s ports are located below the U.2 port. The motherboard also features an RGBW LED header and two USB 2.0 ports.


A large plastic RGB LED diffusion strip looks really neat when lit up, and you can change it out for other designs. All the heat sinks and IO cover are screwed into the motherboard.
GIGABYTE Z270X-Designare Circuit Analysis
Circuit Analysis
The Z270X-Designare's hardware is revealed after removing the heat sinks.


The VRM on this motherboard is a 4+3 phase VRM. It consists of an Intersil ISL95866 multi-phase R3 PWM controller chip, which offers 4+3 phase output. While the PWM controller has a total of 3 integrated drivers (2+1), GIGABYTE took advantage of all the rails by adding in four (2+2) ISL6625 single phase drivers.
Each driver on the main CPU VRM rail outputs to two low-side MOSFETs and one high-side MOSFET. Each driver on the iGPU rail outputs to one low-side MOSFET and one high-side MOSFET. The MOSFETs are ON Semiconductor 4C06N and 4C70N PowerPAKs. The
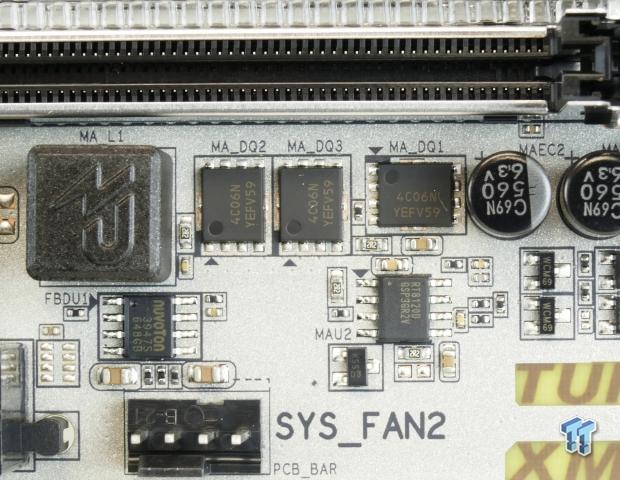
While the memory VRM is a single large phase controlled by a Richtek RT8120 single phase PWM with integrated driver and two low-side and one high-side MOSFET. The MOSFETs are all ON Semiconductor C406N.
GIGABYTE Z270X-Designare Circuit Analysis Continued
GIGABYTE uses the Realtek ALC1220 along with Nichicon Gold series audio capacitor and a physical PCB divide to improve audio performance. The Realtek ALC1220 offers a built-in headphone amplifier.


The Intel i219v is the PHY used to compliment the integrated MAC in the PCH to provide Intel Gbit LAN. An ITE IT7236AFN is used as the RGB LED controller.


There are two ASMedia ASM2142 USB 3.1 controllers for the rear and internal USB 3.1 ports/headers.


The main SuperIO is the ITE IT8686E, which provides PS/2, and system monitoring features. An NXP level shifter provides the DVI and HDMI ports on the rear IO panel.


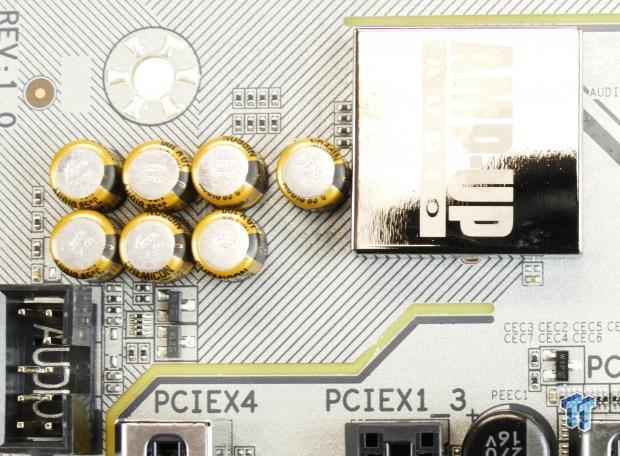
The motherboard features dual-BIOS with two 128Mbit/16MB BIOS ROMs. Four ASMedia ASM1480 switch x8 PCI-E 3.0 from the first to the second slot for two GPUs.
BIOS and Software
BIOS


GIGABYTE's latest UEFI is actually quite useful and offers a great amount of customization and overclocking features. It even offers very basic RGB LED control in the UEFI, of course, software in Windows will offer even more customization of the RGB LED headers and onboard LEDs. The motherboard also offers two different BIOS operation modes, an Easy Mode, and an Advanced Mode.


Software
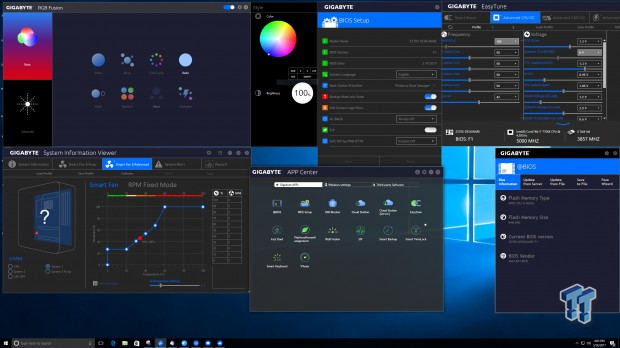
GIGABYTE includes @BIOS, BIOS Setup, USB Blocker, Cloud Station, EasyTune, Fast Boot, Platform Power Management, RGB Fusion, SIV, Smart Backup, Smart TimeLock, Smart Keyboard, and VTuner.
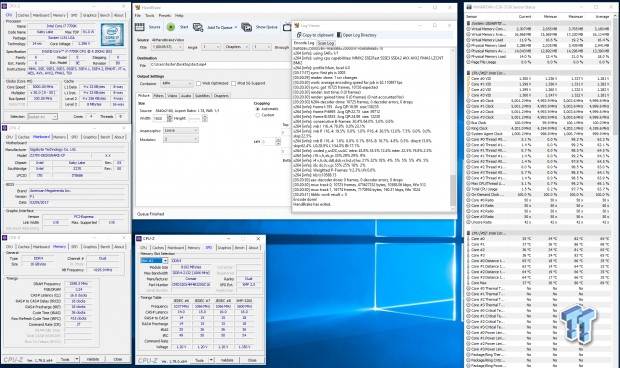
Test System Setup
Steven's Motherboard Test System Specifications
- Motherboard: GIGABYTE Z270X-Designare
- CPU: Intel Core i7 7700K
- Cooler: Corsair H115i GT - Buy from Amazon
- Memory: Corsair Dominator Platinum (2x8GB) 3200MHz
- Video Card: NVIDIA GeForce GTX 980 - Buy from Amazon / Read our review
- Storage - Boot Drive: Samsung 950 Pro 256GB - Buy from Amazon / Read our review
- Storage - SATA6G Drive: Corsair Force LS 240GB - Buy from Amazon / Read our review
- Storage - M.2 Drive: Intel 750 400GB U.2
- Storage - USB Drive: Corsair Voyager GS 64GB - Buy from Amazon / Read our review
- Case: Corsair Obsidian 900D - Buy from Amazon / Read our review
- Power Supply: Corsair HX1000 - Buy from Amazon / Read our review
- OS: Microsoft Windows 10 - Buy from Amazon
- Monitor: GIGABYTE PA328 ProArt 32" 4K - Buy from Amazon
- Keyboard: Corsair K70 LUX - Buy from Amazon
- Mouse: Corsair M65 PRO RGB - Buy from Amazon / Read our review
- Headset: Corsair VOID RGB Wireless - Buy from Amazon / Read our review
- BIOS: F1


The Z270X-Designare's color theme is one of its main selling points. By default the LEDs are blue, but since the motherboard uses RGB LEDs, you can change the color theme to whatever you want. The Designare is definitely one of the most interesting motherboards on the market, and one of the most unique.
Overclocking
Overclocking Results
CPU Overclocking
The Z270X-Designare is actually quite good at overclocking, and that is surprising because of its tiny VRM. However, the VRM delivers, and so does the BIOS, as I didn't really have to mess with many settings to achieve a 5GHz overclock with DRAM on XMP.
Compatible Memory Overclocking Kits
In this section, I overclock four memory kits only using XMP, if the kit works then the results are below. I welcome memory vendors to send in their kits to be tested on each motherboard.
Corsair Dominator Platinum 3200MHz C16 8GBx2


GEIL EVO X RGB 3200MHz C16 8GBx2


GEIL EVO FORZA 3200MHz C16 8GBx2


G.Skill 3866MHz C18 8GBx2


The Z270X-Designare overclocked all of our kits, including the high-end 3866MHz G.Skill TridentZ kit.
CPU, Memory, and System Benchmarks
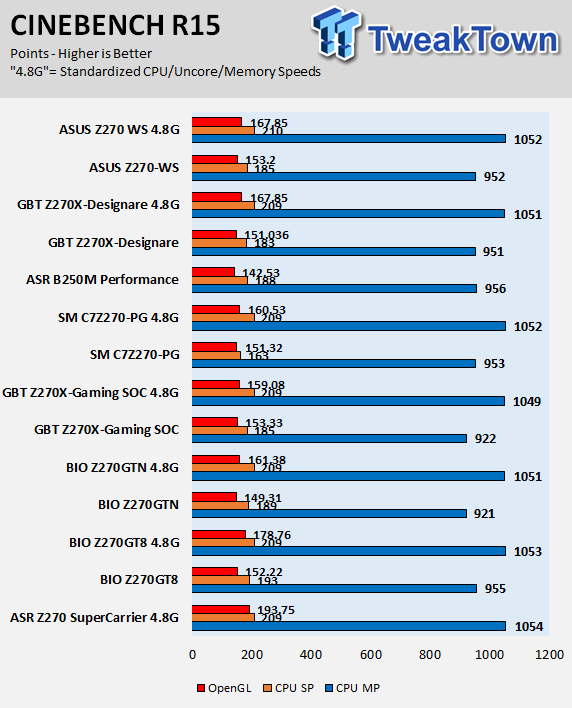
CINEBENCH 11.5
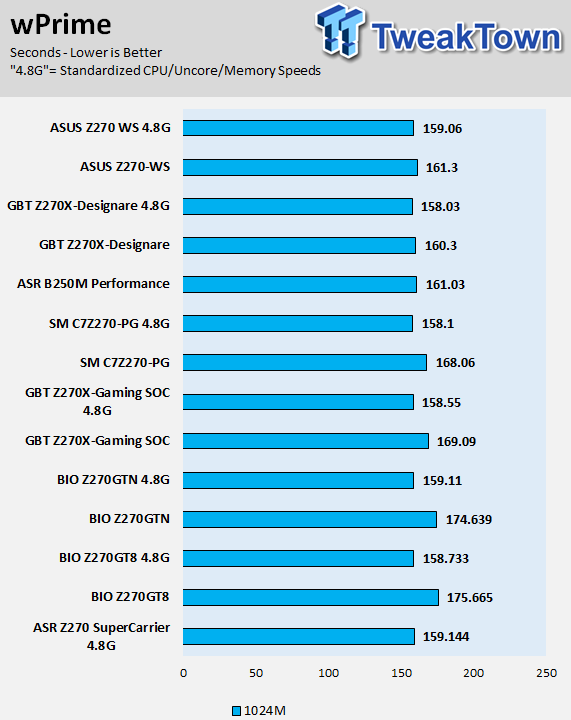
wPrime
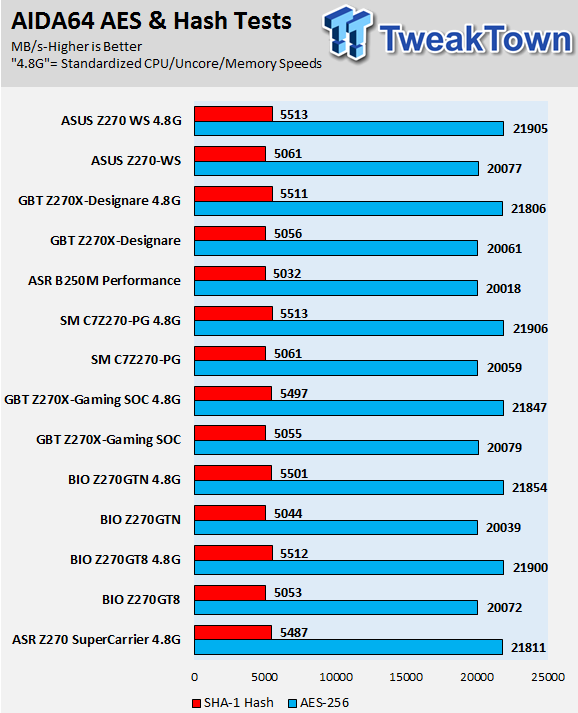
AIDA64 AES and HASH
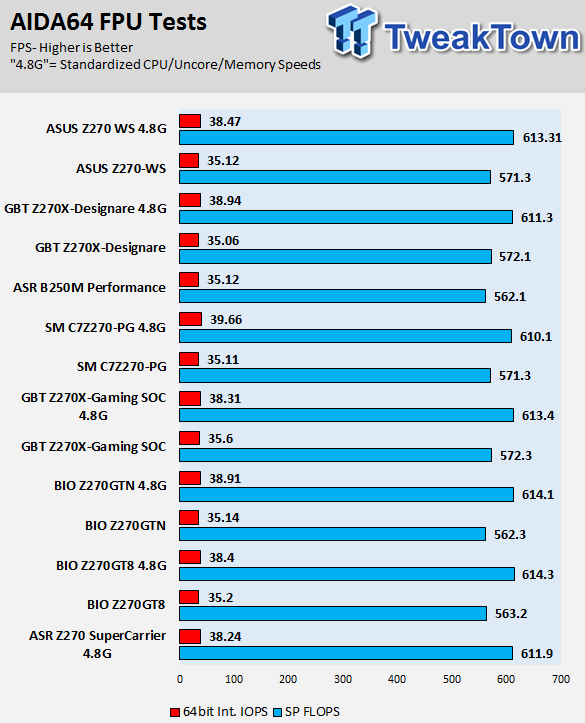
AIDA64 FPU
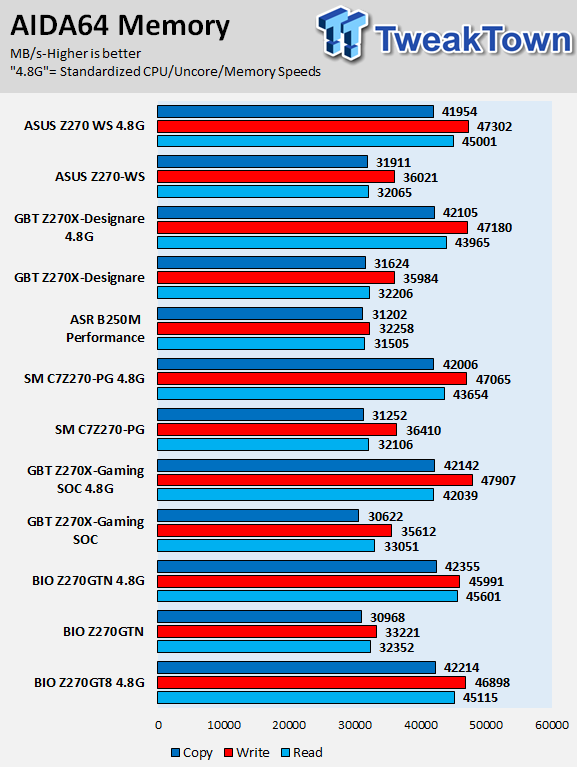
AIDA64 Memory
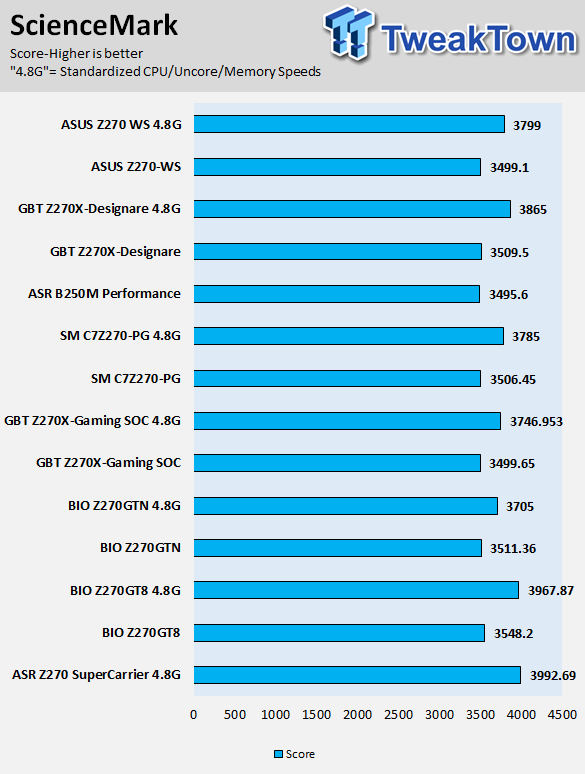
ScienceMark
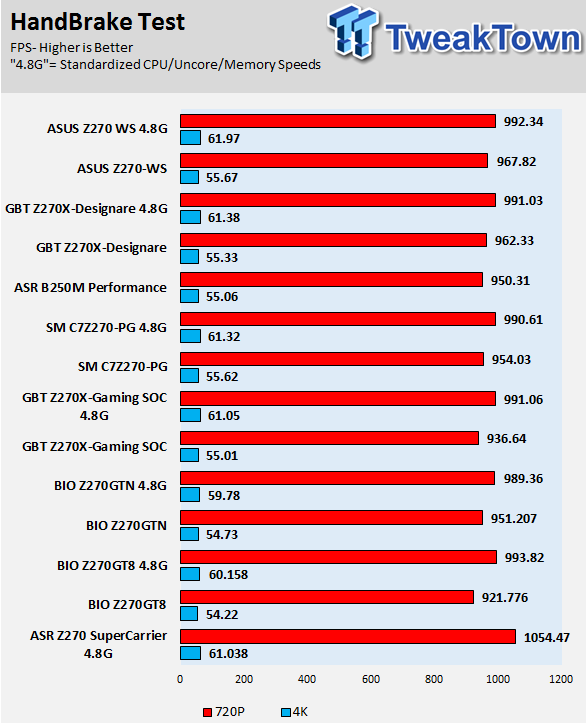
HandBrake
3DMark: Fire Strike

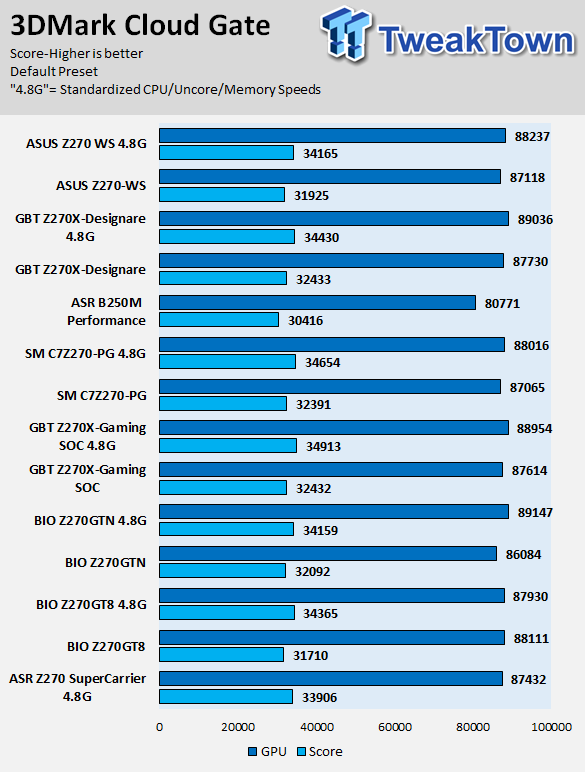
3DMark: Cloud Gate
ResidentEvil 6
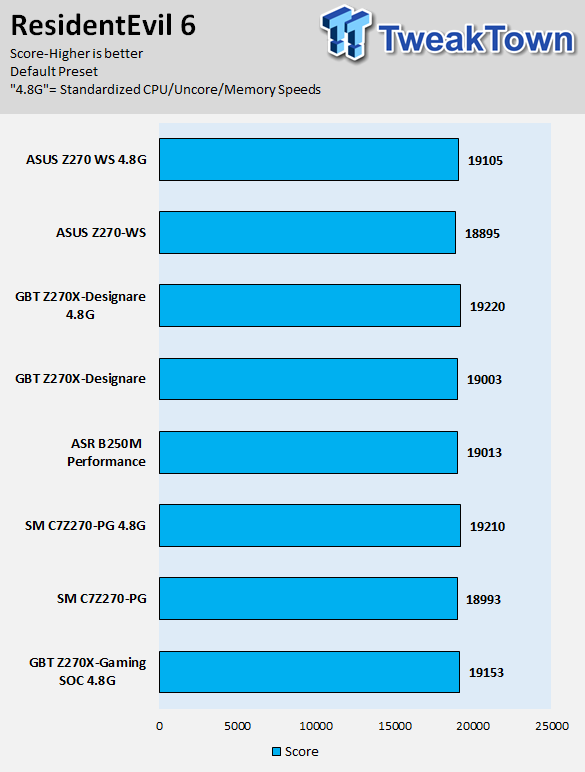
The Z270X-Designare's performance is actually very well rounded; the motherboard doesn't seem to have an issue in any specific area. CPU performance, memory performance, and graphics performance are top notch, and since the board is quite basic, we don't get any issues with latency or too much switching.
Some motherboard reviews put a lot of weight into motherboard CPU, memory, and GPU benchmarks, but for me, CPU, memory, and GPU benchmarks on motherboards should be more about finding anomalies, and I do that at standard settings (4.8G in graphs).
System IO Benchmarks
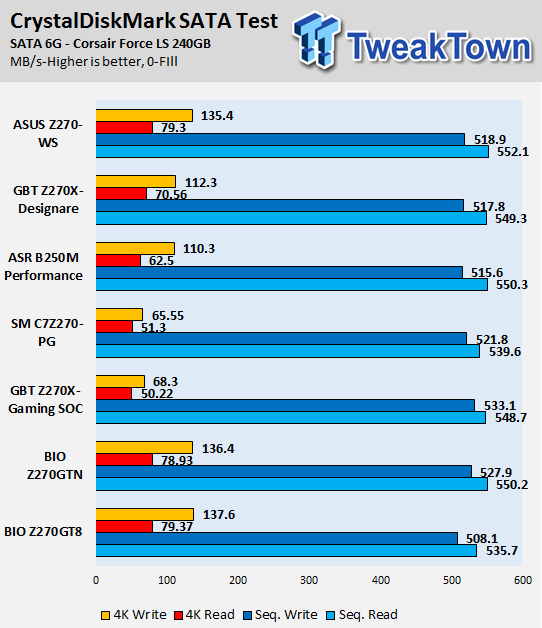
CrystalDiskMark SATA6G:
CrystalDiskMark M.2:

ixChariot Network Throughput:
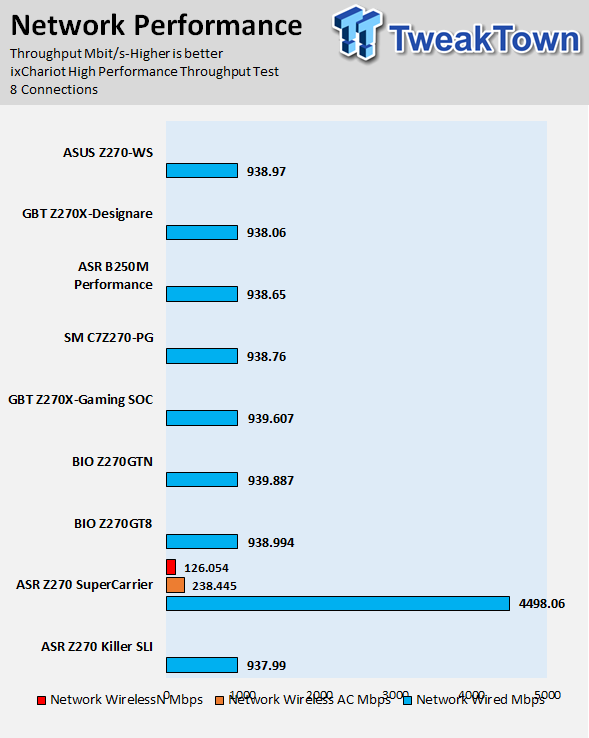
The Z270X-Designare's M.2 and SATA performance is quite impressive, and you won't have issues with performance in real-world scenarios.
Audio RMAA 5.5:
I disable all audio features, set the correct bitrates, and then test the audio with a loopback test.
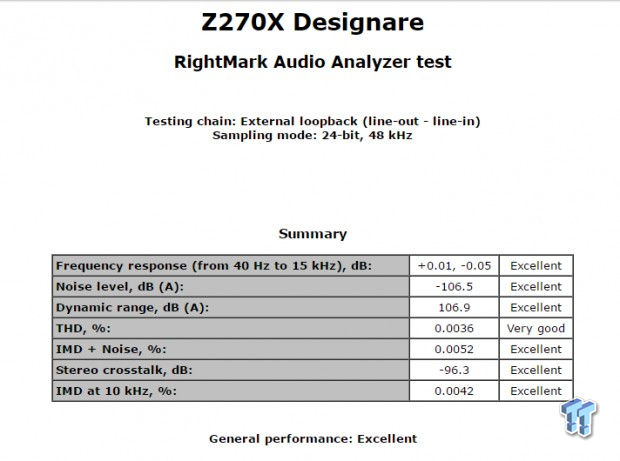
Sound Judgment by Ear: Excellent, I was surprised by how well the Designare scored, and the actual sound was very good as well. There are five ratings for audio: 1. Problems, 2. Okay, 3. Acceptable, 4. Very good, 5. Excellent
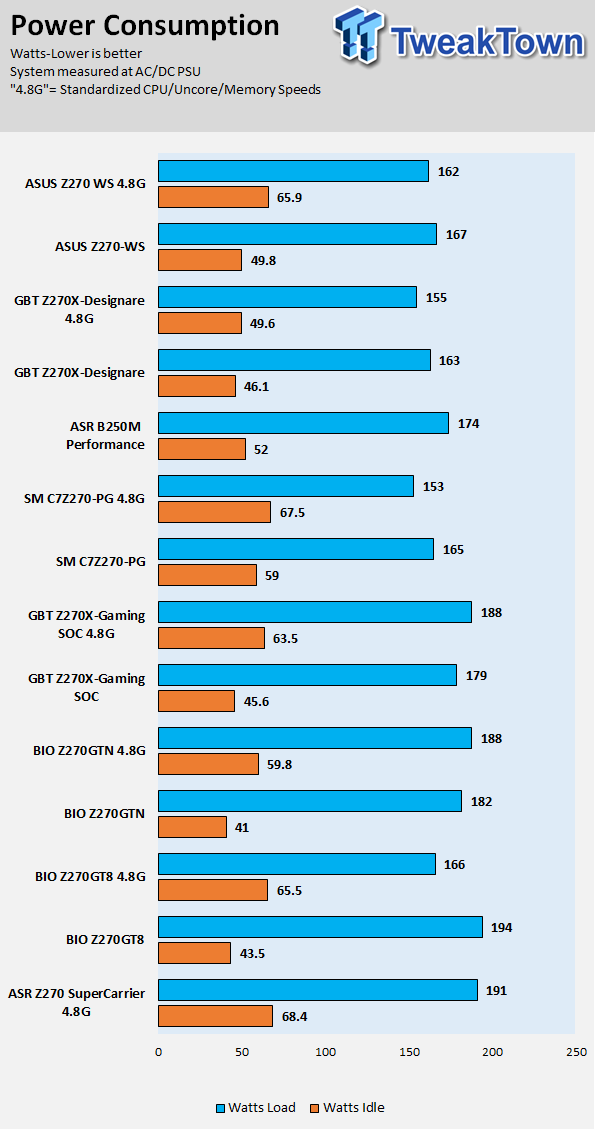
Thermal Imaging and Power Consumption
System power is measured at the wall with an AC power meter.
Note on Thermal Images: In the temperature section, we use our Seek thermal imaging camera to capture the surface temperatures of major components on the board. I look at the VRM and then all other things that light up the screen. If there is something to worry about, then I will state it. Otherwise, I will just show the hotter running parts of the board for fun. Unless some component is over 80-90C, then there isn't anything to worry about.
All systems will act differently, so I will look for commonalities, such as how far from the VRM the heat spreads through the PCB and the difference in temperature between the front side and backside of the PCB. Keep in mind, the majority of the heat from the VRM goes into the PCB as it is a giant soldered on copper heat sink. A larger difference in temperature between the back and front of the PCB points towards a more effective heat sink.
Thermal Testing at Stock Speeds:
The image on the left is always at idle, and the image on the right is at load. During ALL TESTS, fans above the VRM that cool the CPU cooler's (Corsair H110i GT) radiator are turned on to high (12v).


Full frontal.


Up-close of the front of the VRM.


Up-close of the back of the VRM.
Thermal Testing at 4.8GHz Overclocked Speeds:
The image on the left is always at idle, and the image on the right is at load. During ALL TESTS, fans above the VRM that cool the CPU cooler's (Corsair H110i GT) radiator are turned on to high (12v).


Full frontal.


Up-close of the front of the VRM.


Up-close of the back of the VRM.
The Z270X-Designare's thermal performance is surprising considering the motherboard only has a four phase VRM. It looks like the VRM is decent in performance as the motherboard's VRM didn't hit very high temperatures or keep the CPU overclock back.
Anything under 60C is great, 60-80C is acceptable, and anything above 80C is a bit worrisome (if at stock).
What's Hot, What's Not & Final Thoughts
Here are key points about the GIGABYTE Z270X-Designare.
What's Hot
Unique Asthetics: The Designare line is built to be used in modded rigs and unique builds, and the Z270X-Designare delivers. The white PCB matched with the RGB LEDs is a light show waiting to impress anyone and possibly anyone who enjoys their electronics lighting up in new and exciting ways. You also get an RGBW/RGB LED header.
USB Variety: Sure you get USB 3.1 type-A and type-C on the rear along with USB 3.0, but the Designare also offers a bit more. Two of your rear USB 3.0 ports, the two yellow ones, offer GIGABYTE's DAC-UP 2 technology, which allows you to increase voltage or disable power it for data-only mode. The Z270X-Designare also offers a built-in USB 3.1 internal header for type-C devices, along with your typical USB 3.0 and USB 2.0 header.
Simple: There is only one M.2 slot, one U.2 port, and zero switches for moving around PCH bandwidth. That means you won't lose U.2 or your last x4 PCI-E 3.0 slot if you are using M.2, and vice versa. The simple links between the PCH and ports should also result in better performance, as the switches add a bit of latency.
Intel NIC: Surprisingly enough GIGABYTE didn't put a Killer NIC on this gamer/modder centric motherboard, it's nice to find the premium Intel NIC included.
What's Not
Mainly for the Looks: The Z270X-Designare is a solid motherboard, don't get me wrong, but trade-offs have been made on the motherboard, so it trades overclocking features for better aesthetic appeal. If you want a motherboard with more overclocking features rather than RGB LEDs and looks, then there are other options from GIGABYTE.
Final Thoughts
The GIGABYTE Z270X-Designare is a unique and stunning motherboard, with a brilliant white/silver PCB and RGB LEDs in every nook and cranny, to satisfy you need to breed visually stunning hardware effects. The RGBW header is a nice touch as well. When it comes to features, the Z270X-Designare focuses on USB 3.1 for the rear ports and internal type-C header, along with USB 3.0 DAC-UP ports on the back of the motherboard, and M.2/U.2/PCI-E x4 slot for RAID of NVMe storage devices.
The motherboard is not without its caveats, after all, you don't get everything for $175. You only get a single M.2 slot, and the rear IO could feature some more ports instead of the large DVI connector. If you are an overclocker and want high overclocks, the motherboard is actually capable, but you will need active VRM cooling.
Overall, the Z270X-Designare has a very specific market, that market knows who they are, and the Designare is there to satisfy their needs so that they can show off the beautiful hardware in their builds.
 GIGABYTE X870E Aero X3D Dark Wood Review - A woody goody
 ASUS TUF Gaming X870-Pro WiFi7 W NEO Review - Tuffed up
 ASRock Z890 Taichi Aqua Motherboard Review - Flagship features without the flagship price
 GIGABYTE Z890I AORUS Ultra Motherboard Review - Mini-ITX with surprisingly good thermals
 GIGABYTE Z890 AORUS Elite WiFi7 Plus Motherboard Review - Right in the sweet spot
 Microsoft is using the TPM chip required for Windows 11 to crack down on KMS activation piracy
 PS5 Emulation makes big progress again as it reaches GTA 5 loading screen
 Modders turn the PS Vita into a modern gaming handheld through Xbox Cloud Gaming
 Got a cat? Here's a cat-themed PC case with a power button shaped like a paw
 Xbox testing smart client to boost game download speeds
 NVIDIA CEO Jensen Huang joins X with post backing open-weight AI
 Roku raised prices by up to 60%, citing a memory shortage, despite the CEO calling it great for business just two months ago
 Amazon Gaming boss says next-gen consoles crossing $1,000 is good news
 SignalRGB is giving away a Steam Machine clone covered in 36 RAM sticks
 Thrustmaster T.Flight HOTAS 5 MSFS Edition Review
 SteelSeries Arctis Nova Pro Omni Wireless Headset Review - One Headset to Rule Them All
 SteelSeries Arctis Nova 7 Wireless Gen 2 Headset Review - New and Improved, But Is It Enough?
 AMD Ryzen 7 7700X3D Review - Days of Future Past
 Samsung 990 2TB SSD Review - Ninth Gen QLC at PCIe Gen4 Speeds
 ASUS ExpertBook Ultra (Panther Lake) 14" Business Laptop Review
 ASUS ROG Raikiri II Xbox Wireless Controller Review - Ready to Take Control
 MOZA FMP18 Panel Bundle Review: authentic F/A-18 Hornet cockpit controls for flight sims
 Micron 6600 ION 245.76TB Enterprise SSD Review - Best in Class Programming Speeds
 MOZA MA3F EFCM Flight Control Module Review: authentic Airbus A320 autopilot panel for simulators
 Printer Not Working in Windows? How to fix detection, print queues and drivers
 The Ultimate Guide to Personalizing Your Windows 11 Taskbar
 How to Turn Your Windows Laptop Into a Second Monitor with Miracast and Wireless Display in Minutes
 6 Mistakes to Avoid When Buying a Windows Laptop
 I capped Windows Update's bandwidth with Delivery Optimization, and my downloads stopped choking
 I use this decade-old free tool that finds files faster than Windows Search does
 I install and update most of my apps with this Windows command now, and I stopped downloading sketchy installers
 Hisense U6SF 65-inch MiniLED TV: High Performance Meets Leisurely Convenience
 I stopped digging through Windows menus after I set up this one folder
 Don't sell your Windows laptop until you do these things