
The Bottom Line
Introduction, Specifications, and Pricing
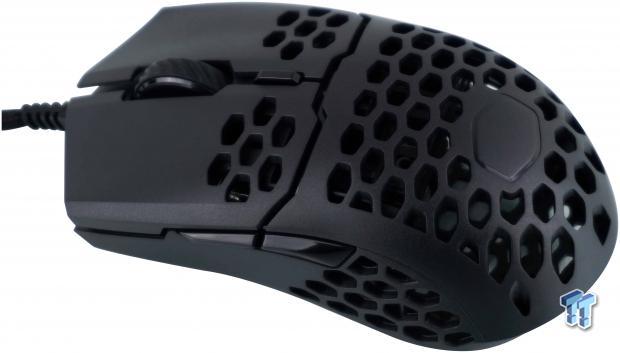
The history we remember, when it comes to companies trying to ventilate and lighten peripherals, started back in 2014 at Thermaltake. Not only did they cut honeycomb openings into mouse frames, but they also took the idea and ran with it across many of their products at that time, with the Level 10 M and Ventus series mice sticking out in our mind. While we do not recall any blowback from the designs, there are always those that are worried the device may fill with Cheeto dust and leftover bits of skin from your hands, we have never seen proof of such claims. Since then, years have gone by, and it appeared that idea had fallen off the map. However, many years later, we did see products such as the Finalmouse Air58 Ninja and the Glorious Model O surface, but sadly, we have not had our hands-on either of them.
With only a couple of options on the market, it only makes sense for others to jump on the wagon, and get their version of it out in public, and hopefully absorb some of the hype that the previously mentioned mice have created. The thing about it is, that if you are going to go head to head with products that are raved about across the internet, you have to come out swinging for the fences to even get noticed. Cooler Master is the first significant player in the peripherals game to try their luck, and we have to say, when compared side by side to the other two current options in mice, Cooler Master indeed came out swinging, and if you are looking for an open-top mouse with class-leading features, look no further.
As you read this, the MasterMouse MM710 is already on shelves on this side of the pond, where on the other, the mouse was released a couple of weeks ago. Nevertheless, we feel that the confusion surrounding the release that some sites ran into, and the wait compared to the competition was worth it! We are not here to shame the predecessors in this class, but rather show how and where the MM710 is superior to the others, in many ways mind you, and cover everything that has gone into such a design, resulting in a device that is well worth your attention, even if you own the Model O or the Ninja currently!
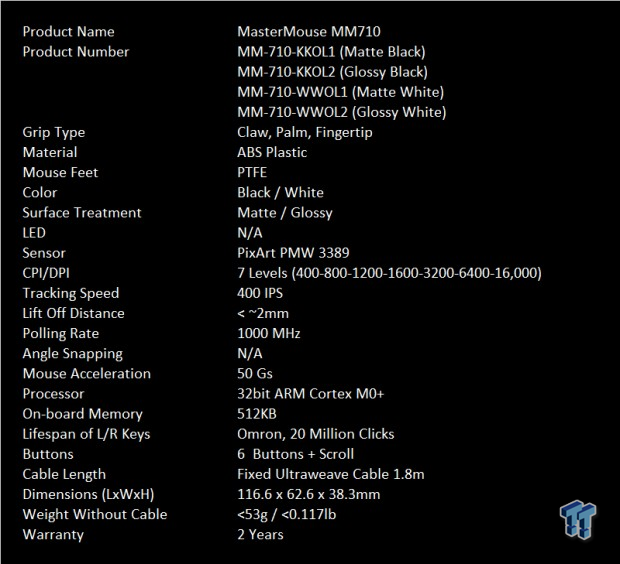
Cooler Master provided a specifications chart in the reviewer's guide, but sadly it was too small, so we copied it to this version for readability. At the top of this chart, we see that the name of the mouse is the MM710, where the MM stands for MasterMouse. What follows are four models of this mouse. You will have the option to look for two black versions, one matte and one in a glossy finish, and you can also search for the white variants, with the same surface treatment options.
Grip style is said to be fine for most users, as claw, palm, and fingertip grip styles covers most, if not all potential customers. The frame of the MM710 is made of ABS plastic, and a good portion of it removed from the top for styling and weight reduction. Under the mouse, there is a set of three, white, PTFE feet to ensure a smooth glide on nearly any surface. The one downer for the MM710 is that in a market full of RGB LED goodness, as not a single LED light is present here!
The sensor inside is the PixArt PMW 3398, which is a higher range sensor than either of the competitive designs. The MM710 offers seven steps of DPI levels built-in, from 400 to 16,000 DPI, and 1200 DPI is the default setting. As to the full range of the DPI scale, on the low-end, you can set 200 DPI. On your way to 16,000 at the top end, you can increase the DPI in 100 DPI increments. Tracking speed is up there with the 400 inches per second, which is faster than many can physically accomplish! The LOD is set to around 2mm, but it is adjustable, the polling rate is set to 1000Hz, angle snapping is disabled by default, and you can swing for the fences when making movements, as the G load is shown to be 50!
The processor is a 32-bit ARM Cortex M0+ with 512KB of onboard memory for profile and Macro storage. Omron makes the main switches, and we get twenty-million click versions, and all told, six buttons can be pressed, and the scroll of the wheel. The attached cable is 1.8 meters in length, on the inside a standard rubberized USB 2.0 cable, but on the outside, it is covered in Ultraweave, which is similar to Paracord. Of the three open-top options, the MM710 is the biggest at 116.6mm long, 62.6mm wide, 38.3mm of height, but weighs the least at around 53 grams, without the cable connected to the mouse! The last bit is about the warranty, where Cooler Master will cover the MM710 for two years.
Even though the embargo technically does not lift until the review releases, we were able to find the MM710 already listed at Amazon! With Cooler Master registered as the seller, we see that the MSRP of $49.99 we saw in the reviewer's guide rings true. While we assume these mice will also be at Newegg soon, at this time, we see nothing. The only downer of this situation is that you are going to have to like the matte black version of the MM710 because as of this moment, the other three options are not listed. However, even if you are an early adopter, you will be pleased with what you have, and at this price, why not get one now, and when the color and texture combination you desire come available on the market, you can buy that one as well!
Chad's Peripherals Test System Specifications
- Motherboard: ASUS Prime X299 Deluxe - Buy from Amazon
- CPU: Intel Core i9 7920X - Buy from Amazon
- Cooler: Corsair H150i Pro - Buy from Amazon
- Memory: G.Skill TridentZ RGB 3600MHz 32GB - Buy from Amazon
- Video Card: EVGA GeForce GTX 1080 Ti Hybrid SLI - Buy from Amazon
- Storage: Samsung 960 EVO 250GB - Buy from Amazon
- Case: Cooler Master Cosmos C700P - Buy from Amazon
- Power Supply: Thermaltake Toughpower DPS G 1050W - Buy from Amazon
- OS: Microsoft Windows 10 Professional 64-bit - Buy from Amazon

Packaging, Accessories, and Documentation

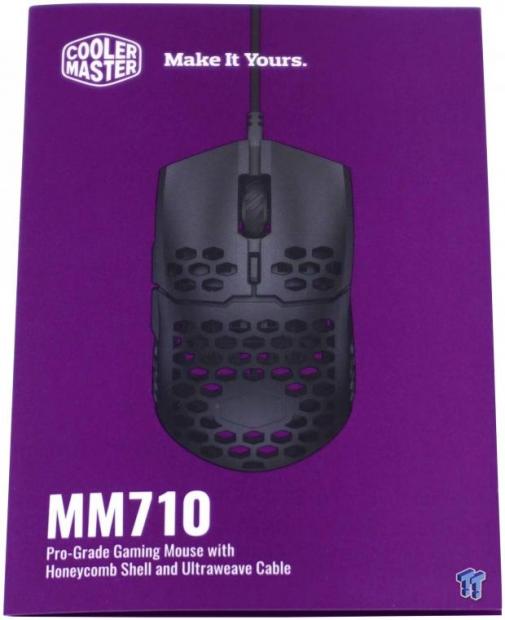
Packaging for the MM710 is quite compact, as neither dimension is over six inches! On the front, laid on top of the Cooler Master purple we see on a lot of their products, we see the mouse in near life-size. We are told at the bottom that this is a pro-grade gaming mouse with a honeycomb shell and Ultraweave cable. That leaves us with the three white circles at top-right, where its light weight is shown, the 16K DPI range, as well as the 10-million clicks of the main switches.

The right side of the box does not afford a ton of room for information, but Cooler Master figured out how to cram in the fact that this is a gaming mouse, the MM710, and if you need more information visit them online, in twenty-three languages!
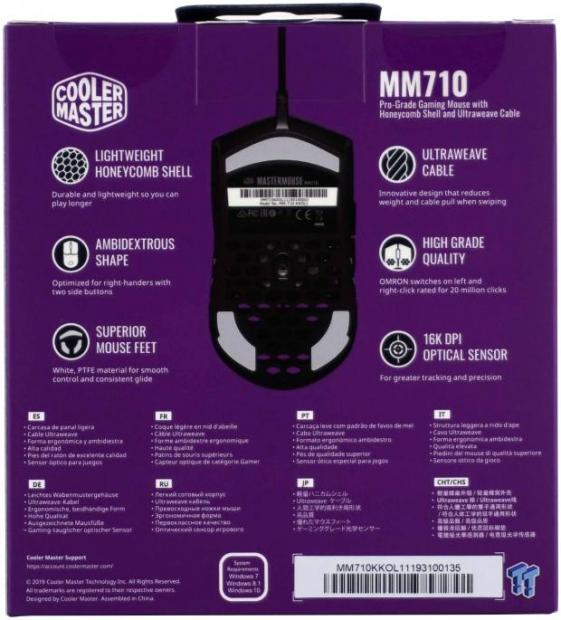
The back of the box starts with the Cooler Master name and logo, as well as the MM710 naming, but below are six things they feel you need to know about it. It has a lightweight honeycomb shell, it is an ambidextrous shape but no concessions made to left-handed gamers. There is mention of the PTFE feet used, the Ultraweave cable covering, the high-end switches, and lastly, showing us the 16,000 DPI optical sensor. These features are then repeated in eight languages before we see the support address, system requirements, and the model/serial number sticker.

As we make it to the left side of the packaging, we see that Cooler Master offers the logo and tagline to the left of the full name of the MM710. At the right, we see the specific model number to the included mouse on the sticker with UPCs.
Under the packaging, or on the bottom panel, we find regional information should you need the address of one of them, or if for some reason you need to make contact by phone, it is all right here for you to use.

Inside the box, there is only some folded cardboard for crush protection. Thankfully our sample was packed well in a larger box, but the reality is that if this box was under something substantial, that cardboard is going to offer little resistance. The mouse is also wrapped in a thin foam bag to protect the finishes, which it did perfectly, and we also see a baggie with bits in it set into the gap of the cardboard.
The guide provided with the MM710 is small and to the point. Once opened, we are shown the button overview, there each button on the mouse is labeled. On the next panel is a pair of charts for package contents, and on the back panel is where Cooler Master presents the warranty information. Our MM710 is a pre-release sample, and things may have changed, but there is no mention anywhere of the MasterPlus software, or where to obtain it.

We cannot say this enough, every manufacturer who sells a mouse to someone should include a spare set of feet in the box, as Cooler Master did! Whether there comes a need to open the mouse to fetch out a screw that accidentally fell in, or when the time comes that the feet are just plain worn out, the replacement set is there, waiting to be used! As a reviewer, I need to remove the feet, which many are destroyed in the process, and having the extra set made our job so much easier!
Cooler Master MM710 Gaming Mouse
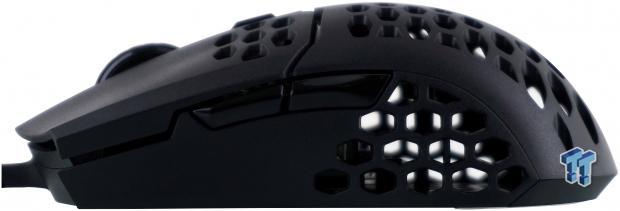
As mice go, the shape of the MM710 is "standard" fare. There is a wider gap than usual that follows the bottom of the main button, as it goes back over the pair of shiny side buttons. The lower portion is concave in shape to allow the thumb to grip it comfortably but is also where the honeycomb weight reduction takes place, allowing us to see right through the MM710, and is also a way for air to flow through it.

The back of the mouse is rounded across the heel, and with the textured plastic offering the matte finish here, we see many more honeycomb-shaped holes, where plastic has been removed from the frame, leaving a spot near the top for a blanked-out Cooler Master logo ring.

While Cooler Master made mention of the ambidextrous shape of the MM710, while true, there are no buttons on the right side of the mouse for left-handers to use. The gaps are the same, the shape of the side panel is the same, and even the layout of the honeycomb openings are identical.

At the front of the MM710, the buttons do come to a point near the center, but both of the main buttons are curved to help keep your fingers in place. Below the main buttons, from dead center of the mouse, the Ultraweave cable leaves the MM710.
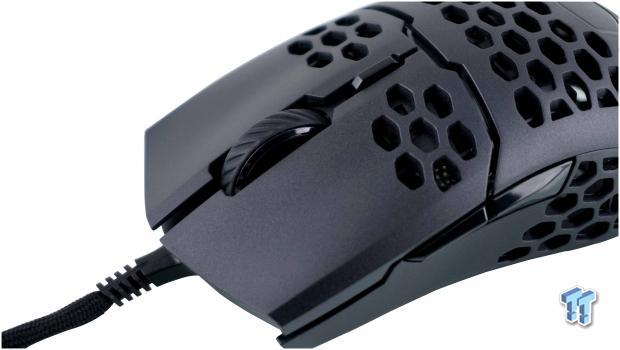
In the gap between the main buttons, we see the shiny black scroll wheel and the rubber ring around the outside with the DPI level selector button behind it. We can also see that Cooler Master did not stop at the heel and the sides of the mouse, they also put seven openings in each of the main buttons!
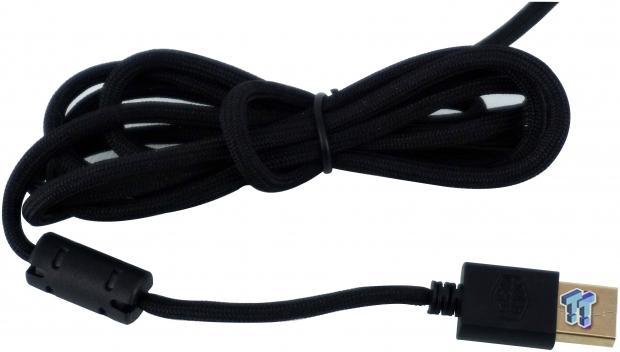
With the weight of the MM710 being what it is, we feel it would be perfect for traveling with as well. However, while the Ultraweave on the 1.8 meters of cable is nice, a more permanent solution for wire tending would be much appreciated! Not only is the USB 2.0 connection gold plated, purple on the inside, and has the Cooler Master name in the plastic, we also see a Ferrite choke in-line.
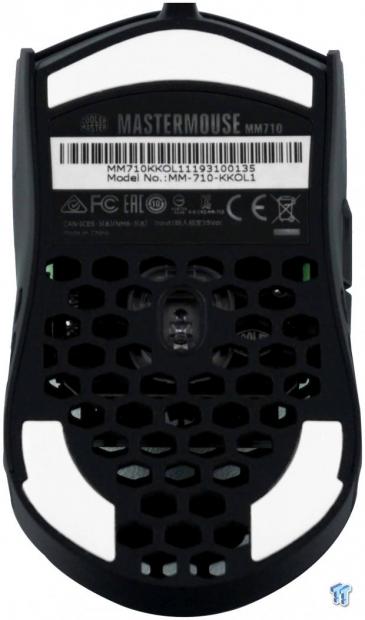
Under the MasterMouse MM710, we find a wide, white PTFE foot used to support the front of the mouse. The product sticker comes next, with the model and serial numbers on it, and then a vast expanse of more honeycomb-shaped holes, with the optical sensor eye placed in the center of it all. That leaves us with the other pair of white PTFE feet, supporting the back of the MM710.
Inside the MM710
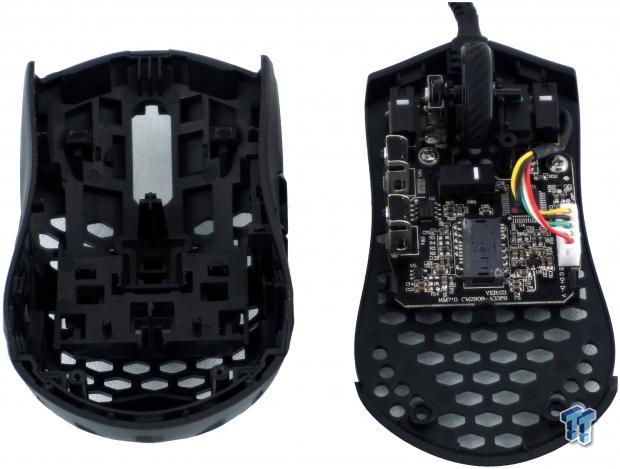
Once the back feet are removed, you have access to the screws to open the MM710. What we find is that in the top half, it is frame, buttons and an inner assembly locking parts of the mouse together and also the plastic spring mechanism for the DPI button. The lower half to the right holds all the cards and on a PCB roughly half the length of many other mice.

Digging right into the components used in the MM710; first, we see one of the Omron switches, which is indeed a twenty-million click D2FC-F-7N white switches we are all used to using by now. Behind it is the ALPS scroll switch that gives the segmented feel to the scroll functionality.

Backing the pair of buttons on the left side of the MM710 are these pad style switches. They are YT branded switches. These take medium force to be used, but in this design, the sound is a very plastic sounding click when pressed.
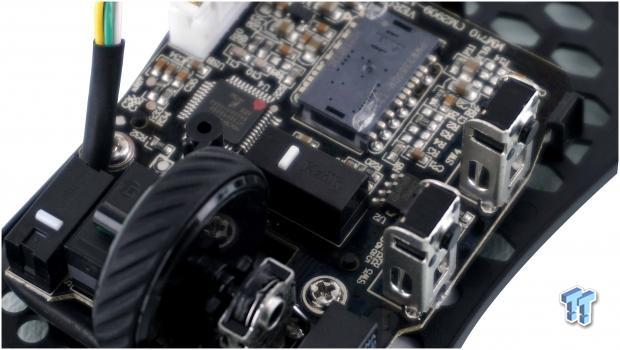
The DPI selector button, while we expected less, we are pleased to see a white Kailh switch used here. The pressure needed for actuation is soft, and much like the side buttons, the click is not as pleasing as we have heard in other mice.

From the beginning, Cooler Master was not shy about informing us of the use of a 32-bit ARM Cortex M0+ processor, but unlike with the switches, they did not mention the maker. In ours, we find the Holtek HT32F52352 in charge of communication, functionality, and delivering 512KB of onboard memory. Plenty of grunt for the MM710 and its feature set!

As described, in the middle of the PCB, near the bottom edge, we find the PixArt PMW3389DM optical sensor used. Not only can it scale the DPI from 200 to 16,000 DPI, but it can also track movements of 400 IPS at 50Gs! The regular abuse we put on mice should be no issue for this sensor to keep track of where you are.

The second of the main buttons are also backed with an identical Omron switch as we saw on the left side. Just behind it, we do see the last switch inside of the MM710, which allows for the scroll wheel click function. The green Huano switch requires medium force for use, but the click from it is solid, and what we expected of the other secondary switches.
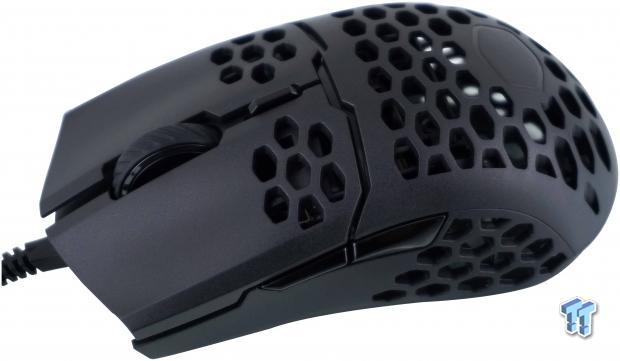
With the mouse back in one piece, not much has changed from the image we showed at the introduction. We have connected the mouse to the PC, but with a complete lack of LEDs of any sort, visually, there is no indication of life.
MasterPlus Software
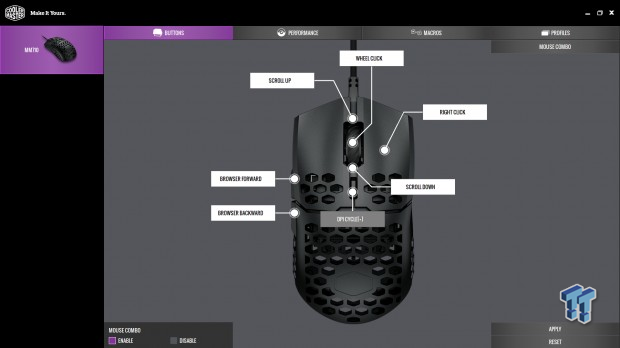
Cooler Master offers software for the MM710 under the name of MasterPlus. What we are showing may change along the way, as in the last week or so, we just got the software, and it has since been updated as well. Once installed and running, the first window you see is that for the buttons. In this menu, you can remap and customize functionality. Options are to disable, mouse, keyboard, Macro, Multimedia, Rapid-Fire, profile, DPI, and even sensor on and off. The DPI button is grayed out, and the left click is missing, and do not offer what the others do.
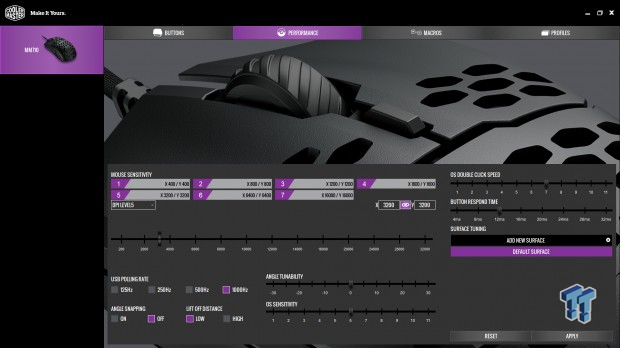
The performance tab covers a lot of things! The first bit we see are the seven levels of DPI, each customizable by clicking the box, and either grabbing the slider or direct entry of numbers into the X and Y axis boxes. Below the DPI section, we see things like the adjustable polling rate, the option of angle snapping, and optional high or low LOD. You can also tune the angles, adjust OS sensitivity, the double click speed, button respond time, and even tune the MM710 to your particular mouse pad.

The Macro menu is basic, but it can get the job done. You would first name a Macro on the left side, then press the record button for programming of it. You do have the option to enable time delays, and at the bottom, you can select how it is to be run when the Macro is enabled. However, we saw nowhere to edit a Macro, so it will need clearing and redone if it is wrong. However, we do like that we can import and export Macros, so existing ones can be carried over to the MM710, as long as you saved them before swapping the mice and deleting the old software.
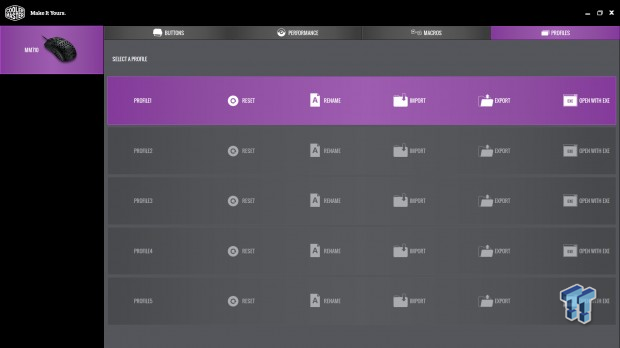
The last of the options is to deal with the profiles. Select a profile first, then go and deal with the other tabs, but before that, you can name the profile, even importing and exporting them if you fill the onboard memory with them. Each of the five that are stored onboard the MM710 also can be opened with the launch of a program or game, making life easier on the user.
As a side note, the software will offer updates to both firmware and software when available. Since there is no place to look for such things, once MasterPlus is opened manually, it will search automatically, and when left running in the background, you will get a popup when new versions are released.
Gaming and General Impressions
DOOM & PUBG
It did take some time to get used to the smaller and much lighter MM710, as we tend to like larger heavier mice. However, after a few hours, we were right back at it, fast-twitch filling daemons in DOOM, and opting for 3200 DPI worked best for us here. For those using lower DPI, the LOD for the sensor is on point, and we saw little cursor movement, as its 2mm setting at default is right where it should be! In PUBG, we did bump the senor up to 4200DPI as we like to run and look holding the Alt-key and swinging circles around to see where threats may be running in from.
At that level of DPI, we rarely lifted the mouse, and we feel our accuracy is excellent at this setting, as our PUBG stats have gone up since using this mouse. Many more kills with the MP5 and Vector under a full spray of the clip, and whether using a VSS to hide or a big boom stick like the M24 or the AWM, more shots are landing on target!
Windows and Productivity
For the day to day grind, when it comes to the simple things like scrolling web pages, or using the scroll click to quick scroll, it all works as intended, pages go forward and backward, and the right and left clicks do what they do too - nothing out of the ordinary to report there. What we did like is when we were editing images. We sorted through the predefined DPI levels and found the 3200 DPI setting the best for all-around performance.
On a 55-inch 4K screen, higher DPI can make getting around the screen a breeze, but we must be too jittery for DPI over 6000 or so, as it becomes tough to open applications and pinpoint something for correction in an image. That being said, with all of the openings in this mouse, we have noticed two things. First, we are not filling the interior with finger gunk, and it is not full of dust or debris. On the flip side, we also do not see any weakness from the open structure. It is as robust in hand as any other mouse out there, just lighter and more comfortable to flick about on the mouse pad.
Final Thoughts
At face value, the MM710 is impressive! Not only did it take on the other two giants already appealing to the masses in the open-top mouse segment, comparatively in all aspects, but the better deal is also with, the Cooler Master Product. Just on paper, the MM710 users a higher-end sensor than the others, it delivers more DPI range, has the highest IPS rating, only one of the group to offer Ultraweave, lightest of the group, designated as splash and spill-proof where the others are not, and competes head to head with the Model O on cost! The list of benefits is a long one, and while feel is a lot of what makes for a good mouse, this is the largest of the group in overall volume and size, offering those with medium to large hands a go at this segment, where others may not have provided the feel you were looking for. Even on the most basic level, with just what we have listed above, it seems to spell out the best decision to make.
Beyond what the charts show and what they compare to, we still have a few things to look at. Structurally, while with all of the plastic missing, you feel like you may have to be gentle with it. The reality there is not that at all. Even with so much of the outer shell removed for lightening and styling purposes, the MM710 can take the same abuse any other mouse can! There is a passive cooling factor that comes into play, as well. The benefit of this is that no matter how hot our video card tried to make the room, we never got sweaty hands! We also liked what we saw inside of the MMK710. The use of top-tier components, some overkill for the task, but all the same, we feel that the components used will offer a great user experience to the masses, and with a headset on, you will never hear the lackluster reports from some of the switches. To our surprise, with weight the critical factor in the development of the mouse, we would have expected all sorts of pad switches and smaller, more lightweight components inside, but Cooler Master opted only to remove any form of LED lighting, which saves on weight that much more, rather than to shortcut what the user expects in today's mice.
Tracking is smooth, and with an extra set of feet in the box, that feeling can continue long past where other mice would be worn out. Out of the box, the MM710 followed our every move reasonably well, we thought. Once we opened the surface calibration tool, things got so much better! Not only did we have to move less as the readability of the pad had increased, but also when we stopped, there was no overshoot. With MaterPlus software installed, the options get better as the features become customizable. Not the best Macro system in the industry, but it will get you by, and with five profiles, most of the buttons can be remapped on each profile, seven customizable DPI levels, Cooler Master can offer what will get any gamer back into the action with the most control they could offer.
At the same price as the Glorious Model O, both with a matte finish, the MM710 puts up quite the fight to deserve some of the hype that the Model O and the Finalmouse Air58 Ninja reintroduced to the mouse game! In most categories, the MM710 is the better option, and we do not feel that the near $90 price of the Ninja for fifty-million click switches are worth it. You can damn near buy two of the MM710 mice for that money! We do not know yet if the glossy black or either of the white versions is going to demand a premium cost with them, as Cooler Master's chart shows all models but only a single $49.99 MSRP. We hope that sticks across the board, as we strongly urge you to have a serious look at the MM710. For those of you who prefer light mice, and want the one with the best specifications, look no further, as Cooler Master came out swinging, and has dealt quite a blow to the others in this game currently!
Chad's Peripherals Test System Specifications
- Motherboard: ASUS Prime X299 Deluxe - Buy from Amazon
- CPU: Intel Core i9 7920X - Buy from Amazon
- Cooler: Corsair H150i Pro - Buy from Amazon
- Memory: G.Skill TridentZ RGB 3600MHz 32GB - Buy from Amazon
- Video Card: EVGA GeForce GTX 1080 Ti Hybrid SLI - Buy from Amazon
- Storage: Samsung 960 EVO 250GB - Buy from Amazon
- Case: Cooler Master Cosmos C700P - Buy from Amazon
- Power Supply: Thermaltake Toughpower DPS G 1050W - Buy from Amazon
- OS: Microsoft Windows 10 Professional 64-bit - Buy from Amazon

Performance |
98% |
Quality |
97% |
Features |
94% |
Value |
100% |
Overall |
97% |
The MM710 from Cooler Master is the most feature rich and lightest in its class. We feel the software could be more robust, it makes RGB fans cry, but comes with top-tier parts and is the best bang for the buck of the three current offerings!

What's in Chad's PC?
- CPU: Intel Core i7 13700K
- MOTHERBOARD: ASUS ROG Maximus Z690 Hero Eva
- RAM: TEAM DDR5-7200 32GB
- GPU: ASUS GeForce RTX 3090 Eva
- SSD: addlink m.2 2TB
- OS: Windows 11 Pro
- COOLER: Fractal Lumen S36
- PSU: be quiet! Dark Power Pro 1500W
- KEYBOARD: ASUS ROG Strix Scope TKL Electro Punk
- MOUSE: ASUS ROG Strix Impact Electro Punk
- MONITOR: ASUS ROG Swift OLED PG42UQ
Similar Content
Related Tags

