


Our Verdict
Introduction, Specifications, and Pricing
Corsair is not one that needs a significant introduction in the case market as they have been here for quite some time, and along that time, they have been pumping out quite a lot of case models. Along this journey, we have seen Corsair pump out some cool cases while also sending some across that were less than stellar.
Today we are looking at the new iCUE 220T RGB, which is another entrant into the 'smart cases' category. The smart cases as a category in the industry have been loosely based on having embedded controllers to manage everything from cooling performance to RGB lighting. Today with the 220T, the smart functions are the latter.
The 220T RGB is made for users who want a full ATX chassis, with liquid cooling fitment without the vast footprint some full ATX mid-towers take up. Based on the same base chassis as the Corsair SPEC Delta, the 220T has effectively been squished on the depth measurement to make it a much more compact platform while still maintaining ATX compatibility.
The 220T RGB comes fitted with triple front 120mm SP RGB PRO fans which are attached to a Corsair Lighting Node CORE unit. This is a fully functional six-channel controller for Corsair RGB fans. The 220T also includes a PSU shroud and some unique front styling which has a front removable metal plate and removable magnetic dust filter.
Best Deals: Corsair Icue 220T RGB Airflow Tempered Glass Mid-Tower Smart
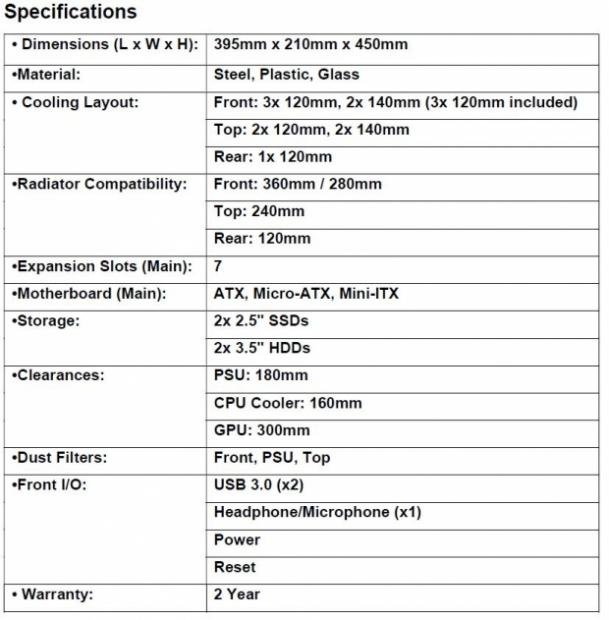
The 220T RGB comes in measuring a height of 450mm, a depth of 395mm and a width of 210mm. This places the 220T RGB well into the mid-tower range while as I said previously being a bit squished in depth. This means the overall tower while supporting ATX, will not have as much room for things such as custom liquid cooling components to fit within the inner chamber as it is more compact.
Motherboard fitment is ATX, mATX, and mITX, I do not think an EASTX board would fit as our standard ATX testbench reached close enough to the cable management pockets I would not feel comfortable recommending it. HDD and SSD mounting are listed as dual 2.5" drives and dual 3.5" drives. This is something we will look at soon as the tight nature of the 220T makes for some unique challenges while building. The PSU fitment is listed as up to 180mm, but I do have to assume they require removal of the HDD cage as installing our 140mm PSU was problematic with the HDD cage in place. There is a PSU shroud which helps hide the PSU and related cabling.
Cooling fitment is listed as the front up to triple 120mm which comes preinstalled with three SP120 RGB Pro fans. It can also support up to dual 140mm as well which means radiator fitment is listed as up to 280mm or 360mm radiators. The top-mounted is listed as dual 120mm or dual 140mm fans while radiator fitment is limited to 240mm while 140mm based radiators will interfere with components. This also becomes an issue with 120mm based solutions, and we will look at this when it comes to looking at the actual chassis. The CPU cooler fitment should you go air cooling is up to a 160mm CPU cooler while GPU is limited to 300mm.
Our Latest Mid-Tower Cases Review Coverage
The 220T RGB is available as of the time of writing and is listed at $109.99, which places it in a pretty tough spot with the fitment being tight. This is once again a rough spot for a case to land as there are various competitors including cases such as the NZXT H500i, Silverstone Redline RL06 and even the HAF XB from Cooler Master. Now that you see the variety of chassis offered, and this is only a small cross-section, you can start to see where it's going to be a defined uphill climb for the 220T RGB.
Shannon's Chassis Test System Specifications
- Motherboard: MSI MPG Z390 Gaming Edge AC Z390 (buy from Amazon)
- CPU: Intel Core i7 8700K (buy from Amazon)
- Cooler: Corsair H100i Pro RGB (buy from Amazon)
- Memory: GeIL Super Luce RGB GLS416GB3600C16ADC
- Video Card: MSI GeForce RTX 2060 Gaming Z (buy from Amazon)
- Storage: Sandisk M.2 256GB
- Power Supply: Silverstone Strider Platinum 1000W (buy from Amazon)
- OS: Microsoft Windows 10 Home 64-bit (buy from Amazon)
Packaging
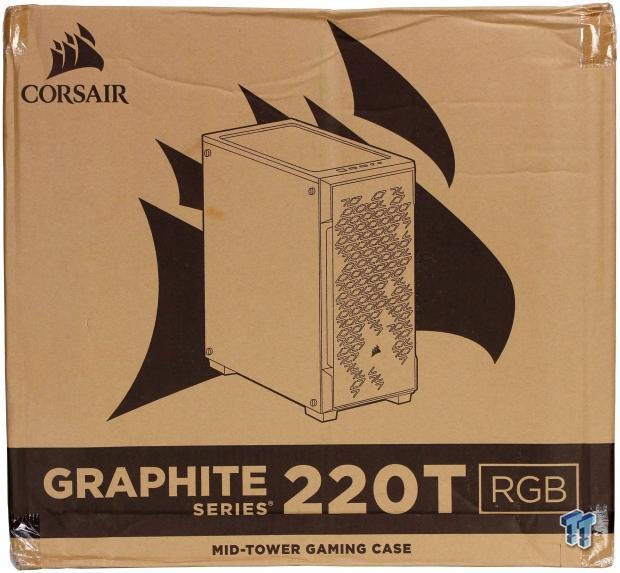
The main panel of the case shows the 220T with the 'Graphite Series' moniker. However, this is incorrect as this is a very early sample and the chassis now is officially named Corsair iCUE 220T RGB. It is rightfully listed as RGB since it comes preinstalled with the Lighting Node CORE RGB controller.
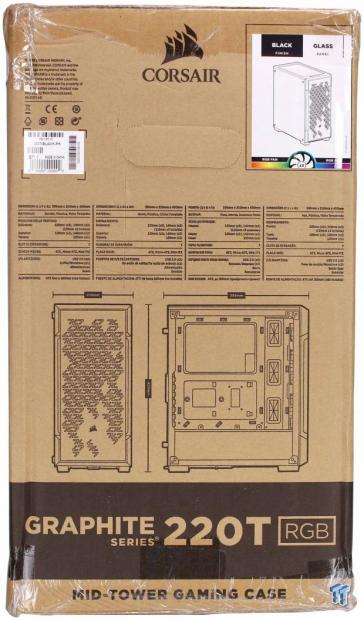
The first of the thinner sides shows mechanical mock-ups of the 220T RGB. There is also a decal at the top listing this 220T as including triple RGB fans, black finish, and a glass panel. This panel is finished with the spec sheet printed in multiple languages.
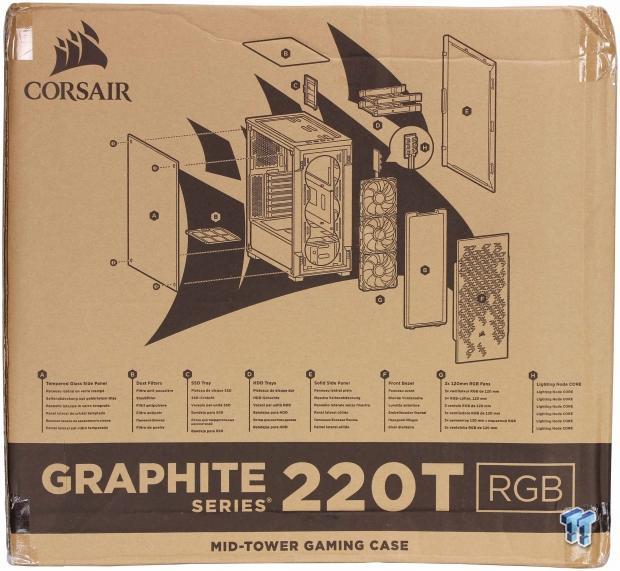
The other main panel we find an exploded view of the 220T RGB, and I specify that as it shows the preinstalled fans and the Lighting Node CORE installed in the chassis. One thing I find funny is they have a parts breakdown, and it is translated into seven languages, with one being English. The only item not translated is Lighting Node CORE, which is just the same thing in every language. Ok, so maybe it's not that funny, but sometimes silly/simple things entertain me.
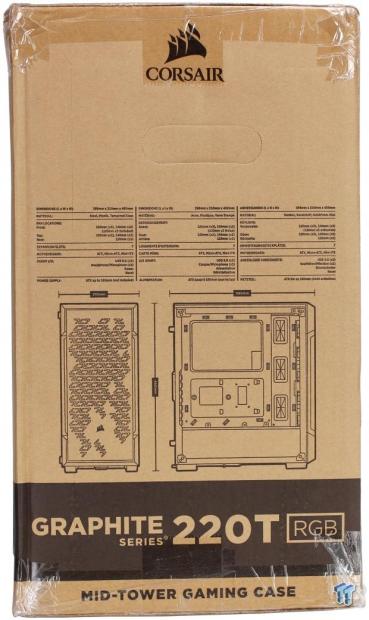
The final thinner side of the packaging is the same as the previous small side, sans labels, of course.
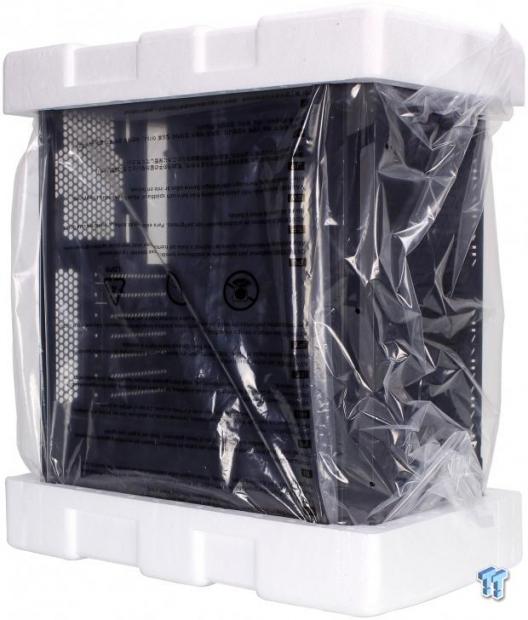
The case comes out of the box wrapped in a plastic bag and hard Styrofoam end caps enveloping the edges. The side tempered glass comes film covered on the exterior while the internal cables are tied back well enough to avoid errant scratches to the panel. When opening the box be careful as pulling the end Styrofoam cap reveals a bagged manual which we will look at in the accessory section.
iCUE 220T RGB Mid-Tower -Tower Chassis
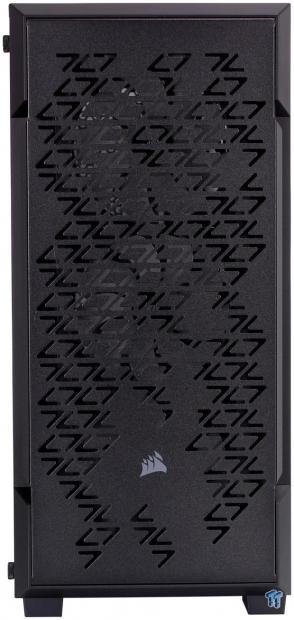
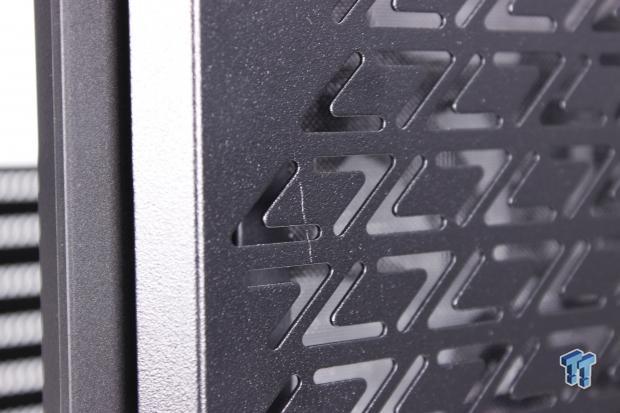
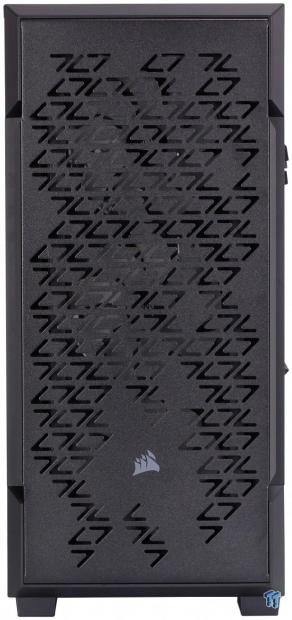
The front of the 220T RGB does a fair bit in the styling department to differentiate it from the SPEC Delta. The front panel is now plastic corner standoffs with a steel front panel that is held on with ball and socket connectors. The metal panel has a unique triangular aesthetic which works as the lighting pass through and air inlets beyond the significant opening gaps on each side of the panel. The angular styling is broken up by the corsair logo at the lower mid-section of the panel.
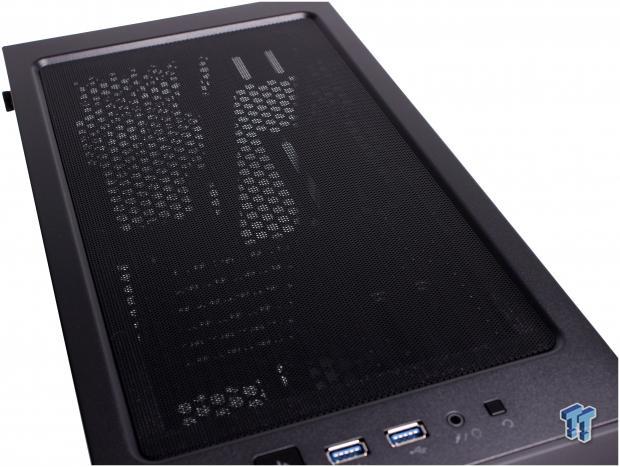
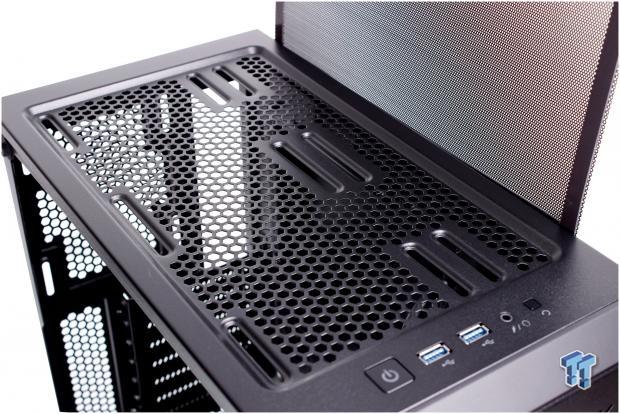
The top has a magnetic filter which covers the fan mounts supporting up to dual 140mm and dual 120mm or a reported 240mm radiator. You also get a small peek below to the front panel connectors which we will look at next.

The front I/O is quite scant on the 220T RGB. From left to right:
- Power button with integrated power LED
- Dual USB 3.2 Gen 1 Type-A ports
- Four-pole 3.5mm jack supporting headphone and microphone (No adapter included)
- Reset button
As you can see, the I/O is functional but basic with only two ports.
The main side panel is quite clear with no tinting on the large tempered glass panel. The panel has four large thumb screw style fasteners affixing the panel, looking toward the front panel you can see the sizeable gap for airflow with the front metal panel elevated above its corner mounts.
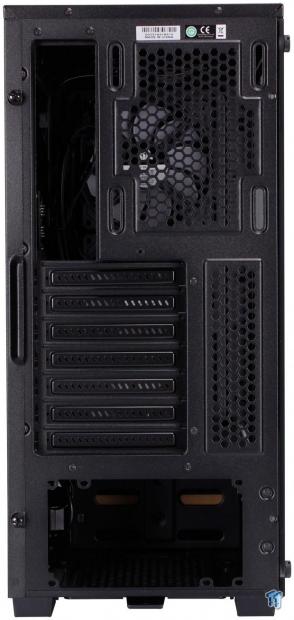
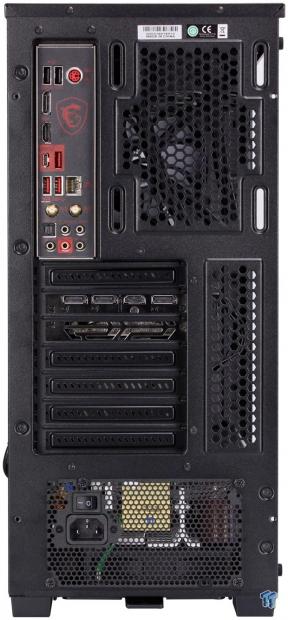
The rear section shows the 120mm rear fan mount which out of the box is not populated. The mounting has a vertical adjustment to allow installation at a more flexible positioning. The 220T RGB has seven expansion slots which are standard fare for an ATX chassis. The PSU is also standard fare here. One thing to note is that we see the mounting thumbscrews for the solid cable management panel, but you will notice there are corresponding holes on the tempered glass side as well since this chassis is directly reused from cases like the SPEC Delta. The thumbscrews are for standard style panels to cover the main chassis, which means we could see non-TG 220T examples in the future if corsair decided it would be a wanted model.

The rear cable management cover panel is solid metal painted the same black finish as the base chassis. This is a slide-type opening panel which means if there are larger bundles of cables, it could end up being troublesome to install the panel.
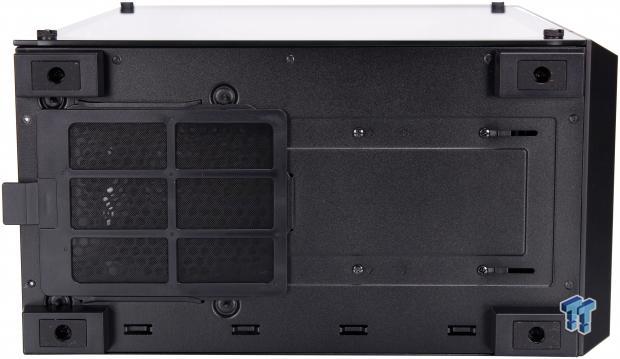
The bottom of the 220T RGB is relatively standard but just a bit shorter. The PSU area has a removable dust filter, and the HDD cage internally has screws to adjust it here. There are five screws total needed to remove or change the cage, but one of them is in the cable management area. The feet are rectangular, and plastic with rubber feet stuck on to help avoid skidding.
Inside the iCUE 220T RGB
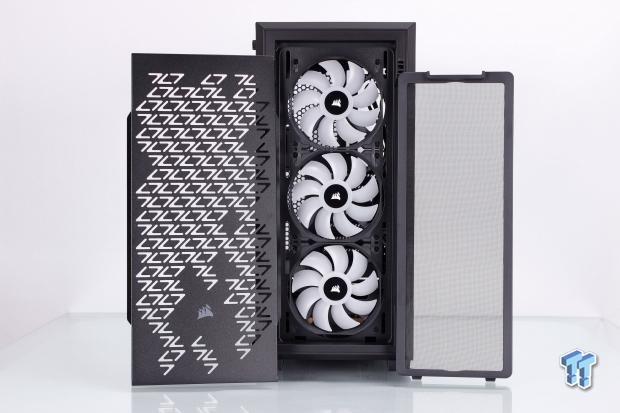
Removing the front of the 220T RGB was simple as giving the metal panel a tug on any of the open sides and the ball and socket retention releases. Then you have the dust filter which covers the entire front opening and is secured using strong magnets which makes removal easy without the worry of breaking clips or anything.
One thing I had to bring up was the finish on the front panel, which I expect better from Corsair. The panel on the 220T RGB I received has a wavy hair embedded in the paint. I reached out to Corsair, and they believed it was a metal shaving from punching the front panel plate out and with a poke of ESD tweezers it stretched slightly then snapped and curled back same as a hair would do, so we know that someone in QC dropped the ball.
I have spoken to Corsair though, and they ensure that this was a rushed early sample for review and the retail units customers receive should not experience these sorts of issues. Beyond the hair in the paint, there are also two other broken spots in the paint where it looks like debris had landed on the finished panel during painting and were picked out, so I have to assume these were either rushed as stated or Sunday jobs.

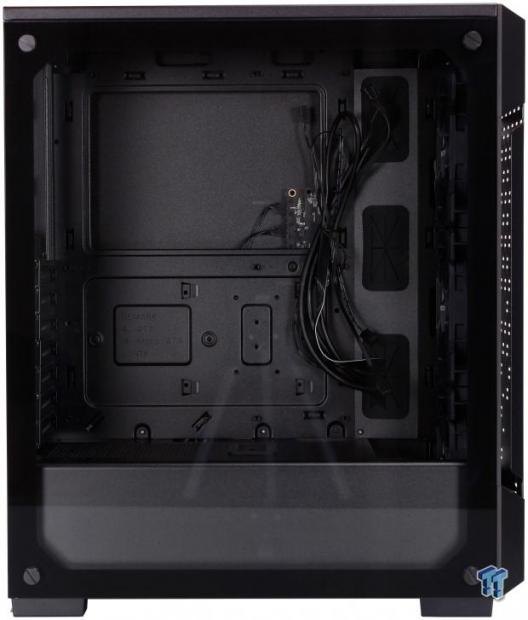
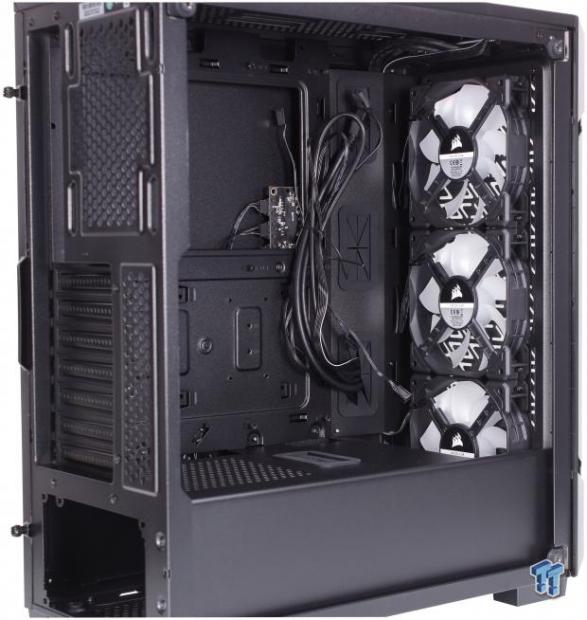
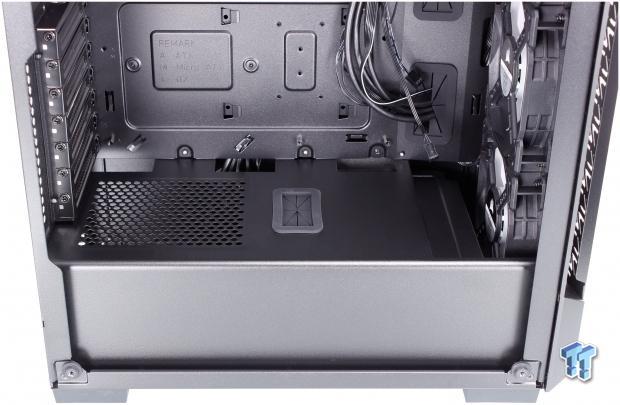
First impressions looking into the 220T RGB is that this is one tight fit for the case. You start to see just how much the depth of the case has shrunk as the cable management pockets which are at the board's edge typically has several inches until it meets the front panel mounting area, but here you can see it's directly adjacent to it. Unlike the SPEC Delta, the 220T has the fans internal, and this means the 220T RGB has even less room internally.
The front panel comes with triple SP120 RGB Pro fans in place as you can see here and can run up to dual 140mm. There is not much as far as liquid cooling mounting such as reservoirs as the board comes up to almost the front, so with liquid cooling, you would have to be a bit creative. I do also question 360mm mounting in the front as the fans are already super close to the HDD cage with just the fans there, and the PSU mounted so that could get dicey in a big hurry.
Here we see the pull away magnetic dust filter at the top of the chassis. The top mounting supports up to dual 120mm radiators at 240mm which is precisely what we installed with the Corsair H100i. This, unfortunately, has some caveats as the fitment from DIMM slot to the 120mm mounting hole is only 35mm approximately which means only corsairs lowest profile memory such as Vengeance LPX, unfortunately their RGB case cannot run RGB memory with an AIO installed in the top, so you may end up with the AIO in the front if you want to install anything above standard profile DIMMs. The holes are slotted, which helps to precisely adjust your AIO or fans at the top for convenience in adjusting your airflow and cooling.
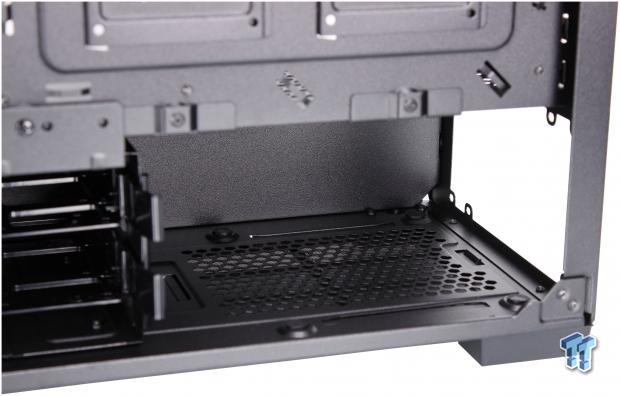
The PSU shroud on the 220T RGB is quite simple and does what it should which is cover the PSU. It has cutouts close to the board edge which is excellent and appreciated to allow easy short runs in the main chassis to internal connectors. The mid way grommeted hole is also nice for a direct pass-through for GPU power cables. There is one non-PSU shroud thing I would like to bring up here.
If you look near the front fans and move down, you can see the HDD cage. That is the HDD cage in its furthest back location, which means if you want to install a 360mm radiator as the 220T is claimed to support, you would need to remove the HDD cage entirely. The 220T is shaping up to be a case of concessions in regards to trade-offs to achieve mounting for supported hardware.
Inside the iCUE 220T RGB Continued
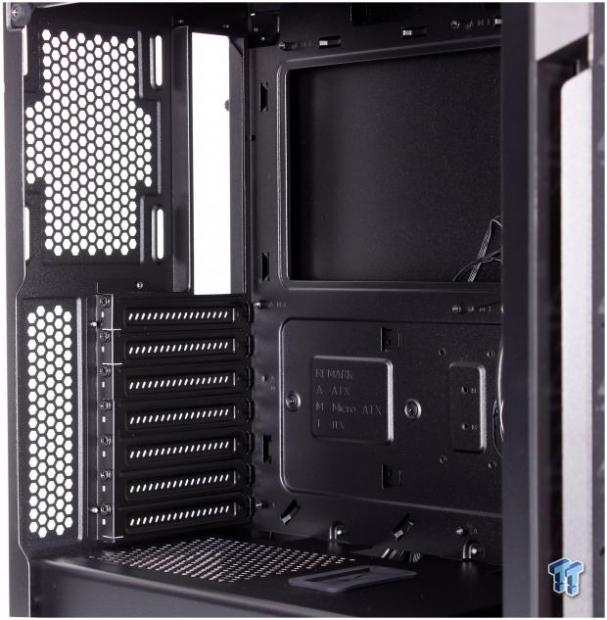
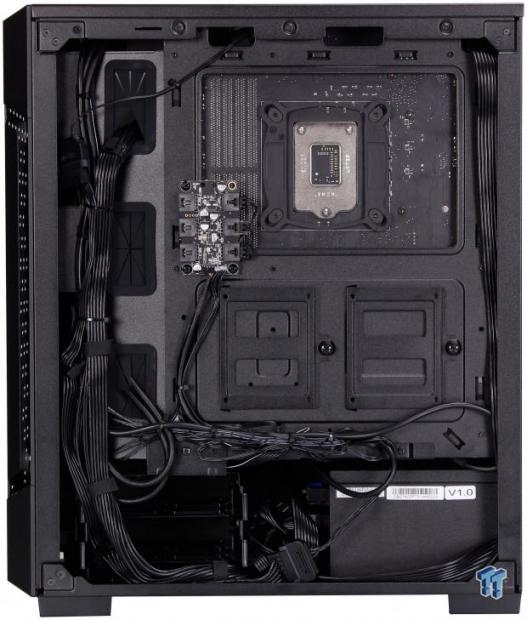
The rear area we get an inside view of the vacant fan slot. The rear fan hole only supports 120mm. We also can see the large CPU access cutout, which is more than enough to work on any cooler backplate I have seen to date. The expansion slot covers all have their own hex headed retaining screws, and they are internally accessible vs. some chassis we have seen recently which opt for external rear access to maximize internal chassis space for component fitment.
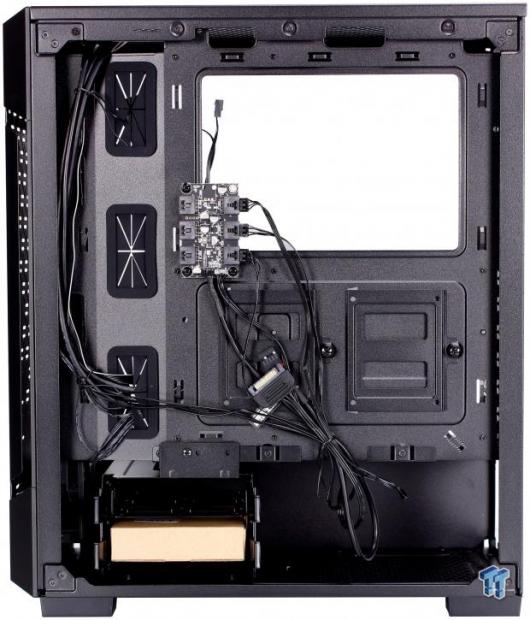
The cable management area of the 220T is reasonably laid out for the space we have available. The HDD cage I can already tell will be problematic as corsairs corners have dual rivet designs which mean there is a roughly 45 degrees strap of metal which takes up almost 2cm of space where you cannot squeeze the PSU in between that edge as you will bite into that edge and the PSU shroud, trust me I did it. I had to slide the HDD cage forward entirely to fit a 140mm PSU into this space which means if you have a relatively standard 160mm PSU, you better remove the HDD cage to save yourself the struggle.
There are two 2.5" SSD trays on the rear of the motherboard tray, and the left-most unit has threaded mounting as an alternate location you can mount the Lighting Node CORE. Speaking of the Lighting Node CORE, you can see it on the edge of the CPU cutout. It is pre-wired, and due to two separate cables coming from the fans, it can be kind of a nightmare to cable manage, but like any RGB device, they are always a cabling mess.
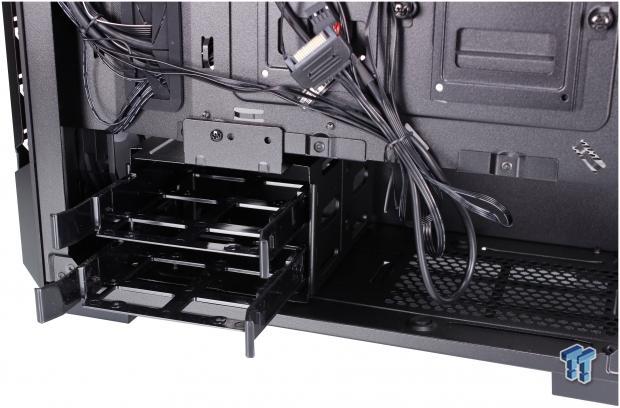
The cage for the 3.5" drives are now in view, and as you can see, the last of the five screws to adjust the cage is now visible. While two of the screws at the bottom are slotted unfortunately the rest is fixed which means if properly mounted you only have three levels of adjustment and none of them will support a front mount AIO or radiator with fans. Therefore if you are opting for a front mount 360mm radiator and you are dead set on the 220T you must remove the 3.5" drive cages, so plan accordingly. The HDD trays are plastic and tool-less, they work well to retain a drive and will be just fine if you have mechanical storage to place here.
The PSU section is listed as supporting up to a 180mm PSU. Here you can see the lip I had a righteous battle with before I gave up and moved the HDD cage. Mind you this is a 140mm PSU which is basically the shortest ATX PSU you can buy and between 140 and 160mm are the most common sizes.
The fitment of the PSU with the out of the box configuration will be nary impossible without adjusting the HDD cage forward or removing it entirely. I recommend the latter just for ease of your build. The PSU area has rubberized feet for the PSU to sit on which will absorb vibration and avoid scratching to your PSU unless you try to cram it in without moving the HDD cage at which point your PSU may have a few well-earned battle scars.
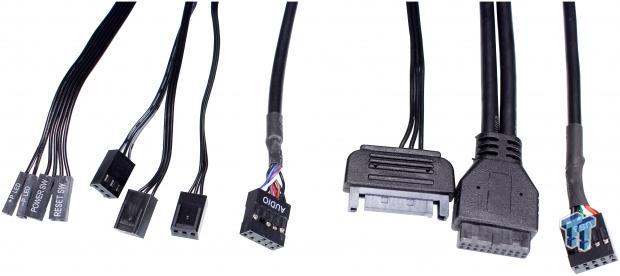
The front panel cables are as follows, left to right:
- Power/Reset/Power LED connectors
- Three 3-pin fan connectors for the preinstalled SP120 RGB PRO fans
- Front Panel Audio Connector
- SATA power for the Lighting Node CORE
- 20-pin USB 3.2 Gen 1 connector
- 10-pin USB 2.0 connector for the Lighting Node CORE
As you can see, all of the connectivity is here, and the included fans are indeed DC, which means no PWM control.
Hardware & Documentation
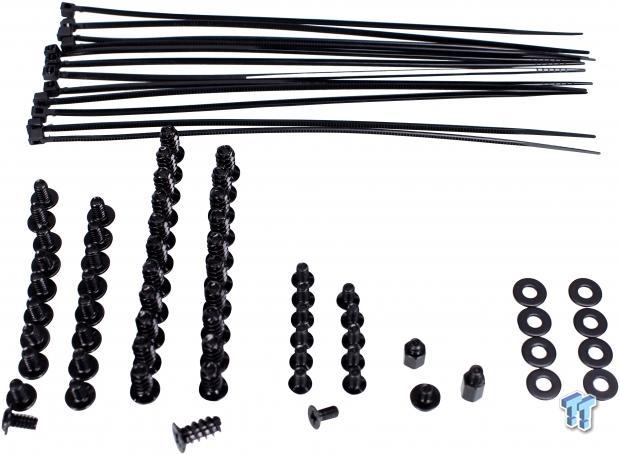
Here we have the complete fastener set for the 220T RGB. The parts are as follows, left to right:
- 18x Motherboard/HDD screws
- 20x Fan mounting screws
- 12x SSD Screws
- Standoff and screw for Lighting Node CORE
- Extra Motherboard Standoff
- 8x washers
- 12x Zip ties
This has everything theoretically for what you would need to install most anything you would need in the 220T.
The manual seems quite large at 74 pages but once you realize its multiple languages and only about ten pages per language, then some regulatory pages. The one thing I found disheartening is the information was rather light, and it shows a PSU being installed without modification to the HDD cage location. The manual also lists the 360mm radiator compatibility again with no note for needing to remove the HDD cage.
Case Build & Finished Product
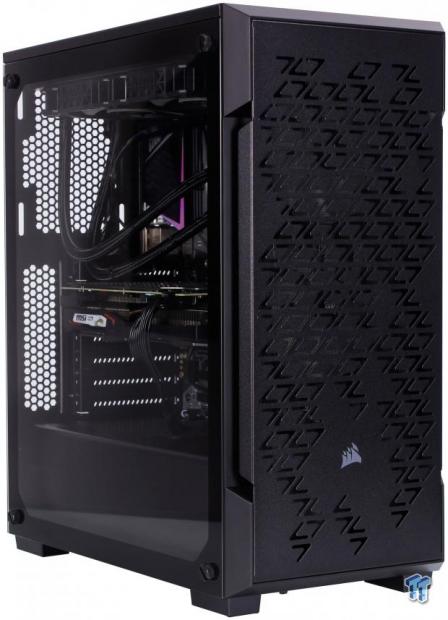
The front of the 220T RGB looks just the same as when we first opened it when built as the metal panel shrouds most view past the fans.
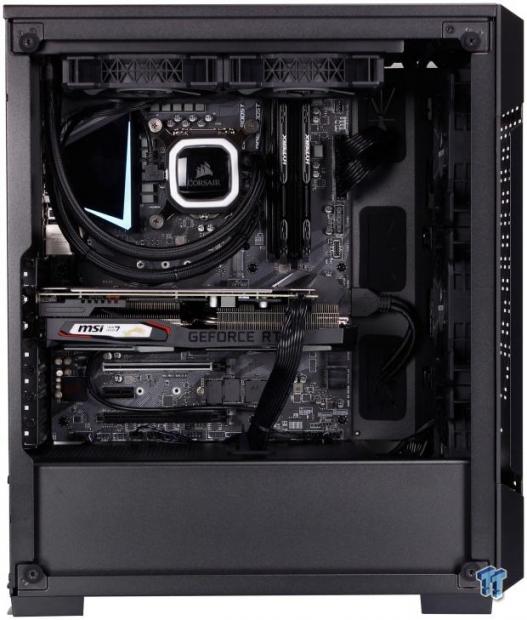
Here we see the main chamber with components installed. The card in place is an RTX 2060 which is a reasonably mid-range GPU and not even very long, but you can see in the tight confines of the 220T it takes up a decent amount of space horizontally. Longer cards will fit up to 300mm of course, but they will be right up against the fans.
Also, note that we had to swap in Kingston HyperX FURY modules as they were the only DIMMs we had which would fit with the AIO top mounted. This is a bit sad in my opinion as Corsair capitalizes on RGB with iCUE and the namesake for this 220T chassis and iCUE could control Corsair RGB RAM, but due to fitment if you are running a top-mounted AIO, you cannot run their own memory in the chassis.
I do understand that mid-tower chassis can be tight, but had this chassis been made about 1-2CM wider it could have had full RAM and cooling clearance while also having more potential room for cable management by having an angled channel where the front grommets are located.
The rear is reasonably standard components have now filled all of the gaps. You can see the cables peeking around the left corner, and this is where we are looking next.
Here you can see we used the front indentation where the cable grommets get their angle to maximize cable fitment behind the panel. This is why I said I wish that Corsair could widen the 220T RGB a bit so that the indentation could be pushed at more of an angle, this would serve a dual purpose. First up, it would allow more room to fit cabling. Secondly, it would enable a straight shot into right-angled connectors such as SATA or USB 3.0 headers.
I know it may look like there's plenty of room in front of the PSU, but keep in mind that cables do not merely make a right angle when it leaves the connector. With that in mind, the soft bend of the wires means you have 10-20mm extra clearance needed plus any additional cabling you may want to cram here since there's not a ton of room behind the motherboard tray. Lastly, note that with the HDD cage move one position forward it is now only 3-4mm from the front fans which mean once again the HDD cages would have to be omitted entirely to fit a radiator at this lowest mounting point.
The built 220T RGB looks quite good, which I know I have complained quite a bit in the preceding pages. As you can see, while there are some issues, it comes out looking quite slick. A slightly tinted window may help hide components or cabling, you may not want to see, but without internal lighting that could also make it look bad. With that considered after the build, I am happy with the clear glass in this case.
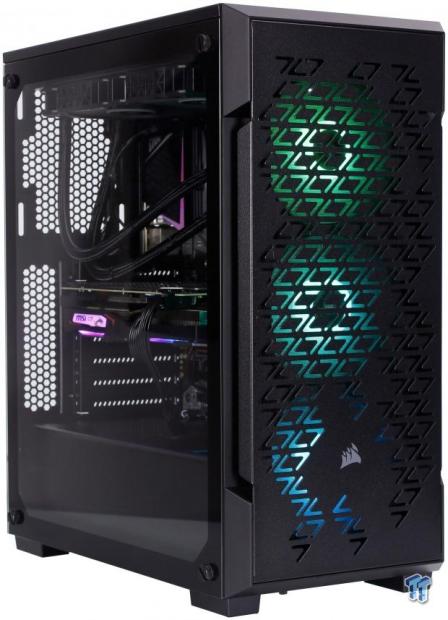
Here we have the iCUE 220T RGB powered up to show the RGB and internal components. The front-mounted SP120 RGB PRO fans admittedly have a nice color flow to them and make the front pop and show off the unique angular styling in the front metal plate. The side view with the many cable pass-through keeps cabling out of sight, except where necessary to give an overall clean aesthetic to your build.
Final Thoughts
When I first received the iCUE 220T, I was impressed by the included RGB controller and triple SP RGB PRO fans. Also, I was intrigued by the quite short depth. Now that I have had some time with the 220T RGB, I feel it is safe to say that it can do the job of a case but don't have too high of expectations with this one. There are concessions at several steps and adjustment necessary to install essential components such as the PSU.
The performance testing even with triple 120mm fans we found that the CPU wound up 47C over the ambient. This is about 1.2-1.8C average over our mean across our cases thus far. The GPU was 36.3C over ambient, which is at the lower-end of the mean. The airflow from the three front fans helps the GPU breathe much better while the tight confines and direct cross-flow from the front-mounted fans do not do many favors for the top-mounted AIO.
I like the fact that the 220T RGB can pull off a nice looking ATX build with a quite smaller volume. The inclusion of triple SP 120 RGB PRO fans is a significant part of the price along with the Lighting Node CORE. The triple pack of SP 120 RGB runs an MSRP of 69.99 alone while the Lighting node we don't have a price on but the basic dual-channel model of 45 dollars approximately. We have to take into account some of this when it comes to pricing evaluation.
Now we address some of the things we did not care for with the 220T. Firstly, I am of the belief that if a product lists a feature such as a fitment, you should not have to remove another listed feature to make it fit. This is, unfortunately, the case in regards to front 360mm AIO/Radiator fitment. If you want to install a front mount radiator that occupies the bottom fan mount, you will need to omit the dual 3.5" mounting entirely.
Next up is the build, the fact that I had to lay on the cable management panel to get it to slide into a closed position with all tabs engaged is something I have not had to do in several years, and I expect better from Corsair in the ease of build' category. I do not believe the iCUE 220T RGB is a case I would ever give to a new builder to try to complete their first PC build as the simple fact that you cannot install a PSU without relocating or removing parts feels wrong for an ATX mid-tower chassis.
Coming to market at the $109.99 range means that the iCUE 220T RGB has some tough competition. The only saving grace for the 220T RGB would be the sheer value of the included controller and fans. The rest of the case can support a build as we showed today, but it is not as easy and carefree build as we have become accustomed to with Corsair cases.
I have to add one more thing, with the fact that top mount radiators are highlighted as supported, Corsair being a memory company form the onset, I would have thought they would ensure that since a major theme of this case is RGB, they would make sure their iCUE ready RGB memory would be supported, unfortunately as we showed, it merely is not.
When considering the concessions we have to make to complete a build as the specs are supported, I do not think I could apply an award here as I feel like the 220T RGB was an excellent idea on paper, but the execution has the 220T RGB found wanting.
Shannon's Chassis Test System Specifications
- Motherboard: MSI MPG Z390 Gaming Edge AC Z390 (buy from Amazon)
- CPU: Intel Core i7 8700K (buy from Amazon)
- Cooler: Corsair H100i Pro RGB (buy from Amazon)
- Memory: GeIL Super Luce RGB GLS416GB3600C16ADC
- Video Card: MSI GeForce RTX 2060 Gaming Z (buy from Amazon)
- Storage: Sandisk M.2 256GB
- Power Supply: Silverstone Strider Platinum 1000W (buy from Amazon)
- OS: Microsoft Windows 10 Home 64-bit (buy from Amazon)
 Lian Li B4-mATX Review: a compact mATX SFF case with excellent airflow and premium features
 Ocypus Sigma F36 BK ARGB Cooling Fan Review: high airflow and unified design in one frame
 PCCooler CPS RZ820 Display Review: a flagship-level CPU air cooler with an LCD screen
 MOAIPLAY ORA PRO G1 850W ATX 3.1 PSU Review: high efficiency and 10-year warranty for $119.99
 NZXT H6 RGB+ Compact Dual-Chamber Chassis Review
 Ubisoft teases new Ghost Recon after seven years of series being MIA
 Portals spotted between GTA 3, Vice City and San Andreas
 SK hynix CEO says 2027 will be the worst year on record for memory supply
 NVIDIA Vera CPU performance shows impressive gains over its x86 rivals
 Acer Predator Atlas 8 pricing is here, portable PC gaming is now a very expensive hobby
 First NVIDIA Vera Rubin NVL72 benchmarks show 10X improvement over Grace Blackwell
 Razer Seiren V3 Chroma 32-Bit DSP is a new USB microphone all about studio-grade vocal quality
 Woot is selling the Nintendo Switch 2 for $399 with a promo code - $100 below the incoming September price
 Battlefield 6's latest update is causing crashes on GeForce RTX 50 Series GPUs
 Pulsar and Noctua launch Feinmann F01 Noctua Edition gaming mouse with built-in fan for sweaty palms
 Thrustmaster T.Flight HOTAS 5 MSFS Edition Review
 SteelSeries Arctis Nova Pro Omni Wireless Headset Review - One Headset to Rule Them All
 SteelSeries Arctis Nova 7 Wireless Gen 2 Headset Review - New and Improved, But Is It Enough?
 AMD Ryzen 7 7700X3D Review - Days of Future Past
 Samsung 990 2TB SSD Review - Ninth Gen QLC at PCIe Gen4 Speeds
 ASUS ExpertBook Ultra (Panther Lake) 14" Business Laptop Review
 ASUS ROG Raikiri II Xbox Wireless Controller Review - Ready to Take Control
 MOZA FMP18 Panel Bundle Review: authentic F/A-18 Hornet cockpit controls for flight sims
 Micron 6600 ION 245.76TB Enterprise SSD Review - Best in Class Programming Speeds
 MOZA MA3F EFCM Flight Control Module Review: authentic Airbus A320 autopilot panel for simulators
 I use this decade-old free tool that finds files faster than Windows Search does
 I install and update most of my apps with this Windows command now, and I stopped downloading sketchy installers
 Hisense U6SF 65-inch MiniLED TV: High Performance Meets Leisurely Convenience
 I stopped digging through Windows menus after I set up this one folder
 Don't sell your Windows laptop until you do these things
 6 PC cleaning mistakes to avoid for safer hardware maintenance
 Phison and Intel Take Aim at Local AI's Memory Wall with aiDAPTIV
 How to Remap Keyboard Keys in Windows using Microsoft PowerToys
 7 tips to organize your Windows files for faster, easier access
 Intel Arc G3 Extreme first impressions with MSI's Claw 8 EX AI+ - Incredible power for an extreme price