


Our Verdict
Introduction, Specifications, and Pricing
Intel's Z170 chipset landed recently and with it comes a slew of enticing motherboards. Many brands have done their best to diversify their lineups with unique features and aesthetics to compliment the new chipset and its rich connectivity.
GIGABYTE has once again redesigned and heavily equipped their gaming lineup, and today I have their top-dog Z170X-Gaming G1, offering the latest in chipset and gaming technologies in one package. The Z170 chipset is loaded with 26x I/O ports which can be configured as USB 3.0, SATA6G, or PCI-E 3.0. Out of those 26 ports, six must be USB 3.0. Out of the remaining 20 ports, four can be allotted to more USB 3.0 or PCI-E. Out of those leftover 16 ports, there is support for a maximum of six SATA6G ports, which can be configured as SATA6G or PCI-E 3.0.
To take things to a new level, those 16 ports also support three sets of 4x PCI-E lanes with iRST support for M.2 slots which can be used in RAID (each M.2 slot must also have two SATA connections blended in). This means that there will be many motherboards with different configurations catering to the target users of each individual motherboard. With the Z170 chipset, it will be harder than ever for manufacturers to differentiate themselves from one another. GIGABYTE has taken their Z170X-Gaming G1 a step further than previous G1 Killer motherboards, upgrading not only the audio with better hardware, but also USB 3.1, Thunderbolt 3.0, and providing better aesthetics all around. Let's see what this board is all about.
Specifications
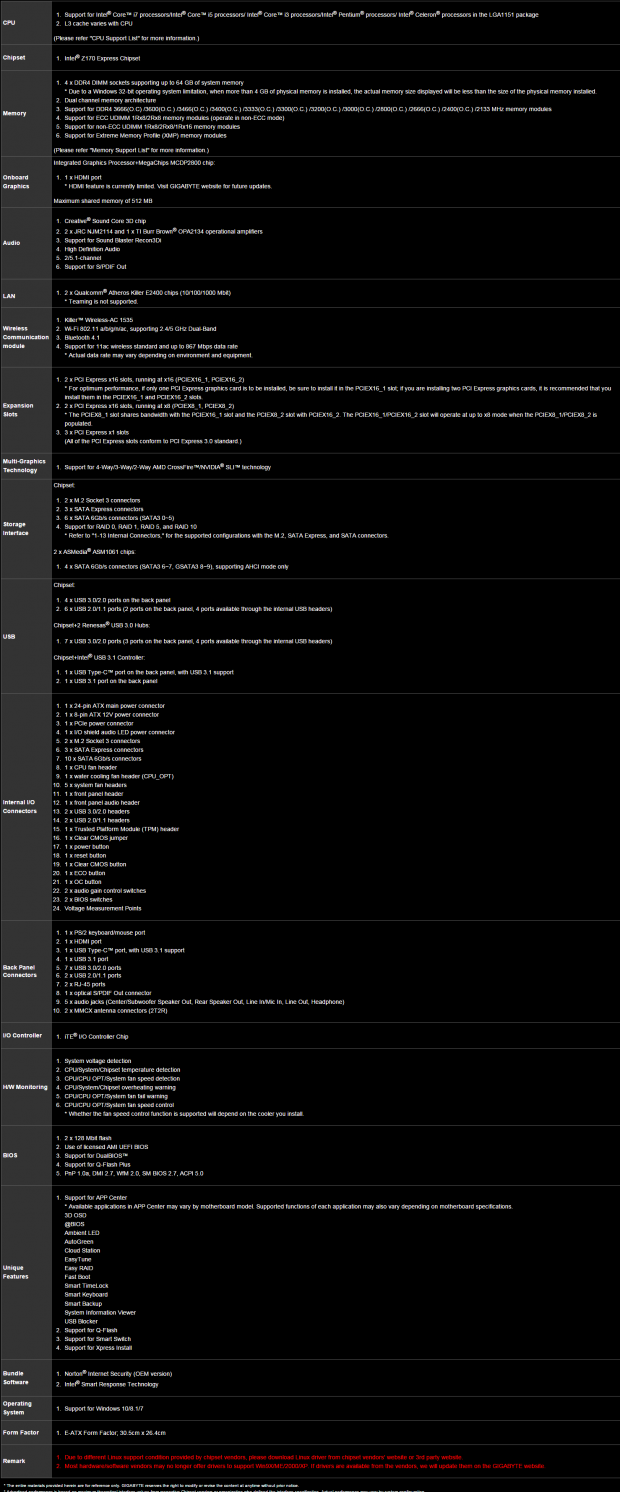
The Z170X Gaming G1 is by far the most feature packed Z170 chipset motherboard I have reviewed so far. It packs 13 USB 3.0 ports (7 back and 4 through internal headers), 2x USB 3.1 Type-C (back panel/front panel), 2x USB 3.1 Type-A (back panel/front panel), two 1GBit Killer NICs, Killer WirelessAC/BT 4.0, Creative ZxRi 120dB+ audio, Thunderbolt 3.0, 4-way graphics support, and 10 SATA (3x SATA Express included) just to list the major ones.
Pricing
GIGABYTE's Z170X-Gaming G1 is currently listed for $500 on Newegg. That makes it the most expensive Intel Z170 motherboard currently for sale on Newegg.
Packaging and the Z170X-Gaming G1
Packaging and the Board


The Z170X Gaming G1 has a huge box, it's the same size box as the X58A-UD9. It is very thick and while it might just seem like it is for show, there is actually a lot in the package including a USB 3.1 front panel bay, and the huge motherboard. The motherboard is well protected inside its own mini box, and some of the accessories come in a smaller box. The packaging is very high quality, probably the best I have seen from GIGABYTE.


All accessories outside the mini box are individually packaged and the USB 3.1 front panel bay is sealed in an anti-static bag. The mini box has a lot of the smaller accessories; there is even a retention bracket for the MMCX antenna for the Wireless AC/BT 4.0.
Our Latest Socket LGA 1150/1151 Review Coverage
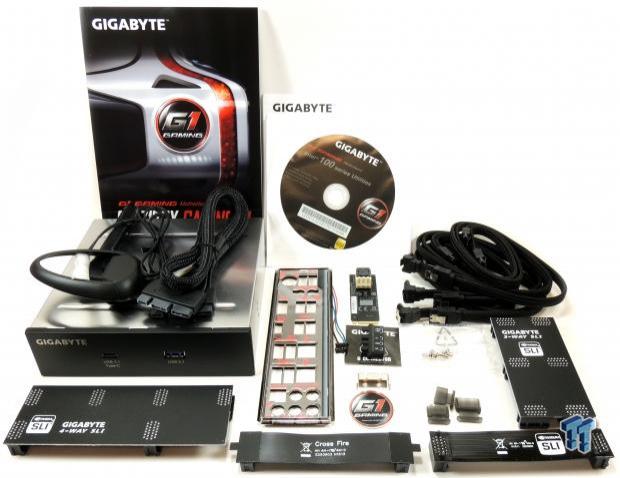
Accessories include 6x braided SATA6Gb/s cables, RGB LED IO shield, 2-way SLI bridge, 2-way CrossFireX bridge, 3-way SLI bridge, 4-way SLI bridge, G-Connector, MMCX antenna retention bracket, plugs for unused back panel IO ports, USB 3.1 front panel bay, SATA Express cable for the bay, 2x2 MMCX antenna, M.2 to U.2 add-in adapter, Gaming G1 case badge, driver DVD, and manuals. The package comes with everything you would expect from a $500 product.


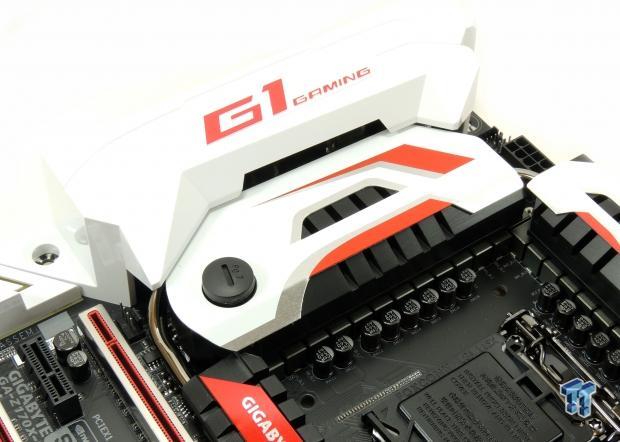
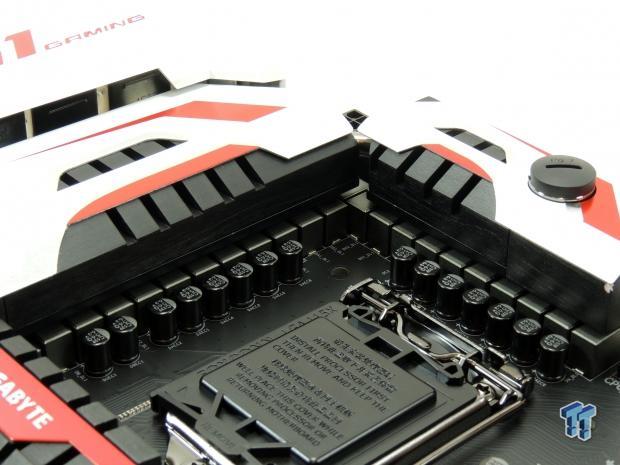
GIGABYTE has increased the number of fan headers to 7; the one CPU fan header circled in green offers PWM or voltage (DC) mode operation, and the rest which are circled in blue offer voltage mode operation (which can control all fans including PWM fans in voltage mode). Control for all the fan headers is offered through the UEFI or Windows, it is the same as on the X99 series Gaming G1. The aesthetics of this motherboard are very nice, and the red and white color theme looks pretty good in person. GIGABYTE did a very nice job with the looks of the motherboard, especially with the shields over the IO panel and the audio section.
While many people might not like LEDs, I have to admit they look quite good on this motherboard. The SATA area also has its own mini shield and LEDs shine through that area as well. The motherboard has a refined look, and I am told it is modeled after a futuristic spaceship, and I am glad they didn't add a heat sink in the shape of a spaceship. The back of the board is pretty much bare except for LEDs, and some MOSFETs for the PLX chip's VRM.
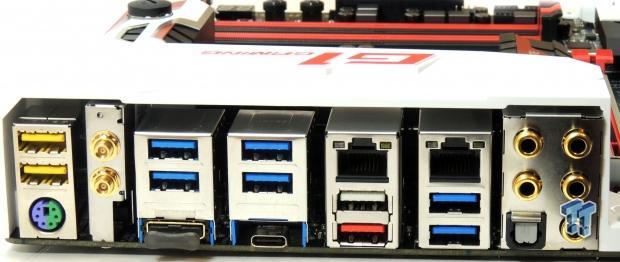
The IO Panel features 7x USB 3.0 ports (the white one can be used for USB BIOS recovery), 2x USB 2.0 "DAC-UP" ports, 2x 1GBit NICs, 2x MMCX antenna ports, HDMI (future support for 2.0), 1x USB 3.1 Type-C/Thunderbolt 3.0, 1x USB 3.1 Type-A, 7.1 audio outputs with TOSLINK, and PS/2 keyboard or mouse.
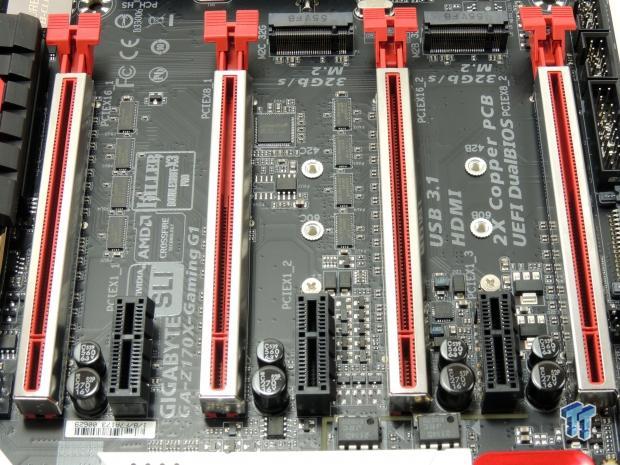
GIGABYTE is providing PCI-E supports, which are one-piece metal guards for the PCI-E slots. GIGABYTE claims that in shear testing the slots are 1.7x stronger than traditional PCI-E slots and in retention tests they are 3.2x stronger. GIGABYTE also claims that their implementation is a one piece design which is stronger than two piece designs. The PCI-E layout is actually quite simple. All the CPU's 16x PCI-E lanes are routed to a PLX bridge which outputs 32x PCI-E 3.0 ports downstream. Two sets of 16x lanes are routed to the first and third PCI-E slots, and each of those slots shares 8x lanes with the 16x slot below it. You can run 16x/0x/16x/0x, 16x/0x/8x/8x, 8x/8x/16x/0, or 8x/8x/8x/8x for 4-way SLI/CrossFireX. All the PCI-E 1x slots are PCI-E 2.0 and go through an ASMedia bridge chip.


Two M.2 slots get their bandwidth from the PCH, but depending on what type of drive you install, some of the SATA ports might be disabled. The top M.2 slot is known as M2C_32G and the bottom one is known as M2B_32G. If you want to know what will be disabled or enabled, look at page 36 of the manual or the image above (from the manual). Both M.2 slots can operate at 32Gb/s max and you can RAID them. I would recommend using the bottom one.


The Z170 PCH provides six SATA6Gb/s ports and two ASMedia controllers provide four ports not inline with SATA Express ports. All six of the Intel SATA 6Gb/s ports also work as SATA Express. There are two USB 3.0 internal headers located right below the 24-pin connector and both of them get their bandwidth from a USB 3.0 hub.


The audio this time around has been upgraded some more. GIGABYTE has added a dedicated DAC which works with the Core3Di chip with different amplifiers to produce 120dB+ output which has been certified by Creative. Two switches located near a SATA power connector for more PCI-E power are used to change the gain from 6x to 2.5x. One switch is for the rear output and one for the front.


GIGABYTE didn't forget overclockers, located at the top of the board is a POST code display, power, reset and clear CMOS buttons as well as voltage read points. There is also an OC button which provides automatic overclocking and an ECO button which provides power savings. At the bottom of the board are two switches for BIOS control; one switches between the main and backup BIOS and the other disables dual BIOS so that the BIOS ROMs are separate entities.


RGB LEDs are located under the motherboard and their light emanates through the PCB audio divide and on the other side of the board where it says "Gaming G1" to produce lighting effects.
There is one huge heat sink which cools the PCH, the PEX8747 PCI-E switch, and the VRM. The PEX8747 produces the most heat and it spreads throughout the heat sink. The heat sink is held down by metal screws and makes very good contact with the components. The shields over the audio and IO panel are plastic, but the shield over the SATA ports is metal.
GIGABYTE Z170X-Gaming G1 Circuit Analysis
Circuit Analysis

In my opinion, most motherboards look best when they don't have any heat sinks on them and the Z170X-Gaming G1 is one of those boards. There are countless ICs to provide all the connectivity and features, and now I will go over them.
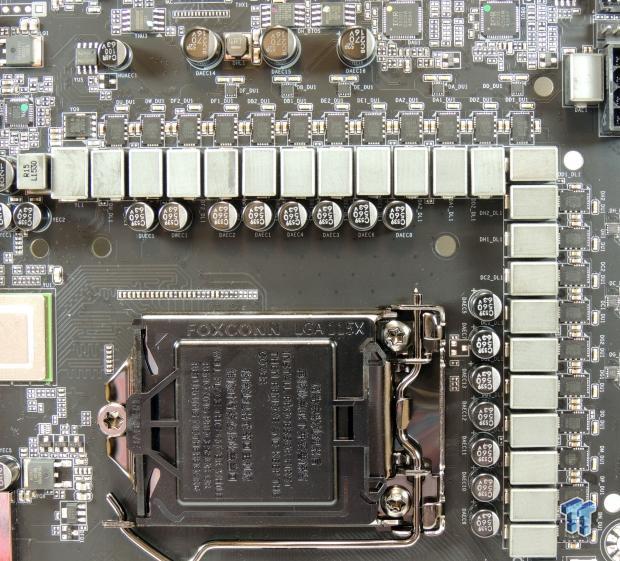
There are four major input rails to the CPU for Z170; VCC (VCore), VCCGT (Graphics core), VCCSA (System Agent), and VCCIO (CPU IO). The main CPU VRM is 16 phases, the VCCGT is 4 phases, and the VCCSA and VCCIO each have their own phase. GIGABYTE is still using their 10K black solid capacitors from Chemi-Con, but I am unsure of the rating on the inductors.
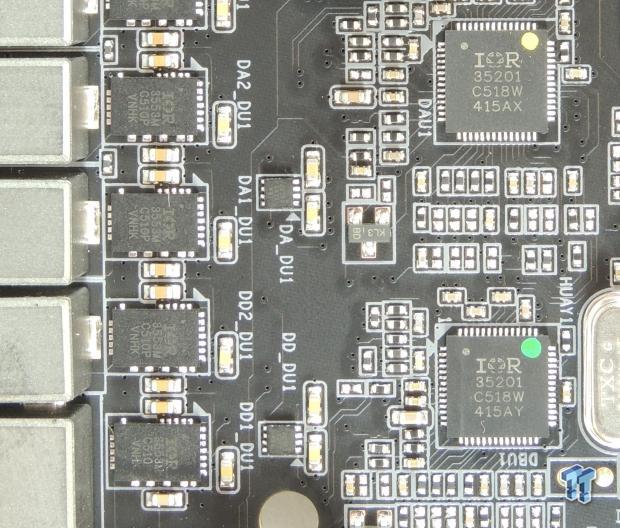
GIGABYTE is using two International Rectifier IR35201 (6+2 mode or 8+0 mode) PWMs; the first is for the VCore and is in an 8+0 phase mode and each of those 8 phases provides its output to an IR3599 phase doubler which in turn outputs two phases to two IR3553 which are 40A integrated power stages. For the VCCGT, GIGABYTE uses four phases from an IR35201 and directly routes them to four IR3553.


The VCCSA and VCCIO are controlled by an IR3570 (3+2 max), which provides one phase directly routed to each IR3553 (1+1). If you count up the phases, there are 22 total IR3553. This is perhaps one of the most robust VRMs I have seen for the Z170 chipset, and it is pretty much total overkill, but at this price point, overkill is welcomed. Another IR3570 (3+2 phase max) is used for the DRAM power; it outputs two phases to two IR3553 and one phase for the DDR VPP which also uses IR3553.


The audio on the Z170X-Gaming G1 is very high quality. GIGABYTE has used the Core3Di chip before, the CA0132, but this time they have added a digital audio receiver, the Cirrus Logic 8416 to decode the Intel HD Audio signal and a dedicated DAC the BurrBrown PCM1794 (127dB). GIGABYTE's normal single AMP-UP socket has been expanded into three. Each channel of the back-panel IO output has its own dedicated New Japan Radio Company JRC2114D amplifier and the front panel audio output has its own BurrBrown OPA2134PA. There are 10x Nichicon Gold Series electrolytic audio capacitors and four WIMA audio-grade film capacitors. I also spotted three Texas Instruments L49710 audio amplifiers for the other audio outputs on the back panel. This is basically the Creative ZxR audio integrated into the motherboard's PCB, so they call it ZxRi (like Core3Di).


Now that I covered the audio, I will also cover the NICs. GIGABYTE is using Qualcomm's Killer DoubleShot X3-Pro which requires three Killer NICs to work together. The first two are Killer's brand new e2400 1GBit gaming NICs and the third is a Killer 1535 2x2 Wireless AC/BT 4.0 card. Together all three NICs can be used to route different traffic through different dedicated NICs. I will cover this more in the software section.
GIGABYTE Z170X-Gaming G1 Circuit Analysis Continued
Circuit Analysis Continued
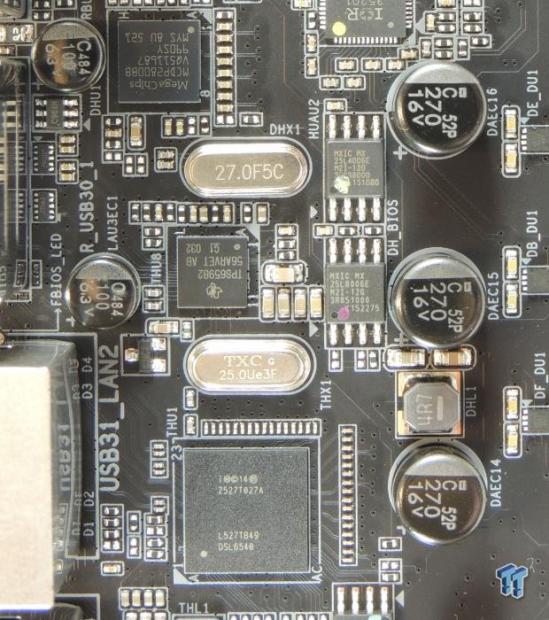
There is no hiding the fact that GIGABYTE had no USB 3.1 capability on any of its motherboards until now. They might have been waiting for Intel's Thunderbolt 3.0/USB 3.1 controller, otherwise known as Alpine Ridge, but now known as the DSL6540. This controller can take up to a 4x PCI-E 3.0 link from the PCH and two DisplayPort connections from the CPU's integrated GPU and produce a whopping 40Gb/s of output when using the C-Type connector for Thunderbolt 3.0. GIGABYTE is providing the controller with 4x PCI-E 3.0 on the Z170X-Gaming G1.
If you are using a USB 3.1 device, you will get 10Gb/s of bandwidth, and GIGABYTE is providing both USB 3.1 type-a and type-c outputs on the back panel, both of which get their bandwidth from this controller. There are also other notable ICs in this image including a Texas Instruments TPS65982 which is a USB 3.1 type-c switch and USB PD (power delivery) controller and power switch which can provide 3A output power at different voltages. A MegaChips MCDP2800 is also present. According to MegaChips, it's a "high-speed level-shifter and active-protocol converter (LSPCON) in a single chip", which most likely is responsible for the HDMI on the back panel IO.


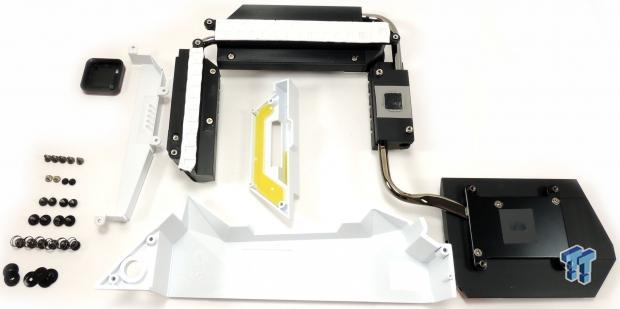
I took apart the USB 3.1 front panel bay which is included with the Z170X-Gaming G1 just to see what it had on the PCB. Since SATA Express is basically PCI-E mixed into SATA ports, you can use it to provide two PCI-E lanes over wires, so GIGABYTE uses a SATA Express connector to provide the front panel bay with the 2x PCI-E lanes needed for USB 3.1. An ASMedia ASM1142 is used here for one Type-C and one Type-A USB 3.1 port. GIGABYTE is using the same Texas Instruments TPS65982 for the USB 3.1 Type-C switch and USB PD (power delivery specification) controller. Two SATA power connectors are needed to power the bay, and there is also a VRM for the USB ports, but this time it is a boost regulator using a Texas Instruments 43061 as the controller and a Texas Instruments CSD87350Q5D, which is more commonly found on high-end CPU VRMs.


The PEX8747 from PLX Technologies makes the Z170X-Gaming G1 one of only a handful of Z170 motherboards capable of supporting 3-Way SLI and 4-Way SLI/CrossFireX. Together with eight PCI-E quick switches from ASMedia, it provides all bandwidth to the PCI-E 16x slots.
Texas Instruments HD3SS3415 are used as PCI-E quick switches. There is a single switch in charge of switching SATA ports 4 and 5 to the M.2 slot when it is in use. Four other switches are used to switch 8x of PCI-E from the first PCI-E slot to the second. While the Z170 PCH might have 26 ports of bandwidth, the Z170X-Gaming G1 requires much more, so GIGABYTE is using an ASMedia ASM1184e which will take one PCI-E 3.0 lane and output four PCI-E 2.0 lanes. Three of those four PCI-E 2.0 lanes are directly routed to three PCI-E 1x slots, and the fourth is routed to an ASMedia ASM1061 used for extra SATA.
There are two ASMedia ASM1061 on the motherboard, one gets bandwidth from one of the M.2 slots and the other gets bandwidth from the ASM1184e pictured above. There are also two USB 3.0 1-to-4 hubs from nec/Renesas, the D720210. While the Intel PCH provides six USB 3.0 ports on the Z170X-Gaming G1, one is routed to one of the hubs for the internal headers, and four are routed to the back to four of the seven USB 3.0 ports. The last remaining USB 3.0 port is routed to one of the hubs which outputs three of the seven USB 3.0 on the back panel.


The iTE IT8628E is GIGABYTE's main SuperIO in charge of voltage, temperature, and fan monitoring and control as well as the PS/2 on the back panel. For control over all seven fan headers and overclocking features GIGABYTE has implemented the iTE IT8792E which is an embedded controller. The iTE IT8951E provides the USB BIOS recovery functionality and GIGABYTE has two 128Mbit BIOS ROMs located right above it.


These five ASMedia ASM1480 switch SATA and PCI-E bandwidth between the M.2 slots and the M.2 ports for different configurations. You can refer to page 36 in the manual if you want to see exactly what functionality you will lose if you plug in different devices.
BIOS and Software
BIOS
GIGABYTE has done away with their other BIOS modes and focused on just the single Advanced BIOS mode which most people were using on previous platforms. No more orange and black or Windows 8 style tiles; the GIGABYTE BIOS is now, in my opinion, easier to use. No longer are you forced to hit F2 twice to get to the advanced BIOS mode, instead you are greeted by the advanced BIOS upon entrance. When I got the Z170X-Gaming G1, I was using BIOS F2, but when I flashed to BIOS F3 many more options appeared, many of which I was surprised to see considering they are very advanced. Extreme overclockers should be delighted with settings such as an IMC timing menu, more DRAM timings, Internal PLL Trend Voltage (for LN2), and even a DRAM timing voltage.
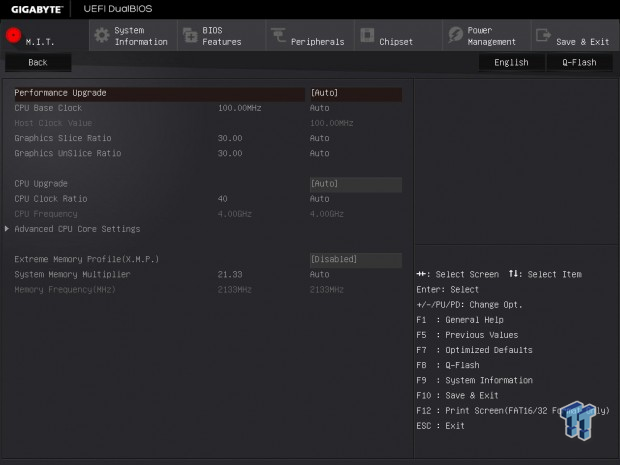
The advanced mode BIOS has everything you need and GIGABYTE has even provided built in CPU OC profiles for the novice.


GIGABYTE is also providing RGB LED control through the UEFI (and Windows), and I also have chosen to select one the pages where you see the fan control. As you can see, fan control is provided for each header. You can chose between auto, silent, full speed, and manual. Manual control provides the ability to choose between 2.5-0.75x the PWM value divided by degrees Celsius, to me it looks like a slope for a cooling curve where the higher number is stronger. The PWM value would be on the Y axis and the temperature on the X, slope is Y/X, so higher value here indicates a more aggressive cooling slope. However, I am sure that many users would appreciate a GUI with more customization options.


Software


GIGABYTE has also refined their Windows software suite, and this time it not only looks more visually appealing, functionality has also been increased. GIGABYTE has provided EasyTune, System Information Viewer (for fan control), @BIOS, and APP Center (along with others like TimeLock). GIGABYTE provides a few new software applications such as HW OC (for using a tethered phone to control OC), Platform Power Management, 3D OSD for gaming, Smart Keyboard for gaming, Easy RAID, and Ambient LED for RGB LED control. If you want good fan control, then you should use the system information viewer (SIV) application.


Killer has a new and improved application, and while you need it installed to enable Killer's DoubleShot X3 Pro, it doesn't automatically install along with the drivers, so many will be happy with the ability to install the drivers separately from the application. The new application will allow for you to download updated application priorities for DoubleShot as well. When you plug in both NICs and connect to a wireless router, the program will color code applications based on which NIC they use to connect to the router.
Right now Internet Speed is restricted at the ISP level, most people's internet plans aren't 1000 Mbps up/down, so they won't saturate a 1GBit NIC. However, if you have two routers with their own internet connections or if you have a super-fast NAS and a fast home network, DoubleShot can provide some advantages. DoubleShot X3 Pro provides the ability to carry out the following scenario: you are playing Battlefield 4 through the first NIC, the second NIC is then streaming Netflix and backing up your local data to your NAS, and the Wireless AC is downloading Windows 10 Updates and the latest SnapChat leak from a torrent.


Killer's application also allows you to change the Wireless AC adapter's mode from Game Mode to Max Throughput Mode, and it requires the NIC to restart for mode change. The Killer application also allows you to see the relative strengths of each wireless network.


GIGABYTE is providing Creative's Sound Blaster Pro Studio which is chalked full of gaming features. This software seems to have more options than previous Creative Software suites provided with older G1 series motherboards.
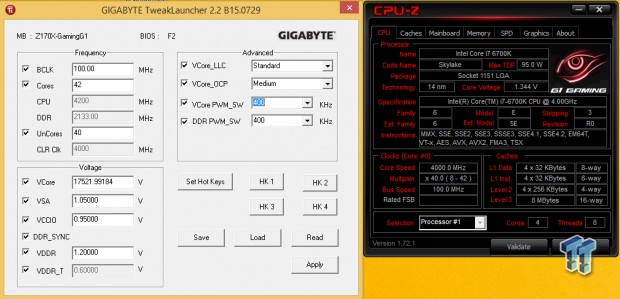
I was able to get my hands on GIGABYTE Tweak Launcher, and it does work with Z170. CPU-Z on the other hand shows a +0.7 offset on the VCore, and it can't recognize the motherboard as of yet, but the G1 Killer skin is available for download.
Test System Setup and RGB LEDs
Test Setup
A big thanks to Corsair for sponsoring the case, fans, SSD, USB drive, and PSU! A big thanks to Seek for sponsoring the Thermal Camera. You can find my review of the camera here.
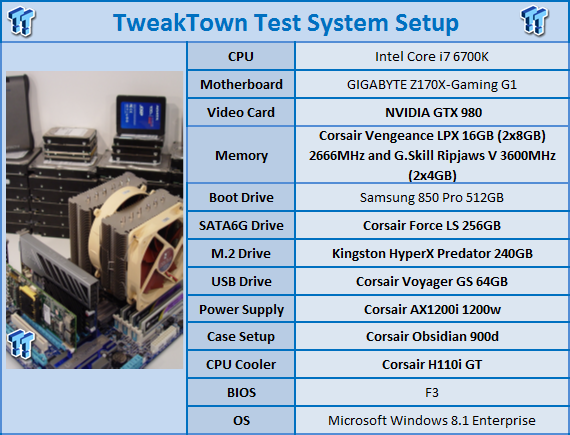
This is the new test bench, and it is designed to test every aspect of the motherboard and IO. I have designed it so that the motherboard sits in a case and is cooled by fans always on at a constant rate to keep the conditions similar for all tests. I have cut out part of the case behind the motherboard so I can get thermal images of the back of the PCB where the VRM heat spreads. System and CPU power measurements are now digitally logged.
I am also using a Netgear Nighthawk X4 AC2350 for our network (including wireless AC) tests. The latest M.2, SSD, and USB technologies are also being utilized to test the maximum potential of the motherboards that are being tested.
RGB LEDs
There are more colors available than just red, green, and blue, but I chose these three as these are the most popular colors. The LEDs look much better in person as it is very hard to capture good LED pictures. The back panel also looks really great with green, as the labeling comes up as orange and it's a color contrast I can't really show in pictures. If you use green, it matches the GeForce GTX lighting on high-end NVIDIA GPUs really well.
Red:


Green:


Blue:


Overclocking
Overclocking Results
In this section, I will go through overclocking this board.
CPU Overclocking
Max CPU Overclock is found by setting the VCore/cache to 1.5v, CPU ratio to 45x and disabling any features that would result in CPU frequency fluctuation. I then proceed into Windows and use software to increase the multiplier; in this case I opted to use GTL.

5.2GHz is the maximum of our CPU on this board with ambient cooling. Maximum AIDA64 Stable Overclock (BIOS settings below for this):
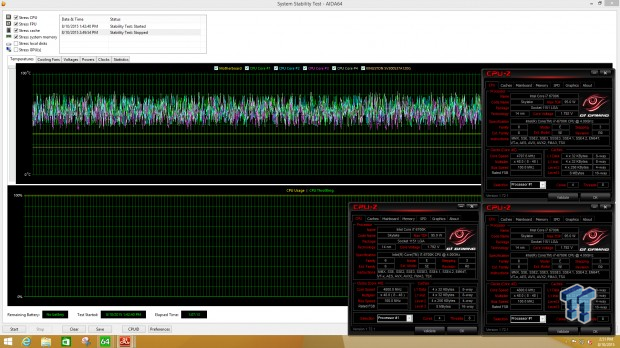
I was easily able to pull off 4.8GHz on the CPU with 4.0GHz cache and a 2133MHz on my memory manually tuning the UEFI. This was quick and dirty because of time constraints, but I could go higher on cache and memory frequency.
Memory Overclocking


For this review, I also used two DDR4 memory kits specifically designed for Skylake; the Corsair Vengeance LPX 2666MHzC16 (2x8GB) and G.Skill Ripjaws V 3600MHzC17 (2x4GB).


The Corsair 2666Mhz kit worked very well with just enabling XMP. The Z170X-Gaming G1 was capable of XMP with the G.Skill kit, but you need to manually set the VCCSA to 1.25-1.3v and the VCCIO to 1.225-1.25v, depending on your CPU's IMC, as the auto rules aren't implemented for IMC voltages.
CPU, Memory, and System Benchmarks
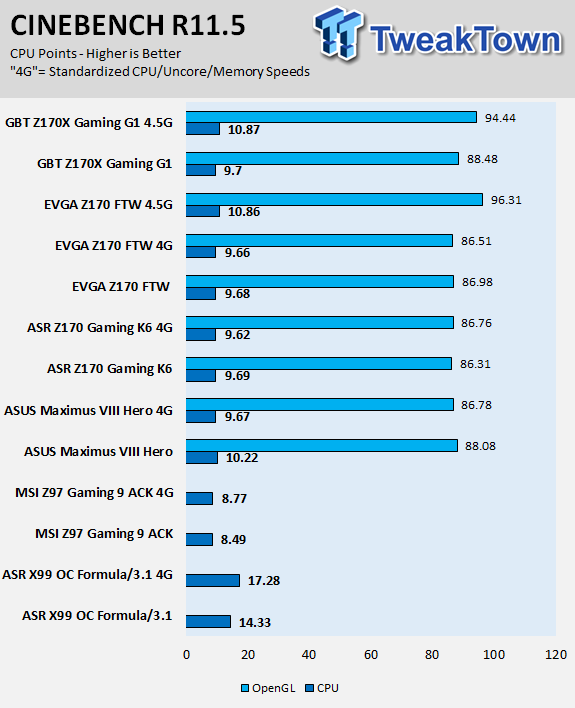
CINEBENCH 11.5
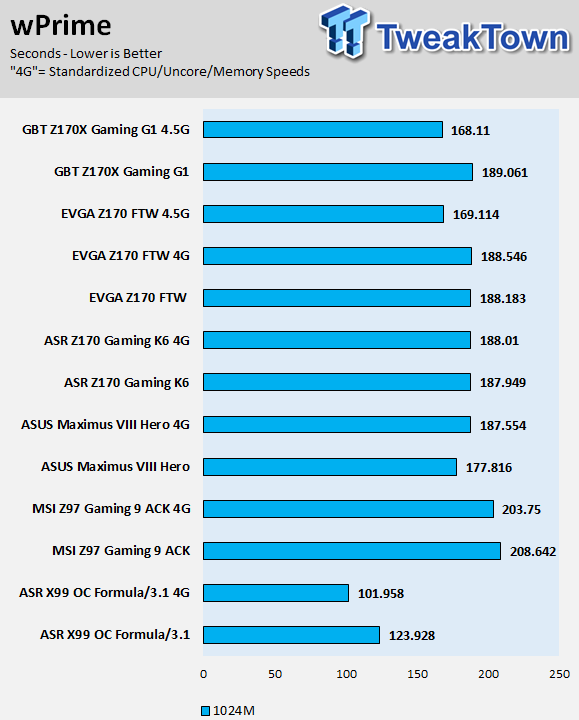
wPrime
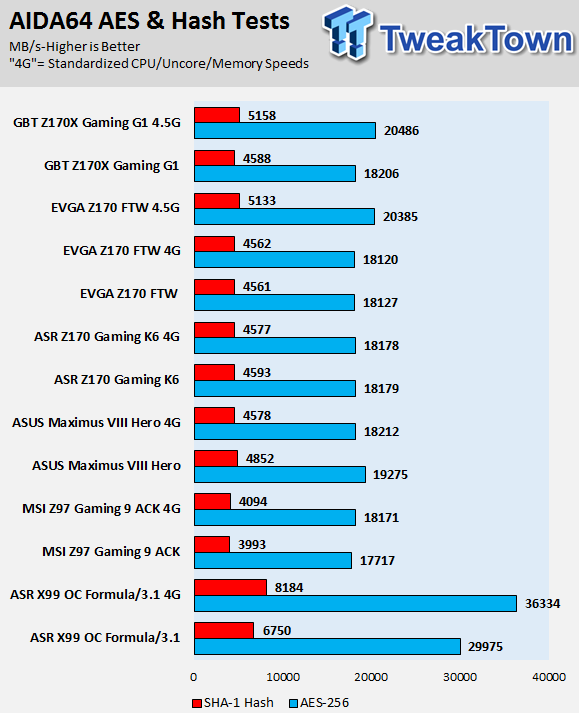
AIDA64 AES and HASH
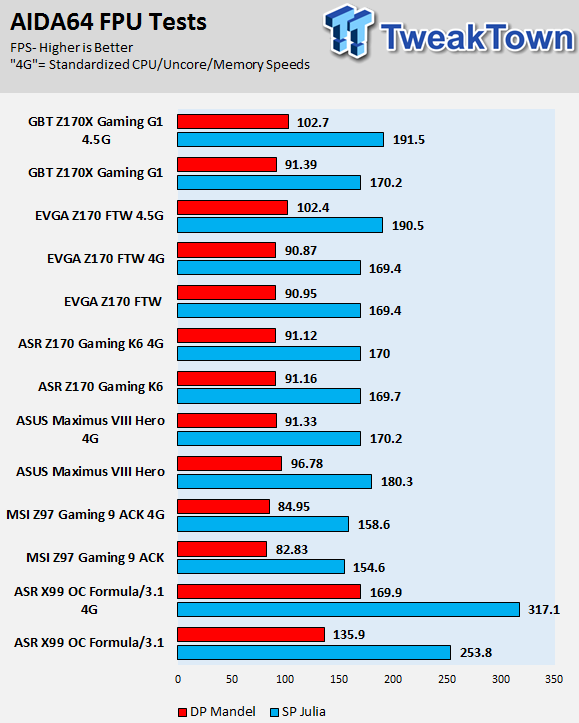
AIDA64 FPU
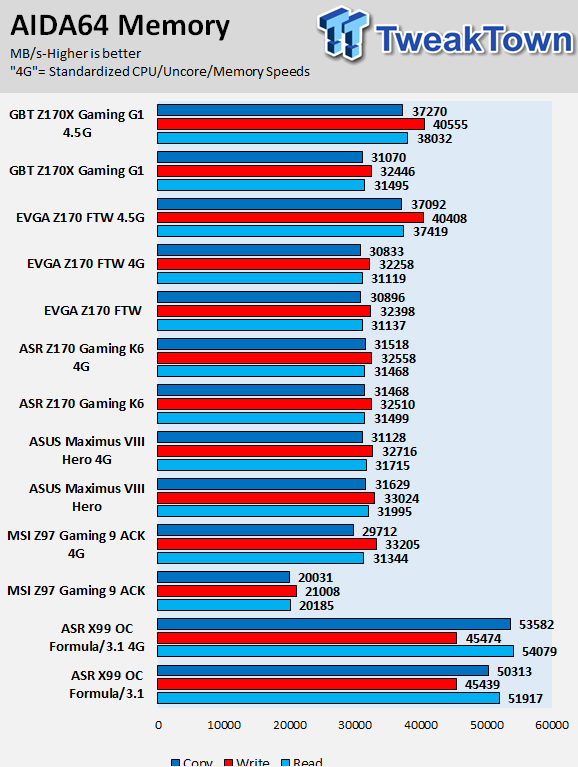
AIDA64 Memory
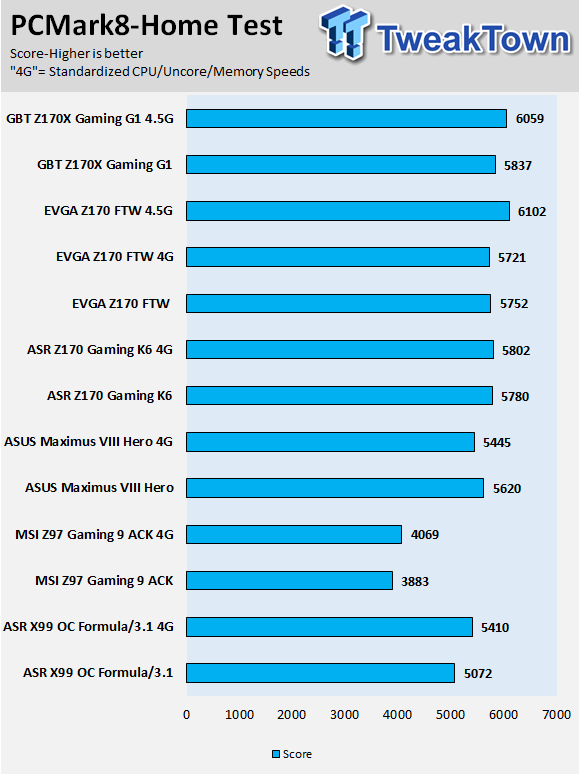
PCMark8 Home Test
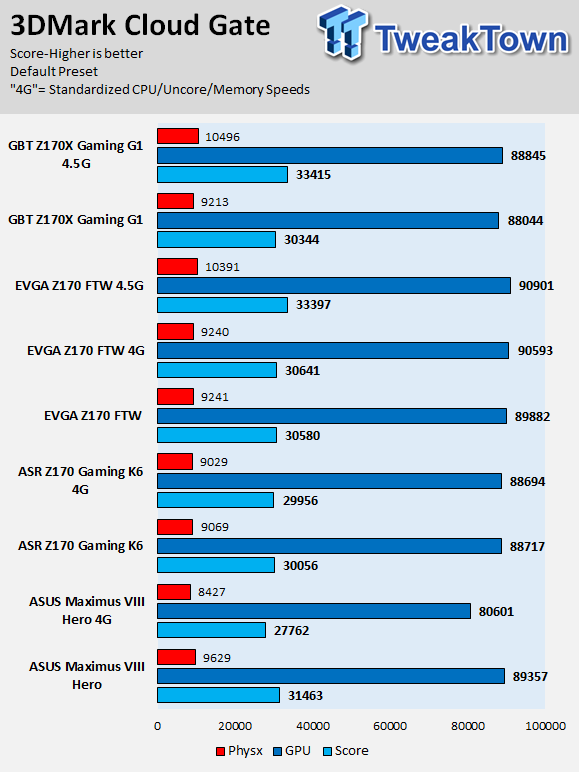
3DMark: Cloud Gate
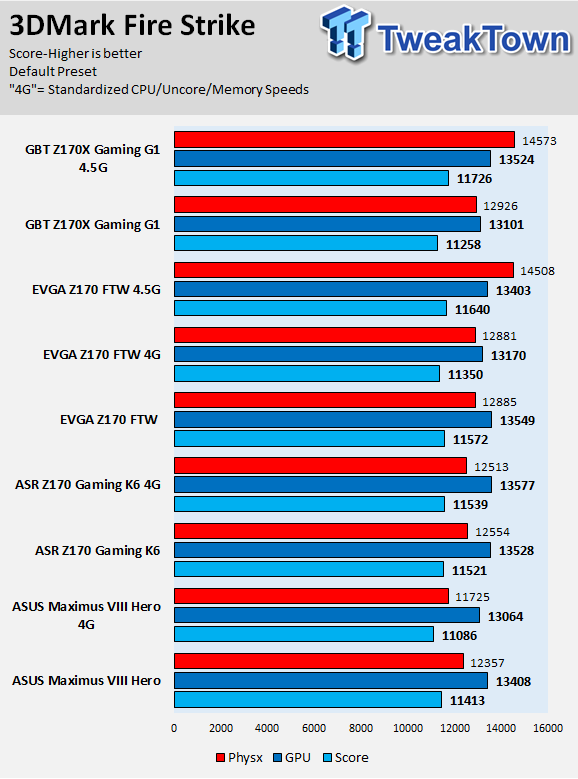
3DMark: Fire Strike
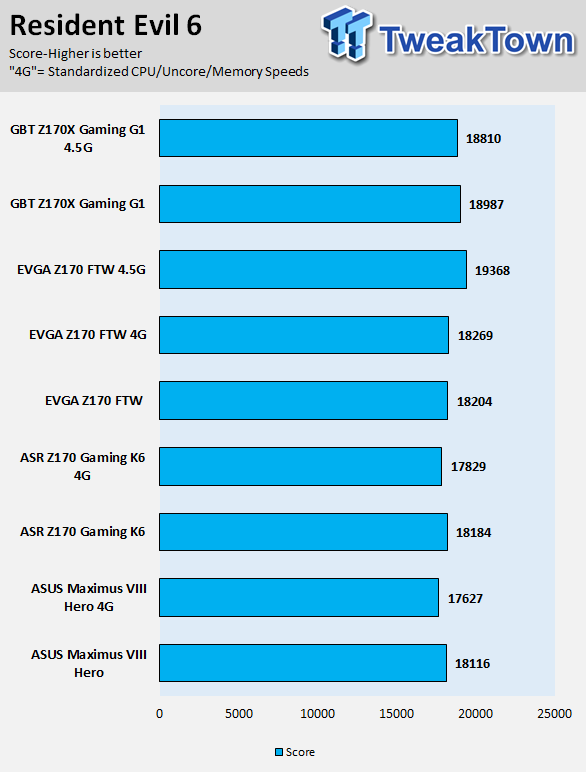
Resident Evil 6
Some motherboard reviews put a lot of weight into motherboard benchmarks, but common sense would dictate that "motherboard performance" should be more about finding anomalies and I do that at standard settings (4G or 4.5G in graphs).
GIGABYTE has definitely tuned the Z170X-Gaming G1 to output solid performance; CPU and memory wise, the performance is strong. Since the motherboard has a PLX bridge for the PCI-E lanes, it adds latency in exchange for increased bandwidth, so in the end with any benchmark that is GPU/PCI-E heavy, the Gaming G1 won't do as well in unless there are two or more cards, and this is apparent in 3DMark CloudGate and Resident Evil, and even to some degree in PCMark.
System IO Benchmarks
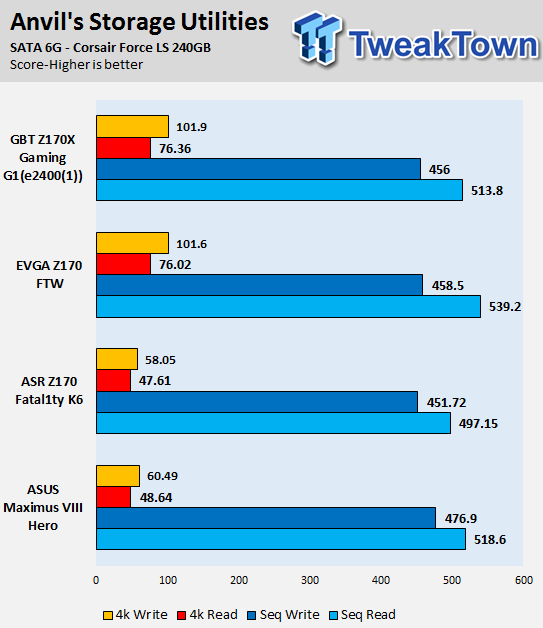
Anvil SATA6G:
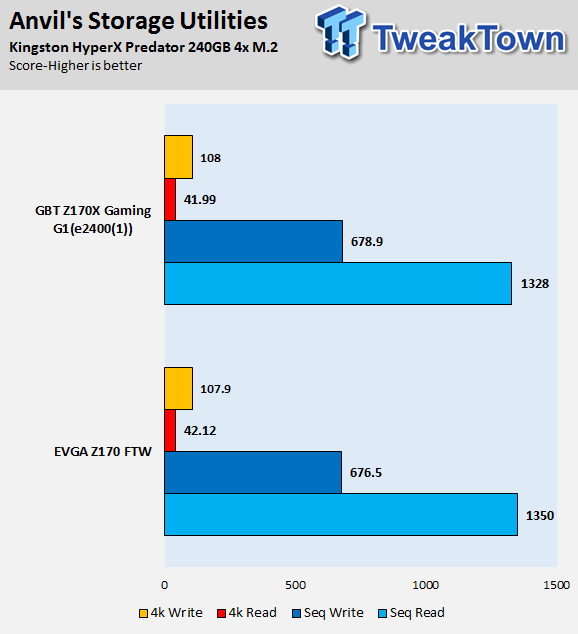
Anvil M.2:
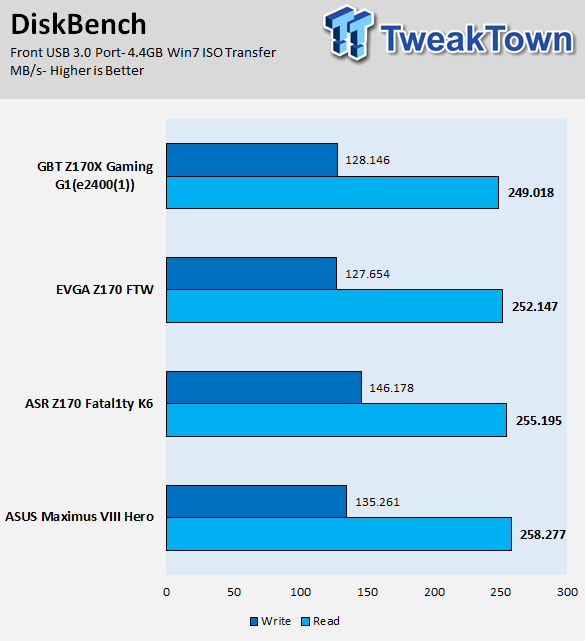
DiskBench USB 3.0:
ixChariot Network Throughput:
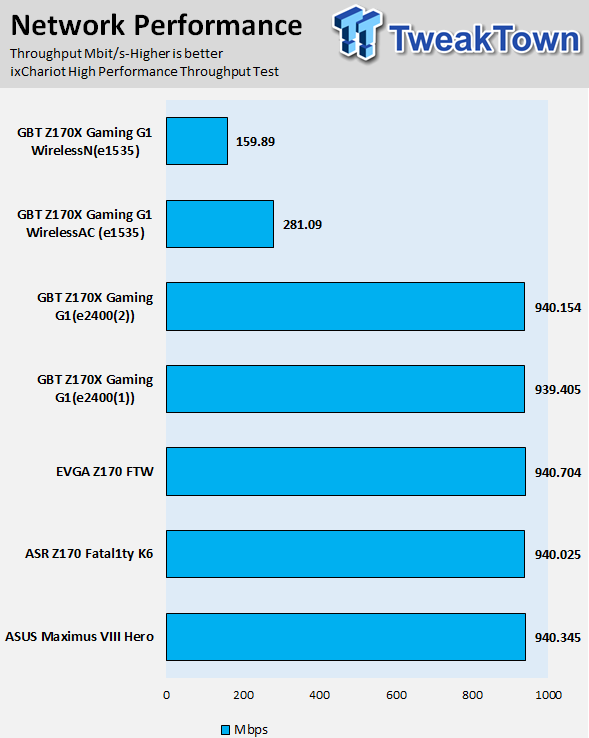
IO Performance is solid, the Z170X-Gaming G1 doesn't seem to have any performance deficiencies, but the Wireless AC could be a bit faster.
Audio RMAA 5.5:
I disable all audio features, set the correct bitrates, and then test the audio with a loopback test.
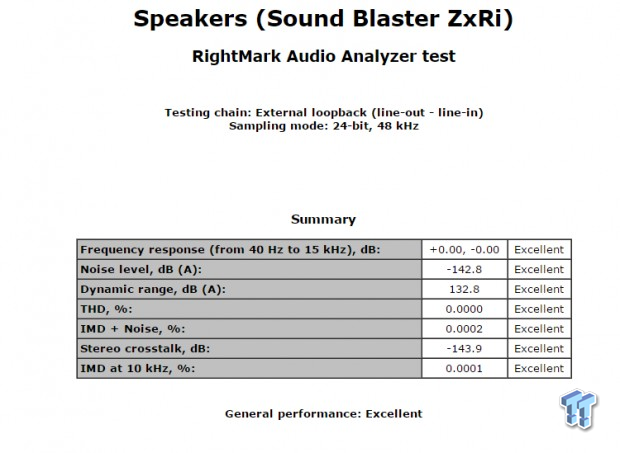
Creative has a special guide on how to use RMAA, but this guide asks that users use not the line in as a recording device, but "what you hear" which gives almost perfect results. The true results for judging the audio on this board are subjective judgment by ear.
Sound Judgment by Ear: Excellent, the audio on this motherboard is basically like a Creative sound card. I really like how powerful the amplifiers are, and the effort that went into the hardware on the audio section really shines when you hear the audio. While some might not consider Creative to be "audiophile grade", I am not saying it is, but as far as $100 sound cards go, the implementation on this motherboard isn't much different than a discrete card. It also has some cool gaming features like scout mode which amplifies lesser sounds so you can hear footsteps coming.
There are 5 ratings for audio: 1. Problems, 2. Okay, 3. Acceptable, 4. Very good, 5. Excellent
Thermal Imaging and Power Consumption
System power usage is measured at the AC/DC PSU (the Corsair AX1200i) which I have connected to another system to measure the test system and as a backup I have a wall meter to verify. The CPU power is measured through the 8-pin connector which is hooked up to a hall effect IC which measures current and puts out a voltage in proportion to the current. That voltage is logged by a National Instruments ADC which logs the DC voltage level, which I then convert into current.
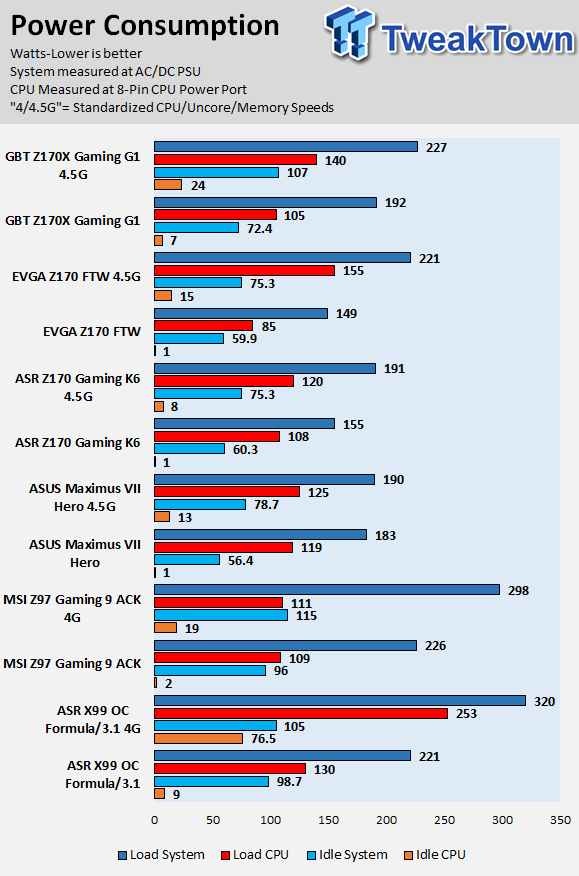
This motherboard does use more power than most, that is due to the PLX bridge chip and all the extra features.
Note on Thermal Images: In the temperature section, we use our Seek thermal imaging camera to capture the surface temperatures of major components on the board; I look at the VRM and then all other things that light up the screen. If there is something to worry about then I will state it, otherwise I will just show the hotter running parts of the board for fun. Unless some component is over 80-90C then there really isn't anything to worry about.
All systems will act differently, so I will look for commonalities, such as how far from the VRM the heat spreads through the PCB and the difference in temperature between the front side and backside of the PCB. Keep in mind that the majority of the heat from the VRM goes into the PCB as it is a giant soldered on copper heat sink. A larger difference in temperature between the back and front of the PCB points towards a more effective heat sink.
Thermal Testing at Stock Speeds:
The image on the left is always at idle and the image on the right is at load.
During ALL TESTs Fans above the VRM that cool the CPU cooler's (H110i GT) radiator are turned on to high (12v).


Full frontal.


Up-close of the front of the VRM.


Up-close of the back of the VRM.
Thermal Testing at 4.5GHz (1.3v w/LLC) Overclocked Speeds:


Full frontal.


Up-close of the front of the VRM.


Up-close of the back of the VRM.
The VRM is quite good, but the thermals can be misleading. The thing is that GIGABYTE has linked the VRM heat sink to the heat sink cooling the PLX bridge. I think they figured the VRM could handle the extra heat load, so they tossed it in there. The PLX bridge puts out a lot of heat, in fact it puts out much more heat than the VRM and PCH combined. You can even see in the pictures that the heat moves from the PLX area (middle of the board, middle heat sink) towards the rest of the VRM. This doesn't only happen on the heat sink, but you can also see it on the back of the board; the heat spreads through the 2oz copper PCB.
The Z170X-Gaming G1 does come with watercooling threads so you can add the heat sink to your loop, and I would think that in this case, if you have no airflow over the motherboard, it might be beneficial to hook it up because that PLX bridge needs to be cooled. The temperatures never got to levels where one should worry.
Power consumption is also higher with the Z170X-Gaming G1 compared to other motherboard because of the sheer amount of ICs and hardware on the motherboard. Overall, the VRM is one of the higher quality VRMs, and if it wasn't of such high quality then I would think that the heat from the PLX might impact the VRM, but in this case it does not. Overall temperatures stayed under 50C, and performance was in line with other VRMs which don't have the PLX bridge.
Anything under 60C is great, 60-80C is acceptable, and anything above 80C is a bit worrisome (if at stock).
What's Hot, What's Not & Final Thoughts
This is where you can fast forward to the final section of the review, and get a quick recap and points on the GIGABYTE Z170X-Gaming G1.
What's Hot
Everything Included: Apart from having one of the highest capacity VRMs for the Intel Z170 chipset, the Z170X-Gaming G1 has to be one of the most feature packed motherboards. While this is kind of expected since the Z170 chipset is the most feature packed, GIGABYTE went above and beyond the call of duty when it comes to adding features. They not only added 4-way SLI/CrossFireX support, but also the latest Intel USB 3.1/Thunderbolt 3.0 controller and two extra SATA controllers. The board also comes with 13 possible USB 3.0 ports and two 32Gb/s M.2 slots. GIGABYTE even paid attention to the Wi-Fi/BT antennas providing a retention bracket for the MMCX connections which do not use the screw-in method. If all that wasn't enough, GIGABYTE also provides a USB 3.1 front panel bay so that you can use USB 3.1 devices through the front of your case.
Latest Gaming Features: When it comes to gaming, GIGABYTE has provided the latest in Killer networking technology and really upgraded the on-board audio to rival that of the Creative ZxR sound cards which cost a decent amount of money and take up PCI-E space. The Killer DoubleShot X3 Pro is quite interesting, and while it is only useful in certain situations, it's kind of cool to watch different applications get assigned different NICs through the software. In my opinion, the audio implementation is much more interesting. I spotted six audio amplifiers, and I was impressed with amplifier selection for the back panel DIP sockets. The added DAC is also quite nice, and the fact that GIGABYTE went and got Creative's 120+ dB certification is a plus.
Aesthetics and RGB LEDs: These days aesthetics are as important as fan control, and GIGABYTE has done a great job with red and white. While many people think red is overdone these days, GIGABYTE's addition of a little red to a lot of white looks very nice in person and even in pictures. The RGBs add to this by providing a level of customization that wasn't possible in the past, and GIGABYTE even added the RGBs to every corner of the motherboard, and provides the ability to disable the back-panel IO's LEDs or all of them in case you don't like lights.
Two Flavors of USB 3.1: GIGABYTE's Z170 line is the first with Intel's dual Thunderbolt 3.0 and USB 3.1 controller, and GIGABYTE has provided buyers of the Z170X Gaming G1 with the ASMedia USB 3.1 controller for the front panel USB 3.1. Overall the IO capabilities provided by both the front and rear USB 3.1 ports is immense, as is the fact that GIGABYTE routed 4x PCI-E 3.0 to the Intel controller for 40Gb/s Thunderbolt 3.0 through the Type-C connector. To make matters even better, they implemented the correct hardware in both the rear and front USB Type-C implementations for USB's Power Delivery protocol.
3-Way and 4-way Multi-GPU Capabilities: Only boards with the PEX8747 bridge chip can do 3-way and 4-way SLI on the Z170 platform because of NVIDIA's SLI requirements. The board also offers the ability to do 4-way CrossFireX. If you want to have more than two cards on Z170, the Z170X-Gaming G1 has you covered.
OC Features: GIGABYTE didn't omit the POST code and basic OC features from the Z170X Gaming G1, and I think that was a very wise choice. The POST code and voltage read points are useful to both overclockers and gamers, as well as anyone else who really wants to know what's up. Since CPU-Z is showing a +0.7v VCore offset, when I set 1.3v in the UEFI CPUz reports 1.8v, which would scare some, and the voltage read points are useful in this case, so that users can see that what they set is actually what they get.
What's Not
BIOS needs GUI fan control: While GIGABYTE implemented seven fan headers with control over all of them, I would have liked to see some type of GUI fan control in the BIOS. GIGABYTE has this feature in Windows, but many people like to have it in the UEFI as well so that the profiles are applied from startup and no extra software is needed. Most of GIGABYTE's competitors have some sort of GUI for fan control, and while GIGABYTE does offer some sort of customized control, I think a GUI would benefit users much more.
Single GPU Performance: Since the Z170X-Gaming G1 has a PLX bridge chip, the PEX8747, the chip adds a bit of latency which is apparent when only a single GPU is used. While this is true about most boards with a PEX8747 (there are some notable exceptions), it is still a downside to using that chip.
Final Thoughts
This is one crazy packed motherboard. It has all the latest technologies from Intel, Killer, and Creative and they are all implemented well. The Intel USB 3.1 and Thunderbolt 3.0 controller is implemented with the proper hardware for the USB Power Delivery specification and integrated graphics switching, Killer's latest NICs are implemented so they can work together, and Creative's hardware is implemented like it is on a sound card with the addition of replaceable amplifiers and dedicated DAC. Hardware choice on this motherboard is top notch, the VRM is total overkill and you would expect that from a Z170 motherboard that costs more than most X99 motherboards.
At $500, the Z170X Gaming G1 is without a doubt one of the most expensive and well equipped Z170 motherboards on the market. It's targeting users who want superlative capabilities, not only for now, but also for the future. This kind of product is specifically targeted at people who have the cash to dish out on multiple video cards to compliment the PLX bridge and want the latest technologies and features. That being said, I would like to see improved fan control options in the UEFI, I thought out of everything that was one area where I wanted more. GIGABYTE has brought to market a real flagship motherboard with a flagship price.
 ASUS ROG Strix X870E-A Gaming WiFI7 Neo Review - A New Enticing Option
 GIGABYTE X870E Aero X3D Dark Wood Review - A woody goody
 ASUS TUF Gaming X870-Pro WiFi7 W NEO Review - Tuffed up
 ASRock Z890 Taichi Aqua Motherboard Review - Flagship features without the flagship price
 GIGABYTE Z890I AORUS Ultra Motherboard Review - Mini-ITX with surprisingly good thermals
 Sony has secured enough memory to meet PS5 sales targets through March 2027 and says no further price hikes are planned
 Reddit is building a video and audio listening experience for the viral post format it accidentally created for TikTok
 Seagate says Mozaic 5 50TB hard drives are on track for 2027, with 100TB already on the roadmap
 MSI adds a BIOS toggle to tighten standard DDR5 timings closer to EXPO ULL kits
 Keychron is building an open-source gaming mouse firmware called ZGM
 Assassin's Creed Odyssey gains 90% more players due to Christopher Nolan's 'The Odyssey'
 AMD Radeon GPU prices set to increase by 10% in August
 Redditor buys an RTX 4080, opens it up to find no GPU die or VRAM inside
 NVIDIA GPU rumors swirl claiming major price hikes of 20 to 30% - or more - are coming, as VRAM costs climb
 AMD's RX 9050 GPU comes up short in first review, but there's a good reason why it lags behind NVIDIA's RTX 5050 here
 Montech TG3 Mid-Tower Chassis Review
 Noctua NL-LC1-36 Liquid CPU Cooler Review
 Logitech G316 X 98 Wired Gaming Keyboard Review - Retro-Inspired Board that Falls a Little Short
 Biwin M560 2TB SSD Review - Best Overall Retail-Ready DRAMless SSD
 Logitech G512 X 98 Analog Mechanical Gaming Keyboard Review - An Innovative Two-in-One
 Thrustmaster T.Flight HOTAS 5 MSFS Edition Review
 SteelSeries Arctis Nova Pro Omni Wireless Headset Review - One Headset to Rule Them All
 SteelSeries Arctis Nova 7 Wireless Gen 2 Headset Review - New and Improved, But Is It Enough?
 AMD Ryzen 7 7700X3D Review - Days of Future Past
 I switched my PC to encrypted DNS in Windows 11, and browsing felt more private
 Printer Not Working in Windows? How to fix detection, print queues and drivers
 The Ultimate Guide to Personalizing Your Windows 11 Taskbar
 How to Turn Your Windows Laptop Into a Second Monitor with Miracast and Wireless Display in Minutes
 6 Mistakes to Avoid When Buying a Windows Laptop
 I capped Windows Update's bandwidth with Delivery Optimization, and my downloads stopped choking
 I use this decade-old free tool that finds files faster than Windows Search does
 I install and update most of my apps with this Windows command now, and I stopped downloading sketchy installers
 Hisense U6SF 65-inch MiniLED TV: High Performance Meets Leisurely Convenience
 I stopped digging through Windows menus after I set up this one folder