Introduction and Package

We continue to work our way through the collection of Z87 boards that have piled up and today's offering comes from our friends over from GIGABYTE under the much known UD3H name. Today, though, we've been fortunate enough to get our hands on a new i7 4770k chip which we've been told will overclock better than our previous chip.
Due to that we're really looking forward to the overclocking side of things to see just what we're able to do today. Of course there's a couple of things we need to do before we get to that area.
So, with that said let's get into the package and move forward to see what GIGABYTE is bringing to the table with the new Z87X-UD3H motherboard.
Package


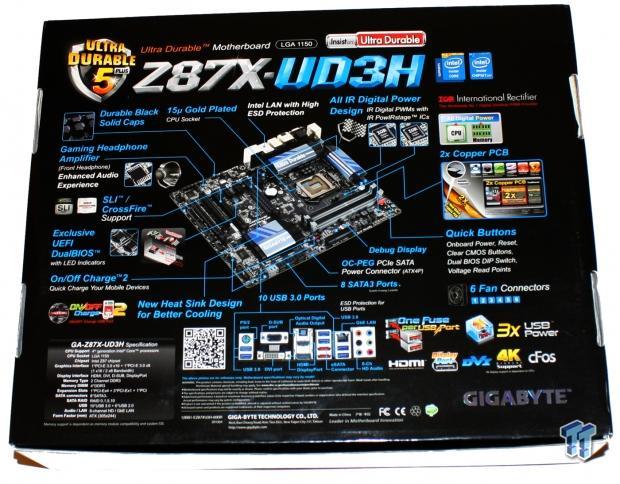
Taking a look at the box you can see we've got an awesome black design. The brand and model are seen clearly on the front and a big push is being made for Ultra Durable 5 Plus, which is of course one of the main features promoted by GIGABYTE. Turning the box over you can see we've got a picture of the board and a ton of detail in regards to some of the main features that are offered.
Looking at some of the main ones you can see we've got Durable Black Solid Caps, 15u gold Plated CPU Socket and all IR Digital Power Design to help keep the power strong and stable throughout. Extras include the Gaming Headphone Amplifier for an enhanced audio experience, 2x Copper PCB and UEFI DualBIOS to name a few more. We've got a couple more that are highlighted, but we'll take a closer look at them when we move onto the board.

Being a UD3H offering means we don't have a massive bundle. Looking above you can see the standard paperwork and driver CD along with four SATA cables, rear I/O back plate and a single SLI bridge.
GIGABYTE Z87X-UD3H Motherboard

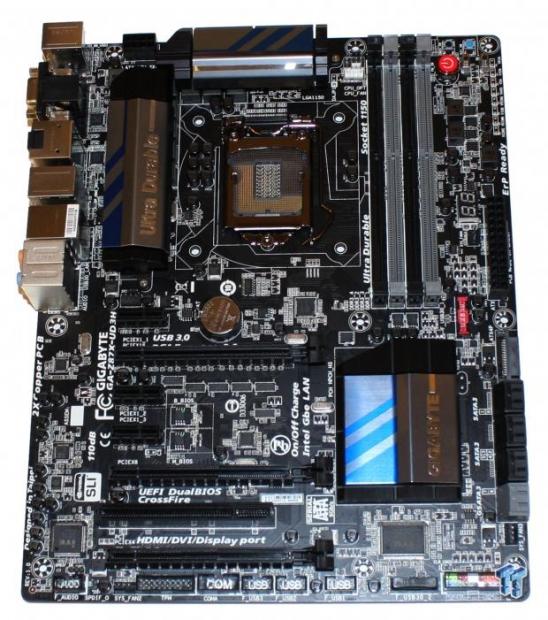
We've got a matte black PCB look which is one we really like and when it comes to the main highlighted color, you can see that we've got a blue and silver combination.

Taking a look at the expansion slots you can see we've got a single older legacy PCI slot towards the bottom along with three PCIe x1 slots. We've also got three PCIe x16 slots which are setup in typical fashion. If you're using just one slot, the top slot will run at x16. If you go for two slots then the top slots and the PCIe x16 below it will run at x8. The final PCIe x16 slot will run at x4. If the final PCIe x16 slot is used PCIEX1_2/3 will be unavailable as the bandwidth of those two slots are shared with the final PCIe x16 slot.

Heading to the bottom of the board you can see all the standard connectors starting with a front panel audio on the left. Moving across we've got TPM, COMA, three USB 2.0 headers, a single USB 3.0 header and finally the Front Panel connectors.

Turning the corner you can see we've got eight SATA ports available. All are SATA III with the six black ones running directly off the Z87 chipset. The other two which are grey run off the Marvell 88SE9172 chip. Along here you can also see a SATA power connector towards the top of the image. GIGABYTE recommend using this when two or more PCIe x16 video cards are installed. The connector provides more power to the PCIe x16 slots making sure everything always runs smooth and stable.

Heading towards the top half of the board you can see the typical four DIMM slots. Up to 32GB of DDR3 is supported ranging from 1333MHz DDR to 3000MHz DDR via overclocking. To the right hand side you can see a power switch along with a smaller reset and clear CMOS switch.
Looking towards the left you can see the main 24-pin ATX power connector and just above that to the right you can see the LED debug meter. Finally we finish off just to the left of the ATX power connector with another USB 3.0 header.


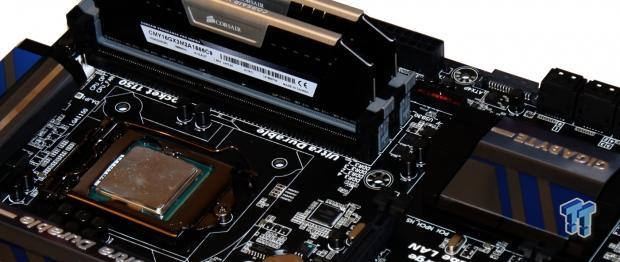
Looking at the CPU area side of things you can see we've got an 8-pin CPU power connector at the top of the board and in typical fashion you can see a nice clean looking CPU area along with the heatsink setup present here.

Heading over to the I/O department to finish things of you can see we've got a combo PS/2 port along with six USB 3.0 headers. Video out options include DVI-D, VGA, HDMI and DisplayPort. You can also see we've got an optical port that goes with six auxiliary ports, which run off the Realtek ALC898 codec. Finally you can see we've got two eSATA III ports which run off the same Marvell 88SE9172 controller used on the extra SATA III ports inside, along with a Gigabit networking port, which runs off the Intel LAN chip.
BIOS

Getting into the BIOS we're greeted with a new setup which is something we've seen a few companies do with the latest generation Intel Z87 chipset. Some have changed it a fair bit, while others have just done a little bit of tweaking. GIGABYTE have dropped the 3D BIOS, though, and we think it's only a good thing.


Starting from the home screen you're offered overclocking options. If you want to go into more detail when it comes to overclocking, though, you can head into the Performance section which offers us all the advanced options that you'd expect.


As we move past the Performance options, we can see all the other typical settings that you'd expect to see. The new BIOS layout is super easy to use and ultimately looks fantastic. We're really happy with what GIGABYTE has done here.


If you're not a fan of the new design, you can hit F2 and go to Classic Mode. Here is everything you'd expect and in the same position as we saw in the Z77 offerings. We found the new setup great to use, though, and really had no need to use the Classic Mode.
Benchmarks - Test System Setup and Overclocking

We would like to thank the following companies for supplying and supporting us with our test system hardware and equipment: Intel, ASUS, MSI, Western Digital, MemoRight and Corsair.
Looking above you can see our standard testbed setup. As for the boards that will be going into our graphs here today, as we've mentioned before, each review we do on the new Z87 chipset means we're slowly adding more and more boards into the mix.
Today alongside our GIGABYTE Z87X-UD3H which we'll be running at both stock and overclocked speeds, we'll also have the recently reviewed MSI MPOWER MAX and ASRock Z87 OC Formula from the Z87 side. We've also got two Z77 boards via the ASUS P8Z77-V Pro/Thunderbolt and the MSI Z77A-GD65 Gaming. Finally we finish off with the GIGABYTE X79S-UP5-Wi-Fi.
If you missed it earlier in the introduction, we'll mention it again now. Today we've been fortunate enough to get our hands on a new i7 4770k CPU that is said to overclock better than the original one we received which maxed out at 4.7GHz. Heading into the new BIOS we did all the normal tuning, adjusted our voltages in key areas and moved the multiplier around to see what we could get out of the chip.
We went straight to 50x as we've been told that 5GHz was possible on this chip. Our machine booted up straight away and we got into Windows with no problem. Everything was looking good, so we fired up MediaEspresso to see if we could complete a run in that. While everything was looking strong, after a while we got a BSOD, so we knew that 5GHz wasn't going to be the number for us.
We figured before we gave up on 5GHz, though, we'd head into the BIOS and see if we could do anything else with the voltages. We tried and while we got the system a bit more stable by getting to a higher part in the encode process, we would always eventually end up seeing a BSOD.
We then moved back into the BIOS and moved to a 49x multiplier. As we expected the system booted no problem and we got into Windows without an issue. With 5GHz not being an issue at this point, we knew that 4.9GHz would be fine. We then fired up MediaEspresso to start our encode process again to see just how far we could get.
This time we had the encode complete. So with everything looking good with a 49x Multiplier and a 100 BCLK, we headed back into the BIOS to see if we could adjust the BCLK a little and up the core clock a little higher than 4.9GHz.

In the end we managed to bump up the BCLK by just .5. It's not much, but it's enough to boost us up a little more than 25MHz more bringing our final clock speed in at 4926.54MHz or 4.93GHz as displayed in our graphs here today. This is of course the best clock we've managed to receive out of an i7 4770k CPU to date, but it's important to remember we're using a new CPU that we knew would offer a higher overclock from the outset.
CPU Benchmarks
HyperPi 0.99
Version and / or Patch Used: 0.99
Developer Homepage: www.virgilioborges.com.br
Product Homepage: www.virgilioborges.com.br
HyperPi is a front end for SuperPi that allows for multiple concurrent instances of SuperPi to be run on each core recognized by the system. It is very dependent on CPU to memory to HDD speed. The faster these components, the faster it is able to figure out the number Pi to the selected length.
For our testing we use the 32M run. This means that each of the four physical and four logical cores for the i7 and the four physical cores of the i5 is trying to calculate the number Pi out to 32 million decimal places. Each "run" is a comparative to ensure accuracy and any stability or performance issues in the loop mentioned above will cause errors in calculation.

AIDA64
Version and / or Patch Used: 1.00.1035BETA
Developer Homepage: http://www.aida64.com
Product Homepage: http://www.AIDA64.com
Replacing Everest in our labs is AIDA64. This new testing suite is from the core development team from Lavalys and continues that tradition. The guys have thrown in better support for multithreaded CPUs as well as full 64 bit support. We use this to test memory and HDDs for now, but may find ourselves opening this up to other areas of the motherboard.


Checking out Hyper Pi performance you can see our numbers come in at the same level as the ASRock Z87 OC Formula, but a little slower than the MSI MPOWER MAX, which offered some fantastic performance out of the box.
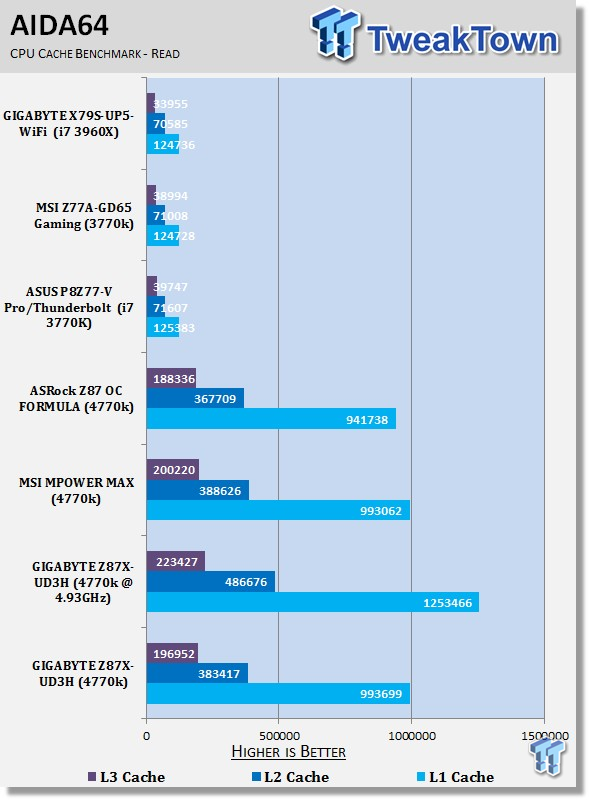
AIDA64 on the other hand sees this GIGABYTE offering line up with the MSI offering. Overclocking really sees some great performance and you can see under Hyper Pi we come in at just under 10 minutes.
System Benchmarks
PCMark 7
Version and / or Patch Used: 1.04
Developer Homepage: http://www.pcmark.com
Product Homepage: http://www.pcmark.com
PCMark 7 includes a range of tests that give different views of your system's performance. In the Advanced Edition you can choose which tests to run. The common use and hardware component tests are unavailable in the Basic Edition.
Overall system performance is measured by the PCMark test. This is the only test that returns an official PCMark score. The Lightweight test measures the system capabilities of entry-level systems and mobility platforms unable to run the PCMark test, but it does not generate a PCMark score. Common use performance is measured by the scenario tests - Entertainment, Creativity and Production - each of which results in a scenario score. Hardware component performance is measured by the hardware tests - Computation and Storage - each of which results in a hardware score.

MediaEspresso
Version and / or Patch Used: 6.5
Developer Homepage: http://www.cyberlink.com/
Product Homepage: http://www.cyberlink.com/products/mediaespresso/overview_en_AU.html?fileName=overview&r=1
MediaEspresso is a blazingly fast media universal converter that can transcode your videos, photos and music files and out put them to a huge range of portable devices including mobile phones, portable media players and even game consoles. With technologies like Smart Detect, Direct Sync and CyberLink's TrueTheater™ video enhancements, you can not only forget about complicated format, resolution and output settings, but your converted file will come out the other side looking better than when it went in!

PCMark 7 out of the box sits between the MSI and ASRock offerings, while MediaEspresso sees both the GIGABYTE and ASRock perform almost identical to each other.
Overclocking again brings with it some awesome gains and you can see under PCMark 7 we manage to break the 7,000 point mark, while our encode comes down to almost 14 minutes from 17.5 minutes.
USB 2.0 and 3.0 Benchmarks
AIDA64
Version and / or Patch Used: 1.70.1400
Developer Homepage: http://www.aida64.com
Product Homepage: http://www.AIDA64.com
Replacing Everest in our labs is AIDA64. This new testing suite is from the core development team from Lavalys and continues that tradition. The guys have thrown in better support for multithreaded CPUs as well as full 64 bit support. We use this to test memory and HDDs for now, but may find ourselves opening this up to other areas of the motherboard.


Looking above you can see both USB 2.0 and USB 3.0 performance is exactly where you'd expect it to be with little difference being seen across the different setups.
SSD Benchmarks
AIDA64
Version and / or Patch Used: 1.70.1400
Developer Homepage: http://www.aida64.com
Product Homepage: http://www.AIDA64.com
Replacing Everest in our labs is AIDA64. This new testing suite is from the core development team from Lavalys and continues that tradition. The guys have thrown in better support for multithreaded CPUs as well as full 64 bit support. We use this to test memory and HDDs for now, but may find ourselves opening this up to other areas of the motherboard.

HD Tune Pro
Version and / or Patch Used: 4.61
Developer Homepage: http://www.hdtune.com
Product Homepage: http://www.hdtune.com
HD Tune Pro gives us accurate read, write and access time results and for the last couple of years has been gaining popularity amongst reviewers. It is now considered a must have application for storage device testing.

Looking at the performance of our SATA III drive you can see under AIDA64 the numbers look good with the best maximum performance being seen and the average and minimum lining up fairly close with the other motherboards here.
HD Tune sees a drop in performance like we have seen on almost all our Z87 offerings. Across the board you can see the number on all our Z87 options are fairly similar with the ASRock having a bit of a leg up in the maximum performance numbers.
Memory Benchmarks
AIDA64
Version and / or Patch Used: 1.00.1035BETA
Developer Homepage: http://www.aida64.com
Product Homepage: http://www.AIDA64.com
Replacing Everest in our labs is AIDA64. This new testing suite is from the core development team from Lavalys and continues that tradition. The guys have thrown in better support for multithreaded CPUs as well as full 64 bit support. We use this to test memory and HDDs for now, but may find ourselves opening this up to other areas of the motherboard.

Memory performance across all our Z87 boards are fairly similar and like we've seen all along, overclocking really does nothing to performance.
Gaming Benchmarks
3DMark 11
Version and / or Patch Used: 1.0
Developer Homepage: http://www.futuremark.com
Product Homepage: http://www.3dmark.com/3dmark11/
3DMark 11 is the latest version of the world's most popular benchmark. Designed to measure your PC's gaming performance 3DMark 11 makes extensive use of all the new features in DirectX 11 including tessellation, compute shaders and multi-threading. Trusted by gamers worldwide to give accurate and unbiased results, 3DMark 11 is the best way to consistently and reliably test DirectX 11 under game-like loads.

Metro 2033
Version and / or Patch Used: Latest Steam Update
Timedemo or Level Used: Built in Benchmark
Developer Homepage: http://www.4a-games.com//
Product Homepage: http://www.thqnordic.com/
Metro 2033 is an action-oriented video game with a combination of survival horror and first-person shooter elements. The game is based on the novel Metro 2033 by Russian author Dmitry Glukhovsky. It was developed by 4A Games in Ukraine and released in March 2010 for Microsoft Windows and Xbox 360.[3] In March 2006, 4A Games announced a partnership with Glukhovsky to collaborate on the game.[4] The game was announced at the 2009 Games Convention in Leipzig;[5] a first trailer came along with the announcement.[6] A sequel was announced, currently titled Metro: Last Light.

The 3D performance in typical fashion is very close across the board. You can see that a little difference is seen with a bit of a bump in the low resolutions tests when overclocking is thrown into the mix. For the most part, though, very little change between all our setups here.
Temperature and Power
Power Consumption

Power draw numbers on the GIGABYTE offering are very strong with the idle number being the lowest out of the bunch and no change being seen when overclocked.
The load number is also the lowest out of the group here out of the box and even overclocked we see that the number doesn't jump by a huge amount.
Core Temperature

CPU temperature looks good with this being the lowest load number out of the box. Overclocked we can see the idle temp is almost the same, but load jumps up massively and hits the 100c mark.
This isn't the first time we've seen 100c hit on the latest Intel chip and it probably won't be the last.
Pricing, Availability and Final Thoughts
Starting off with the price, we have to say that the associated $159.99 price tag that sits on the GIGABTYE Z87X-UD3H at the time of writing is fantastic. Considering the look of the board and the general performance, pricing is one area we couldn't complain about. Along with those areas, though, everything behind the Ultra Durable 5 Plus setup is fantastic and really help make for a great looking and performing board.
When it comes to the bundle, it's ultimately what you would expect out of a board at this price. The cost of having a board that does look as good at this, but does also carry a price tag in the mid-$100 range is that it's not going to be packed to the rim with extras. You really have everything you need to get up and running and not much more. If the board hit closer to the $200 mark, that might've been an issue for us, but where the board does hit at means we're fine with the bundle.
Looking at features you're again lacking in some areas due to the cheaper price. You don't have dual Gigabit networking, onboard wireless and 10 SATA ports. You do have the Ultra Durable 5 Plus features, though, a quality heatsink setup, Gigabit networking, plenty of video out and audio out options and just everything that most people would need.
Performance is strong and of course it's the highest overclock we've seen to date from a Z87 motherboard. Of course the most important thing to remember here is that we're using a new i7 4770k that we knew would overclock higher from the get go. Out of the box, though, the performance is strong and lines up with the other Z87 offerings. Power draw, though, is very impressive, with the idle and load numbers being the lowest out of the bunch.
I think the other thing that we really have to mention is the new BIOS that's offered. We're glad to see that GIGABYTE has ditched the 3D BIOS for this new one. It's ultra-smooth and looks fantastic.
GIGABYTE has made a really good motherboard here. The Z87X-UD3H performs greats and hits at a fantastic price point. If you're looking for a quality Z87 motherboard that not only looks good, but performs well and at an excellent price point, we can't deny that this is one that will likely grab your attention.


 United
States: Find other tech and computer products like this
over at
  United
Kingdom: Find other tech and computer products like this
over at
  Australia:
Find other tech and computer products like this over at
  Canada:
Find other tech and computer products like this over at
  Deutschland:
Finde andere Technik- und Computerprodukte wie dieses auf