


Introduction
One thing about the Sandy Bridge launch that has been different about any other CPU launch that I have covered has been how many motherboards were launched at the same time. I was shocked at the number that came in even before the CPUs arrived. Still, it is a good thing in most respects as it gives you plenty of choices unlike a few other CPU launches that I can think of.
For our third P67 board review we stay inside the ASUS camp, but move a little down the ladder firmly into the upper end of the consumer market. Here we find the P8P67 Deluxe. This board comes complete with Digi+ VRM, EPU and the TPU for what ASUS calls this Dual Intelligent Processors with DIGI+ VRM. But that is not all you get with this new board from ASUS. You get a front panel USB 3.0 box, SLI and Crossfire, Dual GBe LAN (one of these is an Intel LAN chip), and a built in Bluetooth module. Not to mention the performance and overclocking that comes with most ASUS motherboards.
So despite the current issues with the Sandy Bridge MCP, let's dive into the ASUS P8P67 Deluxe and see if it deserves its place at the top of the consumer ladder.
The Box and What's Inside
Package and Contents
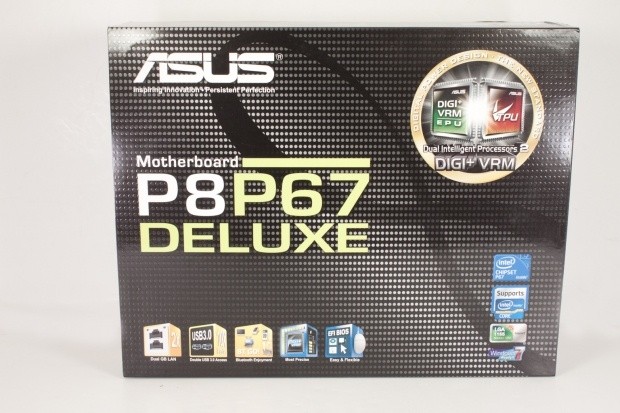
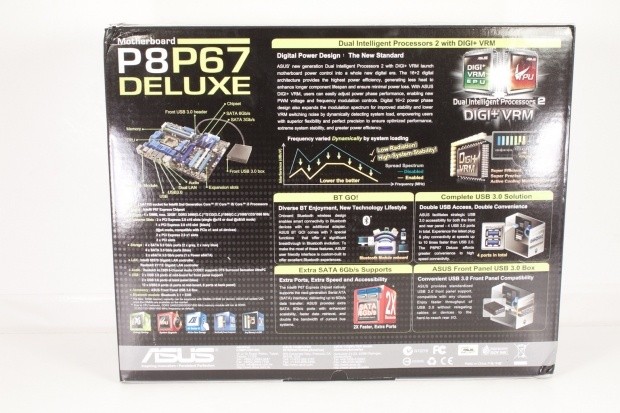
The box that the P8P67 Deluxe comes in has the new "bathroom" tile look to it. Sure, the 3D effect is cool and I like the black color, but the infinity symbol along with the buttons just does not say performance to me. Thankfully, you do not buy a motherboard for the box.
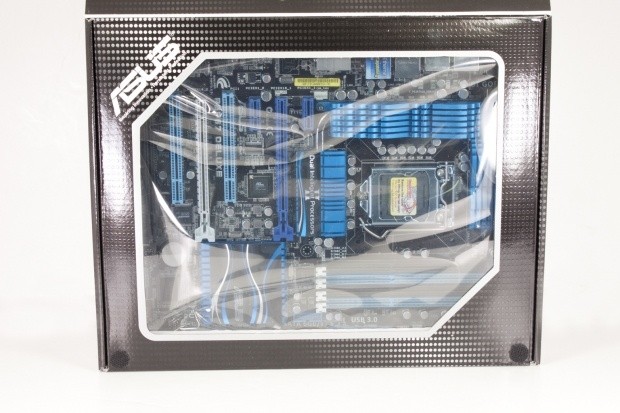
Under the front cover is some information on features that set the P8P67 Deluxe apart from the rest of the crowd. We will certainly be talking about these later in the review, but for now let's just say that the listing is impressive in action as well as on paper. Under the flap you also get a view of the P8P67 Deluxe itself.
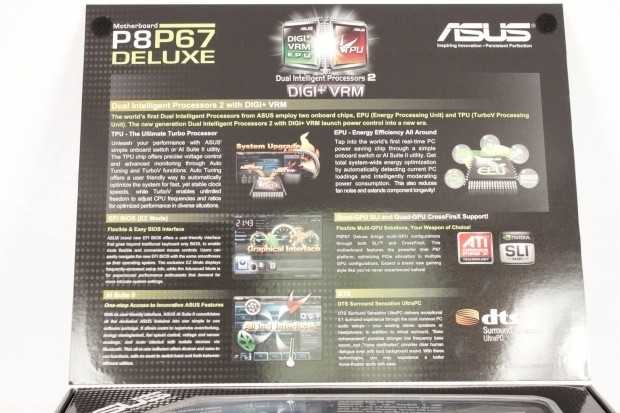
The back of the box is, well, like most other boxes. It has more information on features, makes the usual boast about how one item is better than another (you know the thing). I do like the explanation of the DIGI+ VRM, though. It is informative without getting too zealous about it. The image of the board complete with labels is also a nice touch.
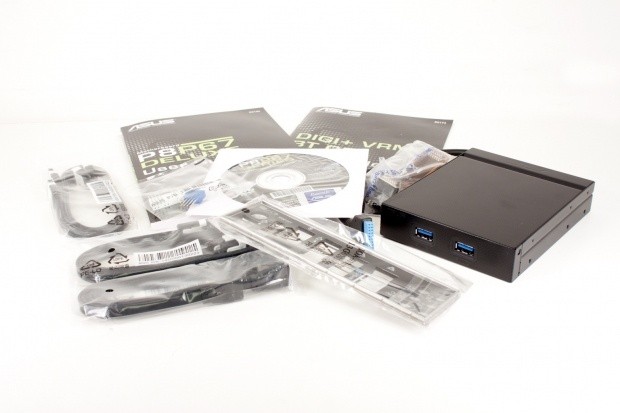
Inside the box we have a pretty good haul. In addition to the usual stuff you get (I/O shield, SAS Cables etc.), you also get a breakout box with two USB 3.0 ports. This box uses the on-board headers instead of a loop back cable. It is a very nice touch.
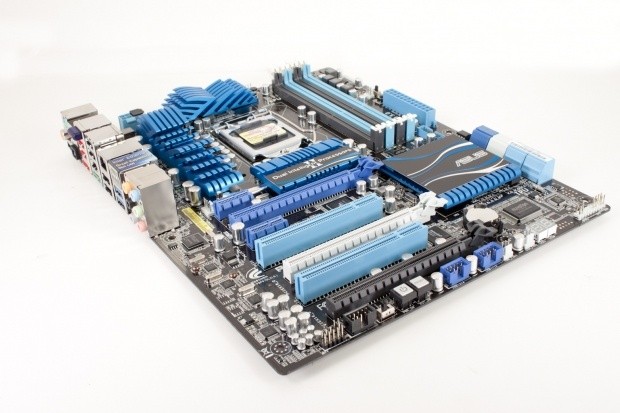
The Motherboard
The Board
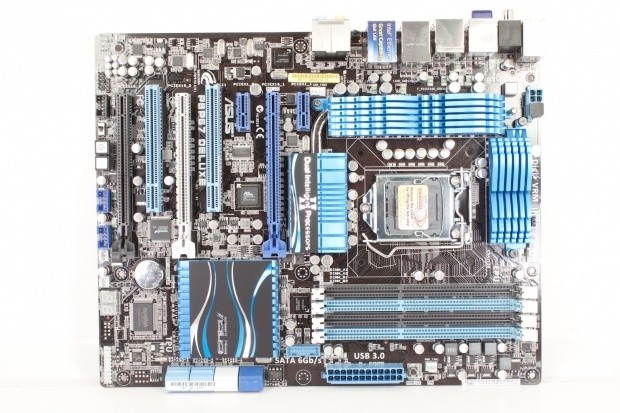
I have to say that the P8P67 Deluxe is a nice looking board. I like the curved design of the heatsinks and also the wave graphic on them gives a feeling of flow. The board is still ATX form factor, but somehow, like the WS, it seems cleaner. So let's start where we usually do and get the walk around going.
with the exception of the heatsinks and the USB 3.0 header, this could be a twin of the P8P67 WS Revolution at the upper end of the board. We see the same MemOK! button right next to the TPU switch. Still, it looks clean; a close inspection will also show the careful trace tuning that ASUS did here.

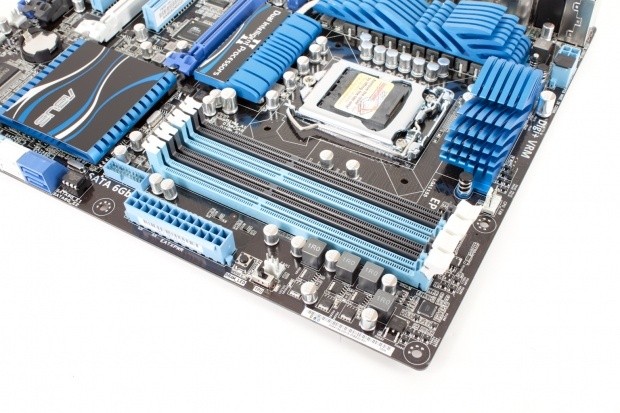
Remember how we told you ASUS responded to our comments on the 8-Pin Aux power connector? Well, here is a different example of their response. They have moved it to the upper edge of the board. This provides some extra clearance for people with fat fingers (like me) to get the plug in easily.
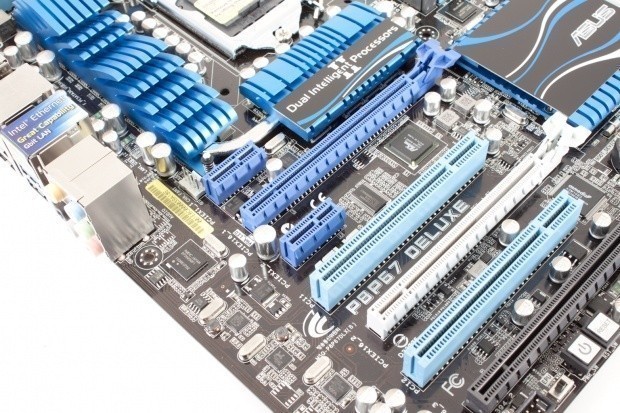
In this shot we find a few interesting items. The first is the PLX bridge there between the primary PCI-E and the first PCI slot. The PLX bridge has been used by ASUS to offset the inclusion of SATA 3.0 and USB 3.0 in the past. My guess is that it is here for USB 3.0 this time, as there should be no need to have one for SATA 3.0 even if it is a Marvell controller.
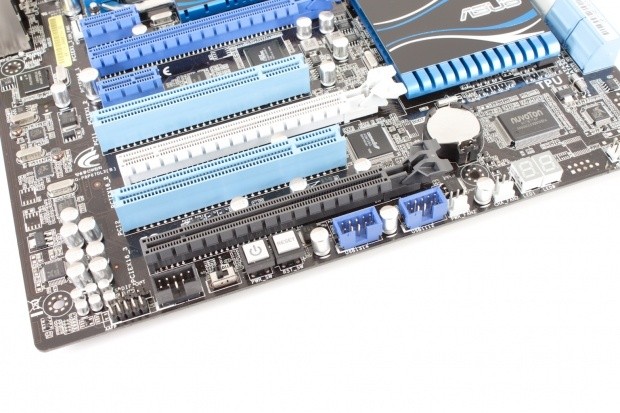
In the second image you can see the PCI controller; this is the ASMedia ASM1083 which brings support for two PCI ports that are on the board. The three visible PCI-E slots are easy to break down. The one at the bottom is only x4; that is all you will ever get out of it. The next one in line is x8 and the top one is x16 if you only have a GPU in it. As soon as you put another PCI-E card into the second slot, well, you are at x8.
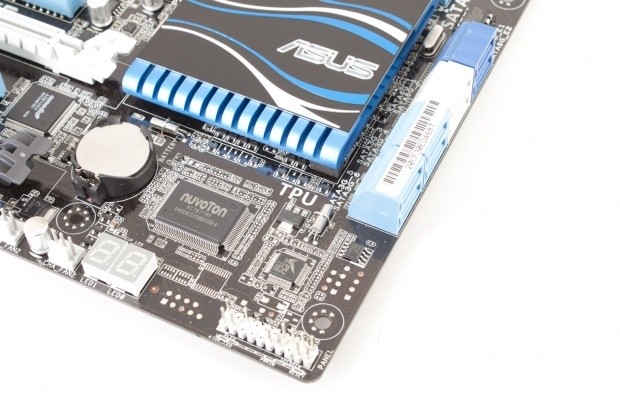
Moving over to the other side of the board, we see the four SATA II ports and the two pair of SATA 3.0 ports. There is a Diagnostic LED on the board here and you can see the TPU chip in plain sight as well. We will talk a little more about the TPU later.
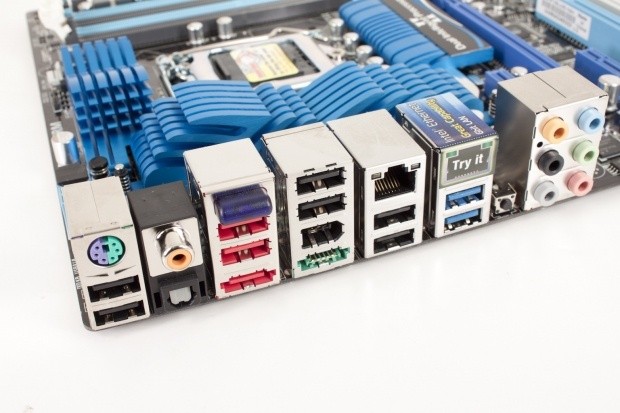
For I/O ASUS has given the P8P67 Deluxe quite a few options. You have the dual GBe LAN (one Intel - one Realtek), six USB 2.0 ports, two powered USB 2.0 ports, two e-SATA ports (one powered one green), a 1394a port, and of course the USB 3.0 ports. The rest is fairly normal with the audio provided by the Realtek ALC889 audio CODEC.
Now, you might be wondering what the blue bulge is above the USB ports; that is ASUS' BT Go module. It provides built in Bluetooth to the P8P67 Deluxe. So start searching for that Bluetooth keyboard and mouse, or more to the point you can use this to quickly transfer files from your phone or laptop to your desktop.
BIOS
The P8P67 uses the same EFI (Extensible Firmware Interface) that the WS Revolution uses. We also see the same style of layout and functionality. When you first enter it you are looking at the EZ Mode.
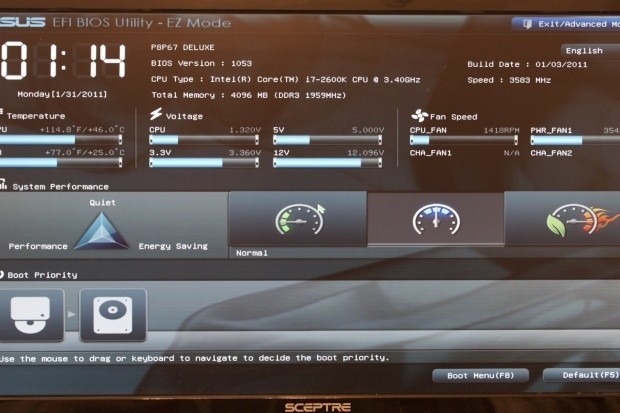
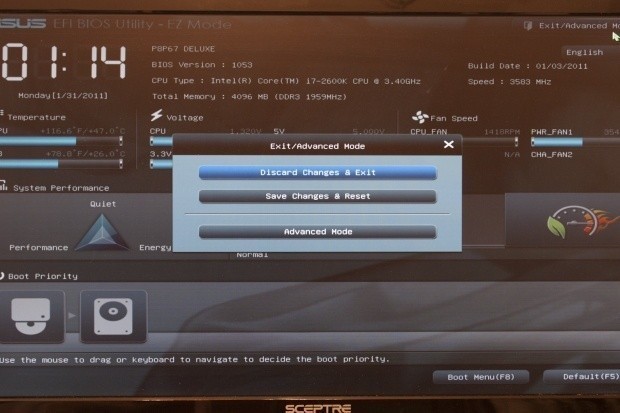
The EZ Mode is just that. It is a UI that is simple to navigate and adjust. This is for the novice that knows they want to change something, but does not want to have to search for all the settings deep inside the BIOS. You can also set the EPU level right from the BIOS now. This is a great option for anyone that does not want to use Windows as their operating system. Don't worry, though; you can get out of this mode and into something more familiar with a couple of clicks of the mouse.
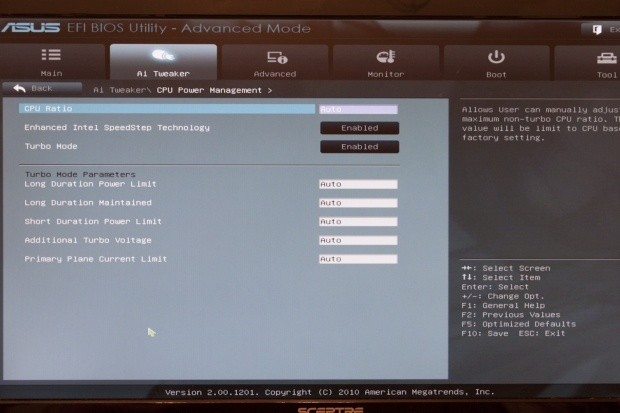
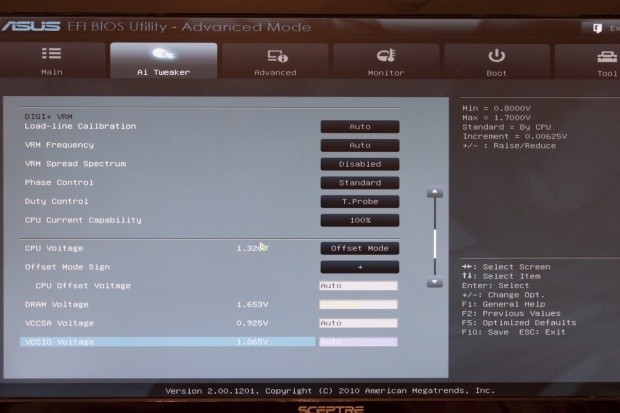
The Ai Tweaker page is what you are used to from ASUS just you can now use the mouse to navigate around. You do get the PLL Overvoltage control like in the WS (again, more enthusiast features trickling down). plus the same level of adjustment that you can find in most ASUS boards. These should get you well on your way to some decent clockspeeds.
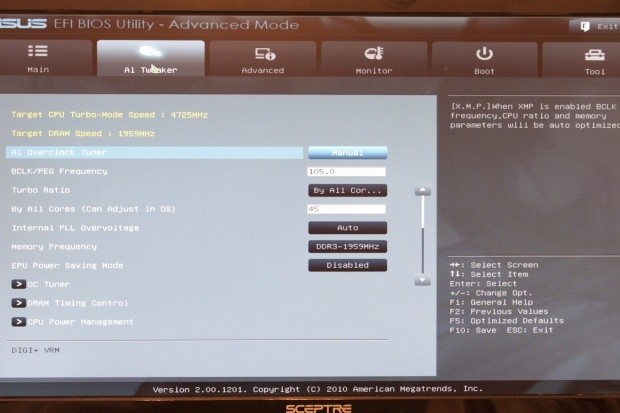
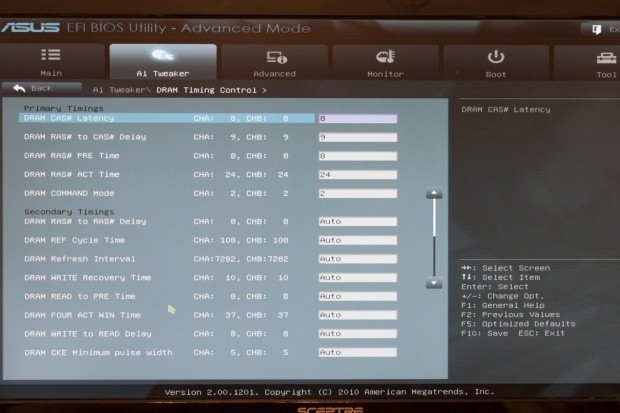
Here we see even more evidence of the ROG line features coming down to the consumer. There's the DIGI+ VRM functions such as VRM frequency and the advanced options for Load-line calibration.
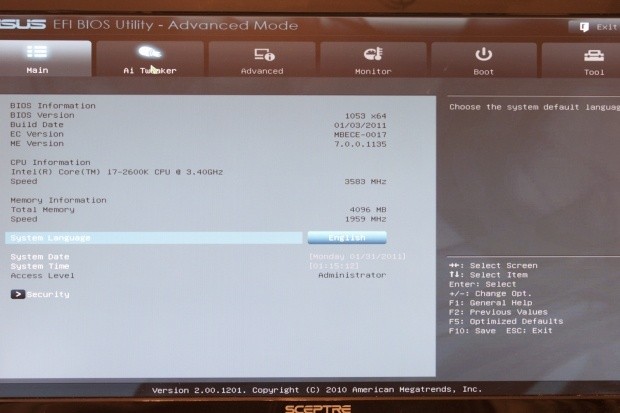
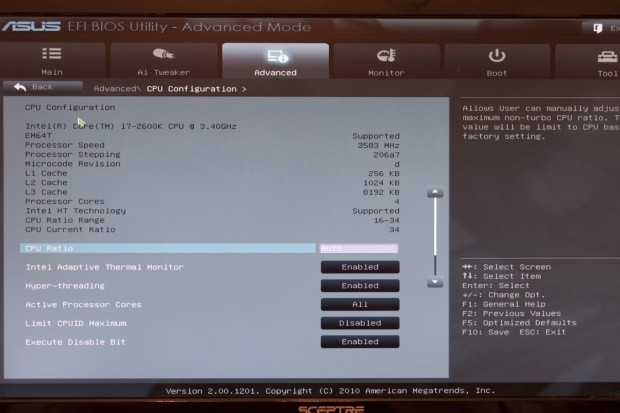
The Advanced tab is pretty much everything else from Integrated Peripherals to Advanced CPU features.
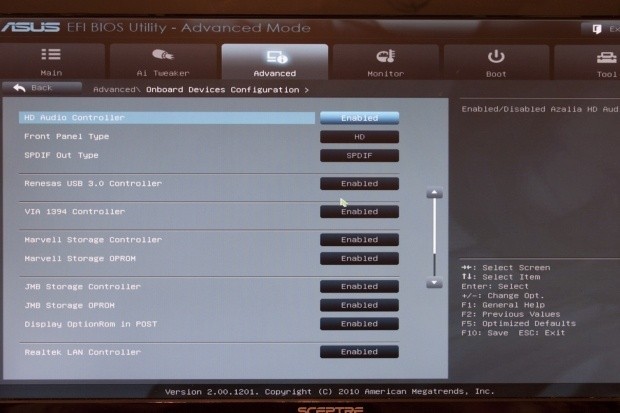
Under the Monitor tab you will find the same type of control that used to be in the Hardware Monitor or sometimes the Power Management page in a more traditional BIOS. It is functional and is where you can find the Q-Fan controls. These have been upgraded with additional profiles. The Chassis fans can also be setup with a manual profile now.
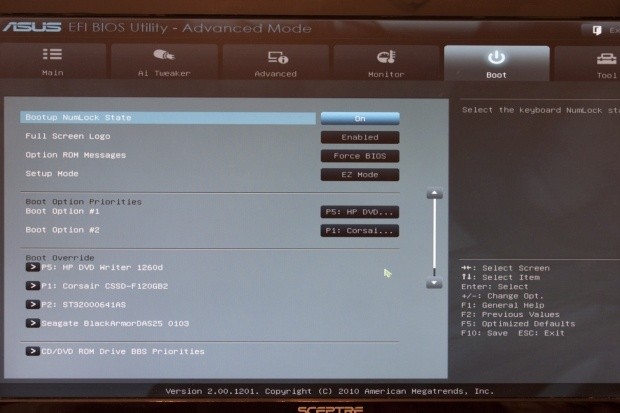
The Boot menu is what you would expect. Not much to talk about here.
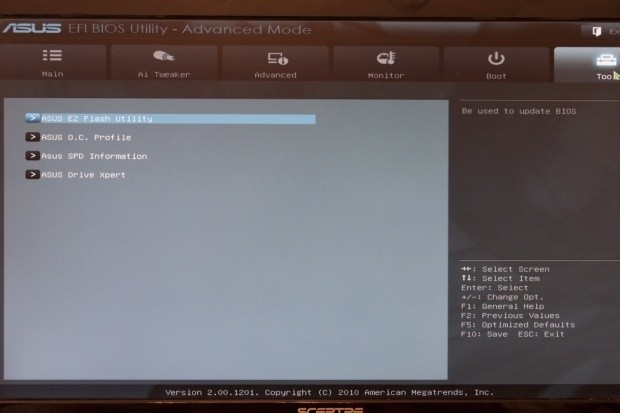
Same thing for the Tools page with the exception of the ability to look at the programmed SPD information for your RAM.
Overclocking
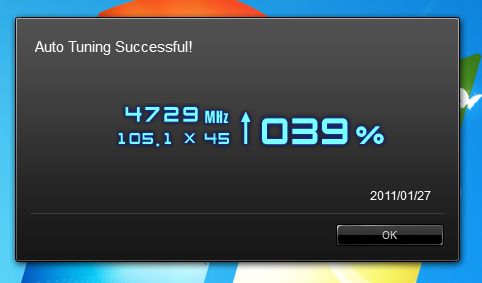
As with all ASUS/ Sandy Bridge combos, overclocking was a snap (come to think of that, overclocking ANY Sandy Bridge CPU is a snap). Once again, we hit up the Ai Suite II for our initial overclock. With the click of the mouse and two reboots we hit a high of 4.729GHz (105.1x45). This was perfectly stable, so we tried for higher. Unfortunately we could not get any farther. We ended up sticking with the auto-tune overclock.
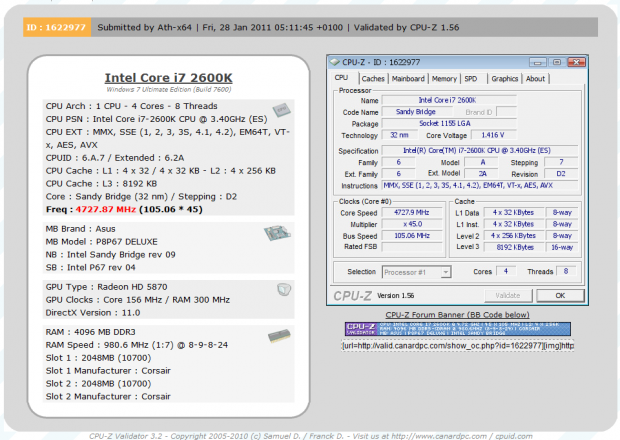
You can see the CPUz validation here.
br>
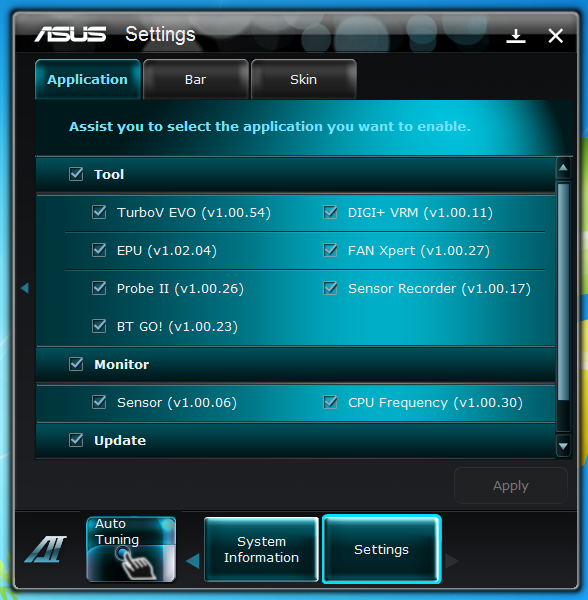
AI Suite II
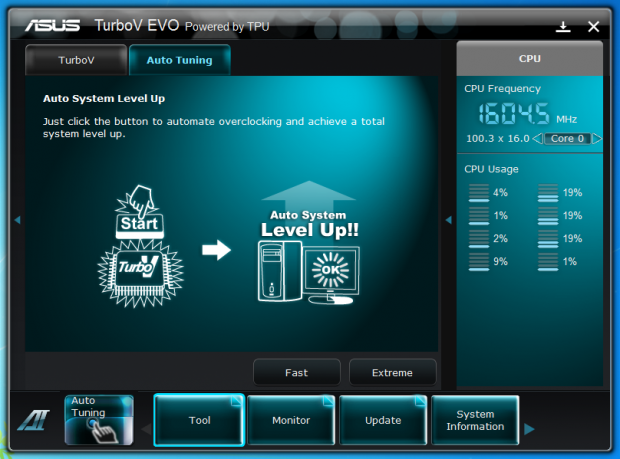
Along with a new BIOS, ASUS has a redesigned suite of tools to help the enthusiast get the most out of their motherboard. This is the AI Suite II. The UI has been revamped with ease of use and accessibility in mind. When you launch the tool it opens up a small bar with a group of buttons. The first one we have already talked about; this is the Auto Tuning option.
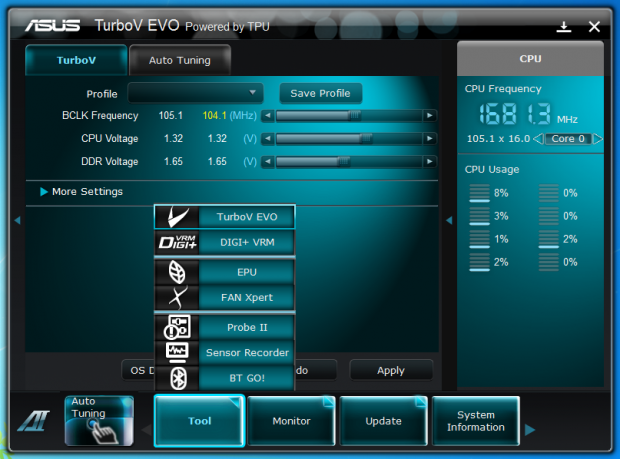
After that we get into the tools; these are items like the TurboV Evo software, Digi+ VRM and others.
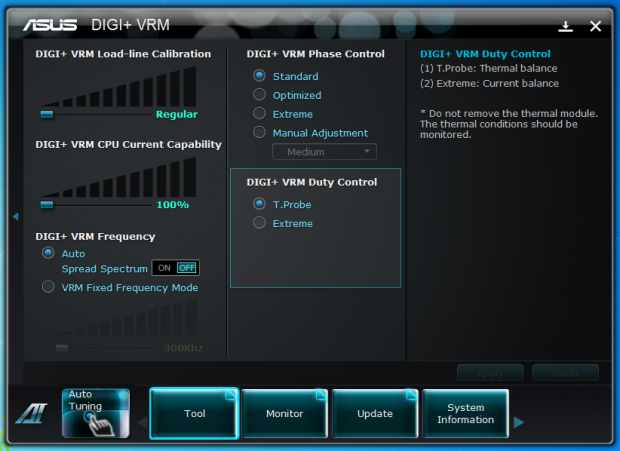
The Digi+ VRM is a great tool that gives you almost the same level of control you have in the BIOS right inside Windows. This really does give you an unprecedented level of control over your power regulation system in a consumer level product.
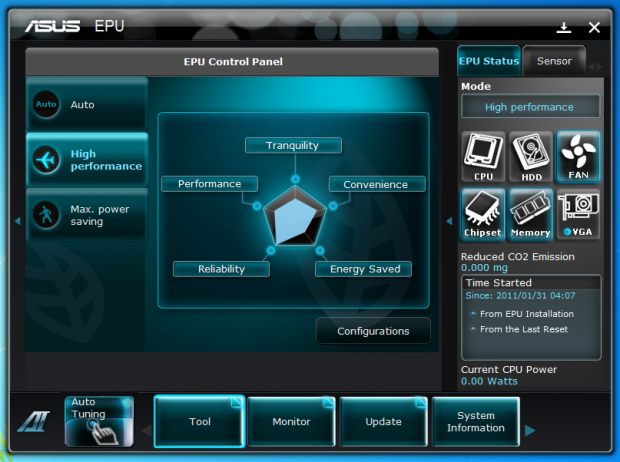
After that we have the more traditional EPU software (with a new look) and a Windows based utility that will let you adjust the Fan settings (Think Q-Fan).
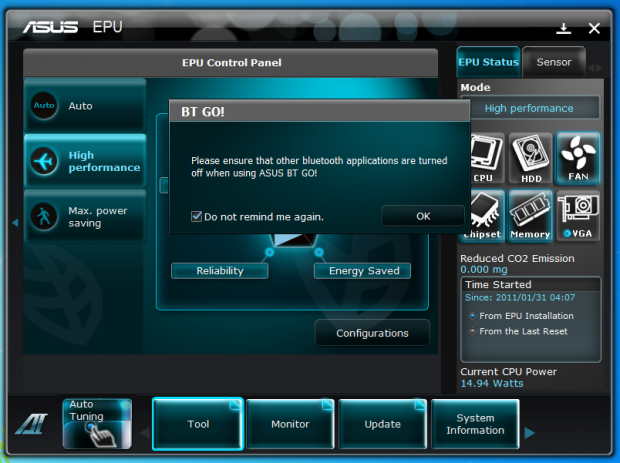
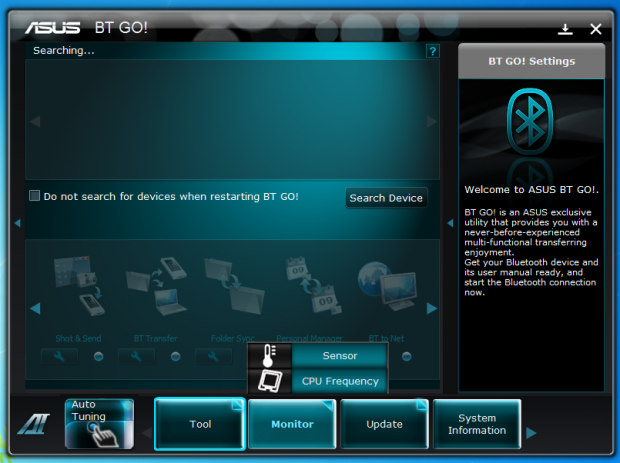
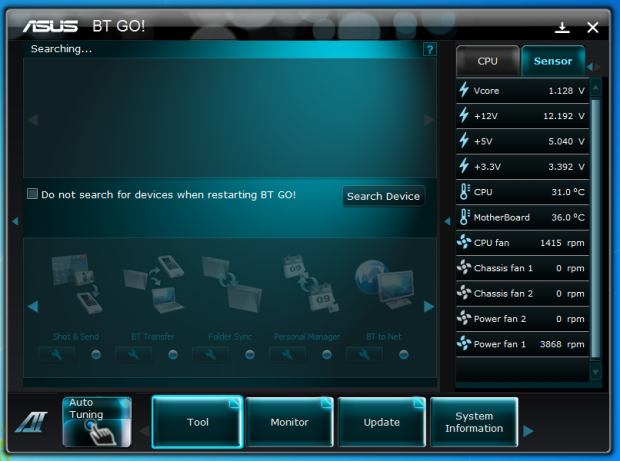
We have mentioned that the P8P67 Deluxe has a Bluetooth module. Well, here is where you would connect to devices. Also visible in this image are the monitoring tools. When you click these they pop up on the side of the window (the right side).
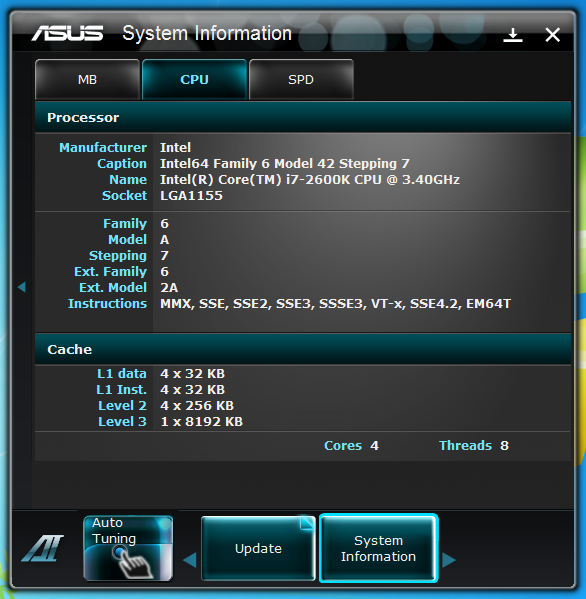
The system information and settings pages are easy to understand. They just offer even more control over your system.
Overall the new suite is nice looking, and pretty powerful. It is the type of thing you would expect on a much more expensive system, but here it is on a workstation board.
As all overclocking results are dependent on the hardware you use, your results may vary. Results of our overclocking tests are included in the performance section with the stock scores.
Important Editor Note: Our maximum overclocking result is the best result we managed in our limited time of testing the motherboard. Due to time constraints we weren't able to tweak the motherboard to the absolute maximum and find the highest possible FSB, as this could take days to find properly. We do however spend at least a few hours overclocking every motherboard to try and find the highest possible overclock in that time frame. You may or may not be able to overclock higher if you spend more time tweaking or as new BIOS updates are released. "Burn-in" time might also come into play if you believe in that.
Test System Setup and Comments
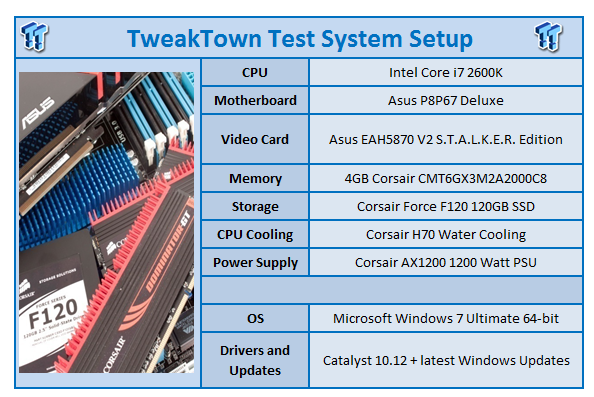
We would like to thank the following companies for supplying and supporting us with our test system hardware and equipment: ASUS, Intel, Corsair and Sceptre.
Once again, setting up a new motherboard is not a big chore. It is very simple and ASUS provides some excellent tools to get you off and running. The one thing that I would like to see is an option to install some of the utilities when you install the drivers. After all, they are pushing Norton on you, why not some of their own utilities?
Other than that one complaint, we found our time with the P8P67 Deluxe to be well spent. We did not note any issues when we were using the dual NIC despite the fact that they are not the same brand. We also found the audio on the board to be more than acceptable.
The front panel USB 3.0 break out box is a nice touch and can add some additional ports to the front of an older case. In general we did not have or note any issues with the build of our test system. Everything just seemed to work.
Synthetic Tests - Part I
With any system you will want to see a combination of synthetic testing and real-world. Synthetics give you a static, easily repeatable testing method that can be compared across multiple platforms. For our synthetic tests we use Finalwire's AIDA64, Sisoft Sandra, Futuremark's 3DMark Vantage and PCMark Vantage, Cinebench as well as HyperPi. Each of these covers a different aspect of performance or a different angle of a certain type of performance.
br>
Memory Bandwidth
Memory is a big part of current system performance. In most systems slow or flakey memory performance will impact almost every type of application you run. To test memory we use a combination of Sisoft Sandra, AIDA64 and HyperPi 0.99.
Sisoft Sandra
Version and / or Patch Used: 2011
Developer Homepage: http://www.sisoftware.net
Product Homepage: http://www.sisoftware.net
Buy It Here
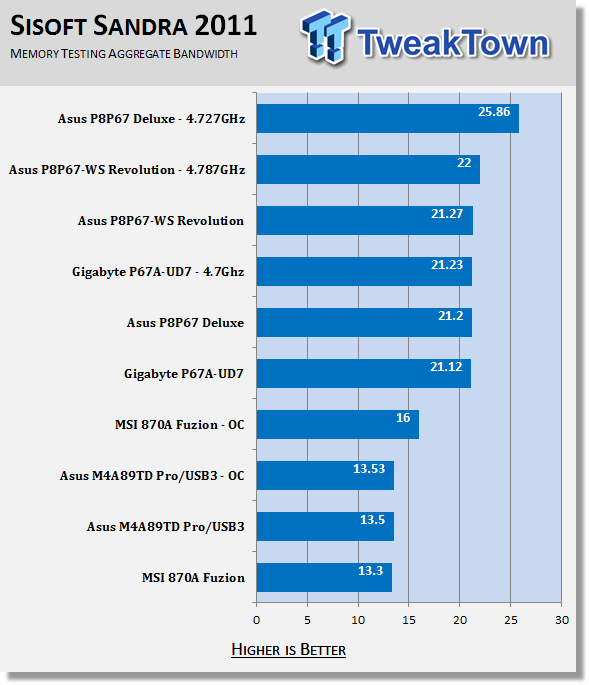
Looking at the numbers here, we find the P8P67 Deluxe falling right into place with the other P67 boards. It is a little slower than the WS Revolution, but not by that much.
br>
AIDA64
Version and / or Patch Used: 1.00.1035BETA
Developer Homepage: http://www.aida64.com
Product Homepage: http://www.AIDA64.com
Buy It Here
Replacing Everest in our labs is AIDA64. This new testing suite is from the core development team from Lavalys and continues that tradition. The guys have thrown in better support for multithreaded CPUs as well as full 64 bit support. We use this to test memory and HDDs for now, but may find ourselves opening this up to other areas of the motherboard.
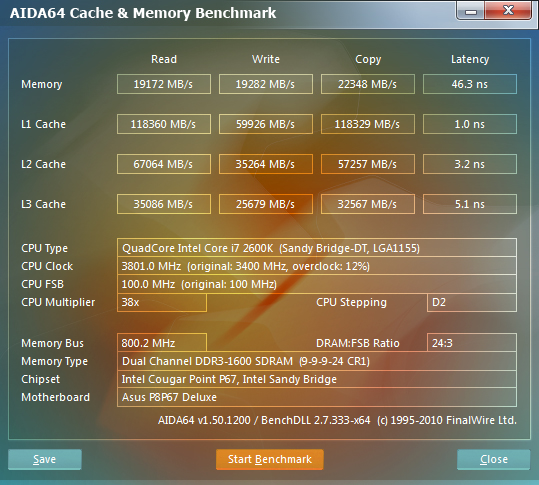
Stock Memory Performance
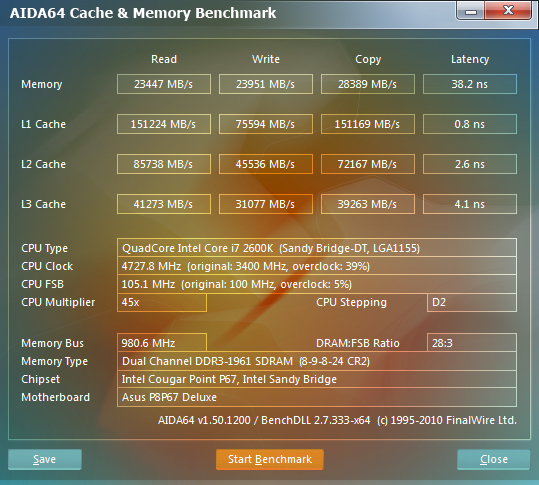
Overclocked Memory Performance
Again we find good performance numbers here and we can see the performance of the Intel memory controller showing up.
br>
HyperPi 0.99
Version and / or Patch Used: 0.99
Developer Homepage: www.virgilioborges.com.br
Product Homepage: www.virgilioborges.com.br
Download It Here
HyperPi is a front end for SuperPi that allows for multiple concurrent instances of SuperPi to be run on each core recognized by the system. It is very dependent on CPU to memory to HDD speed. The faster these components, the faster it is able to figure out the number Pi to the selected length.
For our testing we use the 32M run. This means that each of the four physical and four logical cores for the i7 and the four physical cores of the i5 is trying to calculate the number Pi out to 32 million decimal places. Each "run" is a comparative to ensure accuracy and any stability or performance issues in the loop mentioned above will cause errors in calculation.
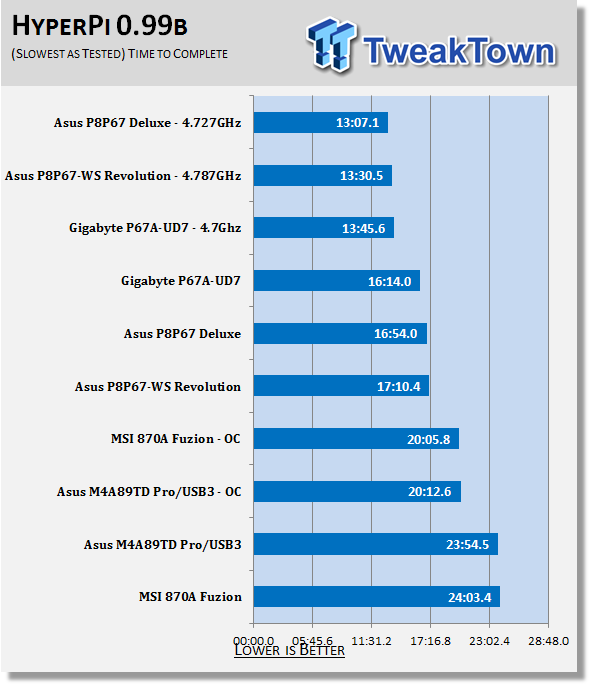
Well look at this, the P8P67 Deluxe is a tad faster than the WS Revolution in HyperPi. Not bad for a consumer level board, or even a top end one.
Synthetic Tests - Part II
Disk Drive Controller
The system drive controller is an important part of system performance. In most modern boards your drive controller will run off of the PCI-E bus. The PCI-E bus performance can be affected by poor trace layout as well as many other design choices that show up on different boards.
For testing we use Sisoft's Sandra and Everest.
br>
SiSoft Sandra
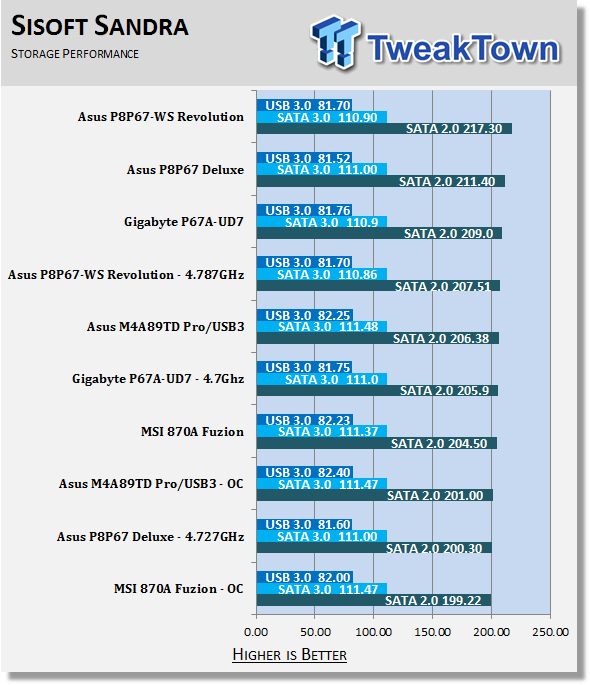
Here we find the HDD performance to be behind the Revolution. It makes the faster HyperPi scores a little puzzling, but not too much. With speeds like this we can still expect decent performance in rendering and also transcoding.
br>
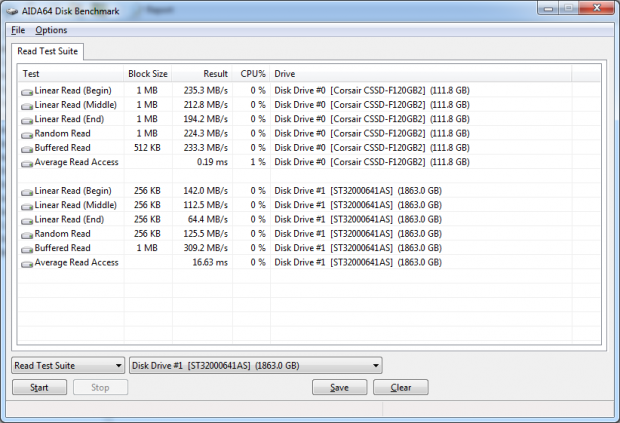
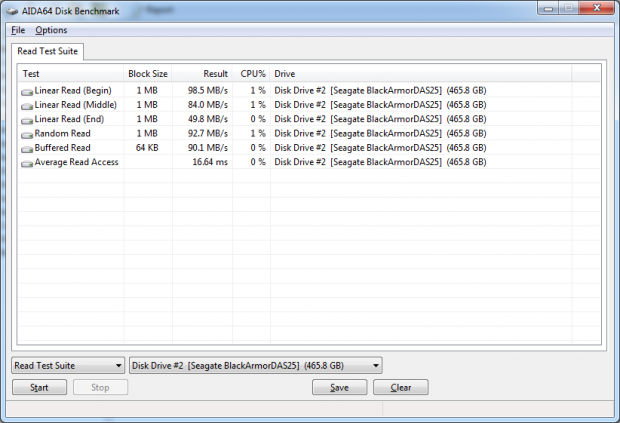
AIDA64

Stock HDD Performance
Overclocked HDD Performance

Stock USB 3.0 Performance
Overclocked USB 3.0 Performance
Interesting again; we see pretty good performance from the HDDs with AIDA64. Although there is a slight reduction in the linear read speed, it is not that large of a gap. Still, it is good to know that you can expect this level of performance and when Intel replaces the Cougar Point you can expect to get at least this level of performance, if not more.
Synthetic Tests - Part III
Here is where we dig out the FutureMark tests.
PCMark Vantage
Version and / or Patch Used: 1.0.0.0
Developer Homepage: http://www.futuremark.com/
Product Homepage: www.futuremark.com
Buy It Here
For overall system performance we use PCMark Vantage. This is run in both x86 and x64 mode to give the best indication of performance.

Another good showing from the P8P67 Deluxe. It places just behind the WS Revolution. This would seem to indicate that it is a good board for general computing.
br>
3DMark 11
Version and / or Patch Used: 1.0.1
Developer Homepage: http://www.futuremark.com/
Product Homepage: http://www.3dmark.com
Buy It Here
For synthetic gaming tests we used the industry standard and overlockers bragging tool 3DMark 11. This is a test that strives to mimic the impact modern games have on a system. Futuremark went a long way to change from the early days of graphics driven tests to a broader approach including physics, AI and more advanced graphics simulations. 3DMark 11 uses the DX11 API in addition to having support for CPU based Physics. Gone are the days of the PhysX inclusion giving you inflated scores.
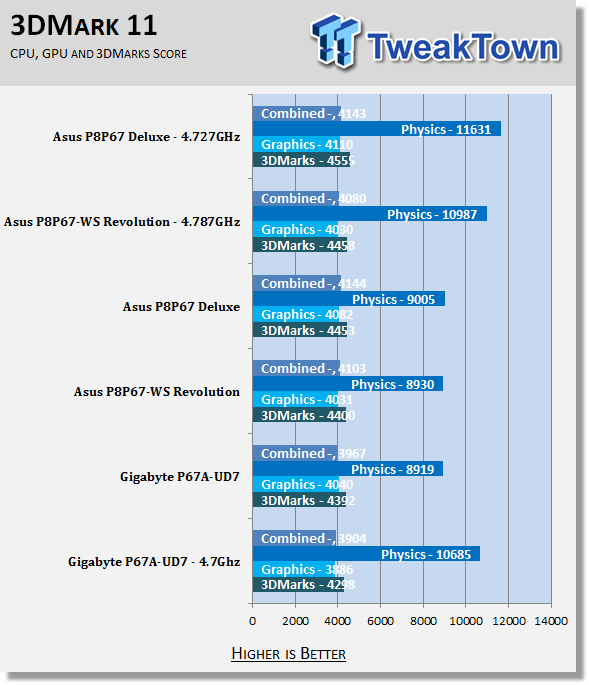
Hmmm, things look fairly close here as far as final scores go. If you look at the Physics performance, things are a little different, but again not by much. The P8P67 Deluxe is at the top, though.
br>
Cinebench R11. x64
Version and / or Patch Used: R11.5 x64
Developer Homepage: http://www.maxon.net/
Product Homepage: www.maxon.net
Download It Here
Cinebench is a synthetic rendering tool developed by Maxon. Maxon is the same company that developed Cinema4D, another industry leading 3D Animation application. Cinebench R11.5 tests your systems ability to render across a single and multiple CPU cores. It also tests your systems ability to process OpenGL information.
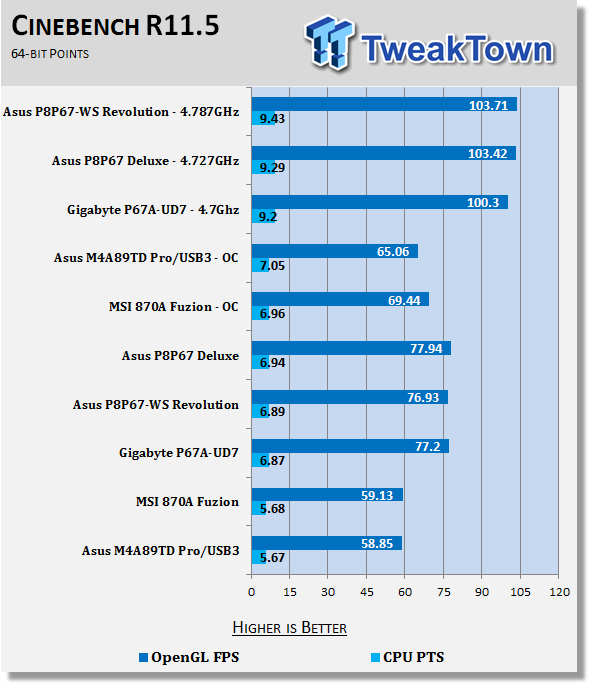
For Cinebench the P8P67 Deluxe does a great job and falls into line just behind the WS Revolution again.
Real-World Tests - Part I
Real-world testing allows us to see how well a product will perform when used in the same manner as it would be in your house or office. It is an important side to performance testing as it can uncover hidden glitches in the way a product performs.
It is especially true when testing a mainboard; there are so many components of a board that have to interact that any problems between parts can cause a failure of the whole.
For real-world testing we use some common applications and functions. We test with LightWave 3D for rendering performance, AutoGK for transcoding from DVD to AVI and two games for gaming testing.
br>
Rendering
Rendering of 3D Animation is a system intensive endeavor. You need a good CPU, memory and HDD speed to get good rendering times. For our testing we use LightWave 3D. This software from Newtek is an industry standard and has several pre-loaded scenes for us to use.
br>
LightWave 3D
Version and / or Patch Used: 9.6
Developer Homepage: http://www.newtek.com
Product Homepage: http://www.newtek.com/lightwave/
Buy It Here
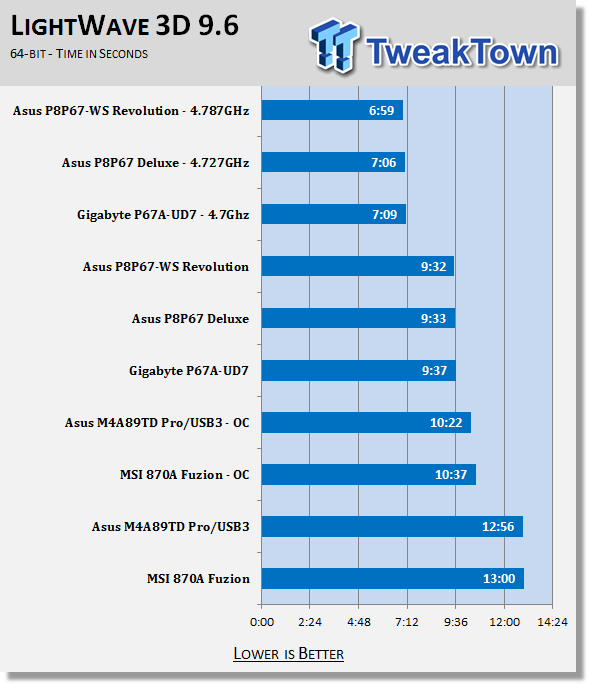
Here we have another excellent showing from the P8P67 Deluxe.
br>
AutoGK
Version and / or Patch Used: 2.55
Developer Homepage: http://www.autogk.me.uk/
Product Homepage: http://www.autogk.me.uk/
Download It Here
AutoGK stands for Auto Gordian Knot; it is a suite of transcoding tools that are compiled into an easy to install and use utility. It allows you to transcode non-protected DVDs and other media to Xvid or Divx format. For our testing purposes we use a non-DRM restricted movie that is roughly 2 hours in length. This is transcoded to a single Xvid AVI at 100% quality.

Interestingly enough the P8P67 Deluxe falls to the back of the P67 boards we have tested so far when it comes to AutoGK transcoding. This could be caused by the slower SATA II performance (the SSD and DVD-ROM combined).
Real-World Tests Part II
Here we have our real gaming tests. Each of the games we chose uses multiple cores and GPUs. They are able to stress the system through use of good AI. Both have decent positional audio that adds impact to the sound subsystem of the board. We ran each game through the level or parts listed and recorded frame per second using FRAPS. This brings the whole game into play.
*** A word on gaming as a motherboard test; ***
Despite the fact that most games are very GPU limited, we are still noticing HDD and even audio creating issues in gaming performance. Because of this you may see differences in the number of frames rendered per second between different boards. Usually the difference is very small but occasionally, because of bad tracing, poor memory or HDD performance this difference is significant. The issues are often more prevalent in older versions of DirectX but can still pop up in DX10 and 11.
br>
Call of Duty Modern Warfare 2 (DX9)
Version and / or Patch Used: 1.0
Timedemo or Level Used: First combat until the school is cleared
Developer Homepage: http://www.infinityward.com
Product Homepage: http://modernwarfare2.infinityward.com
Most of you know about the game Modern Warfare 2 - It caused quite a bit of controversy in the latter half of 2009. The game is a first person shooter with a heavy combat emphasis. It follows the events in the first Modern Warfare very closely and brings back several characters from the original.
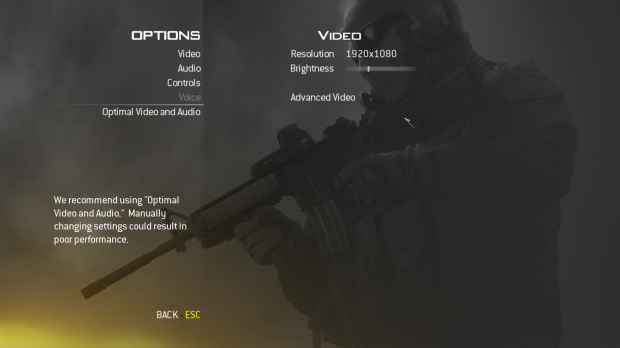
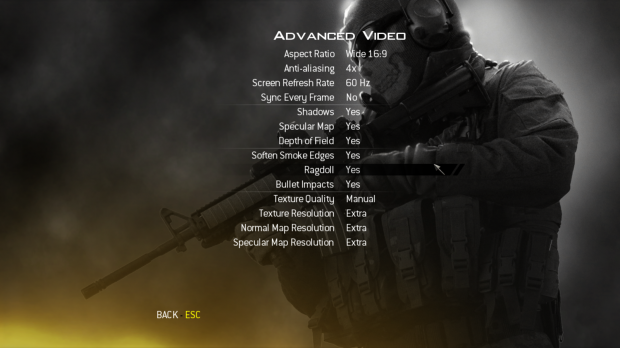
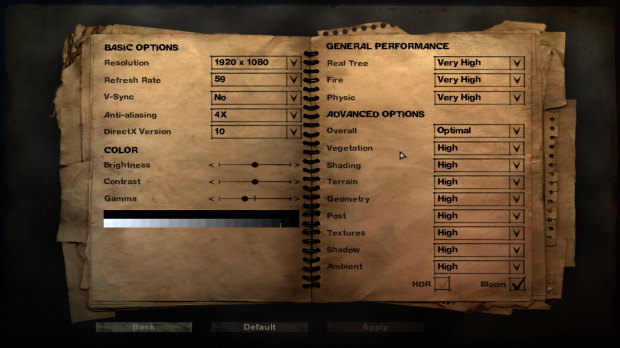
As with most games in the Call of Duty franchise, it features a heavy AI load. This is not because of a complex AI routine, but more due to the sheer number of enemies in any given combat situation. It is also our single DX9 based game in our testing suite. Settings are shown below.
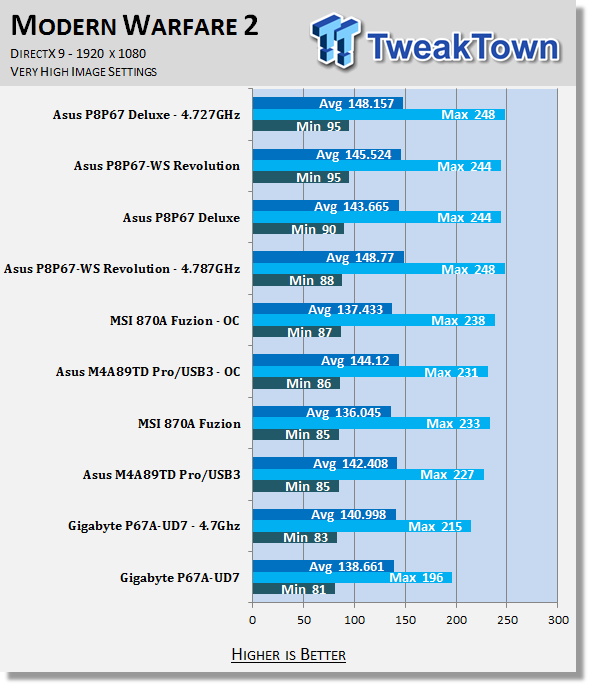
The P8P67 Deluxe does great with our DX9 game, but then again, if you consider that all of these boards are running more than 80FPS minimum, I think any would be great as gaming platforms.
br>
Far Cry 2 (DX10)
Version and / or Patch Used: V1.00
Timedemo or Level Used: Clearing the Safe house through to the Rescue
Developer Homepage: http://www.ubi.com
Product Homepage: http://farcry.us.ubi.com
Far Cry 2 is a large sandbox style game. There are no levels here, so as you move about the island you are on you do not have to wait for the "loading" sign to go away. It is mission driven, so each mission is what you would normally think of as the next "level".
In the game you take the role of a mercenary who has been sent to kill the Jackal. Unfortunately your malaria kicks in and you end up being found by him. Long story short, you become the errand boy for a local militia leader and run all over the island doing his bidding. Settings we used for testing are shown below.
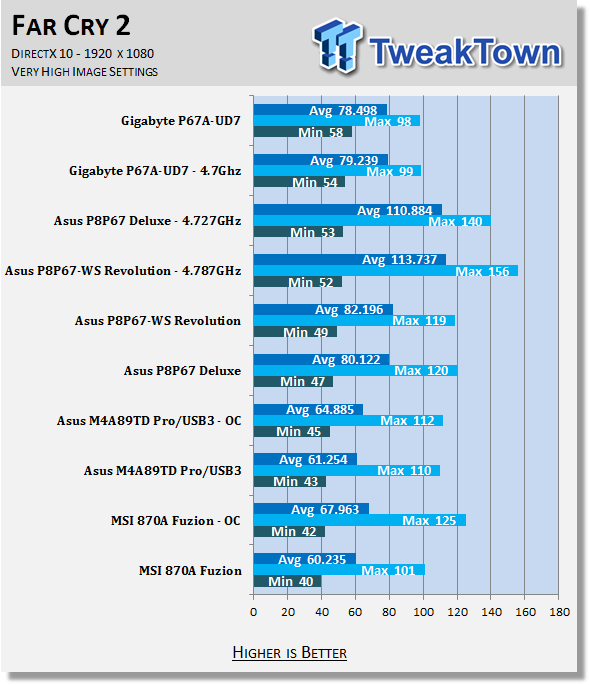
Far Cry 2 is a little different. There is a much larger Delta from top to bottom even between the P67 based products. The P8P67 Deluxe at stock speed is 11 FPS Minimum behind the UD7. All are still playable, but the UD7 is faster here.
br>
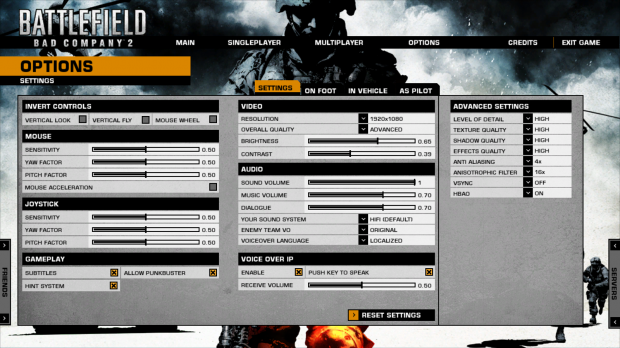
Battlefield Bad Company 2 (DX11)
Version and / or Patch Used: V1.00
Timedemo or Level Used: From washing up on the beach to the mine fields.
Developer Homepage: http://www.ea.com/
Product Homepage: http://badcompany2.ea.com/
Battlefield Bad Company is another sequel and also another game "franchise". Bad Company 2 is also our DX11 Shooter game. The game follows a fictitious B company team on a mission to recover a Japanese defector. This puts you back in World War II (at least for the beginning of the game) while the multi-player game is centered on much more modern combat. For our testing we used the single player mode. Settings are shown below.
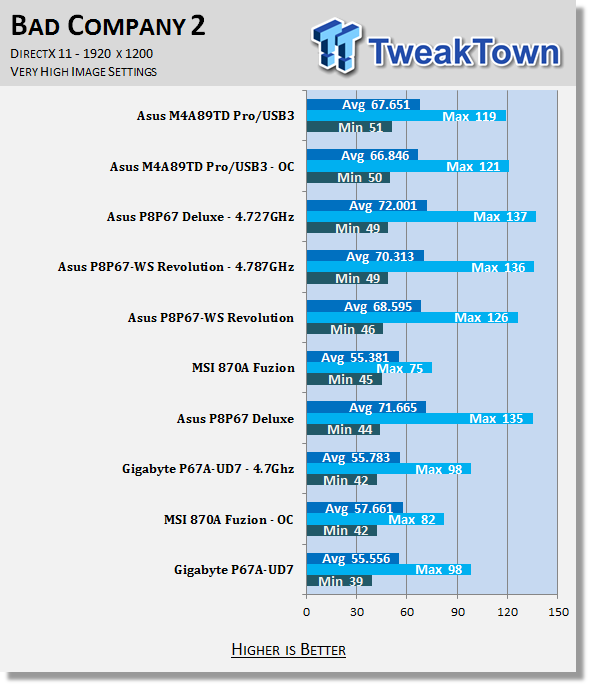
For Bad Company 2 (our DX11 game), none of the other boards have been able to knock the AMD system off the top of the hill. All of these are still above the 32FPS line, so they are more than playable.
br>
Gaming Conclusion
Gaming is becoming less and less about frames per second as far as motherboard testing goes. We know that the GPUs can handle the higher resolutions. With our gaming tests we are now concentrating on level load, AI, networking and of course audio.
The P8P67 Deluxe with its Intel based LAN does great over the network, the audio was more than adequate and the AI on all of our games was responsive (or as responsive as the AI routines could be). So if you are interested in this board for gaming, you would not be making a bad choice.
Power Usage and Heat Tests
Power Consumption
We are now able to find out what kind of power is being used by our test system and the associated graphics cards installed. Keep in mind; it tests the complete system (minus LCD monitor, which is plugged directly into an AC wall socket).
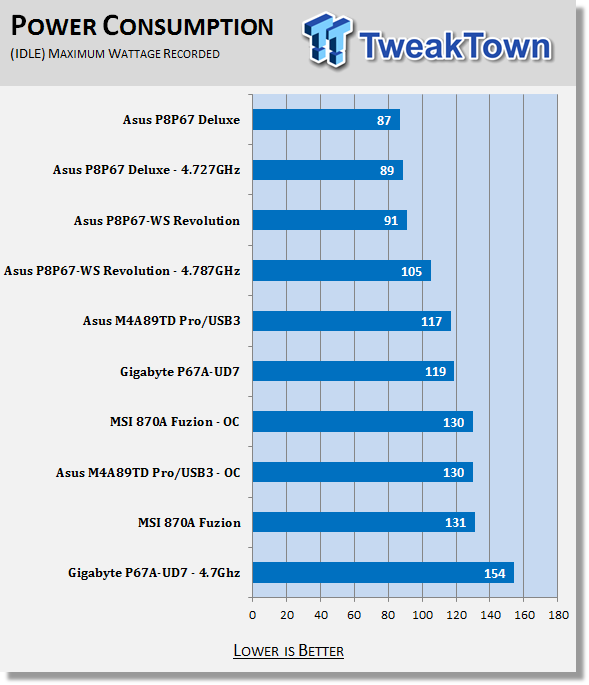
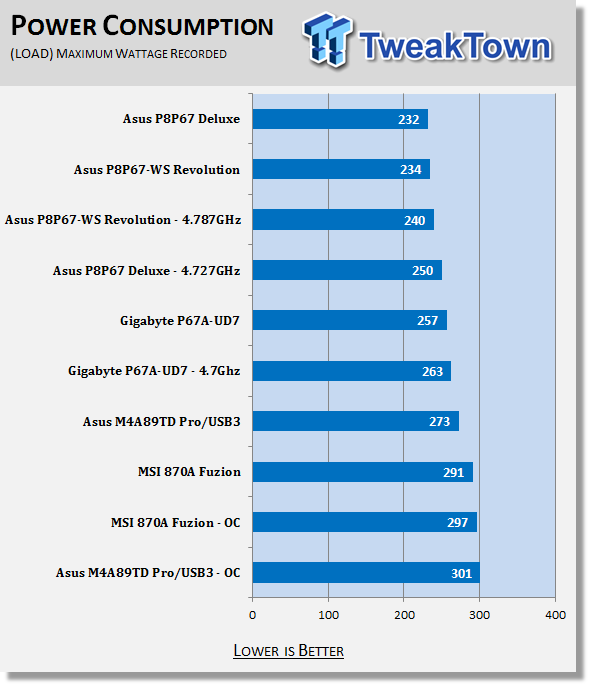
Ok, I am impressed. The P8P67 Deluxe simply sipped power at idle speeds even when overclocked! - Under load things did get closer to normal, but we still saw good power efficiency with this board.
br>
Heat Generation
As a new measure, we are now monitoring the heat generation from the key components on the motherboard; this being the Northbridge, Southbridge (if it contains one) as well as the Mosfets around the CPU. The results are recorded at idle and load during the power consumption tests.
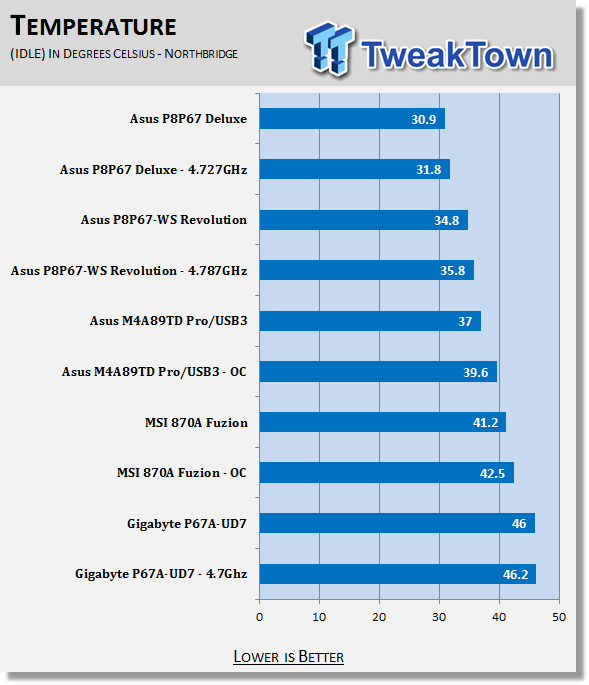
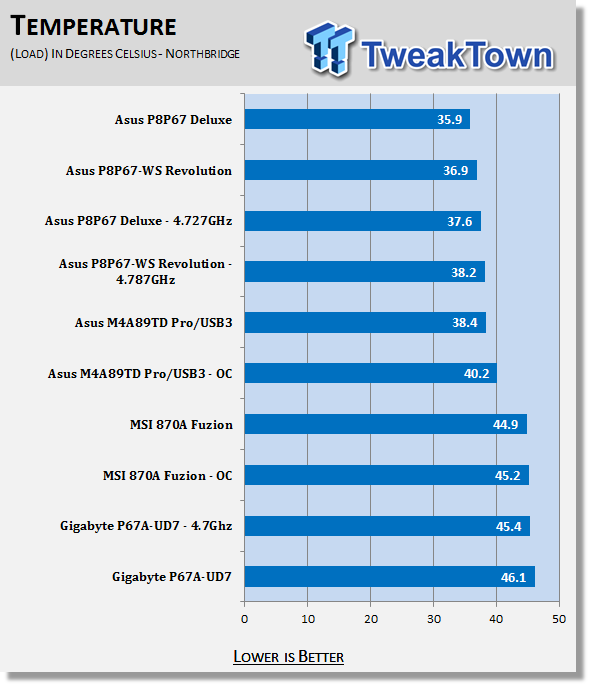
The P8P67 Deluxe was also more heat efficient than its workstation cousin. We saw great temperatures at idle and even the load temps were better than we expected.
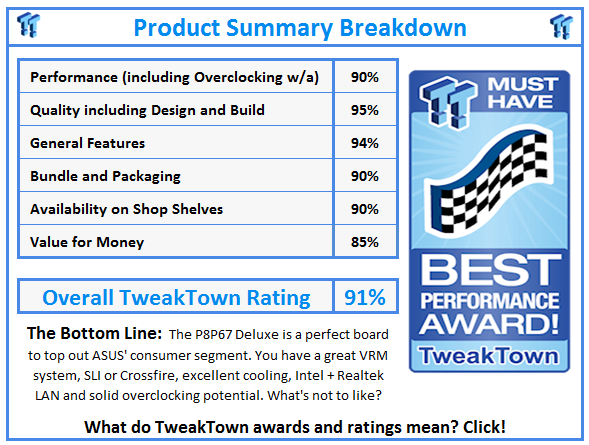
Final Thoughts
The P8P67 Deluxe is a great board for ASUS' consumer lineup. As the top of the line for this market segment it performs very well and has a great feature set that is sure to grab the attention of more than a few people looking to pick up a P67 board once the Rev 3 Cougar Point chips begin shipping.
ASUS, as we have told you before, is looking to differentiate their products by offering enthusiast class performance and options at every level but the very entry point in the market. We have now seen this in two of their products that are far outside the ROG line. It is a great initiative and one that will benefit the consumer. You really would be hard pressed to find another line up with this level of performance and the feature set.
I mean look at what you get; SLI/Crossfire, BT Go, TPU, EPU, DIGI+ VRM, Ai Suite II, USB 3.0 break out box and much more. When we start to see the new revision of Cougar Point, I can see this product being a big hit.
Our Latest Socket LGA 1155 Review Coverage
 GIGABYTE X870E Aero X3D Dark Wood Review - A woody goody
 ASUS TUF Gaming X870-Pro WiFi7 W NEO Review - Tuffed up
 ASRock Z890 Taichi Aqua Motherboard Review - Flagship features without the flagship price
 GIGABYTE Z890I AORUS Ultra Motherboard Review - Mini-ITX with surprisingly good thermals
 GIGABYTE Z890 AORUS Elite WiFi7 Plus Motherboard Review - Right in the sweet spot
 Acer Predator Atlas 8 pricing is here, portable PC gaming is now a very expensive hobby
 First NVIDIA Vera Rubin NVL72 benchmarks show 10X improvement over Grace Blackwell
 Razer Seiren V3 Chroma 32-Bit DSP is a new USB microphone all about studio-grade vocal quality
 Woot is selling the Nintendo Switch 2 for $399 with a promo code - $100 below the incoming September price
 Battlefield 6's latest update is causing crashes on GeForce RTX 50 Series GPUs
 Pulsar and Noctua launch Feinmann F01 Noctua Edition gaming mouse with built-in fan for sweaty palms
 Redditor walked into Costco for groceries and left with a $2,000 Ryzen 7 9800X3D, RTX 5070 gaming PC for just $1,220
 Old School RuneScape players just reminded everyone why MMO games are unmatched
 Sales data indicates bleak future for physical games in US
 Game Pass starter edition now bundled with Meta Horizon+, Xbox gamepad emulation coming to Meta Quest Touch controllers
 Thrustmaster T.Flight HOTAS 5 MSFS Edition Review
 SteelSeries Arctis Nova Pro Omni Wireless Headset Review - One Headset to Rule Them All
 SteelSeries Arctis Nova 7 Wireless Gen 2 Headset Review - New and Improved, But Is It Enough?
 AMD Ryzen 7 7700X3D Review - Days of Future Past
 Samsung 990 2TB SSD Review - Ninth Gen QLC at PCIe Gen4 Speeds
 ASUS ExpertBook Ultra (Panther Lake) 14" Business Laptop Review
 ASUS ROG Raikiri II Xbox Wireless Controller Review - Ready to Take Control
 MOZA FMP18 Panel Bundle Review: authentic F/A-18 Hornet cockpit controls for flight sims
 Micron 6600 ION 245.76TB Enterprise SSD Review - Best in Class Programming Speeds
 MOZA MA3F EFCM Flight Control Module Review: authentic Airbus A320 autopilot panel for simulators
 I use this decade-old free tool that finds files faster than Windows Search does
 I install and update most of my apps with this Windows command now, and I stopped downloading sketchy installers
 Hisense U6SF 65-inch MiniLED TV: High Performance Meets Leisurely Convenience
 I stopped digging through Windows menus after I set up this one folder
 Don't sell your Windows laptop until you do these things
 6 PC cleaning mistakes to avoid for safer hardware maintenance
 Phison and Intel Take Aim at Local AI's Memory Wall with aiDAPTIV
 How to Remap Keyboard Keys in Windows using Microsoft PowerToys
 7 tips to organize your Windows files for faster, easier access
 Intel Arc G3 Extreme first impressions with MSI's Claw 8 EX AI+ - Incredible power for an extreme price