


Our Verdict
Introduction, Specifications, and Pricing
Just over a year ago now, we reviewed the Cooler Master Nepton 240M, and for those who missed it then, there is a reason it is hard to find today. Cooler Master used the Asetek idea of offering a head unit with the pump and cold plate being in one single chamber, in doing so. Eventually, it was found that Cooler Master could no longer sell these units inside of the US. So rather than turning tail and hiding from the giant of the industry, Cooler Master found a way to design an AIO, which does not infringe on the Asetek patent, and in doing so, should not be pulled from the market, allowing all of us to take advantage of what Cooler Master has to offer.
The reality is, though, this late in the game, developing a new AIO, there is a huge wall of already well-known companies, already blocking Cooler Master's path. To help tear down that wall, Cooler Master went back to the basic components, and asked themselves, what else could be done to take our kit over the top? In answering this very question, Cooler Master delivered us with the most thought out hardware that makes life simpler for us, yet at the same time almost make you smile with some of the changes we see in their new AIO.
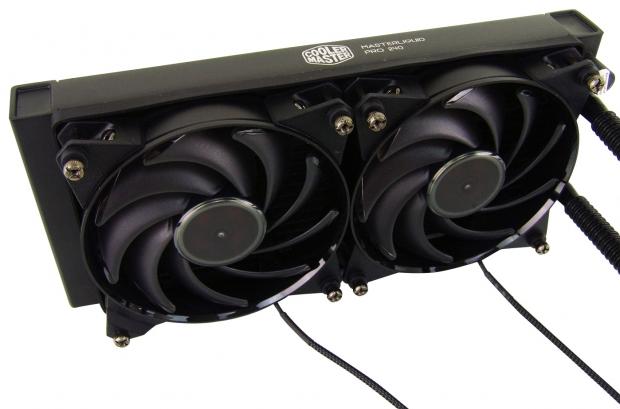
Today we are looking into the Cooler Master MasterLiquid Pro 240, which is the latest edition to the Master/Maker series of products. Judging from their product page, they hit on things like Flow Op technology, which is the name for their overall design philosophy. In this quest, they looked at the heat flow and used it as the cornerstone to deciding what components and accessories are needed to last longer and perform better than the massive amount of competitors out there. That said, expectations are high, and we feel that by now Cooler Master should have a great solution, based on what we saw in the past. Hopefully the MasterLiquid Pro 240 is more than dressed to impress so that Cooler Master can jump right back in the game and attempt to get their slice of the AIO liquid CPU cooler pie.
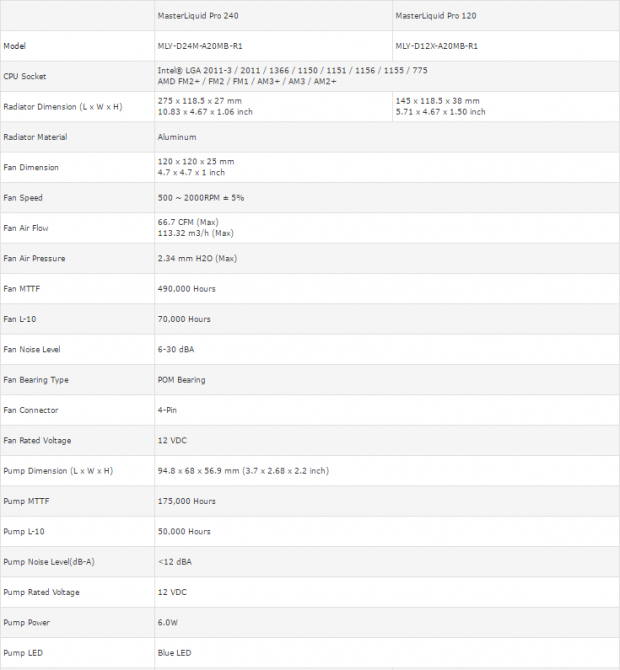
In this series of coolers, we see that there are two versions being offered at this time. There is the MasterLiquid Pro 240 we have today, but they also offer the MasterLiquid Pro 120, for those with lower TDP processors, or those without the space required for the 240mm version. Compatibility is as good as it gets. Everything Intel including LGA775 or newer sockets are supported, and as for the AMD side, the FM and AM sockets are all covered. Along with finding that this is a mixed metal AIO, using aluminum for the radiator, we also find its dimensions. There we are shown that this unit is 275mm long, it is 118.5mm wide, and is 27mm thick.
Now we move over to the fans that cool this system, the MasterFan Pro 120 AB fans. These are 25mm thick, 120mm fans with a rubberized frame, and uses sickle-shaped translucent fan blades. The chart shows that these fans will spin from 500 to 2000 RPM, but the fans say they cap at 2500RPM. Assuming the rest is correct, they should deliver near 70CFM per fan, and are rated at 2.34 mmH2O of pressure. They are said to last an astounding 490,000 hours, or possible 70,000 hours when running at level 10. The noise ranges from six to thirty decibels on the adjusted scale, are spun on a POM bearing, and are PWM controllable via the 4-pin power leads.
They do also bring attention to the head unit as well. At the bottom of the chart, we find the dimensions of 94.8mm of height, 56.8mm from one side to another, and the longer sides measure out to 68mm. The pump inside is rated to run up to 175,000 hours, and again it drops if used at full speed all the time, down to 50,000 hours. The unit is rated for less than ten dBA of noise when drawing six watts of power via the 4-pin fan lead. Cooler Master also offers a bit of LED lighting in the head unit, and when powered, there is a blue glow behind the cover plate.
Pricing is varied dependent on where you look to buy the MasterLiquid Pro 240 from. Cooler Master lists this cooler for just $90.99 at this time, down $29 from its original MSRP, and seems to be the best location to grab it at this time. For those who frequent Newegg, expect to shell out a bit more cash to obtain this cooler, as they list it at $117.24 currently, which is not that great of a deal. Amazon.com is following the trend Cooler Master has set, and while not as affordable as a direct purchase, the $94.99 they are asking is more reasonable than what Newegg has going on at the moment. This is affordable for a 240mm AIO system, but we will wait until the testing is finished to give our verdict on value.
Our Latest CPU Liquid Coolers Review Coverage
Packaging
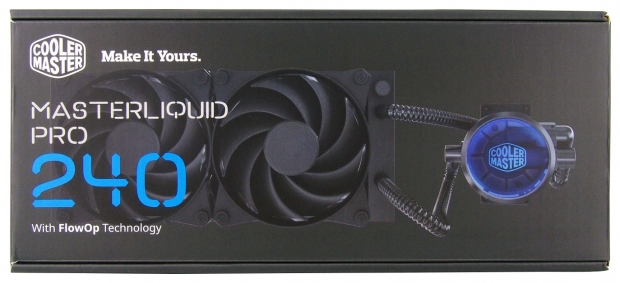
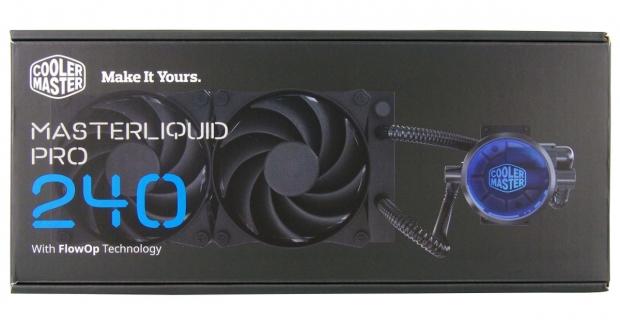
A very large image of the MasterLiquid Pro 240 is used for the backdrop on the front panel. On the left side, we see all of the company and product naming, with a pop of light blue used in the 240 to help attract the eye to it. On the right end, we see that the head unit comes with a blue glow under a clear top panel.

Cooler Master keeps things simple on this end. They again offer the product name, company name, and logo, and display their AIO near the bottom, with a view of the copper cold plate.
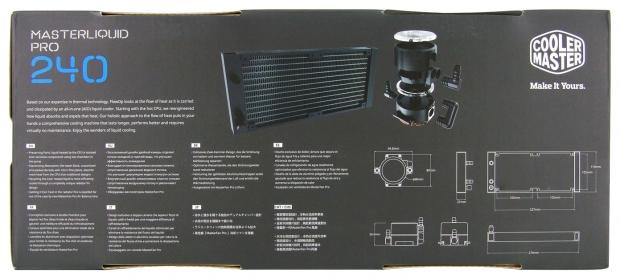
The back offers quite a bit more to digest than the previous two. Off to the left is a statement of what went into the design of the MasterLiquid kits with multilingual lists of features below. In the middle is an image of the radiator, and exploded view of the head unit and pump. Under those images, we then find dimensional renderings for all the components.
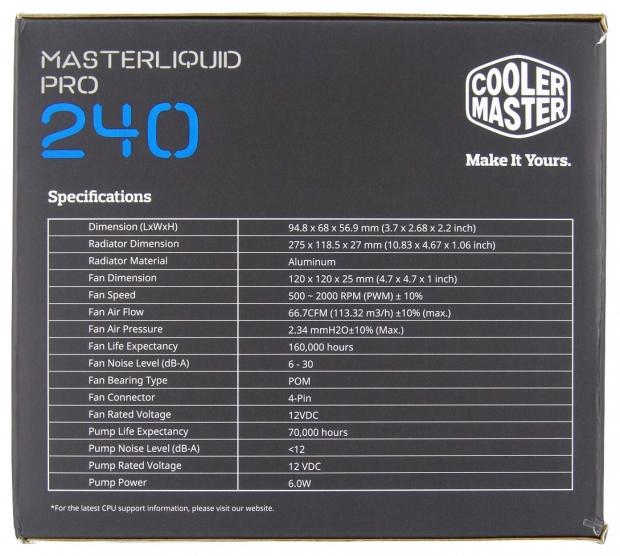
The last end of the packaging for the MasterLiquid Pro 240 delivers the specifications chart. We can only assume they opted for new fans to accompany this kit after the Packaging was printed. We say this, as the fans we were sent can top out at 2000 RPM, and that we could and did verify.
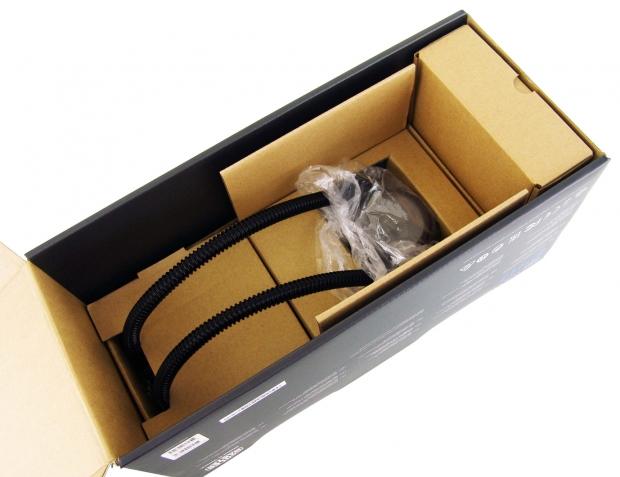
The inner packaging is completely new to us and is overdesigned to ensure no damage occurs to any component. The head unit is pushed into a box with dense foam around it, and between it and the hoses, the fans are laying under the cardboard. At the bottom, in its section is the radiator, and at the right end is a hardware box. So not only is Cooler Master offering their take on an AIO, they make sure that their coolers arrive in pristine condition for testing, as ours did.
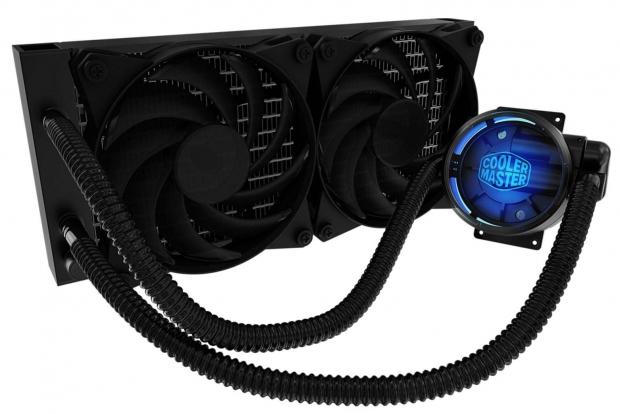
Cooler Master MasterLiquid Pro 240 CPU Cooler
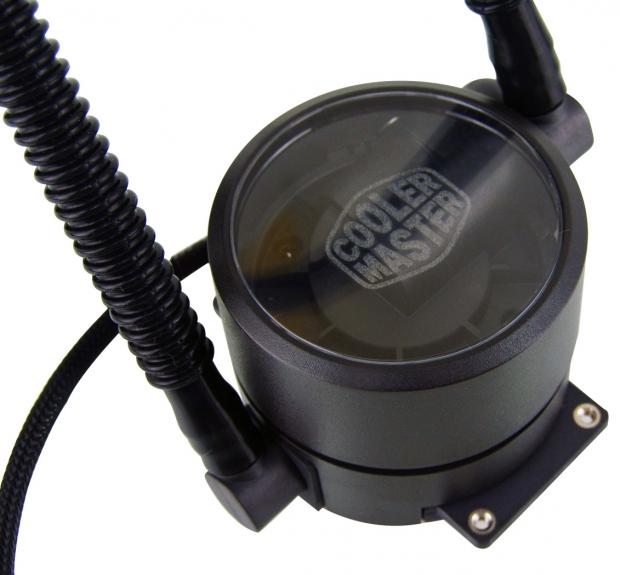
Fresh out of the box, we start the tour off with a look at the head unit. From this view, the first thing we noticed was the clear top with the Cooler Master logo etched to the underside. We also notice this design it taller than most other AIOs out there, and we see tabs for mounting hardware at the bottom, rather than the more traditional teeth round on round head units.
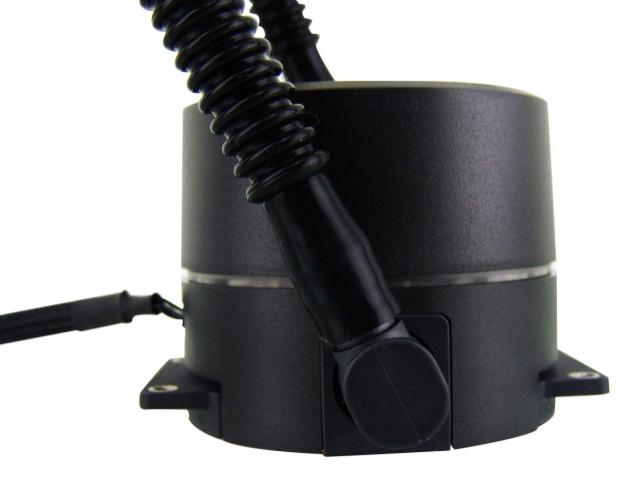
This side of the head unit offers one tube running down to the lower of the two halves in this design. This tube is pulling heated coolant from the cold plate, and returning it to the radiator to be cooled. As with any other AIO design, these are swivel fittings and will rotate to make mounting and hose routing easier.
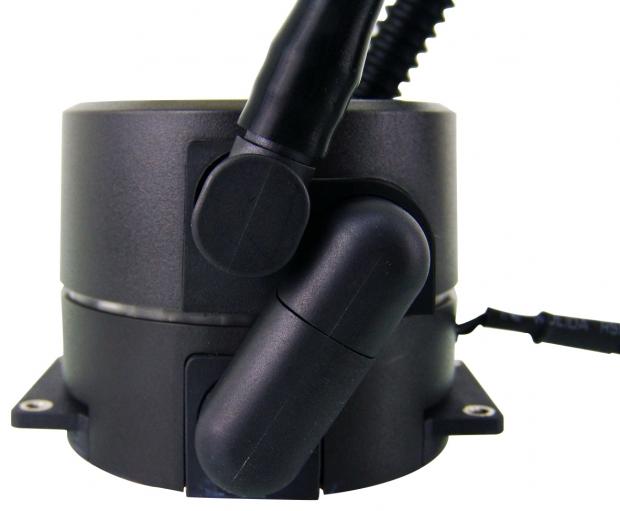
The opposite side is much different. Here we see that the tube is returning cooled fluid it dumped into the top section containing the pump. It then is sent down the small angled tube to return fluid to the cold plate. There are also a few other companies using a similar setup but are not as hidden into the design as this one is.
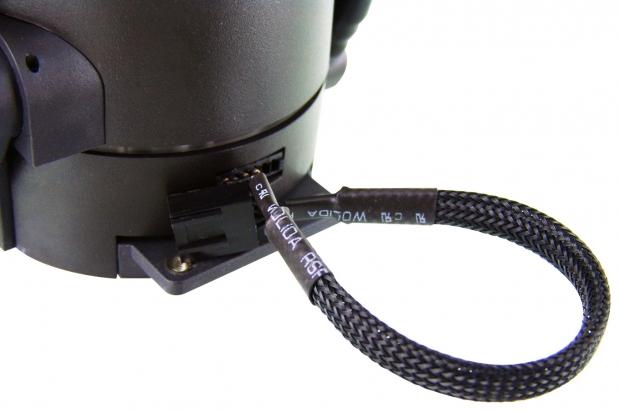
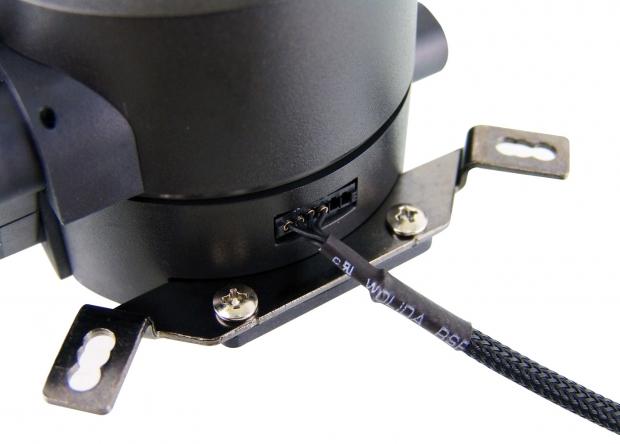
Just above one of the mounting tabs, we see that there is a short lead coming out of the head unit. This braided lead will power the pump and LED lighting via a 4-pin connection on the motherboard, and it can be PWM controlled.

The cold plate is not one level in this design, as we see a square section in the center raised above the outside edges. Cooler Master also uses a protective sticker to keep the base clean and free of damage.
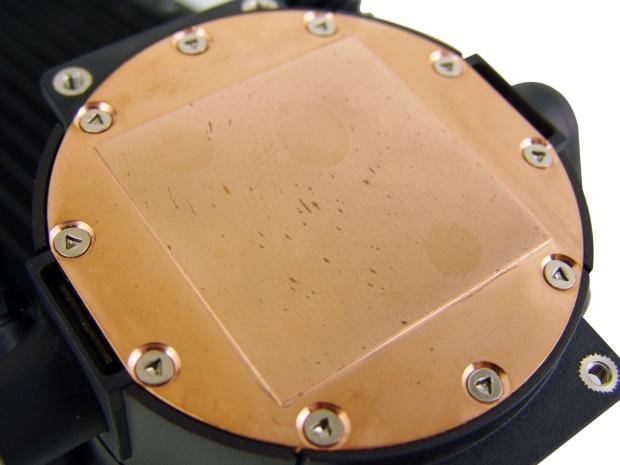
We hope this is just found in the pre-release samples, as they were likely rushed to us to review, but we do find quite a bit of oxidation from coolant or cutting fluid, and even a few fingerprints are present. While we will simply polish this off of our sample, we do home the retail samples will be cleaned properly before being boxed.
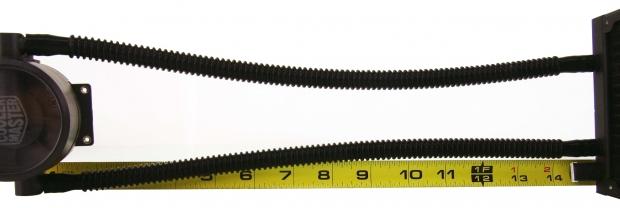
As we have seen only a couple of times to date, Cooler Master wants to make sure that this cooler can be used in more locations than others. They offer over 15 inches of corrugated plastic covered FEP tubing, allowing this to go into the top of the case, but even has enough to go in the front of the newer cases too.
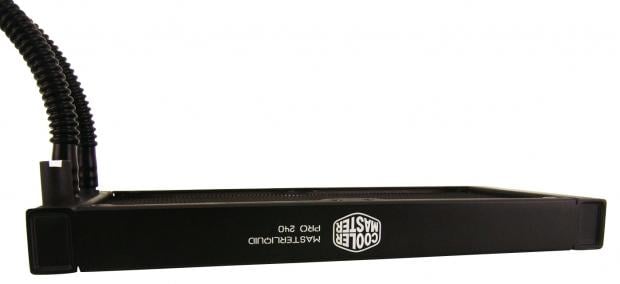
The radiator in this kit is indeed made for two 120mm fans to cool it, and while upside-down at the moment, we do see the Cooler Master logo and the name of the cooler, painted in white on this side.
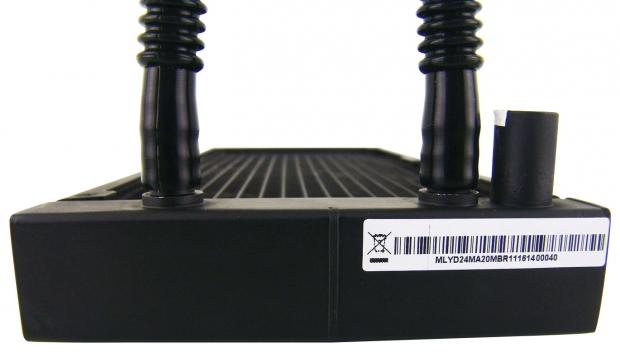
At this end of the radiator, we see the tubing is stretched over the fittings, just like we saw on the head unit. We also see a fill-port to the right, which is not to be tampered with if you want to use the warranty. The sticker on the end of this 27mm thick radiator provides the part number first, and the second half is the serial number.
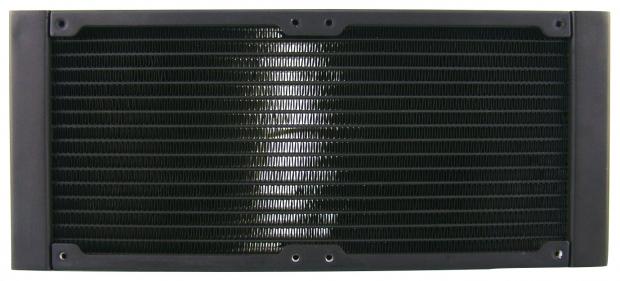
The site explains that this radiator is supposed to have a square fin arrangement, where more of the fins are touching the tubes, to offer better heat transfer. What we were sent, though, is a V-shaped fin design, typical to most radiators, and they use a 24 FPI density in our sample.
Accessories and Documentation
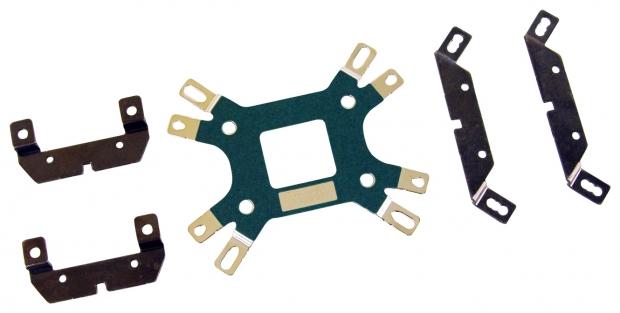
We found this inside of the box of hardware and is most of what is used to mount this cooler to the motherboard. In the middle, there is a universal backplate, to the left are AMD mounting brackets, and to the right of it are the Intel mounting brackets.
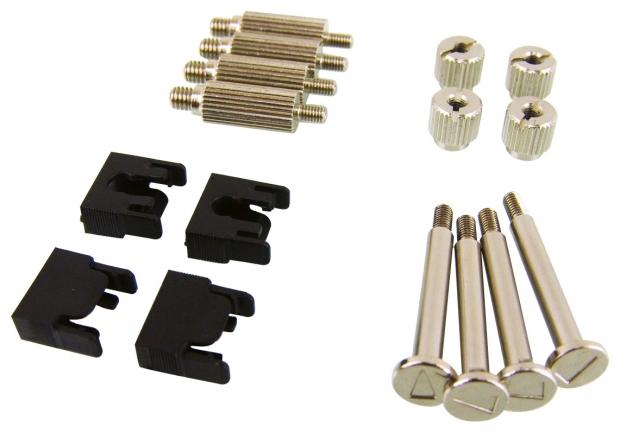
In this image, we start with the LGA2011 socket standoffs at the top left, but the rest is used universally for all other sockets. At the bottom left, we see clips which hold the studs to the right of them into the ends of the backplate. The studs have a key on them to keep them from spinning in the back plate, and the black ends are adjustable for various Intel socket types. To mount the head unit to the long screws, we use the four small nuts found at the top right of this image.
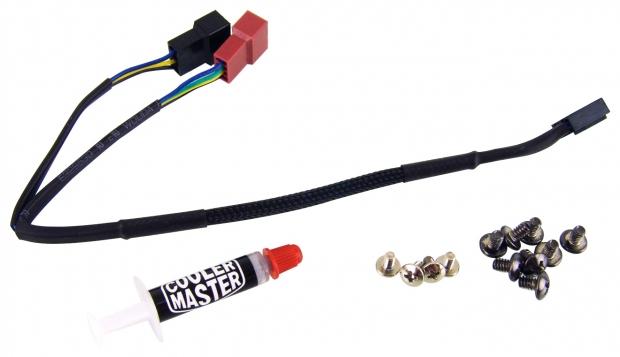
Cooler Master ships the MasterLiquid Pro 240 with a Y-splitter cable use to power both fans from one motherboard header, and a small tube of thermal paste to get the cooler mounted properly. The screws along the bottom are used for two things. The set of four is for mounting brackets to the head unit and the set of eight it to hang this cooler into the chassis, with or without fans on that side.
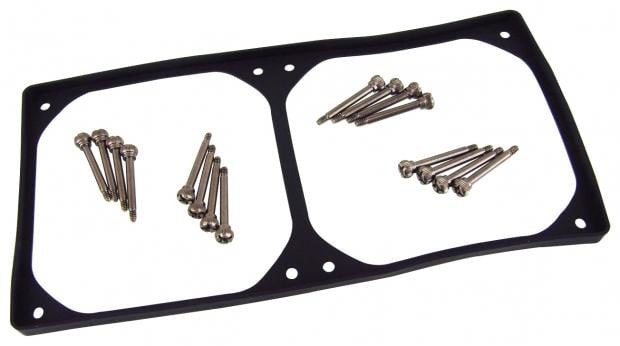
Also for the fans, we found this in the box too. There is a rubber gasket to use between fans and the radiator. Since the ones that come in the kit are already isolated with rubber rings, it implies this is for additional fans, but we will use it with the stock fans for now anyways. The long screws here are to install the fans. They have large heads and are easy to install, but the ends are also drilled, so that the short screws in the previous image, can be screwed into the ends of these, simplifying case mounting.
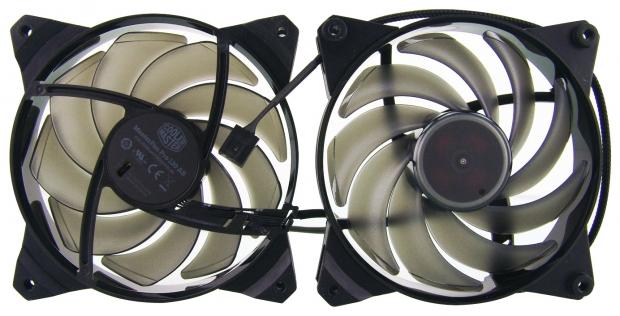
The pair of MasterFan Pro 120 AB fans is seen here with their black frames and translucent fan blades. These blades are sickle-shaped and total nine per fan, designed to move more air through and past the radiator, and well out of the chassis. These also are powered via 4-pin connections, and of course, can be PWM controlled.
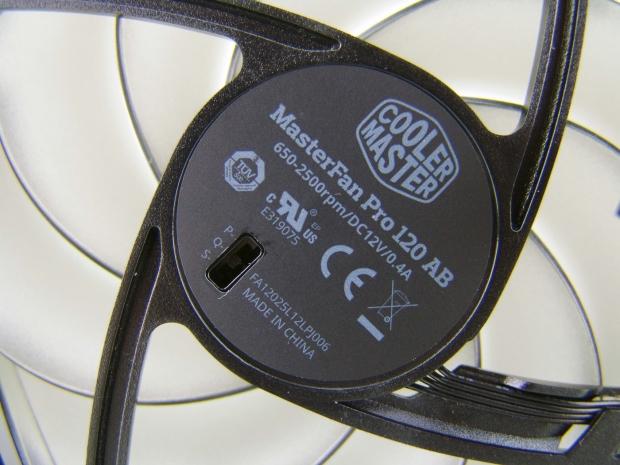
Moving in much closer to the fan hub, and the product sticker found there, we noticed a tiny switch. Just guessing the P is for power, the Q is for quiet, and the S is for silent. The reason we mention this is that the P setting is 2500RPM, the Q is 2000RPM, and the S offers an 1800RPM speed cap.
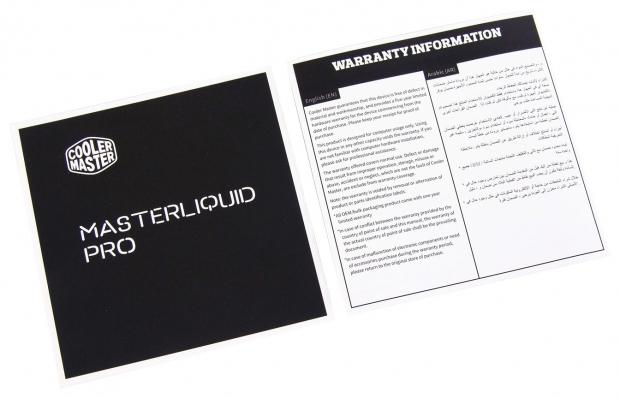
Last but not least, we found the manual and the warranty insert at the bottom of the box. The manual shows you everything from head unit hardware and mounting, on through fan installation, and even shows how to mount it into the chassis, so everything is covered for you there. If you were to run into an issue in workmanship, or an early failure with this CPU cooler, Cooler Master backs it with a five-year warranty to cover those sort of issues.
Installation and Finished Product
The first thing to do is to get the brackets mounted to the head unit. Since we test with an Intel motherboard, we installed the universal brackets for Intel to the sides. All you do is align the keyway in the bracket with a tab in the head unit, and screw it into the base with the silver screws.
We next moved on to the fan mounting. To ensure the fans do not make any noise against the radiator, we put the gasket down first and then screwed the fans into place. You can also see the holes in the ends of each fan screw so that you can use the longer screws on the other side for fans too, and using the smaller screws, mount it all right to the chassis with no hassle at all.
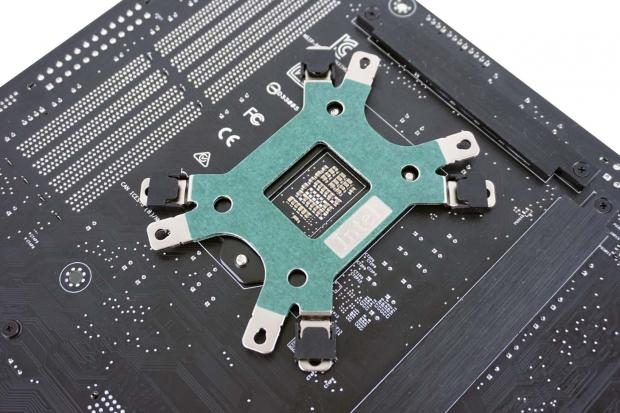
To get here, we took the studs and made sure the key either faces to the inside of the bracket, or to the outside, to help lock them in place when it comes to the head unit being mounted. Once the studs are in, they get the plastic locks placed over them, and these will adjust to notches on the side of the back plate to set for various socket sizes. It is then that we slid it in through the back of the motherboard for this image.
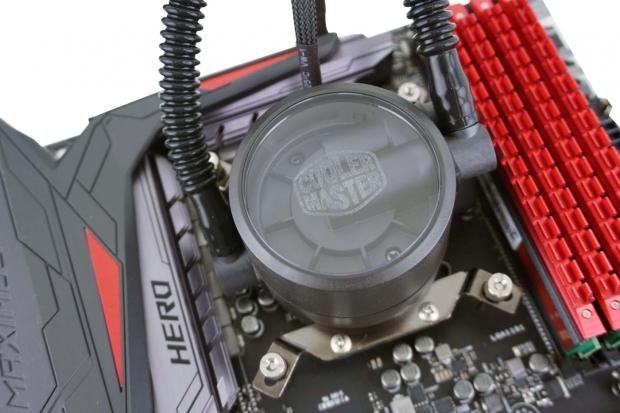
There aren't any spacers or anything to grab onto the long studs to keep it all connected to the motherboard. In this design, you simply set the head unit over the studs and using the small thumbscrews, you can lock it down onto the motherboard. To completely tighten them, there is a slot in the top to use a standard screwdriver to get to the end of the threads.
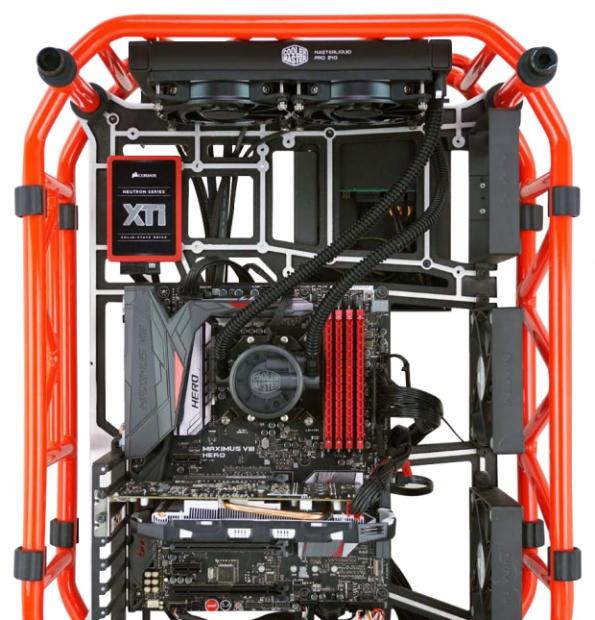
The top of this D-Frame is further away than the front is from the socket in most chassis designs, and we had no issues getting the 240mm radiator that far away from the head unit. We like the white paint on the side of the radiator telling us exactly what is cooling this CPU, and we also like the look of that head unit, shining from the clear cover, waiting to be powered up.

Once the system and MasterLiquid Pro 240 is powered on, we find the brilliant glow of blue from the LED hidden into the side of the head unit. This light not only accentuates the Cooler Master logo, but it also shows the top of the pump down below the clear top cover. This LED will always be blue and is a bit of a letdown from many other RGB offerings out there.
Test System Setup, Thermal Tests, and Noise Results
Chad's CPU Cooler Test System Specifications
- Motherboard: ASUS ROG Maximus VIII HERO (Intel Z170) - Buy from Amazon / Read our review
- CPU: Intel Core i7 6700K - Buy from Amazon / Read our review
- Memory: Patriot Viper 4 3000MHz 4X4GB - Buy from Amazon / Read our review
- Graphics Card: MSI GeForce GTX 1060 6GB OC - Buy from Amazon / Read our review
- Storage: Corsair Neutron XTi 480GB - Buy from Amazon / Read our review
- Case: INWIN D-Frame - Read our review
- Power Supply: Thermaltake Toughpower DPS 1050W - Buy from Amazon / Read our review
- OS: Microsoft Windows 10 Home 64-bit - Buy from Amazon
- Software: RealTemp 3.70, AIDA64 Engineer 5.75.3900, and CPU-z 1.77.0 x64
I would like to thank ASUS, InWin, Patriot, and Fractal Design for supplying products for me to test with.
To see our testing methodology and to find out what goes into making our charts, please refer to our CPU Cooler Testing and Methodology article for more information.
Thermal Results
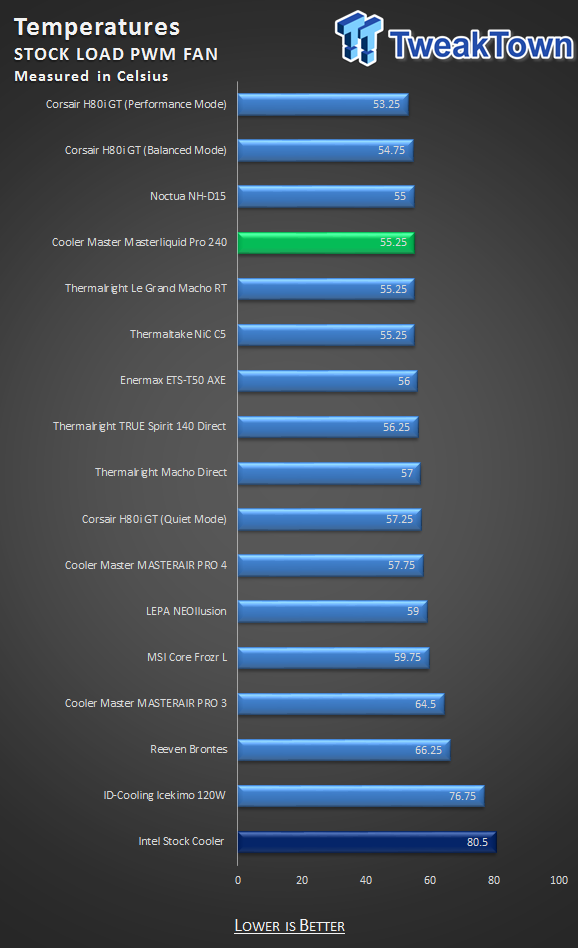
Right out of the box, and allowing the cooler to do what it does without any messing about with it, the performance starts off strong. At 55.25 degrees, the MasterLiquid 240 comes in at a respectable fourth place with the coolers we have tested thus far. We should mention, that for this, and all following testing, we did run the pump at full speed, which was reported at 948 RPM.
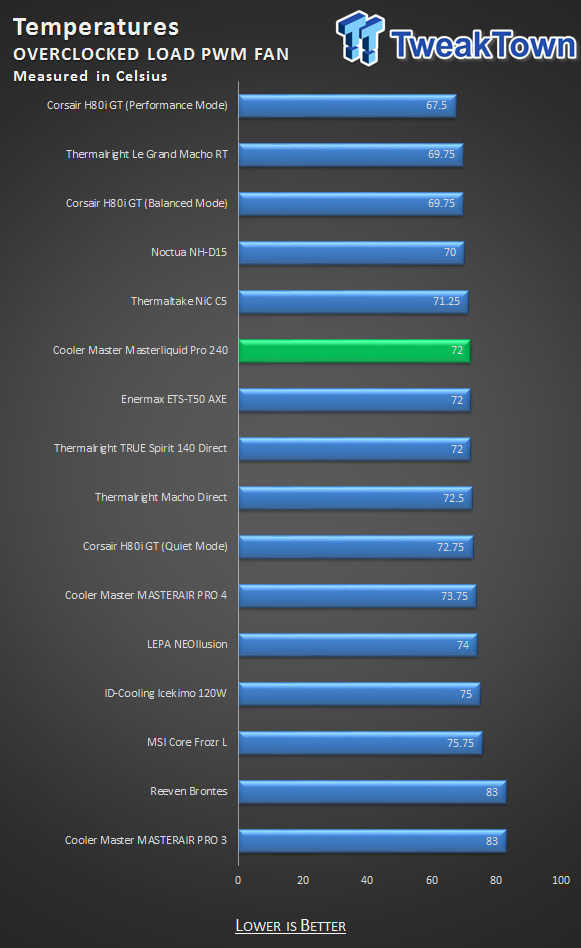
Applying the overclock, and still allowing for PWM control of the fans, the temperature jumped to 72 degrees, which is not all that bad in the grand scheme of things. However, the MasterLiquid 240 has fallen from fourth to sixth place in this test.
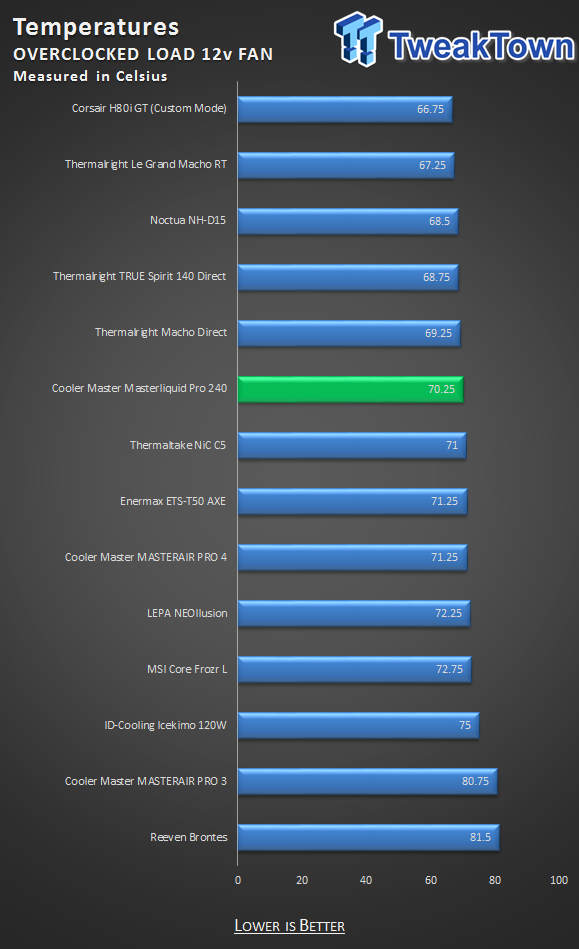
Attempting to gain every ounce of performance out of the cooler, pushing the fans at full speed, we see there is a slight reduction in temperature. The 70.25-degree result keeps the sixth place position in this run, but also shows how close the PWM fan curve is to delivering the most from this cooler, without having to deal with all the noise this test method presents.
Noise Level Results

As it is displayed in this chart, with the pair of fans turning at 1147 RPM, the 30 dB of noise seems high, but in reality it is not all that bad at all. Most descriptions of noise levels will tell you that this is the beginning of human hearing, and while we could hear a slight hum from the fans, we would in no way call this result loud.
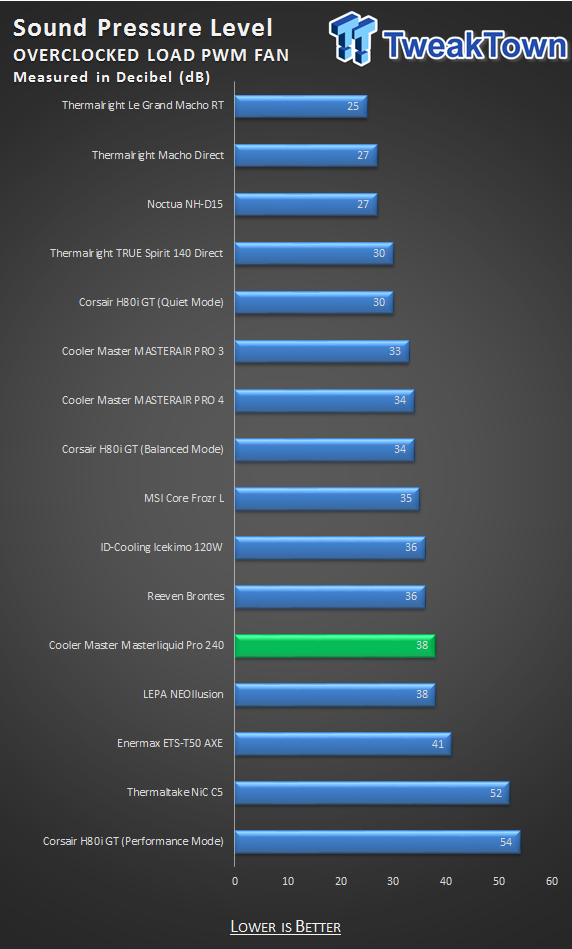
When we applied the overclock, the PWM circuitry did ramp up the fans slightly to 1636 RPM. At this time the noise does increase to 38 dB, which is noticeable in the room, but still not in the droning range of noise, and inside of a chassis, with sound directed away from the user, the noise is even less noticeable.
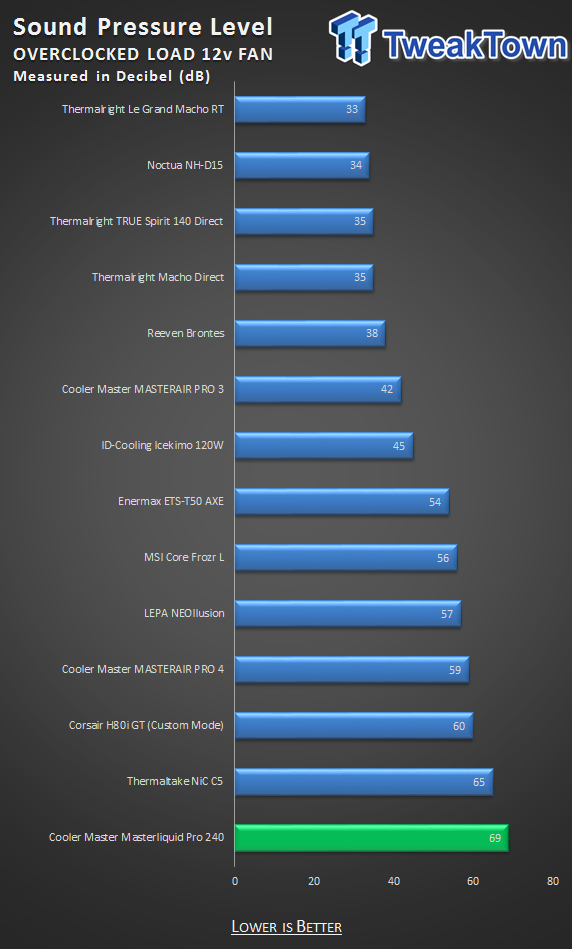
To obtain the best performance, we do not feel the extra 1.75 degrees we saw in thermal testing is worth the amount of noise produced to achieve it. At 69 dB with the fans turning at 2547, there is no way to disguise this amount of noise. Even with headphones on while gaming, you are going to hear the MasterLiquid Pro 240 if you choose to run the fans at full speed.
Final Thoughts
At first, our hopes were high, but this product diminished that for us as soon as testing begun. But there is a lot to like about this design over many others. There is the use of more typical cooler hardware, making sure the head unit mounting system will never spin in the back plate, a concern for some other makers. We liked that there was plenty of tubing length, and the move to FEP tubing to reduce evaporation even more.
We liked the sleek design of the head unit, and even being taller so they can separate the pump and cold plate, the clear top, and blue LED backlighting in it takes it over the top aesthetically compared to others who have tried this configuration in AIOs. There is the new fan thumbscrews, the rubber gasket, a splitter cable to power the fans and a slick way to mount this cooler even with four fans on it to try and capture your purchase. None the less, this is why we say to let the charts do the talking, and wait till we are done before you fall in love.
Even with fans rated higher than the specifications were telling us to expect, we feel the MasterLiquid Pro 240 should have made a better showing in the charts, especially when considering it was bested by a couple of coolers which cost half as much. We get that the design is intended to be quiet above all things performance related, but with a switch to let these fans spread their wings, delivering all that speed and noise, the performance is not worth the effort to manually control these fans.
In our testing, the PWM curve was sufficient to get nearly all of the performance available out of this cooler. If you do intend to try to run these fans at full speed, plan for the MasterLiquid to be overpowering to everything else in the room. Even if you had a window AC unit running, or music blasting, it is likely that the 69 dB from these fans will still be heard. Of course, you could opt to change the position of the fan switch to a lower setting, but with about three degrees added to each step-down, it would leave our CPU in the eighty-degree range at the lowest fan setting. While Cooler Master did a nice job with the PWM curve, and performance is not all that bad, there is not shaking the fact that you can get better results at half the price.
It is a shame, as with everything we saw on paper, and what is described on their website, we thought Cooler Master was on the right path, coming back stronger than ever. What we were delivered was off-specification, the radiator was not as described, and after rechecking our settings and making sure there was no air trapped in the head unit, we were left scratching our heads a bit with these results. All signs pointed to this being a superior design, but with potentially obnoxious sound levels, and being beaten by the Corsair H80i, we don't see a lot of users moving to this AIO unless you just have to keep with a theme for a build.
There are just too many good AIO designs out on the market already for us to justify what Cooler Master is offering in the MasterLiquid Pro kits, and with many now offering software control and RGB lighting, it almost leaves this unit in the Stone Age. As it stands, with the product we were handed to test, there just isn't enough amazement in what they do offer to make us want to advise you take this route for your next liquid CPU cooling choice.
 Lian Li B4-mATX Review: a compact mATX SFF case with excellent airflow and premium features
 Ocypus Sigma F36 BK ARGB Cooling Fan Review: high airflow and unified design in one frame
 PCCooler CPS RZ820 Display Review: a flagship-level CPU air cooler with an LCD screen
 MOAIPLAY ORA PRO G1 850W ATX 3.1 PSU Review: high efficiency and 10-year warranty for $119.99
 NZXT H6 RGB+ Compact Dual-Chamber Chassis Review
 NVIDIA is reportedly increasing the prices of its GeForce RTX GPUs due to rising memory costs
 Snapdragon X Elite laptop runs Cyberpunk 2077 using an RTX 4060 eGPU with the help of an RTX Spark development driver
 No amount of backlash will change Sony's mind on disc cancellation, says ex-Santa Monica dev
 The PS6 controller could eliminate stick drift by using magnetic joysticks
 Xbox confirms free game streaming with ads, clarifies how it'll work and ethos around monetization
 Ex-PlayStation boss can't understand why there isn't a Bloodborne remaster for PS5, but he hasn't given up hope yet
 AMD's Ryzen AI Embedded X100 Series processors are built for autonomous robots and physical AI
 AMD Helios rackscale solution for AI offers 15% more AI Compute than NVIDIA Vera Rubin NVL72
 AMD Instinct MI455X GPU launches with 432GB of HBM4 memory and next-gen CDNA 5 architecture
 AMD announces 6th Gen AMD EPYC 'Venice' CPUs, up to 256 cores and 512 threads and built for AI
 Thrustmaster T.Flight HOTAS 5 MSFS Edition Review
 SteelSeries Arctis Nova Pro Omni Wireless Headset Review - One Headset to Rule Them All
 SteelSeries Arctis Nova 7 Wireless Gen 2 Headset Review - New and Improved, But Is It Enough?
 AMD Ryzen 7 7700X3D Review - Days of Future Past
 Samsung 990 2TB SSD Review - Ninth Gen QLC at PCIe Gen4 Speeds
 ASUS ExpertBook Ultra (Panther Lake) 14" Business Laptop Review
 ASUS ROG Raikiri II Xbox Wireless Controller Review - Ready to Take Control
 MOZA FMP18 Panel Bundle Review: authentic F/A-18 Hornet cockpit controls for flight sims
 Micron 6600 ION 245.76TB Enterprise SSD Review - Best in Class Programming Speeds
 MOZA MA3F EFCM Flight Control Module Review: authentic Airbus A320 autopilot panel for simulators
 6 Mistakes to Avoid When Buying a Windows Laptop
 I capped Windows Update's bandwidth with Delivery Optimization, and my downloads stopped choking
 I use this decade-old free tool that finds files faster than Windows Search does
 I install and update most of my apps with this Windows command now, and I stopped downloading sketchy installers
 Hisense U6SF 65-inch MiniLED TV: High Performance Meets Leisurely Convenience
 I stopped digging through Windows menus after I set up this one folder
 Don't sell your Windows laptop until you do these things
 6 PC cleaning mistakes to avoid for safer hardware maintenance
 Phison and Intel Take Aim at Local AI's Memory Wall with aiDAPTIV
 How to Remap Keyboard Keys in Windows using Microsoft PowerToys