


Our Verdict
Introduction, Specifications, and Pricing
NZXT should not at this point require any introduction at this point. Not just because we recently took a look at the outgoing H series model the H500i, but because NZXT has been making chassis for a while. NZXT has carved out a niche for themselves. Their H series has become such an iconic lineup that by a mere glance, most can recognize the NZXT chassis but also associate it with the brand. Now with that being said, we are looking at one of the newest in the H series family, the H210i.
The NZXT H series is made to be a focused case designed for optimal layout and targeted cooling performance. They are also offering several features to make builds more comfortable with cable management considerations, ease of cooling installation, among many other factors.
The main features NZXT has chosen to highlight for the H210i, the predecessor to the H200i. Firstly we have an upgraded CAM smart controller. This includes double the channels for RGB along with a faster MCU to make it a better overall control unit and more responsive. Let us not forget that the control unit has three available channels for fan control (DC or PWM).
NZXT also integrated newer connectivity by adding a USB Type-C capable of USB 3.2 Gen 2 (10Gbps data rate). This will be a point of contention for me as I will explain later in this review. A lot of the features we liked about the H series are still here. Such as the cable management guides and removable cooling, mounting trays to make installations much more manageable.
Best Deals: NZXT H210i
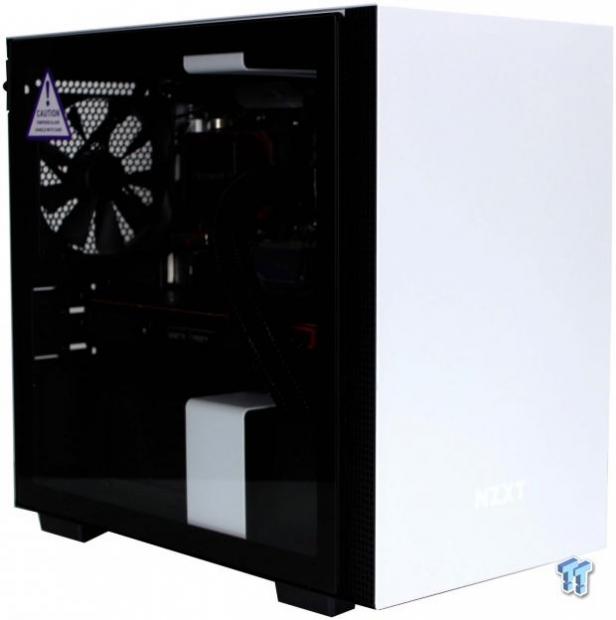
The chassis today as previously mentioned carries the H series namesake. Being the H210i, it is the successor to the H200i and a Mini-ITX variance. Now the MPN ends with -W1, which means it is a white model, and we all know that with the right case, white really can look slick although it can be a nightmare to photograph.
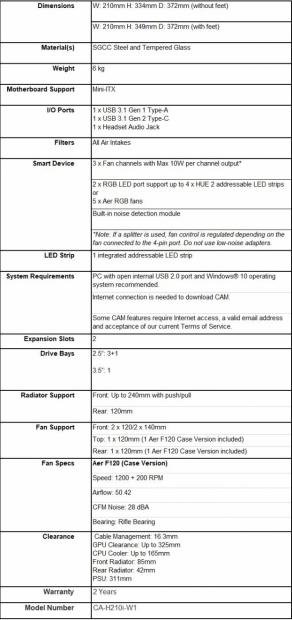
The chassis fits only Mini-ITX motherboards as it is a tiny case measuring in at only 334mm high (not including feet). The H210i can fit up to three SSD's plus one if you use the bottom mount on the floor of the chassis. HDD fitment for the H210i is one or a single large 3.5" drive which would mount on the floor of the chassis below the PSU shroud area.
Cooling for such a small box is admittedly quite good as NZXT opened up the area passing into the PSU shroud to support up to a dual 120 (240mm) liquid cooling radiator with push/pull fans. Or the front can support up to dual 120 or 140mm fans and has a removable tray to make installation easier.
Our Latest Mid-Tower Cases Review Coverage
The top and rear come preinstalled with Aer F120 case fans, and on that note, you can replace the preinstalled fans with a fan of your choice should you so choose but they will be limited to 120mm. Even with the compact nature of a Mini-ITX case, while this is not a super SFF case. It is small enough it still manages to leave enough space to connect cables and get everything set up with minimal hassle.
The H210i comes to market at an MSRP of $109.99 globally and $119.99 for USA due to imposed tariffs by the USA, a thirty or forty dollar premium over the H210 non-I version ($79.99) which does not include a CAM smart controller or included Addressable LED strip. Comparing the H210i to others on the market can be tough as the ITX market is unfortunately largely underserved. Therefore when searching in a specific price range, you may find a ton of the same models with color variances.
A few competitors we find are the Silencio S400 from Cooler Master, the Aging Bitfenix Prodigy, and the Enthoo Evolve ITX from Phanteks. Another Phanteks case we have looked at previously is the Shift and Shift X. Those being monolith style designs its tough to compare as they do not have the cooling fitment flexibility afforded to the H210i.
With all of this considered, let's dig into the new H210i and see what helps to make it worth your buck, and what just flat out does not.
Shannon's Chassis Test System Specifications
- Motherboard: ASUS ROG STRIX Z370-I Gaming (buy from Amazon)
- CPU: Intel Core i7 8700K (buy from Amazon)
- Cooler: Reeven NAIA 240 (buy from Amazon)
- Memory: Kingston HyperX Predator RGB - HX429C15PB3AK2/16
- Video Card: NVIDIA TITAN Xp Collectors Edition - Galactic Empire Edition (buy from Amazon)
- Storage: Sandisk M.2 256GB
- Power Supply: Thermaltake Toughpower Grand 1200W Gold (buy from Amazon)
- OS: Microsoft Windows 10 Home 64-bit (buy from Amazon)
Packaging
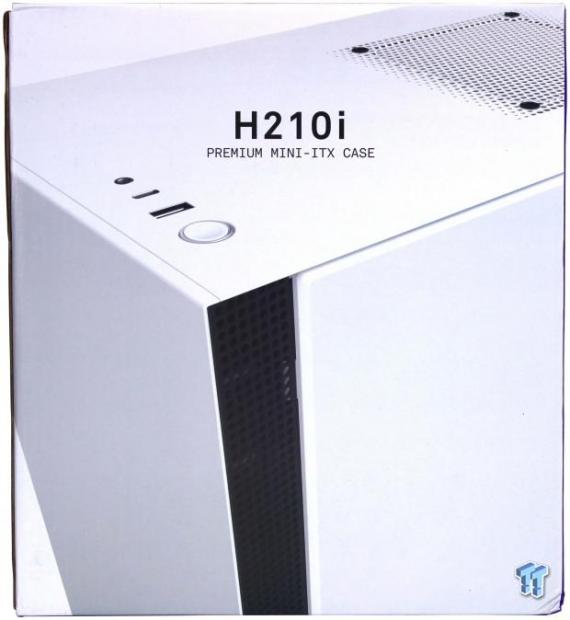
The front of the box for the H200i is simple, like we have seen on other NZXT models. It is a color box which offers a stylized shot of the top corner I/IO of an H210 series chassis, then has the name and model size.
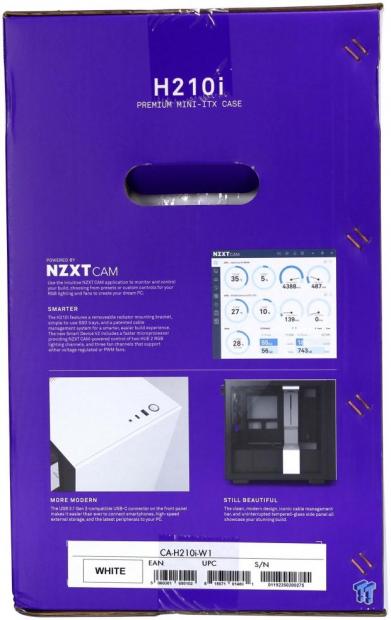
The first of the smaller sides show cam software control for the 'i series' of chassis. The box also explains the 'more modern' I/O layout as previously mentioned as it now offers a front panel Type-C connector. Lastly, the 'still beautiful' moniker with the massive open design thanks to the tempered glass main panel.
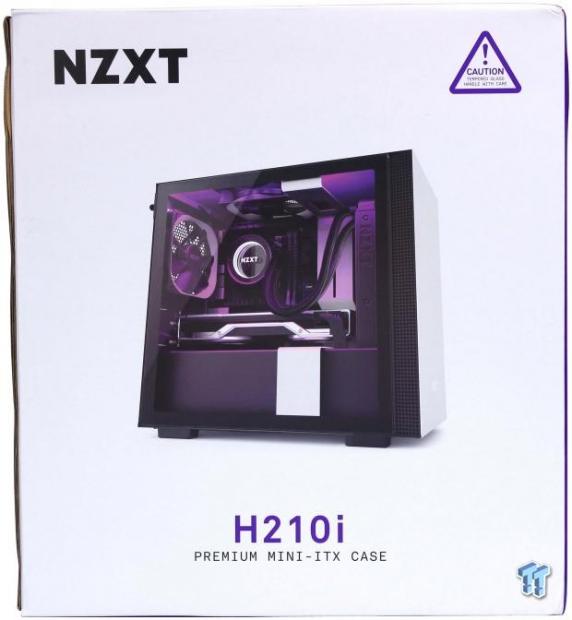
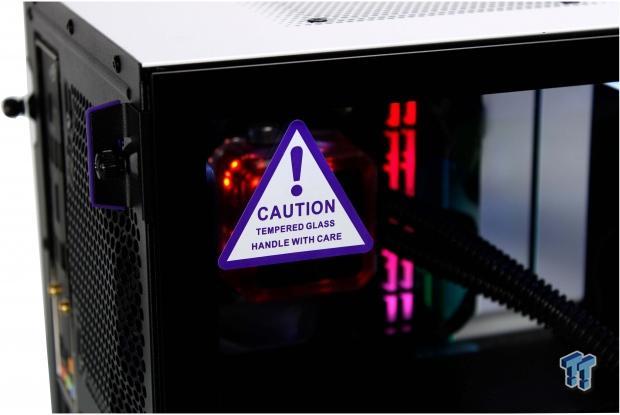
The opposing side expanse shows a full build H210i with optional components (obviously). Once again notates the model name and size. Then, of course, we have the brand name and warning that tempered glass should be handled with care to avoid breaking it.
The final smaller side we see carries a spec sheet similar to the one we listed on the previous page. We also have five bullet-pointed features to entice customers to adopt the H210i. Things such as the new smart controller with more LED channels, Faster MSU, etc. Along with the adoption of the higher Speed USB 3.2 Gen 2 Type-C port on the front panel and other features we have mentioned already. Here is where you will also find the Labels for UPC, MPN and others all in the lower white box.

The chassis comes in a plastic bag and shrouded by two hard Styrofoam end caps. The window had a film on the outer layer but not internally. This is not an issue to me as all of the internal cables and parts were well tied so they could not damage the window internally.
H210i Mini-ITX Chassis
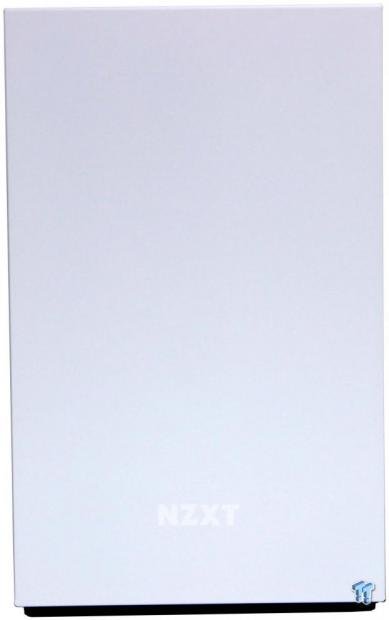
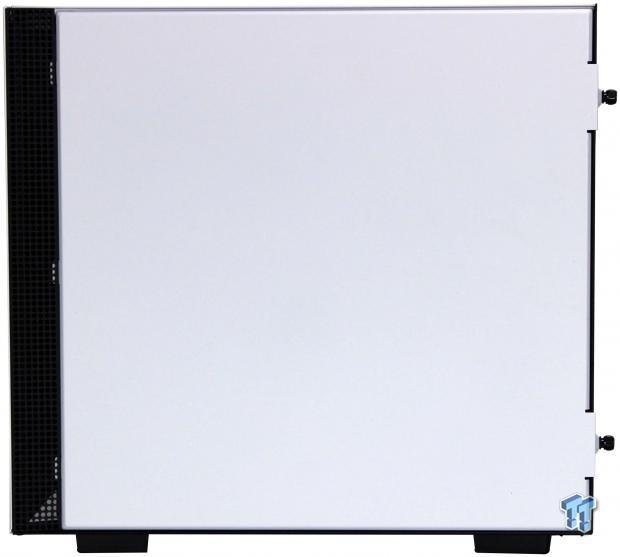
The front of the H210i is muted with mostly just a white slate visible with an NZXT logo emblazoned on the middle-lower portion. Other than that it is a clean white slate.

The top of the H210i as you can see has a single 120mm fan opening, and a fan comes preinstalled from NZXT. The white blank slate observation carries over here as well with only the fan opening and front I/O breaking the appearance.
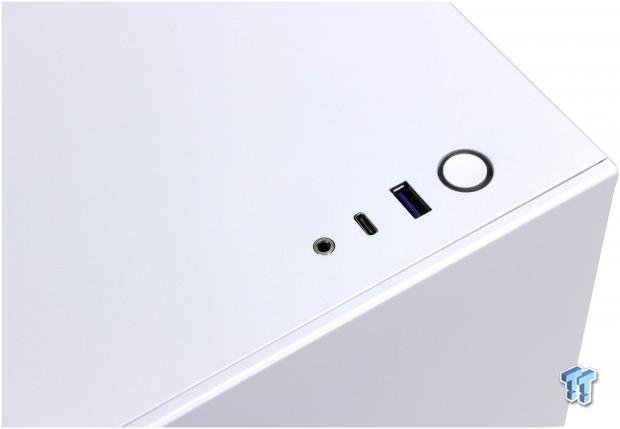
The front I/O of the H210i is the definition of scant. It has only four items, well five if we include the power/HDD lighting from left to right.
- Headphone/Mic combo 3.5mm jack (Adapter is included)
- USB 3.2 Gen 2 Type-C port
- USB 3.2 Gen 1 Type-A port
- Power Button w/power and HDD led ring surround
So as you can see, this is a minimal I/O which has enough for some users, but many may find it lacking. This is a point of contention for me as I am the type that likes to have a few ports accessible for copying between devices. Maybe an external drive or other devices I need to connect quickly and easily. I understand I do not speak for every user, but that's the first part of my issues with the I/O.
The next item I have is the waste in regards to internal connectivity, which we will look at shortly. I will close this one by saying the minimalist I/O does make the front look clean and uncluttered. This is a plus especially for keeping the relatively clean unbroken appearance of the white slate panels.
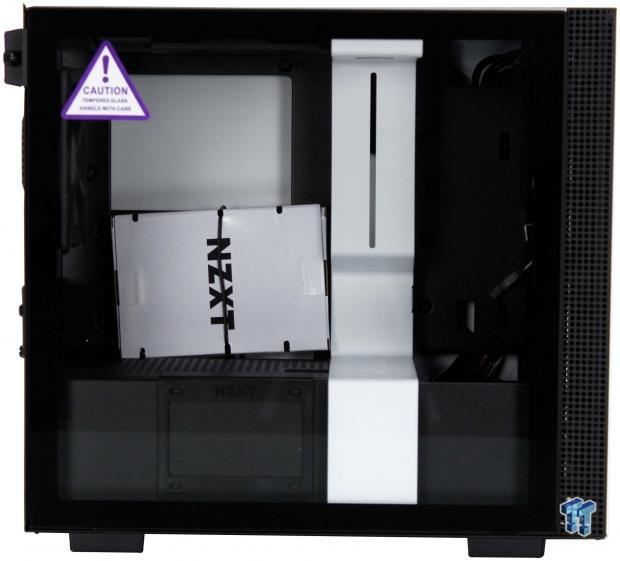
Here we see the main chamber through the glass panel. The TG panel is held on by a ball and socket snap-in retention, then fastens by a single thumbscrew at the top rear edge. Here we can see the side ventilation entrance behind the front panel. This ventilation feeds the front fan opening, which is independently filtered.
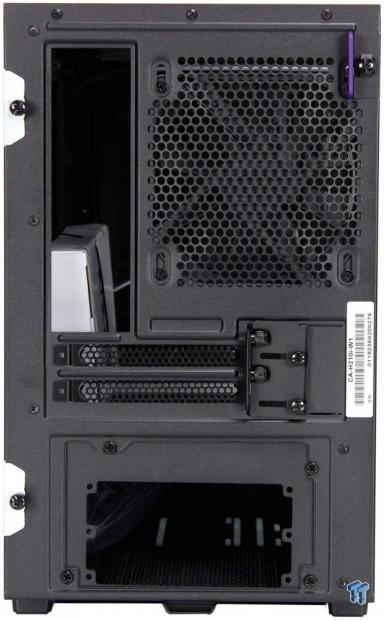
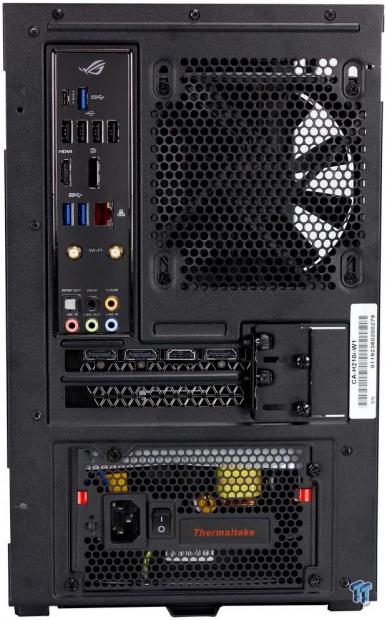
Here looking at the back of the H210i we find what looks like a standard ATX chassis if you had cut out the middle section below the second expansion slot to the PSU opening. From the top, we have the motherboard I/O shield cut-out adjacent to the preinstalled 120mm fan opening. The opening is slotted, so you have around 10-13mm of adjustment vertically.
The two expansion slot openings each have their thumb screw along with a sliding plate to help secure the slot covers or installed GPU. The PSU area is the area that caught my attention the most. It is a full-size opening but comes with an adapter plate preinstalled that allows installation of SFX supplies should you prefer or have a smaller form factor PSU already.
The cable management side of the H210i has a solid steel panel which is a blank white slate like the top and front. The panel is secured to the chassis by two captured thumbscrews on the rear. The rear panel swings away from the chassis like a door, and that means closing the panel even if packed in with cables should be a bit easier than a slide style panel. Once again, we see the ventilation grille behind the front panel.
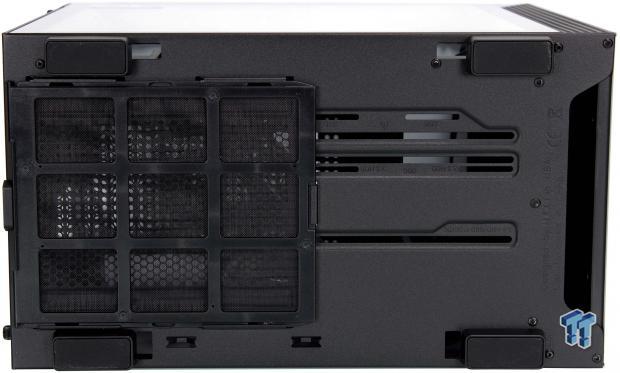
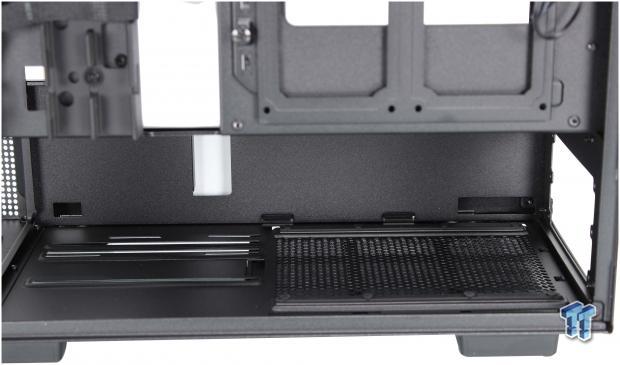
The bottom of the H210i employs a sizeable dust filter which can slide out from the rear. Below the filter is slotted mounting locations for everything from liquid cooling pumps to a full size 3.5" HDD or an SSD. There is also a straight opening you can use to pull the front panel off. This also is an open area for more air to enter the front fan area (pre-filter of course)
Inside the H210i Mini-ITX
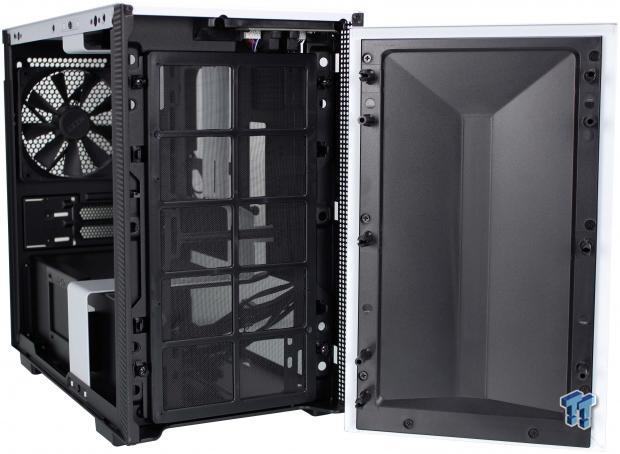
Digging into the H210i, we pull the front panel off to check out the cooling fan and radiator mounting area. Here we see it has a full-length dust filter held in with four plastic snaps. The entire tray can come out by simply removing the four thumb screws around the perimeter of the front plate.
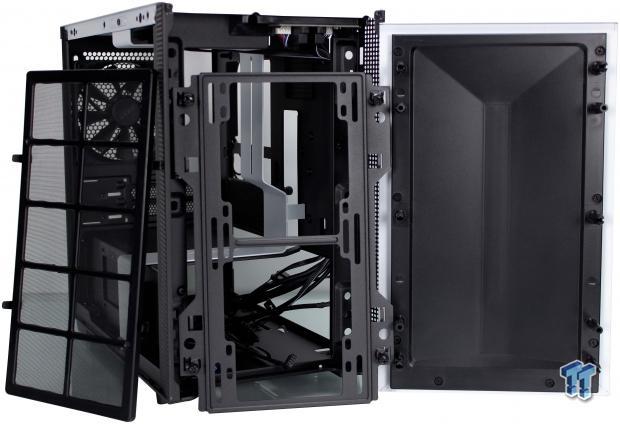
Here we take a look at the front with all of the front mounting removed. As you can see, the filter comes off for easy cleaning. And the front fan/radiator mounting plate comes out rather quickly as well to make cooling installation much more painless. All of this came out in about 2 minutes, maybe three with positioning them for the photo. The inside of the front panel has an almost trapezoidal indentation in front of the fan mount points. Based on my knowledge of acoustics, this likely will help redirect sound to reenter the chassis chamber, which may help with errant noise form components and cooling.

Looking inside, one area that always stands out is the vertical cable management bar. This, by far, is one of the coolest aspects of building in an NZXT H series case. It allows for a wide cable management opening and cables to pass into the main chamber without wrestling with grommeted holes that can look awkward depending on cable type and angle.
The area is quite open well as open as you can expect for an ITX enclosure. We can see in front of the white vertical bar where the front cooling can pass through the PSU shroud area to allow full 240mm cooling in the ITX chassis. The CPU backplate cut-out is massive and even made the M.2 slot on the rear of my board accessible.
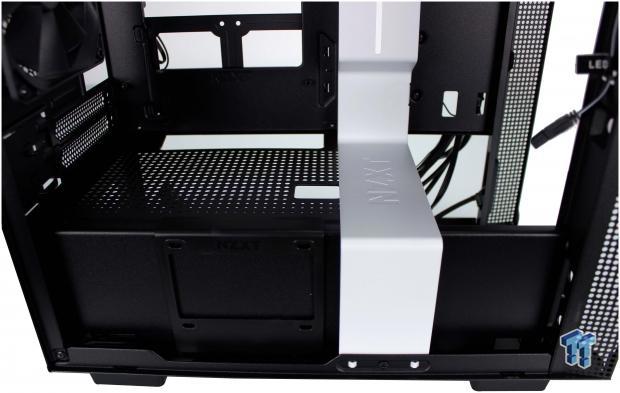
The PSU shroud area is solid on the visible side while it is ventilated on the top side. This will undoubtedly help with GPU cooling as GPUs can sit very close to the shroud area. The shroud has a pass-through hole mid-way outward to allow GPU power cables to pass through. There is also a longer pass-through hole more inboard which will work well for running a front panel or USB cables or other needed connections depending on your motherboards connector location. The front panel facing edge also has a plastic snap-in SSD tray which can then be viewed through the glass panel should you have a particularly attractive drive you want to showcase. Otherwise, the SSD tray pops off rather quickly for a cleaner look.

The rear of the chassis looking from the inside, we now can see the preinstalled 120mm fan which is routed to the integrated CAM controlled smart device. The two expansion openings you will notice are very close to the PSU shroud. This is why I mentioned the top of the shroud being vented was an excellent design. Many GPUs will likely be pulling air in from there due to the tight tolerances between the GPU and the shroud.
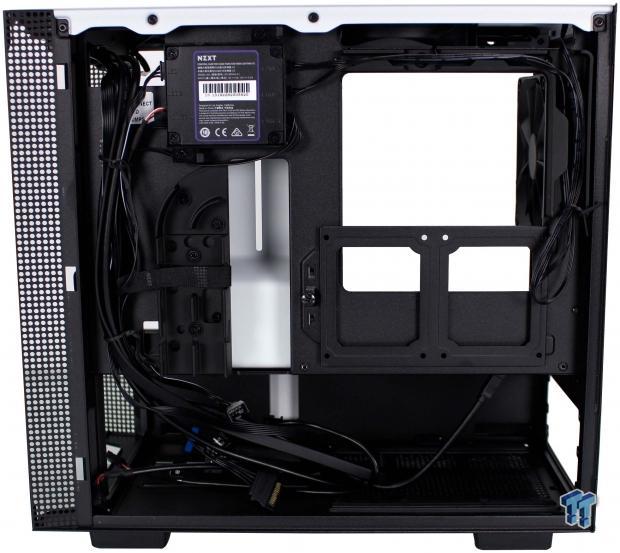
Here we have the rear cable management area of the H210i, and like the H500i we looked at recently it carries a lot of the same features. The plastic cable management guide is a helpful and welcome addition. With such a compact enclosure that would be tougher to manage cables manually, this guide helps give predefined channels to place cabling. Here we can also see the two SSD trays over the lower portion of the CPU cooler backplate cut-out. The cables you see in the lower section were bundled in a plastic bag when the chassis was unpacked, but I removed the wrapping to grab a snap of them.
Here we see the lower chamber below the PSU shroud. The PSU has virtually limitless space as long as nothing is mounted adjacent to it, but this is also where we observed the slotted mounting for pumps or drives. The PSU area has rubberized pads to help soak up vibration and also give the PSU a place to rest that is not direct metal to metal contact.
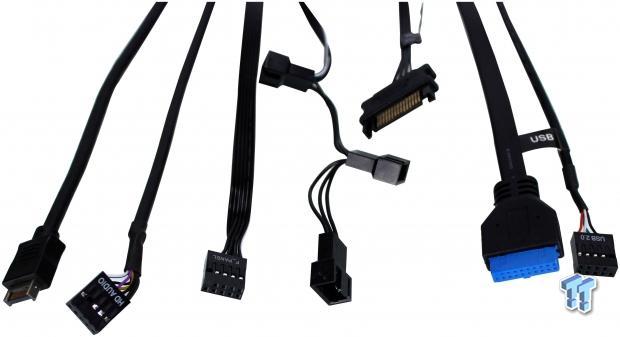
Here are the internal connectors from left to right.
- USB 3.2 Gen 2 Type-C internal connector (Feeding Type-C port)
- HD audio connector
- Front Panel connector block
- Triple fan breakout splitter from CAM device channel 3
- SATA power for CAM device
- USB 3.2 Gen 1 20 pin connector (Feeding Type-A port)
- USB 2.0 10 pin connector (For CAM device)
Now, this may seem like no big deal, but there is something which bothers me about this. Many motherboards recently have a minimal number of USB 2.0 headers, especially in the case of ITX. Same can be said for the 20-pin large connector for USB 3.2 Gen 1. The USB 2.0 used for the CAM device only uses one side, which means there is one side of the connector or an entire port which is wasted. The same happens with the 20 pin connector which feeds a single Type-A port, and therefore half of the connector is utilized. This means if you have a liquid cooler which communicates with your PC via USB 2.0 you may not have a port available without buying an internal USB hub.
This issue could have been resolved by combining the CAM powered USB 2.0 connector into the 20 pin harness. Using the appropriate four pins to give the USB 2.0 signal to the smart device and leaving the USB 2.0 header of the motherboard open for other devices which may need it. This would open up possibilities along with eliminating the dual waste we see now. I hope NZXT considers this as it would be a great way to reduce the cables needing to be managed and make the H series a smarter, less wasteful solution.
Hardware & Documentation

The hardware included Left to right (sort of)
- Adjustable GPU support (snaps into vent holes in PSU shroud)
- Six Hexagonal screws for PSU mounting
- Eight 6-32 x 5mm screws for motherboard and HDD mounting
- Sixteen M3 x 5mm screws for 2.5" drive installation
- Eight KB5 x 10mm Screws for fan mounting
- Standoff installation tool
- Front panel connector breakout tool (for non-standard connector layout)
- Single four-pole 3.5mm jack adapter to dual connector Mic/Headphone
- Ten zip ties for cable management
This is a pretty stout accessory pack for an ITX case. I am not left wanting in any area; everything I could think of needing for a build is here. I want to state something I have said before but bears repeating. NZXT did something awesome by creating a connector for the front panel with the standard layout. Every common board I have used recently has this layout, and it's much easier than the tiny front panel connectors. I'm sure many of you will agree, especially if you have massive mitts as I do.

Here we have the manual, and in standard NZXT style, it is a multi-fold page which has quite a lot of information along with pictographs for each component installation. The best part is NZXT lists all fasteners we just discussed along with their intended usage. NZXT even lists how many come in the accessory pack vs. already installed in the chassis which is very nice for quickly confirming you have everything you need for your build. Admittedly it also helped me realize where the 3.5" HDD mounted as it had escaped me that it mounted on the floor area of the chassis.
Case Build & Finished Product

Now that we have built our entire system, we get to give it another look. First, we take a look at the front, and as you can see, I could technically use the original image here. But I did not as the front styling doesn't change and that means that while we could have all kinds of cool RGB components, you would never be able to tell by simply looking at the blank slate that is the front of an NZXT H series. This helps the H series of chassis to fit into offices or home theaters rather easily. Especially if you are tucking it into other equipment where you will only see the front, it could perfectly match a chic setup.

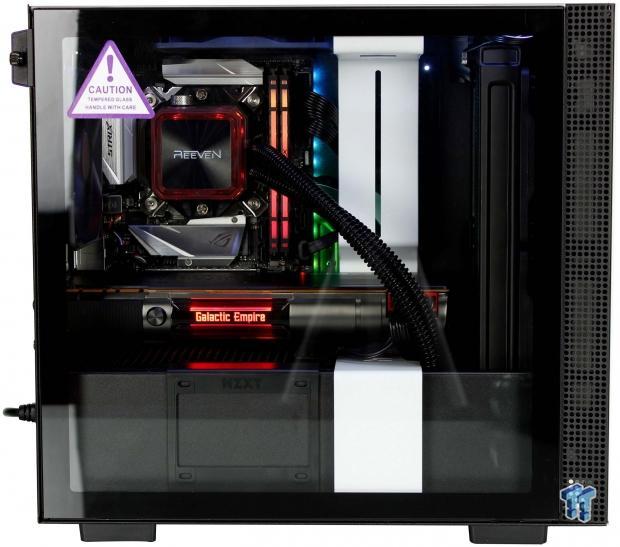
Here, we see the full build in the H210i, and while it may look tight in there, in reality, everything went in rather smoothly. We even fit a monster TITAN Xp graphics card which is massive horsepower for a tiny rig. The front liquid cooler can be pulled with the removal of the four thumbscrews on the front bracket to make ample clearance should you want to swap internal components with more freedom.
Do note that we installed the radiator and fans inside the bracket as installing fans outside the bracket behind the front panel would not only omit the dust filter but would severely hamper airflow and cooling performance. Had we opted for push/pull on the radiator we would have had to have gone for a shorter GPU by about 10mm to ensure proper fitment.
The rear area is completely stuffed as you can see we went with a large full-size PSU even though we did not need to, to show precisely how much room the H210i has internally.
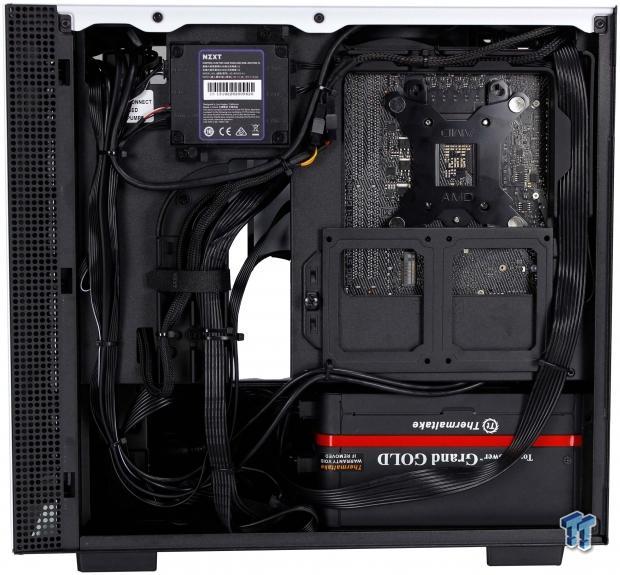
Here we see the H210i fully built, and cable managed. We used a large PSU to show in the worst-case scenario what you would be dealing with to build within. Even with the extra cable length it all was tied back or tucked under the PSU shroud to avoid excess clutter, or a doubled over cable clump which can press the panel outward. If you had a PSU like our standard Silverstone unit with shorter cables, you would be able to achieve much more efficient build. One thing to note is that there are not tons of cable tie-down locations at the lower edge of the motherboard tray, so I found the SSD trays work fine if you do not have drives mounted there.
Here it is, the H210i fully built but not powered. In its dormant state, the interior is dark enough that we can make out some components, but they are mostly shrouded in the dark.

Now we have the H210i powered on with our built rig, and I must say, with the internal light strip up top and the LEDs for the components this rig has a quite menacing aesthetic and the horsepower to back it up.
Final Thoughts
When I first received the H210i, I was excited to see what improvements NZXT had made as I do rather enjoy building in their cases. When I unpacked the case and saw how small it was I had a good reason for panic as I looked at my hands and realized my hand with fingers extended can eclipse over 70% of the rear I/O and 50-60% of the large main panels. I immediately felt a sense of dread at the thought of working in such tight confines.
Much to my appreciation, the H210i was not super hard to work in, except for having to pull the front radiator tray to maneuver the GPU into place as it was a bit too close to get it past the tubes with the small space between the GPU end and the radiator.
Thermally the H210i did very well as it comes preinstalled with dual 120mm exhaust fans and with the dual radiator fans pulling air into the chassis it kept things cool with CPU averaging T of 47.3C over ambient. The GPU topped out at a T of 57.8C over ambient which is similar to what I have seen with the same card in another more sizeable chassis. The H210i from NZXT has passing thermal results, I would be interested to see how one of the thicker multi fan AIB GPUs would breathe in this chassis, and if I get the chance, I may test that later to see how well that PSU shroud ventilation works.
Cases are always interesting as a lot comes down to experience building and personal style. With that being said, some of the things I liked about the H210i would be the fact that it is a diminutive footprint yet can house massive horsepower and cool it effectively. The fact that the front can be removed and the cooling tray pops out easily to not only maintain but install needed parts with an even freer open space to work within.
The new smart device is nice and very responsive although I prefer default white lighting it was set at as it gave just enough light to highlight the system without blasting it with odd colors or throwing off the flow of the other devices. The preinstalled fans ramped with heavy system load but never reached a level which was annoying or even noticeable at a reasonable usage distance of a few feet.
There's not a ton that I do not like about the H210i, but there are some areas I would like to see improved. Firstly to nobodies surprise it's the waste of internal connectivity. With the standard H200i, we had dual top Type-A ports which used the entire 20-pin connector so that I can excuse NZXT using the USB 2.0 header for the smart device. But in the case of the H210i, we now have a separate connector for the Type-C port and only half of each the USB 2.0 and USB 3.2 Gen 1 connector which means two ports worth of connectivity are forfeit.
This may not be a big deal to some of you but for those who need the USB 2.0 for your AIO connection (which NZXT Kraken AIO's use USB 2.0) you would be out of luck with the H210i without purchasing a USB 2.0 hub separately to ensure you could split the connector to other devices which mean more cable clutter where the USB 2.0 for the smart device would have used the other side of the 20-pin connector. I'm not going to beat NZXT over the head for this, but it did have to be mentioned.
With everything we observed and mentioned in this review, does the H210i stand up to the challenge and win over a recommendation to earn your hard-earned cash? Well, I would have to say yes, there are not many cases that have the features we have seen today, the only one that comes close in my mind would be the aging Phanteks Enthoo Evolve ITX which does not have the same blank slate aesthetic, smart controller or ARGB lighting. What the Evolve does have is dual 120 mounting at the top and front. So with that being considered, the H210i has a lot going for it and deserves a recommendation.
While some areas can be improved, NZXT made one hell of a potent ITX case in the H210i!
Shannon's Chassis Test System Specifications
- Motherboard: ASUS ROG STRIX Z370-I Gaming (buy from Amazon)
- CPU: Intel Core i7 8700K (buy from Amazon)
- Cooler: Reeven NAIA 240 (buy from Amazon)
- Memory: Kingston HyperX Predator RGB - HX429C15PB3AK2/16
- Video Card: NVIDIA TITAN Xp Collectors Edition - Galactic Empire Edition (buy from Amazon)
- Storage: Sandisk M.2 256GB
- Power Supply: Thermaltake Toughpower Grand 1200W Gold (buy from Amazon)
- OS: Microsoft Windows 10 Home 64-bit (buy from Amazon)
 Lian Li B4-mATX Review: a compact mATX SFF case with excellent airflow and premium features
 Ocypus Sigma F36 BK ARGB Cooling Fan Review: high airflow and unified design in one frame
 PCCooler CPS RZ820 Display Review: a flagship-level CPU air cooler with an LCD screen
 MOAIPLAY ORA PRO G1 850W ATX 3.1 PSU Review: high efficiency and 10-year warranty for $119.99
 NZXT H6 RGB+ Compact Dual-Chamber Chassis Review
 Assassin's Creed Black Flag Resynced sells over 5 times more copies than AC Shadows on Steam
 Obsidian to make a new Fallout game led by New Vegas director
 Even DDR4 RAM is not safe from the RAMpocalypse, prices rose over 50% in Q3 2026
 PlayStation Disc Phaseout Saga: What You Need to Know
 Samsung's first PCIe 6.0 SSD is now in mass production with ridiculous speeds
 Xbox's Elder Scrolls 6 strategy looks shakier after Bethesda layoffs
 The dreaded Steam Machine 'Red Line of Death' was fixed after a simple CMOS reset
 Samsung confirms next-gen Snapdragon power for its new foldable phones
 Apple's foldable iPhone may finally be ready for prime time in 2026
 Earth could escape being swallowed by the dying Sun, scientists say
 MOZA MGX1000 Instrument Panel Review: a realistic Garmin G1000 replica for immersive flight sims
 Simagic Zeus Formula Steering Wheel Review: premium build and advanced inputs for F1 racing
 GIGABYTE X870E Aero X3D Dark Wood Review - A woody goody
 The Super Mario Galaxy Movie (2026) 4K Ultra HD Blu-ray Review
 KTC H49S66 5K2K (5120x1440) 49-inch 180Hz Gaming Monitor Review
 HighPoint Rocket 1604L Gen5 x16 NVMe Software RAID AIC Review: half the price with full 59 GB/s speed
 Next Level Racing ERS3 Haptic Seat Review: immersive sim racing comfort with integrated haptics
 ASUS TUF Gaming X870-Pro WiFi7 W NEO Review - Tuffed up
 GIGABYTE GO27Q24G Gaming Monitor Review: Glossy OLED Gaming at 240Hz
 Don't sell your Windows laptop until you do these things
 6 PC cleaning mistakes to avoid for safer hardware maintenance
 Phison and Intel Take Aim at Local AI's Memory Wall with aiDAPTIV
 How to Remap Keyboard Keys in Windows using Microsoft PowerToys
 7 tips to organize your Windows files for faster, easier access
 Intel Arc G3 Extreme first impressions with MSI's Claw 8 EX AI+ - Incredible power for an extreme price
 How to fix Wi-Fi Adapter Not Working on Windows laptops: troubleshooting tips
 Hisense U7SG 4K TV: Modern Entertainment for the New Age
 6 underrated Microsoft Word features worth using to boost your productivity
 Level Up Your PC Gaming with these Fantastic ASUS Prime Day Deals on GPUs, Motherboards, and More