


Our Verdict
Introduction, Specifications, and Pricing
Aercool has come a long way over the years, and nowhere is it more apparent to us then when we get hands-on with one of their new cases. Aerocool harkens back to the days when cable management was still a few and far between inclusions. Our last Aerocool analysis was a bit more on the higher spectrum with the Aerocool Project 7, which was quite well received at the $105 price point.
Today however we are looking at something much different with the new Aerocool Cylon.
The Cylon is at its core, a very value-oriented option while trying to address some of the features many gamers look for.
The Aerocool Cylon while being a very budget oriented chassis it still has some of the features many are looking for. The inclusion of a PSU cover, Addressable RGB on the front panel and a see-through side panel to name a few.
Best Deals: AeroCool Cylon RGB Mid Tower with Acrylic Side Window, Black
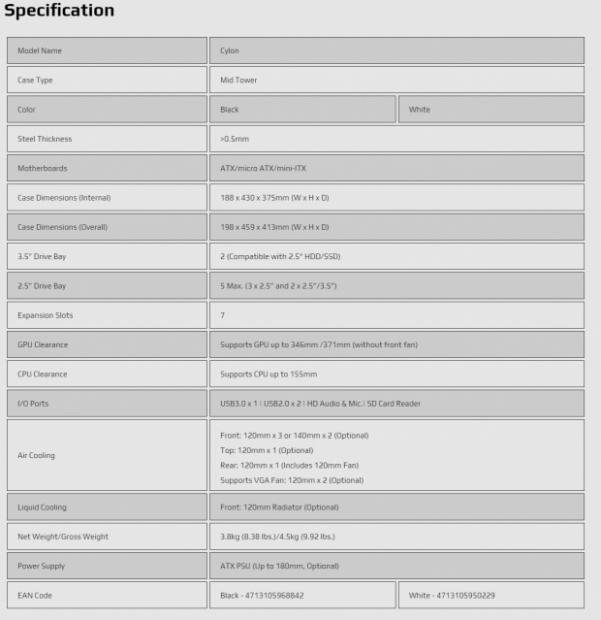
The chassis as you see from the specs list we 'borrowed' from Aerocools website shows the Cylon comes in as a reported mid-tower. Measuring in at 198mm Wide by 459mm height and 413mm deep. The 459mm height puts us just above what has traditionally accepted a mid-tower sizing for height.
Also listed, is the motherboard support which is mITX, mATX and up to full ATX. Drive fitments are reported as five total with three 2.5" dedicated mounts and two 3.5" trays which can also mount 2.5" drives as well. The power supply is full ATX models fitting up to 180mm as listed, which means our standard 160mm unit should fit without issues.
The cooling fitment is the first part where I got a bit worried as most budget cases typically do not have a ton of radiator fitment capabilities, and the Cylon does not break that mold. Listed radiator fitment is only a single 120mm in the front panel of the chassis which means we will likely be moving to our air cooled case tests system instead of our standard Z390 test setup we traditionally use with the H100i.
Our Latest Mid-Tower Cases Review Coverage
Fan fitment is listed as triple 120mm fans in the front or dual 140s should you so choose. However, it is worth noting that we could NOT find any 140mm mounting in the Cylon, so I must assume this was an error on AeroCool's part. While the top can fit a single 120 and the rear a single 120mm as well, there is also a listed dual 120mm fan for what is listed as VGA fans which are Aerocools way of saying, you can mount fans to the PSU shroud. CPU cooler height is limited to 155mm, which means you can fit many of the higher-end air coolers on the market in the Cylon. The Cylon comes out of the box with a single 120mm fan preinstalled in the rear exhaust position.
The Cylon is available from Amazon at $46.99 at the time of writing. The sub 50 dollar price point is usually a quite interesting place to look at cases. We see many cases with the same design which denotes a situation where companies rebrand an OEM chassis generally from China and add a logo or sometimes pay to have a unique external piece such as front panel to help make it unique from the others offering the same model. The Cylon is similar as I know I have come across a similar layout chassis with a similar front I/O layout in the previous few years.
To be fair to the Cylon, and other cases at this price point. There's not much you can do at this price point to buck the tradition as tooling itself to create an entirely new chassis at this price point can be counter-intuitive. The chance of making back your R&D and tooling cost would be hard at such a low price point. This is something we have to consider when we analyze a chassis such as the Cylon.
Shannon's Chassis Test System Specifications
- Motherboard: ASUS STRIX Z370-G Gaming (buy from Amazon)
- CPU: Intel Core i7 8700K (buy from Amazon)
- Cooler: Skythe Fuma Rev. B (buy from Amazon)
- Memory: GeIL Super Luce RGB GLS416GB3600C16ADC
- Video Card: MSI GeForce RTX 2060 Gaming Z (buy from Amazon)
- Storage: Sandisk M.2 256GB
- Power Supply: Enermax Platimax DF 1050W (buy from Amazon)
- OS: Microsoft Windows 10 Home 64-bit (buy from Amazon)
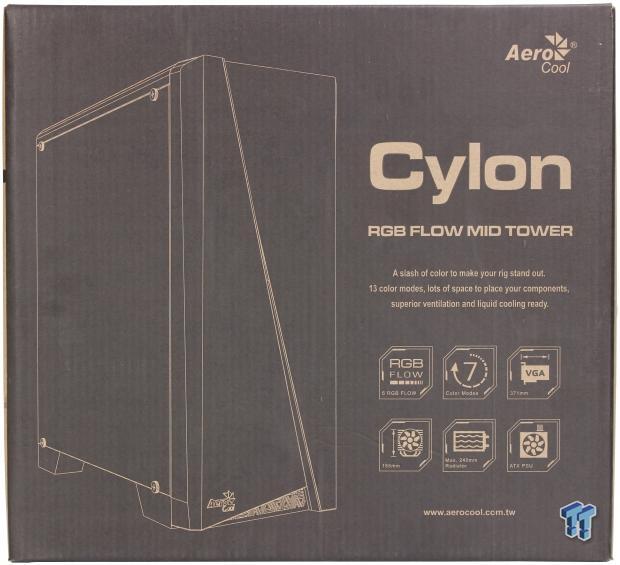
Packaging
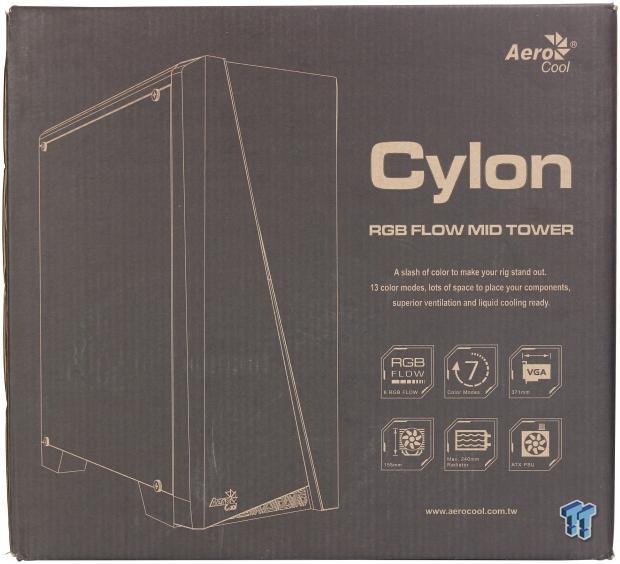
The Cylon comes in a mostly black printed box with a lighter hue outlining the lines of the chassis. There are also some key marketing points and features to help better explain what the Cylon is made for and capable of. One area of concern is that the box shows up to 240mm radiator whereas the box shows' max 240mm radiator'.
I'm not sure what that's about, but since Aerocools website and specs list it as 120mm only, I must assume something in the marketing and design for the box went wrong on this one. (Note: I did find that you can indeed mount a 240mm radiator to the removable 5.25" breakaway cover, but I did opt to avoid that and instead went with a more suitable air cooled testbench)
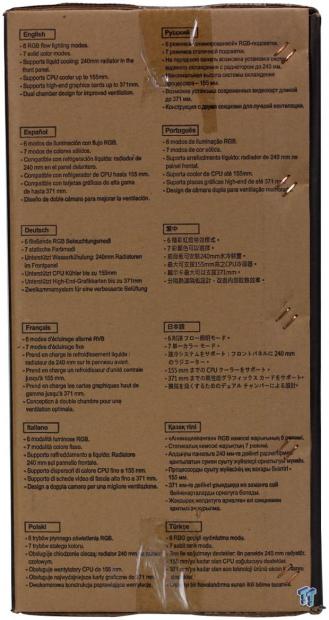
Here Aerocool lists some of the key marketing points for the Cylon in several languages. Mainly RGB lighting, the possibly mistaken radiator fitment, and max GPU and CPU cooler sizes. And of course a notation of a dual chamber design which is what Aerocool is calling the inclusion of a PSU shroud.
Here we see the large opposing side of the box is unchanged and precisely the same as the first side.
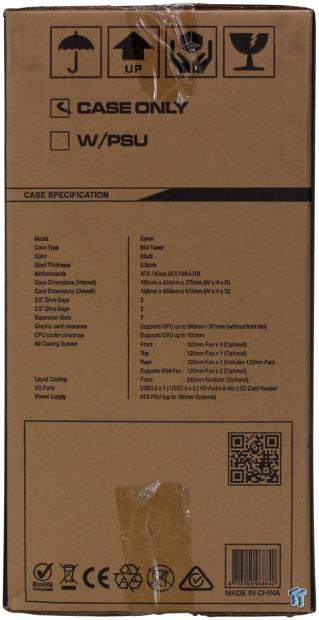
The final skinny side of the packaging lists out the spec sheet which differs from the one we copied from Aerocool's website for the Cylon. Also, note there is a checkbox at the top of the box showing with or without PSU.
Lower cost chassis like this tend to come with options to include a budget PSU as well, and usually show up as barebones kits you can buy from some electronics retailers or etailers. This also is something that many system integrators may use for budget type builds where cost is the highest concern for a user looking for a more basic configuration.

The packaging is hard Styrofoam end caps enveloping the top and bottom of the chassis. The case is also wrapped in a plastic bag to avoid marring of the surfaces during any vibration in transit.
Aerocool Cylon Mid-Tower Chassis
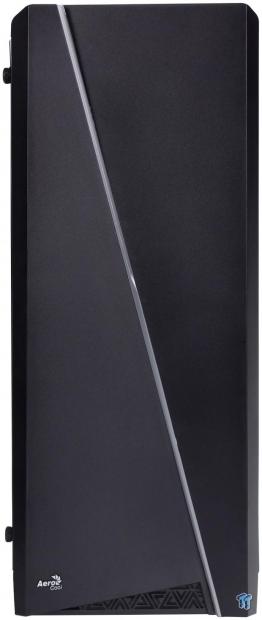
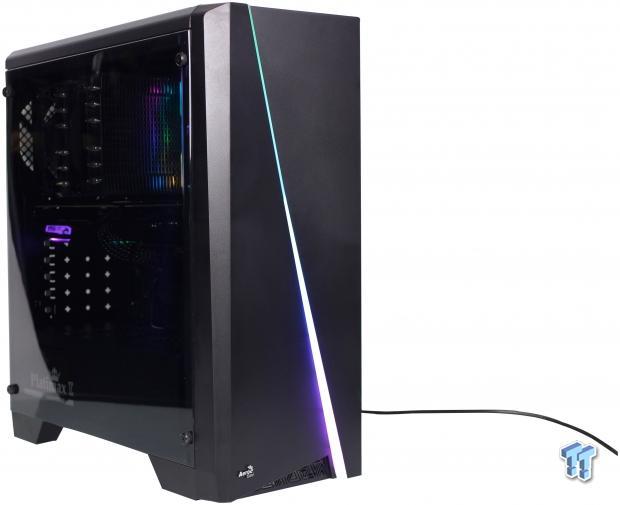
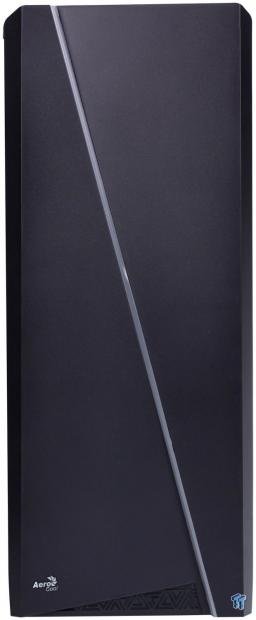
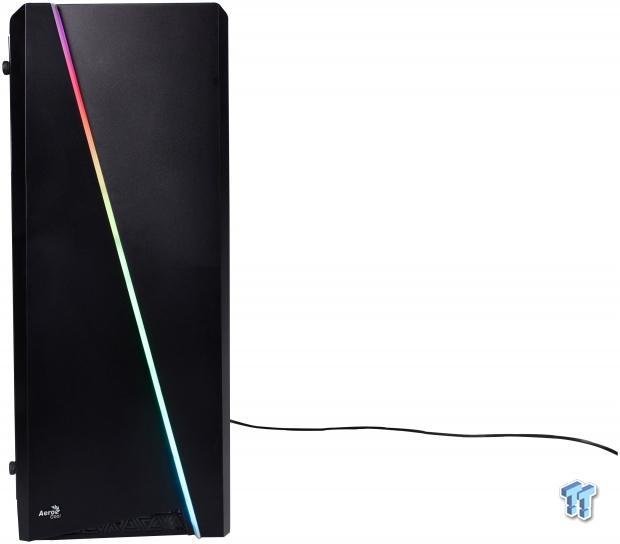
The front is a matte black/gray plastic with a defined break in the styling running diagonally from left top to bottom right. This just looks like a styling piece with a white plastic break, but being that I had reviewed the website previous to imaging and writing I knew this was an ARGB backlit split in the design which adds some rainbow or adjustable color aesthetic. There is also a V or triangular shape in the plastic at the lower edge, which is a pass-through and would allow a minor amount of air through.
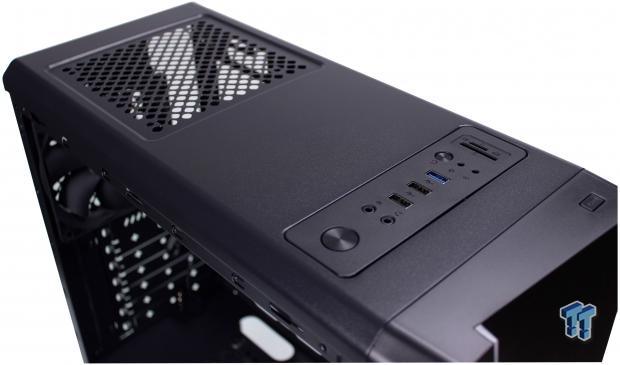
The top of the chassis has a front located rectangle which houses all of the front I/O which we will get to shortly. The rest of the top is solid steel paneling with a 120mm sized vent right above the CPU socket area of the where an installed motherboard would be. A magnetically attached dust filter screen filters the opening. Toward the front most section of the front panel, there is an LED button which is separate from the IO and is used to control the front mounted ARGB lighting effects.
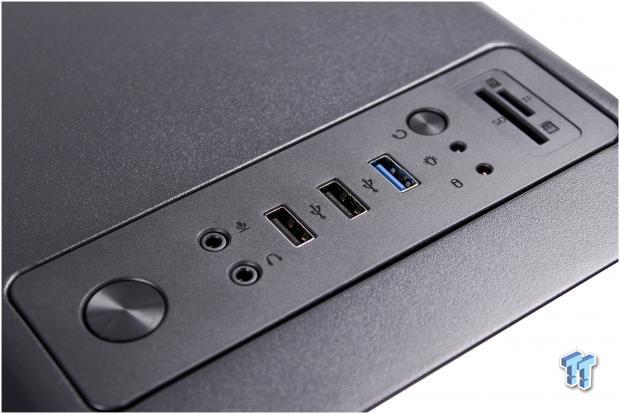
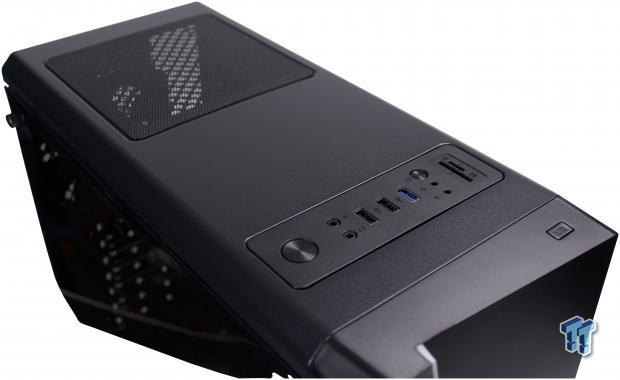
The I/O is fixed to the top of the Cylon chassis and has an interesting mix of ports. Starting from left to right we have a power button, headphone and microphone jacks, dual USB 2.0 ports, a single USB 3.2 Gen 1 port a reset switch, power and HDD LED's and a card reader supporting Micro SD and SD cards. These ports are connected internally via USB 2.0 although I do wish it was 3.2 Gen 1 so that users of current generation SD and Micro SD cards could take advantage of their speeds.
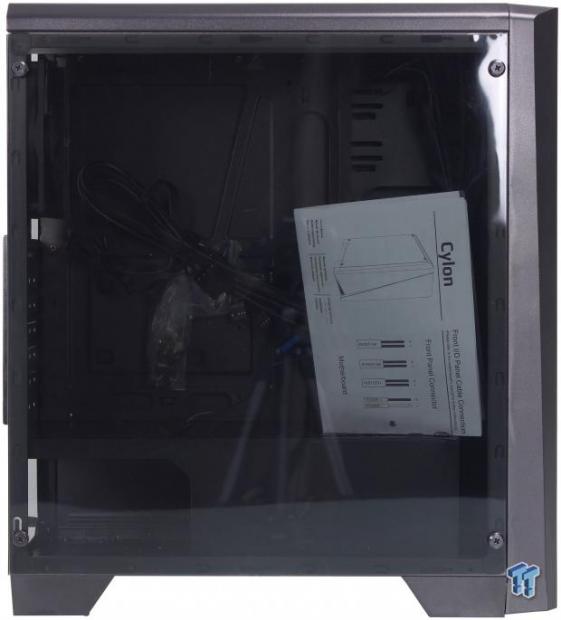
The primary component side of the Cylon shows it has a transparent window. However, unlike the current trend of tempered glass everywhere Aerocool instead opts for acrylic, which at this point is pretty much expected.
We have seen what happens when manufacturers try to shoehorn tempered glass into an extremely budget chassis and it usually ends up with a pretty side panel and a higher price which is generally not very good for the users, so I'm ok with this. The one thing I do wish was better was securing the internal wiring and instructions since they are free to move about the case due to how they are tied in and could potentially scratch the delicate panel.
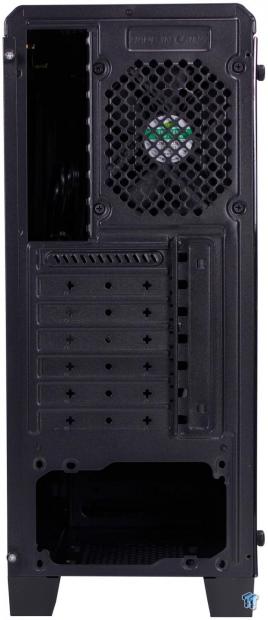
The rear of the Cylon is relatively standard for a budget case even having something we have not seen in a while. The breakaway PCIe slot covers. This is a sure sign of a cheaper model case as they do not have slot covers but instead, breakaway metal slats that cannot be reinstalled should component usage change. The exhaust fan is included, and you can see the 120mm fan mount here which looks to fit with the Motherboard IO shield cutout barely.
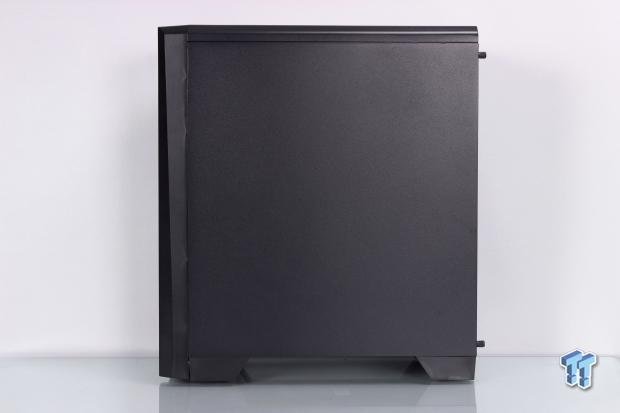
The other main side panel covering the cable management side of the chassis is a solid steel panel in the same color as the rest of the frame. It is fixed to the chassis via dual thumbscrews which are plastic slotted to give a better grip for removal and installation by hand.
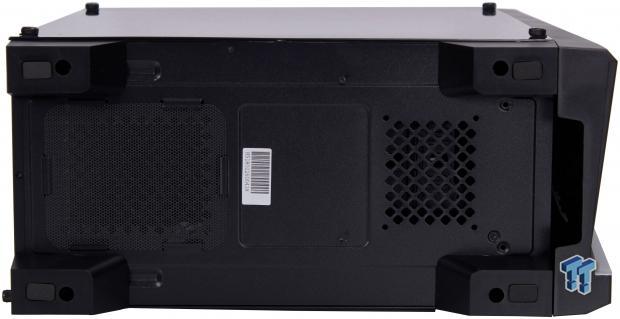
The bottom of the Cylon has four large plastic feet with small rubber pads held on with adhesive. This should help the chassis from skidding across a desk. The lower ventilation for the PSU is filtered with a mesh screen which must be bent to remove from the tabs, but at least it's filtered. The front area near the HDD's, however, deploys a grated opening which is not filtered and to be completely honest I'm not sure why it's here at all.
It almost appears to have the footprint or mounting for an SSD but flat amounting at the bottom of the case would be hell with PSU and data connection, so I must assume this is a leftover tooling application for another design using this base chassis. Lastly, we also see the main area of air ingress for the front with the grab handle portion for removing the front panel. This will likely be where most of the air comes from to enter the front of the Cylon.
Inside the Aerocool Cylon Mid-Tower Chassis
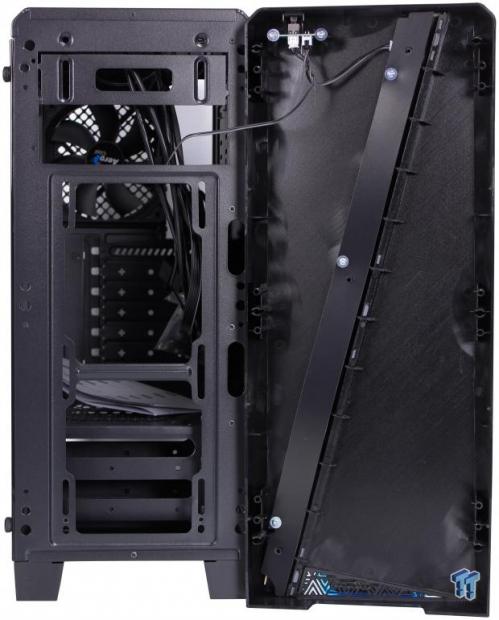
The front panel pops off rather quickly with a tug. It is secured by plastic clips which retain it with a press fit. There is a single, dual lead wire which tethers the front panel to the Cylon. That wire connects power to the small ARGB control for the front panel adjustable illumination. The front panel is all plastic, and the internal mounting of the fans does not have any dust filtration, so something to consider if you are concerned about debris ingress is you may want to pick up some aftermarket dust filters to cover this large opening.
One more thing to note here is the breakaway 5.25" cover which offers an opening you would generally have in place for a DVD/CB/Blu Ray player or even card reader or fan control in front. As we see there are not bays in the front panel which is further evidence of what I had mentioned earlier in regards to reuse of the same base chassis or tooling to meet the needs for a value based chassis.

The Cylon is a relatively blank slate for being such a diminutive chassis. We can observe straight off the bat that the metal quality if pretty thin as evidenced by the multiple light reflections from our photo lights and the metal having slight warms causing dark and light spot variations just going across an area you expect to be flat. This is not inherently surprising on its own as for a chassis in this price range it is not likely to have super thick steel as that would raise the cost substantially.
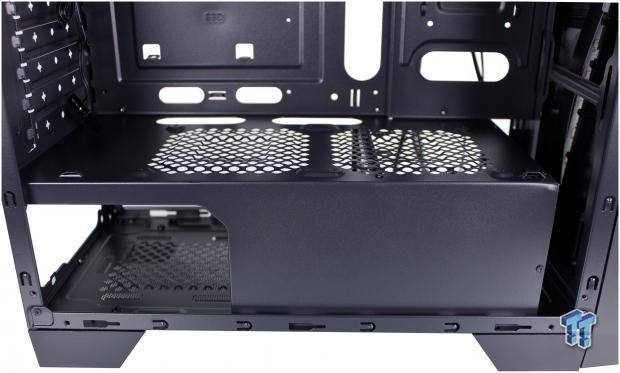
There is a PSU shroud in place with an opening where you can showcase your PSU, and it's not an option, it's just there. The PSU shroud ends with enough room to fit a fan in the front, unfortunately not far enough away to fit a radiator and fan. There should be no significant issues with GPU or Motherboard fitment, although I am a little concerned about the CPU backplate cutout as the angled look appears to come across where most mainstream backplates will reside. We will revisit this when the build is complete.
As we look at the back end of the front panel area, I am struggling to locate the 140mm fan mounting that Aerocool mentioned on their spec sheet. The website lists varying information from pictorial representations which shows 120mm only, but the spec list shows 140mm possible, which is leaving me scratching my head a bit here. While the box also only shows 120mm.
I can indeed confirm that there is a spot for a single 120mm radiator in the front which matches the specs which list this as an option. While it may be possible to use the slots in the top 5.25" bay cutout plate to mount the top-most section of an AIO, I'm not sure I would feel very comfortable recommending that as that plate is only held on by a breakaway tab of metal that is made to twist off rather easily.
Here at the top side, we see the only area changed is the top fan port, which we removed the filter. Being magnetic it was easy and showed a 120mm sized hole which can be used to install a fan to draw heat out of the top rear.
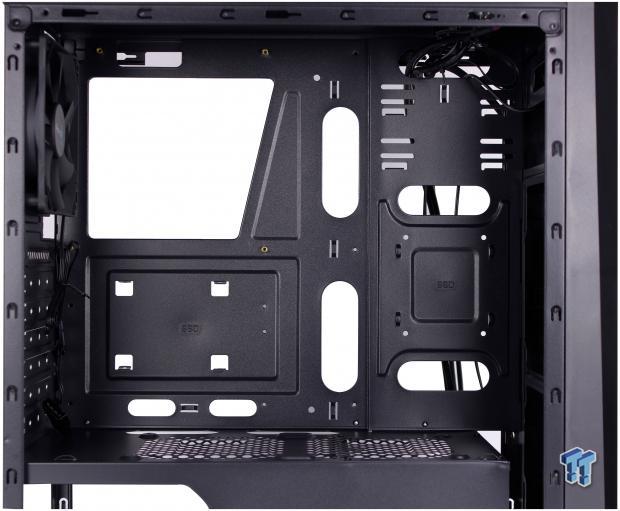
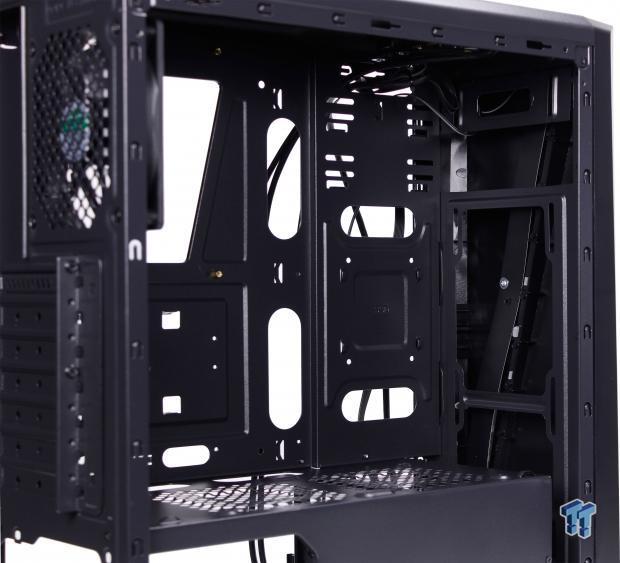
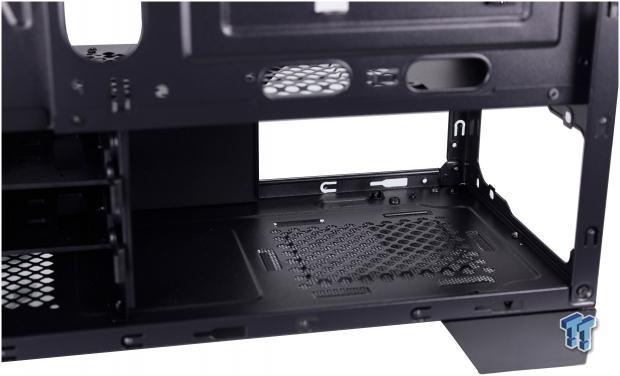
The motherboard tray comes fitted with the four main standoffs which an mITX board would use. The others can be installed as needed for your board type. There are multiple cable pass-throughs which none of them are grommeted. The larger vertical holes will be covered by any board larger than an mITX model, which means our mATX test bench will cover these as you will likely see in our build pictures.
The Cylon does have a PSU shroud, which is helpful at this price point but not unheard of. The shroud has mounting for dual 120mm fans and even cable management tie down points at each leading edge. There is also double cable pass through which will help for front panel connections and management of GPU or other needed cabling.
Inside the Aerocool Cylon Mid-Tower Chassis Continued
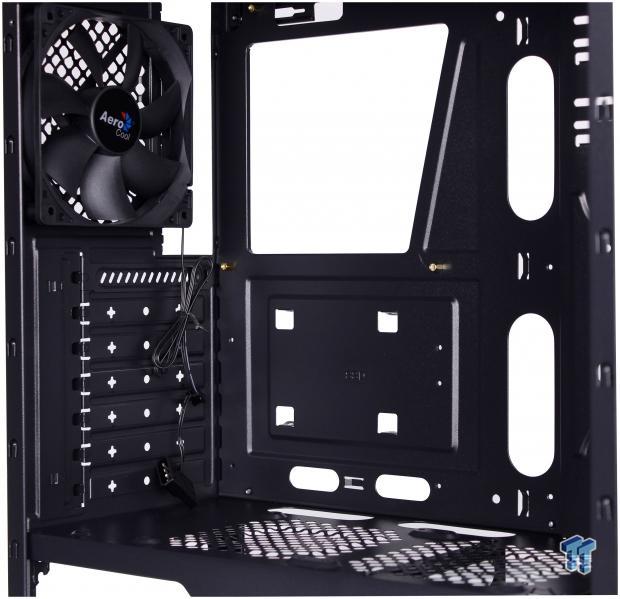
The Cylon comes out of the box with a single 120mm fan which we see installed in the rear as an exhaust. This is quite standard for this price range, and additional fans will make for a better experience. The included fan is a three pin style fan which also has a 4-pin PATA/MOLEX connection, which I do wish was a separate adapter they could include as it will make managing the cables more difficult. We also see here the breakaway slot covers and the hold-down bracket used for installed slotted add-in cards.
The Cylon offers reasonable cable management tie down and space for the price point. In my opinion, the most significant trouble you will have building, in this case, will likely be the horizontal oval cutouts which are where you will have to run your cables when using a full sized motherboard. There are two different SSD mounting locations directly onto the metal plate, one being to the left-hand vertical panel near the front panel, while the other has tabs sticking out from the rear of the motherboard tray to mount.
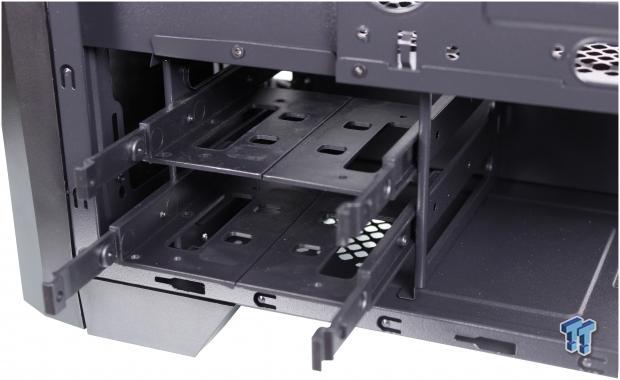
The HDD cage for the Cylon can hold two full 3.5" HDD or 2.5" drives via screws depending on the need. The trays are a plastic toolless variety which holds the drive reasonably well. The drive cage is fixed and is not removable or adjustable, so plan on that being there whether you use it or not.
The PSU area is simply an opening where you can mount the PSU. The internal mounting areas floor does have a pair of humps that the PSU can rest on so that all of the weight of the PSU is not hanging off of the rear mounting point. The 180mm PSU limit is a hard limit as the drive cage adjacent to it is not removable, at least without drilling some rivets.
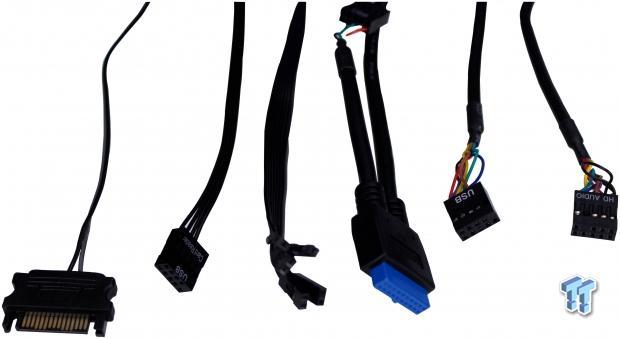
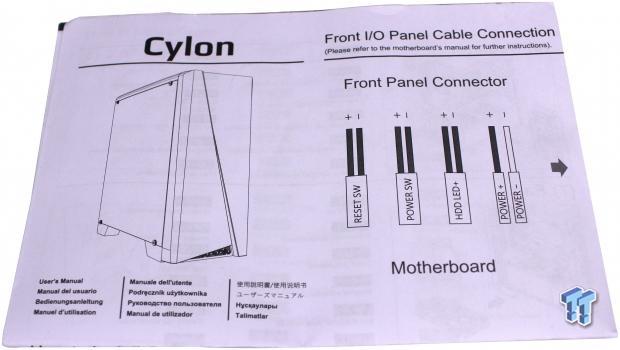
The front panel connection of the Cylon looks quite vast for a chassis in this price point. From left to right we have; SATA power connector for the ARGB front panel lighting, USB 2.0 header for the front panel card reader, Front panel power, reset switches and HDD and power LEDs, USB 3.2 gen 1 19 pin connector for the single front panel Type-C port which also has a USB 2.0 lead in case the installed board does not offer a 19 pin header. Another USB 2.0 connector for the dual Type-C ports in the I/O and lastly HD audio.
Hardware & Documentation
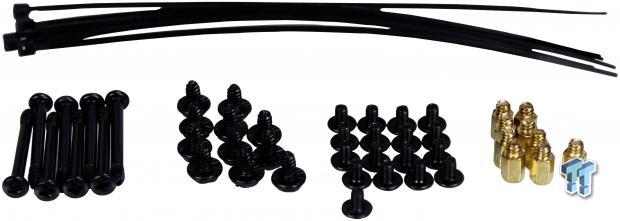
The hardware pack is surprisingly complete. Starting from left to right we have 8x screws for mounting fans to the PSU shroud. Next is the PSU mounting and PCIe mounting screws. After that, we find the motherboard mounting screws, which also can be used to install two SSD's. Lastly, we would have nine more standoffs and six total zip ties.
The manual or included paperwork as I will call it is a multi-fold sheet which has a few pictorial instructions to guide assembly. Also, a note is made to explain the ARGB cycling modes with the button presses.
Case Build & Finished Product
The front of the Cylon looks just the same as when we unboxed it without the system powered on. No significant change until you start your rig and the RGB kicks on.
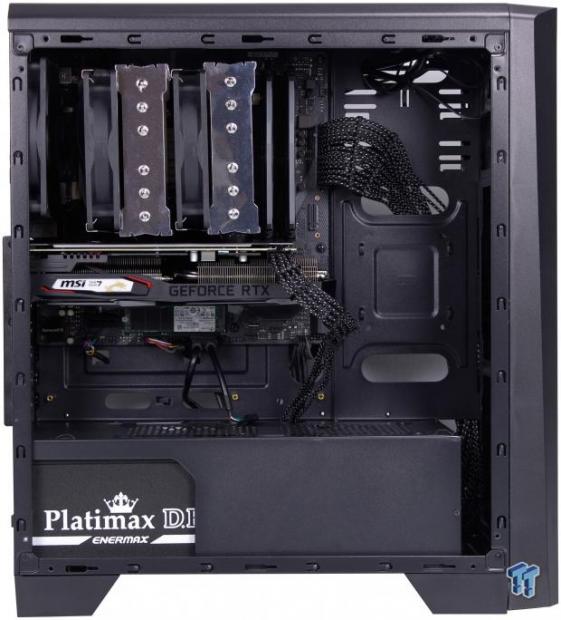
The motherboard and internal components installed with ease, although you may want to pre-run the EPS 8 pin if you do not want to run it over the motherboard front where it can be seen. The space allocated for the pass-through is not substantial enough to support the installation post motherboard install. I was a bit surprised to see how well the cables were hidden in this value chassis as a full-length ATX motherboard would fill even more space and allow more to be hidden, but overall the build went together quite cleanly.
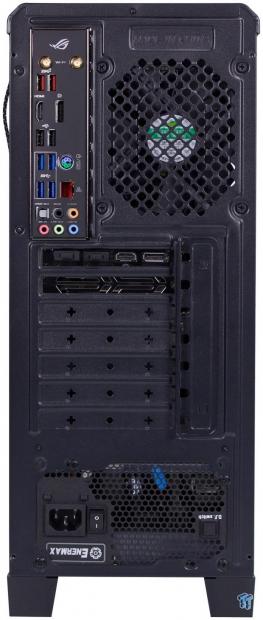
Here we see all of the ports populated as needed for components. The GPU slotted in and the motherboard I/O taking over the previously open rectangle. The PSU went in place with no significant hiccups as well. The only note is to check the slot covers you are breaking away as they cannot be reinstalled to cover a slot if you end up not needing to install a card in that location. There are aftermarket slot covers, but a little caution goes a long way here.
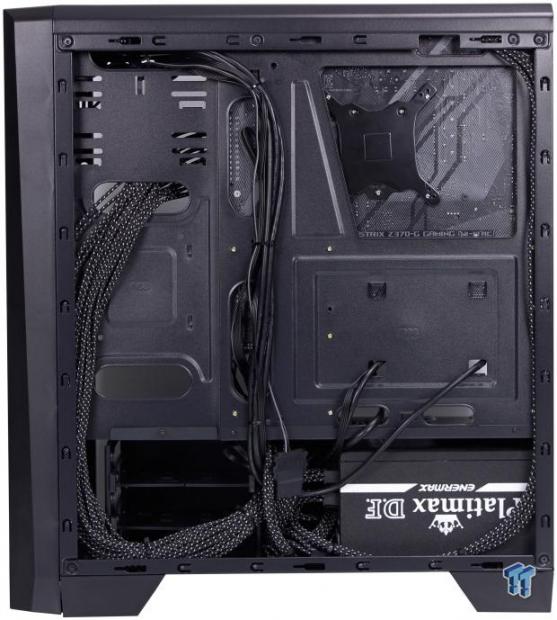
The cable management section is where I can say I am probably most impressed. Most cases in the sub $50 price range tend to be a total disaster to build and manage. The Cylon bucks this tradition and offered not only a reasonably simple cable management experience but also enough room to make it look reasonably tidy.
As you can see the main 24-pin ATX cable needed to be routed to the horizontal cutouts since the motherboard covered the standard vertical pass-through. As you can see we even creatively used the SSD mount pop out holes to run a couple of cables to come through closer to the board which helped with the more tidy cable management. One last thing to note is that as I worried about the CPU cooler backplate cutout and its slanted nature means accessing the rear of the socket will be problematic in the Cylon, so mount whatever you can before installation.
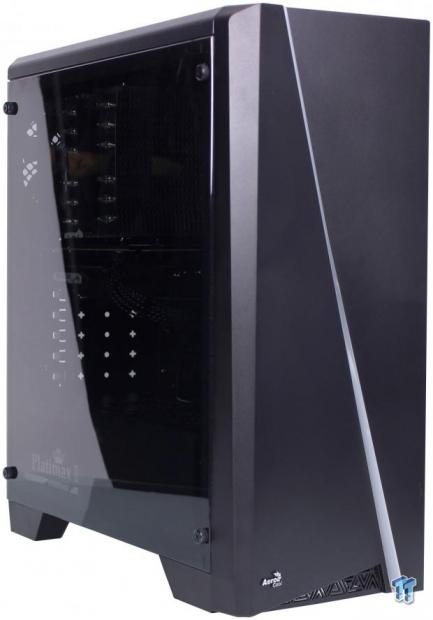
The Cylon when built looks pretty sleek, and for those unassuming, it could pass for a much higher-end case as you see here, it simply looks pretty although the acrylic window panel does scratch super easy so you must take special care.
What do you see? Without TG all dark? Lights? LEDs (HDD/power)? Can you hear anything while running idle? How close do you have to be to hear something? What is making the noise? Now we power the rig on, and I have to give Aerocool credit here, in pictures, this thing can look great, and the front RGB is quite nice with its options of solid colors, effects, and even rainbow flow patterns. If you did not know any better at a glance, this chassis also looks like it could be fitted with a tempered glass panel.
Final Thoughts
Any time we look at a more budget oriented case, we have to go through a mental reset. Realizing that not every case will have the same features or materials used based on the target sale price. When you get to the lowest cost, such as the Cylon, it makes you temper your expectations.
In our thermal testing, I must say that I was more than a bit surprised. While the Cylon may not be the most spectacular or highly featured case on the market it did a passable job keeping our test system cool even with its single exhaust fan. It was a bit warmer than some of the higher-end cases we have seen but for a case in this price point is was in no way horrid, and even rather respectable. I imagine if you threw a few bucks into even basic extra case fans, you could achieve even better potential results with still a really solid value.
The Cylon impressed us. It's not even close to the best case we ever tested, but at this price point, it is hard to beat, although some competitors can readily give it a good fight or even beat it. The ability to mount a 240mm radiator also if it is on a less secure mounting point such as the 5.25" plate it still is possible. Inclusion of a transparent side panel and ARGB on the front is cool as well. A PSU shroud even if not the best-looking one we have seen, these are all places where other cases in this price point may not deliver.
Now we come to what do we think the Aerocool Cylon lost some steam. Firstly, this is a give or take for some, but their website was contradicting itself on specs vs. infographics having different limitations listed can confuse consumers and cause someone to choose another product.
The next and probably most significant issue is that instead of a cheaper 3mm tempered glass panel, Aerocool chose an acrylic panel, which unfortunately even with a light duster and soft swipes still managed to make hundreds of micro scratches on the surface. I guess the other part which I know can be done but not sure on cost impact would be to add a three-pin lead from the front panel lighting so that a motherboard or other RGB controller could sync to the case as that would make it far more cohesive with the installation.
Lastly, we come to the price. At $46.99, you cannot get much lower, and I have heard the term 'below 50 bucks you are lucky if it shows up square,' and that's not too far from the truth. The Aerocool Cylon showed up and did its job admirably in my opinion but now its time to look at what can we compare it to and does it stack up?
Well, the initial discussion of price on the first page said a lot, and when digging, I found several contenders that take some of the wind out of the Cylons sails. Firstly a case many might recognize, the Cooler Master MasterBox ML510L which comes in a few bucks shy of the Cylon and has some refreshing styling along with a solid overall build appearance. Next would be one that I am not so familiar with, and that is the ABKO NCORE which comes in at a relatively similar price point and offers a tempered glass side panel omitting the scratching issue I mentioned previously.
I guess what it comes down to is that Aerocool made an interesting low-cost entry with the Cylon and if the styling appeals to you, by all means, jump on board and start your build. Just be sure to look around as the low-cost sector is an exciting place with plenty of unique and feature-laden cases waiting to be discovered, and the Aerocool Cylon does well to join these ranks.
 Lian Li B4-mATX Review: a compact mATX SFF case with excellent airflow and premium features
 Ocypus Sigma F36 BK ARGB Cooling Fan Review: high airflow and unified design in one frame
 PCCooler CPS RZ820 Display Review: a flagship-level CPU air cooler with an LCD screen
 MOAIPLAY ORA PRO G1 850W ATX 3.1 PSU Review: high efficiency and 10-year warranty for $119.99
 NZXT H6 RGB+ Compact Dual-Chamber Chassis Review
 Wizards of the Coast president to leave position as Magic: The Gathering hits record $500M earnings
 NVIDIA GeForce driver 610.88 launches without a resolution for Battlefield 6 Season 4's crashing issues
 TCL debuts Ultimate Pro 32X3B and 27X3B gaming monitors with LG's 4th-gen WOLED panel
 Apple will offer the iPhone and Apple Watch for $17.99 and $11.99 per month
 Memory supply could plummet 70% as AI's endless hunger devours global production
 Valve fixes Steam bug that downloaded games online instead of over your local network
 World's first tri-mode 1300Hz gaming monitor and 12K ultrawide confirmed
 MOZA's first full-cockpit HMA150 motion system adds a new dimension to flying or racing
 Anthropic gives thoughts on open-weights models, especially those from China
 Xbox explains why its massive outage locked players out of games they owned
 Logitech G316 X 98 Wired Gaming Keyboard Review - Retro-Inspired Board that Falls a Little Short
 Biwin M560 2TB SSD Review - Best Overall Retail-Ready DRAMless SSD
 Logitech G512 X 98 Analog Mechanical Gaming Keyboard Review - An Innovative Two-in-One
 Thrustmaster T.Flight HOTAS 5 MSFS Edition Review
 SteelSeries Arctis Nova Pro Omni Wireless Headset Review - One Headset to Rule Them All
 SteelSeries Arctis Nova 7 Wireless Gen 2 Headset Review - New and Improved, But Is It Enough?
 AMD Ryzen 7 7700X3D Review - Days of Future Past
 Samsung 990 2TB SSD Review - Ninth Gen QLC at PCIe Gen4 Speeds
 ASUS ExpertBook Ultra (Panther Lake) 14" Business Laptop Review
 ASUS ROG Raikiri II Xbox Wireless Controller Review - Ready to Take Control
 Printer Not Working in Windows? How to fix detection, print queues and drivers
 The Ultimate Guide to Personalizing Your Windows 11 Taskbar
 How to Turn Your Windows Laptop Into a Second Monitor with Miracast and Wireless Display in Minutes
 6 Mistakes to Avoid When Buying a Windows Laptop
 I capped Windows Update's bandwidth with Delivery Optimization, and my downloads stopped choking
 I use this decade-old free tool that finds files faster than Windows Search does
 I install and update most of my apps with this Windows command now, and I stopped downloading sketchy installers
 Hisense U6SF 65-inch MiniLED TV: High Performance Meets Leisurely Convenience
 I stopped digging through Windows menus after I set up this one folder
 Don't sell your Windows laptop until you do these things