The Bottom Line
Introduction, Specifications, and Pricing
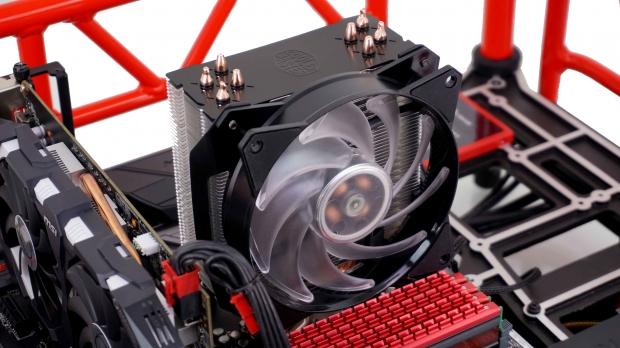
For those of you who have followed our CPU cooler reviews, what you are about to see may cause a bit of déjà vu. This is because, just over a year ago, we had a look at a CPU cooler called the Masterair Pro 4 from Cooler Master, and it appears that what we bring forth today is a refresh of that design. That being said, while the bulk of the design is identical, there are two changes which have been made. First of all, there is a new fan which moves this cooler into the RGB trend, and the second change has to do with the hardware to install it.
Since we have a pretty good idea of how it should perform, with the new fan being the only question mark in the equation, we do not expect to be completely surprised with what we find in testing. However, many love the RGB LED option, and with that being said where the older version had nothing to give in this aspect, now your CPU cooler from Cooler Master can work with any motherboard software and deliver the same effects as the motherboard, solidifying the theme. Not only that but for those without capable motherboards, Cooler Master has included a set of inline switches which will allow the user to select colors and modes for the fan to present while in use.
Cooler Master's refresh of the design is now called the Masterair MA410P. The naming is pretty simple to follow, as the Ma signifies the Masterair series, the four denotes the number of heat pipes, and the P at the end is something Cooler Master is doing with all of their products these days.
From what we can recall, the original design was able to hold its ground quite well, and the noise was not out of control either. We can only hope that we see more of the same this time around, as the new hardware will make the install easier on the user, and the RGB LED fan will accommodate anyone's needs as far as lighting goes. At this point, all we have to do to figure it all out is have a look at the MA410P, complete the testing, and see where she ends up in our charts.
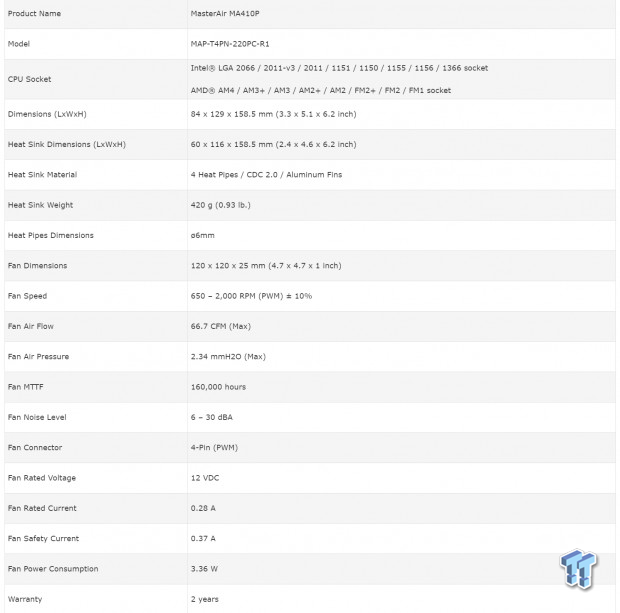
Following what is presented in the chart from Cooler Master, we see that the Masterair MA410P goes by the model number MAP-T4PN-220PC-R1, and it will fit on all Intel sockets since and including LGA1366. On the AMD side of things, AM2 is the oldest socket it will fit on, but also covers sockets all the way through to AM4. By itself, without the fan, the tower is 60mm thick, 116mm wide, and stands 158.5mm tall. With the fan on the cooler, the thickness increases to 84mm, while the width also increases to 129mm due to the fan mounting hardware.
Four 6mm diameter heat pipes are running through the tower, which use Continuous Direct Contact 2.0 to mate with the CPU IHS. The fins of the tower are made of aluminum, and all told, there are fifty-seven of them. We are also shown that the heat sink is said to weigh in at just 420 grams, which is light for a tower CPU cooler, so no worries about weight on the sockets causing odd pin pressures.
The fan of choice to cool this tower is the MasterFan 120 AB, which also sports the model number DF1202512RFMN, just in case you need to know when attempting to locate the optional second fan for a push/pull arrangement. The fan is 120mm in size but can deliver speeds of up to 2000 RPM. At that speed, the CFM is rated at 66.7, and there is also 2.34 mmH2O of static pressure.
This fan can run for 160,000 hours and is shown to top out at 30 dB(A) as far as noise is concerned. The MF120 AB is powered by a 4-pin PWM connection, which sips 0.28 Amps at just 3.36 Watts. The last thing seen on the chart is that the tower, as well as the fan, is guaranteed against defects and failure for two years.
At this time, as we attempt to hunt down a retail price, we see that Newegg is the one with this cooler on the shelves, as no listing appeared on Amazon. Newegg may be doing some funny price manipulation, but it shows there that the Masterair MA410P originally was to be sold at an astounding $80.99. If that is true, there is no way in the world that Cooler Master will sell many of these coolers.
With the feeling that Newegg is trying to make you feel better about the current price of $48.79, which is where we would expect a cooler of this magnitude to retail for, we are happy to see it priced below $50, and is an affordable option for the masses. Compared to pricing we have seen currently for the original Masterair Pro 4 at $44, an extra $5 for better hardware and an RGB fan is well worth the small bump in pricing.
Packaging
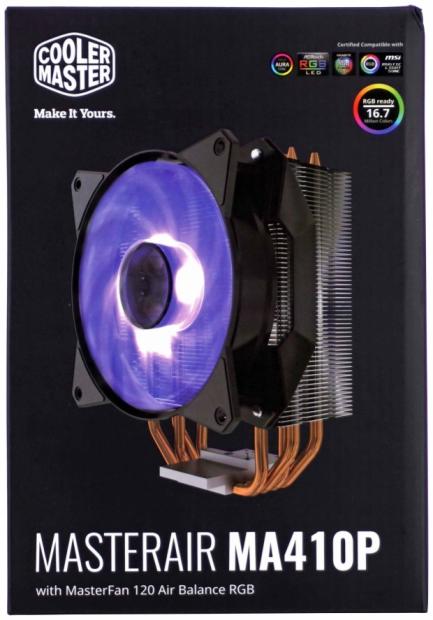
Oddly enough, the front of the box displays no purple on it, but the matte black backdrop does a nice job of highlighting the tower cooler shown in the middle. Along with the logo at the top, to the right are compatible motherboard which will deliver 16.7 million RGB colors to the cooler synced to the motherboard. At the bottom is the name of the cooler and a mention of it shipping with the Air Balance RGB 120mm fan.
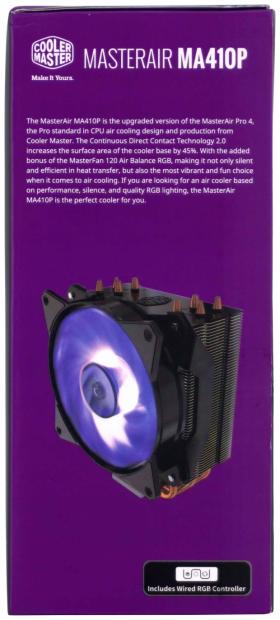
The panel on the right is where the purple pops up, and along with the image of the cooler, there is a statement on what went into the design and why. We also see a notation at the bottom of the wired RGB controller, so that users without RGB capable motherboards can still get the most from the fan lighting.
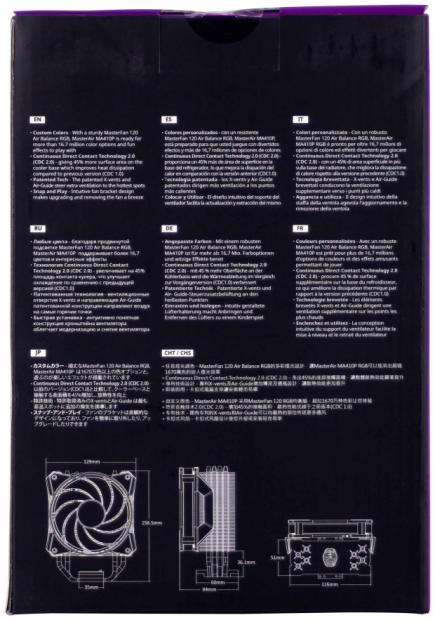
The back of the box is back to black, and we see in eight languages that features are displayed here. Covered in the list are the custom colors of the fan, the CDC 2.0, patented technology in the fin design, and that the fans snap onto the cooler. Beyond that information, we also see three, dimensional renderings, of the MA410P, so you are aware of what it takes to get this cooler on the motherboard and into your chassis.
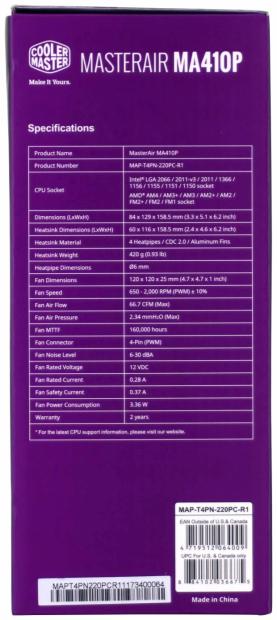
The second smaller panel of the box is purple, and this time the space is used to display a specifications chart. Everything in this chart is what we found on the product page, and was covered earlier in this review.
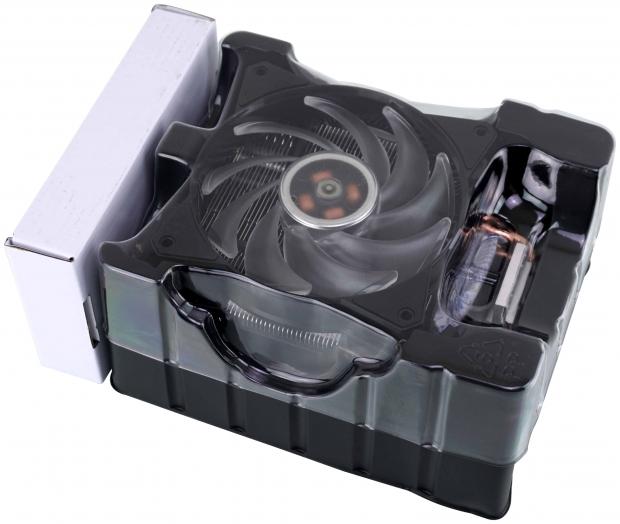
Rather than foam or cardboard, Cooler Master ships the MA410P in a plastic container, much like what we see in mouse packaging. It helps to ensure none of the fins are bent, keeps dust at bay, and will take on more, structurally, than any shipping mishaps the previously mentioned materials tend to handle. At the top of the cooler, we can see the hardware box, which greats you as the box is opened.
Cooler Master MASTERAIR MA410P CPU Cooler
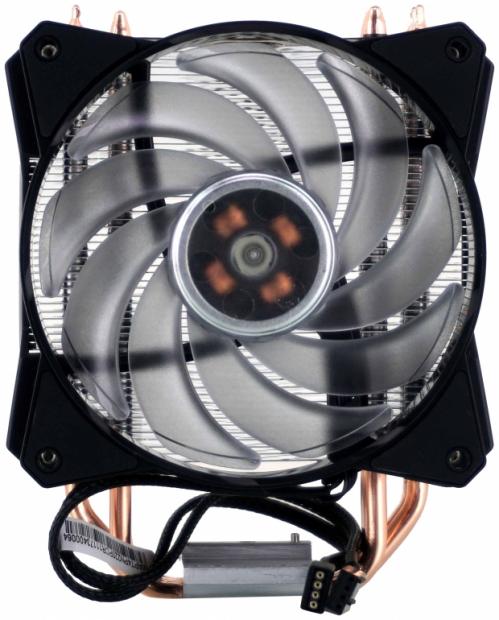
From the front of the MA410P, our memory goes right back to the Pro 4 CPU cooler. The main difference in the view is that now there are clear fan blades, and the hub is clear as well. The Fan covers the majority of the fins, and we see not only the 4-pin PWM connection but also a 4-pin RGB connection to address the lighting.
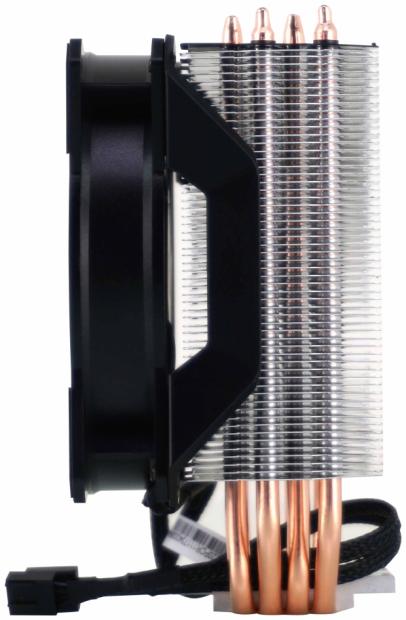
The side view affords us a look at all of the fifty-seven fins, and the one on the top of the stack is black, not left in its natural state. We can also spot the plastic clips for the fan, which wrap around the cooler, and clip onto a ledge on the sides of all of the fins. As for the heat pipes, they are left with the copper exposed, and they are spaced tightly together to run through the stack of fins.
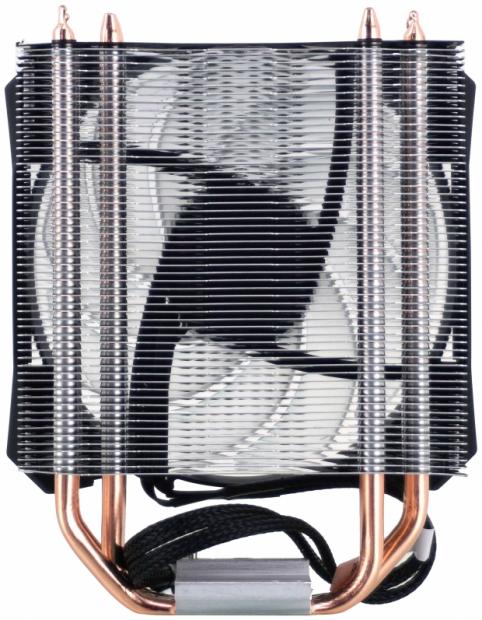
As we see the back of the MA410P, we can tell that there is a pair of heat pipes, two that run nearer the middle, and another pair which is outside of them. It should help to distribute the heat to the fins more efficiently, and at the bottom of the cooler, we see gentle bends in the pipes, as not to limit the wicking effect they are designed for.
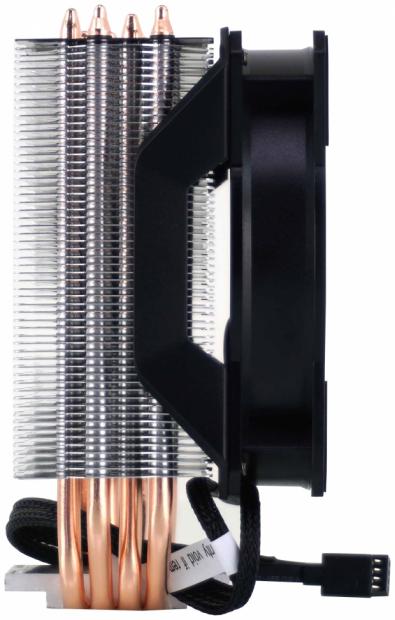
Our last view of the tower at this distance sows off the universal shape of the tower, without any offset. This aids in the fact that you can add a second fan to the back of the tower, which should improve performance a few degrees, but also will not conflict with memory any more than the front of the cooler.
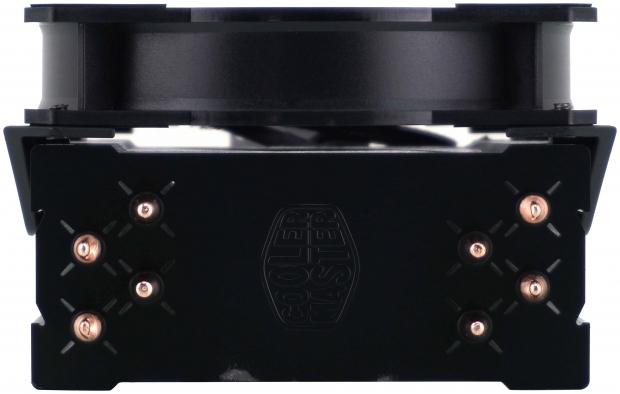
The top fin of the tower, as we mentioned, is black to help with the aesthetic appeal, and the center of the fin has the Cooler Master logo embossed on it. Where we see the pipes exiting the top of the tower, we also see an X-pattern around them, which is there to scoop air towards the pipe, then upon exit, spread the air as to take the most advantage of airflow to the next pipe in line.
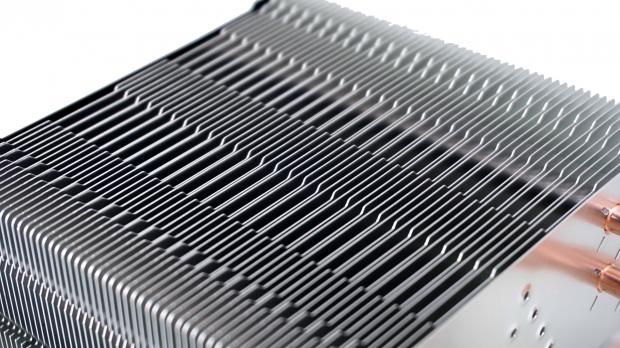
With the fan removed from the tower, we can see the effort Cooler Master puts into the fin design. The leading edges are offset from the next one in line to disturb the air more, and we also see hills and valleys, which allows the fan to build more pressure before sending its airflow over the heat pipes.
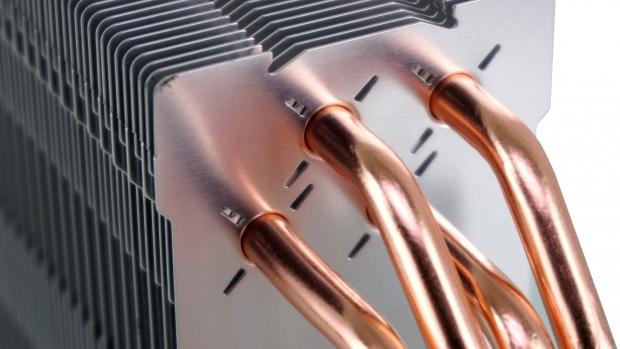
The bottom of the fins stack shows where the copper heat pipes enter the tower. We can also see that the fins are pressed onto the pipes, as well as the lack of the logo on any of the plain aluminum fins.
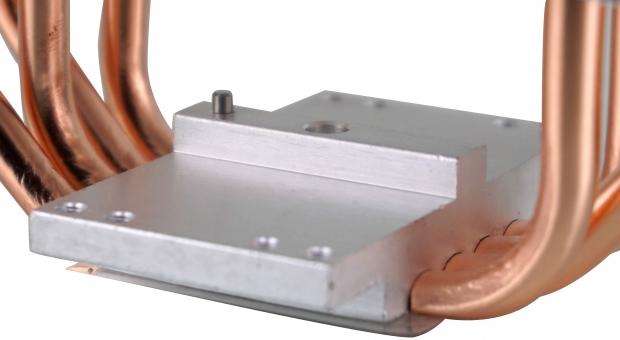
The aluminum base of this tower serves two purposes. This is where the mounting hardware locks the cooler to the motherboard with the pin and hole, which is where the universal bracket installs. The second function of the aluminum base is to lock the copper pipes into place.
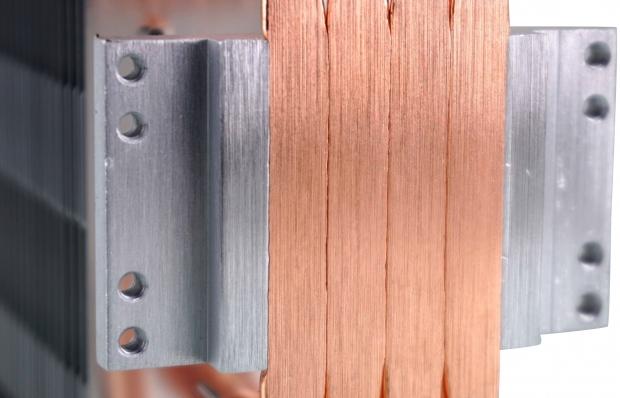
There are two things we like about the base design. If you are going to offer a direct touch cooler, we do not like wide gaps between the pipes, nor do we care for larger separations with aluminum spacers. Cooler Master aligns the pipes, mills them flat with minimal gaps between them, and allows the pipes to take all of the heat, and distribute it properly into the stack of fins.
Accessories and Documentation
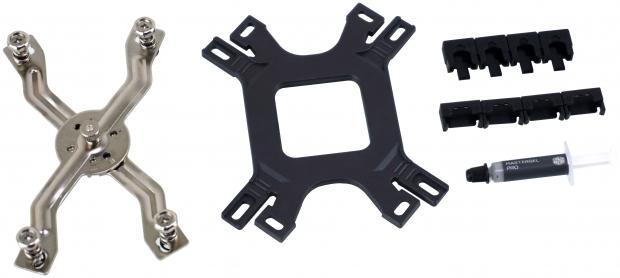
On the left is the universal mounting hardware, which can expand and be used for both AMD and Intel sockets. The backplate is also universal, and adjustable for Intel spacing, and also offers AMD tabs. On the right, we see the Intel stud locks, and a wider set to use with AMD processors. This is also where we have placed the small tube of MasterGel Pro, which has enough for two or three mounts.

The universal standoffs are located at the top-left corner, with the studs for the back plate below them. In the middle is a set of fan mounting screws for the optional fan and a set of LGA2011/2066 standoffs. That leaves us with the wrench at the bottom, extra rubber pads for the second fan, and a socket to drive the standoffs into position.

If you do not have an RGB capable motherboard, you will need the Molex to 2-pin power adapter, which powers the wired remote to the right. The other end of the remote has the 4-pin RGB connector and is why there is a 4-in RGB to 4-pin RGB adapter offered, which allows connection to the fan. Speaking of fans, Cooler Master also sends along another set of thick plastic fan clips, so all you need for a push/pull setup is the fan.
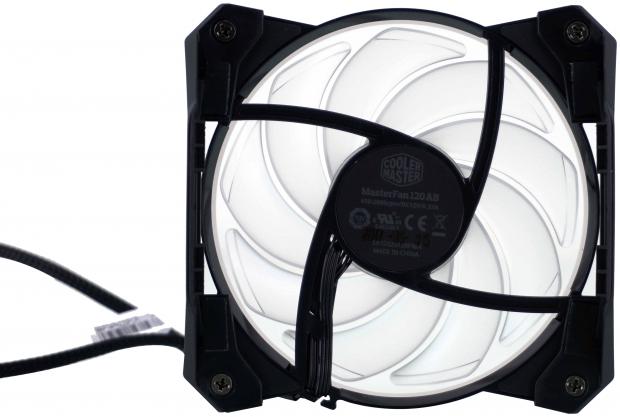
The fan used to cool the tower is what we see here. The fans have rubber pads on them, but due to use of the plastic clips, extra rubber pads are placed on the inside of them to eliminate vibrations. There are nine highly curved blades on the fan, which should perform well, and there are a pair of ribbon cables leaving the hub, which does tend to come out of the tabs, which is something to keep in mind if you hear a cable rubbing the blades.

In this image, to the left is the manual for the MA410P. The parts are described to explain what is used where, and then the manual continues with installation steps for Intel LGA115X, another for LGA2011/2066, and the third set of renderings for AMD installation. To the right is the information on the warranty, and it explains what Cooler Master will cover if you happen to run into a defect.
Installation and Finished Product
[img]21[/img]After installing the studs and the retainer clips in the right position for LGA115X sockets, all you have left to do is to align it on the back of the motherboard. Orientation does not matter either, as there are cavities on the underside which allow for the top two socket mounting screws.
[img]22[/img]Once the backplate is in place, you take the standoffs, which have a nylon washer on both ends, and screw them in with the socket until you run out of threads. At this point, you just add some thermal paste and secure the adjustable bracket to the standoffs.
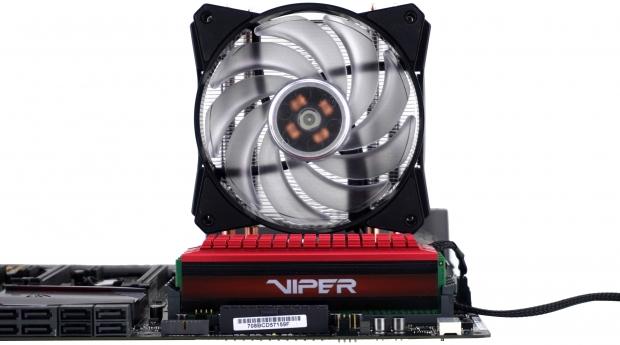
The MA410P stands tall, and while very close to the memory, but just slides past them. If adding a second fan on quad channel sockets, we would expect the fan not to conflict with the memory there either.
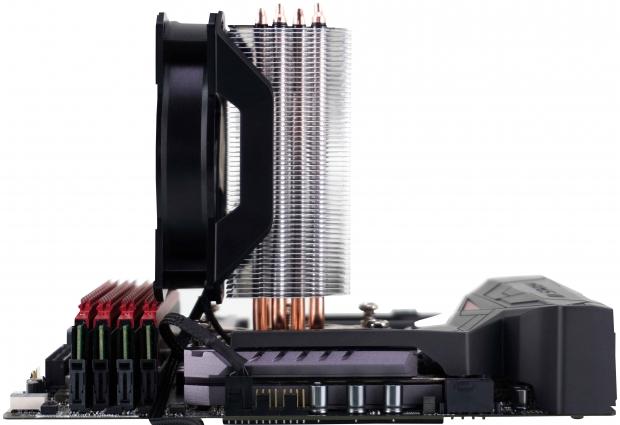
Since there is not an offset from the base to the fins, the MA410P sits further left than many coolers we have seen recently. This leaves plenty of room to add a second fan and still have access to the motherboard screws as well as the 8-pin CPU power connection.
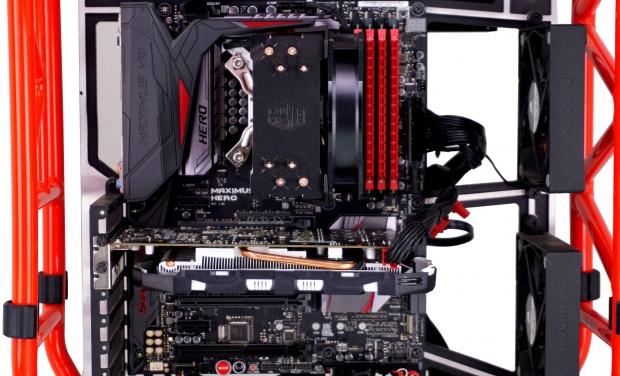
While most of our images were of a lot of natural aluminum and exposed copper, but once installed, much of that is no longer visible. The black brushed metal top fin with the Cooler Master logo is clean looking, and compliments the rest of the build. Even with the copper tips exposed through the top fin, we like what we see here.
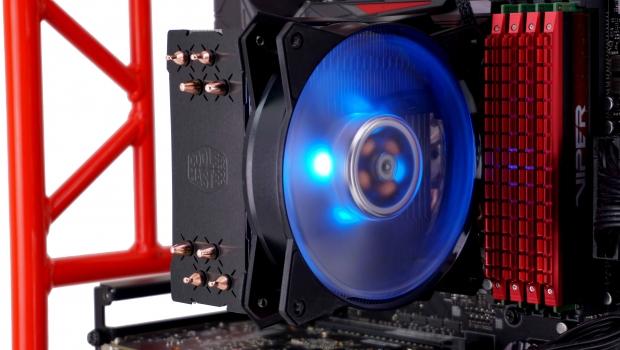
For those wondering what the fan looks like when it is powered, this is what you will get. Four LEDs inside of the hub are what flood the fins with light, and whether using the motherboard to control the color or the wired remote, there are tons of options to flip through and try out.
Test System Setup, Thermal Tests, and Noise Results
Chad's CPU Cooler Test System Specifications
- Motherboard: ASUS ROG Maximus VIII HERO (Intel Z170) - Buy from Amazon / Read our review
- CPU: Intel Core i7 6700K - Buy from Amazon / Read our review
- Memory: Patriot Viper 4 3000MHz 4X4GB - Buy from Amazon / Read our review
- Graphics Card: MSI GeForce GTX 1060 6GB OC - Buy from Amazon / Read our review
- Storage: Corsair Neutron XTi 480GB - Buy from Amazon / Read our review
- Case: INWIN D-Frame - Read our review
- Power Supply: Thermaltake Toughpower DPS 1050W - Buy from Amazon / Read our review
- OS: Microsoft Windows 10 Home 64-bit - Buy from Amazon
- Software: RealTemp 3.70, AIDA64 Engineer 5.75.3900, and CPU-z 1.77.0 x64
To see our testing methodology and to find out what goes into making our charts, please refer to our CPU Cooler Testing and Methodology article (October 2016) for more information.
Thermal Results
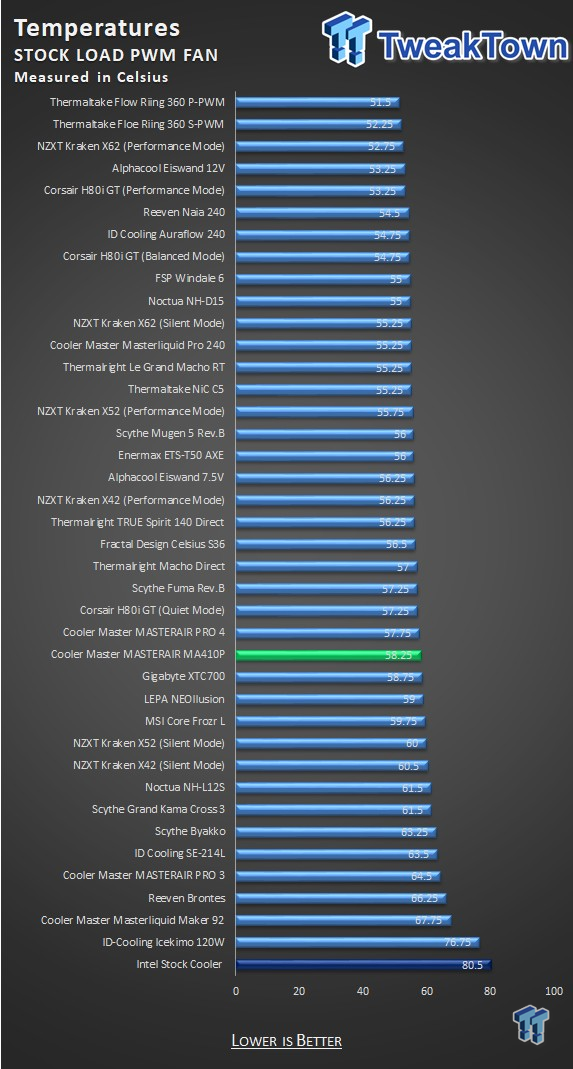
While we did expect a tad more performance from the MA140P, we find that it is a half a degree behind the original design. It's showing, so far down the list looks bad, but the reality is that the MA410P is just less than seven degrees from the best cooler on the chart.
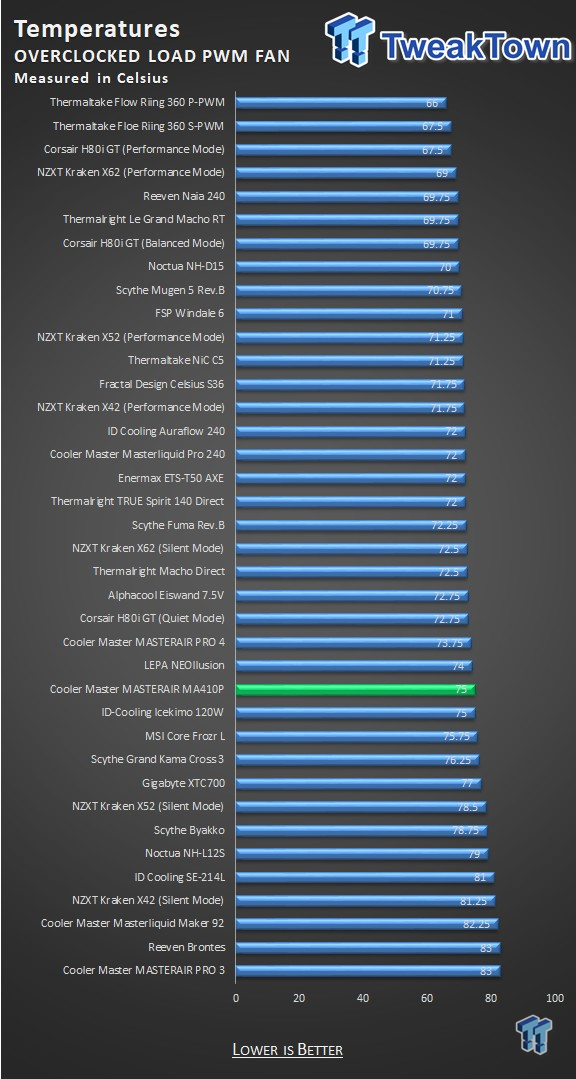
Still using PWM to control the fan, the MA410P falls even further behind the Pro 4. With the company it keeps on the chart, we do have to say it is beating an AIO, but looking at temperatures, it is closer to the least performing cooler than it is to the front of the pack.
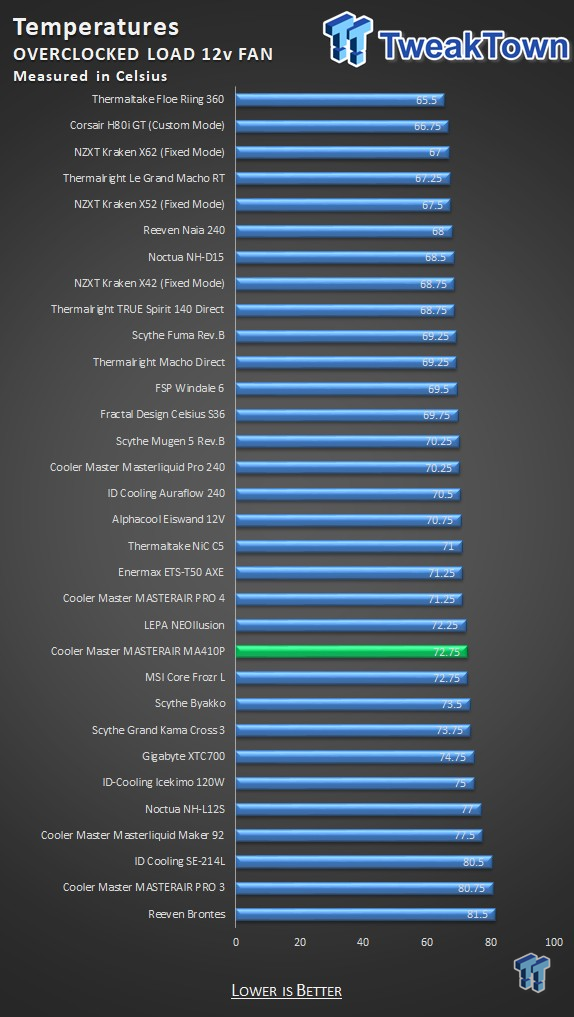
Pushing the fans as fast as they would go, we find that Cooler Master does not leave much meat on the bone. There are less than two degrees to be gained by doing so, but it does push the MA410P just slightly better than average in this chart.
Noise Level Results
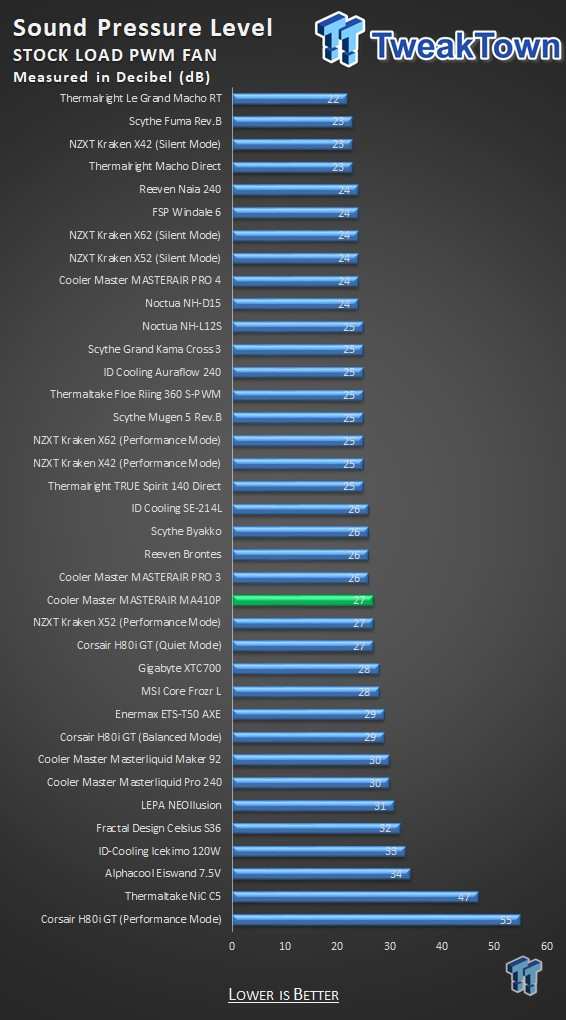
In our first run, with the processor at stock speeds and PWM in control of the fan speed, we saw 1080 RPM reported as the maximum speed. We took a sound reading at said speed, and the MasterFan 120 AB registered at 27dB. Not bad at all.
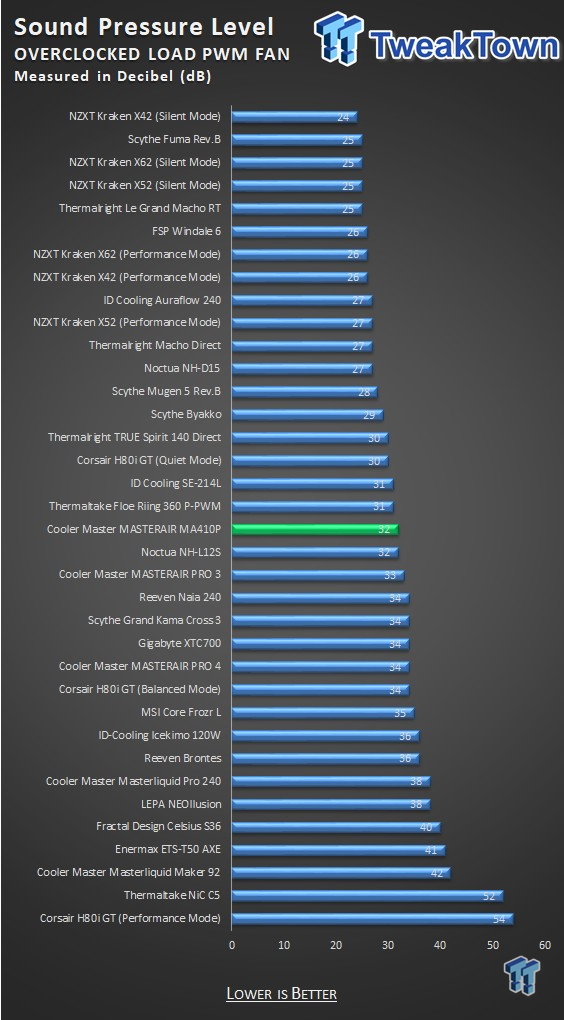
Running the test, in the same manner, just this time with an overclock applied. The noise level does not increase as much as we thought it might. The fan was spinning at 1350RPM when we took the 32 dB measurement seen in the chart.
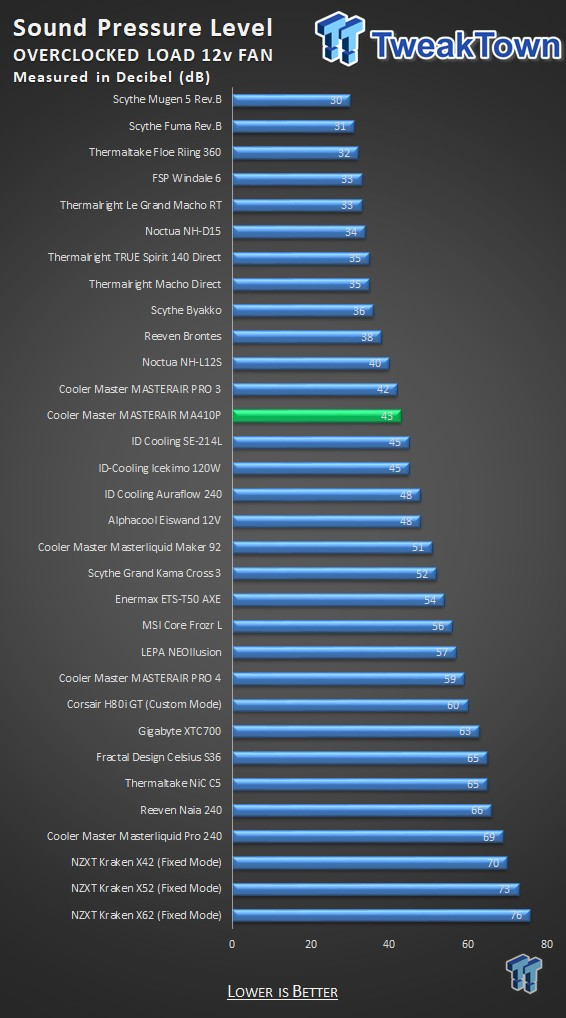
In the grand scheme of things, 43 dB is not all that bad for a 120mm fan at full speed. While we nearly maxed the fan out at 1965 RPM, the increase in noise is not justified for just a couple of degrees of efficiency.
Final Thoughts
Typically, when it comes to products we review, we appreciate new things more than we do looking at products with just a couple of minor changes. With that said, Cooler Master did things right with what was changed, but there are still some issues we found.
The mounting hardware change is something we can get behind, as the hardware that shipped with the Pro 4 was complicated and clumsy to install. The change has simplified the effort and will make many customers happier than if they had to deal with the old setup. We also like the addition of RGB to the cooler. Many might scoff at this, but there is nothing better than to look through a tempered glass side panel of a chassis and see that all of the lighting is identical.

However, even though we can see why Cooler Master made the changes they did and reintroduced the cooler under another name, we do have a few things we need to address. First of all, the performance seems to have degraded. Not by much, but the charts don't lie, and the Pro 4 came out as the better cooler as far as performance is concerned. The addition of RGB is nice and all, but for those who do not have a capable motherboard, the remote idea is a pain. You either keep things clean and hide the remote behind the motherboard tray, making it a pain to change the settings, or you are left with wires hanging out so that you may change the lighting by reaching through the left side of the chassis.
We like having the option to use this, but we do feel they could have come up with a more accessible solution. We also found that our cooler was slightly out of square, as it leans slightly to the front of the tower. This can be seen in our images, and while not detrimental to the efficiency of it, we would like our cooler to arrive square to the motherboard, especially considering all the attention to the inner packaging, we feel this should have never happened. It had to have left the factory in this state.

The one saving grace for the Masterair MA410P is the price. There are many out there looking for an affordable solution to cool their processor, and the MA410P is up to that task. It certainly kept our processor from throttling, and in today's market, we do not expect much from a cooler priced less than $50.
However, Cooler Master does offer a fair amount of bang-for-the-buck with the reintroduction of this cooler. At $48.78 you will not break the bank obtaining one, but looking at the charts, we do have coolers that can perform better for similar costs. They may not look as good in combination with your RGB capable motherboards, but there are options with more efficient designs. Sadly, in the end, while we initially liked what we were seeing, the results are a tad too lackluster for us to solidly recommend this cooler outside of the RGB capability of it.

