


Our Verdict
Introduction, Specifications, and Pricing
While it feels as if we have seen the full extent of what Cryorig had to offer with the R1 in its many forms, the C1, and even the H7 and H5 coolers, but one thing that all those coolers lack is the ability to fit into smaller spaces. While they have already offered up the C7 for ultra-low height clearance machines, there has to be a middle ground between 120mm and 140mm dual and single towers, and what is meant to be a slightly better than stock replacement cooler, and this is the exact reason we are here today.
With an all new letter to grace this series, we bring you one of two options in the M series from Cryorig. The basic idea behind this cooler is to offer a cooler that can take the rigors of what an enthusiast may put a cooler through, yet do so without taking up half the case with the air cooler to do it. We are this time dealing with a single tower cooler, but cooled with just a 92mm fan, and if that isn't enough to peak your interest in this cooler, just wait till you get a look at the styling offered and the price point.
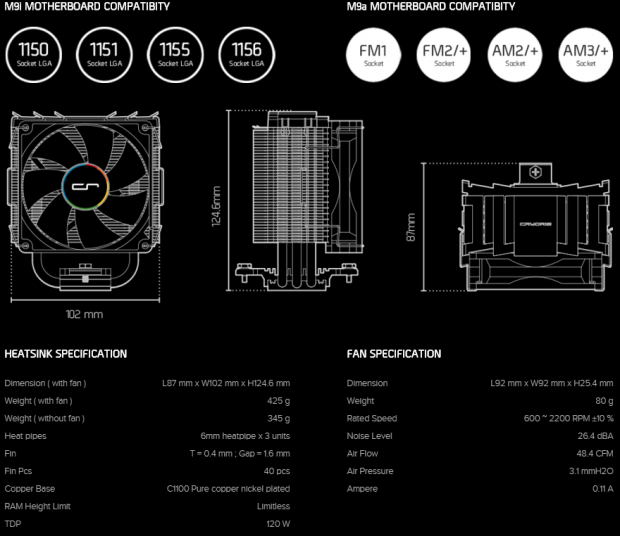
The chart provided by Cryorig is universal to both the M9i and M9a cooler versions. Keep in mind, though, the compatibility listed next is specific to each cooler, do not assume one cooler fits both sockets. Next we run into three renderings. The one to the left shows us the 102mm width of the cooler, and the next image shows the 124.6mm height, and the last rendering shows the cooler is 87mm deep from the front edge of the fan to the trailing edge of the hardware. We also see that with the fan included, this cooler is lightweight at just 425 grams. There are three 6mm diameter copper heat pipes that run through the stack of 40 aluminum fins. We lastly see that there are no issues with memory, and the TDP rating for this cooler is 120W.
The fan that they include with this cooler is an unnamed fan that is 92mm square and is also 25.4mm in thickness. The fan is only 80 grams of the overall weight, and in this small package we are given a fan that can spin from 800 up to 2200 RPM. At top speed, this fan can deliver 48.4CFM of airflow at 26.4dB(A), and at the same time this small fan delivers 3.1mmH2O of static pressure.
Something we found very pleasing, and we know most of you looking for a cooler such as this will appreciate even more. As we shopped around for the M9 in either flavor, we had no issues finding them once searching actual e-tailers, but Google does come up a bit empty on its own. Starting off with Amazon, we see the M9i is listed at only $25.99 with free shipping. We also found this cooler at Newegg for a few dollars less on sale, but their normal offer matches that of the mentioned Amazon price. We told you, though. This is a really good price for a tower cooler, especially in today's market. Not only does it have a nostalgic feel to it, but Cryorig also seems to have adopted 2006 pricing as well.
Packaging
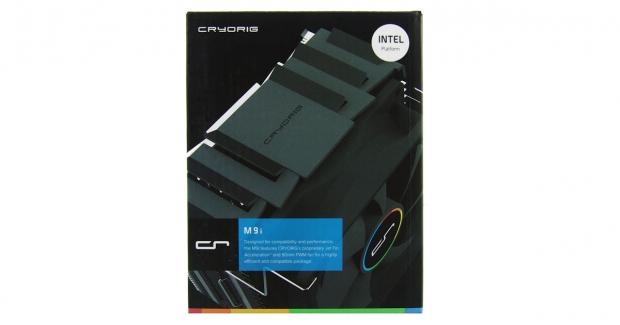
For such an affordable cooler, Cryorig does not skimp on the box. We were sent the M9i designed specifically for Intel platforms, and along with the trademark rainbow of colors along the bottom, the majority of the panel offers a look at the top of the cooler inside the box.
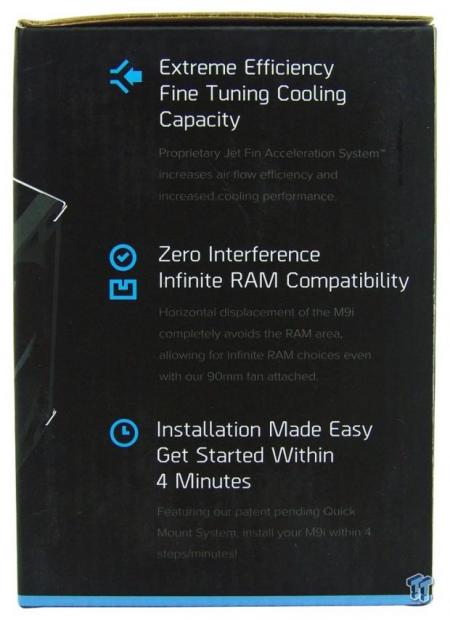
As the image of the cooler wraps around to this side, we run into some features. This mentions the Jet Fin Acceleration System. It tells us there is zero interference for RAM and makes everything seem easy with a notation that this cooler installs in under four minutes.
Our Latest CPU Air Coolers Review Coverage
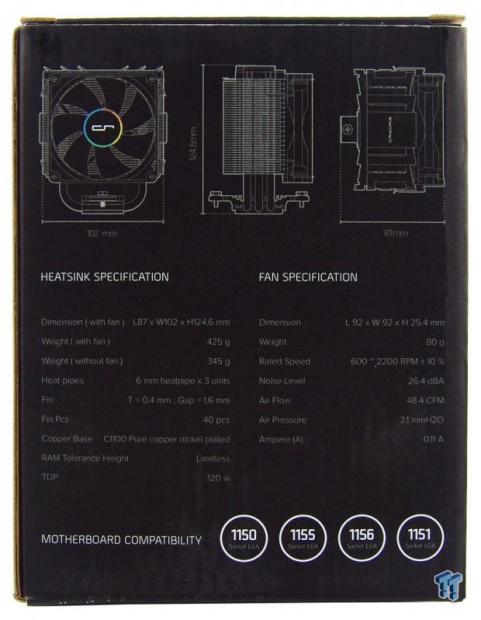
As we make it to the back of the box, we find what we were given on their site in the specifications chart. The only change is that the AMD compatibility has been removed and will be found only on the M9a packaging to eliminate any confusion. Also; yes this is only LGA115X compatible.
The last side is simple yet very effective. They swapped for a white backdrop this time and simply put M9 on this side in bold font.

As we opened the M9i to get to the inner packaging, we find instructions to be sure to register this cooler to extend the warranty as well as it coming with a few other benefits to the registration.
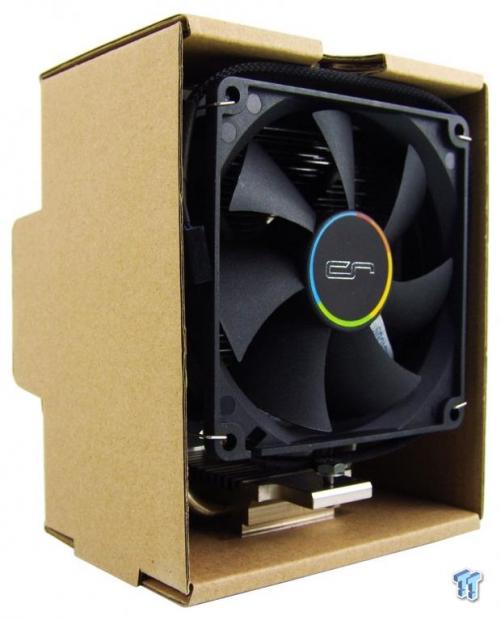
Inside of the box, we did eventually get to finding the M9i. It is surrounded by a layer of cardboard which protects the cooler very well. As for the hardware and paperwork, it is put behind the cooler, and the tabs on the packaging help to keep that spacing in transit.
Cryorig M9i CPU Cooler

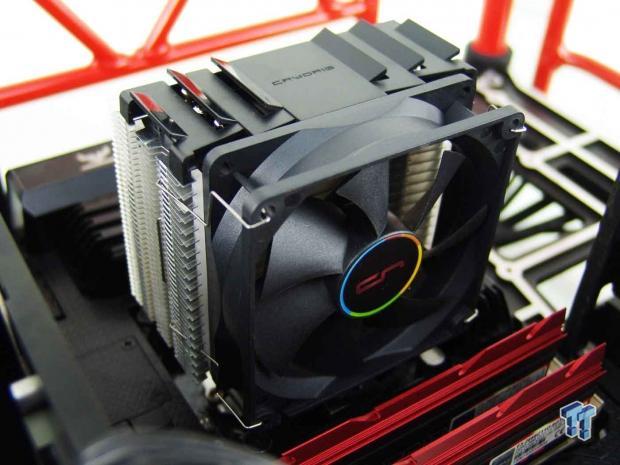
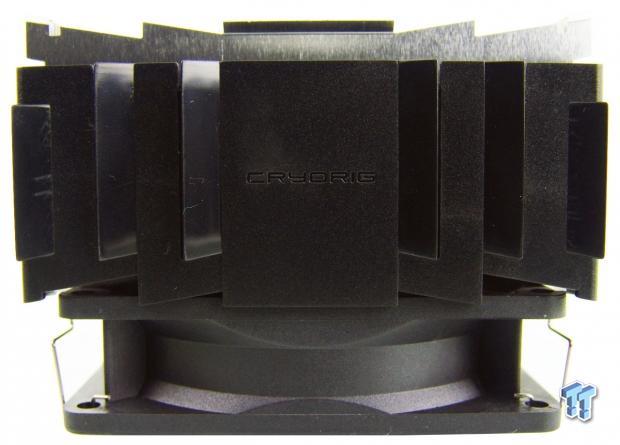
The 92mm fan chosen offers seven wide blades that cover the fin array pretty well. We cannot see much else, but below the cooler we can see the base with the hardware already installed, and the pipes arcing out of it.
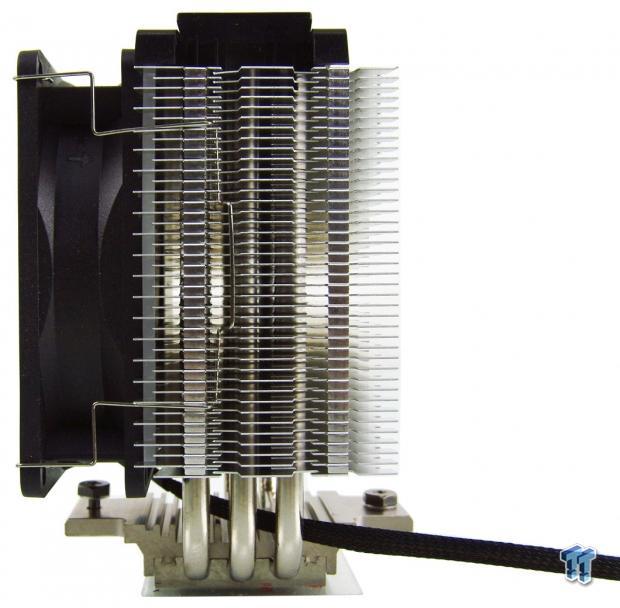
From the side, we can see that at the bottom of the M9i the pipes come from the base and run in line, straight through the staggered array of aluminum fins. Cryorig also uses wire fan clips in this design and are bent in the middle to allow for an easy grip to remove it.
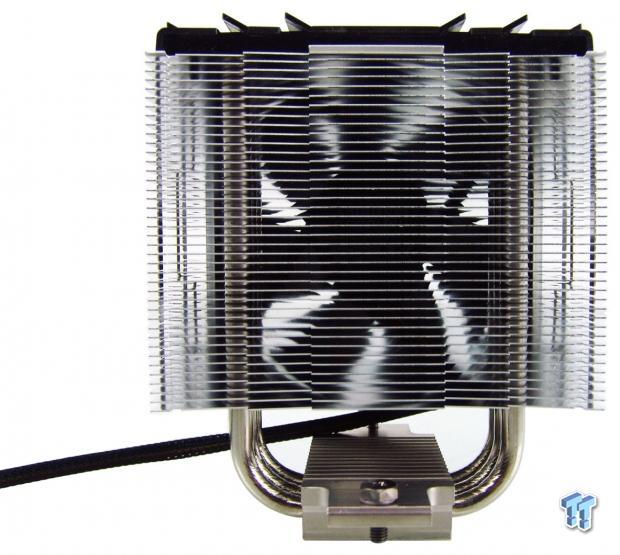
Looking at the back of the cooler is when we first noticed the fin design and the way the center is highest, and either side offers two secondary steps back from the fan, or potentially, the second fan in this instance.
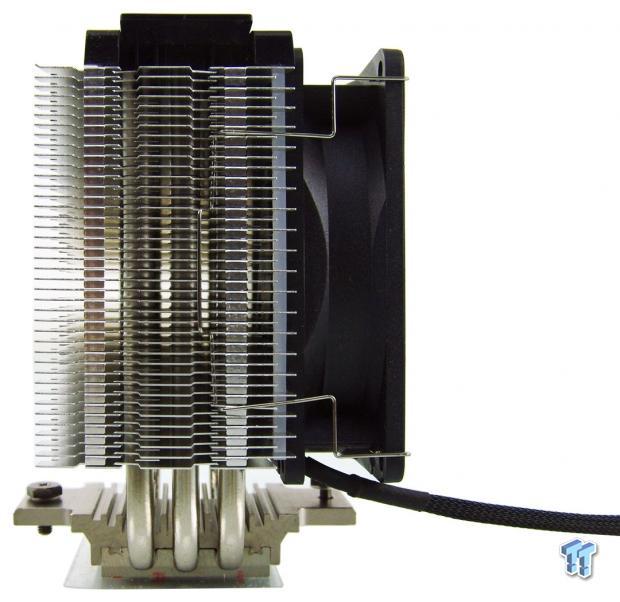
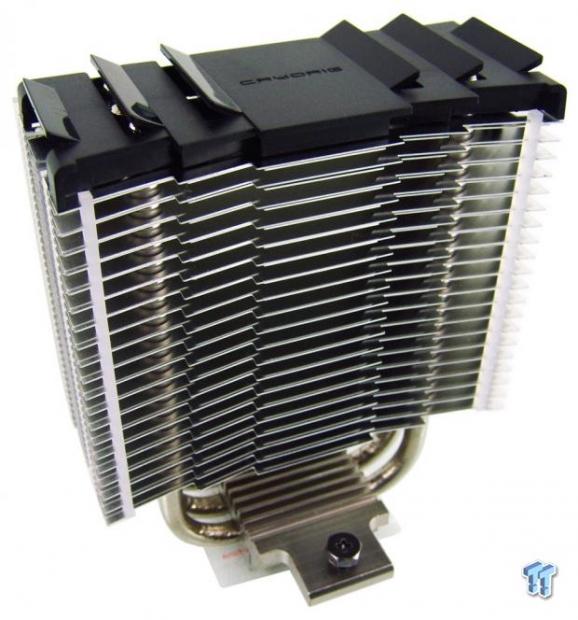
The right side of the cooler offers nothing we did not see on the other side, so at this point we would address the top of the cooler, where a thick black cap has been added to the stack to dress things up.
We also removed the fan from the cooler and found that the front edges of the fins are identical. So not only do they have fins that are offset front to back from each other, but the edges also allow the fan to build some pressure before the flow hits these fins.
The top of the cooler is black as there is a metal cap added to eliminate the exposed pipes from view. The Cryorig name is in the middle, and while there are three wings on either side, the center one is that way to allow the pipes to fit underneath.
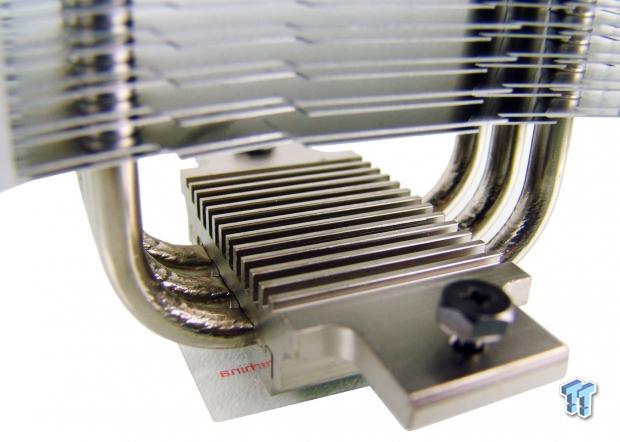
At the opposite end of the cooler, before we start looking under this, we stopped and took the time to get an image of the small pre-cooler that has been designed into the top section of the base assembly. While these do not make a huge difference, a degree or two is likely very appreciated in such a small cooler.
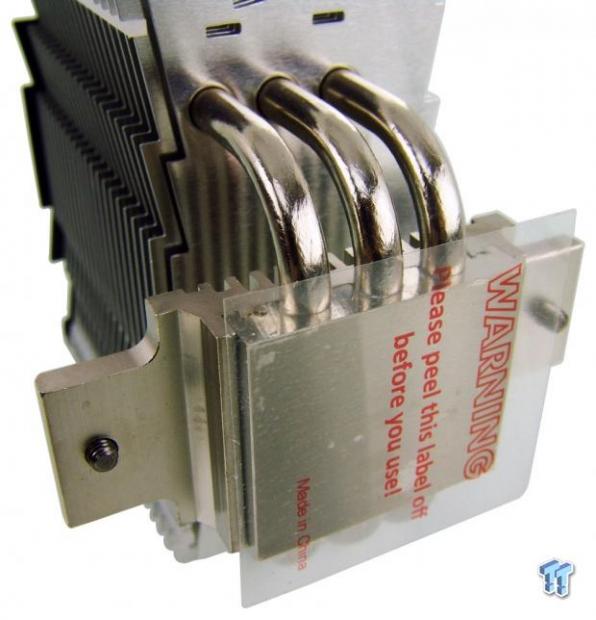
We mentioned earlier that screws are pre-installed in the wings of the top base section, but there are threads there, so be sure to allow the screws to go all the way in for easy mounting. The base of the cooler is protected with this layer of plastic, which keeps air off the metal to prevent oxidation.
The base is only just slightly convex in the center, and is machined finely, but not polished. Polished or not, this is better than a lot of coolers we test, and they all seem to do just fine.
Accessories and Documentation
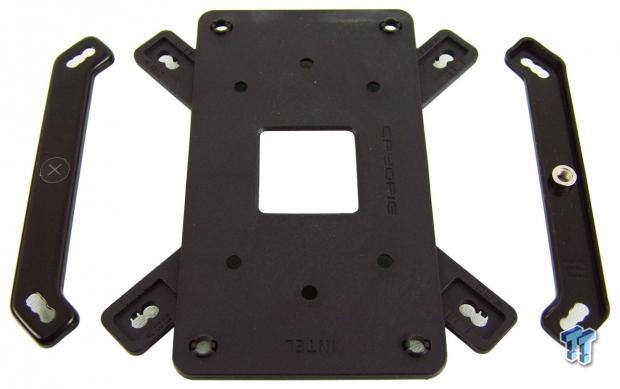
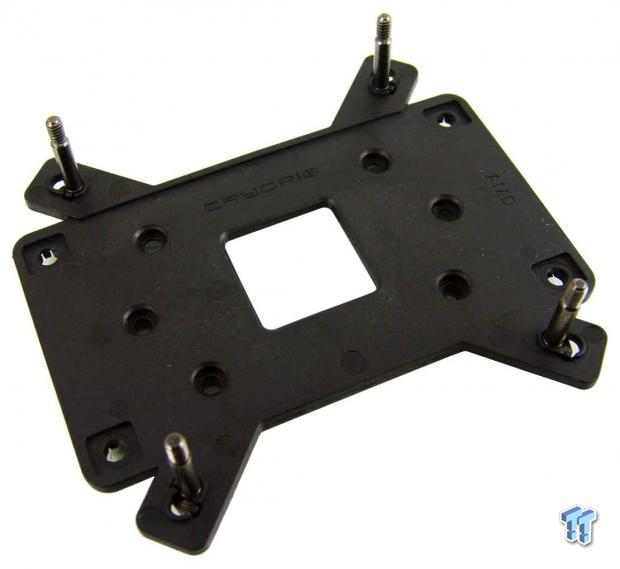
We have the Intel backplate in the middle here, made of plastic, and it has three holes at each corner and grooves to lock in the hardware. On either side is the number two part of the gear, the top brackets that allow the cooler to be screwed into place.
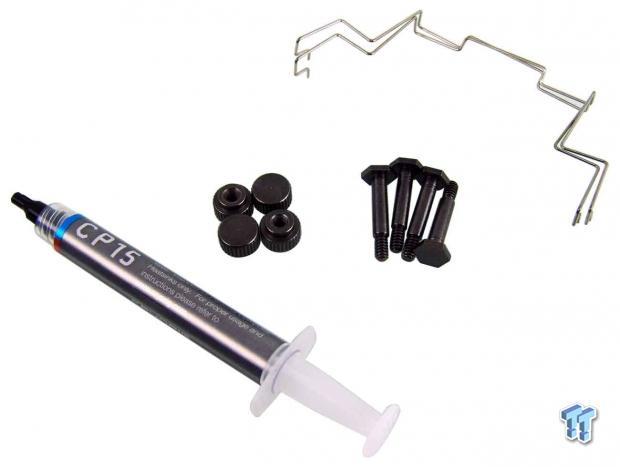
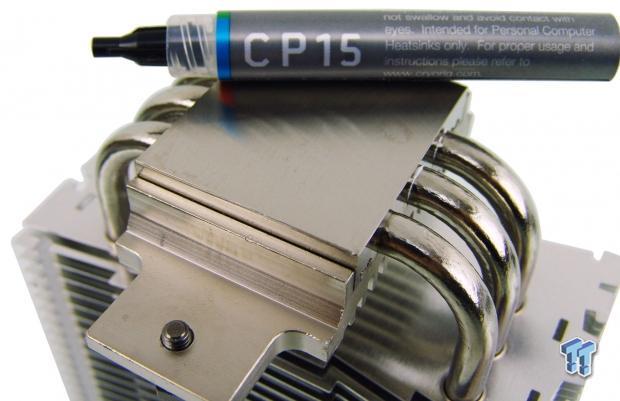
We also found a second set of wire fan clips, as well as some rubber strips that isolates the optional fan. In the middle, we see the nuts that lock down the brackets, and the studs to the right of they that they lock onto. This leaves the large tube of CP15 thermal paste.
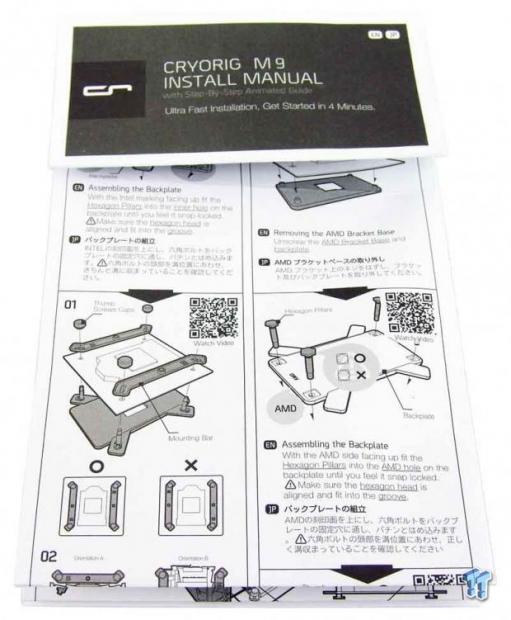
The manual offered is folded up small enough to fit in the box, but once unfolded offers everything needed. They also offer just one set of instructions, one section covers AMD installations with text and renderings, and a whole other section covers Intel mounting.
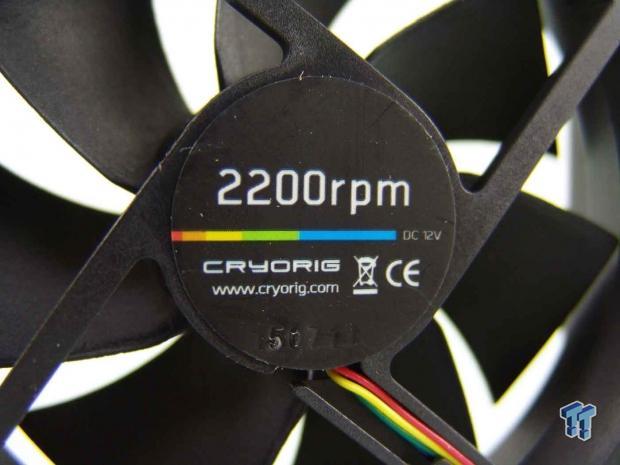
If you do plan to opt in for a second fan, the sticker on the hub offers no model number. All we see here is that this is a Cryorig fan that spins at 2200RPM, nothing more.
Installation and Finished Product
The instructions tell us to take the studs supplied with the hardware and to push them through the middle holes at each corner for LGA115X. Also, make sure that the Hex heads on them are aligned with the other side of the backplate, so they lock into place properly.
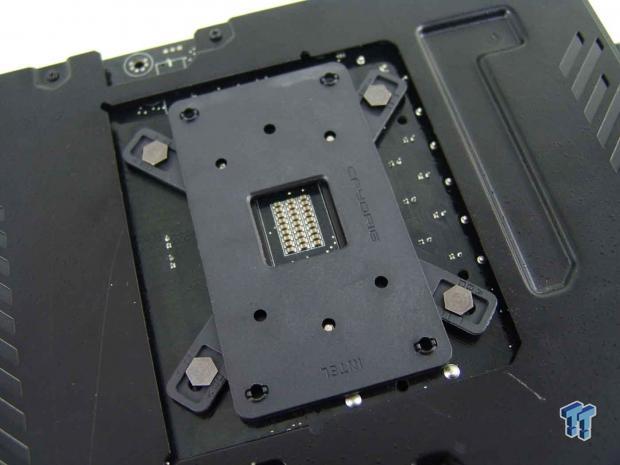
The backplate just fits our Sabertooth opening and is made to work both ways as either end is drilled with all the holes needed to clear the socket screws. You can also see what we meant about aligning the screws to fit in the grooves of the backplate.
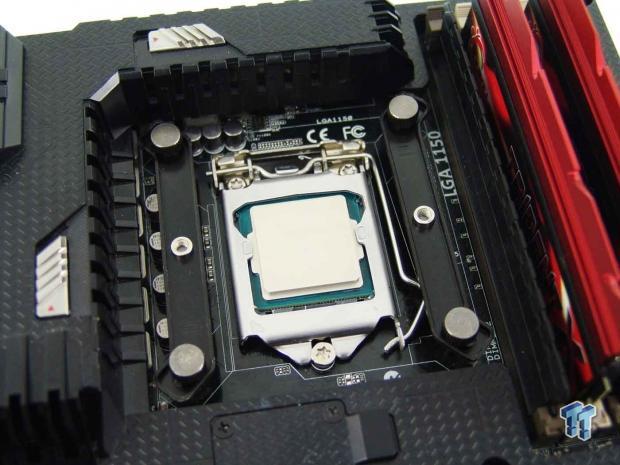
The studs are only threaded so far, and the top brackets rest on the fatter part under those threads. Then to lock it all down, you screw on and tighten the four knurled nuts. Also, make sure you see threads in the brackets and not the sticker with an X on it denoting they are upside down.
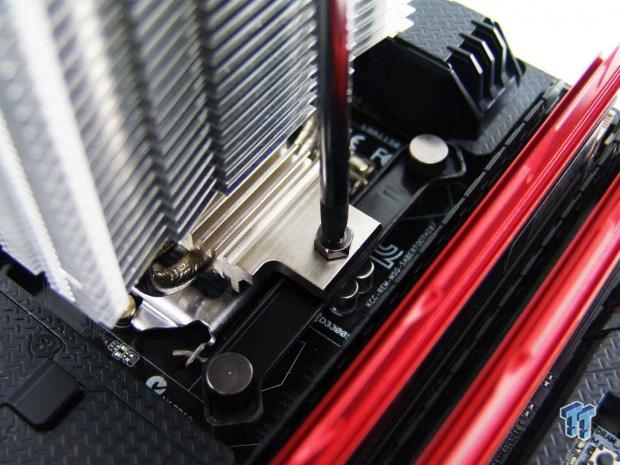
The fan does need to be removed to gain access to both of the mounting screws. Getting this mounted though is simple, just swap screws every few threads, and when they run out, you are done.

With a medium sized tower like this, we find the majority of the fan is still drawing in fresh air, with very little of is hiding behind the memory. We can also see it does not sit near as wide as many other tower coolers do either.
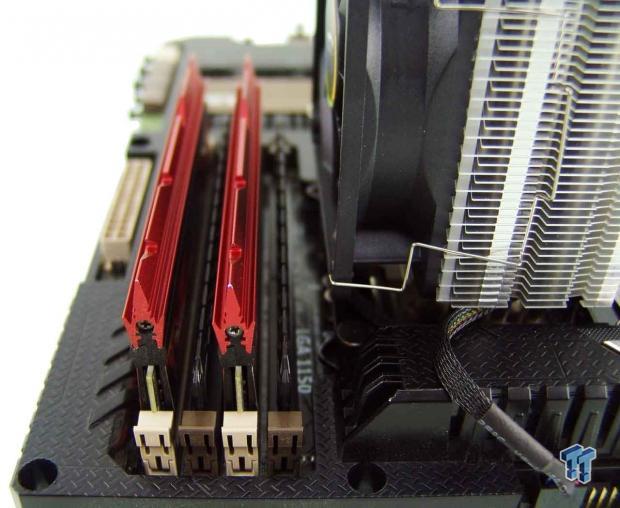
The box plainly stated that there is zero interference with RAM and this cooler, and this image proves this to be true. There is no issue with populating all of the slots, and swapping them out without removing the cooler is fully possible.
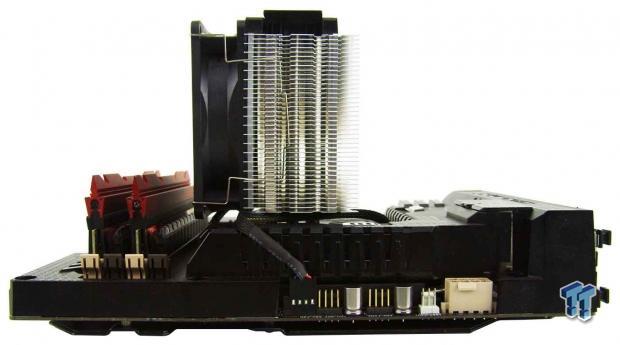
From the top, we see that the cooler does not take up much room on the board either. Even if you added in a second fan, you are just filling the gap left for the socket clearance.

Now that all of the gear is in the chassis and we have a chance to step back, we do like the look if the cooler. It clears everything around it, and as you will soon see, is more than capable for its size too.
Test System Setup, Thermal Tests, and Noise Results
Chad's CPU Cooler Test System Specifications
- Motherboard: ASUS Sabertooth Z87 - Buy from Amazon
- CPU: Intel Core i7 4770K - Buy from Amazon / Read our review
- Memory: G.Skill F3-2666C11D-8GTXD - Buy from Amazon
- Video Card: HIS Radeon HD 7950 IceQ - Buy from Amazon / Read our review
- Storage: Patriot Torch 120GB - Buy from Amazon / Read our review
- Case: IN WIN D-Frame - Buy from Amazon / Read our review
- Power Supply: SilverStone ST85F-G - Buy from Amazon / Read our review
- OS: Microsoft Windows 8 Professional 64-bit - Buy from Amazon
- Software: RealTemp 3.70, AIDA64 Engineer 5.20.3400 and CPU-z 1.72.1 x64
I would like to thank ASUS, InWin, Patriot, and Fractal Design for supplying products for me to test with.
To see our testing methodology and to find out what goes into making our charts, please refer to our CPU Cooler Testing and Methodology article for more information.
Thermal Results
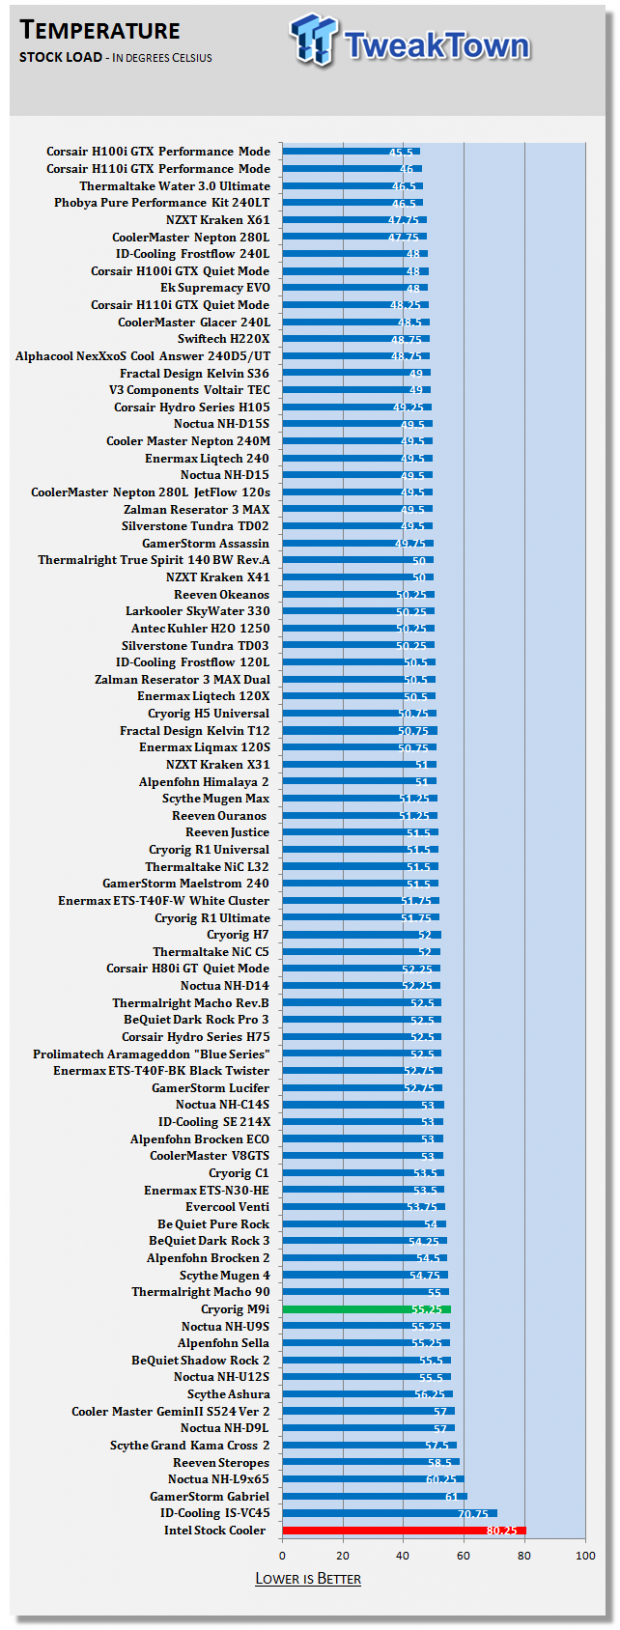
Our chart is a bit unfair as we are pitting the M9i against everything we test, and it appears that the 55.25-degree result isn't all that good. Looking closer, though, it is number two top of the list when it comes to coolers with fans smaller than 120mm.
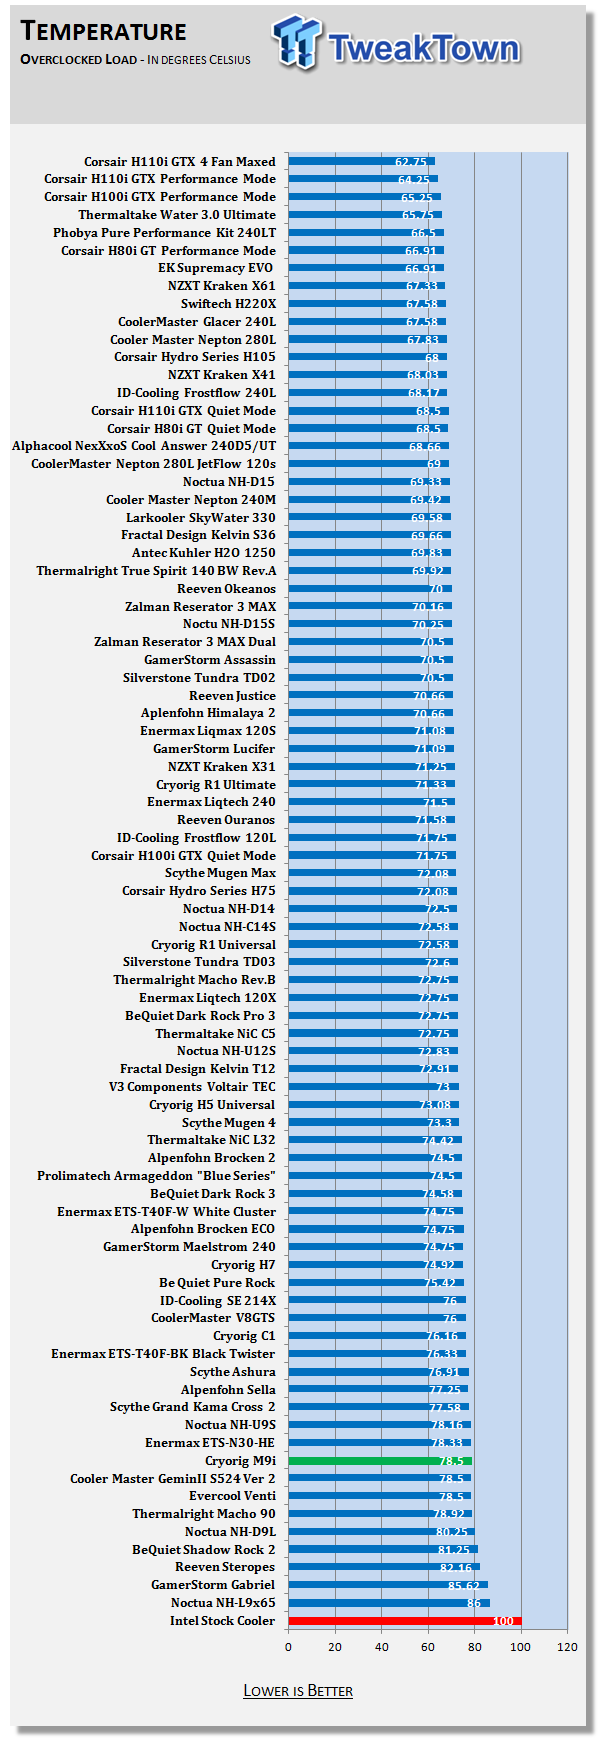
Again the 78.5-degree result looks a bit bad when shown in this chart. The reality is that it is not the best performer in its category but is still within a degree or so of the leaders. To be honest, we weren't even sure the M9i had enough to take on this 4770K, but it did just that and still was more than twenty degrees from the throttle point.
Noise Level Results
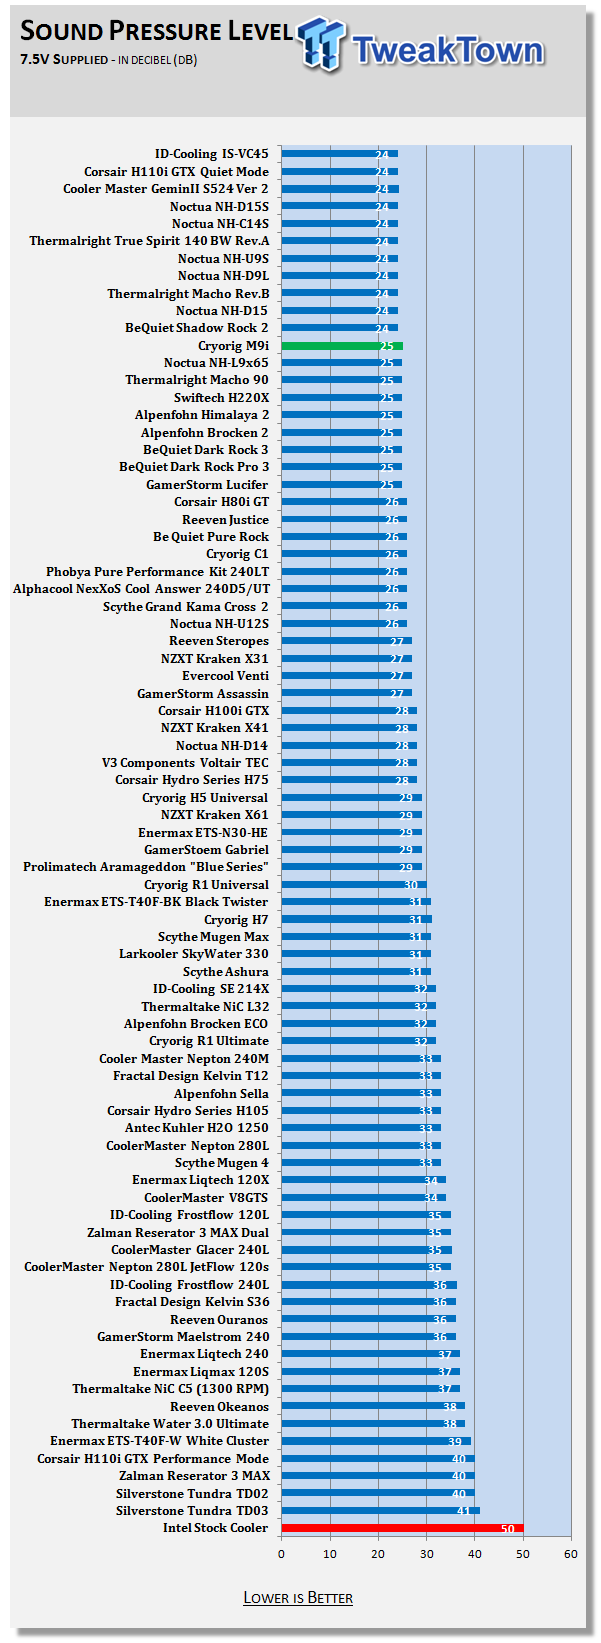
When noise comes into the picture, the M9i, and its 92mm fan do well. With the speed of the fan reported at 1430RPM, all we could get from this cooler was 24dB at a foot of distance.
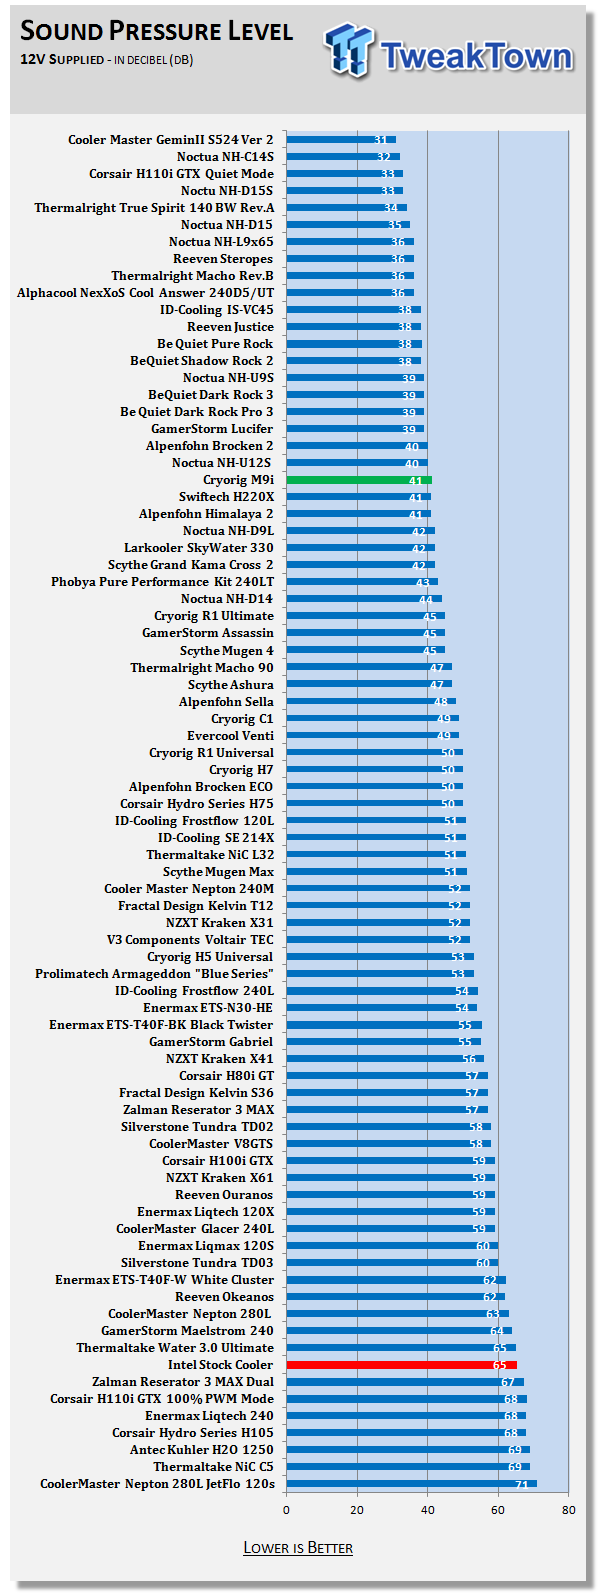
Even as we saw this fan spool to 2224RPM, the noise level never went above 41dB. What we know of the past coolers, usually a fan this small meant a ton of noise too, and in the M9i you get a near silent solution with decent results.
Final Thoughts
Initially, we started to fall into the bigger is better mindset when we first pulled the M9i cooler out of the box. We thought to ourselves this looks cool, then almost giggled as we assume trying to overclock with this cooler was not going to end so well.
The reality of this cooler is that you are dealing with a super-efficient design. All of the tricks like the staggered edges of the fins, the shape of the leading and trailing edges, every bit that went into this design took a cooler we were used to seeing in the early 2000s and brought it up to snuff to run and cool anything across the entire LGA115X lineup. Shockingly by the time it was over, we found ourselves looking at a smallish cooler that does have the ability to impress. Not only in style, but in space savings, clearances, and compared to most of what shows up in our charts, comes at only a quarter of the price of the top contenders.
Everything about the mounting hardware is super solid and well thought out. Studs that lock into the backplate, so they do not spin, no need for extra spacers, and the studs do that job too, and solid brackets and nuts to lock all of that together. We also like that you have to work to get the screws out of the base, so when it comes to mounting the M9i, the screws are right where they need to be, and there is no need for a second hand to hold the screw, the base does that for you.
Also considering the fan that cools this tower is a meager 92mm fan, we are shocked at the thermal results this cooler accomplished with just 48CFM of air flow, but this is also where it helps to have high static pressure as well. We would also like to address the fact that this 120W TDP is about as on point of a rating as any we have seen so far.
This may not be a cooler that you are showing off to all your buddies when it comes to who has the biggest and baddest air cooler in their rig, but the M9i does afford a fair bit of style with the wings and louvers designed into the top of this cooler and the shape of the fins just under it. The thing is, though, while all of your buddies may have e-peen bragging rights, it is likely that you are going to be happy with the results that the Cryorig M9i delivers both thermally and audibly, and still have a pile of cash in your hand for a game or two, while your buddy's cooler is looking cool with nothing to do.
Cryorig has impressed us and also shown us that you don't need a monster tower when it comes to air cooling to get the most out of your system, and at just $25 for the M9i, it's a brilliant price.
 MOAIPLAY ORA PRO G1 850W ATX 3.1 PSU Review: high efficiency and 10-year warranty for $119.99
 NZXT H6 RGB+ Compact Dual-Chamber Chassis Review
 Lian Li HYDROSHIFT II 360P OLED Curved Liquid CPU Cooler Review
 ID-Cooling FROZN A620 SLK CPU Cooler Review
 GAMDIAS Atlas P6 CG Dual Chamber Mid-Tower Chassis Review
 Apple's first touchscreen MacBook Pro is '100% confirmed', leaker says
 AMD reversed a warranty rejection for a swollen Ryzen 9 7950X3D after Hardware Unboxed called it out publicly
 ASUS' $50 ROG Equalizer cable meant to stop GPU connector burns reportedly burns itself
 Intel's 18-core Core Ultra 7 251HX is matching its 20-core siblings in early PassMark results
 Elon Musk is the world's first trillionaire - enough to spend $1 million a day for nearly 3,000 years
 Anthropic's latest AI model 'Fable' was so powerful the US government banned the world from it
 Xbox prioritizes Elder Scrolls VI, Fallout, and Halo in new strategy shift
 Xbox exec wants to use ads to open up new access points, not just to collect money
 Redditor buys RTX 2080 Ti Super engineering sample on eBay, has the same number of cores as an RTX Titan but half the VRAM
 Report: Xbox may be spun off into subsidiary or joint venture with another company
 Navman MiVue Smart True 4K Surround Dashcam Review - Seeing In All Directions At Once
 IQUNIX Magi96 Pro Aluminum Low Profile Mechanical Keyboard Review - Premium Build, Satisfying Sound
 Asetek Forte S-Series Racing Simulator Bundle Review
 Razer Pro Type Ergo Wireless Split Ergonomic Keyboard Review - Built for Comfort and Support
 ASUS ROG Strix Morph 96 Wireless Gaming Keyboard Review - Great Performance, More Affordable
 SAPPHIRE Radeon RX 9070 GRE PULSE OC Review - A New 1440p Challenger Has Arrived
 ASRock Radeon RX 9070 GRE Steel Legend Review - The RDNA 4 Mid-Range Reshuffle
 ASRock Z890 Taichi Aqua Motherboard Review - Flagship features without the flagship price
 This Windows security feature protects Documents from ransomware, but it is off by default
 Windows 11 already has a voice typing tool, and it is the one most people are not using
 Quick Assist is the only remote-support tool I open when a relative calls about their PC
 The PowerToys utilities I keep enabled on every Windows 11 PC, and the ones I turned off within a week
 TweakTown's Best of Computex 2026 Awards - The Best Hardware, Gaming Gear, and AI
 Phison E37T SSD Controller Exclusive Preview - The Fastest DRAMless SSD Platform Yet
 USB Ports Not Working in Windows 11? Try These Fixes
 ASUS WiFi Routers and Networking Solutions Deliver Long-term Security and Reliability with No Additional Cost
 Second Monitor Not Detected in Windows 11? Try These Fixes
 Turn Your Old Smartphone Into a Dedicated Webcam for Your Windows PC