


Introduction

Thinking back to the last chassis we looked at from SilverStone's Precision series, I am bringing up images of a case shaped sort of like an Antec 900, but with a slight bulge in the front bezel, while everything was black, inside and out. There was ample wire management, good drive bays that functioned well and decent cooling. Spiking my interest, I just went back to the images and quite frankly, the PS05 was stylish, yet plain enough to fit just about everyone. Change is afoot for those who appreciated the Precision series chassis in the past.
This time around SilverStone took the PS05 and gave it a whole new feel and look. Not only are most of the exterior features new, there are plenty of new additions to this new submission, while just keeping the essence of the shape and style of the PS05. Think about it this way. Take the PS05, give it a facelift both outside and inside, add updated functionality, a window, a few splashes of blue accents and Raven-like inspirations as well.
Of course, this is just my take on what the PS05 and the new arrival to me are all about. I think the best thing to do is take a closer look at the SST-PS06B-W chassis SilverStone has sent me. As I spin through this review, I will point out where the case has improved and where the chassis may need a little bit of work. Hopefully at the end of reading this you will know if this budget friendly chassis is the perfect home for your next build. So run and grab a soda, and get comfy, because there is a lot to show off with the latest of the Precision series from SilverStone.
Specifications, Availability and Pricing

Outside the PS06 you will find yourself looking at a mass of black steel and black plastic trim with light blue accents on almost every side. Down the front there are five 5.25" bays with molded covers matching the face of the chassis. Below this is the 120mm intake fan and it is covered by a black mesh panel which houses the SilverStone logo in the middle of it. Down both sides of these there is a blue stripe of color that zigzags down the front in a random fashion, adding a bit of pop! The top of the chassis is also mostly plastic, but offers a large tray area to house USB drives or car keys, the front I/O and a large mesh and plastic cover over the 180mm exhaust fan bolted to the top of the chassis. The left side of this version has a large rectangular window with the main body of the panel being composed of steel painted black. In fact, the whole chassis gets constructed of 0.7mm thick steel before the plastic top and front bezel get added.
Inside and around the back of the chassis there is quite a bit going on. There is room for the five ODD's that I mentioned, but there is also a hot swap bay for 2.5" and 3.5" drives right in the front of the chassis. Under this you will find room for up to four hard drives. The rack these install into is removable from the chassis for easier installation. On top of that, these are special trays. The hardware is movable from one set of holes to the other set. This allows you to install the drives with the wires facing the window (as shipped), or by swapping things around, you can wire it all in the back, as the drives will now install in the opposite direction. The motherboard tray has all the management and access holes one would expect, and even a native pin style connector for the USB 3.0 in the front I/O. It seems SilverStone tried to offer everything they could in this chassis and that is down to details like a multi-positional power supply support and hidden dust filters.
Looking around at the pricing of the PS06 with a window, I am pleased at what I see. While pricing looks terrific, the availability is still a bit low and looking via Google shopping, this is confirmed. Out of the five or six locations, you can find the chassis listed as low as $89.99 or up to $100.91, some with and without shipping charges, and even one with a rebate. An average price amongst the group, Newegg.com's listing of $99.99, is prior to both the rebate and shipping charges. Even with all that said, this looks like a feature rich chassis for the near $100 budget price tag. Let's delve a bit deeper into the chassis and see if SilverStone deserves your Ben Franklin over the rest of the competition.
Packaging
The Packaging
Our Latest Mid-Tower Cases Review Coverage

The SST-PS06B-W comes in a plain brown box to help keep costs down. I mean, do you really need the box to be flashy to sit in your basement while the case is on your desk? Found here is a head on look at the PS06 with a list of seven features to its left.

The features that got listed on the front are repeated nine more times here in as many languages.

The rear panel gives you a much better idea of what's going on inside of the chassis. Eleven features are pointed out around and inside the PS06.

The specifications chart on this side shows there is a windowed and non-windowed version of this chassis. We are testing the black windowed version of the PS06 today.

Styrofoam end caps and a thin plastic liner is all it takes to get the PS06 to my house in great shape for me to present to you.

Once the foam and plastic liner are out of the way, there is one added layer of protection in this instance. With the Windowed version of this chassis, both sides get an application of static clink plastic to keep the window as perfect as possible.
The Silverstone SST-PS06B-W Mid Tower Case

If you haven't picked up on the accent color of the PS06, here it is. The light blue zigzag down the front of the chassis is bold, yet I still like it. The shape of the chassis takes its basis from the PS05, but the angled lines and accent strip is more along the lines of the Raven line.

The top has the bold accents as well. This time they surround a large tray that also contains the front I/O, consisting of the two USB 3.0 ports and the audio jacks. Behind all of this is a removable cover over the top exhaust fan.

Flip the case over and remove the covering mesh and plastic with an easy to find latch at the rear of the case, it reveals the 180mm Air Penetrator fan pre-installed and pre-wired to a switch in the rear of the chassis for HI and LOW settings.

The left of the SST-PS06B-W has what the W signifies, a window, and a large one at that! Also, you can really see the similarities in the outer shape of the PS05 here as well, but the PS05 didn't have those bold accents at the top.

The rear of the chassis has all your basic wants and needs covered. Things to point out are, the logo at the top which is where the release for the fan cover is and the PSU also installs in the bottom and the large plastic handle under it to remove the filter I will show you in a minute.

The right side of the PS06 is pretty plain with a large panel of black painted steel, but again, just a bit of flash at the top with the light blue accent.

Under the chassis the PS06 gets supported by the large rails in the back that holds the large filter laying in front of the chassis. The front of the case uses the large round rubber feet to keep this chassis stable.
Inside The Silverstone SST-PS06B-W Mid Tower Case

With the panels off the chassis we get to peek in the inside of the chassis. Here are all the power, reset, HDD activity, and LED power wires along with the USB 3.0cable and HD Audio lines are all tied to keep them from scratching the window. The hardware can be found in the blue bag tied to the drive rack, but the book is packed outside the case.

Down the front there are five usable 5.25" drive bays, all with tool-free latches. The sixth bay has a 4-pin Molex line and a SATA line coming from the back of the hot swap bay. Under all of this there is still room to house up to four hard drives in the rack at the bottom.

Two thumb screws hold the hard drive rack in place. The whole rack can be removed for easier installation of the drives. The sides of the drive trays are actually pretty cool, the hardware moves to allow you to install drives with the leads on either side of the bays.

The motherboard tray is clearly marked for each compatible motherboard. While moist of the risers are bumps in the tray, a pair or more risers need to be installed to finish the job. Four large wire management holes flank the right and bottom of the tray, and there is a large CPU cooler access hole that also allows for the 8-pin EPS cable.

The back of the chassis provides ventilation and all the ease you need to install you goods. What is notable here is the fan clip installed in the rear of the chassis. While there is no fan, SilverStone adds a clip in, clip out fan holder to make installation quick and easy.

The floor of the chassis has room for a 120mm fan to be installed at the right, but the majority of the space is used by the power supply and the rails for the adjustable PSU brace.

The rear of the chassis has room to the left to hide wires, and a few spots o tie down wires here and there, but there is actually little room behind the tray. If not for the doors opening like car doors getting wiring tidy in here would be a lot tougher.
Accessories and Documentation

The manual got a little bent up as it got shipped under a foot of the chassis, but it is still very readable. The manual goes through all of the steps and even shows off the new USB 3.0 motherboard header and how to install it. If the text gets you confused, the images should get you through any rough spots. The chassis is very intuitive and there was only one feature that almost got passed my radar, but I eventually picked it up. I will show that here in a bit, but the rest of the build was smooth with only one major issue.

Remember that blue baggie full of hardware? This is what you find inside. A few risers so you can install the motherboard, a set of screws for the optical drives and a full set of screws for the hard drives. In the middle is a USB 3.0 motherboard connector to USB 2.0 header adapter. If your motherboard does not have a pin style USB 3.0 port, you simply add this and plug them into an open USB 2.0 pin port. The larger screws on the right are for both the motherboard installation and for the power supply.
The Build and Finished Product

I have an odd habit of installing the OD in the lowest position, but even so the black on black with blue accents still looks really attractive.

I can't move on and not show off the hot swap bay. It will hold a 3.5" drive in place, although I don't recommend traveling anywhere with it in there, or a 2.5" drive. The door is spring loaded and the bay seems fairly easy to use, as I had no issues while messing around and testing it.

Thanks to all those over at Gigabyte, I now have respectable hardware to show off inside of a chassis worthy of a full ATX motherboard. The Z68X was a perfect fit in the PS06, almost down to the finest detail, almost!

Here is the only issue I have with the PS06. The HD audio cable is about 4-6" too short. As you can see, it barely makes it to the motherboard, let alone the header, which is just out of frame to the left. The only way I can make any connectivity is to drape it over my card and it barely makes it to the header, looking really bad in a windowed chassis design.
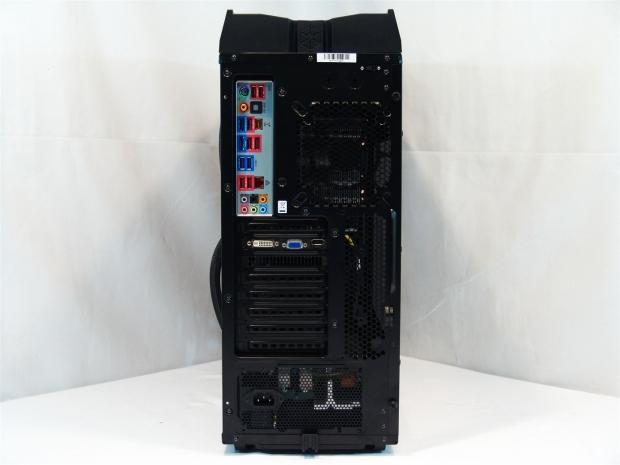
With all the black additions to the chassis like the PCI-e card bracket and the power supply give the back a very finished look. All that black also makes that rear I/O plate pop and much easier to see.

The rear of the chassis did allow for the 8-pin EPS cable and the 24-pin to pass behind the tray. Be thorough with your routing though, over lapping cables are not a good thing here. Even with me tying the wires tight and hoping the panel would press the others into place, the door does warp a fair bit closing it and inserting the thumbscrews.

With all the goods installed I had to place the panel back on and get ready to apply some power to the new test rig. The large window gives you a full view of everything on the board, but it also allows for a view of the drive bays, if you like that sort of view.

This is the little feature that almost slipped past me! There is a fan filter for the front 120mm intake fan. This filter will also slide out of either side of the chassis.

The only light that stays on long enough for the photo is the blue power indicator LED under the power button on the left. The right side, under the reset button, is a white LED to indicate activity. Aside from these two lights and the flicker of the DVD drive LED, there is no other lighting to speak of.

One last image of the PS06 standing tall, showing off its sexiness!
Final Thoughts
I really liked the PS06 Window experience. The case starts with a flashy, yet attractive exterior to draw you in closer, and keeps on giving with USB 3.0 connectivity and a hot swap bay outside as well. On the inside, it gives you sleek black all over. The bays are all tool-free and easy to use. The hard drive bay assembly being removable is nice and something I like to see in chassis designs these days. The motherboard tray has limited wire management options behind the tray, but still offers places to route them there, and I was able to achieve this, but at the expense of flexing the back panel a fair bit to get it locked into place. All around the PS06 has been a pleasure to deal with and use.
The issue that did rear its head during the build doesn't affect me personally as I rarely use the front panel audio. Not being able to have that option without the cable draping out in the open is a bit ridiculous, though, in my humble opinion. I mean if this case didn't have a window, maybe, but it does and running the cable that way just looked wrong and out of place. I guess I could have gotten "shorted" in the cables, pun intended, but it is still an issue that needs addressed if this is a "normal" cable length for them.
Cooling inside the chassis is great, although it does come with up to 34 dBA of noise from the 180mm Air Penetrator at the top. For those who still want good air flow and don't want all the noise, look at the top of the rear of the case. There you will locate a switch to turn the fan down to a more acceptable 18 DBA. At this point with the top fan lowered, I could just start to hear the CPU fan wind up over the noise of the chassis. While the chassis only comes with two of the fans out of the four possible locations, the addition of the Air Penetrator is a far better choice than more 120mm fans to match the one in the front intake position. With the rear and floor of the chassis ready for a pair of fans as well, the cooling potential can only get better. With the removable top, front filter and dust filter under the chassis, maintenance is kept easy and the interior should stay clean for months to come.
All things now out in the open and I'm taking them all into consideration, the SST-PS06B-W is still one heck of a deal, even with the audio cable issue. Look around, pickin's are slim, but the pricing of this chassis is really almost unbeatable. You are getting a very original looking chassis, it has native USB 3.0 support, a hot swap bay in the front, a window, and it's super easy to work in and build with. If it has slipped your mind at this point, realize that you are getting this entire chassis for less than $100 before taxes and shipping. Currently Directron.com has the best deal out there, but for those of us in the states who prefer a bigger e-tailer, Newegg.com has it for $99.99, and after rebate and shipping will set you back right around $110. Not too shabby at all and with price considered, and hopefully a longer HD audio cable in future cases. I can't think of reasons to not like what SilverStone offers in the PS06B-W mid tower chassis.
 Montech TG3 Mid-Tower Chassis Review
 Noctua NL-LC1-36 Liquid CPU Cooler Review
 Lian Li B4-mATX Review: a compact mATX SFF case with excellent airflow and premium features
 Ocypus Sigma F36 BK ARGB Cooling Fan Review: high airflow and unified design in one frame
 PCCooler CPS RZ820 Display Review: a flagship-level CPU air cooler with an LCD screen
 Redditor buys an RTX 4080, opens it up to find no GPU die or VRAM inside
 NVIDIA GPU rumors swirl claiming major price hikes of 20 to 30% - or more - are coming, as VRAM costs climb
 AMD's RX 9050 GPU comes up short in first review, but there's a good reason why it lags behind NVIDIA's RTX 5050 here
 Sony confirms it won't reverse disc phase out: 'We're going to cautiously move forward'
 GeForce RTX 50 Series GPU prices are rumored to increase by 30% in the coming weeks, months
 TSMC's 1.4nm process timeline accelerates, with mass production happening sooner than expected
 Diablo 4's next season is bringing back iconic items from Diablo 2 and 3
 Razer Huntsman V3 HE Magnetic 8K keyboards include a Mini 65% model
 Four C's of Xbox's future outlined in new CEO memo
 Linux kernel patch boosts Steam Deck 1% lows by 31.8% by fixing AMD CPU clock handling
 ASUS ROG Strix X870E-A Gaming WiFI7 Neo Review - A New Enticing Option
 Logitech G316 X 98 Wired Gaming Keyboard Review - Retro-Inspired Board that Falls a Little Short
 Biwin M560 2TB SSD Review - Best Overall Retail-Ready DRAMless SSD
 Logitech G512 X 98 Analog Mechanical Gaming Keyboard Review - An Innovative Two-in-One
 Thrustmaster T.Flight HOTAS 5 MSFS Edition Review
 SteelSeries Arctis Nova Pro Omni Wireless Headset Review - One Headset to Rule Them All
 SteelSeries Arctis Nova 7 Wireless Gen 2 Headset Review - New and Improved, But Is It Enough?
 AMD Ryzen 7 7700X3D Review - Days of Future Past
 I switched my PC to encrypted DNS in Windows 11, and browsing felt more private
 Printer Not Working in Windows? How to fix detection, print queues and drivers
 The Ultimate Guide to Personalizing Your Windows 11 Taskbar
 How to Turn Your Windows Laptop Into a Second Monitor with Miracast and Wireless Display in Minutes
 6 Mistakes to Avoid When Buying a Windows Laptop
 I capped Windows Update's bandwidth with Delivery Optimization, and my downloads stopped choking
 I use this decade-old free tool that finds files faster than Windows Search does
 I install and update most of my apps with this Windows command now, and I stopped downloading sketchy installers
 Hisense U6SF 65-inch MiniLED TV: High Performance Meets Leisurely Convenience
 I stopped digging through Windows menus after I set up this one folder