Introduction to Overclocking and Flow Chart
Overclocking Ryzen
AMD's Ryzen CPUs have been out for almost a year, and it's now time for us to put out an easy to understand and easy to follow overclocking guide for the CPU. The AM4 platform has matured a lot, and so things are much more stable and overclocking is easier now than ever. AMD offers two ways to overclock their Ryzen CPUs; through the motherboard's UEFI and through AMD's Ryzen Master application.

We are going to focus on the UEFI as AMD has done an excellent job of covering how to overclock with their software. If you aren't okay with overclocking in the UEFI you can read AMD's Ryzen Master OC Guide.
Flow Chart
The flow chart above is pretty basic but spells out some things you should know before you begin. At around 95C the CPU will throttle, so you want to stay at least 10-15C below that for safety. CPU core voltage maximum is 1.45v, and SoC voltage is 1.2v. AMD's Ryzen CPUs do not run off a VID table; they run between 0.2-1.5v depending on load and environmental characteristics, but when you overclock, you should not set anything above 1.5v (I doubt you could even cool a CPU at that voltage). You should expect a 3.9-4.1GHz overclock.
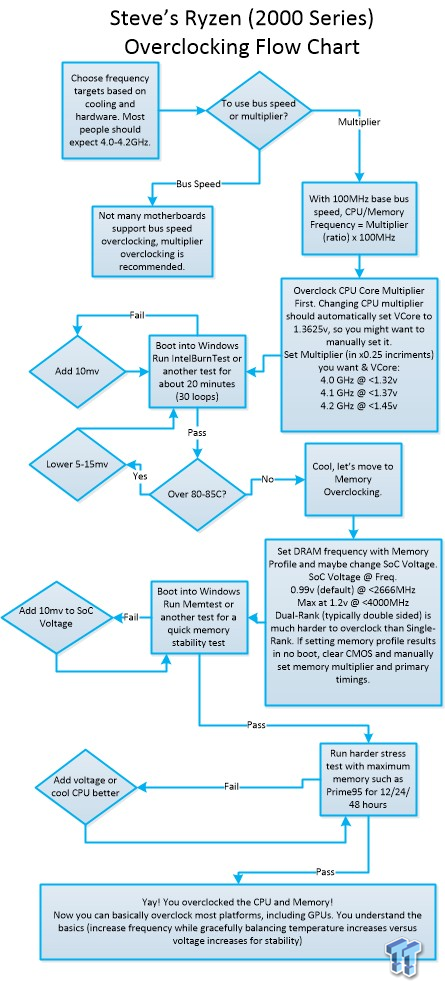
While temperature is typically your limiter, in this case, you will not be going over 4.1GHz on ambient cooling solutions. Some Thread Ripper CPUs can hit 4.2GHz, but Thread Ripper is made out of the top 5% of all Ryzen dies. I always aim for 4GHz, but I have seen some of my CPUs not hit 4.0GHz. The cool thing about the new processors is that their multipliers can be increased in 0.25 increments. AMD's AGESA code is the basic code AMD gives its partners to build a UEFI. AMD has made big leaps with code updates, especially on the memory overclocking side, and they publish a lot of information on their blogs as you can see here.

AMD Ryzen 7 2700X
| Today | Yesterday | 7 days ago | 30 days ago | ||
|---|---|---|---|---|---|
| CAD $375.00 | CAD $375.00 | CAD $385.00 | |||
* Prices last scanned on 5/8/2024 at 12:24 am CDT - prices may not be accurate, click links above for the latest price. We may earn an affiliate commission. | |||||
Disclaimer and Before You Begin Overclocking
Disclaimer: Overclocking your CPU technically can damage your CPU. TweakTown and the writer of this guide take zero responsibility if you damage or kill your CPU. There is also a chance that AMD will not replace a CPU damaged by overclocking. AMD states that "The limited warranty does not cover damages due to external causes, including improper use, problems with electrical power, accident, neglect, alteration, repair, improper installation, or improper testing".
Have you Overclocked Before?
If you have overclocked before and understand hardware selection and the basics of overclocking, you should skip to the next page. The first part of this guide is for those who want to know what to do before overclocking.
Where do I start?
Ryzen Overclocking Guide Systems
CPU: All Ryzen SKUs can overclock
Motherboard: You will need to use an X470 or B350 motherboard to overclock your CPU. A-series motherboards are designed to maintain standard reliability, so overclocking is locked on those motherboards. When looking for a motherboard to overclock with, the main limitation on the motherboard will be the VRM. Our reviews extensively cover motherboard VRM and we thermal test every motherboard, so look to our reviews.
DRAM: AMD and motherboard vendors have greatly improved DDR4 compatibility and speed potential, but we still recommend buying a kit off your motherboard's Qualified Vendors List (QVL). AMD's AGESA 1.0.0.6 code greatly increased DRAM overclocking potential, and increased maximum memory multiplier up to 40x, but so far most people are seeing 3200-3600Mhz as their limitation. There are also many vendors that have memory certified for AMD Ryzen; I highly recommend those kits. Also, you can look at the memory we use in our Ryzen reviews, as that exact kit has been validated by AMD to work at the speed of the profile of the kit.
Dual-rank modules are harder to find these days, but if you do come into possession of them don't expect overclocks similar to single rank kits. Single rank kits overclock much easier. Dual rank kits are typically double-sided modules.
Cooler: High-end air coolers or all-in-one watercoolers are recommended.
The maximum frequency of your CPU will probably be 4.1GHz, and the way voltage scales on the platform means that increasing cooling to crazy levels probably won't get you up to 4.1GHz. That means that even mid-range air coolers are good enough for most Ryzen overclocking.
PSU: I would leave about 150-200W aside for a nice overclock on an Ryzen 7 1800X.
You enter the BIOS/UEFI by hitting delete or F2 (on most boards) during boot up. For most boards you have basic and advanced modes, I always skip to the advanced mode and tend to navigate with the keyboard. To enter a setting you either type (or delete and then type), use +/- keys, or you click and scroll. Then you have to "Save & Exit" the BIOS/UEFI for the settings to apply.
CPU Multiplier and Voltages
CPU Multiplier
Every brand with an AM4 motherboard is included in all of our images of settings to alter. We have done this to include all overclockers.
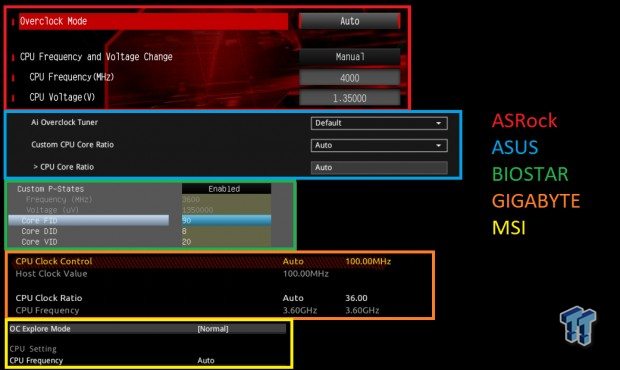
Some motherboards require you to choose a mode on how to overclock. ASRock might also include CPU Voltage in multiple areas; you should only need to change it in one place. ASUS allows you to choose to overclock with D.O.C.P/XMP mode, which is how we do it on their motherboards. It automatically takes up your RAM to its profile settings and then allows you to set CPU ratio. On Biostar motherboards at the time we tested, you could not easily input a multiplier. Instead, you had to rely on core FID and DID values, and Core VID could be used to change the VCore.
On the Biostar motherboard you can increase FID and leave DID at 8, and you will see the greyed out frequency increase or decrease based on what you do. On the GIGABYTE board you see above we just change CPU clock ratio. MSI has a normal and expert mode, we just use expert mode, but you can also use it normally. Remember you can change the multiplier in 0.25x increments so that you can increase CPU frequency in 25Mhz steps. Default voltage when you overclock should be 1.3625v, and you can change it, but on many motherboards, I just use the 1.35v that comes with default VID. Coincidentally my nice 1800X likes 1.35v for 4GHz.

There two ways you might be able to increase your overclock if you reach a thermal or other limit. You can disable Simultaneous Multi-Threading (SMT) which will remove the two threads per core feature of the CPU. So if you disable SMT on a 1800x (8 cores 16 threads), you will get only eight cores with eight threads. You can also turn off cores, and that can be done through Downcore Control. The good news here is that all motherboard vendors have decided to call these settings the same thing.
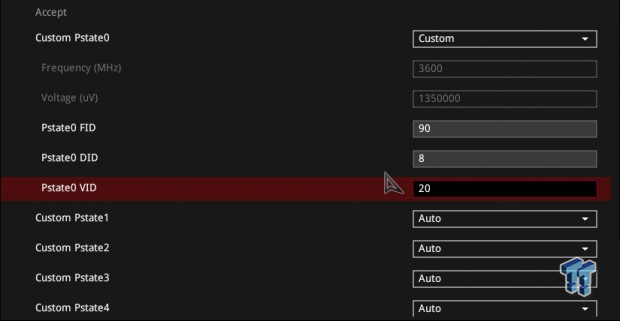
Some motherboards allow users to access AMD's CBS menu. Inside the menu, the settings are standardized as this is part of AMD's core part of the UEFI. If you navigate to AMD CBS\Zen Common Options\Custom Core Pstates and you accept the warning, you can actually change individual core P states and FID, DID, and VID. You can see the resulting frequency and voltage. I believe that VID is in hexadecimal. I wouldn't overclock through this menu, but there has been a lot of discussions online about it.
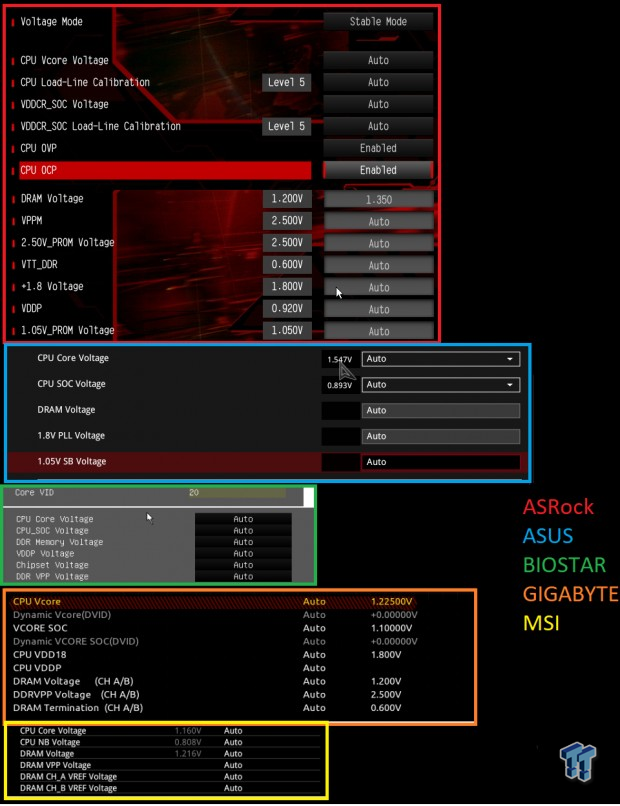
The main voltage you need to change to overclock the CPU is the CPU Core voltage; most vendors call this VCore. Don't set this over 1.45v for 24/7 use, although cooling the CPU at that high of a voltage is pretty though. I like to stay below 1.4v. By default the CPU VCore should go to 1.3625 when you overclock, you might want to change the voltage manually, so you aren't over or undervolting the CPU. You also can change the CPU SoC voltage, and that should increase memory overclocking potential. Default SoC voltage is 0.99v, and AMD recommends no more than 1.2v. There are also other voltages you might need to change, for instance on most motherboards you need to increase DRAM voltage to what your sticks want.
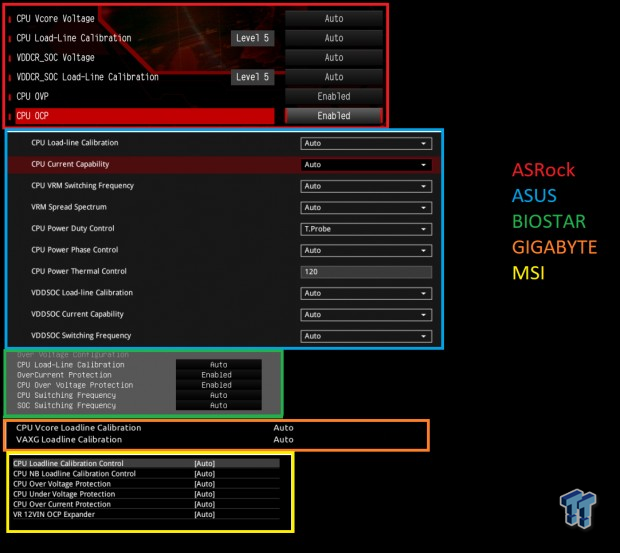
Depending on your motherboard you might also have VRM/PWM settings that control the external VRM's PWM controller. These settings can be used to stabilize a fluctuating voltage and increase power limits. Load Line Calibration (LLC) is used to stabilize fluctuating voltage, switching frequency determines the aggressiveness of the VRM (higher is more aggressive but less efficient), and over current and voltage protects can be increased to maximize output. You typically don't need to touch any of these settings other than LLC. CPU SoC LLC is called VAXG on GIGABYTE boards and NB on MSI motherboards.

Some motherboards might have a more basic VRM, and on those motherboards, you might not have the ability to set the whole voltage and instead just an offset. The offset is an amount added to the base voltage of the CPU, so that should be between 1.35 and 1.3625 when you change the CPU multiplier. The SoC should be 0.99v by default so your offset can be added to that.
Power and DRAM
Power Saving Settings
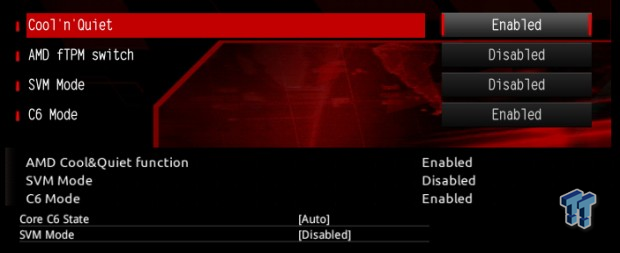
Most motherboard vendors have decided to call AMD's advanced CPU features the same thing. So AMD's Cool'n'Quiet can be disabled if you want to disable the CPU's low-power c-states and you can disable C6 as well if you want. On Intel platforms, many users disable virtualization to help increase stability (I tend not to bother), and on AMD SVM is virtualization.
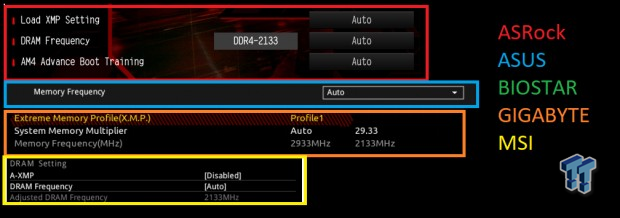
Vendors have taken it upon themselves to make up their own memory profile names. XMP (ASRock/GIGABYTE), D.O.C.P., and A-XMP are all the same thing. They enable a profile built in the memory module to automatically overclock it. It's a good idea on all motherboards to manually set DRAM voltage, and sometimes you need to set the DRAM voltage for each channel. DRAM voltage, frequency, and primary timings can be found on the DRAM module's sticker.
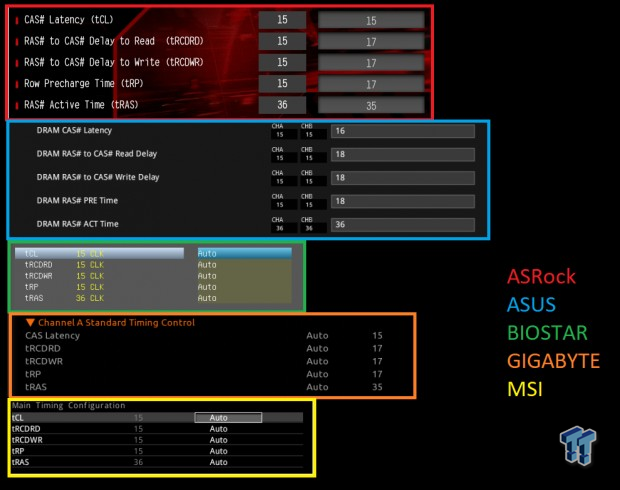
While AGESA 1.0.0.6 brought on a ton of more timings, many users might not understand the complexity of those timings and might just opt to change primary timings you see above. On some motherboards memory profiles might not work, in that case, you need to manually set your memory frequency and primary timings.
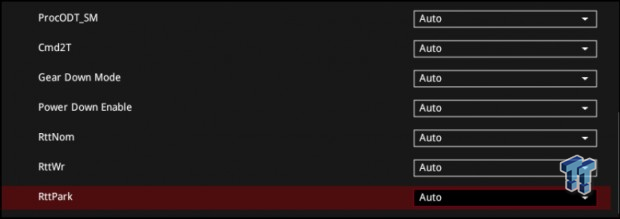
If you want to tweak the new timings and other features like gear-down mode, you can read AMD's block post found here. There is also a DDR4 PHY voltage, I see it more often on Thread Ripper motherboards, it's called CLDO_VDDP, and AMD states this voltage can solve some memory frequency holes. It's an offset voltage you can take up and down (both can be useful). It should be configured to DIMM voltage -0.1v, but you aren't to exceed 1.05v offset on this.
Stability Testing
I prefer running lighter (HandBrake) and more obsolete (IntelBurnTest, IBT) stress tests for quick testing to see how stable the CPU is while making one tweak after another. However, just running these types of tests and passing doesn't mean your CPU is 24/7 stable. Memtest is one of the most popular tests for testing memory stability. From my experience, if you can pass Handbrake encoding with a large 4K video or IBT, you aren't far off from your voltage required for 24/7 stability, but just running something like HandBrake or IBT isn't enough to say your CPU is totally stable.
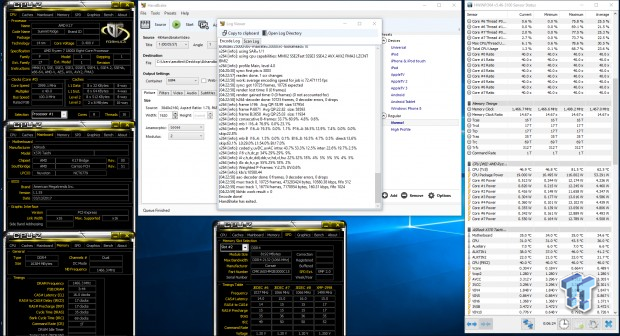
I like Handbrake for quick testing because it spits out a performance figure in FPS in its log and you can see throttling with that number, and it is a real-world test and uses AVX. However, AVX is not a huge issue for Ryzen CPUs because they don't have large dedicated AVX units built into them. I like Intel Burn Test because it does get your CPU very hot and if your system is very unstable it will freeze, but if it is mid-stable, it will error out while HandBrake will just skip to the end of the queue.
Some users will just go to the strong stress testers like Prime95, and run it for a day or two. I mainly use three stability testing programs; HandBrake encoding of a 4K video (very quick but shows performance and uses AVX), Intel Burn Test with a decent chunk of memory usage (has AVX and can be run however long you like), and Prime95 blend one day and small FFTs for another (latest version with AVX). Prime95 has a few different tests you can run. The default test is a blend test, which tests most everything, but isn't going to demolish CPU core instabilities as Small FFTs would.
AIDA64 also has a built-in test, and you can choose what you test (core, FPU, etc.) but I would increase the amount of RAM used in that test as the default value is a bit low. AIDA64 is considered a "safe" test by many, as it's not designed to beat your CPU up, but many believe you can't become a man until you get a really good beating. Over time, it's possible for certain stress testing programs to do better than others, and the best place to find this information is in the stress testing threads on overclocking forums.
When you stress test, it's also a great idea to keep a monitoring program up and running. I like HWinfo, as it monitors a ton of metrics and is often updated. I wouldn't keep up multiple monitoring programs. That means I highly recommend using a program like HWinfo and disabling or uninstalling any other software like motherboard monitoring software. It's also a good idea to not have a CPUz tab up either, as it polls the CPU a lot and HWinfo already reports on CPU speed. You might also want to set your Windows Power Plan to high-performance. Overall, in the end, some people recommend up to 2 days of stress testing to ensure your system is totally stable. The only thing to keep in mind in the long term is that any overclocking and hardcore stress testing can negatively impact the lifespan of your components, but overclocking is fun and can increase performance with ease.
