


Introduction, Testing Setup, & System Requirements

Doom 3's release in 2004 marked the resuscitation of one of the shooter series that started it all. While a fantastic game in its own right, it did stray somewhat from the fast-paced action of its forebears, to the chagrin of fans. Enter the recently released Doom, a reboot that brings back the classic formula and combines it with superb graphics, offering a package that's the best of both worlds.
While the game isn't perfect (there's a lot of handholding enabled by default as well as unnecessary RPG elements that employ a clunky console-centric interface, and a long-range ADS rifle has no place in Doom), on the whole it's a solid old-school FPS, complete with high difficulty that even multiplayer FPS gamers will find rewarding.
Doom is the first game to employ id Software's id Tech 6 engine, and does well to show off what it can do with impressive, high quality graphics and the best performance optimization I've seen since Alien: Isolation. In this guide, I'll take a look at both to help you achieve a nice balance as needed.
Test Setup and System Requirements
Our Test System
- OS: Windows 10 64-bit
- Processor: Intel Core i5 3570K 3.4GHz (Stock)
- Memory: Corsair XMS3 8GB DDR3-1600 (Stock)
- Storage: Crucial BX200 2.5'' 480GB 6GB/s SSD
- Video Card: Sapphire Tri-X R9 290X 4GB (Stock)
- Driver: Radeon Software Version 16.5.2.1
- Resolution: 1920x1080
- Input: Logitech G400 mouse, G.SKILL Ripjaws KM780 Mechanical Keyboard
System Requirements
Minimum:
- OS: Windows 7/8.1/10 (64-bit versions)
- Processor: Intel Core i5-2400/AMD FX-8320 or better
- Memory: 8 GB RAM
- Graphics: NVIDIA GTX 670 2GB/AMD Radeon HD 7870 2GB or better
- Storage: 55 GB available space
Recommended:
- OS: Windows 7/8.1/10 (64-bit versions)
- Processor: Intel Core i7-3770/AMD FX-8350 or better GHz
- Memory: 8 GB RAM
- Graphics: NVIDIA GTX 970 4GB/AMD Radeon R9 290 4GB or better
- Storage: 55 GB available space
Window Mode, Resolution, Anti-Aliasing, & Motion Blur
Window Mode
This lets you choose between the well-known fullscreen and windowed modes (the former better for performance, and the latter better for multitasking), or the somewhat less well known Fullscreen Borderless mode, which appears identical to Fullscreen, but allows for quick switching between the game and other tasks at the cost of game performance.
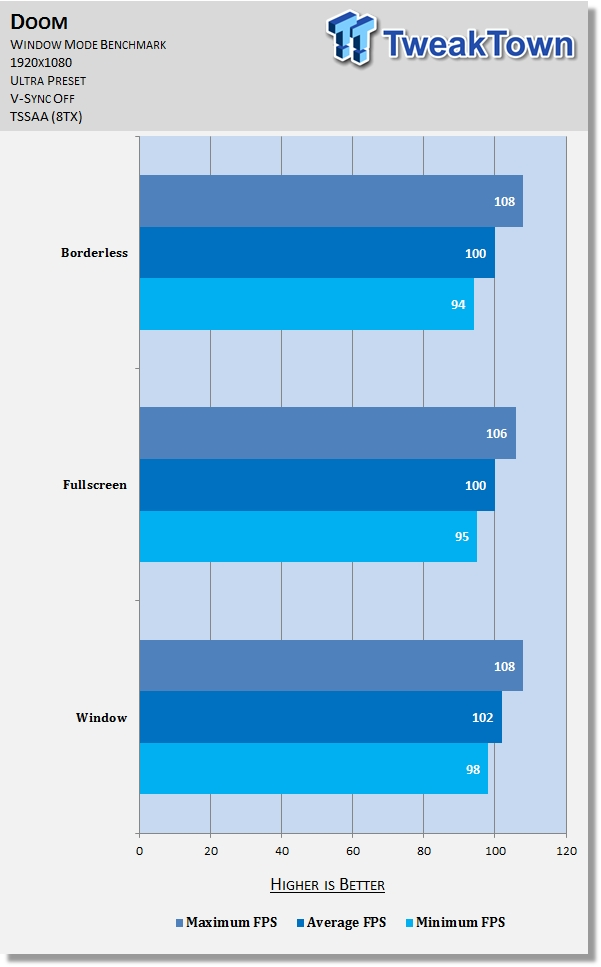
The benchmark shows no definitive change to maximum FPS when changing this setting, but does improve average and minimum FPS values slightly when changing from Borderless to Fullscreen or Window. To put it another way: Borderless will cost you a few frames at most.
Our Latest TweakTown Guides
- Don't sell your Windows laptop until you do these things
- 6 PC cleaning mistakes to avoid for safer hardware maintenance
- How to Remap Keyboard Keys in Windows using Microsoft PowerToys
- 7 tips to organize your Windows files for faster, easier access
- How to fix Wi-Fi Adapter Not Working on Windows laptops: troubleshooting tips
Resolution
The quality at which the scene is rendered, corresponding to the number of pixels; higher resolutions mean more pixels, which means higher quality.


Although difficult to compare 1366x768 to the other resolutions, comparing 1600x900 to 1920x1080 shows the latter features a considerably sharper image overall and much less aliasing. Pay particular attention to the 'Union' text on the left side as well as the left ledge.
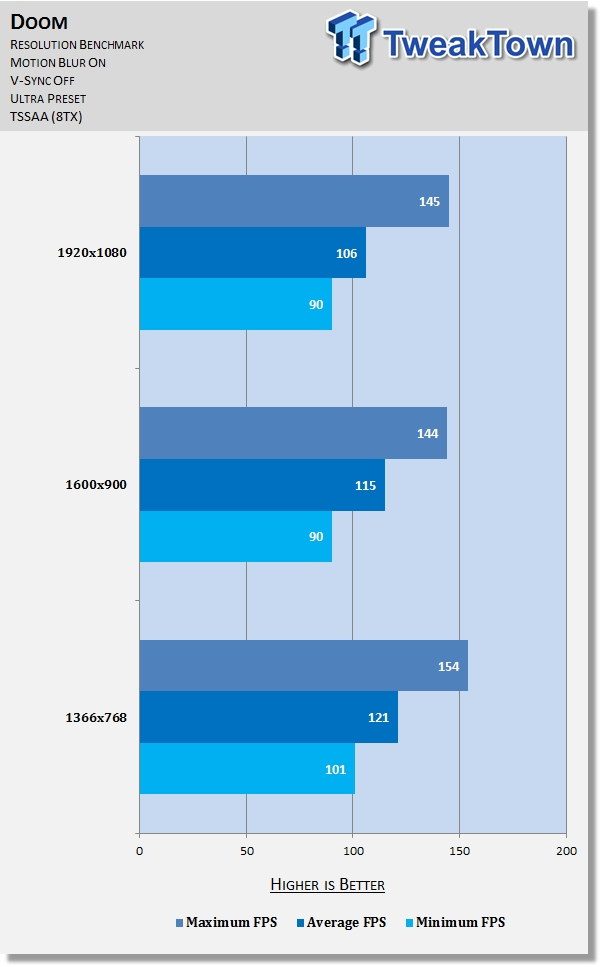
The benchmark shows a major impact to framerate when increasing this setting, although usually only when moving from 1600x900 to 1366x768; not from 1920x1080 to 1600x900. In the latter case, only average FPS values change. As always, keeping this setting at the maximum is strongly recommended unless you absolutely can't avoid it, in which case 1366x768 is the way to go.
Anti-Aliasing
This ever important option controls the appearance of jagged edges (jaggies) seen on various surfaces throughout the game.


With no anti-aliasing, you can observe very distracting jaggies throughout the scene, particularly on the left ledge; FXAA reduces the edges considerably, albeit at the cost of some blur; SMAA gets rid of the blur but offers less coverage; TAA (1TX) offers slightly more coverage than SMAA and without the blur of FXAA, but introduces flatter shadows; FXAA (1TX) offers more coverage than TAA (1TX) but comes with even more blur than normal FXAA and keeps the flat shadows; again SMAA offers less coverage than FXAA in its 1TX form, but suffers blur (albeit less than with the previous setting) and flat shadows; TSSAA (8TX) brings by far the best coverage but also by far the most blur, and again features flat shadows.
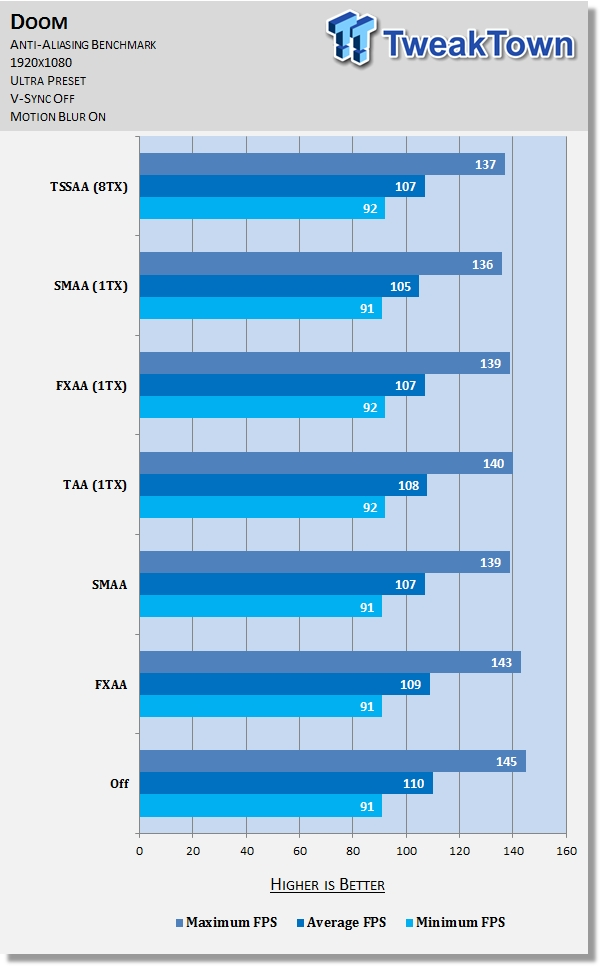
Testing shows the different settings have a small and steady impact on maximum FPS from each setting to the next, with the exception of TSSAA (8TX) which actually works out a little better than SMAA (1TX); maximum and average FPS are affected little or not at all.
This means if you're struggling to hit 60FPS or perhaps you're aiming for 120, AA is definitely something you want to lower (consider FXAA or Off), while most everyone else should be able to pick whatever they prefer. I personally recommend SMAA: while the coverage isn't as complete as I might like, it's the most respectful of the options.
Motion Blur
This setting is always arduous to capture properly, and it's no different here, so screenshots are absent from this section. In-game, the implementation is very subtle.
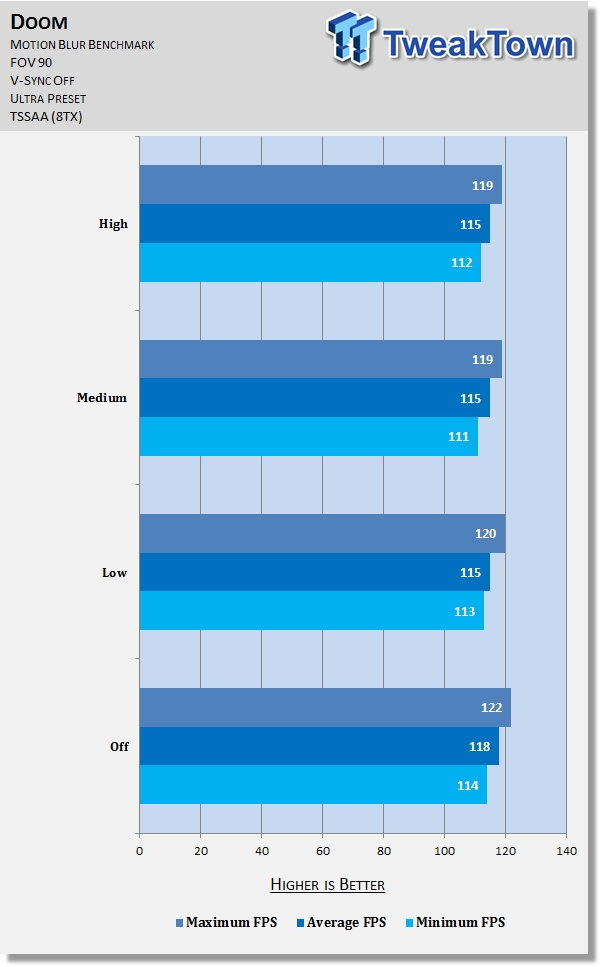
The benchmark shows Motion Blur has a minor impact on framerate at the Medium and High settings; if you want to an extra frame or three, set it to Low or Off with little fear of visual impact.
Chromatic Aberration, Field of View, Overall Quality, & Resolution Scale
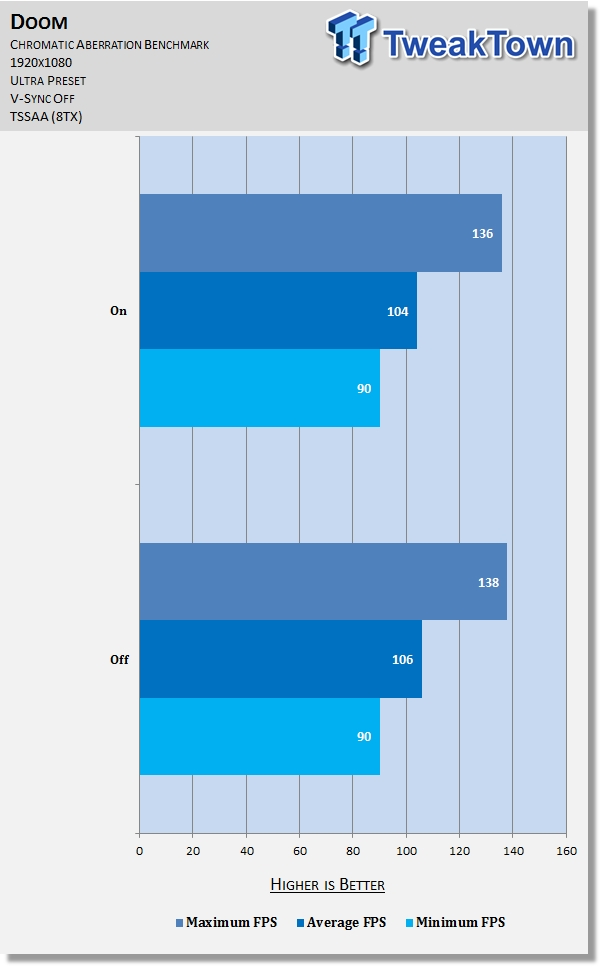
Chromatic Aberration
Chromatic Abberation is atmospheric visual effect that distorts the game image, the result of which is a bit like viewing a game or movie in 3D without the glasses.


The benchmark shows a small but definitive impact on performance when this setting is enabled. As a non-essential effect, it makes a good candidate for tweaking. While some are sure to enjoy the subtle tension it adds to the atmosphere, many will prefer a crisp image. If so, you'll benefit from a few frames in opting to disable it.
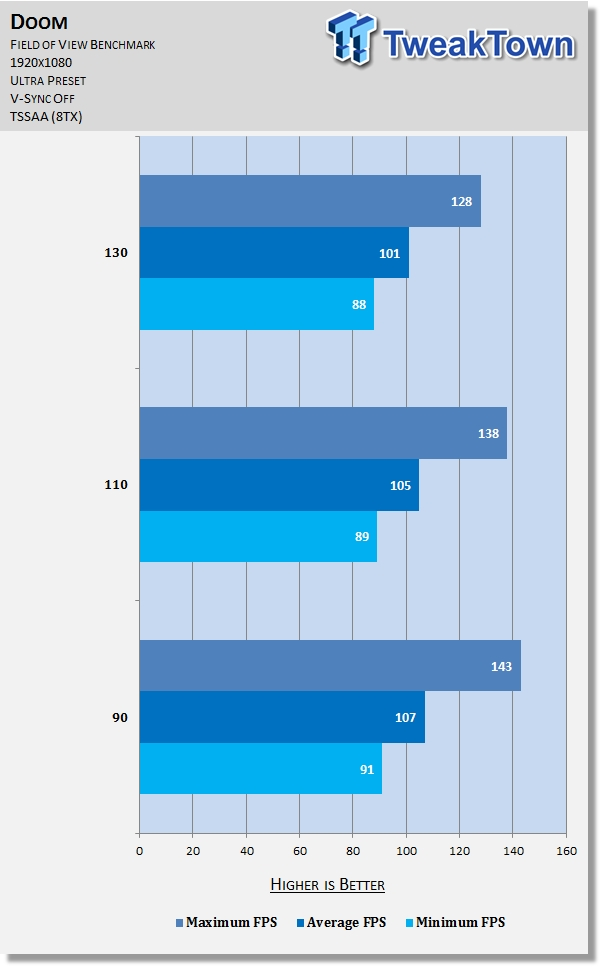
Field of View
One of the more popular and important settings, Field of View (FOV) lets you adjust how 'wide' your perspective is. At the high-end, you see more, but accuracy can be more of a challenge, and depending on your setup, you may get 'fisheye.'


The benchmark shows FOV has a major performance impact in Doom, most drastically on the maximum FPS when moving from 110 to 130. On a standard 1920x1080 monitor, 90-100 is recommended (not considering performance); if you're desperate for more frames (assuming it doesn't cause you headaches and/or other issues, as it does for some), keep it at 90.
Overall Quality
The presets allow for easy changes in visual fidelity in performance by affecting all graphics settings. They are imprecise and don't cater to individual preferences, however, so it's very unlikely you'll see the optimal result by playing with these, but it's useful to observe the cumulative effect of changing multiple settings at once.


The screenshots show Doom scales well visually, starting with rudimentary lighting, shadows, and textures and ending with superb fidelity all around coupled with impressive use of effects like Ambient Occlusion.
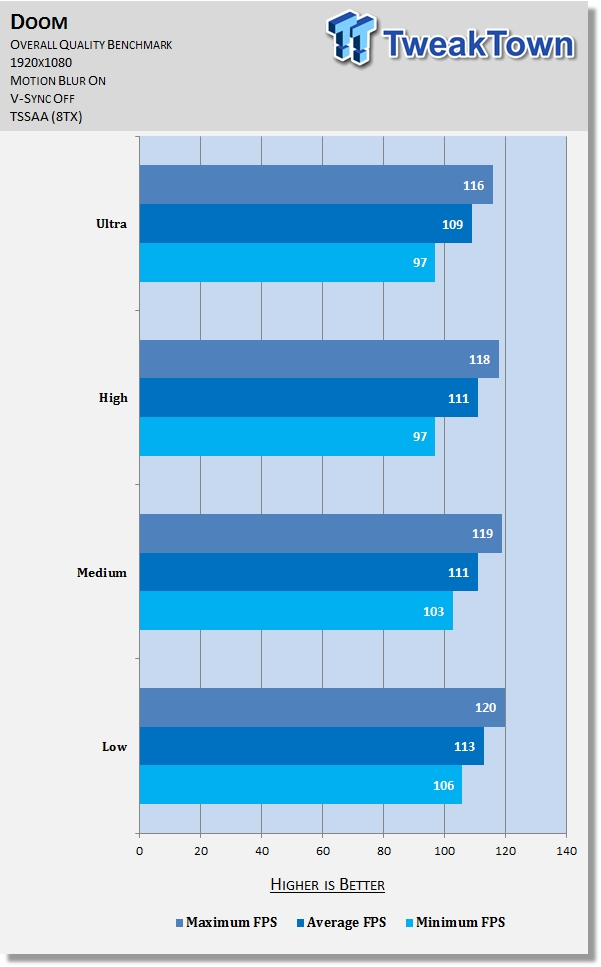
Very much in line with the visual results, performance scales steadily upward as you decrease this setting. The biggest change is seen in minimum FPS, which increases by 6-9 when moving from Ultra-High to Medium-Low. A strong minimum framerate is imperative for enjoyable gameplay, so if you don't want to go into extensive tweaking but do need to increase this number, go with Low, or Medium if you can afford it.
Resolution Scale
This setting allows you to render the game at a low resolution than you monitor natively supports, then upsample it for improved performance at the cost of image quality.


Observing the text on the left and right screens, the console as a whole, the moisture on the window, and the structures and sun outdoors, it's clear 75 reduces fidelity majorly, and 50 even more so.
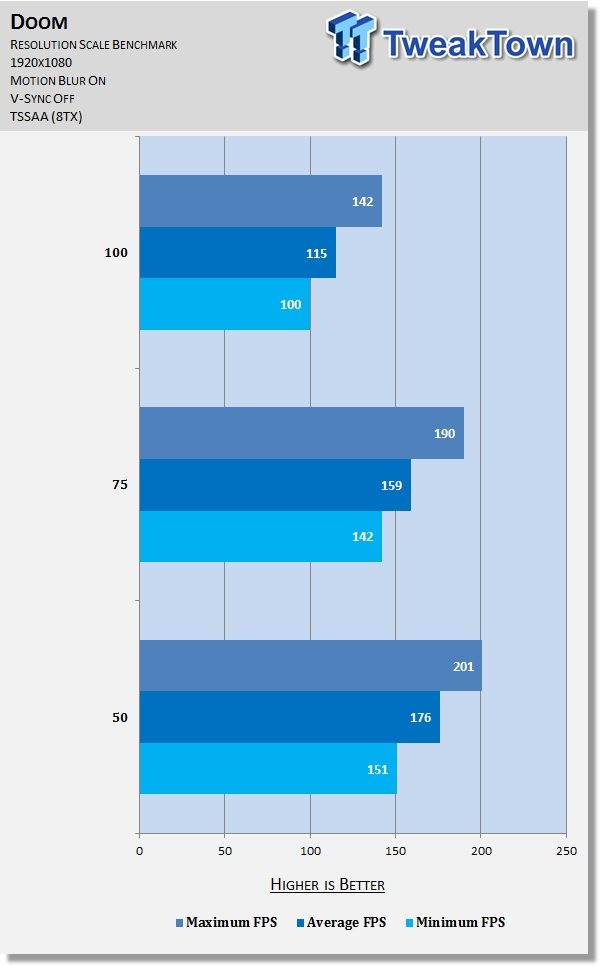
The benchmark reveals reducing this setting offers monstrous gains to framerate. Even so, it affects the entire image and pretty severely, and so should be a last resort. If after all tweaking you still require a boost, look to this setting to gain you however much of one you need.
Lights, Shadows, Player Self-Shadow, & Directional Quality
Lights Quality
Affects the presence, quality, and depth of lighting in a given scene.


On Low, lighting is present in only the most basic form throughout this scene; on Medium, we see added lights most noticeably on the left and right lower sections of the room, and on and around the table and candles in the center of the room, marking a dramatic difference in image quality. Increasing the setting to High sees much more sophisticated lighting in place, whereas Ultra sees no definitive difference except in the top left corner of the screen, where the panels seem to benefit from richer and more realistic lights.
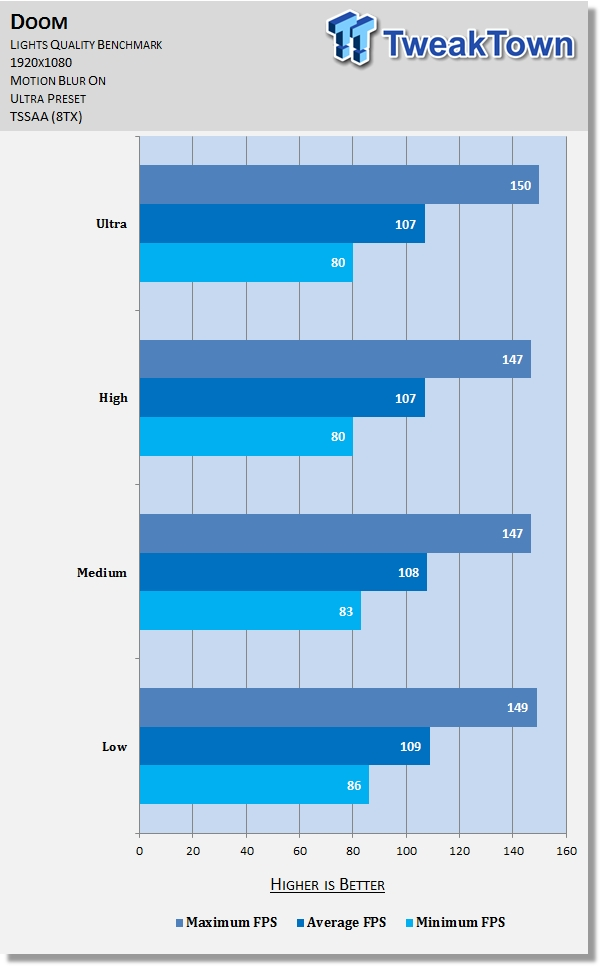
The benchmark shows Lights Quality has a definitive, significant impact on performance, but only to minimum FPS and only at the High and UItra settings. If you can help it at all, keep it at Ultra; otherwise, Medium is a decent compromise, while Low should serve as a last resort.
Shadows Quality
Controls the amount of shadows and their depth in a given scene.


Much like with Lights Quality, this setting features very basic shadows at Low, much more depth at Medium, yet more at High, and virtually no difference at Ultra. If you look very closely at the Ultra screenshot versus the High screenshot, you can see a small amount of added shadowing around the top left corner of the scene, and slightly more precise shadows cast off the bones on the left section of the scene, among other changes.
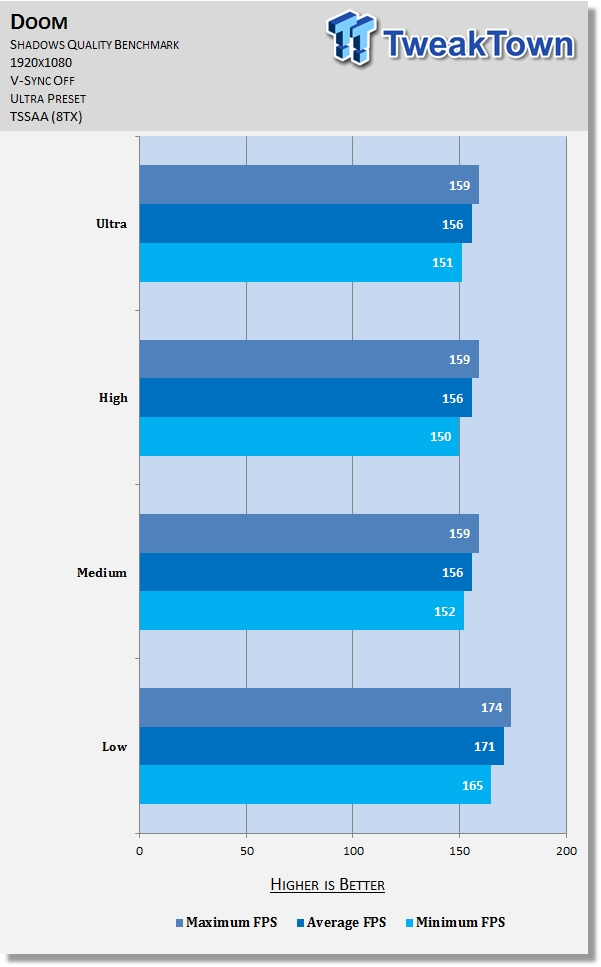
The benchmark reveals this setting has a massive performance impact, but only when moving from the Low setting to any other setting. Ultra is recommended for the welcome depth it adds to scenes, but if you're willing to give that up for a huge performance boost, Low is your ticket.
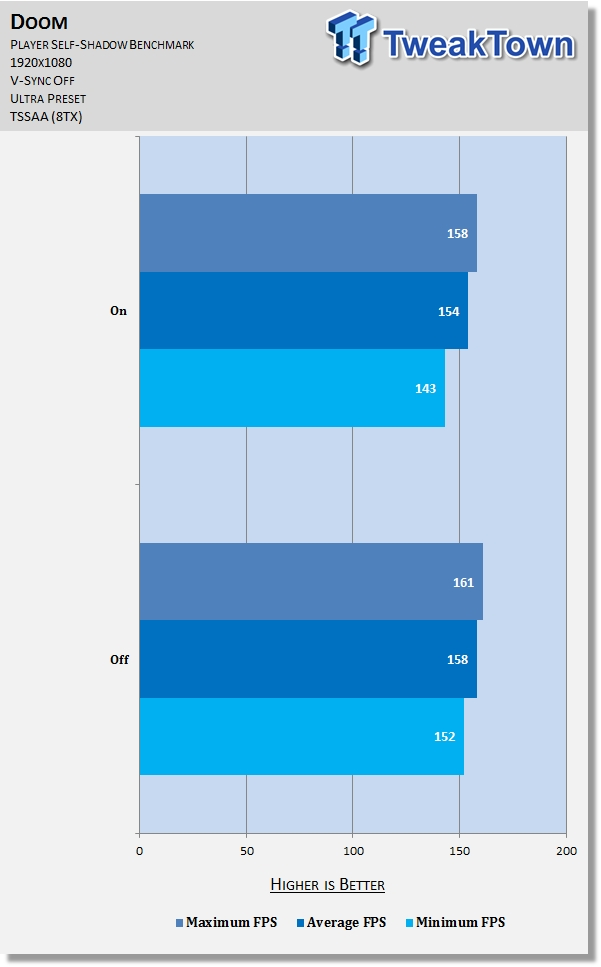
Player Self-Shadow
Affects the presence of advanced shadows on Doomguy's arm and gun.


The benchmark shows a surprisingly major overall impact to performance, largely due to the difference in minimum FPS when enabling or disabling this setting. For such a minor quality change and such a huge performance boost, it's strongly recommended you turn this setting off if you need the extra frames.
Directional Occlusion Quality
This setting affects the richness of shadows and lighting much like Ambient Occlusion, but aims to offer even more visually.


In Doom, Directional Occlusion Quality is only truly noticeable when shifting from the Off setting to the Low setting (at which point the scene is much richer for the more realistic shadows); there are differences between the others, but they're so very minor they're barely worth noting.
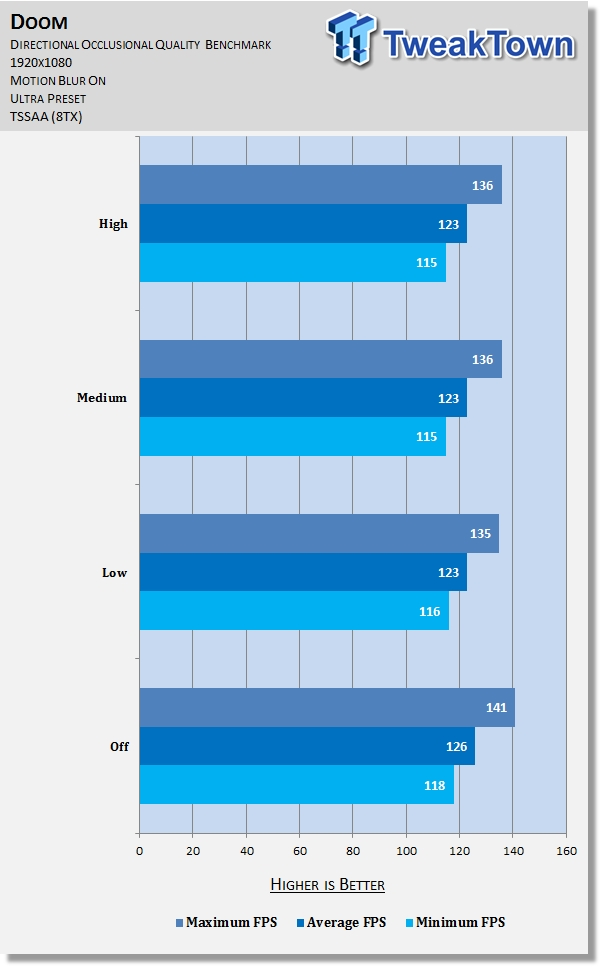
In line with the visual differences, testing reveals only disabling this setting has any performance impact. It makes such a large difference in the depth of a scene that High is strongly recommended, but if you're desperate, turn it off.
Decal Quality, Decal Filtering, Virtual Texturing Page Size, & Reflections Quality
Decal Quality
Alters the presence and quality of smaller details in a given scene, such as dirt, various patterns, and more.


No certain differences can be seen when moving from Low to Medium, but from Medium to High, we see the introduction of many details on the center bridge and the structure holding it up, as well as added grime on the left walkway structure. Ultra expands on this, adding more grime to the left structure, some on the center bridge, and some other indistinguishable details on the section far below the bridge, the distant room toward the right, among other areas.
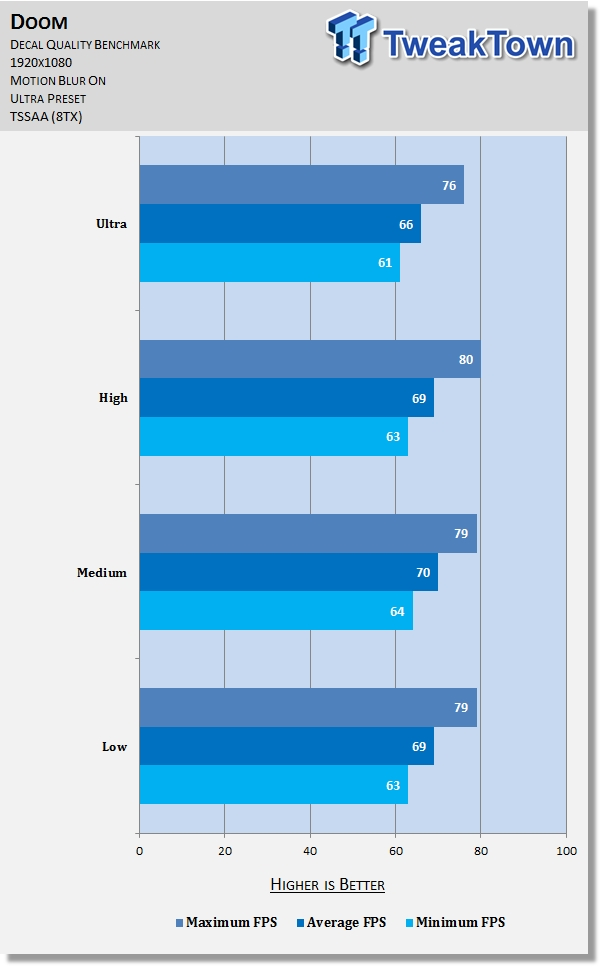
Testing reveals no definitive impact on performance until Ultra is enabled, at which point a few frames are lost. Given the minor visual changes, changing this setting to High is recommended for most, as it grants an appreciable performance boost that's nearly free.
Decal Filtering
This option alters the fidelity of decals in the environment.


The screenshots show Decal Filtering has an extremely minimal impact on graphics. It's only really seen on the left walkway structure and even then differences are only really observed when switching from Trilinear to Anisotropic 2x, at which point fidelity of the grime increases slightly.
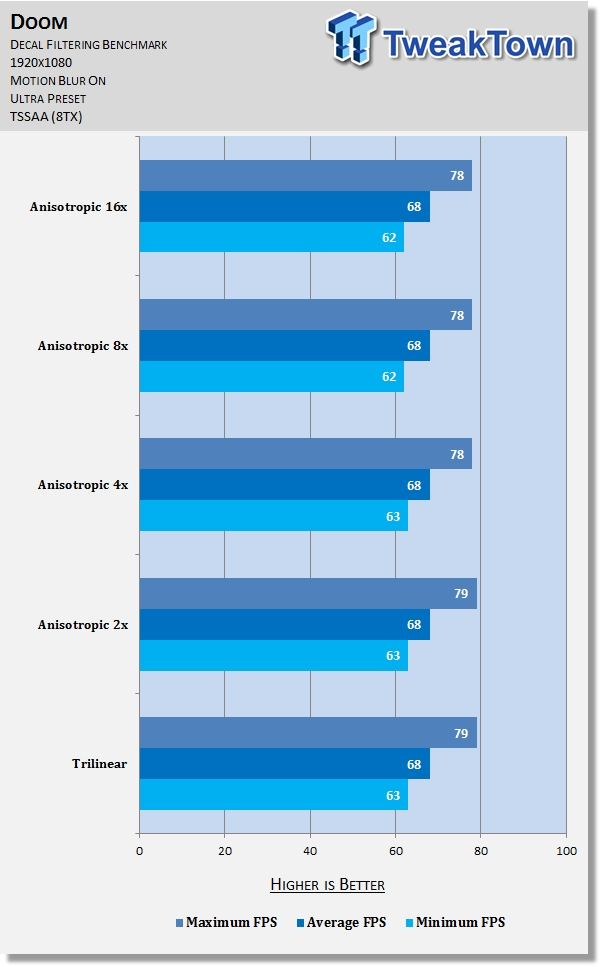
Coinciding with the screenshot comparison, the benchmark tells us Decal Filtering has no real effect on performance. Feel free to keep this setting at maximum for a free, very small visual upgrade.
Virtual Texturing Page Size
Adjusts the amount of memory your system uses for the id Tech 6 engine's virtual texturing system.
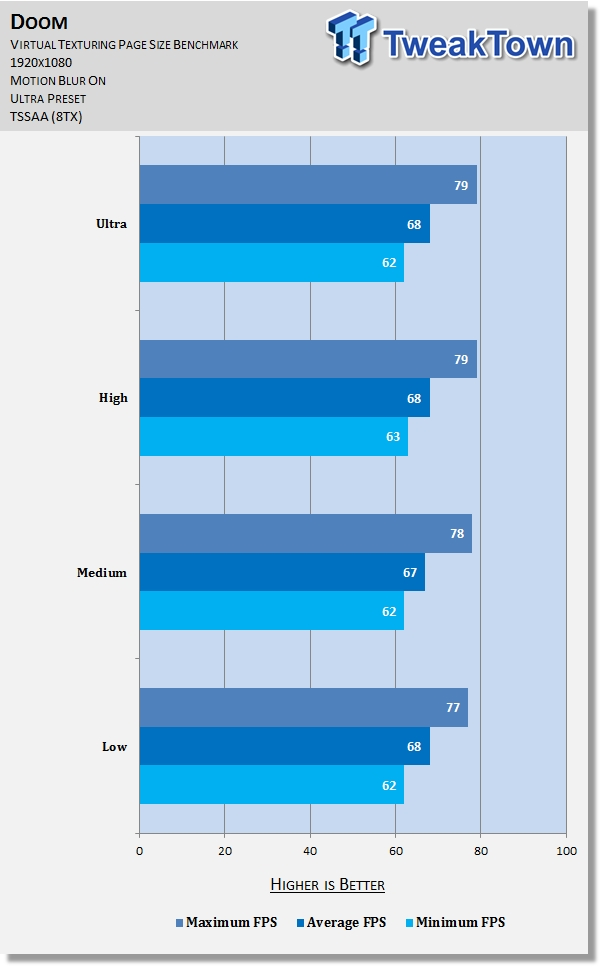
Testing tells us this setting has no concrete performance impact. Keep it at the default recommended setting for your system unless experiencing issues.
Reflections Quality
A normally innocuous enough setting, Reflections in Doom does a lot more than it lets on by its name, altering not just reflections but also lighting and shadows.


Disabling Reflections offers up a flat scene with minimal lighting and shadows; Low offers a massive improvement, with rich lighting and shadows seen throughout the scene, and reflections, most noticeably seen on the blood; Medium increases the quality of reflections and adds new ones (check out the right ceiling above Doomguy); High and Ultra offer a slight bump to reflection quality.
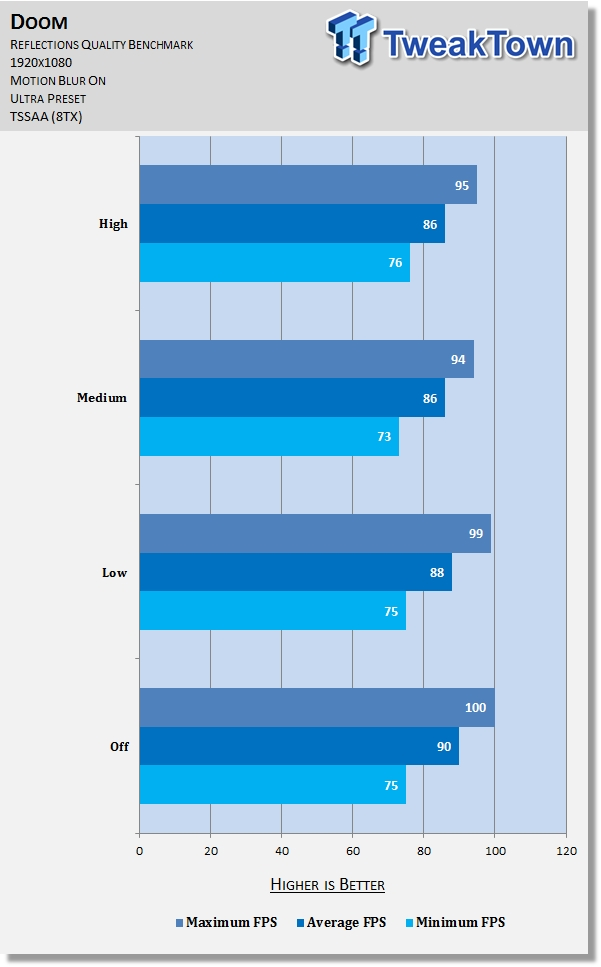
Testing says Reflections has a moderate performance impact as this setting is increased, particularly from Low to Medium or High. Set this to Low to save a few frames; otherwise, keep it at High.
Particles Quality, Compute Shaders, Motion Blur Quality, & Depth of Field
Particles Quality
Affects the quality of particles, such as sparks shooting out of broken equipment. Like Motion Blur, this setting is virtually impossible to capture properly, so screenshots are absent from this section.
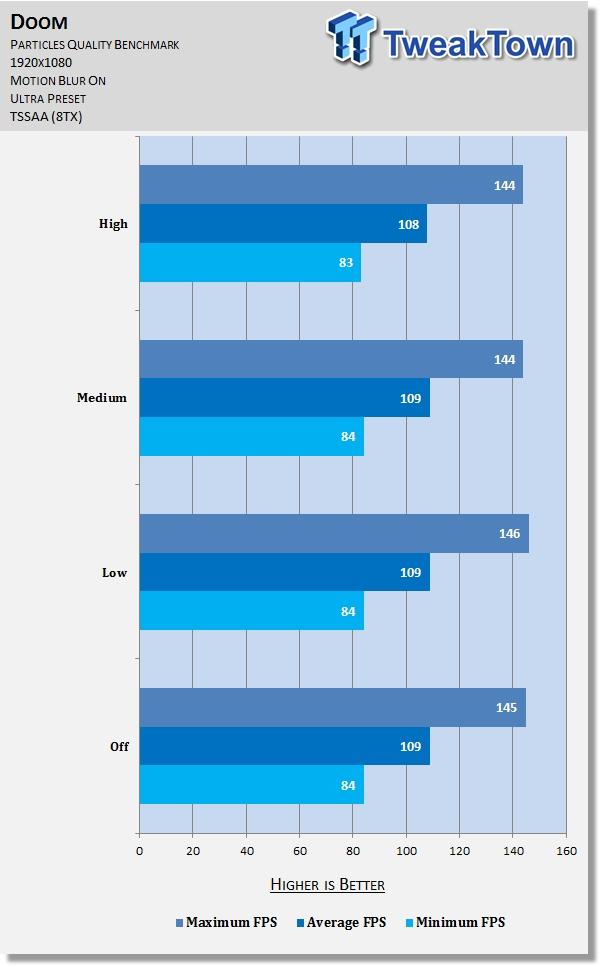
The benchmark shows this setting has no discernable effect on framerate. If your hardware is lacking, lowering it may help a little, but most if not everyone should be good to keep it at max.
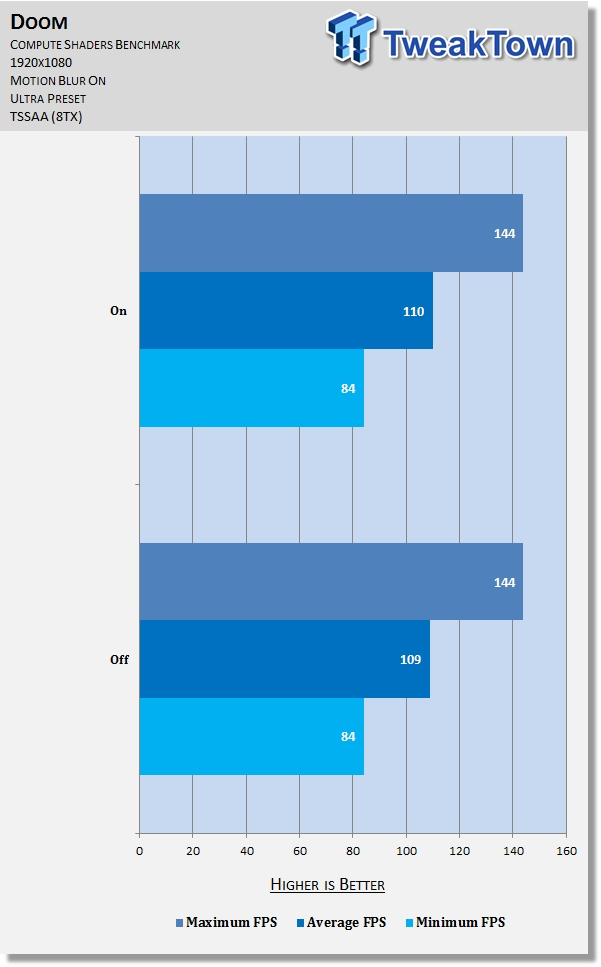
Compute Shaders
Enabling this setting means more efficient processing at the hardware level.
The benchmark shows this setting has no effect on framerate, at least on our setup. Doesn't hurt to keep it enabled, of course.
Motion Blur Quality
Confusingly, id has two Motion Blur settings. We're not sure if or how this one differs visually, but we know it's equally tough to capture in screenshots, so we've left those out again.
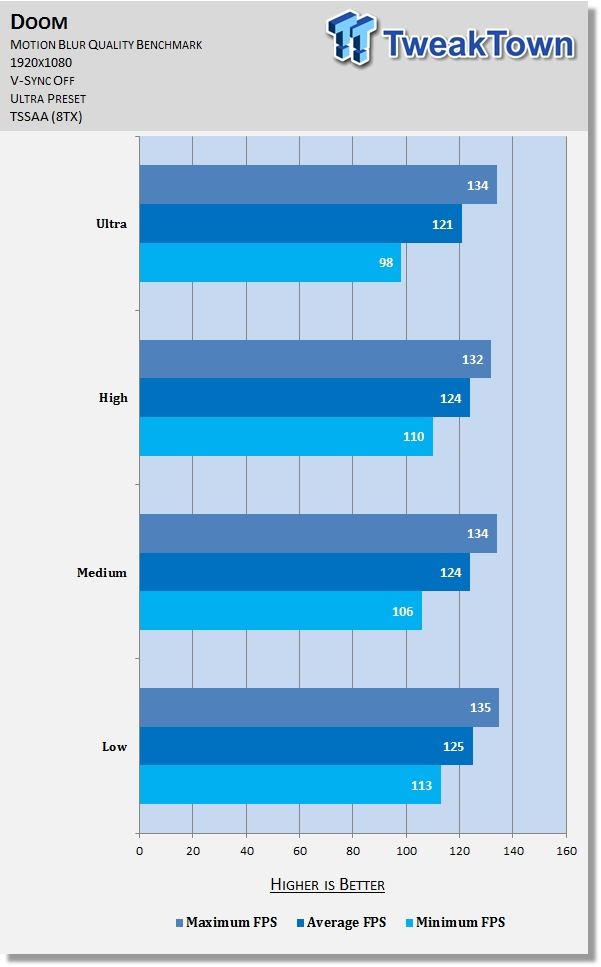
Unlike the other Motion Blur setting, this one has a moderate effect on performance. Giving the non-essential nature of it and the welcome boost lowering it brings, tweaking it is highly recommended. Go with Low unless you really like Motion Blur.
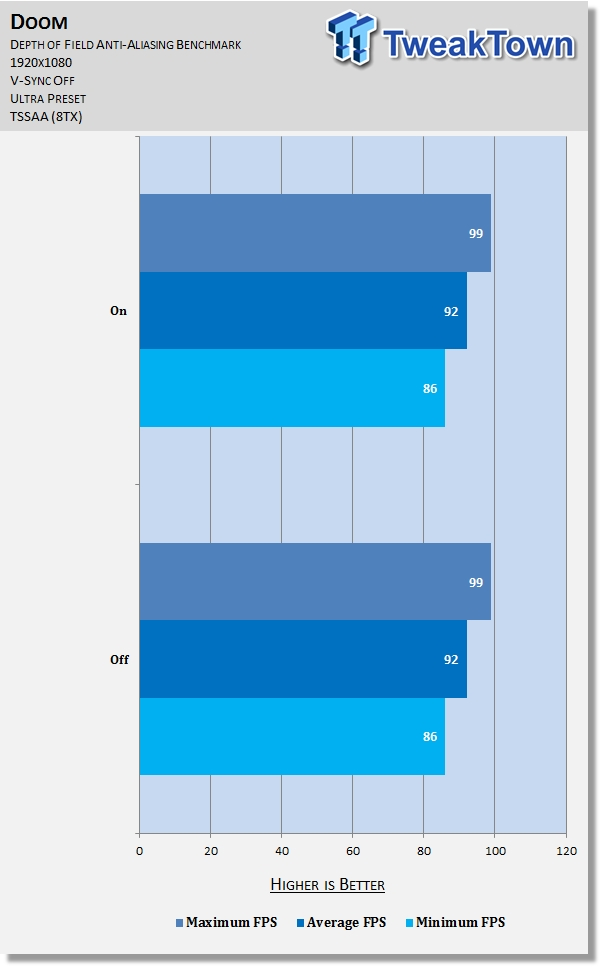
Depth of Field
This setting is typically intended to blur distant objects and terrain to put nearer objects and terrain in greater focus. Examples of it in Doom could not be found in our testing, so screenshots have been left out of this section.

In line with the seeming lack of visual differences, performance differences resulting from changing this setting are also absent.
Depth of Field Anti-Aliasing, HDR Bloom, Lens Flare, & Lens Dirt
Depth of Field Anti-Aliasing
Judging from the name, this setting adjusts the level of aliasing observed on elements affected by depth of field. Again, we could not find examples of this in our testing, so screenshots have been left out of this section.
Nothing to see here. Once again, no performance differences are observed when changing this setting.
HDR Bloom
Bloom is a divisive shader effect that sees light emanate from bright spots in a given scene.


In Doom, it's observed rarely and even then, it's subtle. Our screenshots show an example of it in action in the foundry: observe particularly the metal structures to the right of Doomguy which gives off a bright aura with this setting enabled.
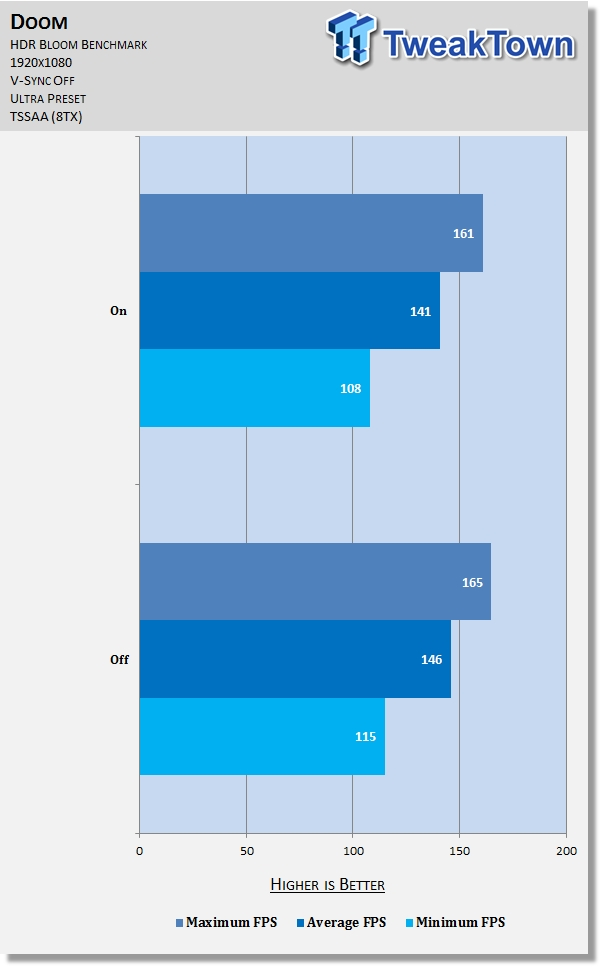
The benchmark shows HDR Bloom has a significant impact on performance. Whether you like it or not, it's a non-essential yet somewhat costly effect, and so makes a great candidate for tweaking.
Lens Flare
This setting affects whether or not light is shown as artifacted or hazed, typically when looked at directly. Unfortunately, we again could not find examples of it in our testing, so screenshots have been left out of this section.
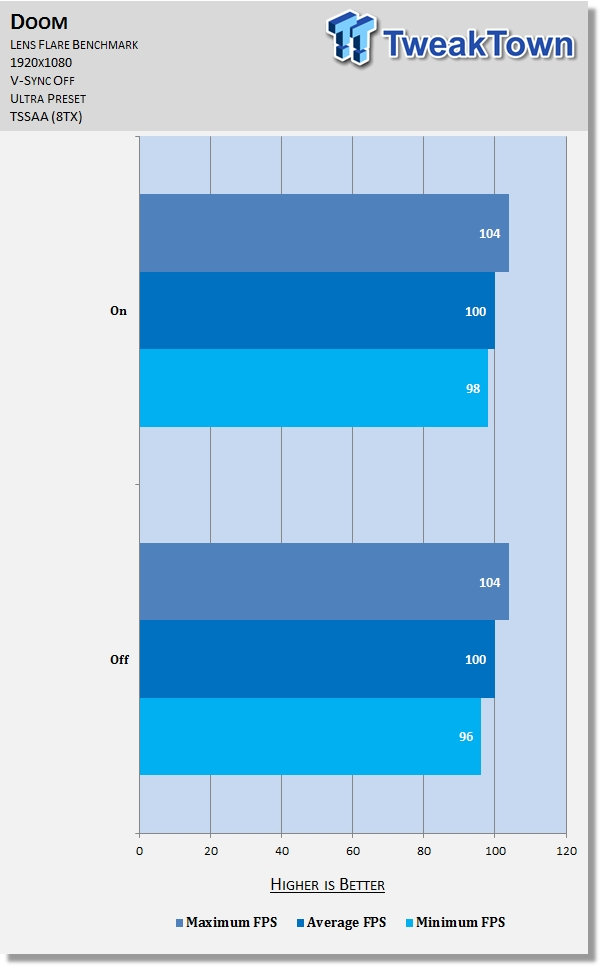
The screenshots show Lens Flare has no definitive impact on framerate and so can be enabled or disabled as you see fit.
Lens Dirt
Judging from the name, this setting changes whether dirt and grime show up from a first person perspective in particular environments. Unfortunately, we again could not find examples of it in our testing, so screenshots have been left out of this section.
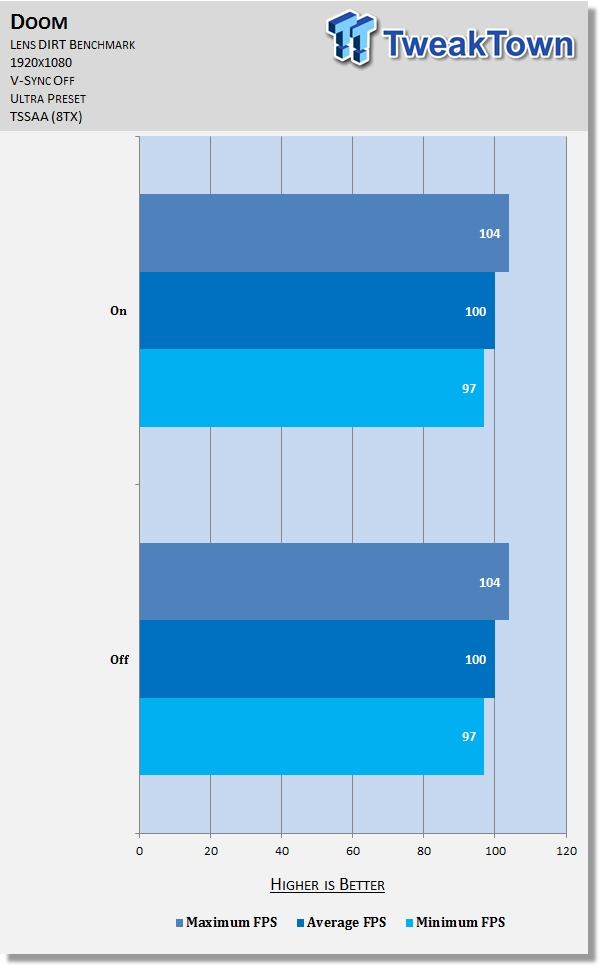
The screenshots show Lens Dirt has no definitive impact on framerate and so can be enabled or disabled as you see fit.
Rendering Mode, Sharpening Amount, Film Grain, UI Opacity, & Final Thoughts
Rendering Mode
Changes the filter the game is rendered with, offering a slightly different aesthetic with each one. 'Cinematic' is also letterboxed for a movie-like feel.


Testing tells us this setting has no effect on framerate, so feel free to use whichever you like best.

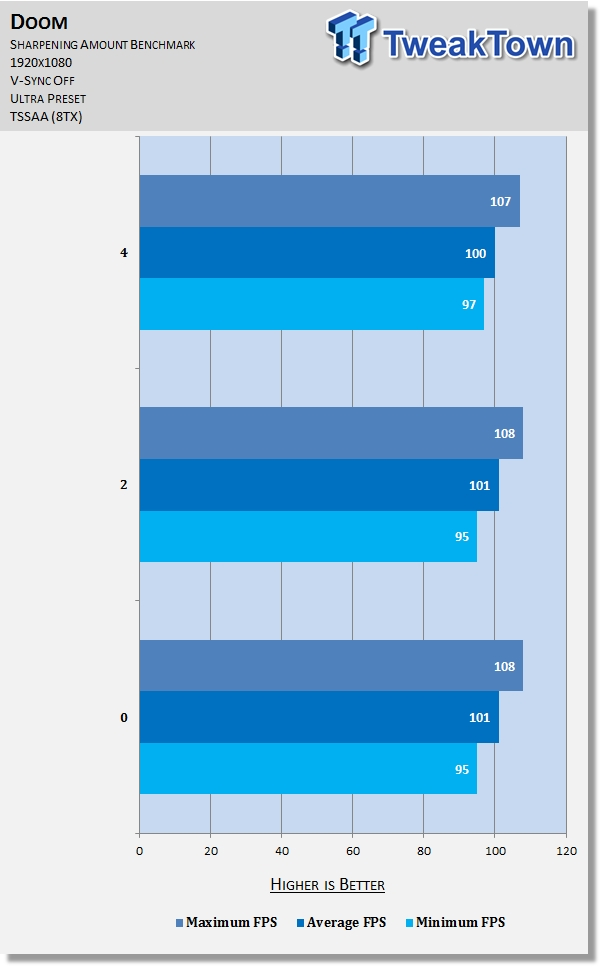
Sharpening Amount
A filter that affects how sharp the entire scene appears. At 0, it's quite muddy; the default 2 offers a much clearer view, and 4 offers a very appreciable crispness that 2 doesn't offer.


The benchmarks show this setting has no discernible performance hit. As such, most everyone should be good to keep at the maximum.
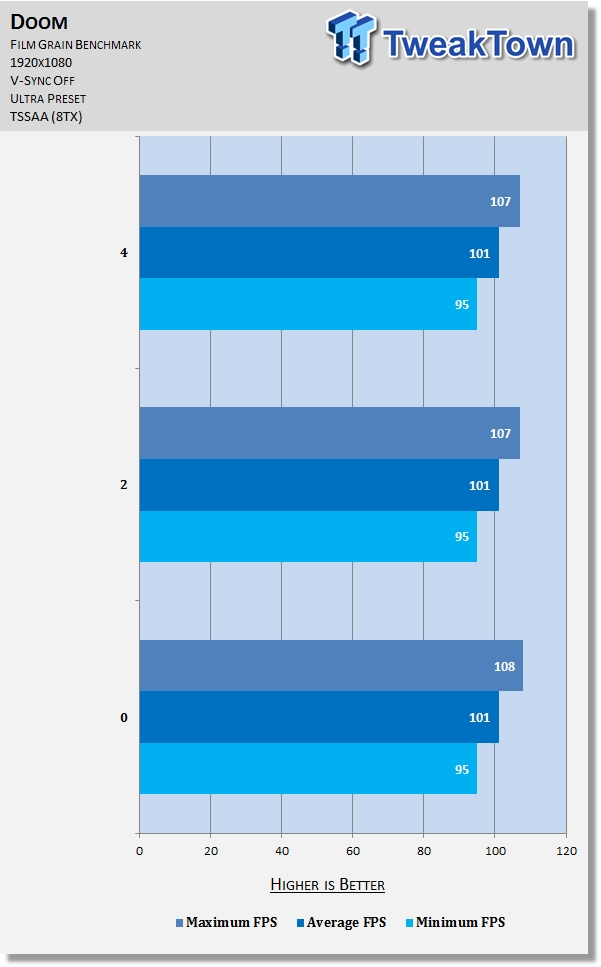
Film Grain
Alters the presence of grain in the game image for a gritty feel. It's a highly preferential setting, but if you like it, definitely try it out with the Rendering Mode options.


As you'd probably expect, this setting has no effect on performance whatsoever. Use however much you like without fear.
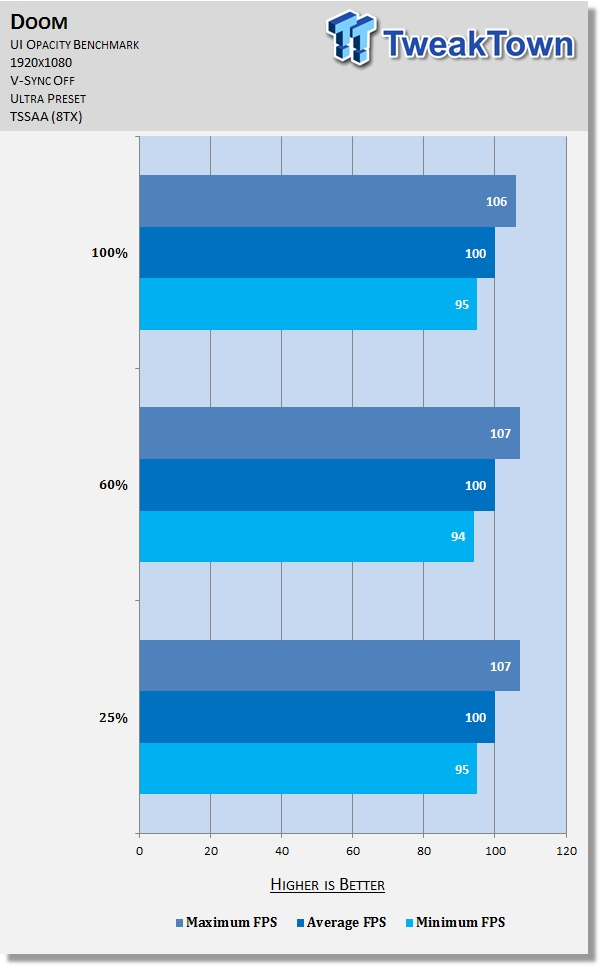
UI Opacity
Changes how transparent Doom's interface is; lowering it means an arguably more immersive experience at some expense to awareness.


Unsurprisingly, this setting has no effect on performance.
Final Thoughts
Doom offers a massive amount of graphics options, although as you can see, a lot have little or no effect on visuals or performance (as far as we could tell anyway).
In any case, to help you sort through it all, the key options are Anti-aliasing, Chromatic Aberration, Field of View, Player Self-Shadow, Directional Occlusion Quality, Reflections Quality, Motion Blur Quality, HDR Bloom, and Sharpening Amount. Most of these affect performance moderately or majorly, which a few only affect visuals (and greatly).
Happy tweaking!
 Don't sell your Windows laptop until you do these things
 6 PC cleaning mistakes to avoid for safer hardware maintenance
 How to Remap Keyboard Keys in Windows using Microsoft PowerToys
 7 tips to organize your Windows files for faster, easier access
 How to fix Wi-Fi Adapter Not Working on Windows laptops: troubleshooting tips
 Apple sues OpenAI, accusing it of engaging in a 'strategy to extract Apple's confidential information'
 Another RTX 5090 power connector melted, and even ASRock TempGuard failed to save this one
 Reverse scam: Redditor orders a Ryzen 7 7800X3D but gets blessed with a 9800X3D instead
 Colorful iGame Shadow II DDR5 memory with CXMT ICs hits 8600 MT/s
 ASRock says there are no plans to sell its Taichi 10th anniversary concept components
 Sony CEO sells $4.7 million worth of stock days after PlayStation announces disc phase out
 Black Flag Resynced is a win for Ubisoft, pirate remaster achieves 2 million sales in 24 hours
 Giveaway: Win an NZXT H6 RGB+ Case, Kraken Elite AIO, RGB Fans and 1200W PSU
 Ubisoft responds to Black Flag Resynced DLC critics by telling them they're 'not a requirement'
 Micron 6600 ION 245.76TB Enterprise SSD Review - Best in Class Programming Speeds
 MOZA MA3F EFCM Flight Control Module Review: authentic Airbus A320 autopilot panel for simulators
 Turtle Beach Stealth Pro II Wireless Gaming Headset Review - Premium Sound, Fantastic Features
 MOZA MGX1000 Instrument Panel Review: a realistic Garmin G1000 replica for immersive flight sims
 Simagic Zeus Formula Steering Wheel Review: premium build and advanced inputs for F1 racing
 GIGABYTE X870E Aero X3D Dark Wood Review - A woody goody
 The Super Mario Galaxy Movie (2026) 4K Ultra HD Blu-ray Review
 KTC H49S66 5K2K (5120x1440) 49-inch 180Hz Gaming Monitor Review
 HighPoint Rocket 1604L Gen5 x16 NVMe Software RAID AIC Review: half the price with full 59 GB/s speed
 Next Level Racing ERS3 Haptic Seat Review: immersive sim racing comfort with integrated haptics
 Phison and Intel Take Aim at Local AI's Memory Wall with aiDAPTIV
 Intel Arc G3 Extreme first impressions with MSI's Claw 8 EX AI+ - Incredible power for an extreme price
 Hisense U7SG 4K TV: Modern Entertainment for the New Age
 6 underrated Microsoft Word features worth using to boost your productivity
 Level Up Your PC Gaming with these Fantastic ASUS Prime Day Deals on GPUs, Motherboards, and More