
The Bottom Line
Introduction
Today we are looking at the Razer Ripsaw HD, which is Razer's capture card that directly competes with the Elgato Game Capture HD60 S.
Right off the bat, I can tell you that Razer has done a fantastic job with this capture card. It's extremely easy to use, easy to set up, and does everything you need a capture card to do. In this review, I will be walking you through how to set up your capture card for both streaming and game capture.
I will also be running you through how to get the best quality out of the capture card with specific Open Broadcaster Software options. On top of that, I will also be filling you in on the positives of the Razer Ripsaw HD, and the negatives. So, let's jump right into it.

| Today | 7 days ago | 30 days ago | ||
|---|---|---|---|---|
| - | $134.97 USD | |||
| - | $229 CAD | |||
| - | $134.97 USD | |||
| - | $134.97 USD | |||
|
* Prices last scanned on 2/27/2025 at 7:41 am CST - prices may not be accurate, click links above for the latest price. We may earn an affiliate commission from any sales.
|
||||
Razer Ripsaw HD Specification Details and Close-up

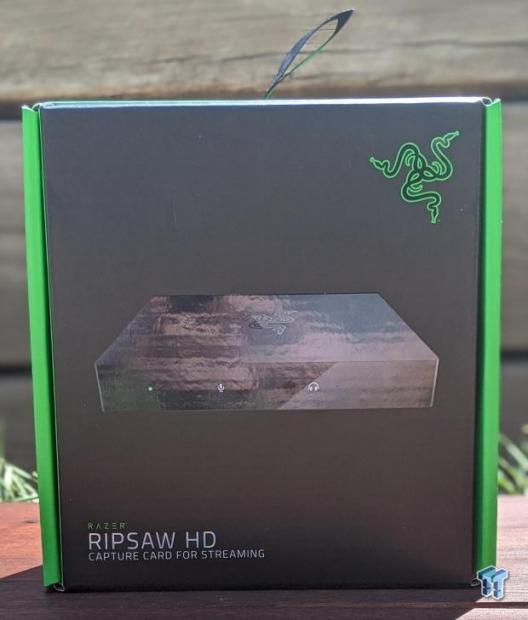
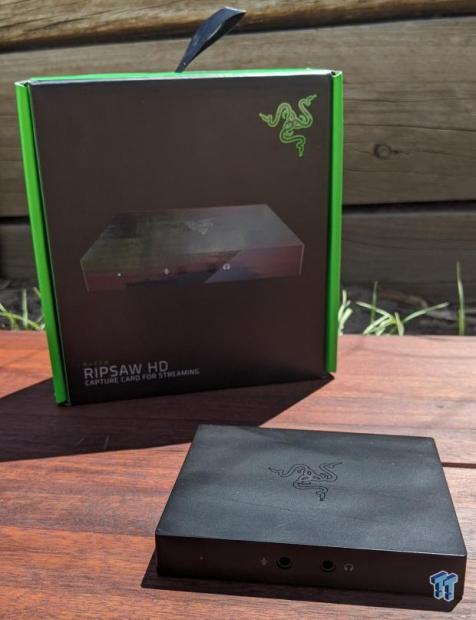
Above, we have a front-on image of the Razer Ripsaw HD box. From this image, we can see an image of the capture card and that it's directed at streamers.
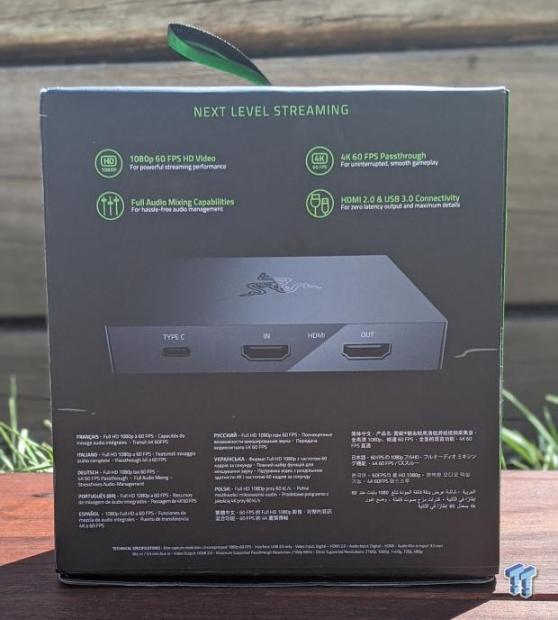
Next, we have a back of the box shot. The back of the box gives some details of what the capture card is capable of. Examples include: 1080p 60FPS HD video streaming, 4K 60FPS passthrough, full audio mixing capabilities and HDMI 2.0 & USB 3.0 connectivity.
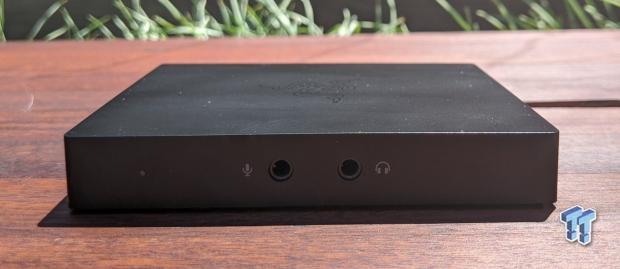
Here we have a front-on image of the Ripsaw, and from the image, you can see the audio ports and that the capture card itself isn't that big at all. The Ripsaw measures in at only 8.5cm x 10.5cm x 1.5cm.
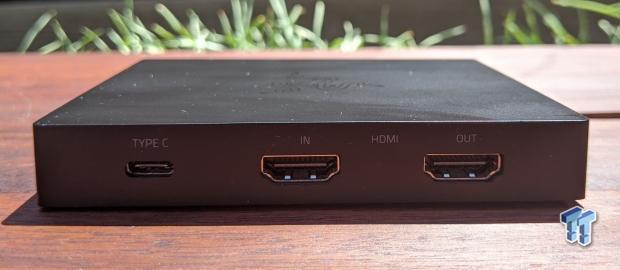
In this image, we are looking at all of the backports for the capture card. The Ripsaw is rocking a USB Type-C port, HDMI In port, and an HDMI out port. We will get to what these ports do later in the review.
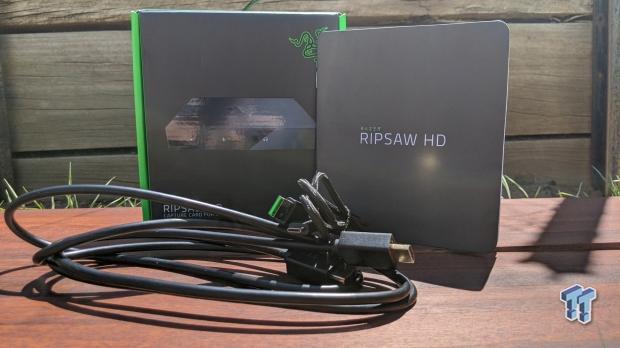
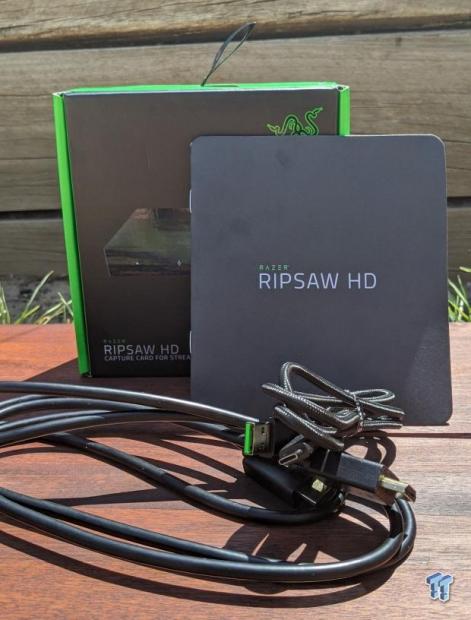
Lastly, we have an image of everything that Razer provided in the box except the Ripsaw. We are looking at the HDMI cord, USB-C cord, and manual.
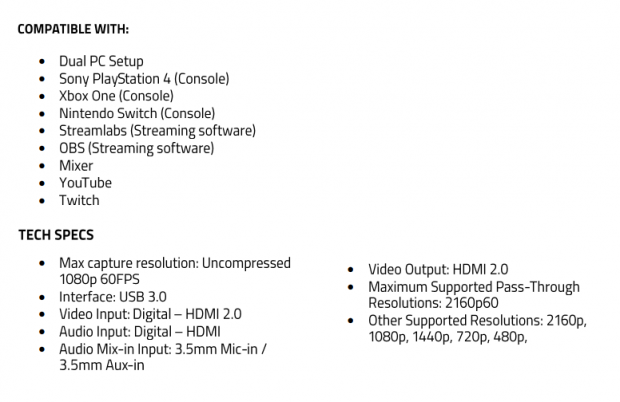
Specifications:
Use Case
So why would you want the Razer Ripsaw? Firstly, if you are an aspiring streamer that dreams of streaming their console gameplay to an audience on Twitch, Facebook Gaming, YouTube, or any other streaming platform, then you most likely need some sort of capture device to fully make the jump. Especially if you want to be able to conveniently save the gameplay you are streaming and redistribute it as other content elsewhere.
For PC gamers, captures cards take a noticeable load of the PC, freeing up more headroom to run the game you are playing much smoother. Think of a capture card as a device that is separate from your PC, but is dedicated to streaming your game smoothly, and at the highest quality possible. Owning one not only improves the quality of the stream, but it also makes capturing awesome gameplay extremely easy.
So why the Razer Ripsaw HD? Razer has outfitted the Ripsaw with everything that an aspiring streamer needs. It is extremely easy to set up (we will get into that later), almost falling into the "plug and play" category for devices. It's also quite small, durable, and can be bounced between streaming on PC and console with a few quick port switches.
Razer Ripsaw HD Setup
Unfortunately, I don't own a PS4 Pro or an Xbox One X, so I cannot utilize 4K 60FPS passthrough compatibility on the Ripsaw. If you are wondering what this means, I can put it quite simply for you. This 4K 60FPS passthrough support is Razer's leg-up on the Elgato Game Capture HD60 S. It means console gamers who are on a PS4 Pro or an Xbox One X can play their games at 4K, and let the Ripsaw convert that footage into 1080p 60FPS for recordings and streams.
For the purpose of this review, I have decided to use my Nintendo Switch as the testing system for the Ripsaw, and play Super Smash Bros. Ultimate on stream to see how the Ripsaw pans out.
Let's jump right into it. Of course, take everything out of the Ripsaw box, prepare the USB-C cable and the HDMI cable. First, you want to plug the USB-C cable into the USB-C port on the Ripsaw, then connect the end of that cable into your PC. Next, take the HDMI cable provided by Razer in the box and plug that into the device you want to stream gameplay from (in this instance, I'm using my Nintendo Switch). Next, plug that same HDMI cable into the HDMI Input port on the Ripsaw.
Moving on, take a second HDMI cable (usually the one you are using to connect to your monitor/TV to play games) and plug that into the Ripsaw's HDMI Out port. So to simplify that process here are the steps:
1. Plug USB-C cable into Ripsaw and then into your computer
2. Plug provided Razer HDMI cable into the console.
3. Plug HDMI from step 2 into the HDMI Input port on the Ripsaw
4. Plug the second HDMI into display/TV (the one you are playing on)
5. Plug the other end of the second HDMI cable into HDMI Out
Open Broadcaster Software download link - here
Next, you want to download and open Open Broadcaster Software (OBS). In the next few steps, we are going to be tweaking OBS to give us some crisp video and streaming quality.
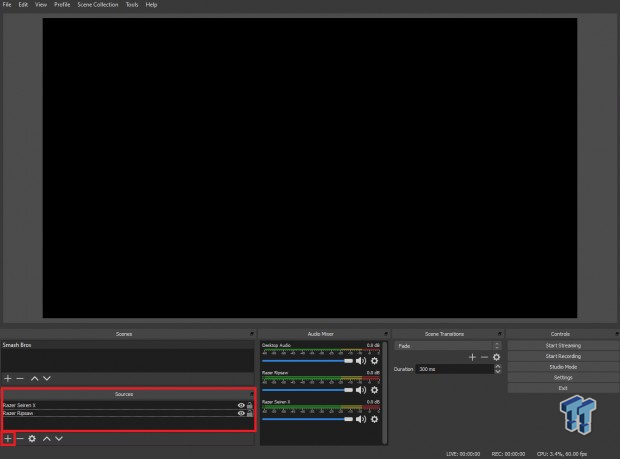
Once you have OBS open, you want to find the 'source' sub-menu located at the bottom left-hand corner of the program window. Once you have found that click the + icon, click on "Video Capture Device." For the sake of this review, I have added my Video Capture Device as Razer Ripsaw. Once you have chosen what you want to call your device, click "ok."
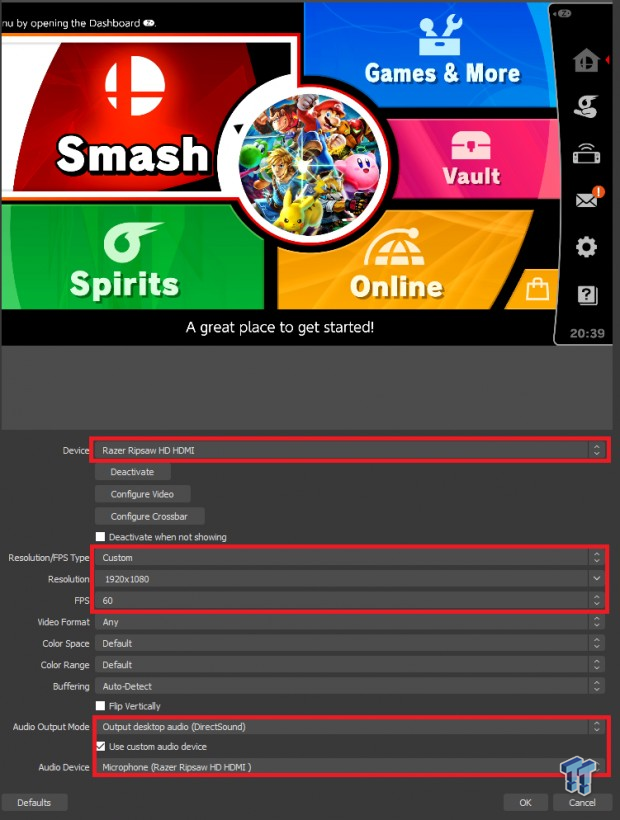
After you have named your Video Capture Device, the above window will pop up. This is your Video Capture Device properties. In here, you will be selecting what device you want to use as your Video Capturing Device and what video settings that device will be using.
First, you want to click on the 'Device' drop-down menu and select Razer Ripsaw HD HDMI. Moving down the line of options, you want to select your Resolution/FPS Type to 'Custom' and then make your resolution 1920x1080 at 60FPS.
Finally, to get in-game audio outputting on OBS, you will need to select "Output desktop audio (DirectSound)" and tick "Use custom audio device." Then in the Audio Device drop-down menu, select "Microphone (Razer Ripsaw HD HDMI)." If you have followed those steps correctly, you should be able to see a preview of your game in the preview window as well as hear your in-game audio playing through OBS.
At the top right and corner of OBS, click on 'File' and then 'Settings.' Once that window has popped up you will be presented with an overwhelming amount of settings, don't worry, most of them you can ignore for now if all you are desiring is to be able to capture gameplay/stream to your desired platform. For now, we will only be needing to concentrate on the "Output" and "Stream" sub-menu.
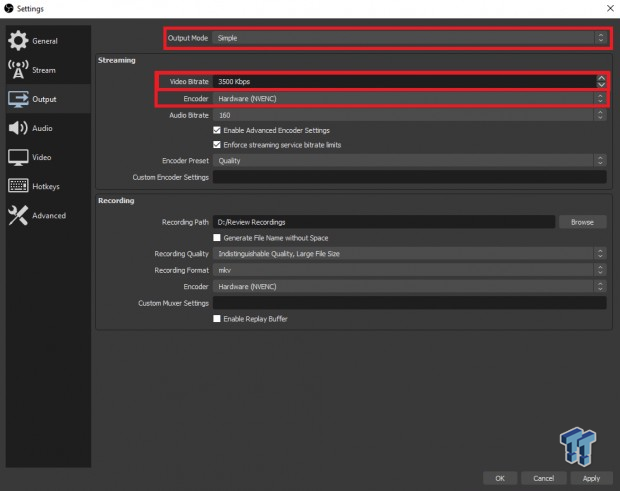
Click on the "Output" sub-menu. Here's where you can change the quality of the video that is being outputted from OBS to your stream or recording. Firstly, where it says, "Output Mode," click on "simple." Next, you want to change your "Video Bitrate" to something around 2500 Kbps - 3500 Kbps for 1080p streaming. It should be noted that increasing/decreasing "Video Bitrate" changes the overall quality of your stream/recording as the Bitrate determines the size of the file, which then ultimately determines the visual quality. Next, if you own any RTX GPU from NVIDIA select "Hardware (NVENC)," choosing this encoder will swap the workload, which is originally on the CPU to your GPU, freeing up more performance headroom for your PC.
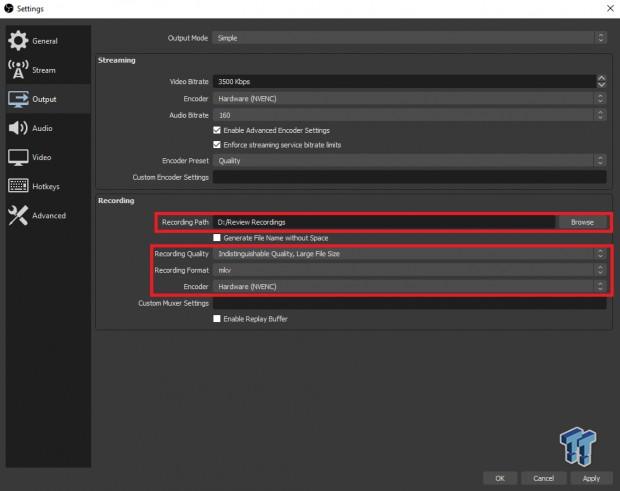
Moving onto the "Recording" options now. Firstly, you want to create a folder somewhere in your PC to keep all of your recordings. You can do this by changing the "Recording Path." Next, to keep the recording quality the same as what the quality of the game is, select "Recording Quality" and choose "Indistinguishable Quality, Large File Size." Next, you want to make the "Recording Format" "mkv" and your "Encoder" to again be "Hardware (NVENC).
Side note - These are the settings I used to capture gameplay and stream, I found zero problems with these settings, but they aren't the greatest. I'm sure with further tweaking and a deeper understanding of OBS, you can make your stream much better. This is just a basic OBS setup that should be able to get you started.
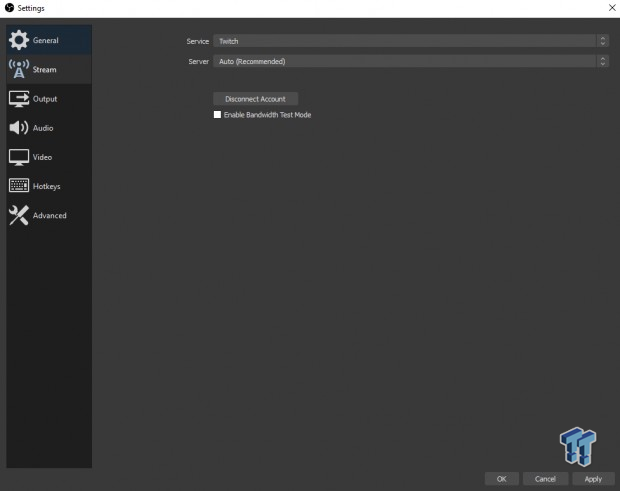
If you head on over to the "Stream" sub-menu, you will be able to connect your stream to your desired platform. In the above example, I've connected my Twitch account to OBS, and to do this, you will need your unique stream key found in the settings of your Twitch account. Simply input that key into OBS and login in, and it's connected.
What's Hot, What's Not, and Final Thoughts
What's Hot
The Razer Ripsaw HD is a fantastic capture card for any streamer that is looking to kick start their career. It's simple, easy to use, basically 'plug and play' and does everything it's designed to do. Connecting it to devices is simple, and it looks absolutely great on your desk under your monitor.
What's Not
There Ripsaw is a formidable capture card in almost every right, except for the fact that it doesn't have its own capture software. Razer doesn't provide users with their own capturing software, so users have to outsource to other programs.
Final Thoughts
All in all, Razer has made the new king of affordable capture cards for the streaming market. With its simplistic design, easy setup, and fantastic quality, the Razer Ripsaw really hits the nail on its head when it comes to streaming and recording.
The Ripsaw is currently priced at $159.99 on Amazon, which is exactly $20 cheaper than Elgato's Game Capture Card HD60 S. If Razer's intention was to knock Elgato's HD60 S out of the market in terms of features, performance, price and overall looks they seem to have certainly achieved it.
To round everything up, if you are an aspiring streamer or just someone who wants an easy way to capture all of your gameplay footage from their console or PC, look no further than the Razer Ripsaw HD. It will do everything you need, all you have to do is plug it in and start gaming.

