
The Bottom Line
Introduction, Specifications, and Pricing
Even though we have tested many of the Be Quiet coolers in years gone by, on various test systems, it is now time to see how well they do against coolers on the newest system, finally. With what we hav3e seen in the past, we expect certain things from the cooler we are about to see.
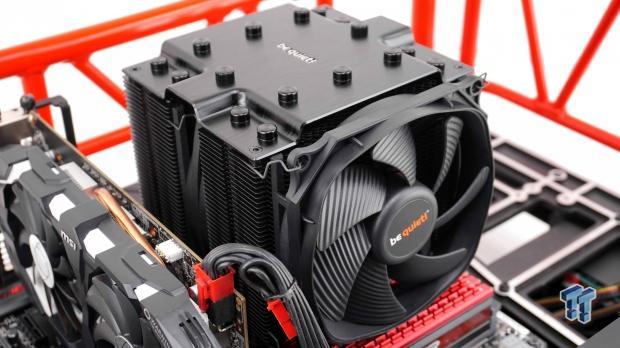
Build quality is top-notch, putting Be Quiet in with a select few coolers out there with the likes of Noctua, Phanteks, and Thermalright. Usability had issues in the past with specific motherboards in the past, but this is something that has been addressed, and with a name like Be Quiet, noise is something we should not be dealing with from their coolers.
The Dark Rock Pro series of coolers have been around for quite some time, and is the answer to the Noctua NH-D15/15, being a dual-tower CPU air cooler. Along the way, Be Quiet has made minor changes. Things like the hardware, size of the cooler, fans, and even the coating technologies have all been studied, and the best options of the time applied to the cooler.
Specifically to the latest iteration of the Dark Rock Pro cooler, it also comes with a 250W TDP, and there is also a TR4 variation. Be Quiet are still using Silent Wings PWM fans in varying sizes to reduce the volume of the cooler as much as possible. So, while the Cooler will eat up most of the real estate at the top half of the motherboard, with a lack of noise and the all-black look we have liked for years, it is difficult not to stop and admire what Be Quiet is offering.
At this time, we are speaking of the Dark Rock Pro 4, the latest multi-tower cooler from Be Quiet. What we are about to see is a cooler that is the current pinnacle of what this series of coolers can do. Even though we know these coolers are built to high expectations and lack the noise of many other cooling options on the market, we are still going to take a close look at what the Dark Rock Pro 4 is all about. Putting it through the testing, and mulling over the results before we get excited, yet it is hard, based on aesthetics and ease of mounting, not to admire what Be Quiet has done with this cooler.
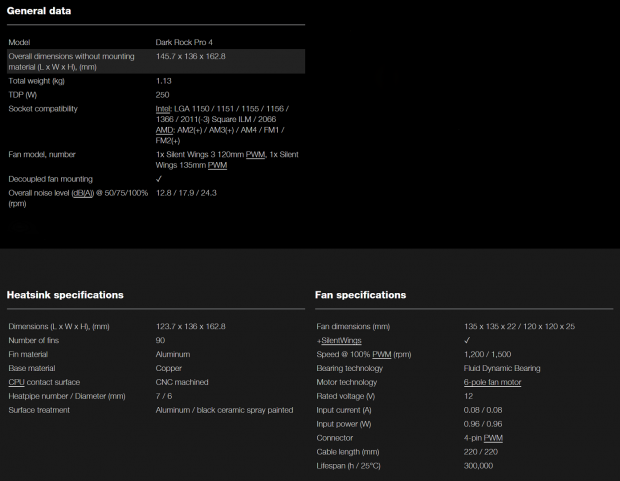
Grabbing the specifications from the site, we have a lot of information to go over, starting with the general data section. Here we find the Dark Rock Pro 4 name, and the overall 145.7mm long, 136mm wide, 162.8mm tall, and the 1.13kg weight dimensions. It is also where the 250W TDP is listed, as well as the compatibility. On the Intel side of the fence, it will fit any LGA115X sockets, LGA1366, LGA2011, and V3, as well as LGA2066. On the AMD side, it will fit all of the AM and FM sockets, but if you want it to go with a TR system, there is another specific model for that application. We then see the use of Silent Wings 3 fans, that fans are removable, and even the dB(A) ratings of the fans from in-house testing.
Moving to the heat sink section, we see that the cooler is not as wide as the 135mm fan, and is why the length dimension is reduced here. There are ninety aluminum fins stacked on the heat pipes. The base material is copper, which has been machined and then nickel plated. Taking the heat load from the base of the cooler into the fins are seven heat pipes, all of which are 6mm in diameter, and are again made of copper. As for the coloration of the tower, rather than opting for anodization, this time all of the fins and the heat pipes have been covered with black ceramic spray paint.
To find out what sort of cooling potential is to be had, venture to the fan specifications. We find there that there are a 120mm fans and a 135mm fan. The larger fan rides between the towers, while the smaller of them pushes air through the front, yet offers more room under it for RAM. The 120mm fans will run at a maximum speed of 1500 RPM, on a fluid dynamic bearing, powered with a six-pole motor.
The 135mm fan will spin at 1200 RMP using the same style of motor and bearing, what we see following these numbers are the power requirements, that they both are 4-pin PWM controlled, and that they should last 300,000 hours. As to the airflow and pressure, we can find specifications in the 50 CFM and 1.79 mmH2O range for the 120mm fan, but as to the 135mm fan, they do not sell it individually, so we have no information on hand for it.
Locating the Dark Rock Pro 4 is relatively easy to do at the major e-tailers out there, and when found, we see the cost is the same across the board. Both Amazon and Newegg are asking $89.90, and come with free shipping to members. This is cheaper than many AIOs on the market currently, which is a good thing, but the flip side has shown us some impressive sub $50 coolers to compete with the Dark Rock Pro 4 as well. While we will be going over features, changes, and what the DRP 4 brings to the table, it is the charts that will tell the tale, and as such, we hold our tongues at this time.
Packaging
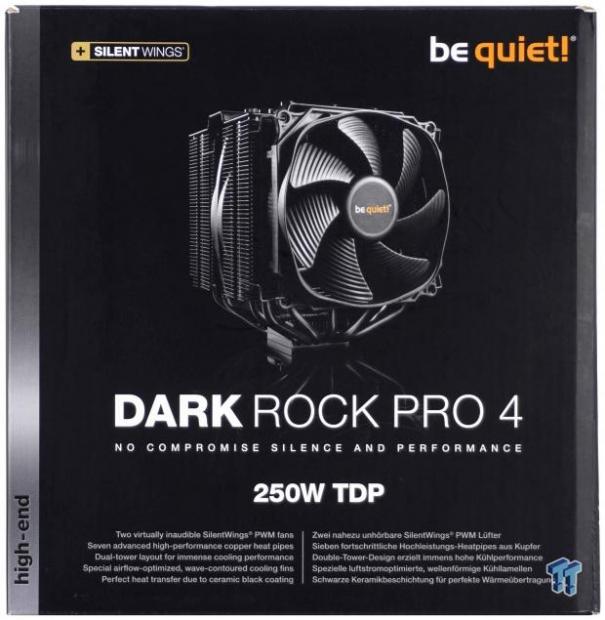
Packaging is similar to every other Dark Rock Pro cooler we have seen. Mostly black, with the silver stripe and use of white and orange lettering we have the Dark Rock Pro 4 shown above its name. Also boldly printed is the TDP, while the features are presented in the much smaller text.
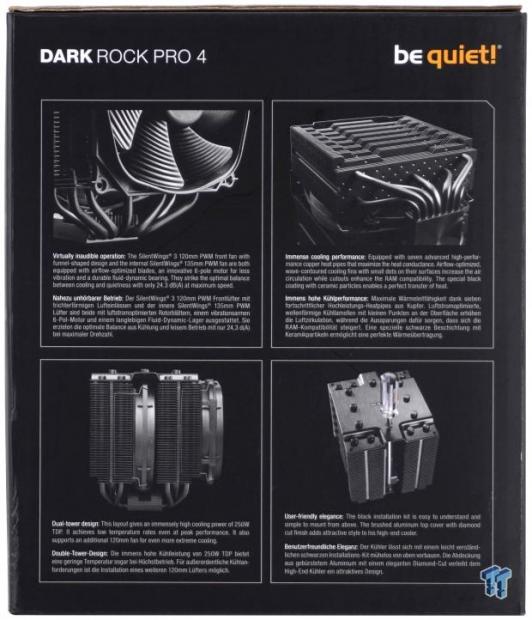
The next panel offers four images which correspond to the features. Be Quiet chose to highlight the virtually inaudible operation, immense cooling performance, its dual-tower design, and the user-friendly elegance.
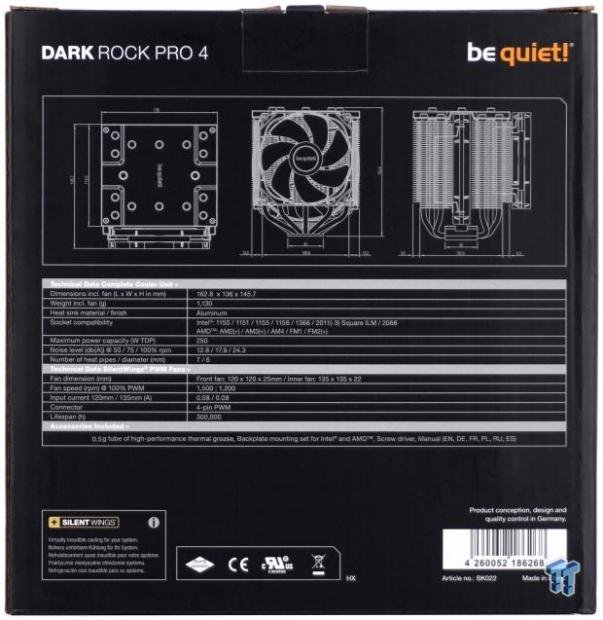
On the back, we see three, dimensional renderings, across the top to help ensure a proper fit with the chassis and motherboard. Below is a list of specifications, but there is much more information to be had if you look for the product online.
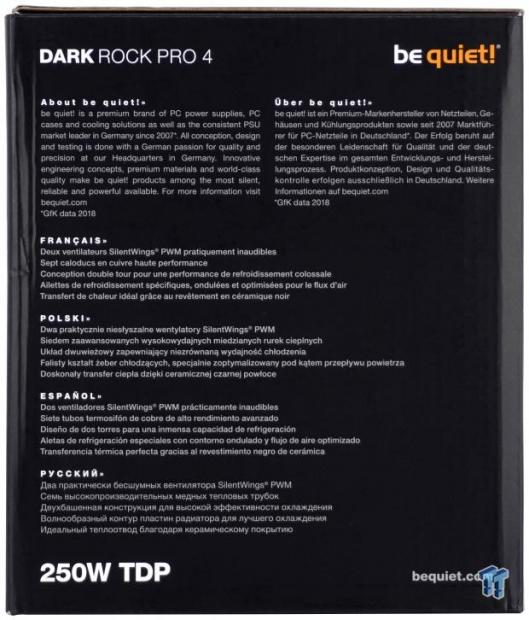
If living under a rock is your thing, and you have never seen or heard of Be Quiet in the past, the last panel is used to explain what they are all about and what goes into the mix when planning and designing a cooler from them.

The internal packaging is also top-notch. The cooler is flanked on both sides with thick, dense foam, and the hardware and paperwork are slid into a notch, ensuring nothing touches. There is also a provided screwdriver for mounting included, which rides in the side of the foam. The measures taken here are all appreciated, as aside from a bit of dust, the cooler is in excellent condition for us to progress with the review.
be quiet. Dark Rock Pro 4 CPU Cooler
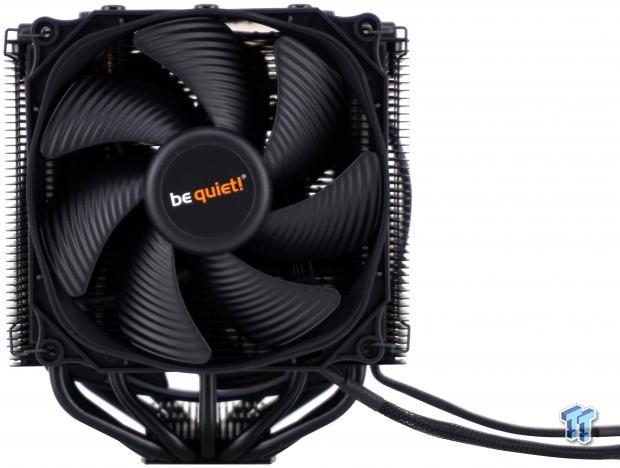
At the front of the Dark Rock Pro 4, the view is mostly of the Silent Wings 3 120mm fan, which covers the fin stack from top to bottom, but has a bit of width lacking in coverage. Below the fins and the fan, there are seven heat pipes, but two are bent in behind another pair, making them difficult to see at this angle.
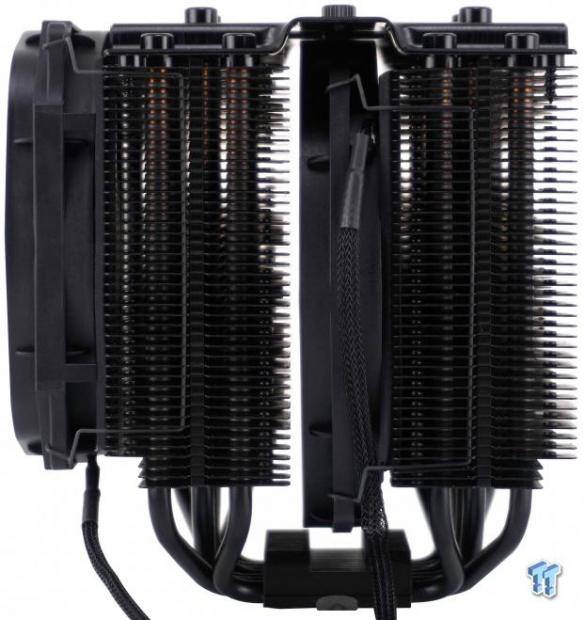
From the side, our view is of, from left to right, a 120mm fan, a ninety-fin tower, the 135mm fan, and another ninety-fin tower, and all but the front fan covered with a thick layer of aluminum at the top. At the bottom, we get a better idea of the bends of the heat pipes, and can now see how seven pipes are used.
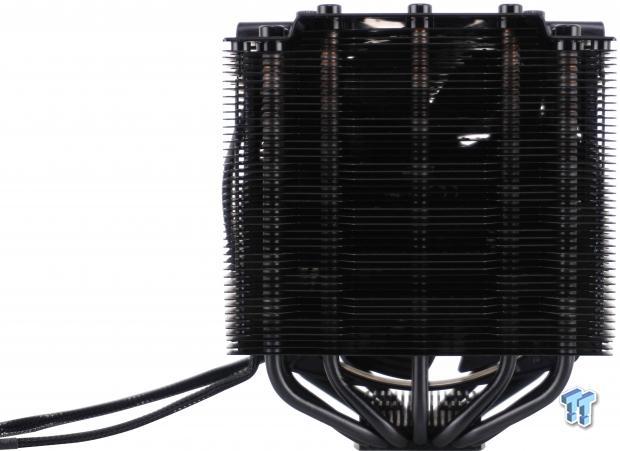
Looking at the back of the cooler, not only do we see the fin stack, but we also see that the fins are shaped differently in sections, and is found on the leading edges as well. Doing this to a set of fins allows the fans to spool more pressure in specific areas, to "boost" the ability of the lower CFM fans cooling them.

As we gander at the left side of the cooler, we see a mirror image of what we found on the right side. Covering much of what is there from the other side, we will address the fan heights now. The 135mm fan sits low in the cooler and covers the majority of the fins, both pulling through the front stack, and pushing through the second. As for the front fan, it is smaller, so that, along with the notch in the first three fins, allows for better RAM clearance.
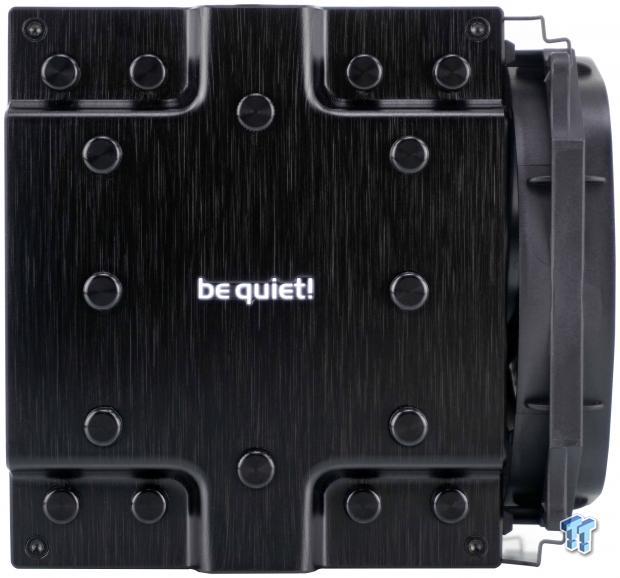
The top of the cooler is made of aluminum, it has been brushed, and is anodized black. The "be quiet." name in the center pops, and we also see sixteen caps, but only fourteen of them cover heat pipe tips. The two on either side of the nameplate are removable and are used as access holes for mounting the cooler.
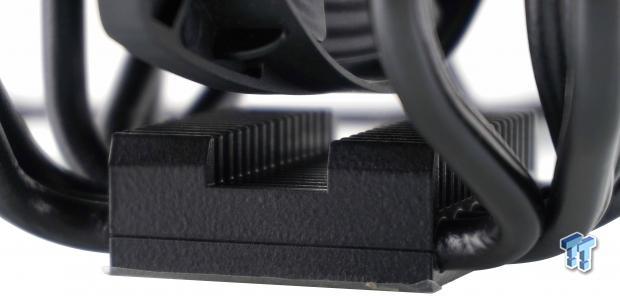
The base of the cooler is made of two parts and different metals. The top section, which is a pre-cooler as well as where the cross-bar mounting takes place, is made of aluminum. The lower section is made of copper and is what transfers the heat from the CPU to the heat pipes.
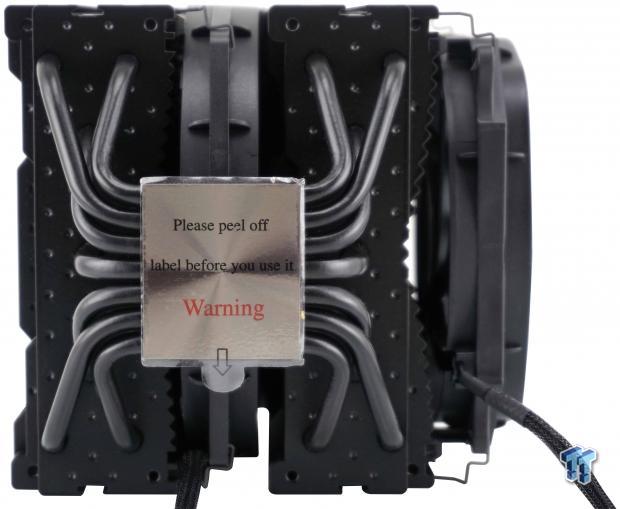
The view of the bottom of the cooler shows us a few things. It is easier to see all seven of the 6mm heat pipes now, and following them to the finds shows that dimples are used in the fin stack, which helps with efficiency. Lastly, we can see the nickel plated base, which is currently protected with a plastic sticker.
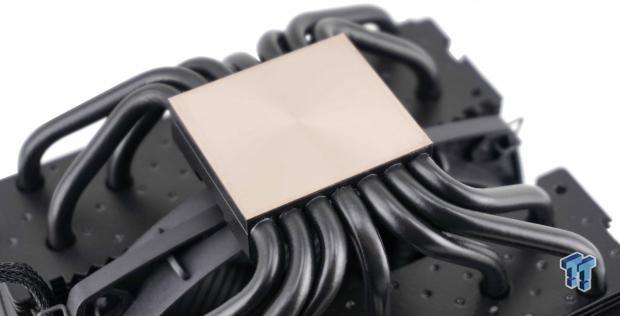
With the protective cover removed, we find that the base is machined quite well, with just the faintest hint of a circular pattern found. As many are, this base is also higher in the middle, which helps with mounting pressure, which in turn helps with efficiency.
Accessories and Documentation
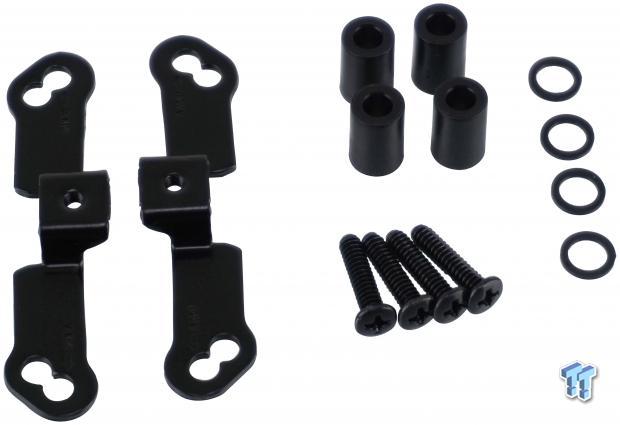
After removal of the top retention bracket of an AMD motherboard, using what is shown here, allows the DRP 4 to be able to be mounted. First, put the standoffs on the studs from the factory backplate, then put the AMD brackets on top of the standoffs. You then use these screws to secure the brackets to the rest of the hardware. The washers are noted to go with AM3 mounting and are used under the plastic standoffs.

When looking to use the DRP 4 with an LGA1156 or LGA1366, you will need these three parts. In the middle is the backplate, which is made to install in any orientation. To either side of it are the top brackets, which are used for all Intel sockets.

In this image is the rest of the Intel mounting goodies. At the left, we see the screws and washers that go into the backplate for LGA115X and LGA1366 installs. In the middle, we have the LGA115X and LGA1366 standoffs above the LGA20121 and LGA2066 standoffs. We also see a set of four screws used to mount the brackets from the previous image to either set of standoffs.
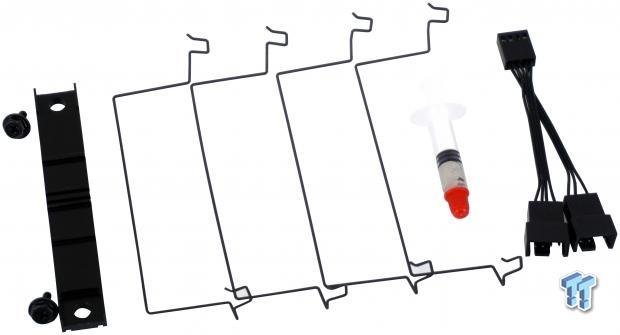
The rest of the hardware is universal. The cross-bar mounting bracket is on the left and comes with a pair of screws to mount it. Next, we see a set of four wire fan mounts. There is a small tube of thermal paste, good for a couple of mounting attempts, and even a Y-splitter fan cable to connect to a single PWM header on the motherboard.

The manuals and instructions come in six languages, including English, Spanish, French, Russian, Polish, and German. All of them start with an introduction and included parts lists. Following that, there are sections of instructions with text and images for LGA2011/2066, LGA115X, and AMD to ensure that the cooler is applied correctly in whatever compatible system it is you are trying to mount it on.
Installation and Finished Product
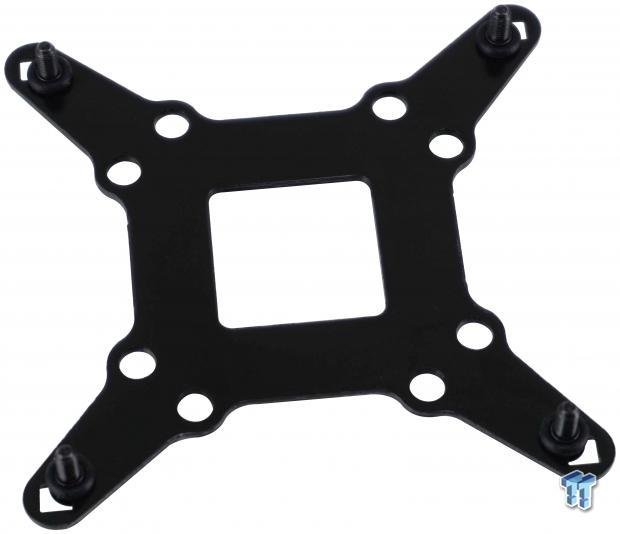
Using an LGA115X system to test, our installation process began with the backplate. Using the inner set of holes on the backplate, we installed the screws, which lock into the diamond-shaped holes. To secure the screws to the backplate, as well as acting as the isolation material, you slide the rubber washers down the screws and into a groove.
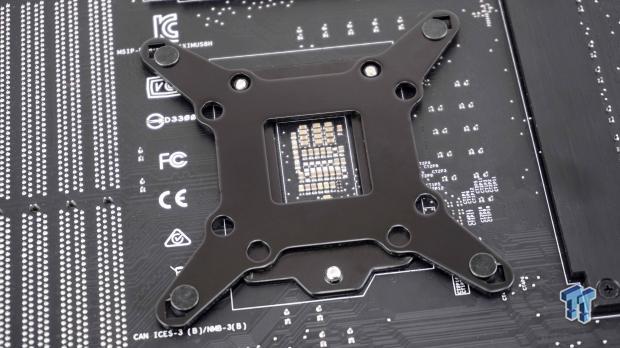
Now, as one piece, you align the backplate with the holes in the motherboard and allow it to slip through the board. You can also see that all four sides are designed the same, allowing the backplate to go in any orientation, as well as there is no top or bottom to the plate, making it really hard to screw this part up.

After flipping the motherboard over, we can mount the rest of the hardware needed. We first dropped the plastic standoffs over the screws to set the proper height. Once completed, we took the brackets and installed them above and below the socket, as it is laid out in the instructions.
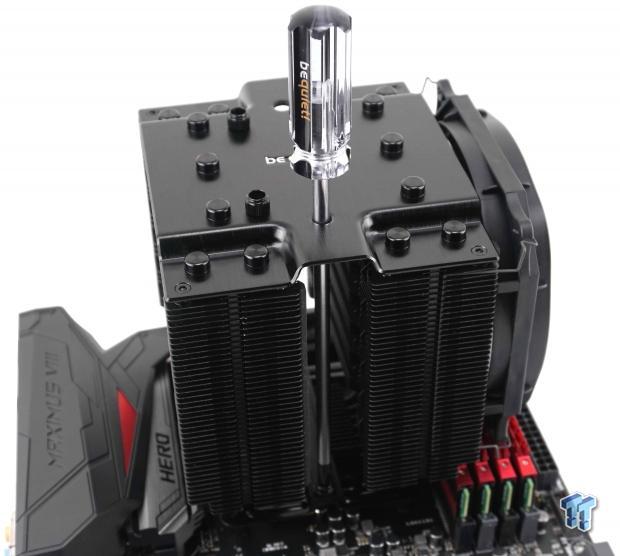
After applying the paste, grabbing the crossbar and sliding it properly into the base of the DRP 4, we needed access to mount the pair of hex-head Phillips screws. We mentioned earlier that a couple of the caps at the top of the cooler are removable, and unscrewing them from the top plate allows the supplied screwdriver access through the cooler. Of course, the second fan will need removing to accomplish this.
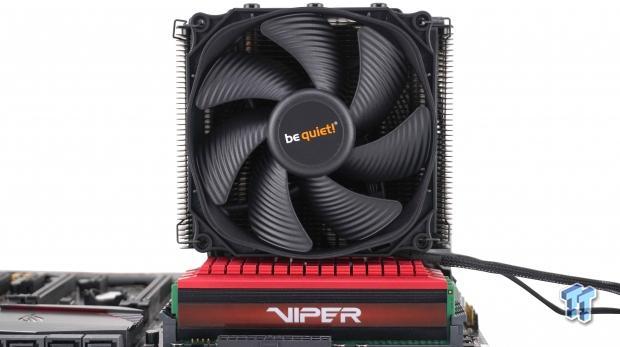
While there are taller kits of RAM on the market, the DRP 4 is designed to allow for reasonably tall memory modules. The cooler is as wide as the RAM and stands tall above it, and we like the "murdered-out" appeal of this all-black tower.
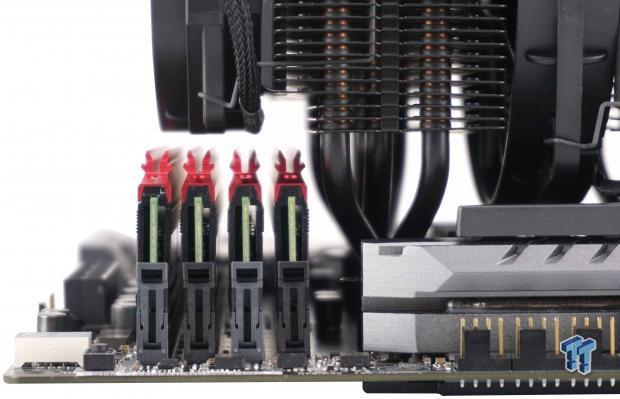
If you happen to have some of the taller kits on the market, by raising the intake fan, we do see more room. Moving the fan can, and likely will increase the overall height of the tower, so be sure your chassis has the extra width needed to accommodate the change if needed.
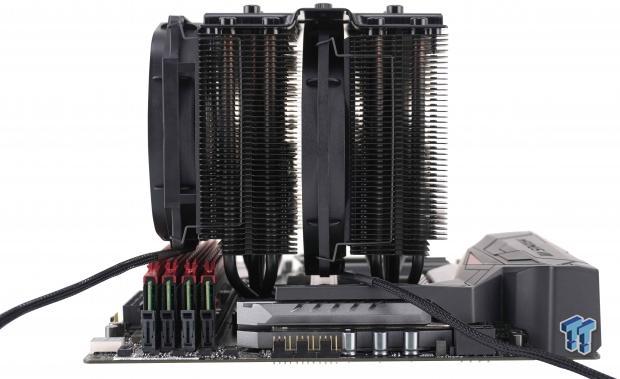
Stepping back for a better look at things, there is a lot of cooler to see by doing so. Currently, only blocking access to swapping out the memory, if adding a third fan to this tower, it will complicate access to the 8-pin but should stay clear of the rear I/O and any exhaust fans in the chassis.
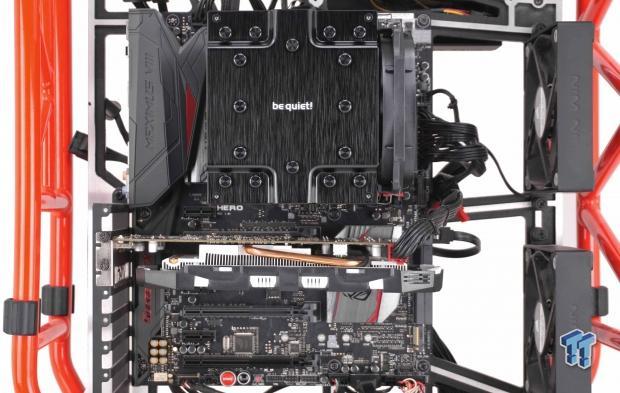
Looking at the Dark Rock Pro 4 as if viewed through a chassis window, the look of the cooler is clean, high-end, and it is easy to see how much room it takes while staying clear of the top PCI-e slot. For those who loathe RGB, there isn't a single light on the cooler, just sexy aluminum, the company name, and a view of the front fan is all.
Test System Setup, Thermal Tests, and Noise Results
Chad's CPU Cooler Test System Specifications
- Motherboard: ASUS ROG Maximus VIII HERO (Intel Z170) - Buy from Amazon / Read our review
- CPU: Intel Core i7 6700K - Buy from Amazon / Read our review
- Memory: Patriot Viper 4 3000MHz 4X4GB - Buy from Amazon / Read our review
- Graphics Card: MSI GeForce GTX 1060 6GB OC - Buy from Amazon / Read our review
- Storage: Corsair Neutron XTi 480GB - Buy from Amazon / Read our review
- Case: INWIN D-Frame - Read our review
- Power Supply: Thermaltake Toughpower DPS 1050W - Buy from Amazon / Read our review
- OS: Microsoft Windows 10 Home 64-bit - Buy from Amazon
- Software: RealTemp 3.70, AIDA64 Engineer 5.75.3900, and CPU-z 1.77.0 x64
To see our testing methodology and to find out what goes into making our charts, please refer to our CPU Cooler Testing and Methodology article (October 2016) for more information.
Thermal Results
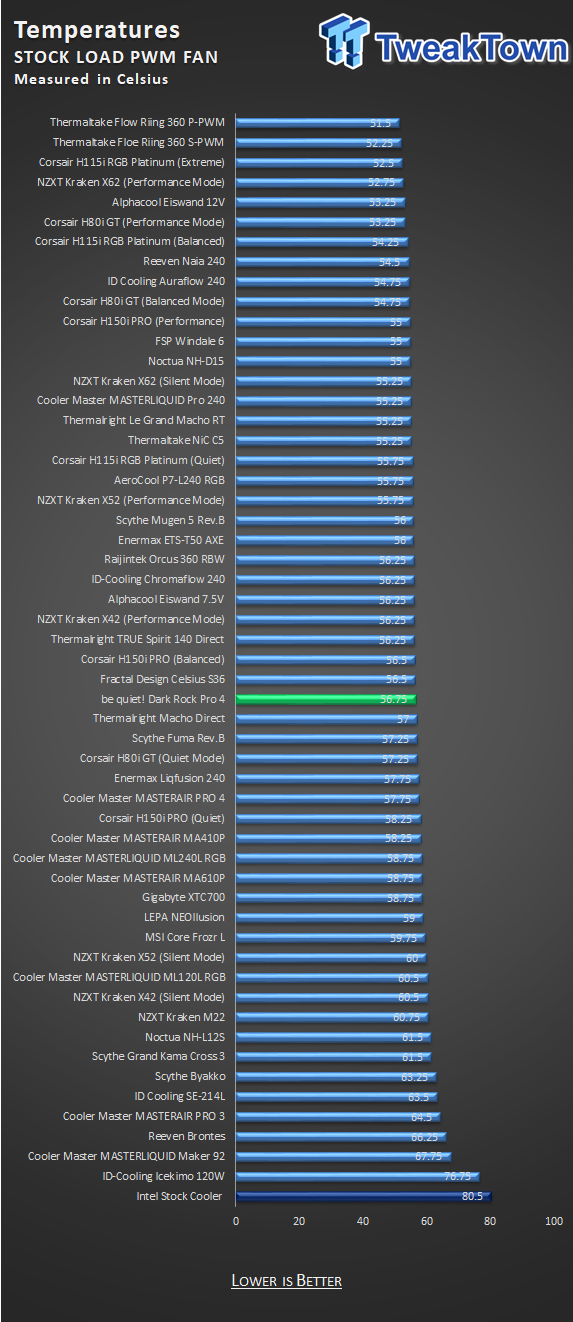
The chart makes the Dark Rock Pro 4 look like an average contender, but the reality is that the 56.75-degree result of the stock thermal testing is only 5.25-degrees out of the lead. Over forty-degrees from throttling leaves a lot of headroom for overclocking or higher TDP CPUs than ours.
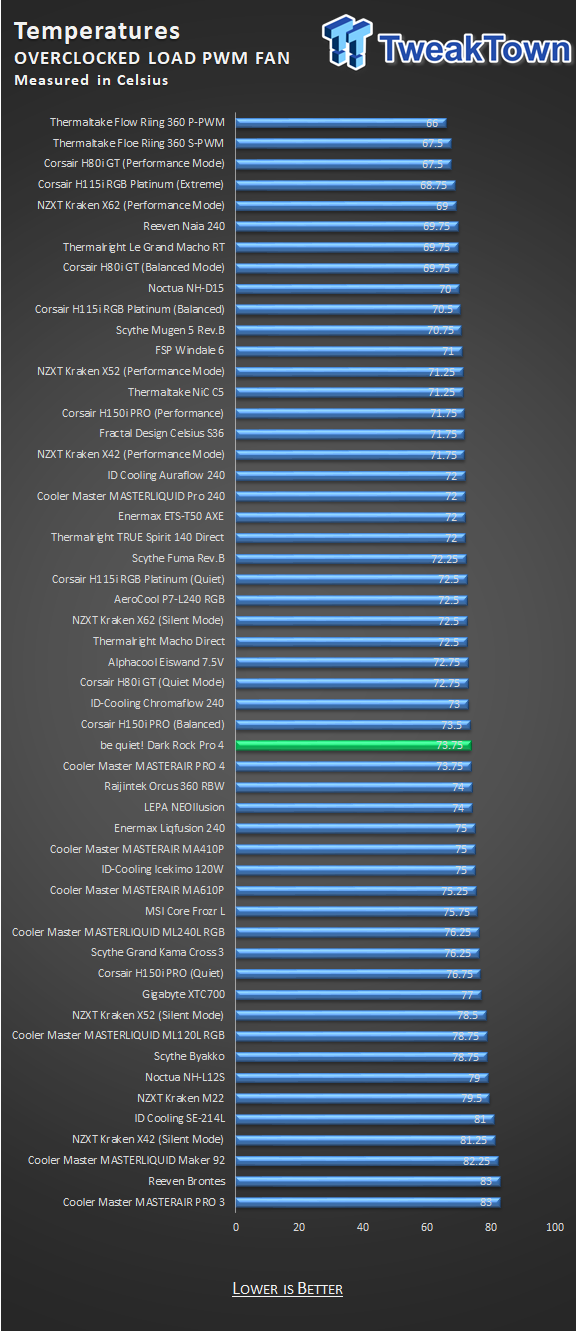
Applying the overclock and testing with PWM still enabled sheds a similar light with we saw in the first test. While again not topping our chart, we are only 7.75-degrees out of the lead. The 73.75-degrees does seem high at first glance in the chart, but with the lack of noise coming from the cooler to accomplish this, the results are reasonably good.
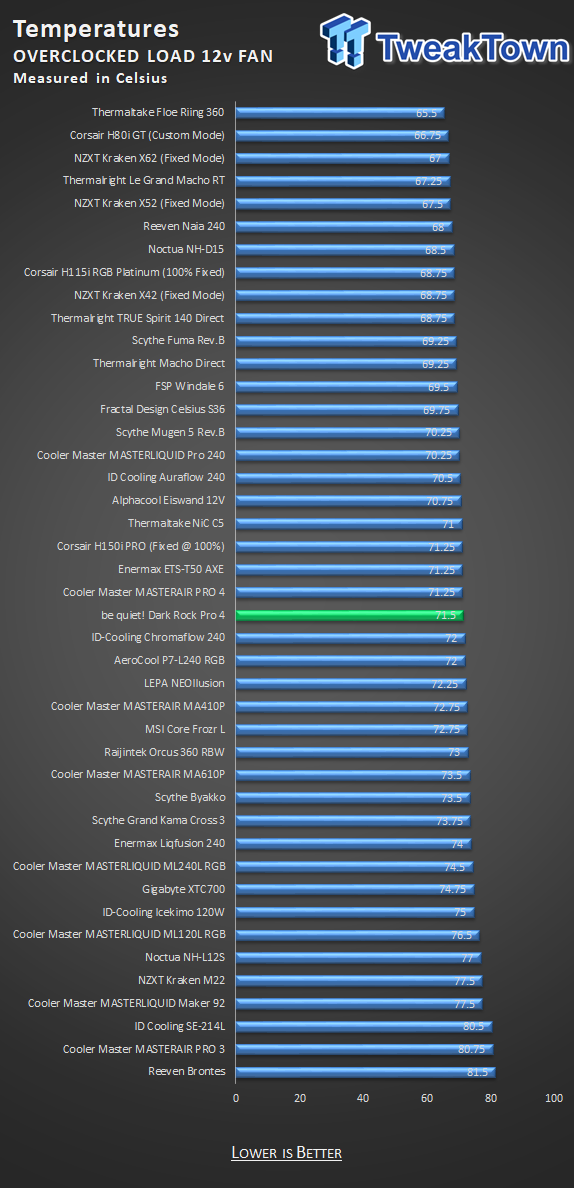
As with many coolers on the market with PWM control, the manufacturers tune the curve closest to the maximum as possible. With only a 2.25-degree advantage, it is likely not worth the effort and audible noise from the fans to run it like this, especially if looking to build a nearly inaudible system.
Noise Level Results

While using the Y-Splitter cable, the RPMs reported are for the 120mm Silent Wings 3 fan. In our stock-clocked run, watching AIDA64, the PWM curve tops out the fan at 761 RPM. The 140mm fan is slower and more silent in operation, but we have no issue at all with the 25 dB reading we got in this round of testing.
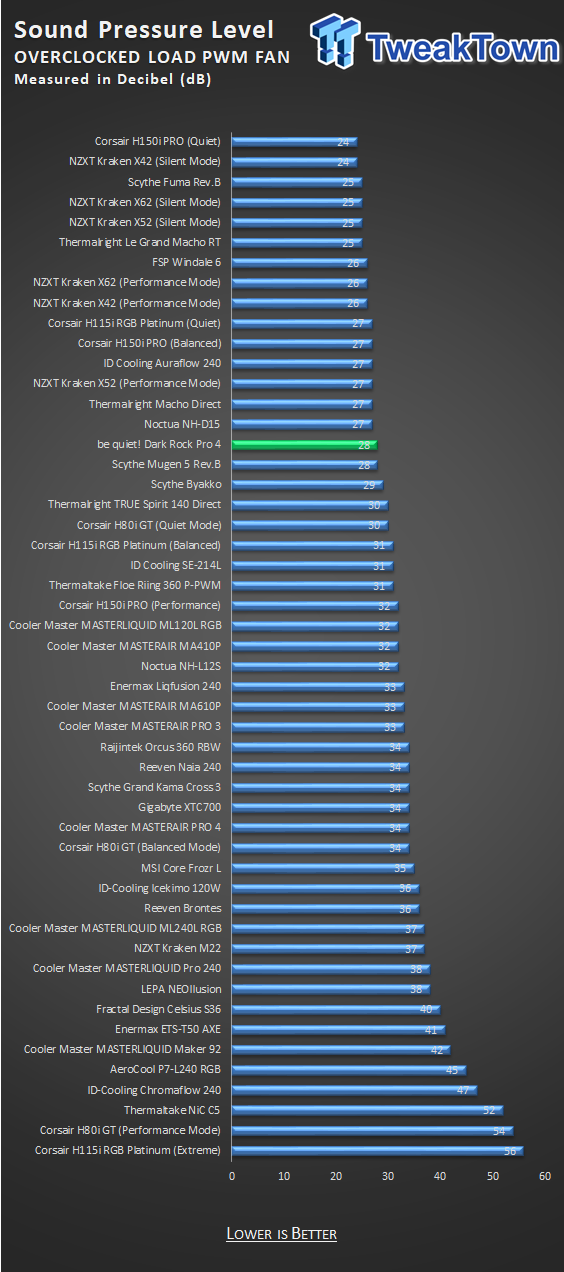
Applying the overclock with PWM control of the fans, speed increased a bunch to 1164 RPM maximum for that round. What is terrific about the Dark Rock Pro 4, is that with a 500RPM increase, the noise level only increased to 28 dB.
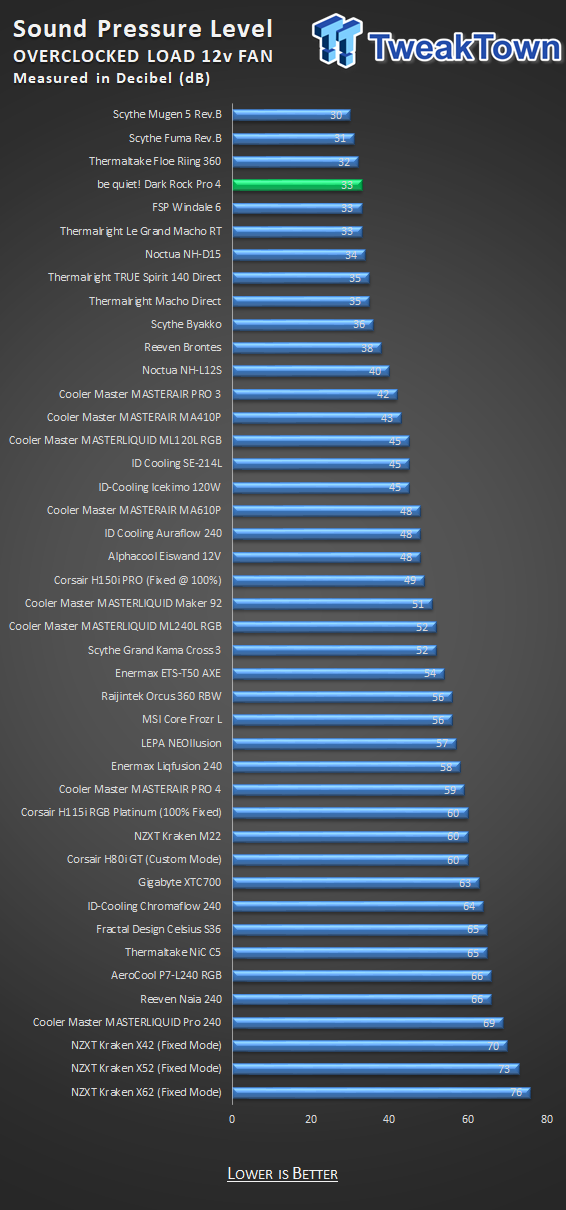
It takes using all of that 12V potential to get the Silent Wings 3 fans into the audible range for most users. With speed reported at 1500 RPM, which is exactly what the specification show we should top out at, the noise is still only 33 dB. While slightly audible, a case side panel will dull it, and there are only three coolers in the chart with a lower rating.
Final Thoughts
The Dark Rock Pro 4 from Be Quiet is no disappointment. With the past as our guide to expectations, in all aspects, they hit them or exceeded them. Aesthetics may be a bit boring for some of the RGB lovers out there, but at the same time, we can appreciate a large cooler with brushed aluminum and no LEDs staring at us from inside the chassis. Beyond the excellent build quality of the tower, we much also consider the fans.

Silent Wings 3 120mm and 135mm fans are used, keeping testing and usage near silent in all scenarios, and are tough to pick up on at all when using with PWM control. Mounting has been made more manageable, and we like that Be Quiet ditched the huge backplate they used to supply. Removable caps on the top for easy access when mounting is also a plus, and we weren't left with holes to look at. Lastly, while not topping any of the thermal charts, the Dark Rock Pro 4 is close enough and no slouch.
Typically, this paragraph is filled with dislikes about design or anything we feel might be lacking. However, unless you are looking for the best of the best in thermal results, there is not one thing we can pick out with the Dark Rock Pro 4 which we do not care for. Be Quite has proven to improve designs each time they come forward, and this latest cooler is no exception.
With the lack of noise associated with it, the better than average performance, and the improvements to the mounting hardware, you will hard pressed to find reasons to pass on this cooler for your CPU. Yes, the cooler is large, which may eliminate some customers, but in the end, Be Quiet covers all current processors, even offering a TR4 edition of this model, and with a 250W TDP to abuse, we feel the Dark Rock Pro 4 is a solid option for any system, as long as the chassis allows for fitment.
Cost is also a significant concern, and if anything lends to moving away from this cooling solution, the price would be it. While $89.90 is reasonable for what we have in our hands, many do not shop in this manner. Looking at the charts, there are more affordable solutions which can perform better thermally, but these options come with a lot of extra noise.
Compared to an AIO, the Dark Rock Pro 4 is more affordable but has much more weight on the socket, but most motherboards can handle either well and are more about personal preference, but the DRP 4 can contend thermally with them, outperforming AIOs in many instances. We find the Dark Rock Pro 4 from Be Quiet to be a great compromise of all things to consider when it comes to buying a new cooler, and unless you use a small chassis, we strongly urge you to ponder the Dark Rock Pro 4 for your next build.

