


Our Verdict
Introduction, Specifications, and Pricing
Out of the blue, we were asked to look at some gear from a company called Micronics. Not knowing anything about them, we looked at a couple of links they had sent to us and agreed to have a look. Without a single bit of information on the company previous to this request, we ventured out into the internet to look them up and see what they were all about. We found that they are a Korean company that has changed names a few times, were established way back in 1996, and at this time, have quite the assortment of components including PSUs, cases, peripherals, fans, AIO PCs, and there is even a section for CPU coolers, although it is empty at this time.
In the request for our review of Micronics gear, we were asked to look at a mid-tower chassis, and highlight a power supply that is designed to fit into their cases. Upon our first glance of the chassis, we felt it was a bit old school in its design, but figured we would give it a fair shake, and put it up against all of the other cases we have seen in our tenure at TweakTown. With that in mind, Micronics has a huge hill to climb to get our recommendations, but we have been surprised by manufacturers in the past. There have been times we almost wrote something off initially, turned out to be something we enjoyed and ended up being either a product which is either so affordable you could not pass it up or was in some way unique and worthy.
What we are putting to the test today is the Micronics Master M400 mid-tower chassis and the Caslon II 600W power supply. The chassis has some features like hidden drive bays, room for radiators, tempered glass, and even comes in a glossy finish for the front bezel or the option for a mesh front panel. The power supply is a standard, non-modular unit, but it is also compact so that the unused wires along with the PSU can be hidden from view without all of the mess associated with them. At this point, we may as well jump right in, and see if Micronics is a company that we could see many of our readers using, or if this is another company that while they are trying their best, it isn't up to snuff.
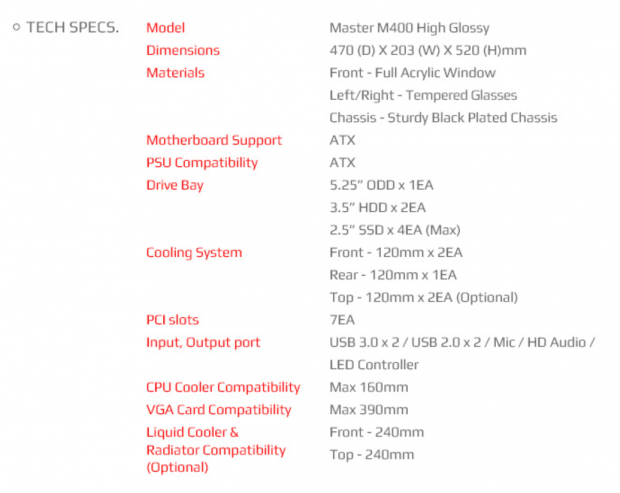
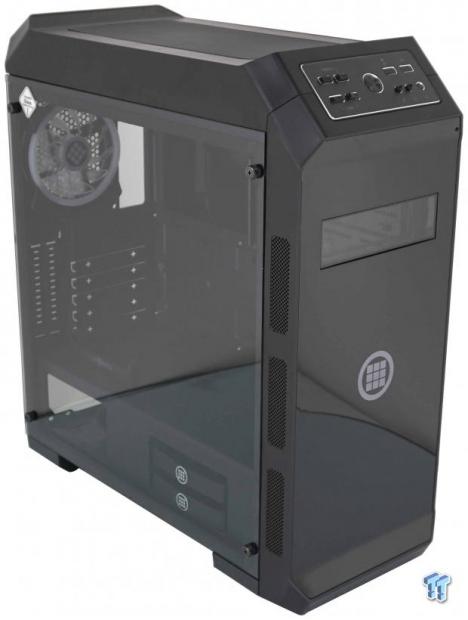
In the specifications chart we borrowed from the Micronics site, we have most of the information available to make an informed decision. We have the Master M400 with the high glossy finish on it, and the chassis is 470mm deep, 203mm wide, and stands 520mm tall. While a significant portion of the enclosure is made of steel, the front and top of the chassis use plastic covers, all of which is black. The front bezel is shown to have a full acrylic window, but that is not precisely true. There is a small window near the top in one of the optical drive bays, and below it is a pair of round windows to let the fans shine through. The last thing to note about the exterior is that Micronics has opted for tempered glass side panels. The left side is in full view behind a lightly tinted glass panel, while the right side is painted on the inside of the glass to block the view behind the motherboard tray.
On the inside, while stated that only ATX motherboards fit, there are markings on the motherboard tray for Micro-ATX and Mini-ITX as well. There is a single spot for an optical drive, although there are two bays. 3.5" drives go into the bottom of the chassis, in an HDD rack, somewhat hidden under the PSU cover. These bays utilize plastic trays, which are also accommodating to 2.5" drives too. Behind the motherboard tray, there are two dedicated locations for SSDs, as well as a pair of spots to the right of the motherboard, on the front side of the motherboard tray. Other things of interest are found in the front I/O of the M400, where the pair of USB 2.0 and USB 3.0 ports are, along with an LED switch, fan speed switch, and the 7+2 expansion slot arrangement. As far as clearances go, there is 160mm worth of room for CPU air coolers, and the maximum length of video cards is 390mm.
Cooling the chassis is a pair of 120mm LED fans and a single 120mm at the back. As stated, there is room for another pair of fans at the top of the chassis, also made for 120mm fans. It is shown that a 240mm radiator can be fitted into the front of the chassis as well as at the top. The rear of the chassis is also capable of housing a single 120 mm radiator, and we also notice that the front of the chassis is drilled for 140mm fans, but there is no mention of this in the specifications.
As we look around for the Micronics Master M400, we find it on this side of the pond, only at Newegg. While there we see the two versions of the M400, where the front of the chassis is made of mesh at $76. The high glossy version we have for you today is a bit cheaper at just $66. When it comes to a mid-tower chassis, this is far below the $100 average pricing of what we typically see day to day. That being said, by the time we are done with this review, you will have a grasp on the value, and see if the Micronics Master M400 is the right case for you or something you should pass on.
Our Latest Mid-Tower Cases Review Coverage
Chad's Chassis Test System Specifications
- Motherboard: ASUS Maximus IX Code Z270 (buy from Amazon)
- CPU: Intel Core i7 7700K (buy from Amazon)
- Cooler: NZXT Kraken X62 (buy from Amazon)
- Memory: Team T-Force Night Hawk RGB TF1D48G3000HC16CBK
- Video Card: NVIDIA GeForce GTX 980 (buy from Amazon)
- Storage: Samsung XP941 256GB (buy from Amazon)
- Power Supply: SilverStone SST-ST85F-G (buy from Amazon)
- OS: Microsoft Windows 10 Home 64-bit (buy from Amazon)
Packaging
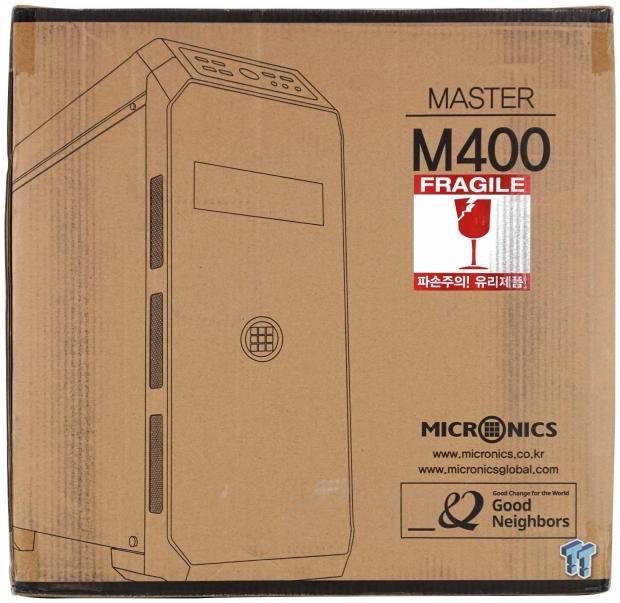
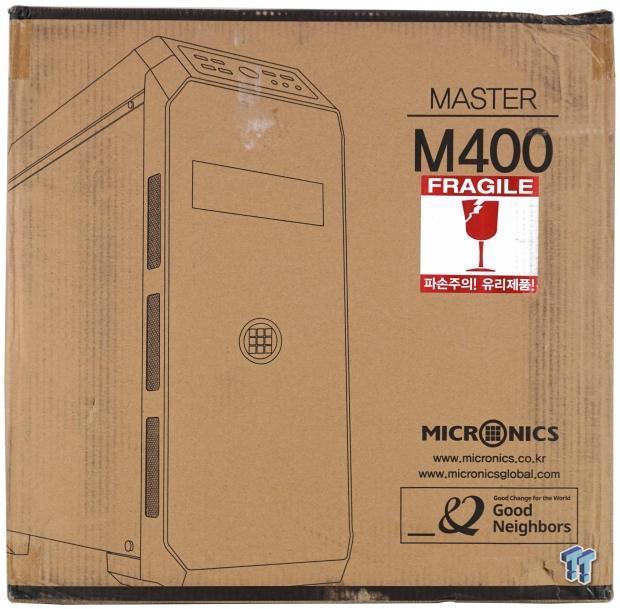
Micronics does the right thing, and puts the money into the chassis, not some flashy packaging. The Master M400 comes inside of a plain brown box, which has been screen printed with black ink. There is a rendering of the chassis on the left side, and on the right are the name of the chassis, the fragile sticker, and the company name and logo along with addresses.
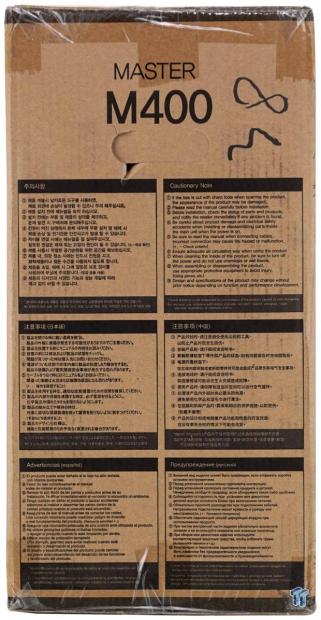
The right side of the box has the name of the chassis at the top, which is followed by nine cautionary statements in six languages. The statements are simple things for many, but it is good to read it over once, before going any further.
Technically this could be the front, and we got it all reversed, but you can see that this panel is identical to what we called the front of the box.
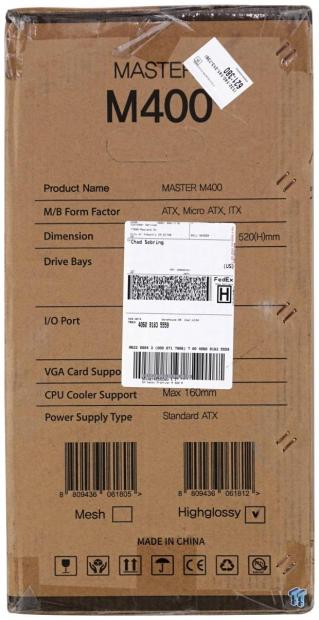
Had FedEx not put the shipping information over it, you would be looking at a condensed version of the specifications on the last panel of the box. The name of the case is at the top again, and at the bottom, there are boxes to check as to if the mesh or high glossy version is inside.
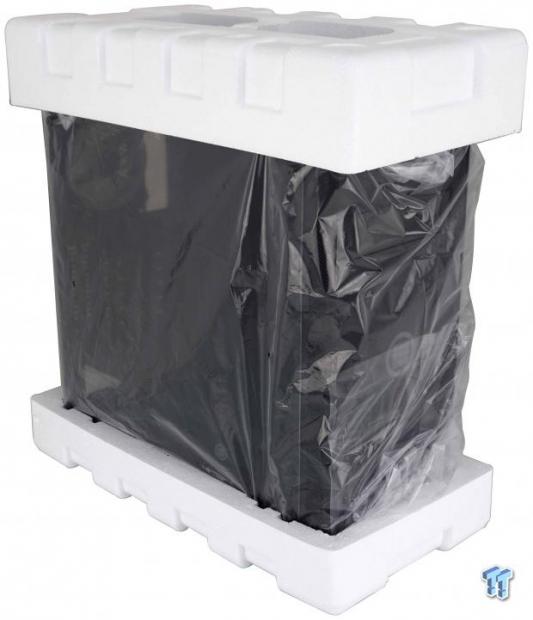
There is plastic clung to the front of the chassis, and since there are tempered glass side panels, there is plastic stuck to both sides of both panels too. To keep the paint from being scratched, the entire chassis is surrounded in a plastic bag, leaving the Styrofoam caps on the top and the bottom to take on any drops or impacts the chassis may see in shipping. In this instance, all of the packaging did its job, and the M400 is in prime condition to be reviewed.
Micronics Master M400 Mid-Tower Chassis
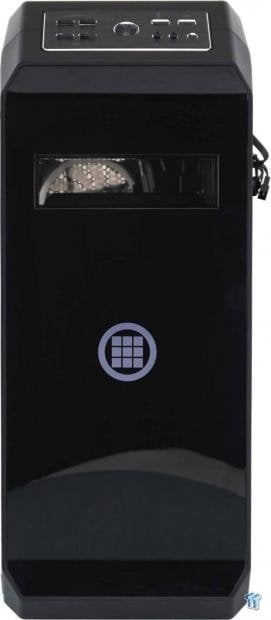
The front of the M400 is where the front I/O panel is found at the top, and shiny plastic covers the majority of the front. In one of the optical bays is a window, which is removable, and at this time, all we see is the Micronics logo painted on the bezel, below it. The angles used sets the front bezel back from the outer edges, which is much easier to see from the side.
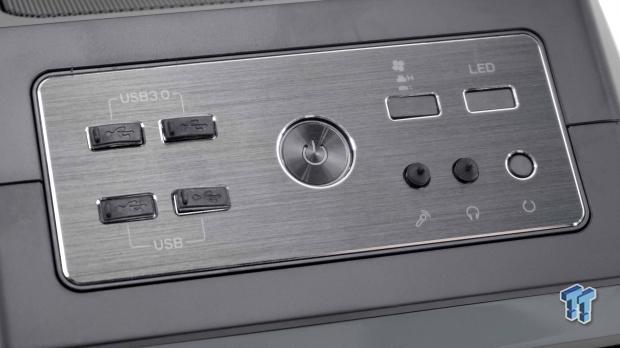
The front I/O panel is set in a metal plate with a brushed finish. To the left are the USB 2.0 and USB 3.0 ports, with dust covers in place. The backlit power button is in the center and will glow blue once powered. On the right are the fan speed button, the LED button, 3.5mm jacks with dust covers in place, and the small reset button in the corner.
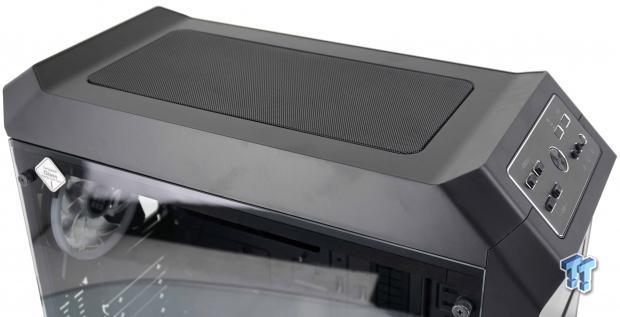
The top of the chassis is shaped similarly to the front, where the center section is set back from the angled ends, which are the highest points on the chassis. The center of the top cover has a mesh panel, but on the inside is also backed with a foam dust filter as well.
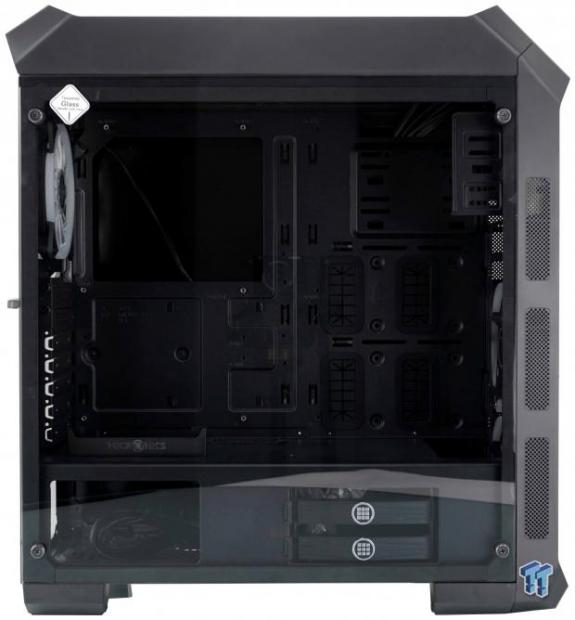
From the side, we see that the entire steel portion of the chassis is covered with tempered glass for a full view inside of the case. The top cover stands taller, than the front is, in thickness, but in the front is also where we see the mesh areas to allow the intake fans a path for fresh air.
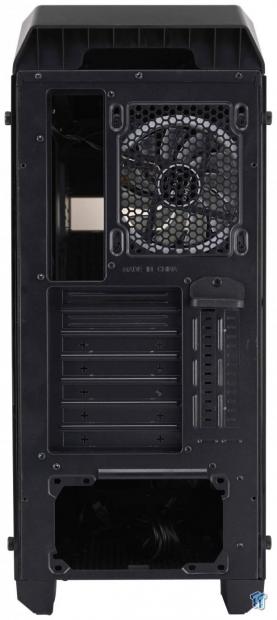
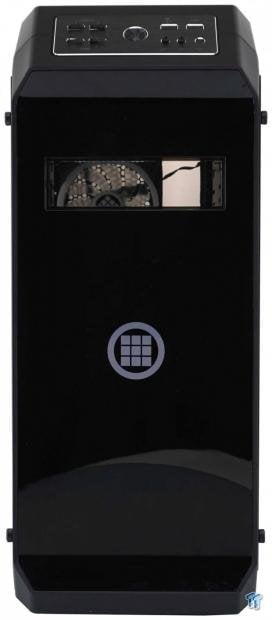
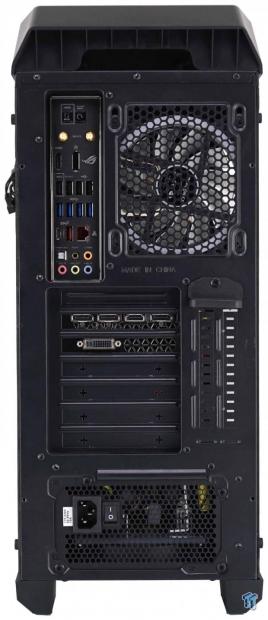
The back of the chassis shows the area at the top, where you grab, to remove the top panel, above where the rear I/O and 120mm adjustable exhaust fan reside. The chassis has seven expansion slots in the typical area, but is also built for vertical GPU mounting, and has the extra slots to support it. That leaves the large hole at the bottom, which is filled by a power supply.
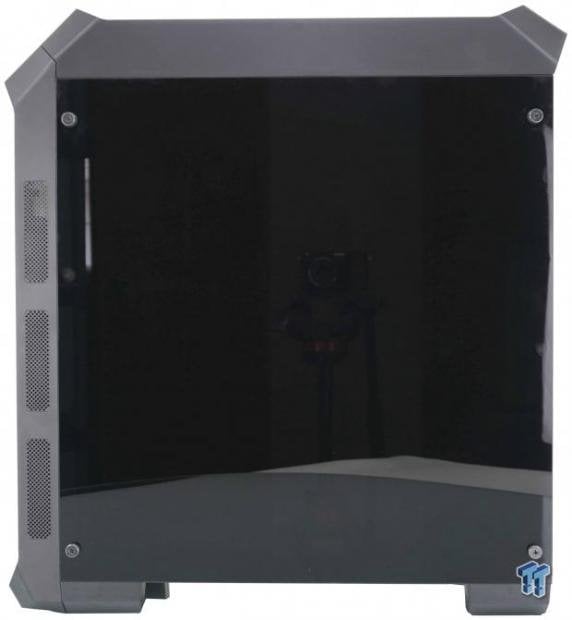
The right side of the chassis is nearly a mirrored view of the left. The shape of the chassis is the same on both sides; there is venting in the front here too. What has changed is that the tempered glass panel has been painted black on the inside, which blocks all things behind it from view when the build is complete.
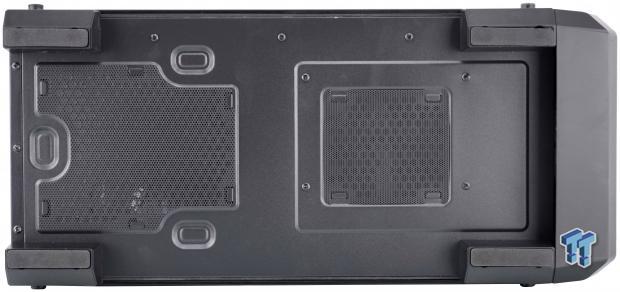
Underneath of the M400, we see that the chunky feet have large rubber pads stuck to them, and the feet are placed in the outermost corners for the best in stability and footing. The PSU has a removable dust filter, as does the area under the HDD cage, but both are not the easiest to remove without laying the chassis over for access.
Inside the Master M400
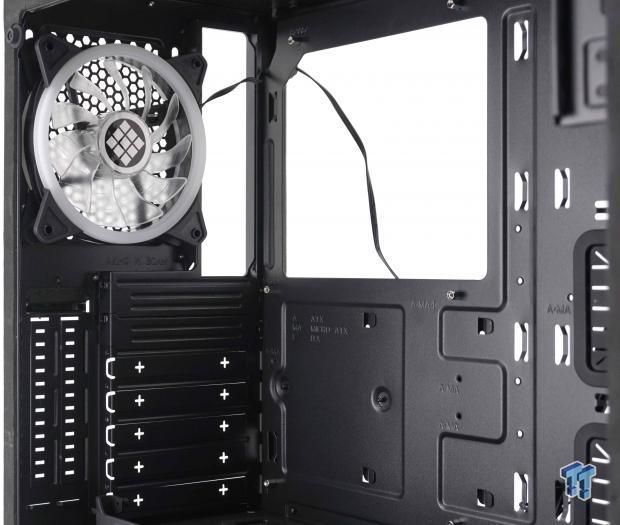
Opening the front of the chassis shows that the front I/O panel is connected to the bezel, and so are the wires. There are a pair of LED fans on the front of the chassis, which can be seen through a couple of amber tinted windows. As for the transparent window near the top, it is removable for an optical drives placement, but otherwise, it is just a window looking in at the RAM and CPU cooler.
With the tempered glass out of the way, we find a chassis with two compartments. The larger one at the top for most of the components blocked off from the bottom by the PSU cover.
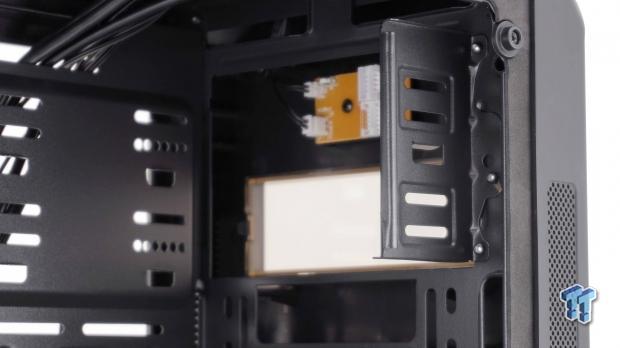
The bracket is for a pair of 5.25" drives, but the PCB behind the bezel makes the top one irrelevant. The lower bay can be used for whatever you want to fill it with, and in the right instance, it would be cool to have thermal monitoring or a digital fan controller showing through the window.
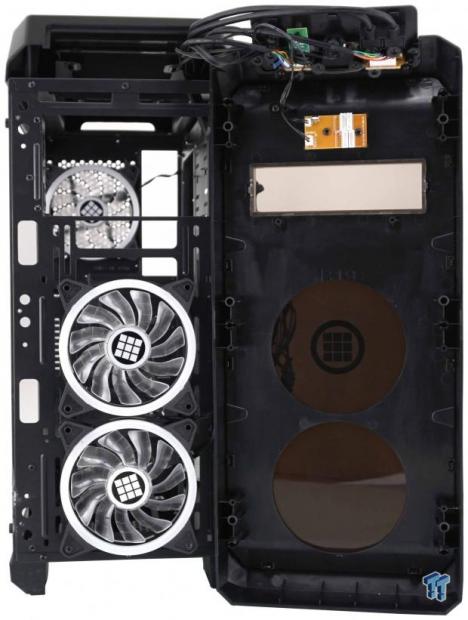
Further down the front of the case, we can see how it breathes. The pair of TB12025-33LED fans are pulling air through the sides of the bezel and into the chassis. Notice too, that at the bottom, the PSU cover is open to allow a radiator to fit there as well.
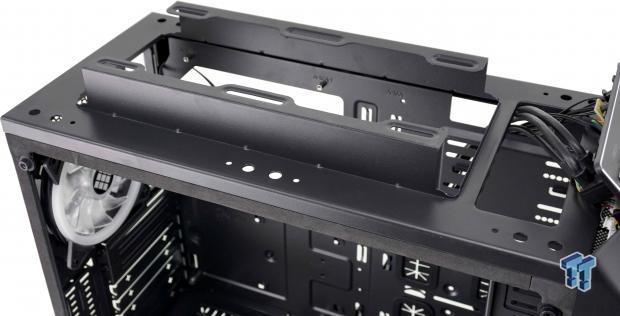
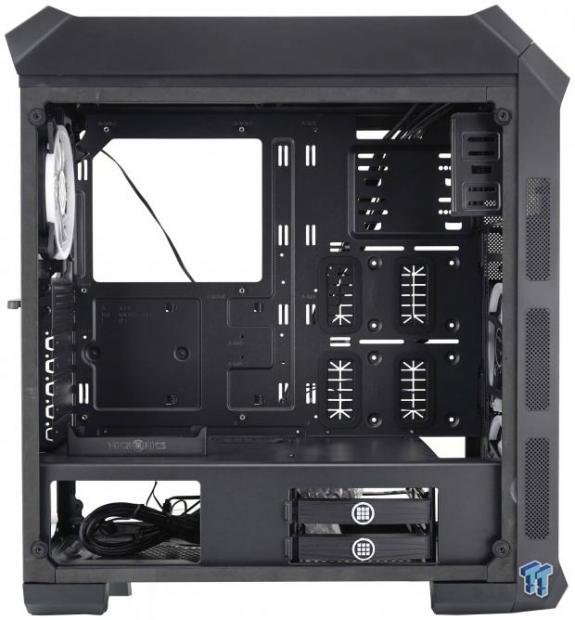
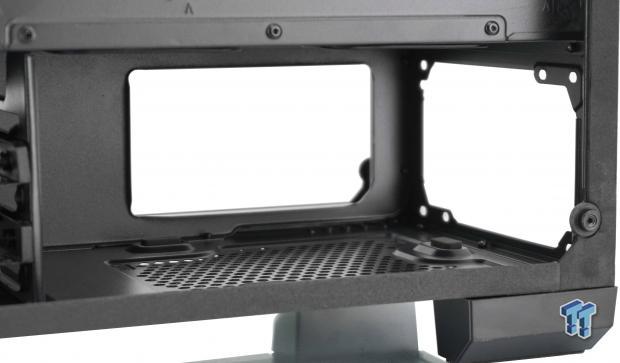
Once the big top cover is removed, we find a raised section of the chassis for more fans. A pair of 120mm fans will fit without any conflict to the motherboard, and even with a 27mm AIO radiator, we do not find issues. Thicker radiators can be an issue for taller RAM usage or also hit the motherboard heat sinks.
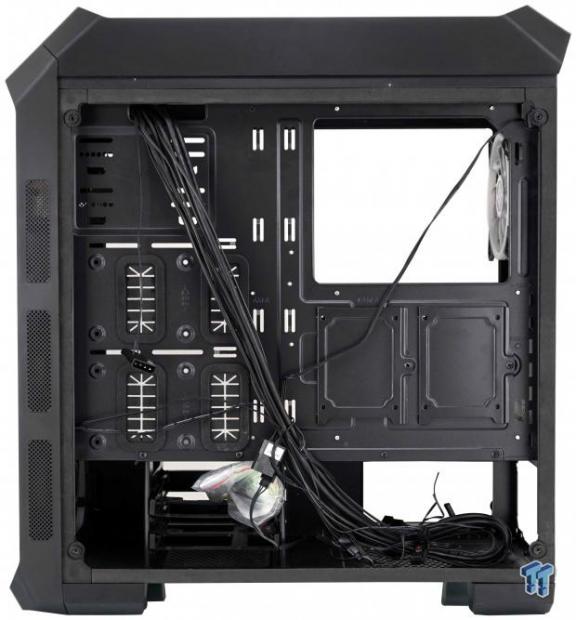
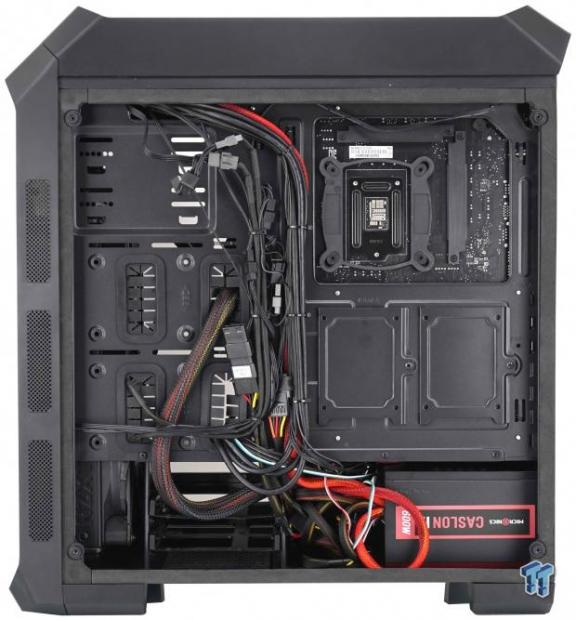
The motherboard tray is marked for various motherboard sizes and has a large CPU access cutout. There are twelve tie points on the motherboard tray, and the four bigger holes for wires have grommets in them.
Inside the Master M400 Continued
The back of the chassis is where the third fan is located, and it is ringed with LEDs just like the two in the front. Below the fan, we find the seven expansion slots with two removable covers, and the rest are knock-out style. The two vertical slots are accessed from the outside but do allow for vertical GPU mounting, if you buy the riser card.
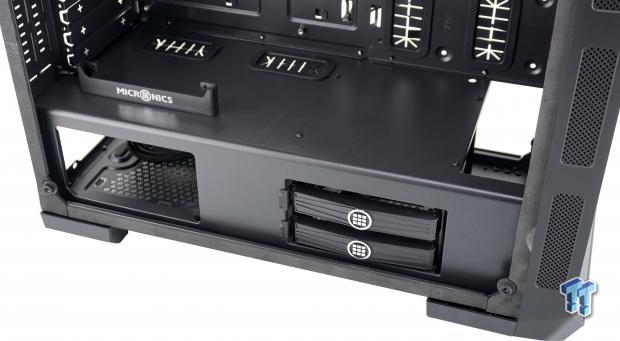
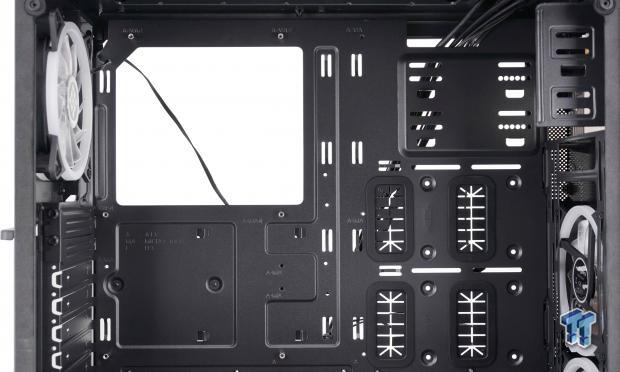
The PSU cover sections off the motherboard from the hard drives, which are accessed from this side. At the back, there is a cut-out to view the PSU sticker, and just above it is the vertical GPU mounting bracket. We also found another pair of holes for the wires, which also have grommets in them.
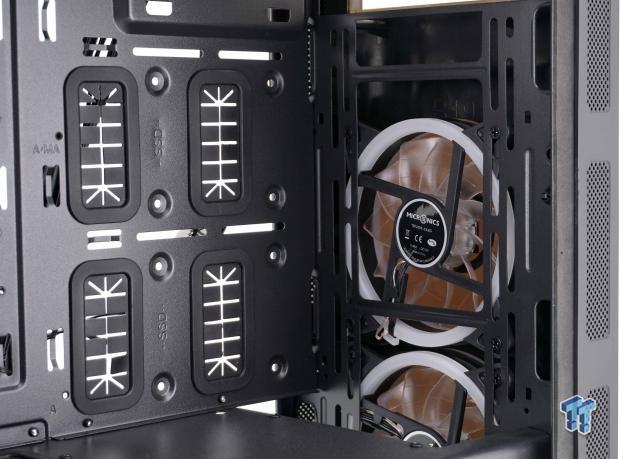
Behind the motherboard tray, we located the manual and hardware tied into the HDD cage. On the left is a pair of locations for 2.5" drives to be mounted on the front of the motherboard tray, and under the CPU access hole is room for another couple of them.
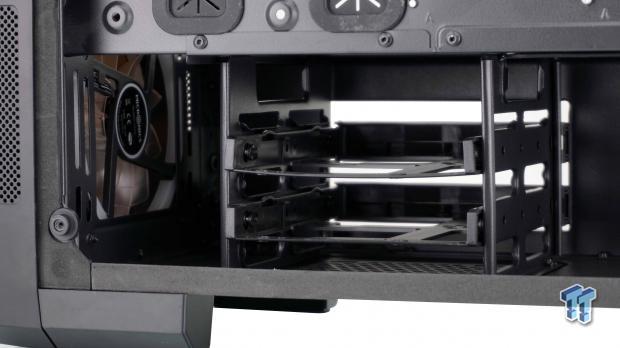
The HDD cage is set back enough to allow a radiator to sit in front of it, and has a pair of plastic trays in it. These bays will house 3.5" drives with screws through the sides of the trays and can be used for more 2.5" drive bays, as the trays are drilled to accommodate that.
The PSU has ventilation under it, and a set of three foam pads for the PSU to rest on. When using a modular power supply, we suggest connecting the wires to the unit before putting it in the chassis, as there is not much room to do it after, and the HDD cage is not removable.
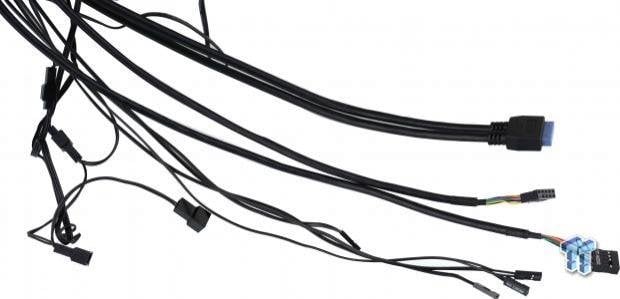
Not in the image are a pair of 4-pin Molex connectors for the power to the fans, and the other is used for an RGB fan hub, which has nothing connected to it for this chassis. We can see the mess of 3-pin fan connections on the left, the front panel wires for LEDs and buttons, the HD Audio cable, the USB 2.0 cable, and even the native USB 3.0 cable. All of which are black, and will blend in when the build is finished.
Hardware & Documentation
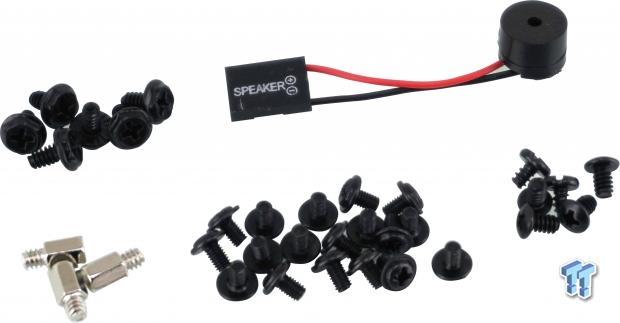
The hardware shipped with the M400 seems limited, but there is plenty here to fill the chassis. There are six hex-head screws for the PSU and two for either a second GPU or use with the vertical GPU mounting bracket, and next to it is a motherboard speaker. At the bottom we have three standoffs that need to be installed, eighteen M3 screws for the motherboard and 2.5" drive mounting, and a set of round 6/32 screws for ODD and HDD mounting.
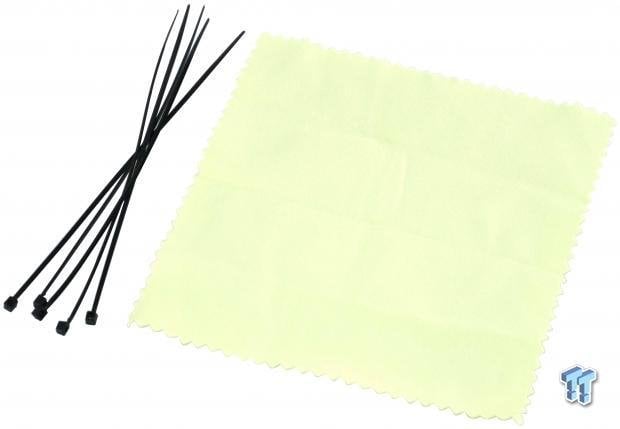
Micronics also considers the need to keep wires tight to the motherboard tray, so that the tempered glass panel can go back on the chassis smoothly, and gives us five zip-ties. Also, with glass sides and a shiny front, Micronics has thought about fingerprints too and offers a cloth to remove them when needed.
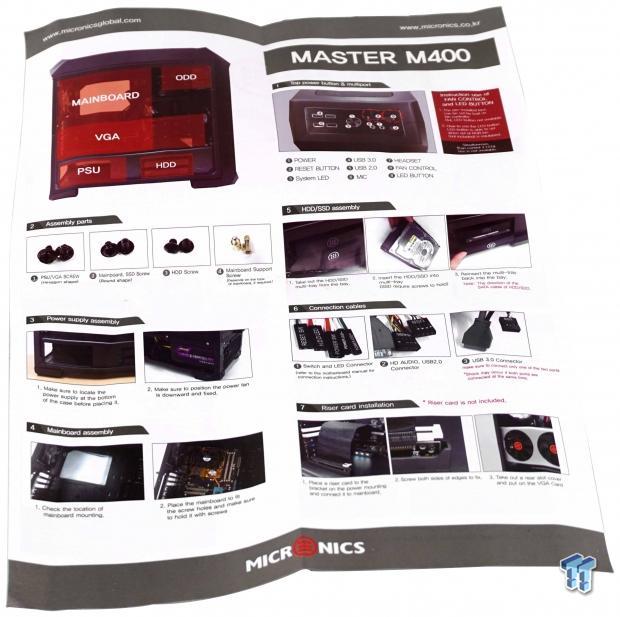
The installation guide is a single sheet of paper with many images on it, and text to help with each step. The hardware is labeled, and each component has a section on how to install it. While not the most comprehensive guide out there, it will get a novice builder through the process.
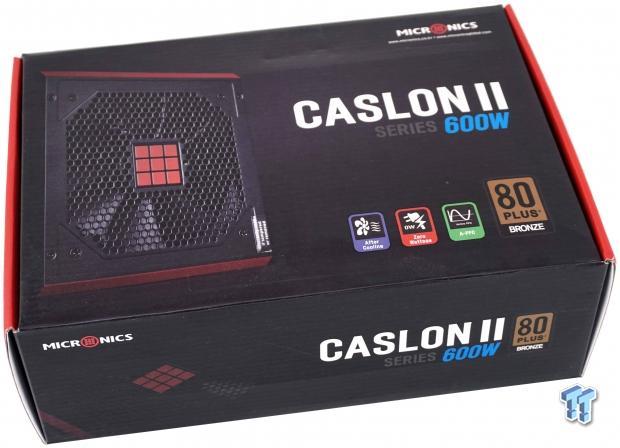
Micronics also sent along the Caslon II 600W PSU to use inside of the Master M400. Its compact size helps, and the 80PLUS bronze rating is not so bad, but there are two things we prefer there not to be. One of them is that the PSU is hard-wired, so if you do not use all of the cables, you have to stuff them in the chassis somewhere. The second is that the PSU has an odd wiring system, where you have to plug the chassis power 2-pin connector to a lead going into the PSU. Once that is done, another 2-pin lead from the PSU connects back to the motherboard power switch header.
Case Build & Finished Product
Not much has changed on the front of the chassis from the beginning until now. While we do see some of the wires hanging out behind the motherboard tray, we can also see the top of the radiator peeking through the transparent window near the top.
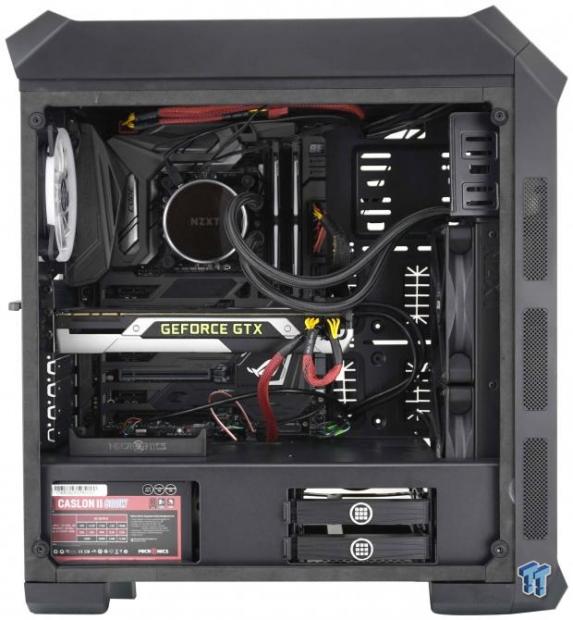
The finished interior looks decent, but the wires need some help. The motherboard and GPU fit, as does the AIO at the front, but the PSU complicates the use of the holes at the top of the PSU cover, and the opening where the rear fan lead passes, does not bode well for the 8-pin placement. Not horrible, but not excellent in this aspect.
The rear I/O dust cover snapped right in, and the motherboard aligns with it as expected. The GPU needs to be forced into place as if the expansion slots are too close to the back edge of the motherboard. Without a supplied cable, the vertical GPU slots are pointless, but the PSU did line up well when it came time to mount it.
The wires behind the motherboard tray can be a handful to manage. With just enough room, roughly 20mm, we were able to keep the wires close enough to not impede on the glass panels placement, but it took us quite a bit of time to get to this point. We also do not care for the fact that we had to stuff the PSU cover with cables, but it is what it is built for, in the end.

Once back together, the Master M400 does have a look that some will appreciate. The lightly tinted glass on the left side affords a good view of the interior, but we are not entirely sold on the styling yet.
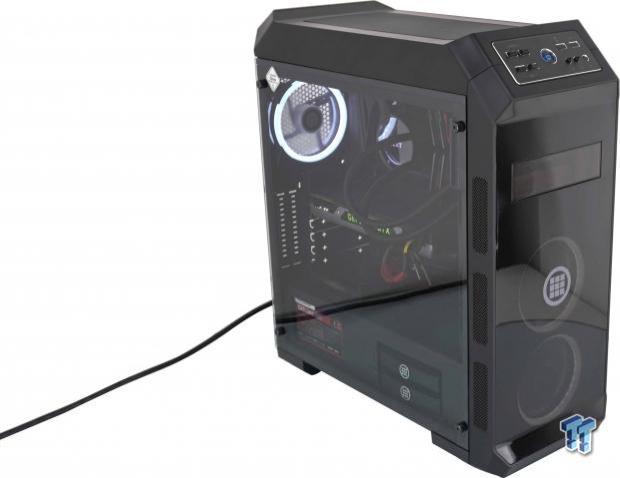
Once we plugged the PC into the wall and hit the power button, it comes to life. The LED ringed fans can be seen through the dark tint of the bezel, and the one in the back adds a ton of light to the interior. The power button is backlit with a blue LED, and while looks have improved, the airflow is lackluster at best.
Final Thoughts
As much as we would like to have said we think the Master M400 from Micronics is something you should own, we then run into a wall of things we found that did not satisfy us. Starting at the front, we see the optical bay window just weird, and the fact that amber tinted windows darken lower in the bezel, the LED light from the fans is also just as strange. The side venting on the bezel is insufficient, and leaves the chassis sucking a shake through a straw to get any air inside of it.
We would rather that the PSU cover not have any openings in the left side of it, we wish the HDD cage was removable and had they opted for not ODD bays at all, they could list 140mm fans and a 280mm radiator being supported in the front of the case. The lack of wire management holes in critical areas is a bit of a downer, that and the fact that all of the grommets fall out of the holes just by looking at them, does not bode well either. The aesthetics are hit or miss for us as well. While we do like the glossy front to an extent, and who doesn't like tempered glass panels, but the odd dog bone shape seems like nobody could figure out how to blend the front I/O with the rest of the chassis, and just threw something together.
That is not to say that the chassis is a complete waste of time, and Micronics got close to delivering something we might use. The room inside is nice, the fans are a brilliant choice to add a bit of bling to the chassis, and overall, it is not horrible looking, it is just not to our tastes. Aside from having to fiddle with the GPU more than we liked to get it installed, the build process is smooth and uncomplicated, at least until it comes to tidying up the wires. Sadly, though, this is a design that for every good thing we find in the chassis, there is another thing that we find about it, that leaves us with a feeling of "meh." The bottom line is that, even if you were to replace the fans, the ventilation is hindered by design, the compatibility of larger coolers is limited, and once the glass is off the chassis, there is a feeling of "cheapness" that we couldn't shake.
Even though the Micronics Master M400 is an affordable solution, we would rather pay another $30 or so, and step into a realm of cases that are thought out with much more scrutiny. Micronics tried pretty hard, delivering many of the current trends in cases. Adding in a vertical GPU mount, using tempered glass, installing a PSU cover, even introducing a flood of interior lighting from the choice of fans are all good things to have. If they are inside a chassis that cannot breathe, the wire management is sub-par, and grommets are always in need of refitting, what is the point. At just $76 for the glossy version, we would hope that the mesh version for ten dollars less may solve the airflow issue, but we have no way of telling for sure. At the heart of what we are trying to say, is that for us, we are going to pass on the Micronics Master M400 with the glossy front bezel, and we would suggest you do the same.
Chad's Chassis Test System Specifications
- Motherboard: ASUS Maximus IX Code Z270 (buy from Amazon)
- CPU: Intel Core i7 7700K (buy from Amazon)
- Cooler: NZXT Kraken X62 (buy from Amazon)
- Memory: Team T-Force Night Hawk RGB TF1D48G3000HC16CBK
- Video Card: NVIDIA GeForce GTX 980 (buy from Amazon)
- Storage: Samsung XP941 256GB (buy from Amazon)
- Power Supply: SilverStone SST-ST85F-G (buy from Amazon)
- OS: Microsoft Windows 10 Home 64-bit (buy from Amazon)
 Lian Li B4-mATX Review: a compact mATX SFF case with excellent airflow and premium features
 Ocypus Sigma F36 BK ARGB Cooling Fan Review: high airflow and unified design in one frame
 PCCooler CPS RZ820 Display Review: a flagship-level CPU air cooler with an LCD screen
 MOAIPLAY ORA PRO G1 850W ATX 3.1 PSU Review: high efficiency and 10-year warranty for $119.99
 NZXT H6 RGB+ Compact Dual-Chamber Chassis Review
 SignalRGB is giving away a Steam Machine clone covered in 36 RAM sticks
 Giveaway: Win an ADATA SE880 2TB Portable External SSD
 Rockstar co-founder doesn't care about the physical vs digital debate, says companies should give players what they want
 God of War Laufey gets a release date and Kratos is making a return
 GTA 6 trailer 3 expected to arrive within two weeks, according to insider
 Thieves stole 16 RAM sticks from Chinese eSports hotels, arrested
 Lisuan LX7G100 GPU achieves playable FPS in system with no Intel AMD or NVIDIA hardware inside
 Elder Scrolls 6 roadmap not affected by layoffs, Bethesda says
 Intel and AMD are locking Chinese customers into long-term CPU deals as server chip prices climb more than 40%
 Thrustmaster T.Flight HOTAS 5 MSFS Edition Review
 SteelSeries Arctis Nova Pro Omni Wireless Headset Review - One Headset to Rule Them All
 SteelSeries Arctis Nova 7 Wireless Gen 2 Headset Review - New and Improved, But Is It Enough?
 AMD Ryzen 7 7700X3D Review - Days of Future Past
 Samsung 990 2TB SSD Review - Ninth Gen QLC at PCIe Gen4 Speeds
 ASUS ExpertBook Ultra (Panther Lake) 14" Business Laptop Review
 ASUS ROG Raikiri II Xbox Wireless Controller Review - Ready to Take Control
 MOZA FMP18 Panel Bundle Review: authentic F/A-18 Hornet cockpit controls for flight sims
 Micron 6600 ION 245.76TB Enterprise SSD Review - Best in Class Programming Speeds
 MOZA MA3F EFCM Flight Control Module Review: authentic Airbus A320 autopilot panel for simulators
 The Ultimate Guide to Personalizing Your Windows 11 Taskbar
 How to Turn Your Windows Laptop Into a Second Monitor with Miracast and Wireless Display in Minutes
 6 Mistakes to Avoid When Buying a Windows Laptop
 I capped Windows Update's bandwidth with Delivery Optimization, and my downloads stopped choking
 I use this decade-old free tool that finds files faster than Windows Search does
 I install and update most of my apps with this Windows command now, and I stopped downloading sketchy installers
 Hisense U6SF 65-inch MiniLED TV: High Performance Meets Leisurely Convenience
 I stopped digging through Windows menus after I set up this one folder
 Don't sell your Windows laptop until you do these things
 6 PC cleaning mistakes to avoid for safer hardware maintenance