The Bottom Line
Introduction, Specifications, and Pricing
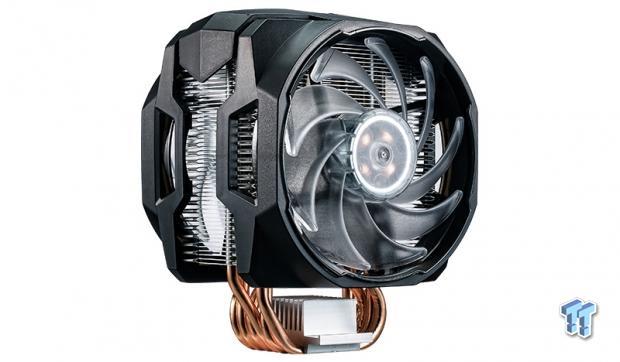
Round two of CPU cooling options is upon us, and is yet another cooler to be released within the Masterair Series. Recently looking at its little brother, the MA410P, we hope this larger, better equipped, tower cooler leaves us with a more pleasant feeling at the end.
Some of the things that set the two coolers apart are things like a full fan shroud in it, increasing the number of heat pipes, installing a pair of fans this time, and even offering a much more substantial pre-cooler on the base. In principle, if on the same tower as the MA410P, things look promising out of the gate for what we are about to see.
We had a suspicion after seeing the new cooler that we had seen it before, and we have to some extent. The reason we felt we had seen it is that this new cooler is the offspring of the Masterair Maker 8. That being said, we do lose a little bit to the original, as there are not eight heat pipes this time.
We also lost the vapor chamber base, the vertical vapor chambers, and thankfully did away with the pain in the bum hardware. Most of the cooler is very reminiscent of the Maker 8 in style, but outside of looks, to say they are that similar is a bit of a stretch.
It is the Masterair MA610P which has us here today. Just looking at this single tower cooler with a pair of fans and its fancy plastic components, one would quickly conclude that the cooler is more than capable at taking a run at those coolers we have already tested.
However, there comes the point where listening to customers can be the bane of your existence. We do feel the Cooler Master has moved towards looks and silence above performance, as with what you are about to see, bigger doesn't always mean better.
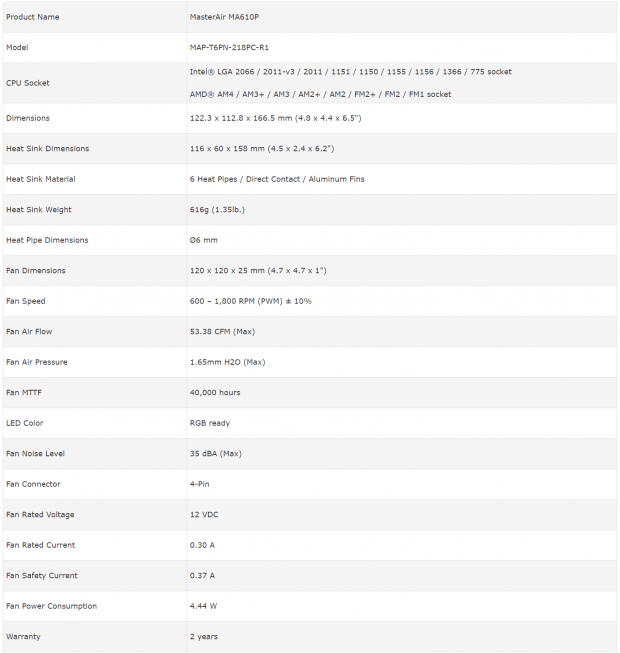
The Masterair Ma610P can also be found searching for the MAP-T6PN-218PC-R1 model number. When it comes to mounting the MA610P anything since LGA775 is covered, and for AMD, AM2 is the earliest socket it will fit. The primary structure of the cooler is 116mm wide, it is 60mm thick, and stands 158mm tall.
With the plastic and fans on the tower, the measurements increase. The cooler is now 122.3mm wide, it is 112.8mm thick, and is now 166.5mm tall. This is another direct contact cooler which sports six 6mm diameter heat pipes, which are run through fifty-four thick aluminum fins. All told, with the fans included, the MA610P weighs in at only 616 grams.
With the MA610P, you get a pair of fans, which sport the model number DF1202512RFMN. The front fan is conventional in its design, where the rear fan is a bit different. It has the blades on the outside and the frame against the cooler, where the blades are reversed, so it will pull through the cooler.
These fans will spin at 1800 RPM at their max, and deliver only 53.38 CFM at 1.65mmH2O of pressure. These fans are also rated for just 40,000 hours; they are RGB LED illuminated, they are powered via a 4-pin PWM connection, and use 4.44W of power each. The warranty is pretty standard for Cooler Master, where they will address issues for two years from the time of purchase.
Since the MA610P is larger and comes with more than the MA410P does, we are not shocked to see that it costs more than the smaller option. What we see currently is that if you shop at Newegg, you will find the MA610P listed at $67.49. For those that favor Amazon, you will pay a touch more, as it is listed there for $69.99.
By looking at the specifications, and looking at what the box shows you, we feel this is not out of bounds to ask such a price. However, we do still have to put it through our gauntlet of stress tests, and see just how well it performs before we make a judgment on bang-for-the-buck.
Packaging
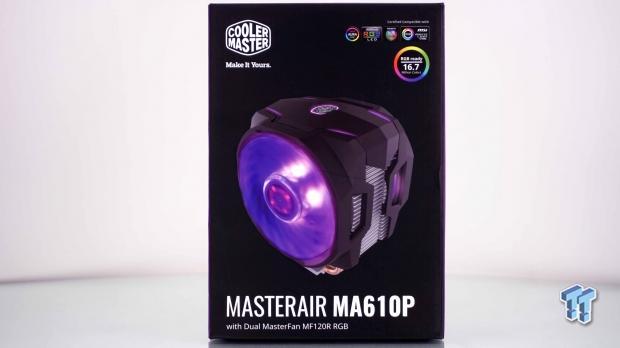
The box is black, with a huge image of the CPU cooler right smack in the middle. We see the motherboard RGB types which are supported and can deliver 16.7 million color options. At the bottom of the front panel, we not only see the name of the cooler but are shown that it comes with dual MF120R RGB fans.

Along with an image showing us the top of the CPU cooler, we are also told a bit about how the MA610P came to be. Cooler Master also goes into details that allude to the improvements of the design, and that this is intended for gamers and overclockers.
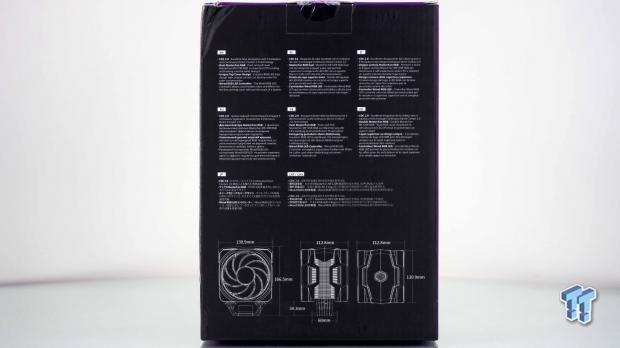
Around the back of the box, we are shown features like the CDC 2.0, dual fans, unique top cover design, and the wired RGB controller. This is repeated seven other times before we get to the three, dimensional renderings, explaining the size of the MA610P from all angles.

The last of the external panels offers a specifications chart. This is identical to the one we just went over, but this is also where you find the serial number and barcodes.
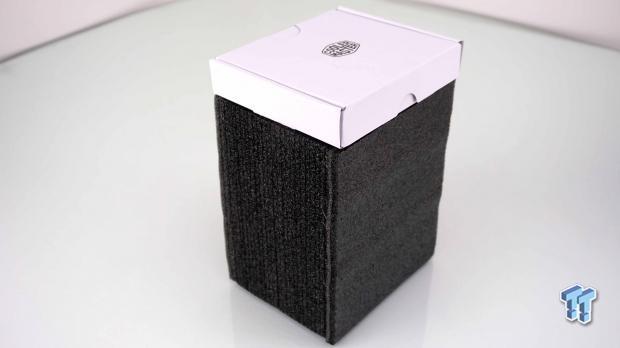
Upon opening the box, you will first run into the white cardboard box full of the hardware. It is under the box where we found the cooler enclosed in dense black foam.
This should be enough to take the bumps and drops associated with shipping, and as for our example, the packaging worked well enough for this cooler to show no damage at all.
Cooler Master MASTERAIR MA610P CPU Cooler
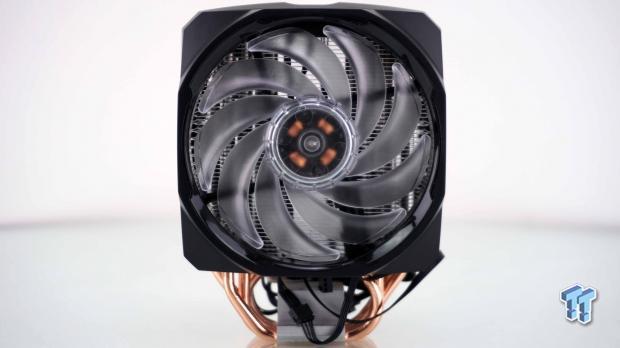
The front of the MA610P is enclosed as the plastic frame around the fan fits around the fins. The shiny center section is what supports the fan and is separate from the textured bits around it, and is what holds the clear hub and nine blades to the tower.

The side of the cooler shows how both fans are attached to the tower, as well as hinting at the plastic cover on the top. Near the bottom of the cooler, we can see some of the cables for this cooler, of which there are three to connect, and two more that allows for RGB control of the fans, as the main 4-pin RGB lead goes into the top cover first.
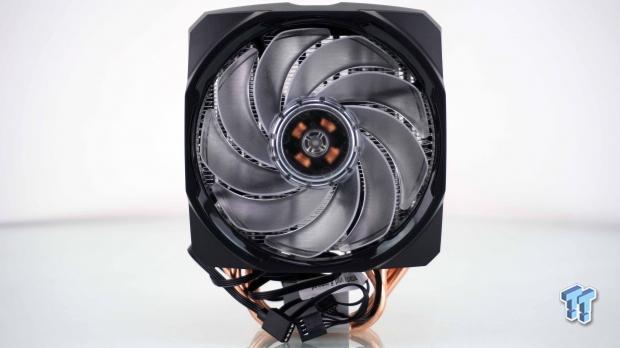
From the back, it is almost as if we are staring at the front of the cooler, but Cooler Master has engineered this fan as a pull fan. The blades spin clockwise and scoop air from the back of the cooler to pull heated air out. We can also see the 4-pin RGB lead as well as the 4-pin PWM lead at the bottom.

While looking at this side, we point you to the fin arrangement, where they come together at the front and back of the cooler, as well as pointing out just how close the heat pipes have to be arranged to fit through the tower.
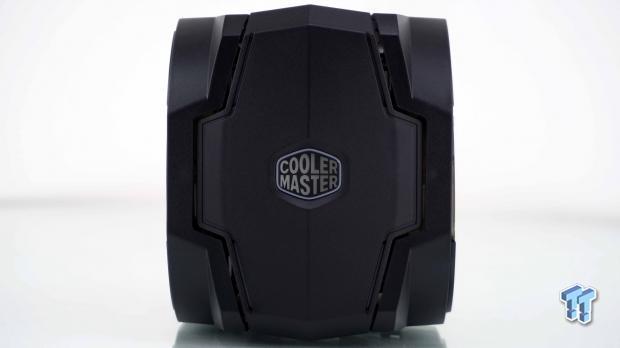
The view from above is pleasing. Three parts black textured plastic, one part RGB logo ring, and four parts slot at each corner to illuminate, once underway, the aesthetic appeal is top notch. This is a pleasing way to cover the top of the cooler, as well as enclosing some of the tower to help direct airflow.
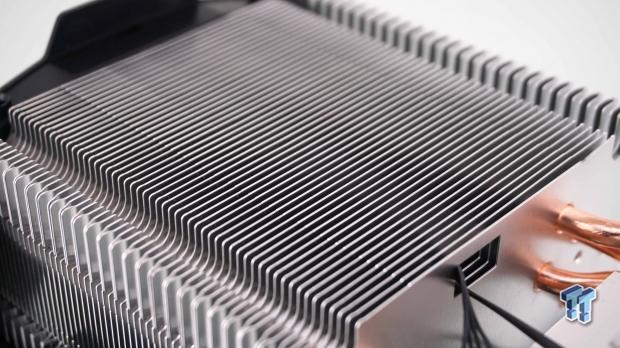
There are two things we want to explain here. The front edge of the fins is blunt, with not much in the way of valleys to help the fans build any pressure before removing heat from the tower. The second thing is the pair of wires coming out of the bottom. One lead is the RGB in-lead, while the other is there for fan control. Another fan control wire is found on the flip side as well.
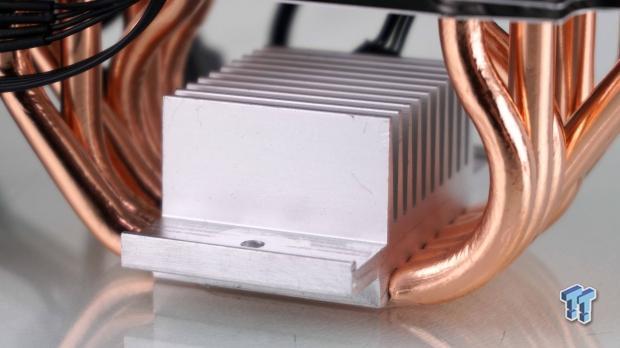
In an attempt to help eliminate heat from the cooler as soon as possible. Cooler Master has installed this large pre-cooler. We do feel the slots should go front to back rather than side to side, to take more advantage of natural airflow, but we assume Cooler Master knows what they are doing here.
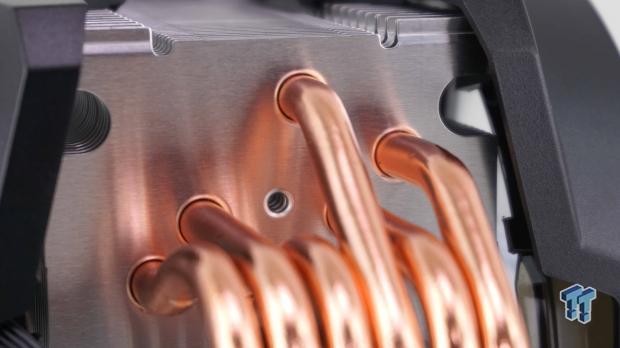
The heat pipes are staggered from one another, as to not have any of them in the same line with another. This way all six pipes deliver heat across more of the fin area, and should also gain individual airflow, again, helping to keep this tower cooler than others.
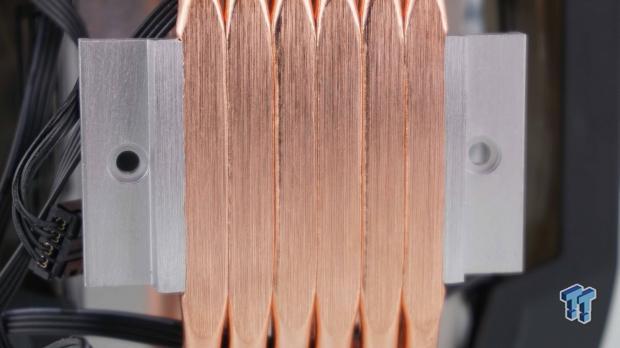
At the base of the cooler, we have six pipes trapped between the aluminum pre-cooler portions. Some of the gaps are tight, some of them have a fair amount of space between them, but once assembled, the base is machined and left in a rough state to make direct contact to the CPU.
Accessories and Documentation
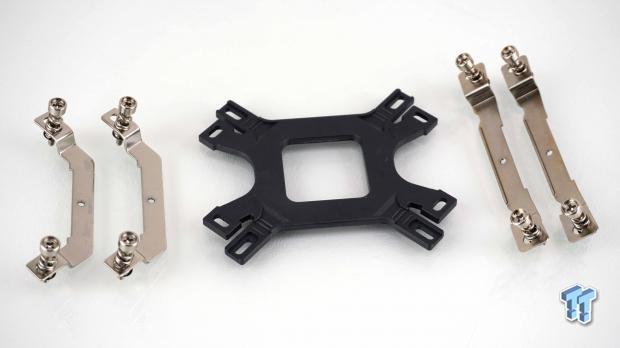
When it comes to mounting the MA610P to the processor of choice, you will need to use the universal backplate centered in this image. You then need to choose whether it is the Intel mounting brackets on the left, or if it is the AMD mounting brackets on the right you need next.
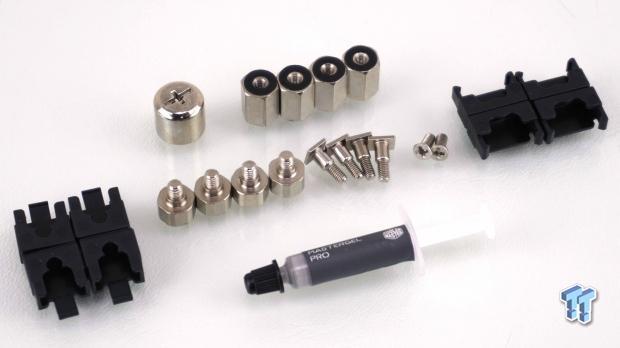
To go along with the previous parts, you will also need most of this. Across the top are the socket and the universal standoffs for the majority of the sockets. Across the middle are the Intel stud clips, LGA2011/2066 standoffs, the studs, two screws for the brackets, and AMD stud clips on the right. We also got a smaller tube of MasterGel Pro paste.
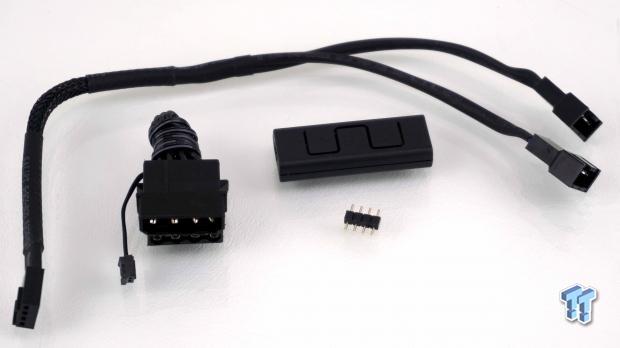
To power both fans, Cooler Master does offer a longer Y-splitter cable to help ease looking for an extra fan header. To control the lights without a motherboard involved, you will need the Molex to 2-pin power lead, the control box, and the 4-pin to 4-pin adapter to connect the 4-pin RGB lead from the cooler to the controller.
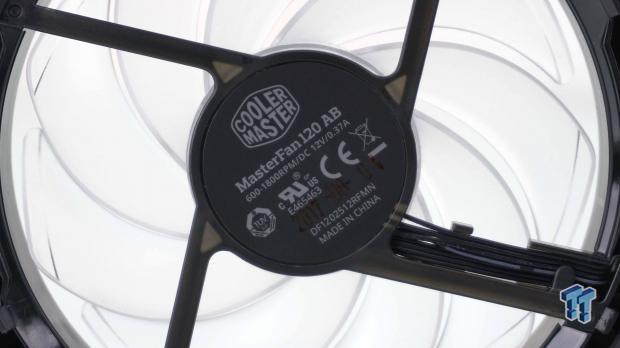
The MasterFan 120 AB on this cooler is shown to deliver 600 to 1800 RPM, even though the DF1202512RFMN model number is the same we saw on the fan for the MA410P. Rest assured, this pair of fans is not the same.
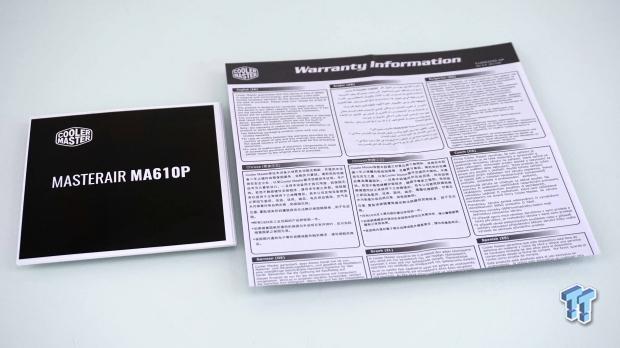
The manual gives you everything from a parts list to detailed instructions to secure the cooler to any supported socket motherboard; there should be no questions after following the manual step-by-step. The other insert is about the two-year warranty and explains what Cooler Master will cover if you find something wrong with the product.
Installation and Finished Product
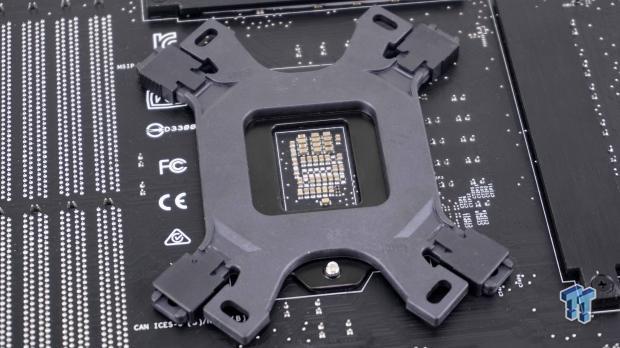
After installing the studs into the backplate, and then using the stud clips to hold the studs in place, we also made sure we were clicked into the LGA115X slots at the corners. Once we had that all set, all we had to do was insert the studs into the motherboard, and orientation is of no concern.
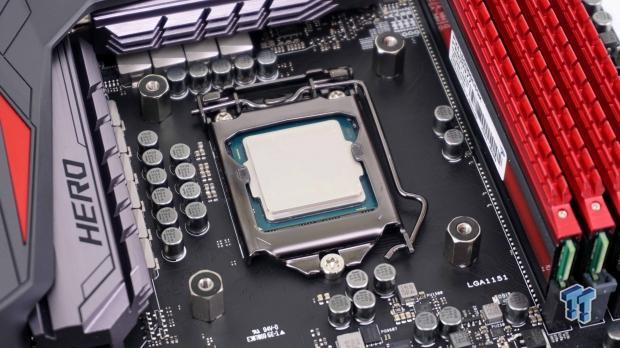
The next step is to find the set of four standoffs and screw them onto the studs. Both ends of the standoff have a nylon washer taped to it, and with use of the socket, we can lock these down pretty tight.
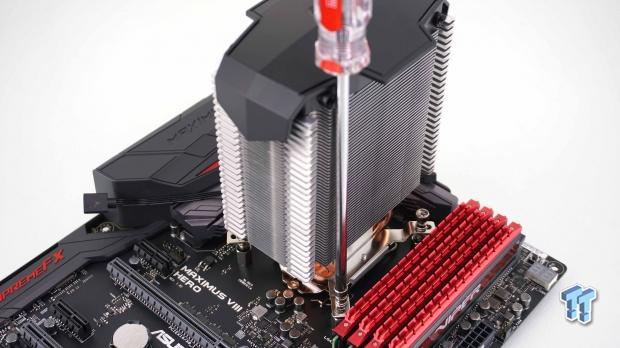
After removing the fans from the tower, and disconnecting the RGB cables from them, you can take the cooler with the appropriate brackets installed on it, and mount the cooler to the motherboard. A few turns on each screw in an X-pattern is best, and keep twisting until you run out of threads.
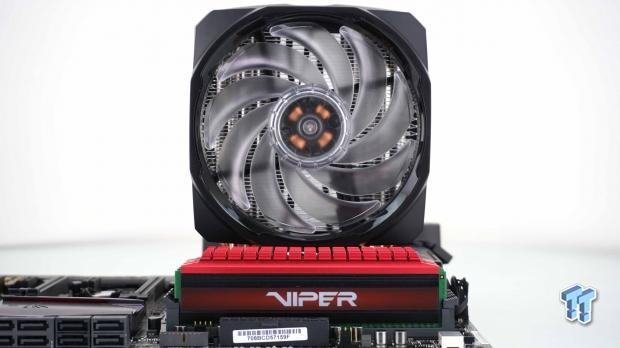
After some finessing the wires back into the fans and fighting the top cover studs for alignment, we were able to get the cooler ready for testing. Standing tall, well above the memory, it will take a decent sized chassis to house this tower, and we can see that the RAM doesn't block any of the airflow.
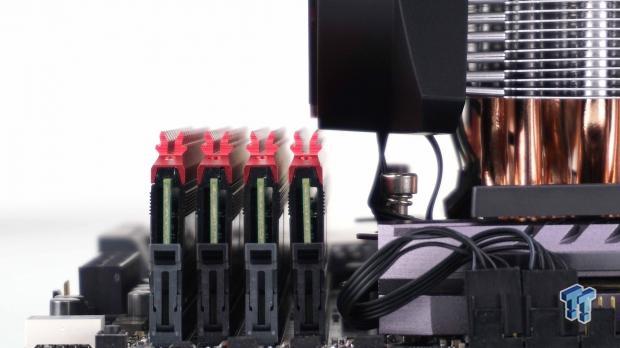
By the skin of its teeth, the fan just fits in behind the memory. We could have easily removed the tops on our sticks, but this does point out that if you have taller memory on your motherboard, fan fitment may be next to impossible.
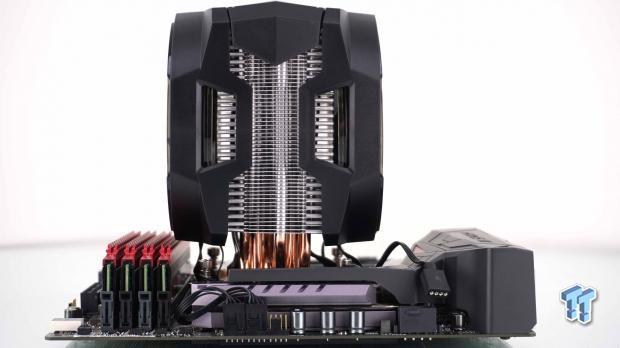
With the fact that the MA610P is not off center of the CPU, it does take up a lot of room, but it is all to one side. There is room behind it for quad channel motherboards, but keep the height in mind. Even if the motherboard was installed at this time, we still could access the 8-pin connection without too much hassle.
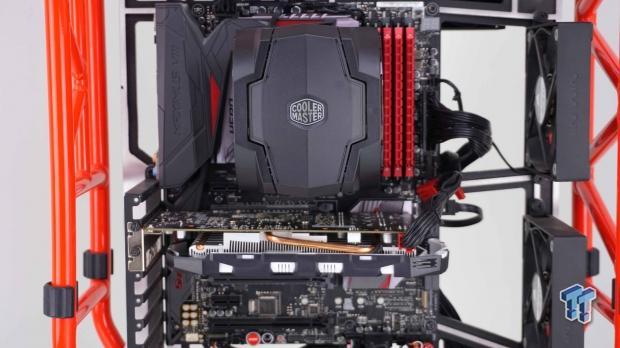
Once everything is installed, we can now take advantage of the best looking side of the MA610P. The top of the cooler is the money shot, as the angular black plastic shape is attractive to look at, and will blend in with most cases and motherboards, that is until you power it up.
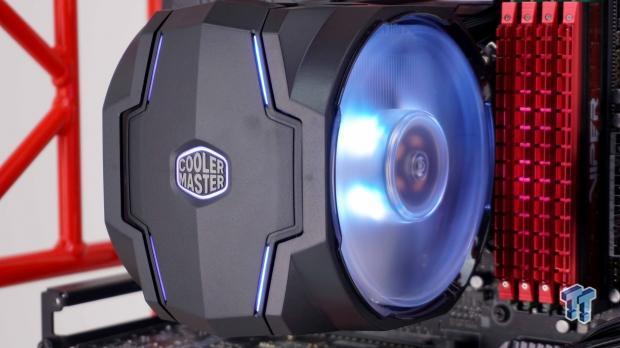
With power now coursing through the MA610P, we begin to take advantage of the RGB LEDs to improve the look even further. As we alluded to earlier, the logo lights up, the four slits are backlit, and it all matches the color of the fans too. Keep in mind that this is only one color of many, and there are modes available through the controller as well as compatible motherboard controls.
Test System Setup, Thermal Tests, and Noise Results
Chad's CPU Cooler Test System Specifications
- Motherboard: ASUS ROG Maximus VIII HERO (Intel Z170) - Buy from Amazon / Read our review
- CPU: Intel Core i7 6700K - Buy from Amazon / Read our review
- Memory: Patriot Viper 4 3000MHz 4X4GB - Buy from Amazon / Read our review
- Graphics Card: MSI GeForce GTX 1060 6GB OC - Buy from Amazon / Read our review
- Storage: Corsair Neutron XTi 480GB - Buy from Amazon / Read our review
- Case: INWIN D-Frame - Read our review
- Power Supply: Thermaltake Toughpower DPS 1050W - Buy from Amazon / Read our review
- OS: Microsoft Windows 10 Home 64-bit - Buy from Amazon
- Software: RealTemp 3.70, AIDA64 Engineer 5.75.3900, and CPU-z 1.77.0 x64
To see our testing methodology and to find out what goes into making our charts, please refer to our CPU Cooler Testing and Methodology article (October 2016) for more information.
Thermal Results
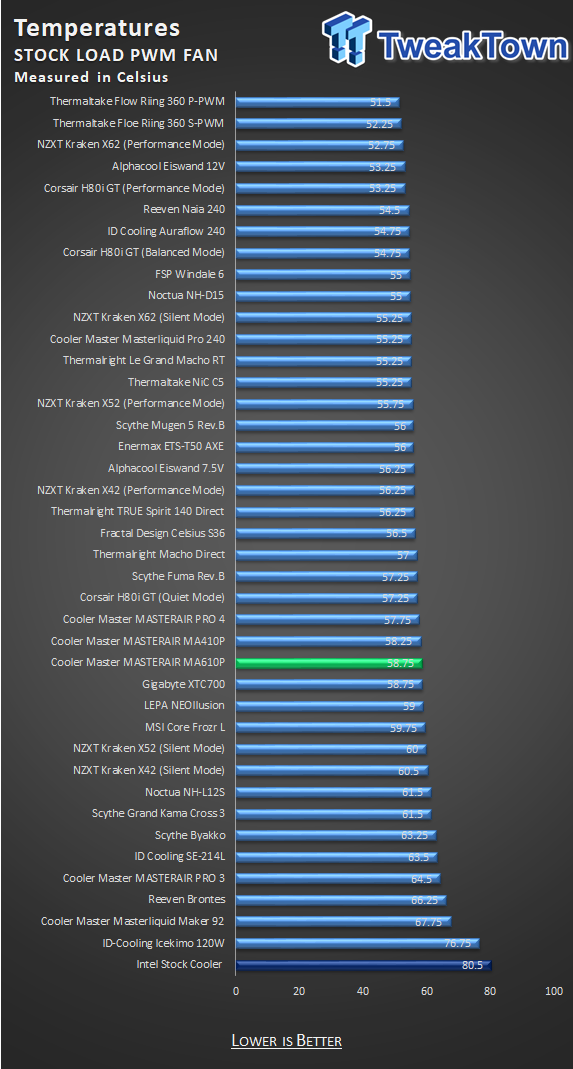
This early is when the disappointment starts to set in. While 58.75 degrees is better than average, it is plain to see that it is half a degree worse than the MA410P. We do feel that it falls into the right area on the chart, but it is shocking to see their own, cheaper solution, performing better.
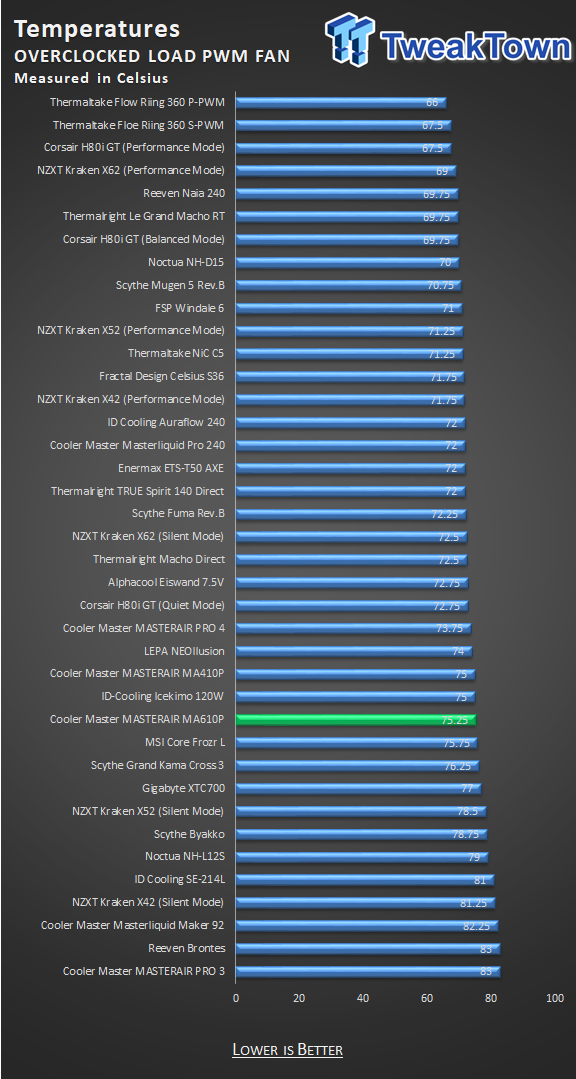
With an overclock applied, the gap tightens to a quarter of a degree, but facts are facts, and the 75.25-degree result still fails to do better than its kid brother.
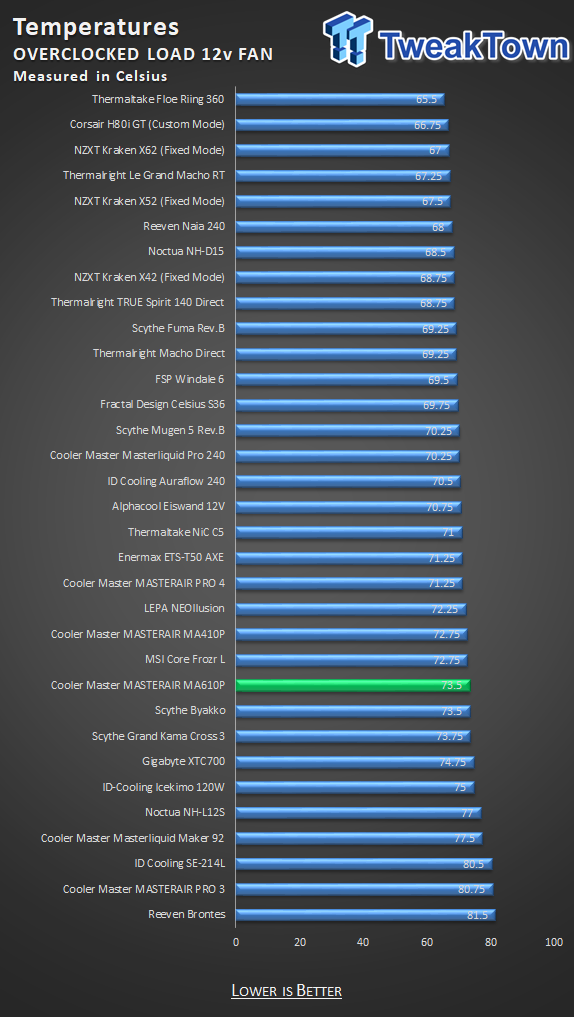
Allowing the fans to do everything they are capable of doing to the tower, we got a bunch of noise and around two degrees reduction in temperature. We are not that impressed with the thermal results if you had issues gathering that from our last few comments.
Noise Level Results
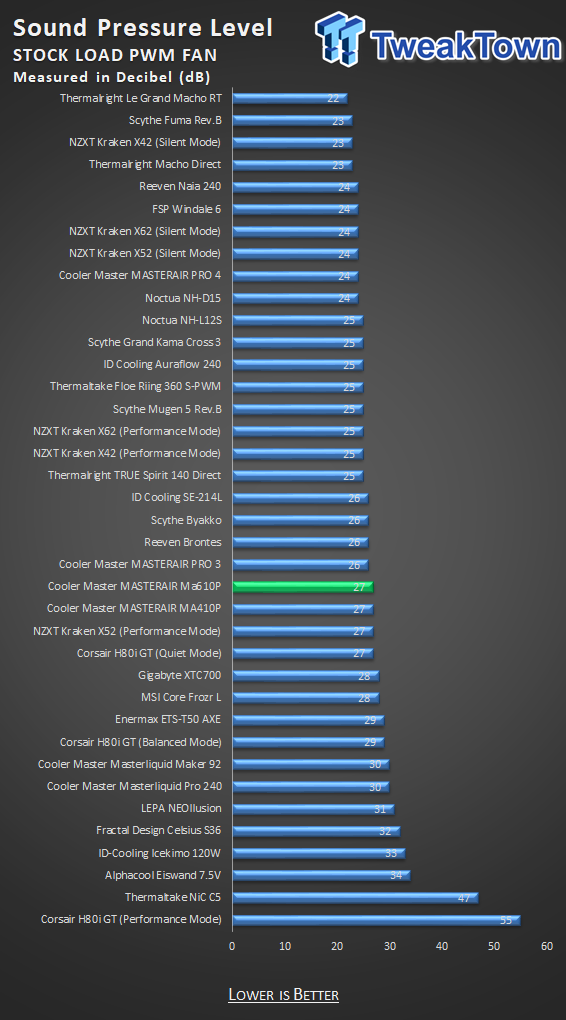
With the processor stock and the fans under control of PWM, the front fan was spinning at 880 RPM while the rear fan was spinning at 985 RPM. At this point in the test, we grabbed the meter and found the fans to be delivering only 27 dB into the room.
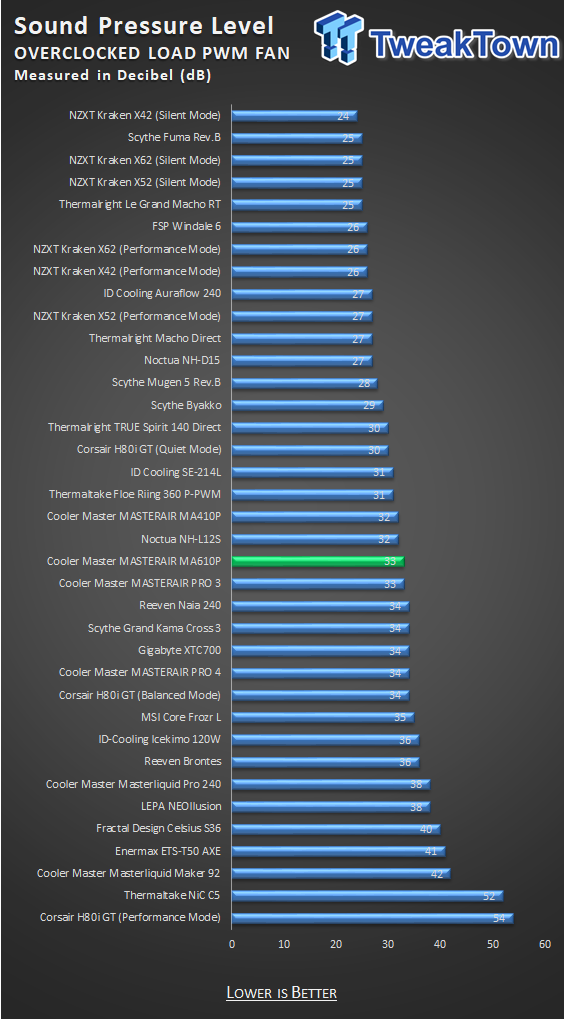
Applying the overclock takes the fans further up into the speed range. The front fan was spinning at 1187RPM while the rear fan was turning at 1358, and the amount of noise is kept low at just 33 dB.
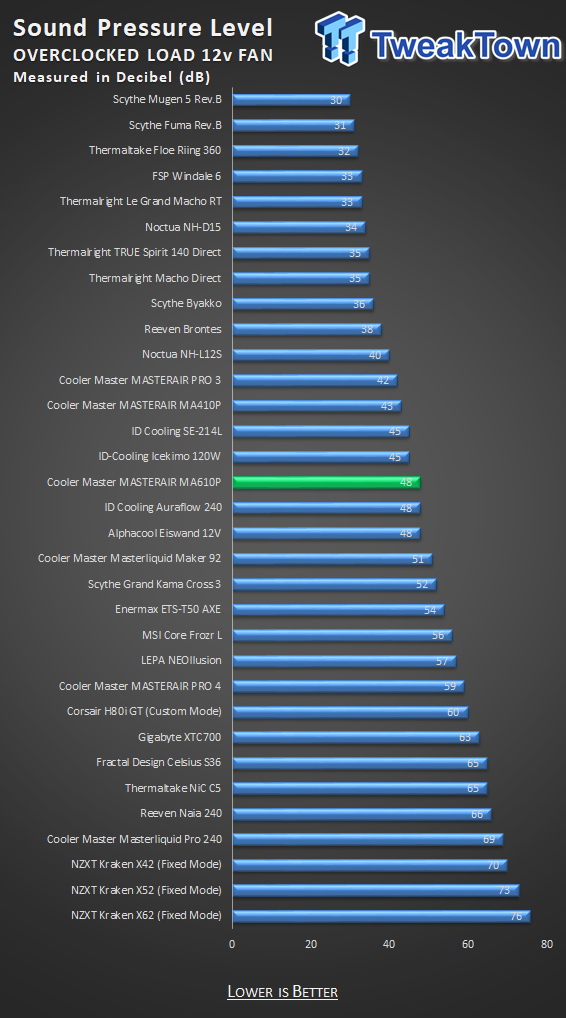
With the fans allowed to do what they can at maximum power, the front fans spun at 1660 RPM, and at this time the rear fan was reporting 1802 RPM. The noise increased a bunch at this point, and jumped to 48 dB.
Final Thoughts
When it comes to going back over the MA610P from Cooler Master, the hit the nail on the head with three things. The cooler is terrific to look at. With the use of a cover for the tower and the way the fans near seamlessly fit into it making one sleek tower, we give them props in the aesthetics.
Noise is kept to pleasing levels when using PWM control. At idle we can hardly tell they are running, and even with a healthy overclock applied, once heated up, noise is likely surpassed by the sound of the video card.
They also improved upon the hardware from the Maker 8 which this cooler gets its heritage. These are all things that many customers will gravitate to, and that is even before because the RGB LED system in this cooler is some of the best out there right now.
On the flip side, we feel that the MA610P has its shortcomings as well. Performance is a huge deal breaker for us. Because performance is less than that of the MA410P, we honestly do not see the point of this cooler past its looks. While we appreciate the fact that we can manually control the RGB lights without the use of a compatible motherboard, the system used is clunky.
To install the cooler, the wiring can be a pain, especially with short leads for the RGB LED cables from the cooler to the fan; it can complicate the installation process. Also as thick as this tower is, memory compatibility is a concern, as anything you buy needs to be short as to fit under the fan or fans.
We just feel that Cooler Master is overlooking the main point of an aftermarket CPU cooler and that it should perform above all else. Covers, fancy lighting, and an increase in price is not the way to sell coolers in our opinion.

Of course, there are many out there that will fall in love with the looks of the CPU air cooler, and are eager to add RGB LEDs on top of the motherboard, so that most of the system can be matched, and we get that.
However, it is our job to weed out the coolers that may not even be worth the time to ponder after reading this conclusion. At $69.99, we just don't see the need to spend it, when we can buy the MA410P for less, and still get RGB lighting with better performance to boot.
The Cooler Master MA610P is not a complete failure by any means, as it is capable of keeping our system from throttling. However, we do expect more from a cooler of this magnitude than fancy lights, covers, and a deeper dent in our wallet.

