
The Bottom Line
Introduction, Specifications, and Pricing
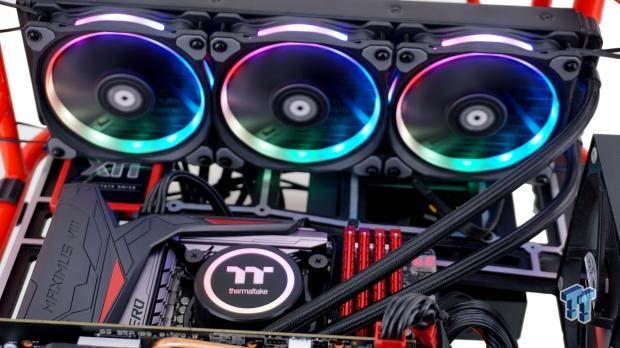
Ever since we needed to cool a CPU with an aftermarket solution, Thermaltake has been a tremendous player. It doesn't matter if you were going way back to the Orb coolers, thinking about the Jing, or NIC-C5, or even more recently, looking to the Water 2.0 and 3.0 to cool your processor, the game of evolving products to meet today's demands has always been strong with them. Thermaltake is not a company to sit on its heels and play catch up to the masses, but rather jump out ahead of the game with something that takes cooler development to a whole new level.
More specifically, when speaking of AIOs, Thermaltake has offered sealed loop solutions for quite a few years. Most times they were at the top of the chart with coolers tested in the same timeframe, but there was little as far as flashiness or features beyond what other AIO makers were bringing to the table. The time has come, where Thermaltake has developed a new AIO, which hits the nail on the head with performance, but has found a way to keep noise at bay, all at the same time, delivering RGB lighting on a scale we have never seen.
The reason behind this review is the introduction of a whole new lineup or AIO coolers, and we have the biggest version of it for testing. The new cooler is called the Thermaltake Floe Riing 360 TT Premium Edition RGB AIO Cooler. With the latest generation AIO from Asetek, Thermaltake adds in a hub system with software, to take a step beyond what NZXT showed us, and is the premier kit now when it comes to aesthetics and customizable appearance in a sealed loop system. The Floe Riing 360 is well worth your attention, and what you are about to see will more than likely have you looking for this kit to use on your PC as soon as humanly possible.
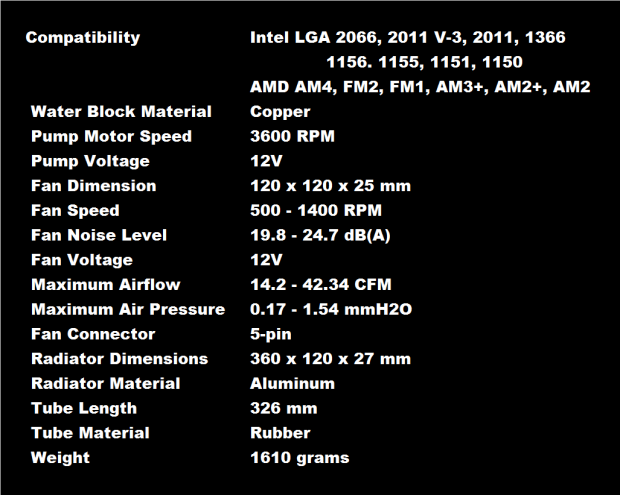
Socket compatibility is listed first in the specifications chart we borrowed from the side of the packaging. As one can tell, Intel is covered from the 115X series on up, and anything AMD since AM2 is also viable to use this cooler with. The head unit of the cooler is black; it is backlit with a ring as well as the TT premium logo. The cold plate on the bottom of it is made of copper, and when drawing twelve volts from the fan header, the pump can run at 3600 RPM. Jumping down a bit, we then see the radiator specifications. This is where we are informed that it is made of aluminum, and in this instance is it 360mm long and 27mm thick. The tubing is made of rubber, and each tube is 326mm long. What they do not tell you, is that the tubing has braided sleeve around it to help dress up appearances too.
Back to the section on the fans. In the Floe Riing 360, there are three Riing Plus 12 LED RGB TT Premium Edition fans, also known as CL-F059-PL12SW-A. In the chart, we are told that these are 120mm fans which can run at speeds of up to 1400 RPM. They are also said to deliver 42.34 CFM of airflow and 1.54 mmH2O of pressure. Lastly, it is stated that the fans use a 5-pin connection for power, when in reality, it is a 0-pin connector, much like a USB 2.0 connection. If you search for the fan specifications, there we are shown that the fans can deliver 48.34 CFM of airflow, the noise rating is 24.7 dB, and they should last you 40,000 hours spinning on a hydraulic bearing.
At the time of writing this review, we do not see any listings at retail outlets. What we do know, is that in some form of a comparison, Thermaltake does offer the Water 3.0 Riing Edition, which is similar, but is not on the same level. To get the best of what Thermaltake has to offer, which is a huge step up from the predecessor, you will have to dig deep for the sum of $199.99 to obtain the model we have here for testing. However, with a number of features, extras, and the performance with lack of noise you are about to see, it drastically lessens the hurt that this price put on you at first glance.
Packaging
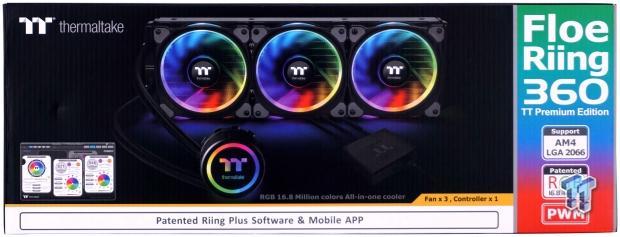
Packaging is quite attractive, with the use of black and bright rainbows of colors, both on the cooler as well as on the right end. We see the cooler, the software, the mention of the mobile app, and to the right are boxes pointing out AM4 and LGA2066 compatibility, the RGB nature of it, and PWM control is possible.
Both of the smaller ends of the box are identical. What you find on them is a black panel which offers the TT premium logo, and the Thermaltake name, printed in white letters.
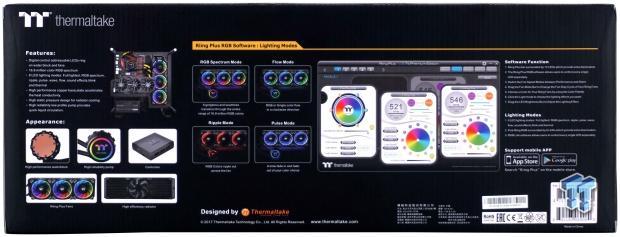
The back of the box is where Thermaltake goes into finer detail. Six key features are listed over images which show off the appearance of all the parts. Next, there are ways to light the fan and head unit is shown, which is done in the software, which images of it follow, as well as information on what it can do.

The bottom of the box is where we located the specifications chart we copied. This is also where, in many languages, three key features are listed, for those in other markets.
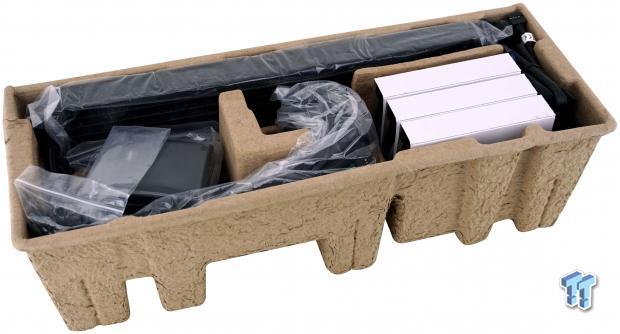
On the inside of the box we just looked at, and inner box made of recycled cardboard can be slid out. Inside of this compartmentalized interior packaging, all of the components and goodies are shipped, well protected, and allowed our sample to arrive in spectacular fashion.
Thermaltake Floe Riing 360 TT Premium Edition CPU Cooler
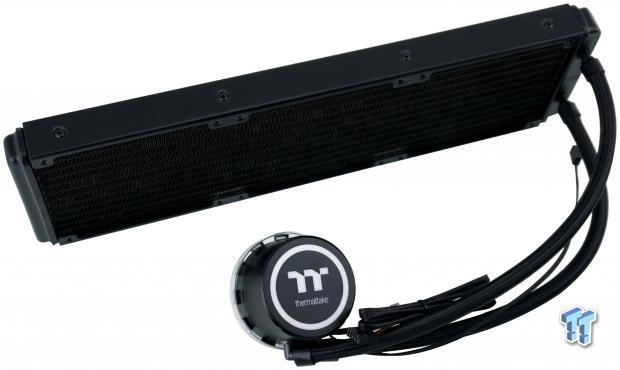
Right out of the box, after removing plastic bags from both the head unit and the radiator, this is the bulk of the kit. At first glance, the Floe Riing 360 appears to be like many others, outside of the TT Thermaltake branding on the head unit, but there is more to this AIO than what is gathered on the initial look.
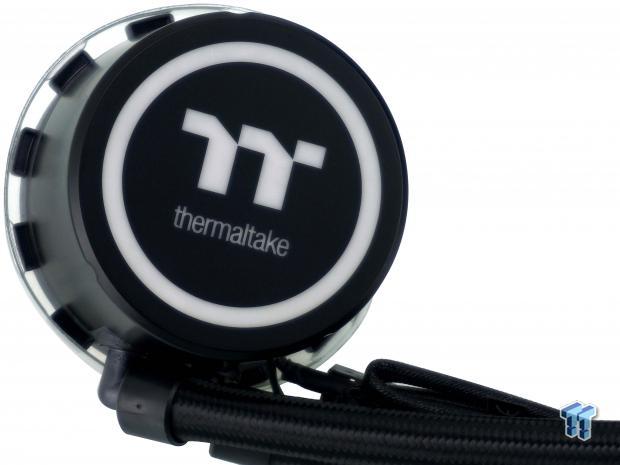
The head unit is black, and the ring, the TT, and the Thermaltake name are all RGB backlit when powered. On this unit, we find the swivel fittings as well as the wires coming out the bottom of the head unit, where most are on the side.
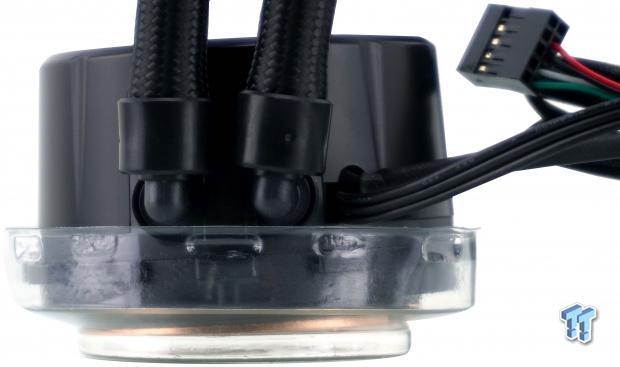
Looking at the bottom of the head unit from this angle, we can see the swivel fittings, the braided sleeve, and the rubber ring that holds the braid in place. Just to the right of the tubes, there is a notch, where the fan power lead and RGB control wire come out.
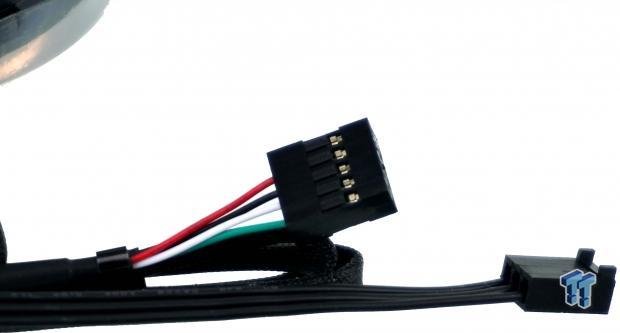
To power the pump, one must connect the 3-pin fan connector to the motherboard, preferably a fan header with PWM controls. The thicker sleeved wire is used for RGB control and is similar to a USB 2.0 connection, but the missing pin in the bottom row is on the opposite end of the connection.
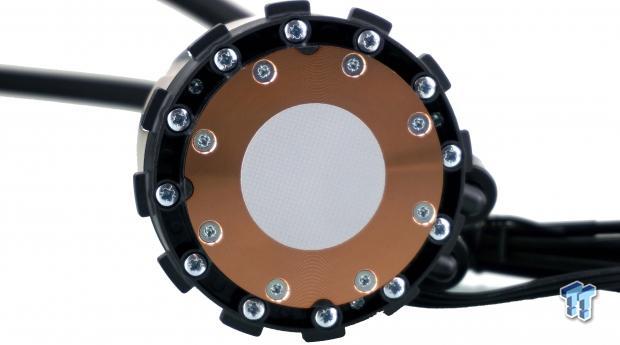
After removing the plastic cup that protects the base, we get an unimpeded view of the cold plate, as well as the pre-applied thermal paste. We are pleased to see that nothing has gotten under the protective layer of plastic, and the TIM is debris free and ready to be used.
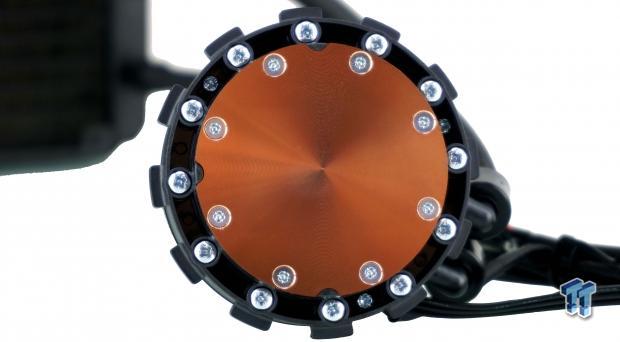
Since we use MX-2 for all of our cooler testing, we cleaned off the TIM to have a look at the surface of the cold plate. It is machined circularly, it is highest in the middle for added pressure when mounting it, and shows no signs of hidden damage where the TIM was applied.

The tubing runs from the head unit to the radiator, and we put the tape measure next to it to check the length. Converting thirteen inches to millimeters, we come up with 330mm, which is a bit longer than advertised. We have seen longer tubes on other AIOs, but this should be sufficient for most case installs.

In the last image, we could see the 27mm of thickness, so we wanted to address overall size and fin density with this one. The radiator is more than 360mm long, in the realm of 390mm, and as to the fins, they are set at a density of 23 FPI.
Accessories and Documentation
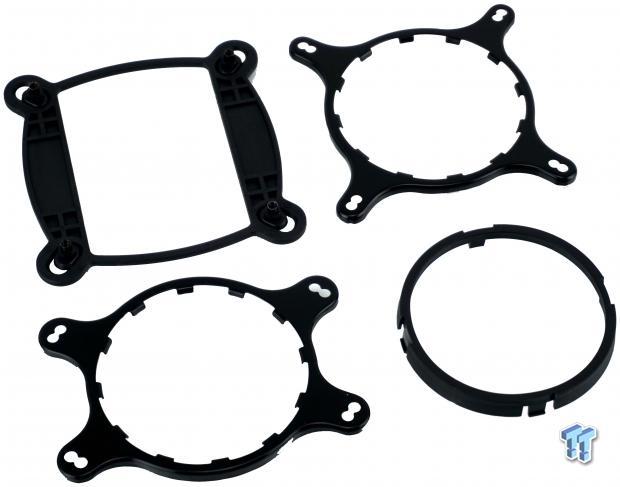
In this image, we find the universal Intel backplate in the top-left corner and the universal Intel top bracket to the right of it. At the bottom, we see the new AMD top bracket with two sets of holes, and we also have the plastic lock ring which locks the top brackets on to the head unit.
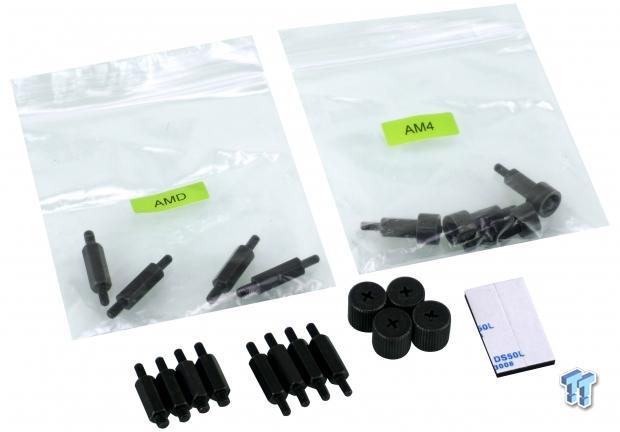
AMD users get a bag marked for them, with special standoffs in it, and for those using AM4 motherboards, there is a bag especially for you too. Across, below the bags, are the LGA 2011 and 2066 standoffs, standoffs for all other Intel sockets, a set of thumb screws to secure the top bracket, and a pair of pads with tape on both sides to stick the Intel backplate to the motherboard.
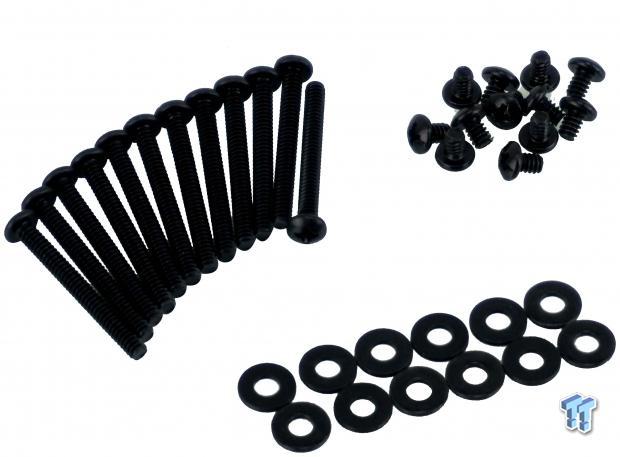
To mount the fans, we are given twelve Philips head screws, and to secure the radiator to the chassis, there is another set of short Phillips screws. Thermaltake also provides a set of washers, which can be used with either set of screws, when and if they are needed.
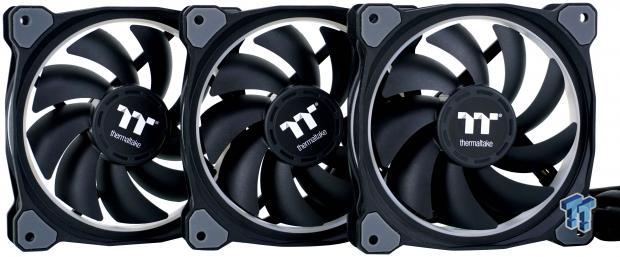
These are the trio of Riing Plus 12 LED RGB TT Premium Edition Fans, which we found in the box. The fans have black frames with an opaque ring around them, which is what is illuminated via RGB LEDs. There are nine curved blades on each hub, and we also see the corners of the frames are padded with gray rubber and is found on both sides of the fans.
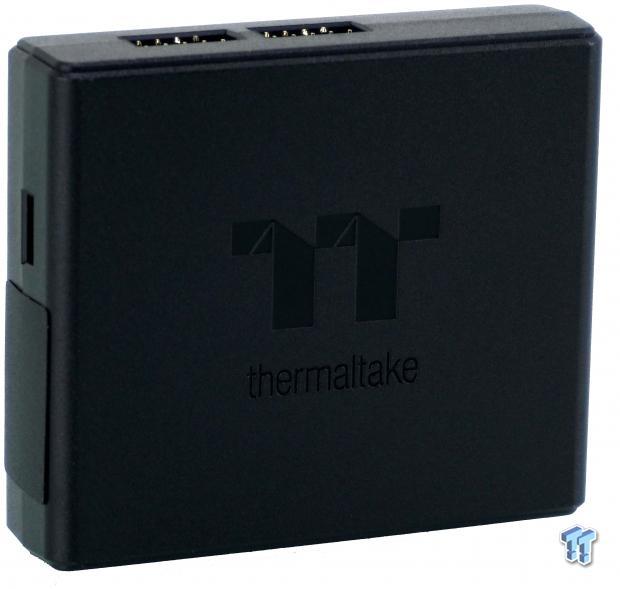
To utilize the RGB feature of the fans, all of them and the 9-pin connections are to be plugged into the top or the bottom of this hub, and so is the lead coming from the head unit. On the left, there is a connection for the USB control wire which connects to the motherboard, and on the right, is where power for the hub is to be made.
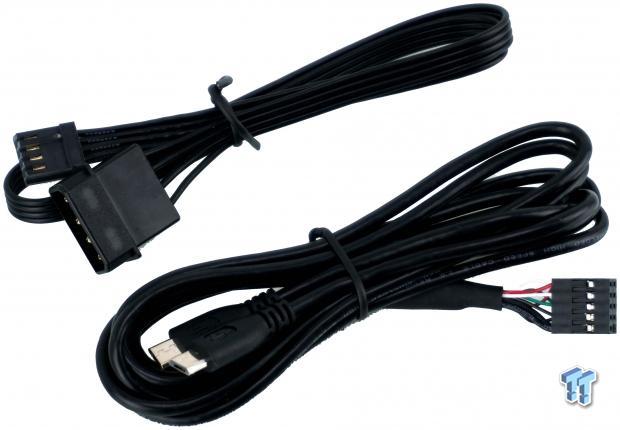
Used with the hub are these two leads. The one at the back is a 4-pin Molex connection, which draws power from the PSU, and via the smaller 4-pin connection, powers the hub. The USB 2.0 cable to micro-USB connections is for control. This allows the hub and the software to communicate with the fans and head unit.
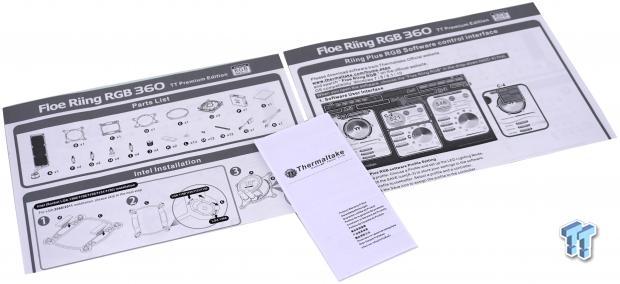
Lastly, you will need some instructional help to get this AIO set up and running. The manual to the left is the guide of how to install the cooler, while the one to the right explains the hub connectivity, as well as how to use the software and where to get it. The bit in the middle covers terms of the warranty, which we can only assume, carries the same three-year warranty the Water AIOs offer.
Installation and Finished Product
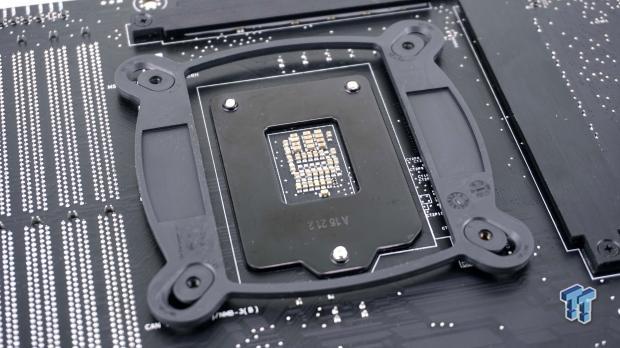
Installing the back plate is simple. You first stick the pads to the underside of the backplate, and then by aligning the holes of the motherboard with the pins on the plate, you press on it to allow the tape to hold it there for you.
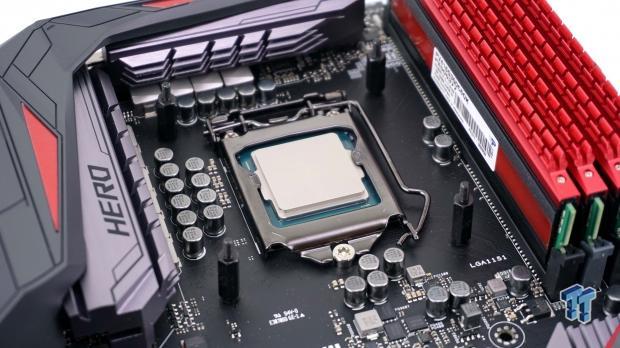
The next step is to grab the proper set of standoffs and mount them into whatever back plate your system requires to be used. These are screwed in until the threads stop.
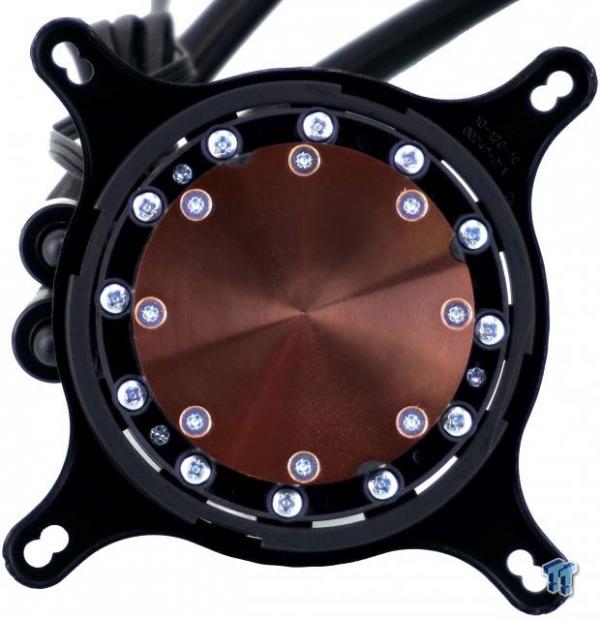
Next, our attention was back to the head unit, as we mounted the Intel top bracket onto it. The bracket passes the tabs on the side of the head unit, and after a slight twist, they grab onto the tabs. To keep the keys locked to the tabs, you then clip in the lower lock mechanism, which holds all three parts together.
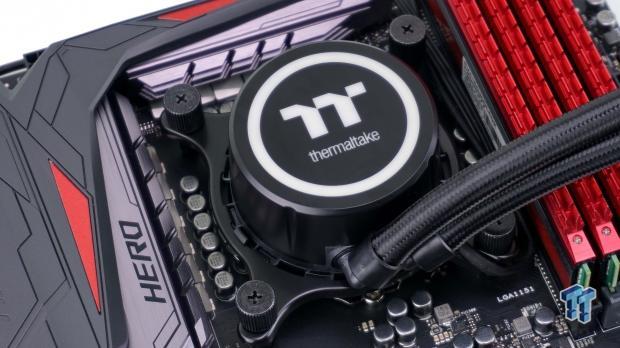
After applying some MX-2 to the top of the processor, we then move on to installing the large nuts onto the standoffs. Again, we took these nuts down as far as they will go. There are no issues with clearance from any direction, but the head unit is a tad taller than the motherboard heat sinks, just slightly taller than the memory.
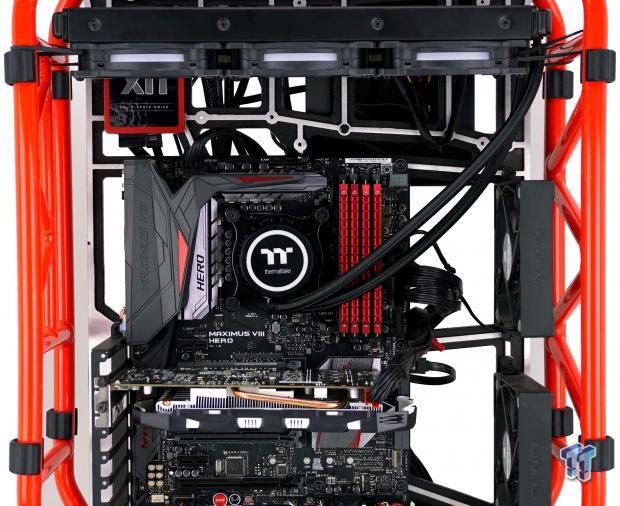
While the D-Frame is not 360mm water cooling friendly, we managed to hang the radiator at the top of the chassis so we could see it installed. A bit more tubing would have been nice for our install, but keep in mind, most cases are not as tall as we have the radiator installed. In most cases, this AIO should give you little issue, as long as it is 360mm radiator ready.
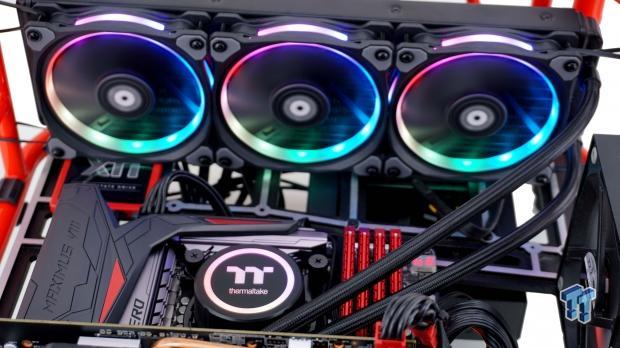
There is no way we would end this review without looking at what the Floe Riing 360 delivered once the light show begins. Yes, there is more wiring and setup involved with this AIO, but the effort is so worth the results. OF course, you do not have to choose just this display; the software delivers many options to utilize.
Test System Setup, Thermal Tests, and Noise Results
Chad's CPU Cooler Test System Specifications
- Motherboard: ASUS ROG Maximus VIII HERO (Intel Z170) - Buy from Amazon / Read our review
- CPU: Intel Core i7 6700K - Buy from Amazon / Read our review
- Memory: Patriot Viper 4 3000MHz 4X4GB - Buy from Amazon / Read our review
- Graphics Card: MSI GeForce GTX 1060 6GB OC - Buy from Amazon / Read our review
- Storage: Corsair Neutron XTi 480GB - Buy from Amazon / Read our review
- Case: INWIN D-Frame - Read our review
- Power Supply: Thermaltake Toughpower DPS 1050W - Buy from Amazon / Read our review
- OS: Microsoft Windows 10 Home 64-bit - Buy from Amazon
- Software: RealTemp 3.70, AIDA64 Engineer 5.75.3900, and CPU-z 1.77.0 x64
To see our testing methodology and to find out what goes into making our charts, please refer to our CPU Cooler Testing and Methodology article (October 2016) for more information.
Thermal Results
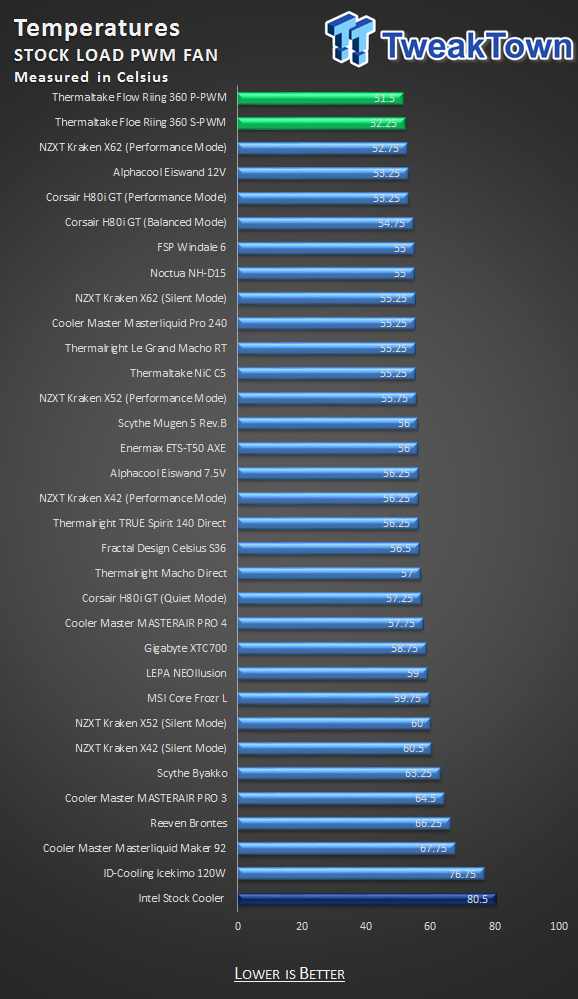
What is there to say, other than this cooler handed the coolers on our chart, their bums on a platter. Yes, it is bigger, but the results found with the software set to silent mode with PWM functionality (S-PWM, and in Performance mode with PWM enabled (P-PWM), the results are better than expected. At just 51.5-degrees in Performance mode and 52.25-degrees in Silent mode, it not only beats out all other AIOs we have tested but tops the charts.
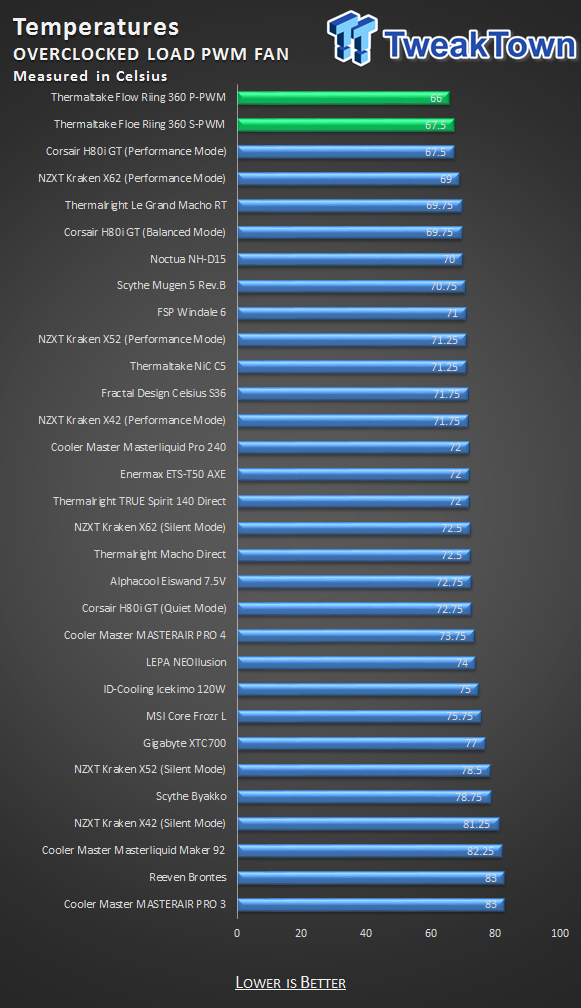
Using the same mode profiles for testing this cooler with the overclock active, we find chart topping results yet again. Allowing for the PWM curve to be active, in Performance modem the results were 66-degrees, while in Silent mode, the temperature rose just 1.5-degrees to 67.5.
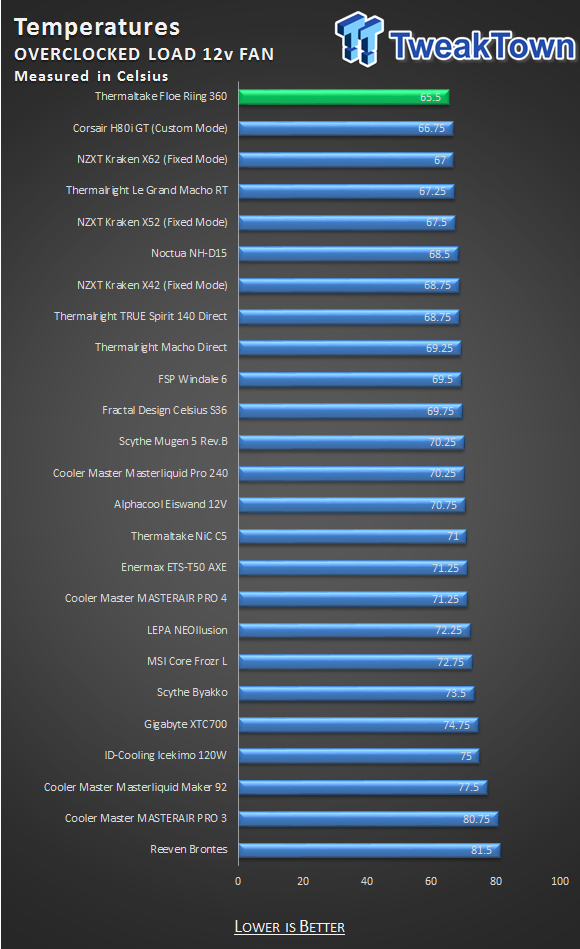
As we do with all coolers, we set all of the fan headers and whatever software settings, to make sure the fans, and in this case, the pump, are all running at full speed. What we find is that performance mode already does this for us, leaving nothing gained by manually setting everything up, and having to hear the cooler all of the time.
Noise Level Results
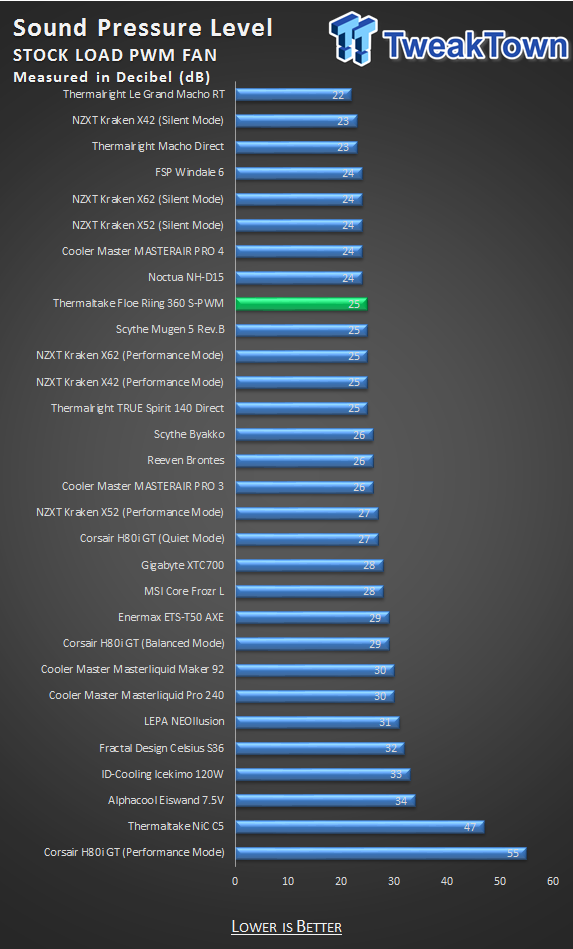
When using Silent mode, we saw the fans topping out at 920 RPM as reported in the software. At this time, while much of the time it was much less, at maximum speed for the run, the trio of fans were showing up at 25 dB on the meter.
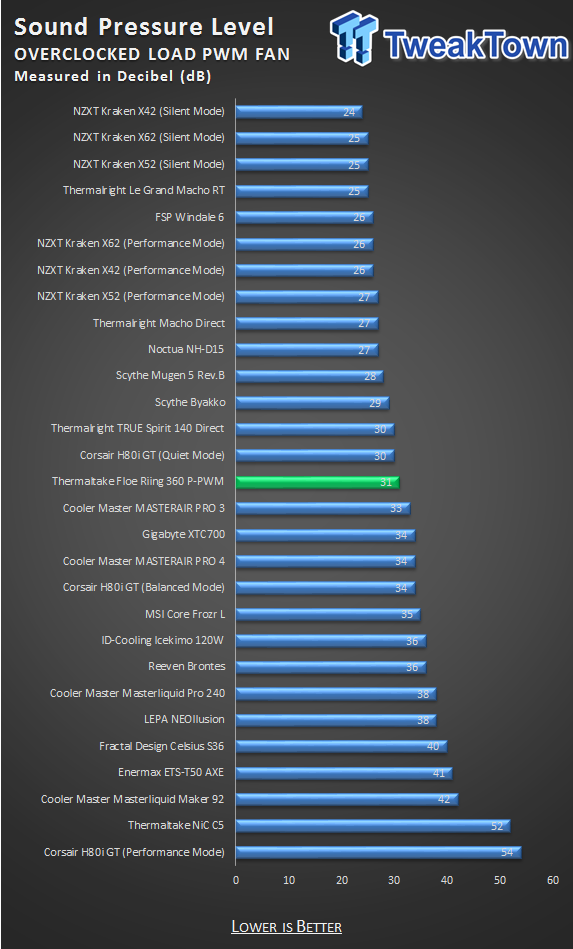
When set to performance mode, we did see an increase in fan speed to the tune of 1630 RPM; the noise level did increase. While not much of a difference, we could most certainly start to hear the fans over the rest of the system when they approached the 31 dB mark we saw in this type of testing.
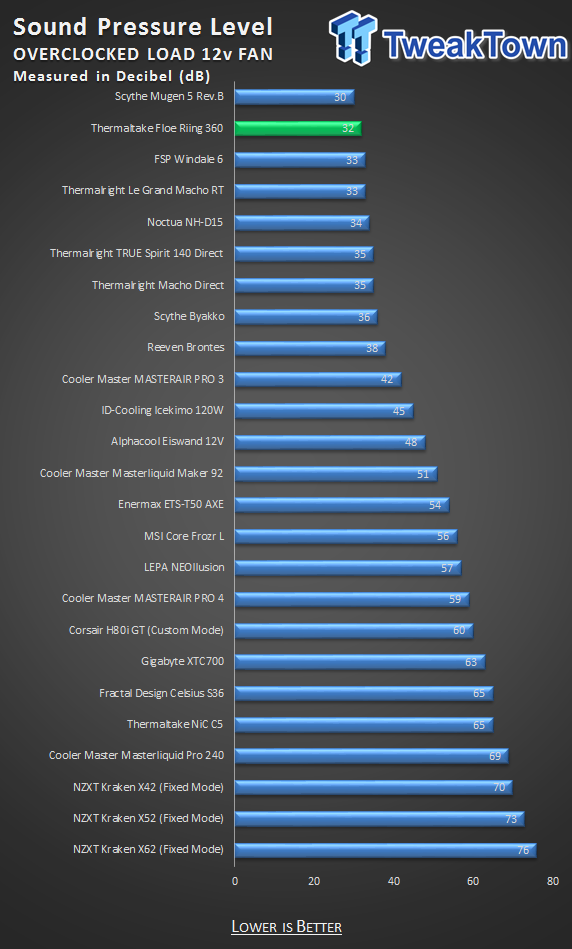
With all things set to run as fast as possible, we did notice a sound increase, but it was due to the pump and not the fans. Since the fan speed stayed the same as we saw in the performance mode, we find the pump speed increase adds to the acoustics. While it normally spun in the range of 1400 to 1650 RPM, once we saw it showing up at 1800 RPM in AIDA64, we did start to pick up an internal noise from the head unit, which raised the noise level to 32dB.
Software
Software

After downloading and installing the software, the software window opens, but you are greeted with a warning notice. In this instance, we only have one hub running, and the warning is signifying, that by clicking OK, we are then controlling hub number one. This is there, simply due to the fact, that you may connect an astonishing sixteen hubs together, and they can all be controlled via this suite.
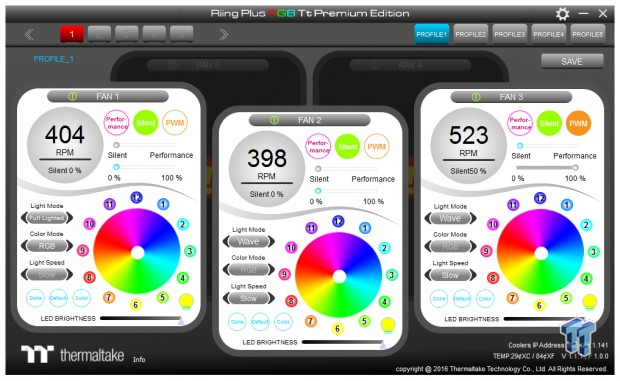
The software offers which hub is being controlled at the top-left, while to the right of that ate five profiles which can be programmed to make changing the lighting less stressful later on. In our system, we are shown the three fans which are connected to the hub, which shows current fan speed in the gray circle. Each window offers the ability to use Performance mode, Silent mode, or a combination of either with the PWM function enabled or disabled.
You can use the sliders to adjust where in between the two modes you may want to be, or set for a fan speed percentage below it. There is a full assortment of modes as to how the RGB lighting is presented, most of them are what we are used to seeing, but there are also three modes controlled by sound. You can pick RGB mode or choose a solid color to the right, and you can also click on the fan speed buttons, use the slider at the bottom for brightness, but do not forget to save any settings after changing them.
We did find the software needs a little bit of work, as you cannot just set everything to PWM mode, it has to be with one of the other modes enabled. We also found, that while images suggest otherwise, no matter what we set the fans to provide us with colors or intensity, nothing seemingly addresses the head unit, which was always in the rainbow mode like you saw in the earlier images. However, even with a bit of quirkiness, we appreciated what is offered, and how well the fans are controlled by it. There is also a mobile app, just in case you want to show off to your friends from a distance.
Final Thoughts
With everything we have just seen, it is hard to find reasons to try and dissuade you from choosing the Thermaltake Floe Riing 360 AIO cooler to cool your CPU. The performance is the best we have seen from anything we have tested with this processor, and while not chart topping in sound levels, we are more than happy to get this level of performance with what little noise is present. We also like that Thermaltake left nothing on the table.
Using performance mode delivers the best results you can obtain, even while PWM controlled as well, so there is no need to ever run this AIO at full speed all of the time. Then, of course, we move into the choice of fans and the lighting in the head unit. Never before have we seen LED lighting in an AIO on this level, hell we haven't even seen this in custom loops yet. Added into the mix is a fancy hub that can be connected to nearly every PC fan on the block and be controlled from one window in the software suite. All signs truly point to the fact that the Floe Riing 360 is the best of the best when it comes to sealed loop systems.
While we love the hub, the fact that we can connect up to sixteen of these things together, we do think the software could use some love. Nearly fully functional, the lack of easy controls of the head unit RGB LEDs, and the odd ways in which the fan modes are to be used can be tricky, yet we feel this is something easily addressed by programmers. Another thing we noticed is that the head unit does produce more noise than anything we have tested in AIO country in quite a while.
We can deal with what is presented, but other companies can deliver head units which make virtually no noise at all. The last thing, and it could have been a typo in the chart, but we were told the fans would spin at 1400 RPM tops. Our fans were spinning at 1600 RPM and are well outside of the margin of error for fan speed. We hope this is a simple mistake, and that when you get a unit, your fans spin just as fast.
The Thermaltake Floe Riing 360 TT Premium RGB AIO Cooler is a top tier product, which attempts to deliver everything possible, and does a damn fine job with what is offered. Considering the upgraded fans, the superior performance, the addition of the hub and software for control, it does alleviate that $199.99 MSRP a tad. While our advice is always to wait for the best deal, this cooler which is priced like a custom loop, offers that level of performance, with much more pizazz, and all in a sealed loop system, where a tenth of the work is involved in setting it up.
If we were on the hunt for a new AIO, our money would be going to Thermaltake and this round of AIOs. There just isn't anything better on the market right now.

