The Bottom Line
Introduction, Specifications, and Pricing
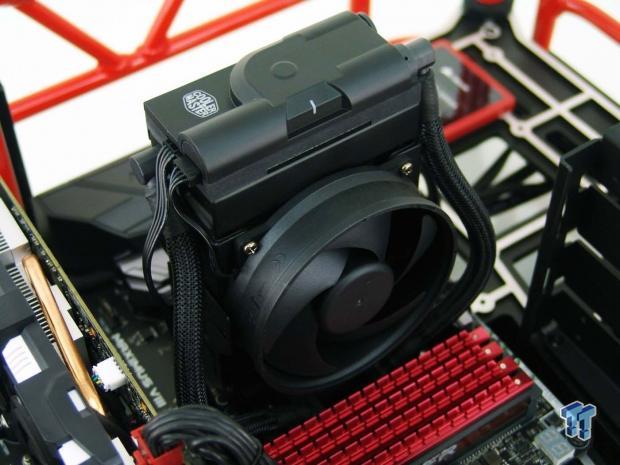
Looking back at just about every AIO or CLC system we have seen over the years, the majority of these coolers have been the same thing as one another, with minor changes here and there. The basic concept of the CLC system is to offer users a way of removing the weight of the CPU cooler from the socket while offering the benefits of a liquid cooled system. The vast majority of these systems all have common features. There is a head unit which sits on the CPU and with a pump mounted just above the cold plate, the liquid is cycled through the head unit to remove the heat from the CPU. Beyond that, the coolant passes through tubes of various styles, some naked, some with plastic covering them, and some with a braided sleeve, but all are used for the same purpose. Then, of course, there are aluminum radiators attached at the other end of the tubing, using a fan, a pair of fans, and even up to four fans, to move the heat from the liquid into the room.
While everyone and their monkey is using this basic idea to offer their versions of AIOs, not everyone sees that as the end of the road. For instance, Cooler Master has developed a system which uses all of the components of a typical AIO but has condensed it into a much more compact system. All of the same principles are at play with their latest AIO design, but the idea here is to return the bulk of the cooler to the motherboard, while at the same time returning airflow to the motherboard and power delivery components, something many other AIOs just do not have the ability to do. The only drawback to such a system is that the overall size has to be limited due to chassis constraints, but it appears that Cooler Master has come up with ways to make this AIO even shorter for those who do have smaller cases.
Today, we bring you the Cooler Master MasterLiquid Maker 92 closed loop cooling system. With everything contained in a single unit, Cooler Master can offer features which other AIOs cannot. The major benefit to such a cooler design is that by using a special bracket design for this cooler, the MasterLiquid Maker 92 can be run vertically or horizontally. Why you may ask, is this important? The basis for this feature is not only to be able to reduce the overall height but to bring back the down flow of air to the motherboard as well, something many air and liquid coolers do not compensate for these days. There are also a few other cool features incorporated into the MasterLiquid Maker 92 from Cooler Master, but you will have to stick it out and read through this review to find out what this cooler is all about.
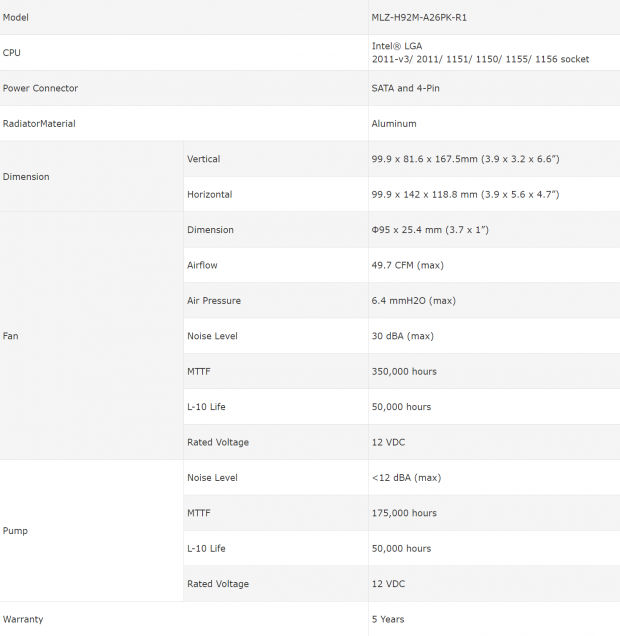
Following the chart provided by Cooler Master, we initially see that the MasterLiquid Maker 92 also goes by the MLZ-H92M-A26PK-R1 name as well. The second thing listed in this chart is likely most important, however. As we can see this cooler only supports Intel processors from LGA1156 on up through LGA 2011-V3. There are no options for AMD users at this time. The system is powered via a SATA power connector, and like the rest of the AIO designs, it is based on an aluminum radiator. Dimensionally, the cooler stands 167mm tall in the vertical position, 99.9mm wide, and 81.6mm in thickness. With the cooler moved into a horizontal alignment, the cooler stands only 118.8mm tall, it then changes to 142mm in width, but the thickness remains the same.
The fans that ship with the cooler are 92mm fans that have frames which measure 95mm and these fans are 25.4mm thick. The maximum airflow from these fans is rated at 49.7CFM with a combined static pressure rating of 6.4mmH2O. The noise level is said to be at 30 dB(A), the runtime is shown to be 350,000 hours, and if left to run with 12V all of the time, they will last only 50,000 hours. To help combat the shorter lifespan of the fans if used with full power, Cooler Master has designed the front fan to stay idle until the cooler reaches a certain thermal threshold, and it will then kick in to aid the rear fan, both of which are PWM controlled.
The pump, which is found at the top of the radiator in this design, is shown to only deliver 12 dB(A) of noise, so it is likely that users will never hear it running. The pump is rated to run for 175,000 hours in normal usage, but if forced to run full speed, the lifespan is cut to 50,000 hours of use. We do not see anything about flow rate, RPMs, or anything specific about the pump, but we do see that this cooler is backed by a five-year warranty.
When it comes to pricing, we still are not certain how we feel about it yet. Looking around the internet to get the best price, we see that no matter where the MasterLiquid Maker 92 is to be found, all of the pricing is the same. At the CM Store, the cooler is listed at $99.00 for those who want to buy directly from the manufacturer. If you like to use Amazon or Newegg to buy things, both locations show a current listing at $99.99, with free shipping offered to paid members. Keep in mind, this is the going rate for a single 120mm radiator based AIO, and even if there are a few tricks that this cooler can do what others cannot, we feel performance needs to be close to make this cooler from Cooler Master have much value.
Stick with us, as we plan to not only show off all of the cool new tricks the MasterLiquid Maker 92 has to offer but as we always do, we will put it through its paces and see just how well this cooler stacks up against all the rest.
Packaging

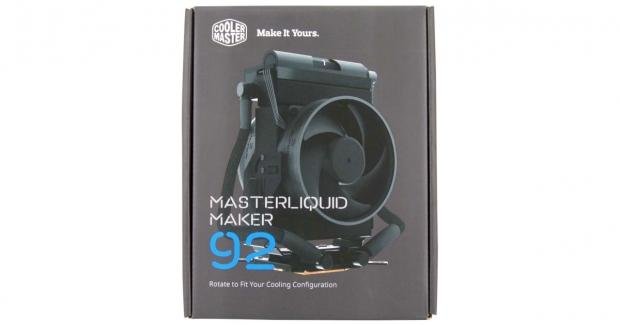
The MasterLiquid Maker 92 comes in a box which is dark gray on color, and the top of which has a large image of the cooler centered in the panel. Company name and the logo is found at the top, and at the bottom is says this cooler can "rotate to fit your cooling configuration."
On this much smaller panel, in many languages, we are told three things. This is a CPU cooler, it is called the MasterLiquid Maker 92, and the site address is listed to know where to go for more information.

Rotating the packaging again, we are now given a brief story on why Cooler Master has developed such a cooler and ends it with the line "don't let size define the strength of your PC." The image found on this panel shows the MasterLiquid Maker 92 in its horizontal orientation.
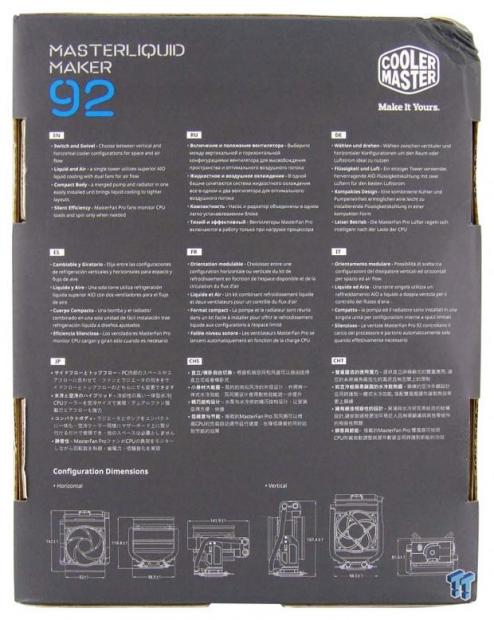
On the back of the box, Cooler Master lists four features of this cooler. First is the ability to switch the look and swivel it into whichever position works best. It then moves into the superior liquid to air transfer of this cooler, on into its compact design, and ends with its silent efficiency. Across the bottom of the panel, we find six renderings which have its dimensions marked, so it is easier to see what we were explaining in the specifications section.
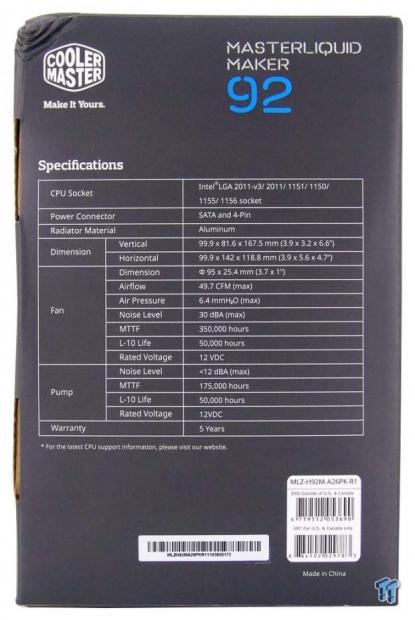
The last panel with anything of value to be found on it is this one. Here, Cooler Master delivers a specifications chart, exactly like the one we already discussed.
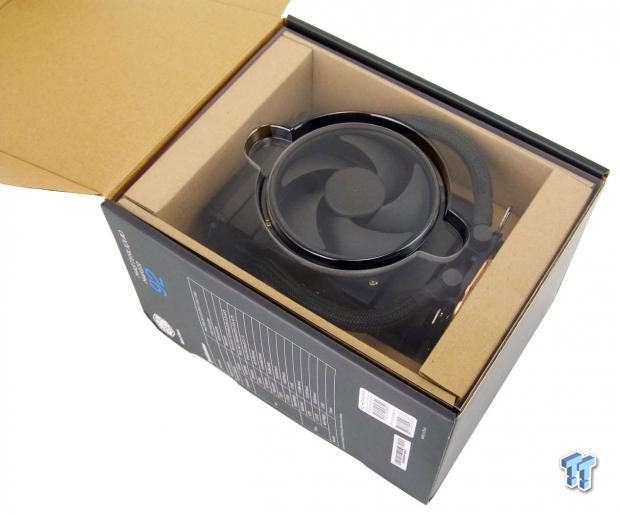
Upon opening the box, we find the MasterLiquid Maker 92 under a thin sheet of clear plastic, which keeps the cooler in place while also protecting it from dust and scratches. Under the cooler and is separated section of cardboard, there is yet another box which contains all of the hardware that goes along with the cooler.
Cooler Master MasterLiquid MAKER 92 CPU Cooler
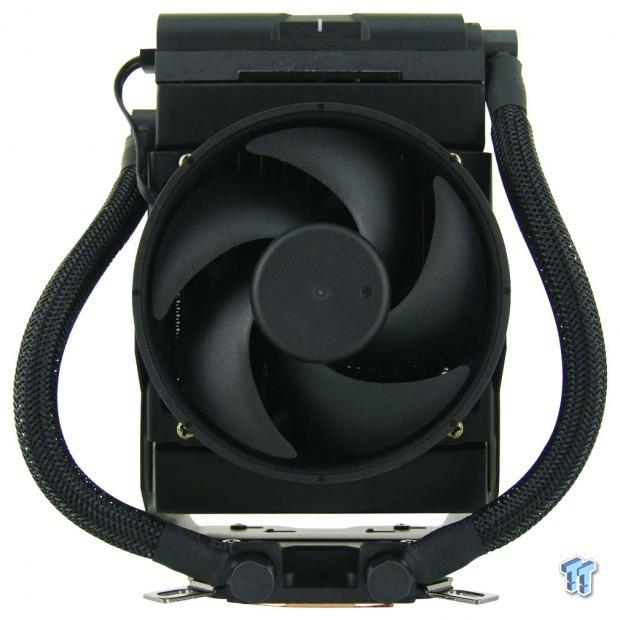
A view of the face of the MasterLiquid Maker 92 shows us many things. We can see the 92mm fans with five wide blades; we can even see bits of the radiator it is mounted to. On the sides, there are swivel fittings at the top, and we see the tubing has been covered in a braided sleeve, which returns to the cooler base via another pair of swivel fittings.
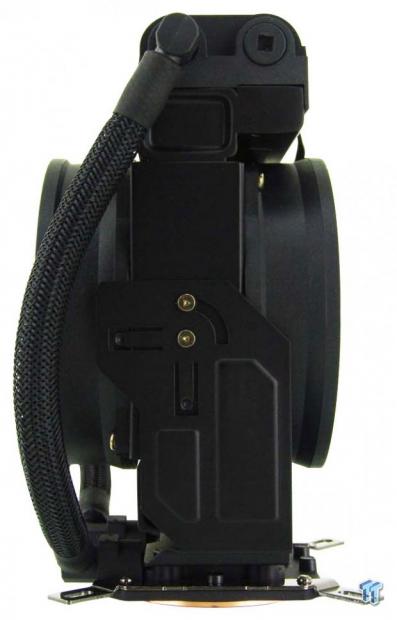
On this side of the cooler, starting at the top, we see the swivel fitting returning cooled water to the base, and in the middle of the cooler is the dual screw swivel mount. The steel frame of the support runs all the way to the top of the base plate, where we see half of the Intel LGA115X and larger socket mounting legs.
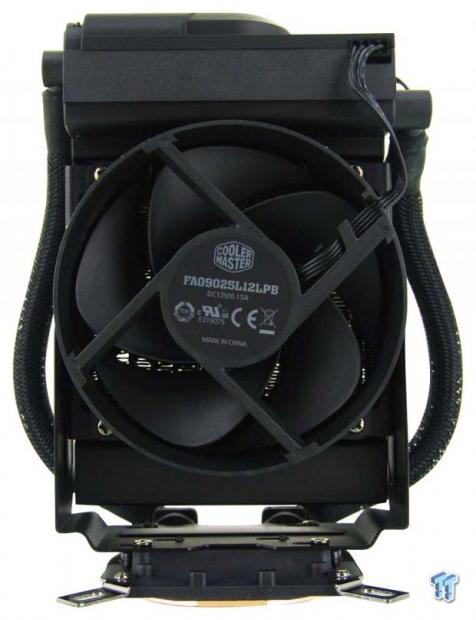
On the back of the Maker 92, we find a second fan to match that on the front of the cooler. This fan is the FA09025L12LPB from Cooler Master, and of the two fans, this one does most of the work.
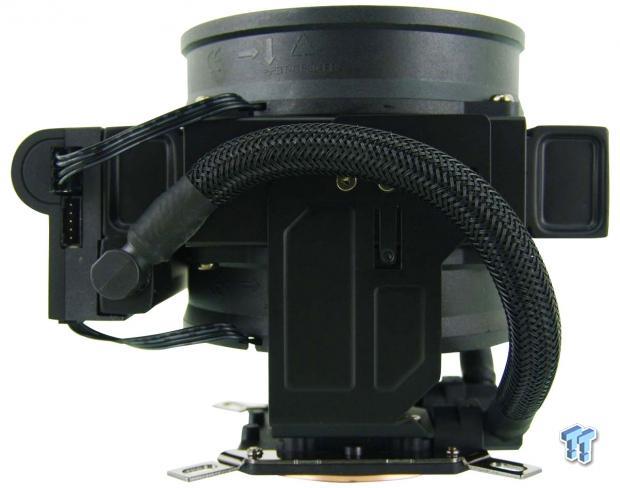
Rather than to repeat much of what was seen on the other side of the cooler, we have now arranged it in the horizontal position. The tubing has to not only swivel at the left side to make the tube bend gentle, but these tubes also need to go outward and is why the base has swivels as well.
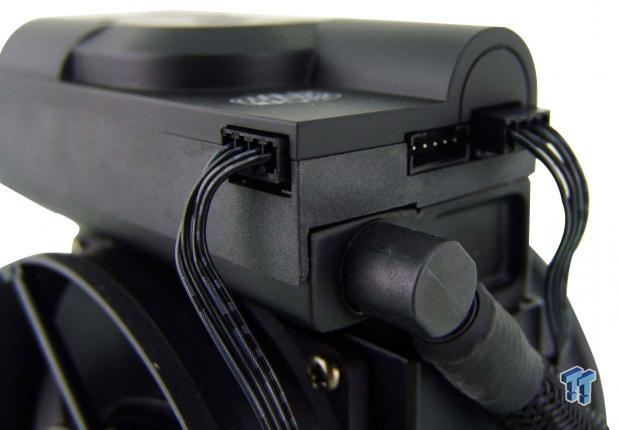
At this end of the pump unit found on the top of the radiator, we find this arrangement of connections. The rear fan connects on the side of the pump, while the front fan and a supplied power cable system connect to this end.
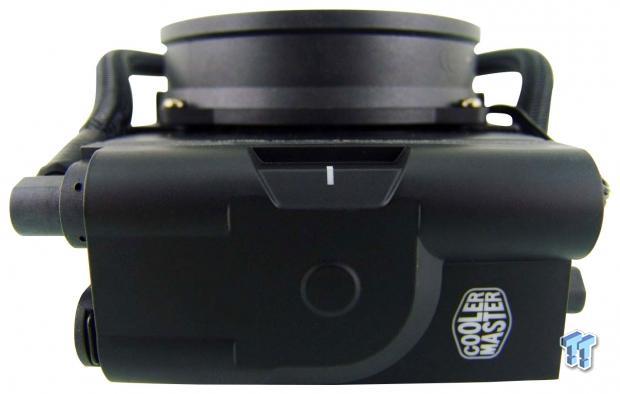
The pump portion if the cooler covers the top of the AIO completely. The water returned to the pump on the right side is sent through the right side of the radiator, returns up the left side, and exits the pump on the left side to return to the base. The white line and the Cooler Master logo are backlit with white LEDs, and glow when the Maker 92 is powered correctly.
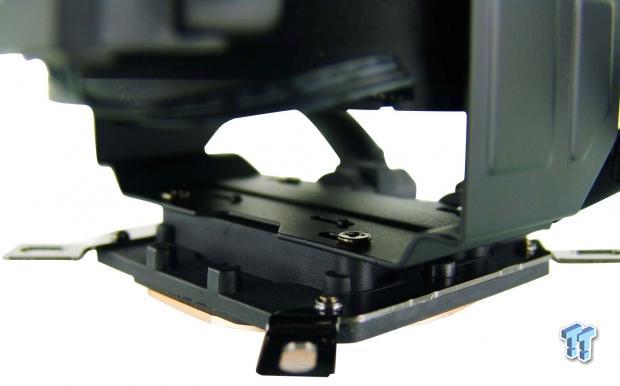
The base of the cooler is thick to allow liquid to pass through it and across the fins of the base plate. The socket mounting hardware is mounted to the metal section of the base from the bottom, while the radiator support bracket is screwed into the top plastic section.

Not only do we see that there is a protective cover on the copper base, this is one AIO without pre-applied TIM. The four Phillips head screws are there to keep the Intel hardware in, and while AMD hardware would go on simply, it could be that the mounting holes are inaccessible due to the shape of this cooler. There are also ten TA or triangle head screws used to secure the base, and should not be messed with unless you plan on voiding the warranty ahead of time.
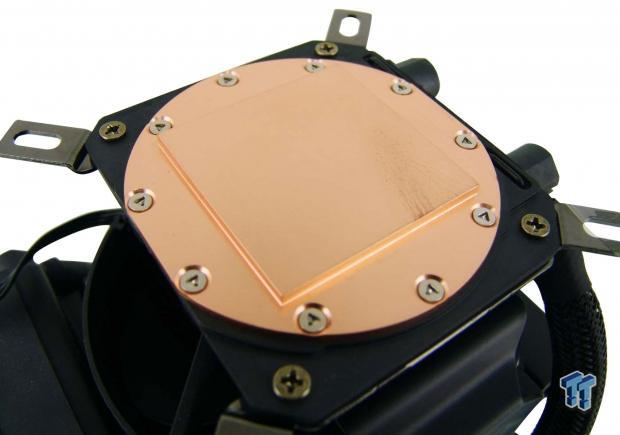
The mating surface of the copper base is milled finely, but unless under very bright light it is hard to see. The surface is slightly convex at the center to help with mounting pressure and needs to be cleaned before we use it in testing.
Accessories and Documentation
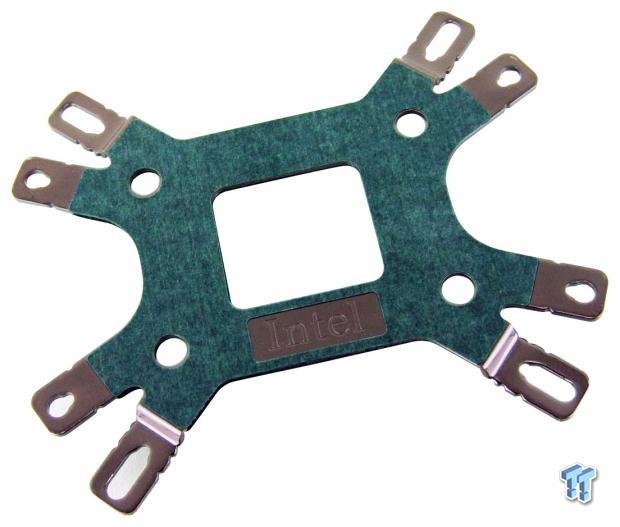
Inside of the hardware box, it a bag all by itself, we find a universal BACKPLATE USED WITH THE Maker 92, but at this time, it is only the Intel side we are worried about. The plate is not limited to its orientation, and there is a protective layer applied to it, just in case the rest of the hardware leaves it resting on the motherboard.
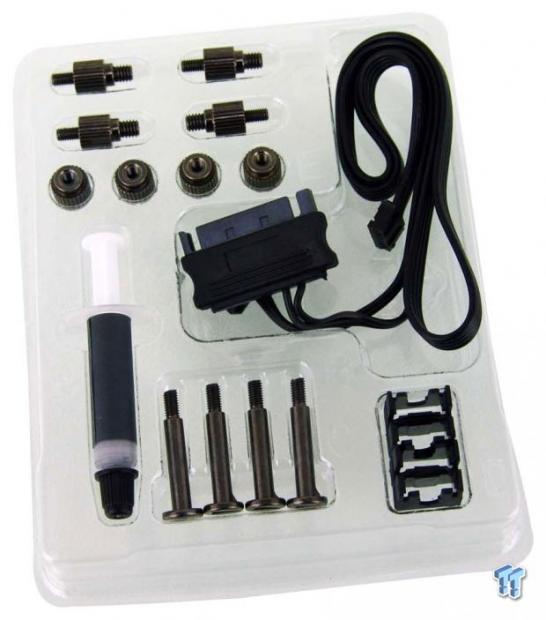
Cooler Master sent the rest of the hardware inside of a compartmentalized plastic tray. Marked A through F next to all of the parts, we have the LGA2011 standoffs, the cooler mounting nuts, a tube of Mastergel, four standoffs for all other Intel sockets, four plastic locks for the standoffs. Bundled up is a lead to power the cooler with both a 4-pin connection for the motherboard and a SATA power connection; both of which need to be connected to function properly.

The manual on the left will take you step-by-step through both the Intel installation processes, and while the room is not always guaranteed to make life easy when mounting this cooler, with time and patience, it can be accomplished. The insert on the right covers everything you will need to know if it does come to the point of needing an RMA within the five years of coverage.
Installation and Finished Product
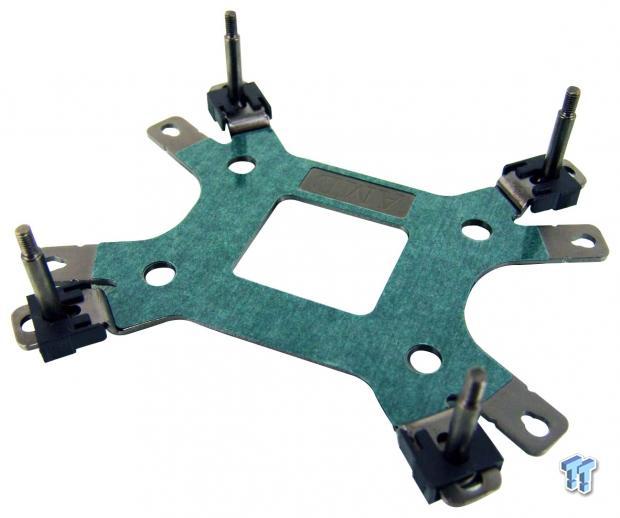
This bit of the hardware needs to be used for LGA115X sockets only as LGA2011 and 2011-V3 sockets use screws that go into the top of the motherboard. After installing the standoffs, you then slide on the plastic clips to lock the standoffs into the location. Be sure the standoff is seated in the cap properly, and also be sure to use the middle position on the backplate for the side tabs to lock into.
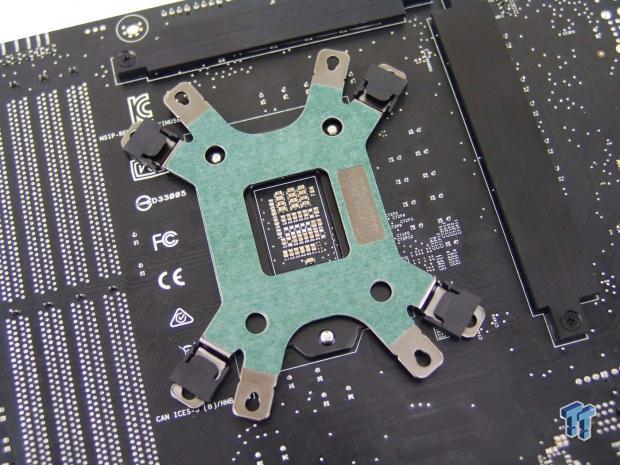
The next step is to take what we just assembled, and as we align all of the standoffs, we allowed the backplate to settle onto the motherboard. There are holes at both ends, but the sides are also short enough not to conflict with the socket screws.
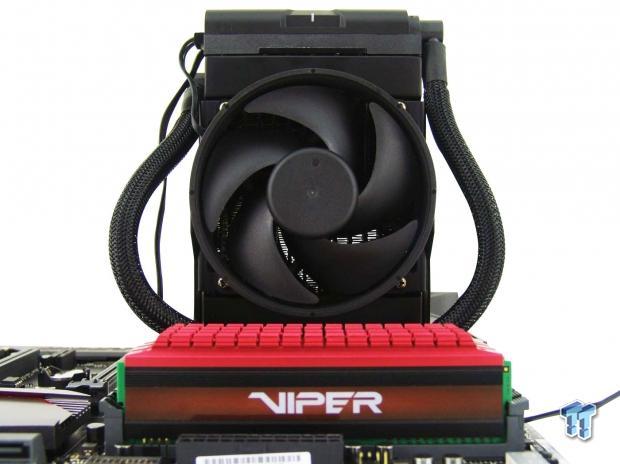
Mounted to the motherboard, seen behind the RAM, the Maker 92 appears tall and slender. Even though the tubing is wide on the side nearest the top PCI-e slot, the hose can be adjusted, and there is no fear of the braid or rubber to short against the video card.
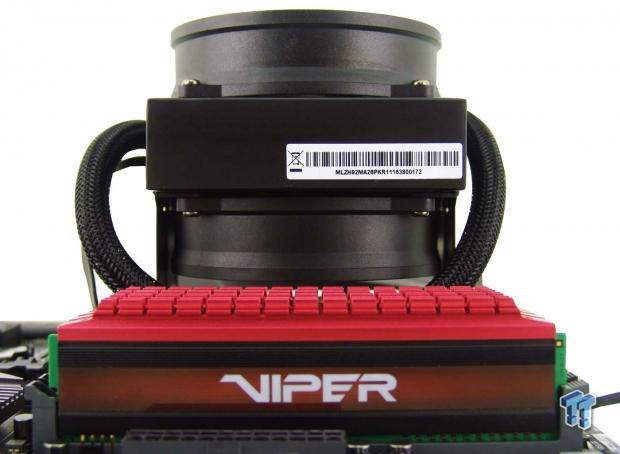
If you should choose to run the Maker 92 horizontally, the height of the cooler shrinks drastically. Not only does this allow it to fit in smaller cases, but the airflow from the fans is also now blasting onto the motherboard.
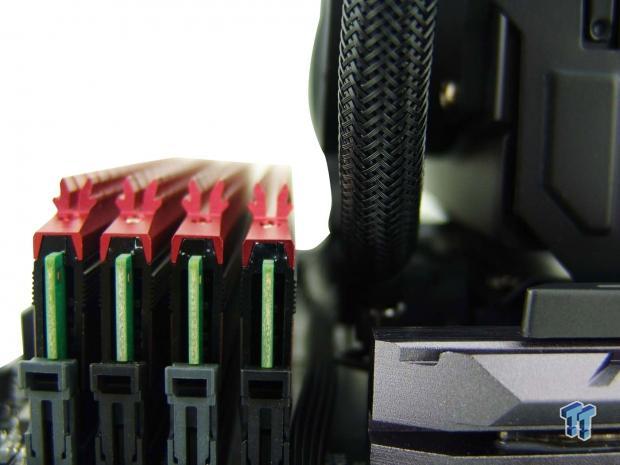
In the vertical position, we find a gap between the cooler and the RAM, and the same is found for those using RAM on both sides of the cooler too.
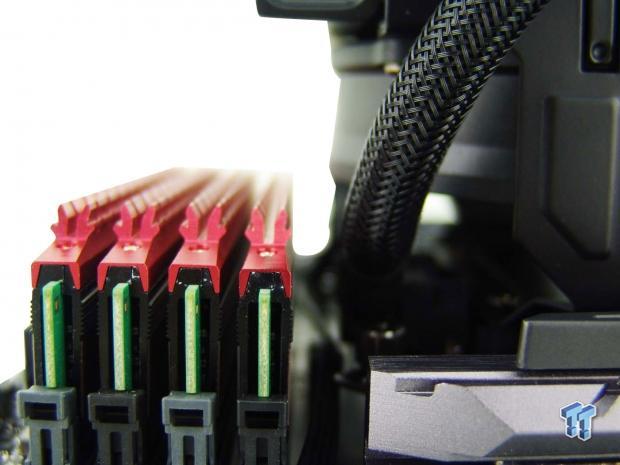
Using the Maker 92 horizontally, there is more room between the two. We also found that with these taller sticks of memory that we use, the cooler did not make contact while pivoting it on the bracket either.
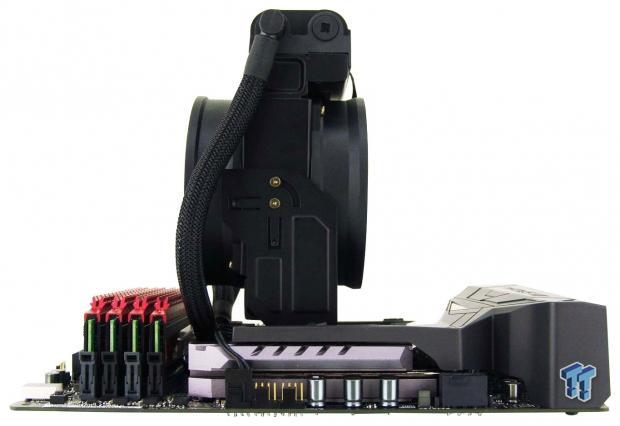
Make sure to connect the 4-pin fan connection from the cooler to the motherboard, as the PWM signal is used to drive the fans, and it also is used for the thermal setting of the motherboard to drive the front fan. In the vertical, the Maker 92 leaves room all around it.
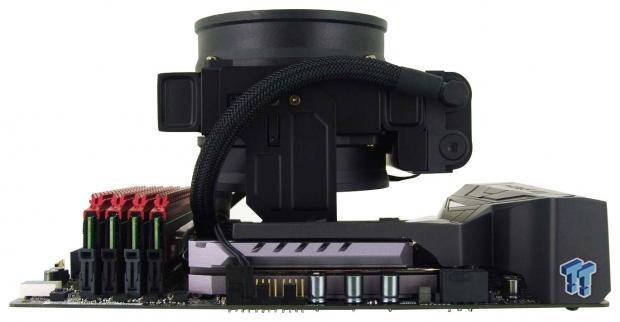
If at all possible, install the Maker 92 vertical, then afterward twist it to the horizontal as seen here. While not blocking the 8-pin motherboard connection, room is at a minimum when inside of a case. Those with LGA2011 and 2011-V3 motherboards, the bit on the right comes from the top so that any RAM can be used on that side.
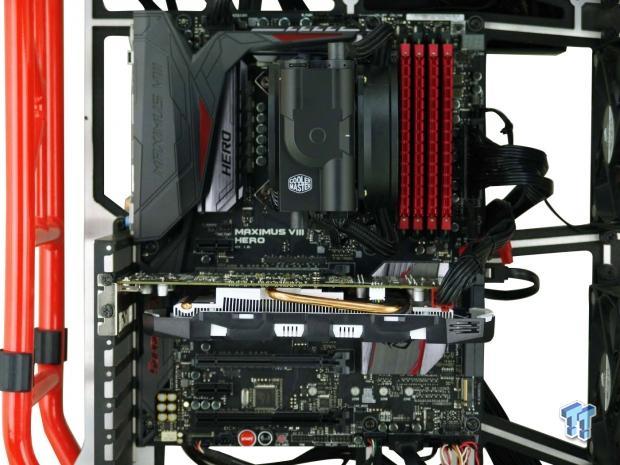
If you plan to use the MasterLiquid Maker 92 vertically, this is what you would see of the cooler if your chassis has a side panel window. The cooler is well short of conflicting with the motherboard screws, and we can easily populate the slot just under it.
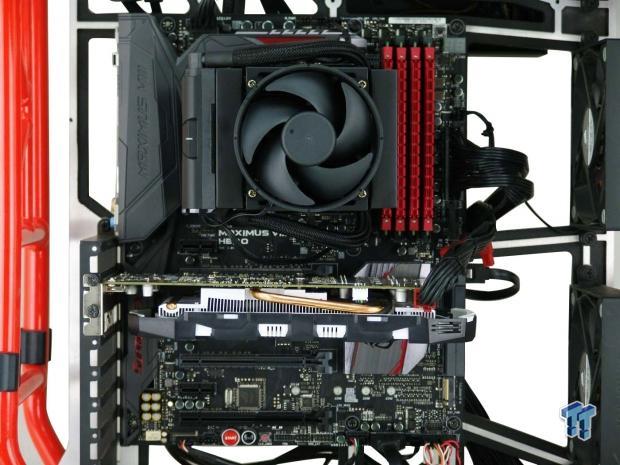
Once moved to the horizontal orientation, we can see the cooler covers much more of the motherboard, but again, almost any memory will fit underneath of it, it just may not allow it to swivel freely without removal. Even so, the cooler does not cause any conflicts like this.
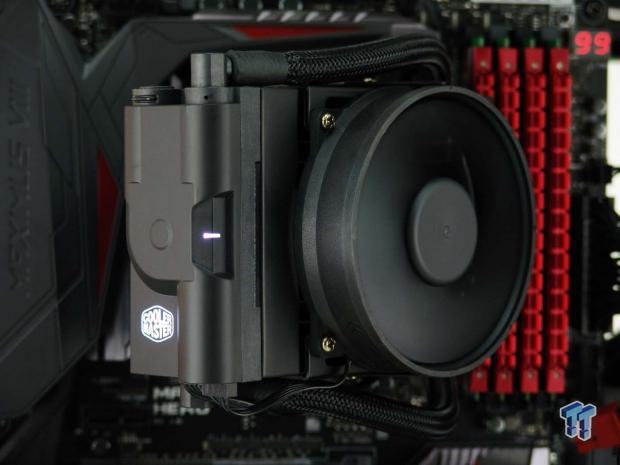
With both the 4-pin fan connection made and being certain to plug in the SATA power lead, both the Cooler Master logo and the pump light come on. If you do not connect the SATA cable, both lights will not turn on.
Test System Setup, Thermal Tests, and Noise Results
Chad's CPU Cooler Test System Specifications
- Motherboard: ASUS ROG Maximus VIII HERO (Intel Z170) - Buy from Amazon / Read our review
- CPU: Intel Core i7 6700K - Buy from Amazon / Read our review
- Memory: Patriot Viper 4 3000MHz 4X4GB - Buy from Amazon / Read our review
- Graphics Card: MSI GeForce GTX 1060 6GB OC - Buy from Amazon / Read our review
- Storage: Corsair Neutron XTi 480GB - Buy from Amazon / Read our review
- Case: INWIN D-Frame - Read our review
- Power Supply: Thermaltake Toughpower DPS 1050W - Buy from Amazon / Read our review
- OS: Microsoft Windows 10 Home 64-bit - Buy from Amazon
- Software: RealTemp 3.70, AIDA64 Engineer 5.75.3900, and CPU-z 1.77.0 x64
To see our testing methodology and to find out what goes into making our charts, please refer to our CPU Cooler Testing and Methodology article (October 2016) for more information.
Thermal Results
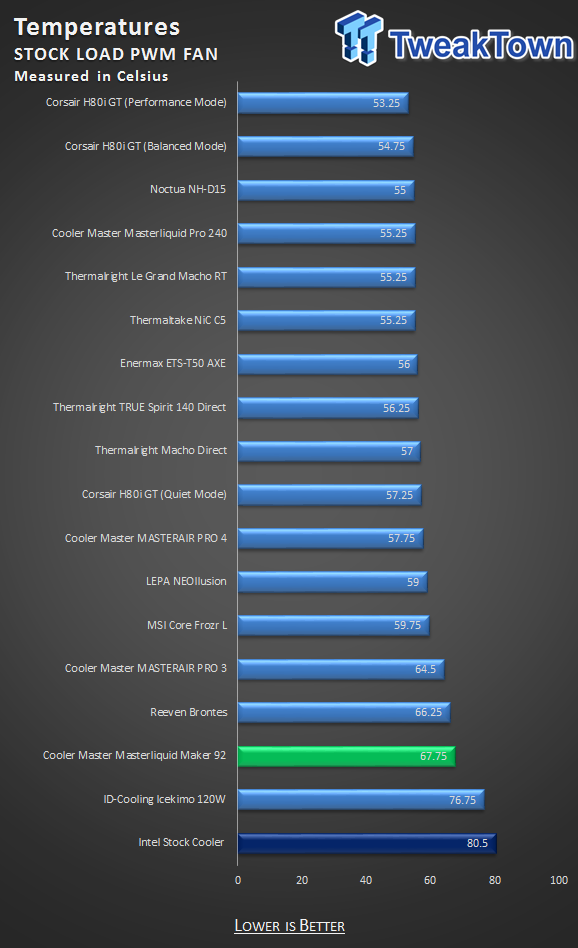
In our first test, we see that the MasterLiquid Maker 92 is roughly 13 degrees better than a stock cooling solution but still comes in second to last with all the aftermarket coolers we have tested thus far. 66.75 degrees does not sound all that bad initially, but keep in mind, this result is with the CPU running at stock.
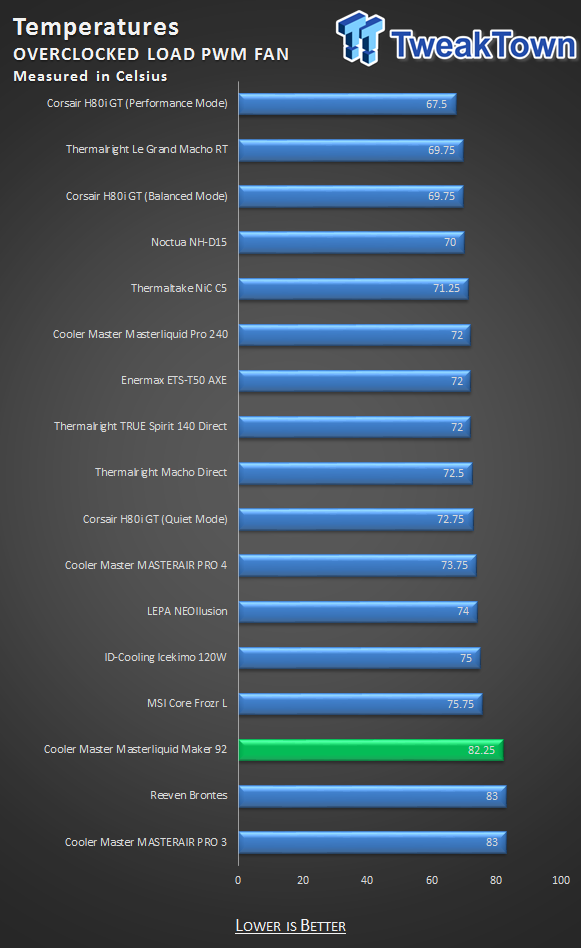
With the processor now overclocked, still using PWM to control the fans on this cooler, the Maker 92 steps up the chart one slot this time. There is no way to sugar coat this result, 82.25 degrees keeps us from the throttle point but is not what we would consider a good result.
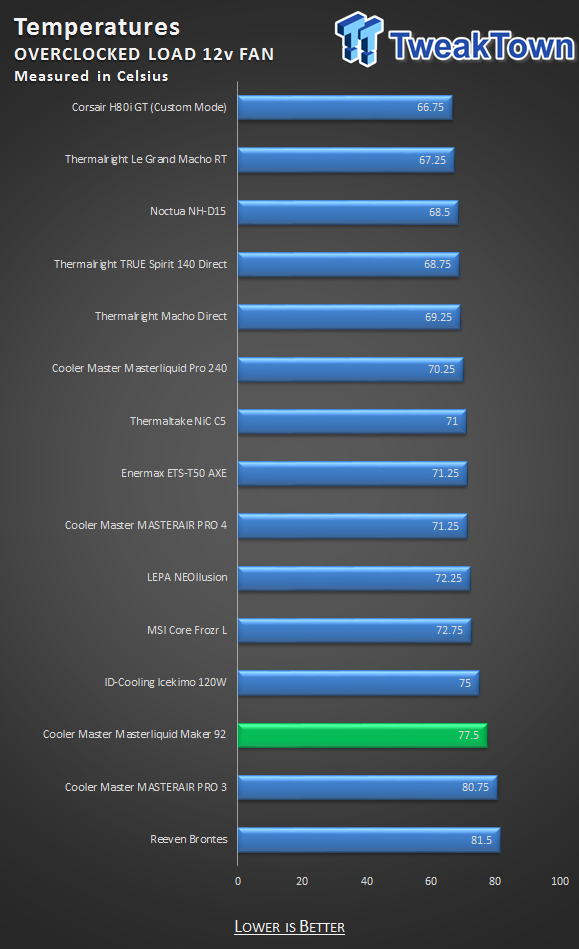
Using both fans to their maximum potential on the Maker 92, we can see that there is nearly five degrees of performance left on the table. While it does not increase the standings in this round of testing, we do see that silence is priority one, and not maximum performance.
Noise Level Results
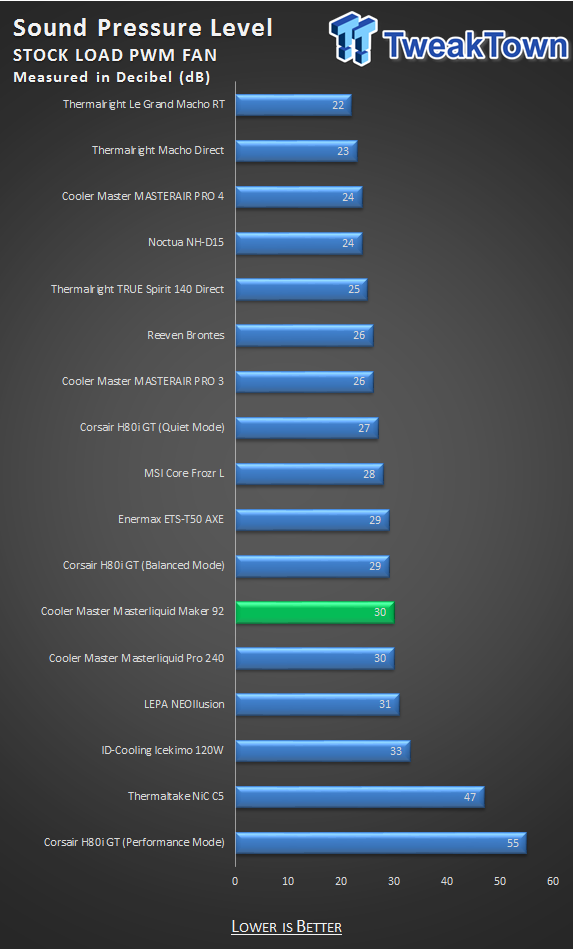
Initially, at idle, you will find that the front fan does not spin at all, but once the heat is applied, the front fan does kick in but runs slower than the rear fan. At this time, the front fan was spinning 352RPM, while the back fan was turning at 1420RPM, and gave us a 30dB result for noise at this time.
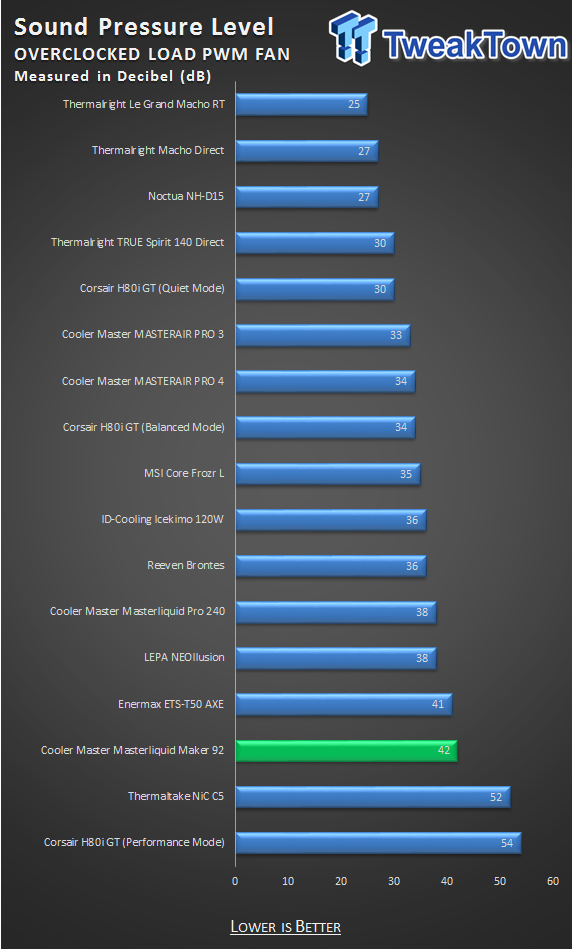
Since the overclock of the processor delivers more heat, the fans will ramp up to try to compensate. In this test, the front fan spun to 1530RPM, while the back fan reached 2067RPM, and increased the noise level to 42dB at this time.
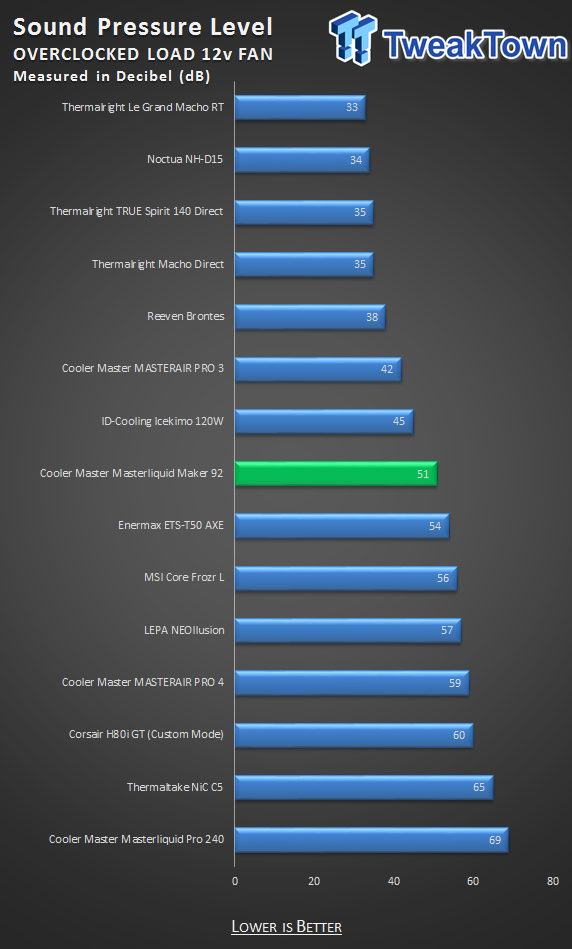
Manually setting the fan speed in the BIOS, we saw both fans turning at better than 2500RPM. The noise level rises again at this time and reaches 51dB. With the audio test results in hand, we can see why Cooler Master designed this cooler to keep the fan speeds slow.
Additional points to consider. The pump speed is not displayed as it is powered with a SATA connection, so we have no way to verify what is happening in that aspect. Also, the position of the cooler did not matter for CPU temperature results, but horizontally, the Maker 92 could reduce our VRM temperature by six degrees.
Final Thoughts
Up front, the idea sound plausible, and the way in which Cooler Master went with this design, it is easy to adjust the cooler to whatever the system requires, and initially we assumed this might be the right way to go with liquid cooling for compact cases. While we do wish we were given feedback for the pump, everything about this product is done well, keeping what could look like a mess, clean and tidy.
We also like that there were no conflicts with the memory we use, and it will also clear the vast majority of what is offered in heat spreader designs out there. Those who use the tallest of RAM kits may need to remove the RAM to change the cooler orientation, but once in the new position, it is possible to reinstall the memory. Even things like the mounting hardware, it is a solid setup, and seems to be tight enough to apply sufficient pressure on the CPU for the best thermal transfer possible.
At the same time, there are a few things we found not to our liking. First and foremost, we found the performance to be lacking, even if we did not care about noise. We realize this cooler is small and compact, but why bother at all when you can use an air cooler for similar or better results? The hardware, while solid, is a pain to get mounted all the way, and does require the front fan from the radiator to be removed to get to two of the screws. We also get that silence is key these days when it comes to what customers want in their cases today, but we feel that this cooler needs all the fan it can get, and allowing the front fan to sit idle just kicks its chance to be the most efficient right in the grapes. The last part that has us with little options as to where to go when it comes to an award is the fact that for all the hassle, we could do better with a $50 air cooler. For double the cost, it is hard to find value in this product outside of the unique design.
Initially, $99.99 did not sound all that bad, if the MasterLiquid Maker 92 could keep up with the pack. The sad reality is, though, that the Maker 92 was sucking on an oxygen mask just to finish the race, and when it crossed the line, we felt like we needed to call in the medics and be sure it was fine to continue. If performance had been better, if the cooler was more than just a cool design, we could have gotten behind the idea and helped to push a cooler like this to the front of the line. However, with all the facts present, and knowing what we do now, we feel you are having to pay too much for something you may never change position on, and for a cooler that keeps all AMD users out of buying it.
Sorry to have to say this, but when it comes to the Cooler Master MasterLiquid Maker 92, this is an instance where something looks cool and intriguing, but once you get to testing it, you see it is all show and no go.

