Introduction
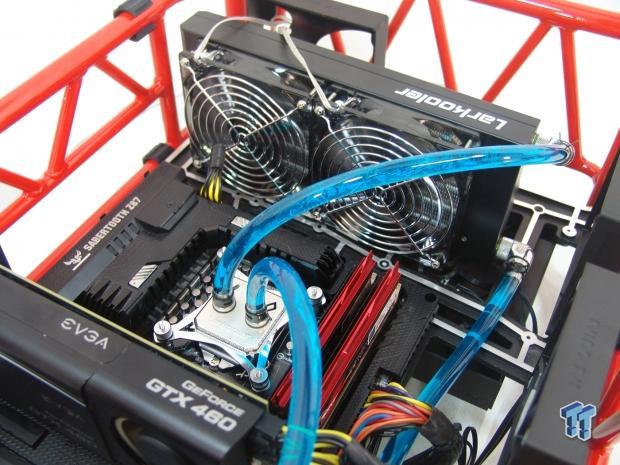
When it comes to water cooling components inside of your chassis, there are really only three angles of attack. First, and easiest, is of course to buy one of the many AIO solutions on the market, but there are only two units sold as AIOs that allow for any additional components to be added without voiding the warranty of said product. The second angle of attack is to buy all of the parts you need, and configure the loop yourself. With this method, you will need to invest time in finding compatible parts and components. You will also need to spend time thinking of everything you want to do; even down to the right clamps, the screws needed to mount fans, the screws to secure the radiator, even sometimes the method for mounting the pump.
You will also need to ask yourself whether you will go with a bay reservoir, a tube, or some sort of pump and reservoir combo unit. Many companies across the board now offer a third way to get into custom water cooling for your PC and its various components, and here is where Larkooler steps in.
Larkooler, like many other companies we have had the pleasure of working with, takes all of the guess work out of the whole ordeal, and will offer a kit full of everything one needs to get at least the CPU under a loop. Most companies offer forms of upgraded kits, where you can add other blocks as well; of course with a slight increase in the cost. Here, all of the thinking is done for you.
The company puts all of the components together, so you don't have to worry about the right diameter or thread of the fittings, whether or not the tubing fits with the fittings you picked, or whether or not you have the clamps, screws, or added accessories like a 24-pin jumper to help bleed the loop. When you are able to purchase a full kit in one box, the companies do all of the work for you, and make sure you are ready to go; without the need to go to the hardware or plumbing shops two or three times as you hunt down the parts you may have missed.
When we looked at the Larkooler website for the first time the other day, we saw that this is not their first rodeo. They have made other kits and separate water cooling components, long before this latest kit was sampled to us for testing. The SkyWater 330 Liquid Cooling System is just the latest and greatest of what Larkooler has to offer, and they were gracious enough to send it along, so we could see what it is all about.
After having seen a few of these kits (some great, and some that were almost there, but may have forgotten a thing or two), we know that the bar has already been set pretty high by companies like Swiftech and EKWB. Stick with us as we put this new SkyWater 330 through its paces, and see just how well Larkooler does in their new full kit, which is aimed at getting any user under water with the least bit of effort and planning involved.
Specifications, Availability and Pricing
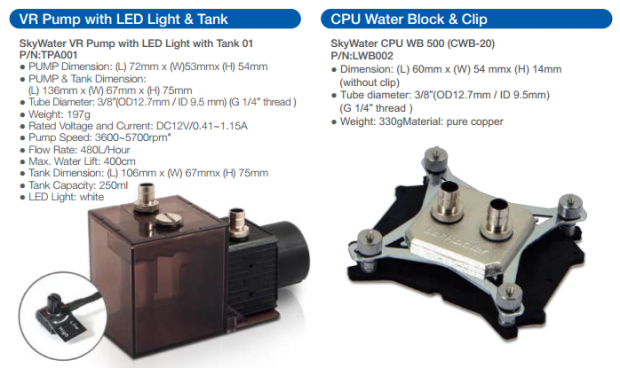
The first chart that Larkooler provides deals with the pump and reservoir combination unit, as well as the Universal CPU block. The pump and reservoir are fit into an area that is 136mm long, 67mm wide, and stands only 75mm tall without the fittings. Provided throughout the kit are six 3/8" OD barbed fittings with G1/4 threads. The pump also offers two removable caps for bleeding and filling the loop. This pump will run at speeds of 3600 to 5700 RPM, delivering a maximum of 480 L/h of flow. This pump also offers 400CM of lift height of the provided fluid. The connected reservoir will house 250mL of coolant, and there is also a variable speed dial for the pump. There is also a white LED installed into the reservoir.
As for the CPU block: it is made of 330 grams of pure copper that has then been Nickel plated. It also offers G1/4 threaded fittings that are preinstalled, and it is 60mm long, 54mm wide, and sits only 14mm off the IHS. This block does not come apart in any manner, but on the inside there are many tiny skived fins cut into the base to remove the heat from the copper base, and send it on to the coolant to be removed.
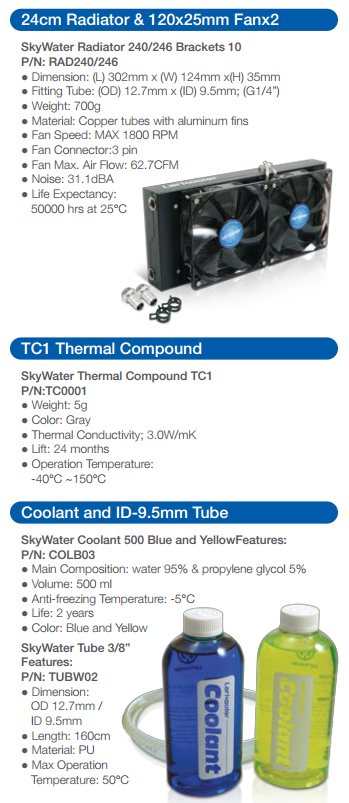
The second section of their charts covers everything else about the kit. Starting off with the radiator: it measures 302 mm in length without fittings, is 124mm wide, and is 35mm thick without the fans; this isn't a typical radiator. It uses copper tubes, brass headers, and aluminum fins. However, the fins here are much like what SilverStone was first to show us; they are more like the fins of a tower air cooler than the V-shaped fins of the usual suspects. The provided fans have a maximum rotation of 1800 RPM, and will deliver up to 62.7CFM each. These fans also have a 50,000 hour run time expectation, and they are rated at 31.1 dB(A).
As we move down the chart, there is also some information on the provided thermal compound: the TC1. They supply us with 5 grams of it, allowing for a few applications to get the mounting just right. This paste offers a 3.0W/mK conductivity level, will operate to this level in temperatures from -40 degrees to 150 degrees, and should stay usable for two years before becoming less effective. While that is all good for the customer, to level the playing field, as always, we will be using the MX-2 that every other cooler has used.
The last bit of information on the charts is about the coolant, and there is obviously a choice between the blue and the green coolant; we have received the blue coolant for our SkyWater 330. You get one 500 mL bottle of the coolant, and it will cool with ambient temperatures of -5 degrees before freezing. Also, note that right about the time you would need to replace the thermal paste, they also show that the coolant is due for a flush and refill.
As for the pricing and availability: the Larkooler SkyWater 330 can be found at quite a few locations, and is ready to ship as soon as you make payment. As for the pricing, it may vary a little bit from place to place, but considering the fact that this is priced just slightly more than what most sealed, dual radiator AIOS are releasing at, Larkooler may very well be onto something here. At an MSRP of roughly $130.00 USD; as it sits on paper, the SkyWater 330 seems very on point in the pricing aspect, and provides the ability to add components that the sealed AIOs will not provide for. At this point, I don't see where Larkooler has gone wrong. This is quite the kit for the price.
Packaging

Larkooler packs quite a bit to see on the front of their packaging for the SkyWater 330. The top offers the company and product naming, along with all of the socket types it is compatible with. Under a view of almost the entire kit at the center, there is a diagram of the kit in a chassis, as well as six key features the SkyWater 330 has to offer.
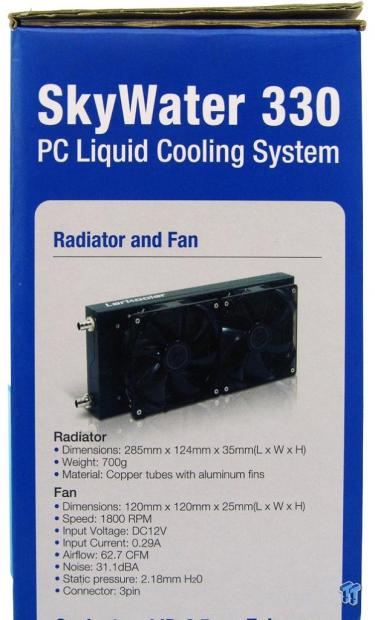
This is the thin right side of the packaging (as we look at it over two images); the top half offers a view of the radiator and fans, and also offers their specifications below the image.
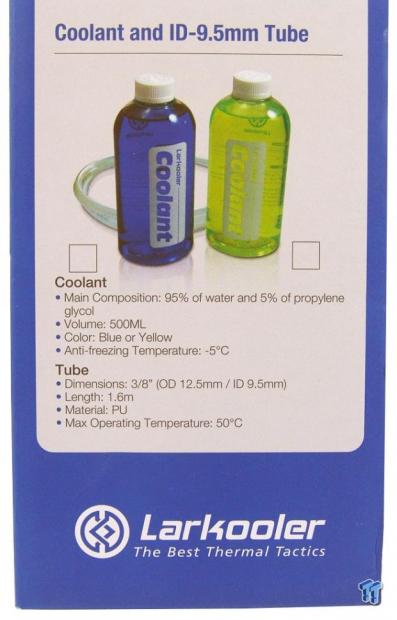
The lower half of the right side displays the bottle of coolant, and the roll of clear tubing sent in the kit. While the box next to the blue bottle is not marked, that is what we received. There are specifications for the coolant and tubing here as well.
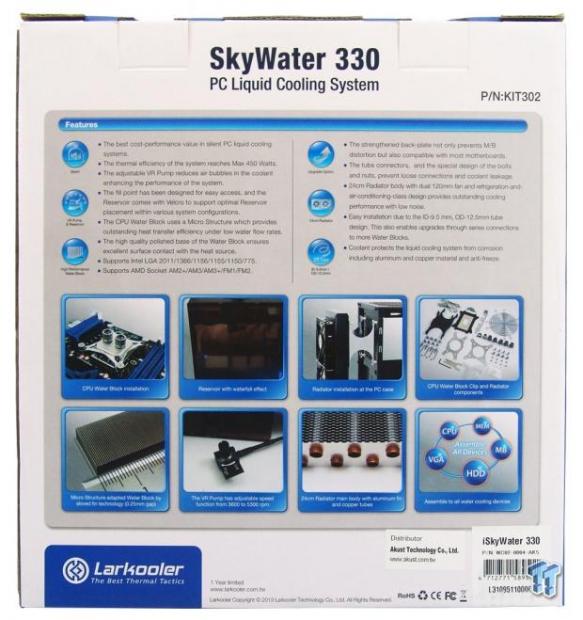
The back of the packaging also has a lot to look at. The six features that were shown on the front are now addressed in greater detail. Near the bottom are eight images of the various parts and designs within the SkyWater 330, but we plan to cover these later as well.
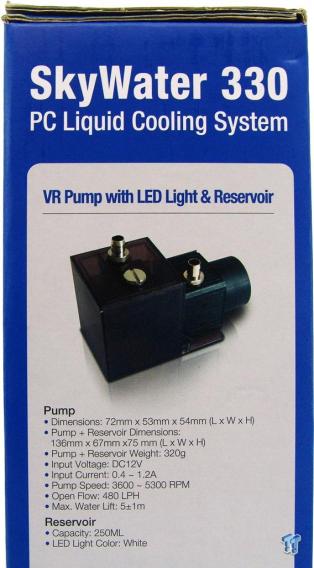
The thin left side of the box is used much like the right side. Here, at the top half, we have an image of the pump and reservoir combination, along with the full specifications for both components.
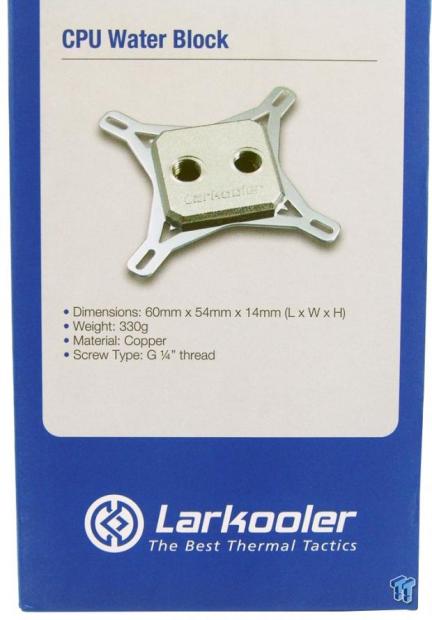
That leaves the lower half of the left side to offer the image of the CPU water block, and the specifications for it.
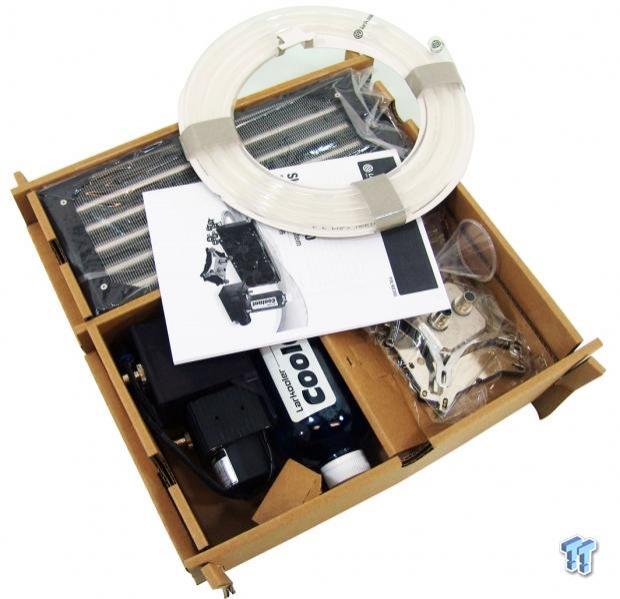
Inside of the outer packaging, there is a cardboard tray that has sections to keep the components from beating each other up in transit. At first glance inside, it looks like everything we need is in here, even some things we haven't yet mentioned. Considering how far this package has traveled, and how loosely packed things are inside, everything arrived in great shape.
Larkooler SkyWater 330 Liquid Cooling System
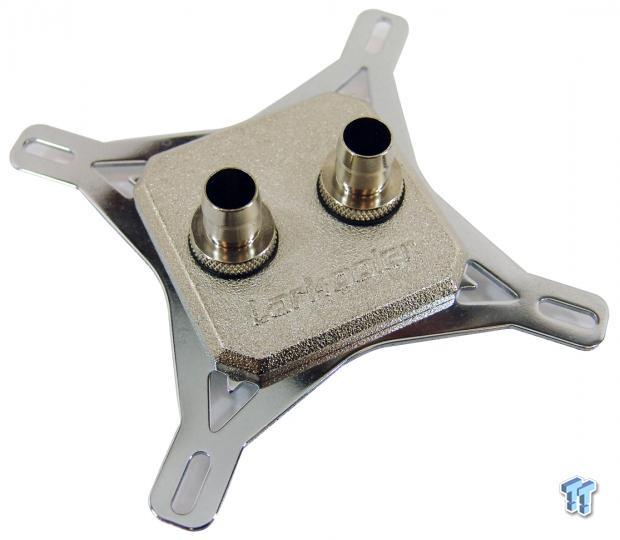
First out of the box is the CPU water block. The block is made of copper, and the top appears to be cast, with the Larkooler name applied to it prior to the nickel plating. The fittings come pre-installed here, and are very tight. The mounting bracket is steel, and comes ready for any Intel installation.
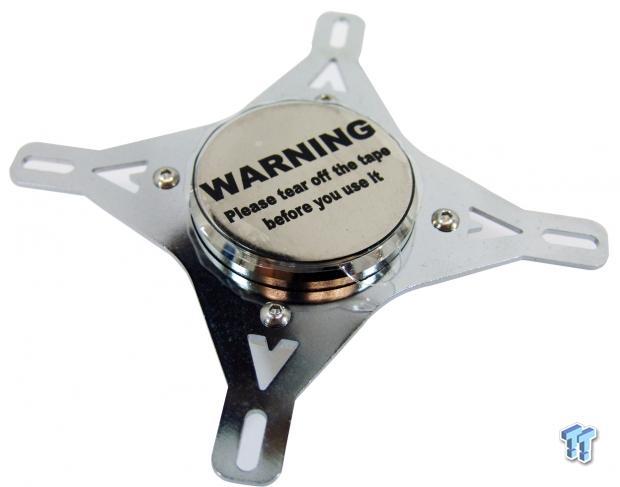
We flipped the block over to see that the base has a warning sticker applied to protect the finely polished base. We also found four Allen screws, which allow users to swap out the Intel bracket for the AMD bracket we found later in the hardware. The block is sealed, and does not come apart.
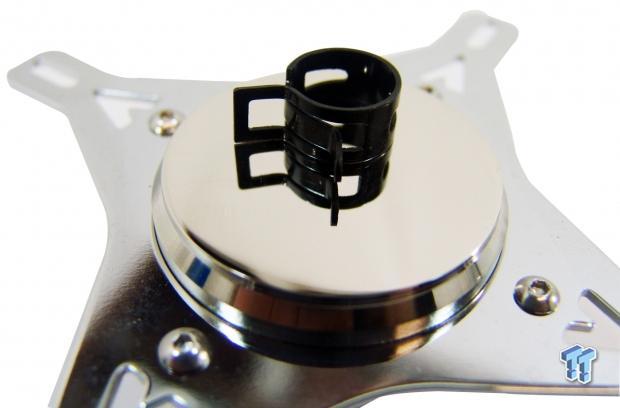
The base is round, and is somewhat convex in shape, as the center sits slightly higher than the rest. The diameter is also enough to cover any processor's IHS, and with the nickel plating added to the copper, we are left with a mirror-like reflection on the base.
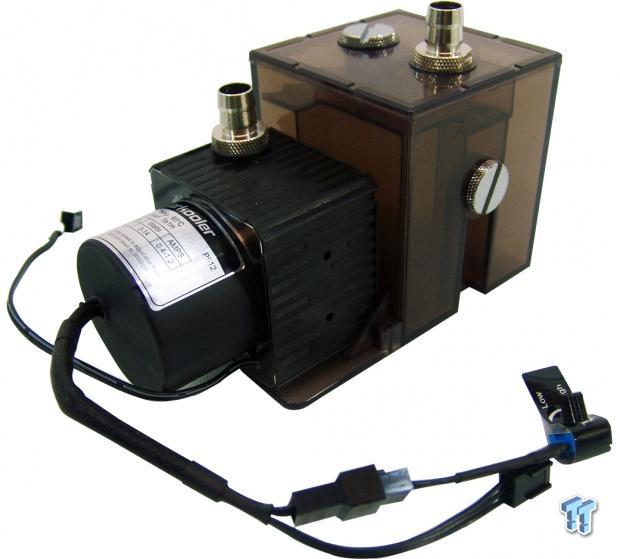
The pump and reservoir combination offers a pump that can push 480 liters of coolant per hour, but also offers a variable speed dial to allow users to adjust the flow rate as needed. The tinted plastic at the back is the 250mL reservoir, which bleeds very well. The pump and reservoir both have their fittings pre-installed. The pump receives its power via the 3-pin fan connection under the speed dial, and the second 3-pin to the left powers the LED that is set into the side of the reservoir.
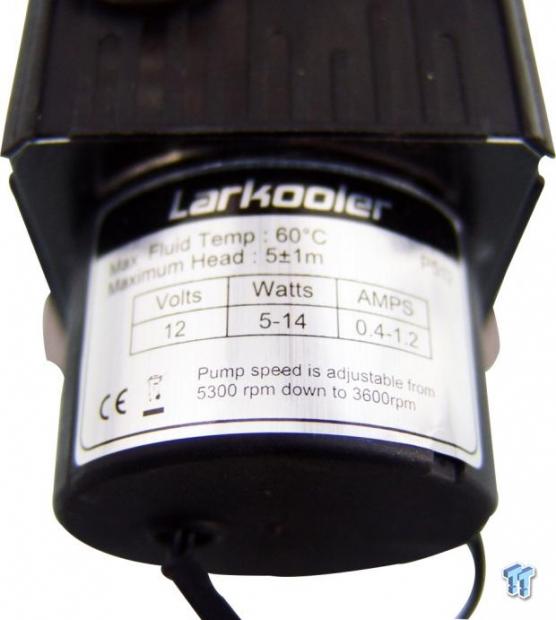
The P512 pump from Larkooler runs at 12V maximum, drawing 5 to 14 Watts, and no more than 1.2Amps. The pump's sticker also shows the 5 meters of head pressure, and that there is a typo in the charts, as this shows the maximum RPMs are 5300, not 5700.
SkyWater 330 Continued
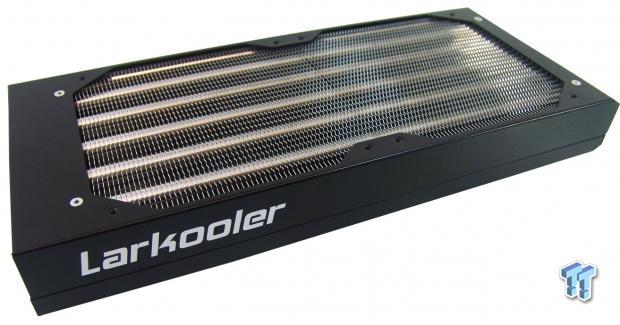
Now, we have the dual 120mm radiator that Larkooler ships in this kit. It is shrouded with a very squared off design in the black steel exterior. The white paint for the name on the sides makes it really stand out. You may also notice that the G1/4" fitting locations are not on the conventional side of this radiator.
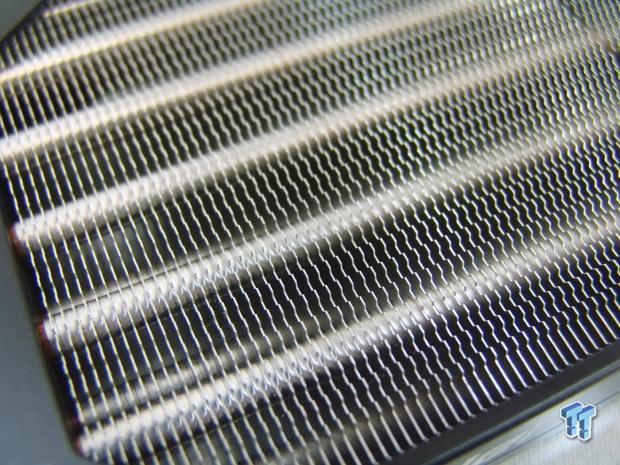
Before we get into fitting locations, I wanted to get much closer to the aluminium fins, and the copper pipes running through them. This design is just like a typical air cooler arrangement, which did well when SilverStone tried it out. Let's hope Larkooler has similar success.
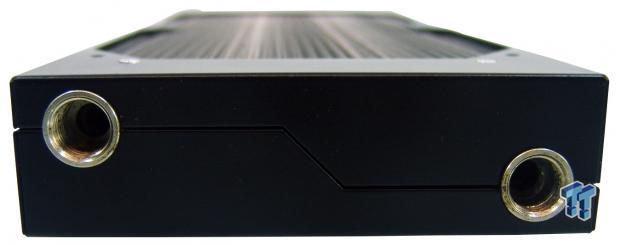
Now back to those fittings. On this radiator, the location to add a pair of fittings is at the end of the radiator. In some instances, this will make for a cleaner looking installation, but in others, it may require that you buy a few angled or rotary fittings as well.
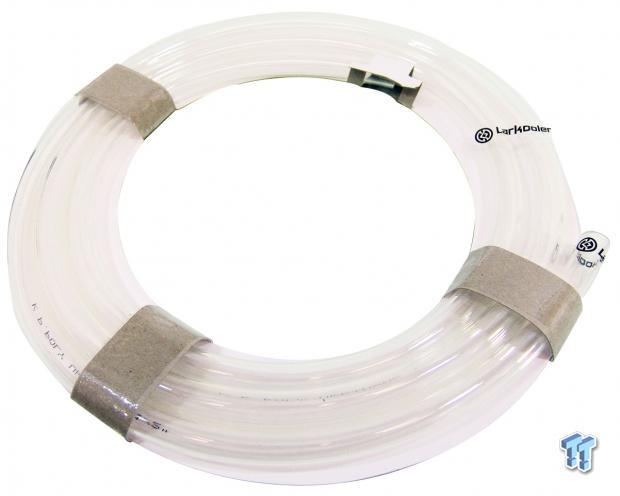
Here we have a small coil of clear 3/8"ID tubing. Larkooler provides 160cm, or just over five feet of this tubing. While it is somewhat pliable to get the tubing where it needs to be, it is much stiffer than what others provide, and somewhat harder to cut, and get the bend out of.
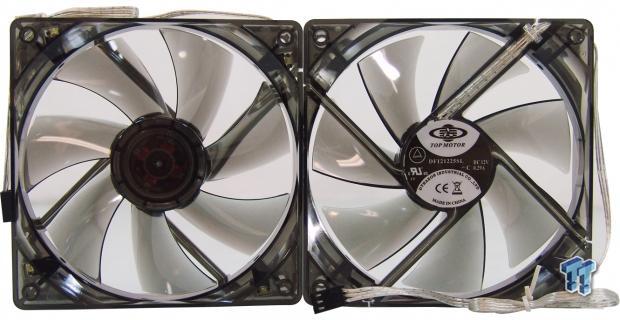
Likely the most important bit of any water cooling loop has to be the fans, as they can really make or break how well the system performs. Here, Larkooler has provided two 120mm fans that use blackened opaque frames and blades, and are also white LED lit when powered. There are Dynaeon Industrial branded DF121225SL fans, with just over 60CFM, and while they are rated lower on noise levels, there is no mention of a static pressure rating.
Accessories and Documentation
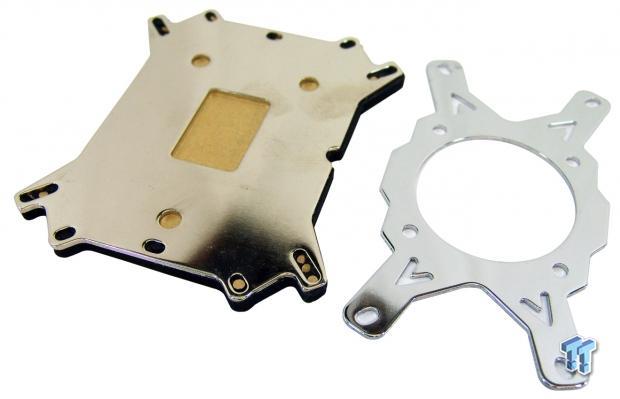
There is a ton of hardware in this kit, so we broke it up so it was much easier to see, and easier for us to explain what it all is. To the left is the universal back plate for both AMD and Intel motherboards. All of the foam isolation material is left in place, and you remove what you need to when the installation gets underway. At the right, there is the AMD water block bracket that can be swapped out for AMD users.
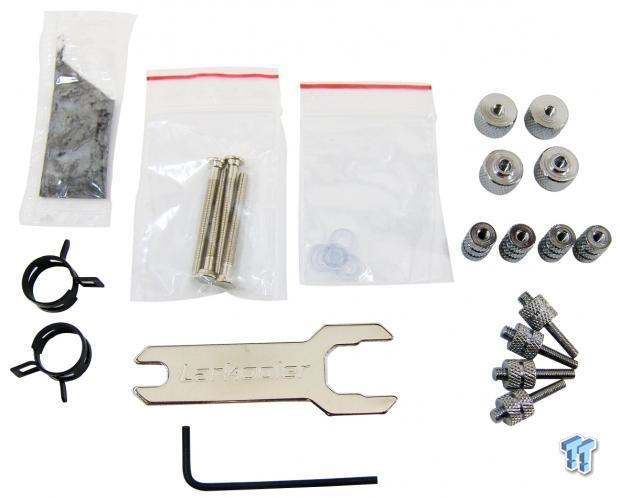
In another bag, we were given a packet of the TC1, above a pair of hose clamps. A little further right, there is the bag of studs, a bag of clear washers, a dual sized wrench, and an Allen wrench. At the right are the top nuts to secure the water block, the barrel nuts that are the standoffs, and a kit for LGA2011 at the bottom.
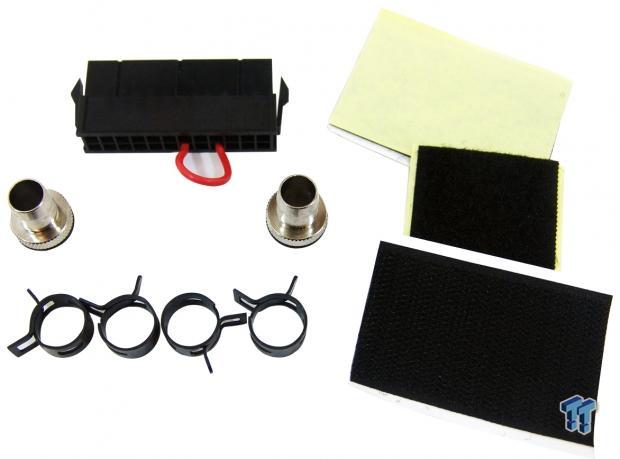
Here, we have the 24-pin adapter that allows you to power the loop in the chassis without booting the board to bleed the system, and check for leaks. There are also two 3/8" fittings, and four more hose clamps. To the right are two Velcro pads to use for mounting the pump/reservoir combo.
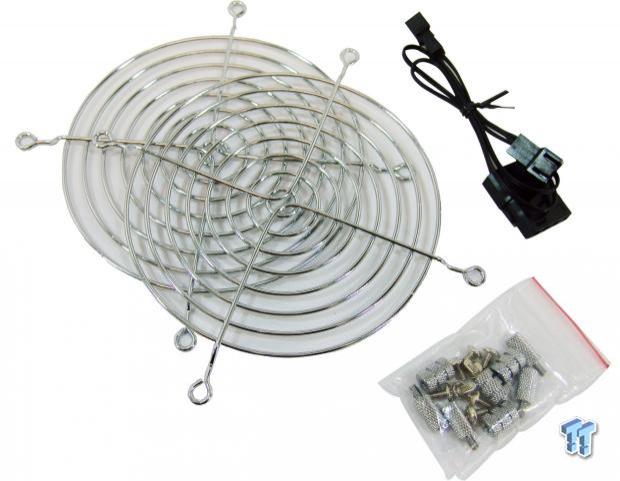
In this image, we have the pair of fan grills to help keep pets, children, and even your own fingers out of harm's way. There is a 4-pin Molex to a pair of 3-pin fan connections adapter to use with the fans, or to use on the pump. In the bag, we have the AMD hardware, and screws to use with the radiator brackets.
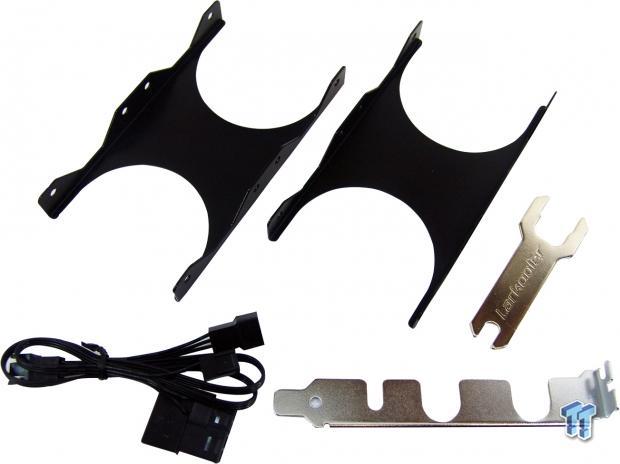
Speaking of brackets, here they are, and these will allow the radiator to hang off the back of a case via the 120mm exhaust fan. We get another wrench, as well as a rear expansion slot insert to allow for the wiring and tubing to easily go outside the chassis. There is also another adapter provided, but this one needs power from a 3-pin and a Molex to send power to both female fan connections on the other end.
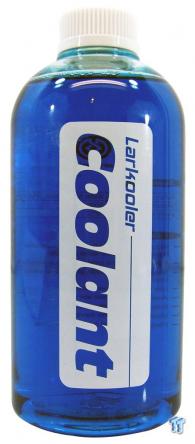
As it is easy to see, we definitely received the 500mL bottle of coolant in blue.

The back of the bottle tells us this is a mixture of water and Propylene Glycol, or coolant. It also provides its freezing temperature, as well as eight cautionary points of interest.
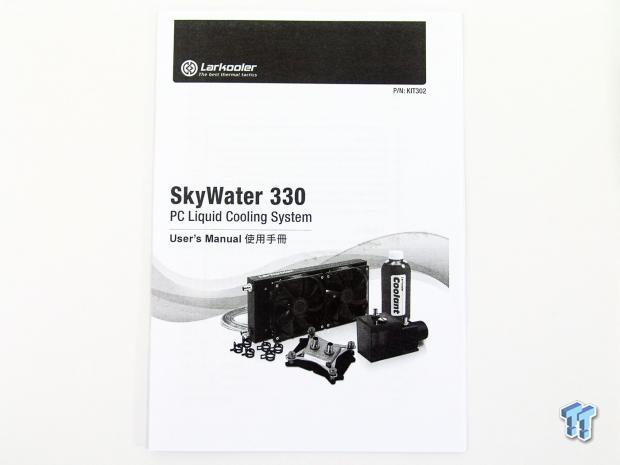
The manual you will receive is pretty thorough, and does cover things from start to finish. One thing I did see, or rather did not see, is that it does not show the flow of the pump. If this is a kit for beginners to get into water cooling, showing the flow of the pump might be helpful, as not all potential buyers understand that water should always flow into the reservoir first in devices of this style. Other than that, the images and text will guide you right through.
Installation and Finished Product
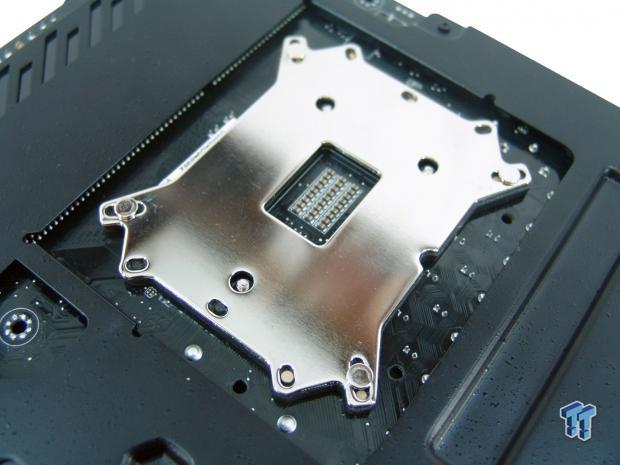
Removing the middle section of padding is easy enough; it is cut and pops right out. As for the holes for the studs, I just pushed them through the foam, and the plus and paper comes right out of the other side. Then, we simply slip the studs through the board, and we are ready to flip it over.
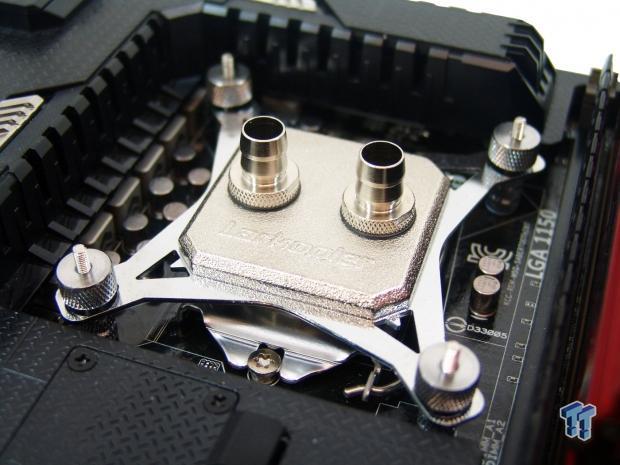
First, we had to send the barrel nuts on top of the washers down to the bottom of the studs to make standoffs, and secure the plate to the board. After that, we applied some TIM, and set the block down. To secure the block, we then used the larger nuts, and I tightened them as tight as possible with my fingers, in an X-pattern.
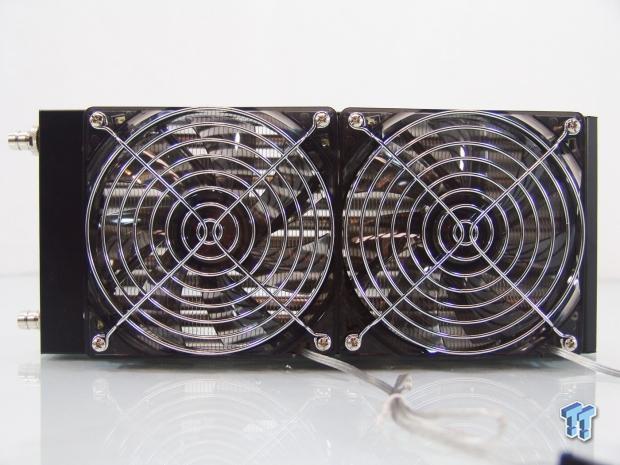
There is one thing obviously missing from this kit, and it took me until I added the fans to the radiator to even see it. The small screws that I thought were for the brackets will mount the fans, but then there is nothing to mount the fan grills. Digging into my older hardware, I was able to come up with what I needed to get the job done correctly.
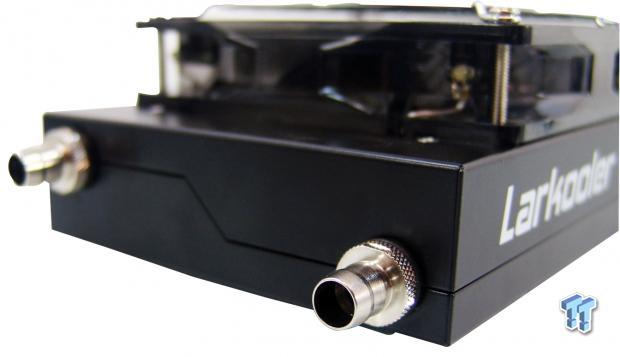
We went ahead and checked the thread and fit of the fittings with what Larkooler had supplied. It didn't take but a second to realize I would be in dire need of some angled fittings to make this fit in the chassis we test with.
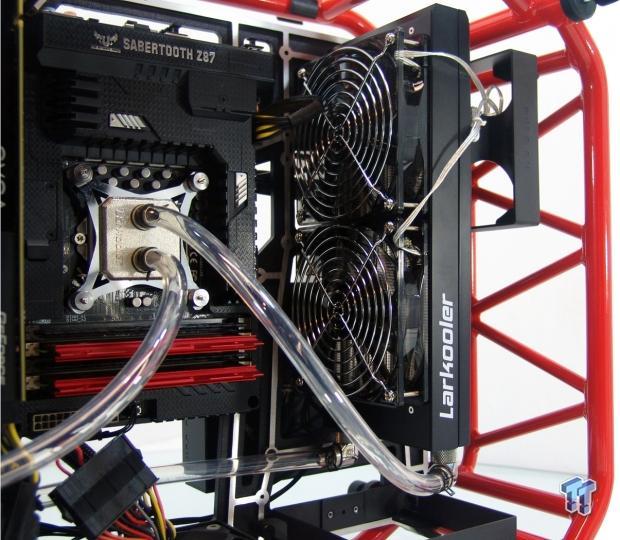
And this is why we had to opt for a pair of angled fittings, and it does not hurt that they are rotaries either. Setting things up at this point were pretty simple, outside of the fact that the tubing is not as soft as I would like it to be.
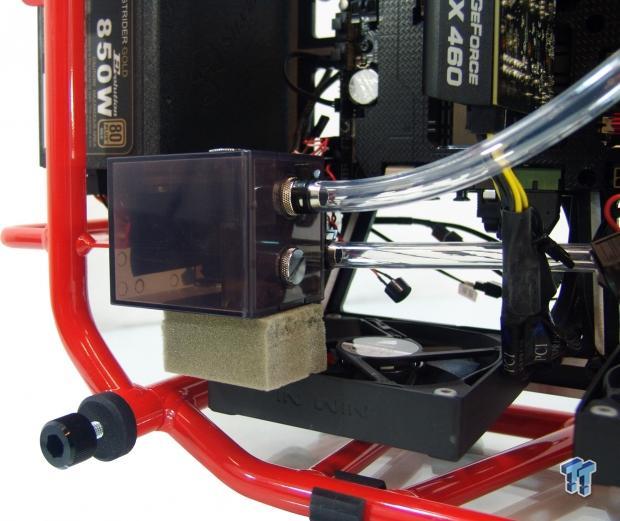
At the other end of the loop, I did have to do some rigging to make it all work and stay where I needed it, but that is due to the chassis, not the kit. The Velcro pad held pretty well, but we added the foam to make sure it stayed in place. Also, keep in mind, the fill port is the one facing you, not the one at the top currently; that is a bleeder valve of sorts.
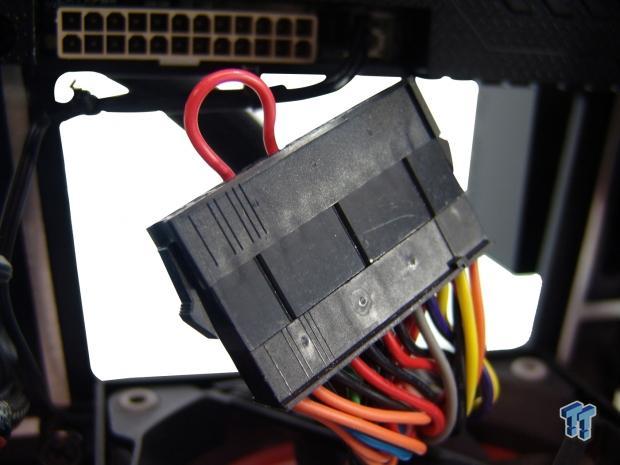
The 24-pin jumper comes in really handy when filling the loop. This way, you can just flick on the PSU, run it, then stop to add more fluid; rinse and repeat until the loop is full. It also allows you to run the loop and look for leaks, and wait for all the air to escape the block, the radiator, and the tubing, while the rest of the system sits essentially dead with no power.
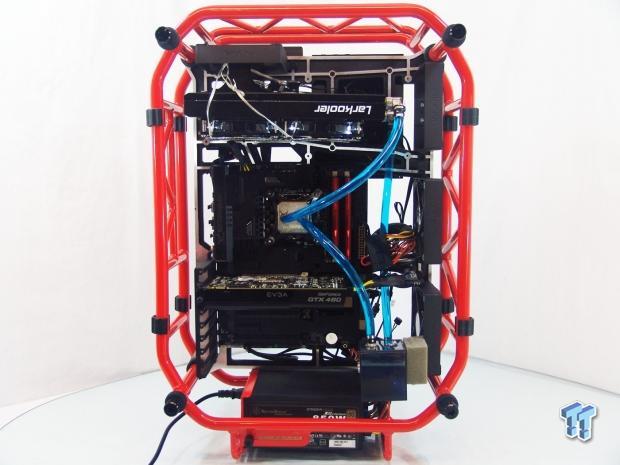
After about 30 minutes to an hour of messing around and getting the majority of the air out of the SkyWater 330 loop, we had it installed, and almost ready for testing. We did run the system for another few hours to get all the air out of the lines, and that seemed to take the most time. At this point I will say: It has been rather simple and easy thus far to put this all together.
The Test System and Thermal Results
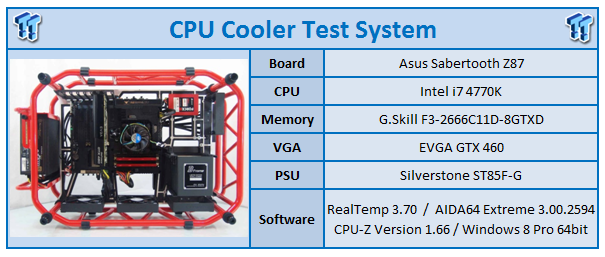
I would first like to thank ASUS, InWin, Corsair, and Fractal Design for supplying products for me to test with. To see our testing methodology, and to find out what goes into making our charts, please refer to our CPU Cooler Testing and Methodology article for that information.
During this test, we allowed the pump to run at full speed, which was reporting through the motherboard at 5600 RPM. Confusing, I know. One place says 5400, another says 5700, and ours ran at 5600; go figure. The fans were receiving 7.5V of power, and were spinning at 1265 RPM.
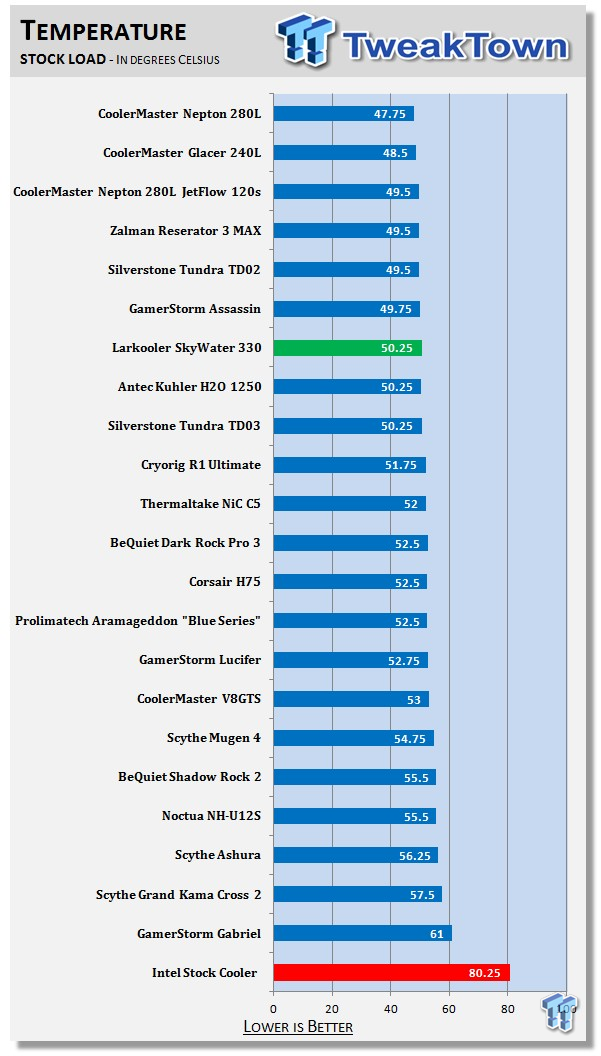
With all of that set, we let the rounds of testing loose. While the system idled at 27.25 degrees, once the load was applied at stock settings, the temperatures climbed to 50.25 degrees. Not the best on the charts, but only 2.5 degrees out of the top slot.
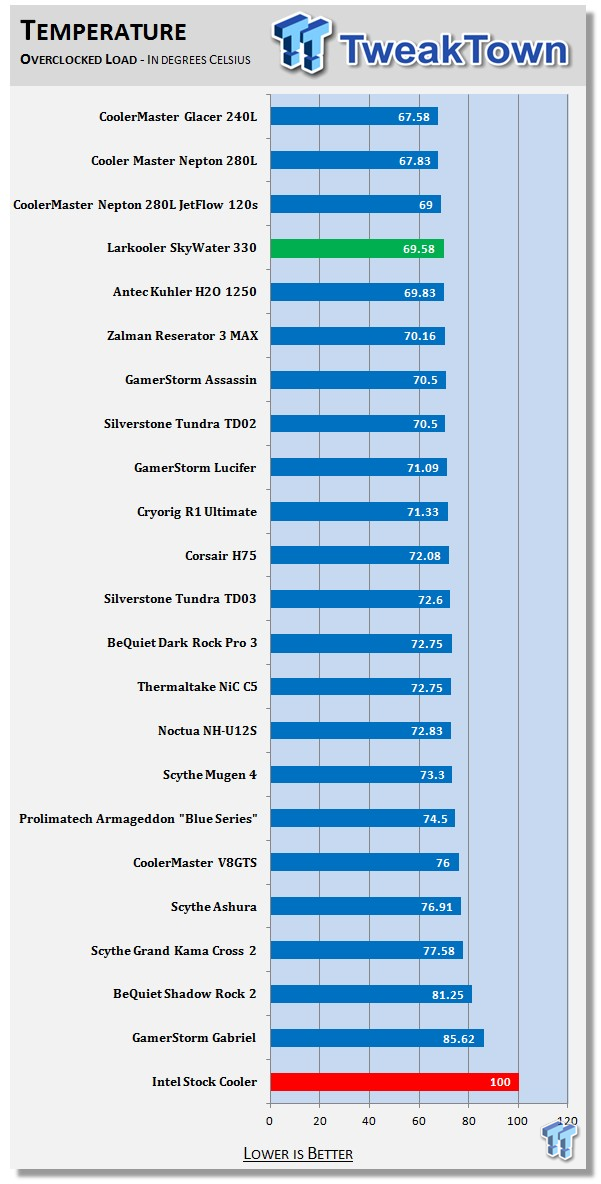
For the overclocked run, the pump was still at 5600 RPM, but this time the fans were full steam, and reporting speeds at 1721 RPM. While at stock, the SkyWater 330 was outperformed by some of the AIOs; when we let it do its job in this test, we found the performance to be very good. Sliding into the fourth spot at 68.58 degrees average is great for such a cost efficient solution.
Although the Glacer is still top dog, the SkyWater 330 is only two degrees out of the top slot. Considering the thinner tubing, the block being used here, along with other small factors, I think the Larkooler kit does a really good job thermally.
Noise Level Results

For the stock level of testing, the fans slowed to only 1265 RPM. The 31 dB level of noise our meter showed is inaudible to most people, and definitely to those who work around noise all day. When inside of a chassis, there is definitely going to be no noise heard from the fans, unless it is hanging outside the chassis in the back; even then it's a maybe.

While it looks like the SkyWater and its 41 dB rating has slid into the fifth spot, I look at it from a completely different angle. Not to say that fifth place is not something to be proud of on its own, but look again, as this is the best solution over all other versions of sealed or unsealed water cooling solutions.
While this level is slightly audible, and may be slightly distracting to those with sensitive ears, you can do much, much worse in this department.
Final Thoughts
First, let's discuss what we liked. Larkooler provided us with almost the full gamut of goodies to get this kit installed and ready to go. The block installed easy, and being sealed makes for one less point of potential leakage. Pre-installing the fittings on the block and the radiator was nice too, but with such a large o-ring being used, I doubt they needed to be wrenched in to the point to where it was almost impossible to break them free. The clear tubing is nice, as adding coolant will add that bit of color, and you can also keep an eye on the fluid, to see any air bubbles, or when it is time to change the tubing, as it yellows over time.
The radiator offers a newer design, and does seem to perform very well considering the fans supplied offer only 62.7 CFM. Also, the pump and reservoir work well together. The variable speed pump makes bleeding easy, and offers the ability to remove some noise, but the pump is barely audible when running full speed. Filling and bleeding the reservoir was also easy; in fact, we did fill the reservoir as it ran, and did not have to go through the on/off procedure. Just keep a towel handy while doing this, in case you pour too much into the funnel when filling the reservoir.
When a cooler (or full loop as in this instance) performs so well it is really tough to tear it down, but there are some things I would like to go over. The biggest thing to me is the lack of screws supplied. While I had eight screws to mount the fans to the radiator, what then of mounting the radiator in a case? Also, if you are going to supply the fan grills, I think there should be a way to attach them. In the aspect of mounting the brackets, you also have to provide the screws for that.
For a kit that is designed to allow beginners an easy way in, this way wasn't so easy, and for someone without all the extra goodies I have collected over the years, these things may really upset the customer. Then, the fact that they supply such tough tubing is a twofold issue as I see it. Most beginners will not think to buy a tubing cutter, and using a utility knife was in no way gentle or easy. The second thing is kinking, and while our run was smooth, tubing this rigid is not very giving when it comes to making tighter bends.
With a couple of very small adjustments to the hardware kit, this could be a real show stopper. The price is right to allow new people into water cooling, and still offer some very good performance to boot. Having almost every angle attended to when jumping into water cooling is very nice when inundated with all of the water cooling gear to choose from. Also, like other assembled kits, you can extend the loop to fit other components later, which is a huge benefit over similarly priced CPU only AIO solutions. Overall, the SkyWater 330 is a well performing kit that is very basic to install.
It offers features not found in other kits, like the newer radiator design, which allows for much quieter fans to accompany the kit. It gets right into the mix at the top of all of our charts. While we did see some very minor and easily fixable things in this kit, I am sold on the SkyWater 330, and as long as you know what you are missing at this point, you are very prepared to take the SkyWater 330 and add it to your rig too. At an MSRP of roughly $130, it is just hard to look past what Larkooler is offering.



 United
States: Find other tech and computer products like this
over at
  United
Kingdom: Find other tech and computer products like this
over at
  Australia:
Find other tech and computer products like this over at
  Canada:
Find other tech and computer products like this over at
  Deutschland:
Finde andere Technik- und Computerprodukte wie dieses auf