Introduction, Testing Setup, & System Requirements
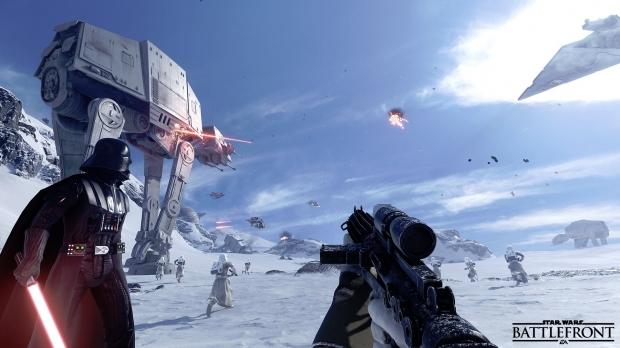
Swedish developer DICE is best known for its Battlefield shooter series, which includes the futuristic and snow-rich Battlefield 2142. With that kind of background, the studio was a no-brainer choice for publisher EA when deciding who to set upon the task of creating a new Star Wars: Battlefront game to precede the release of The Force Awakens. The reception to the result is mixed, but any reasonable person should be able to acknowledge it's a well-made, fun game. The debate is really about how much of a Star Wars game it is or isn't. I'm no expert on the franchise or the game series, but I will say the gameplay and design reminds me quite a lot of Battlefield: Bad Company 2 in ways, and that's a very good thing (at least if you loved Bad Company 2).
As is the case with all Frostbite games, a long list of graphics options is included. In this guide, I'll go through them all to show you what altering each of them does exactly, both regarding visuals and performance.
Test Setup and System Requirements
The Ultra preset was used as the baseline while testing with this guide. Also, Fullscreen mode and 55 Field of View (FOV) were used, FXAA was set at high, and V-Sync was disabled. All testing was performed after the December 1 patch was released, which contained some performance improvements.
Our Test System
- OS: Windows 10 64-bit
- Processor: Intel Core i5 3570K 3.4GHz (Stock)
- Memory: Corsair XMS3 8GB DDR3-1600 (Stock)
- Storage: Western Digital Caviar Black 640GB 3.5" 7200RPM
- Video Card: Sapphire Tri-X R9 290X 4GB (Stock)
- Driver: Catalyst 15.11.1
- Resolution: 1920x1080
- Input: Logitech G400 mouse, Leopold Tenkeyless Linear Touch Mechanical Keyboard
System Requirements
Minimum:
- OS: 64-bit Windows 7, Windows 8.1 and Windows 10
- Processor: Intel i3 6300T or equivalent
- Memory: 8 GB RAM
- Graphics: NVIDIA GeForce GTX 660 2GB or AMD Radeon HD 7850 2GB
- DirectX: Version 11
- Network: 512 KBPS or faster Internet connection
- Hard Drive: 40 GB available space
Recommended:
- OS: 64-bit Windows 10 or later
- Processor: Intel i5 6600 or equivalent
- Memory: 16 GB RAM
- Graphics: NVIDIA GeForce GTX 970 4GB or AMD Radeon R9 290 4GB
- DirectX: Version 11
- Network: 512 KBPS or faster Internet connection
- Hard Drive: 40 GB available space
Fullscreen Resolution, Fullscreen Mode, Field of View, & Motion Blur Amount
Fullscreen Resolution
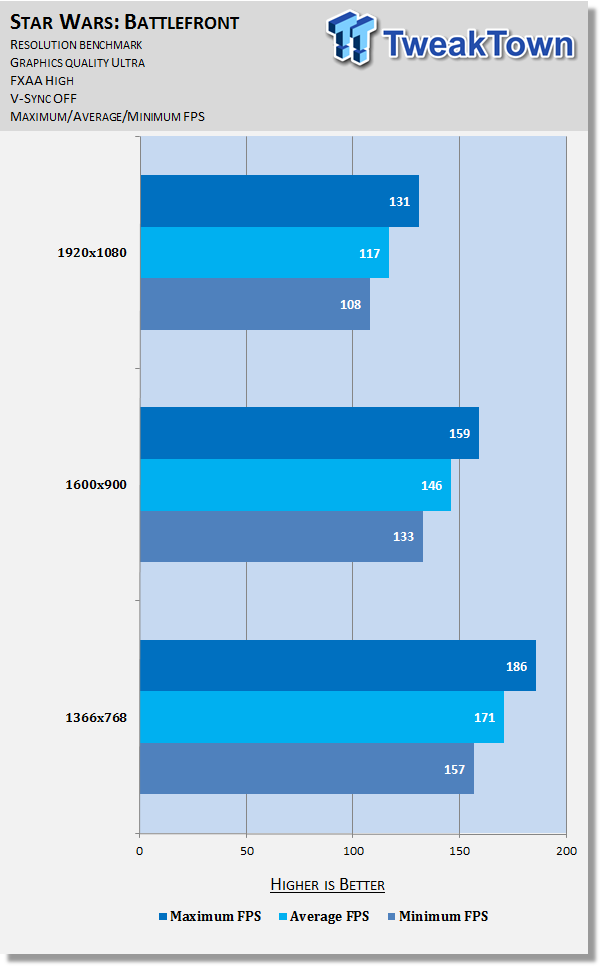
The quality at which the scene is rendered, corresponding to the number of pixels; higher resolutions mean more pixels, which means higher quality. Keep in mind that when playing with a resolution lower than your monitor's native resolution (e.g. 1366x768 on a 1920x1080 monitor), the image will be scaled up and look significantly poorer for it than what you see in these screenshots (zoom in on the lower resolution ones to get an idea).
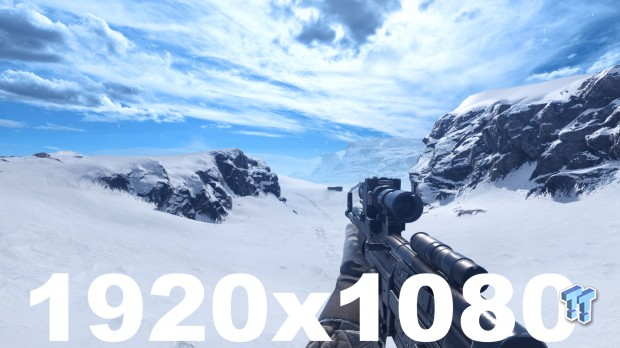
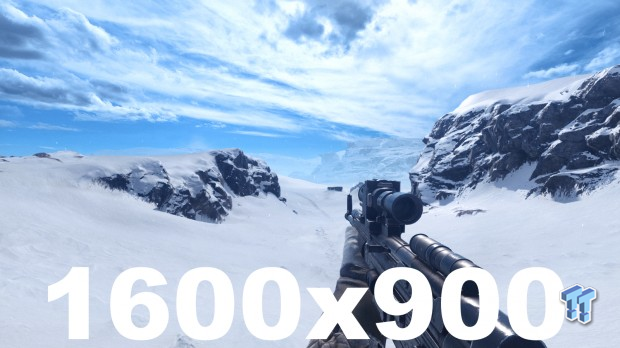
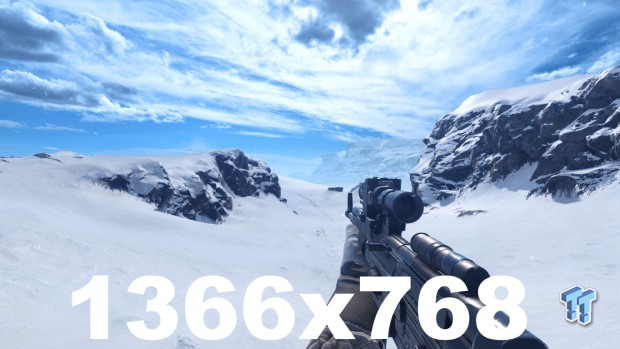
The benchmark shows a major impact to minimum, average, and maximum framerate at all levels. While costly, I recommend keeping this at the maximum setting allowed given the potentially drastic drop in visual fidelity should you not, thinking of it only when you need a significant framerate boost even after trying everything else.
Fullscreen Mode
This lets you choose between the well-known fullscreen and windowed modes (the former better for performance, and the latter better for multitasking), or the somewhat less well known Fullscreen Borderless mode, which appears identical to Fullscreen, but allows for quick switching between the game and other tasks at the cost of game performance. Since windowed mode requires a different resolution, I tested just Fullscreen and Fullscreen Borderless modes.
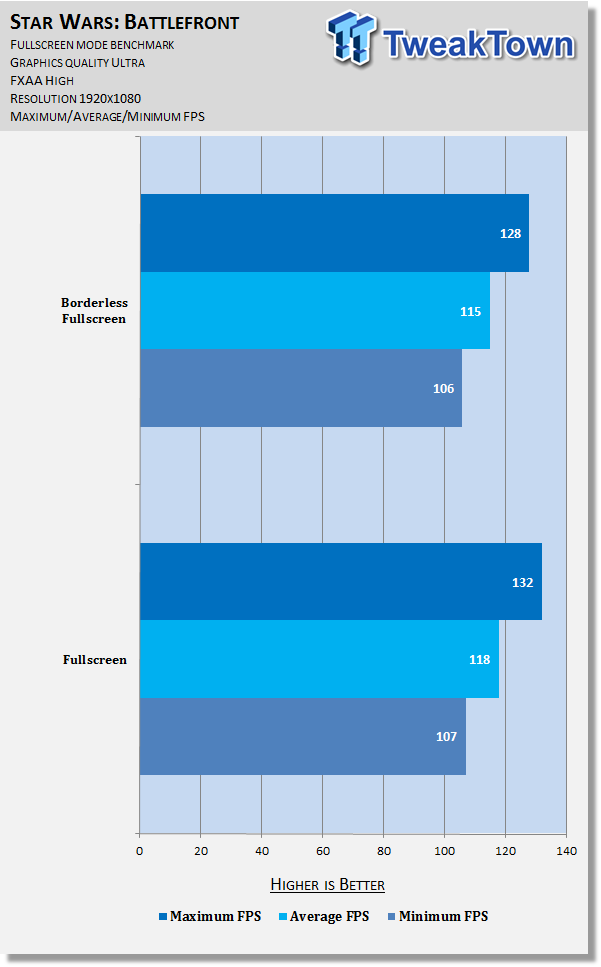
The benchmark shows Fullscreen Borderless mode has a minor impact on framerate, especially on minimum framerate, which moves down just one frame per second (FPS). If you have the headroom, this is a great option to enable to make task switching seamless. Otherwise, staying at Fullscreen will provide you a few extra FPS.
Field of View
One of the more popular but sadly often left out settings, Field of View (FOV) lets you adjust how 'wide' your perspective is. At the high-end, you see more, but it can be harder to aim, and depending on your setup, you may get 'fisheye.'
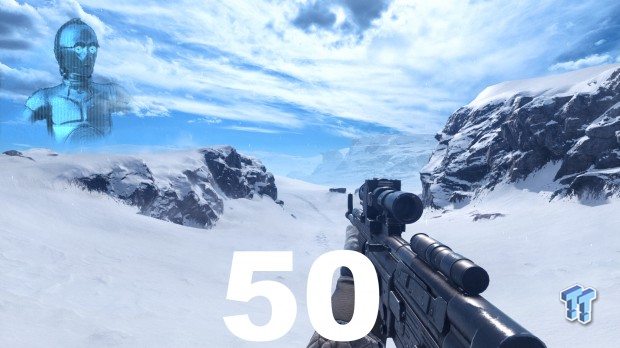
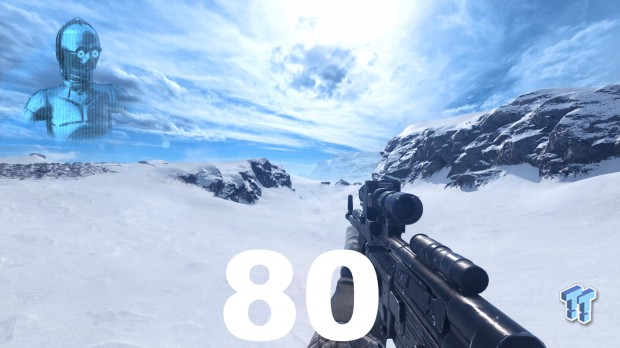
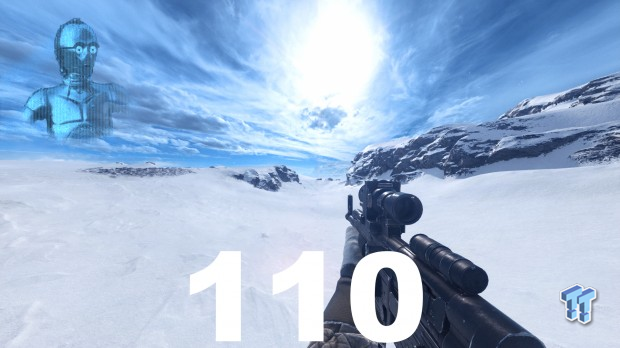
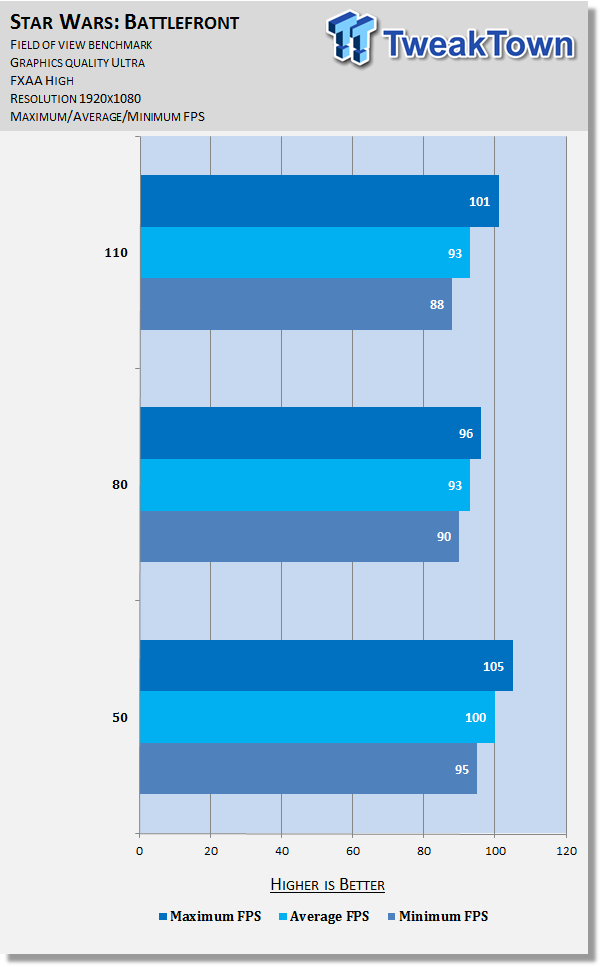
Testing revealed very strange results even across multiple benchmarks on various maps. Generally speaking, decreasing FOV will increase your framerate, sometimes by a significant margin, but in some cases, it won't change at all, or will actually decrease. Find a value you find comfortable to look at and play with and tweak a bit up or down if you're dissatisfied with performance.
Motion Blur Amount
This setting is always arduous to capture properly, and it's no different here, so screenshots are absent from this section. In game, blur is most only really noticed when making sharp spinning movements. Even at the maximum setting, it's not an extreme implementation, either.
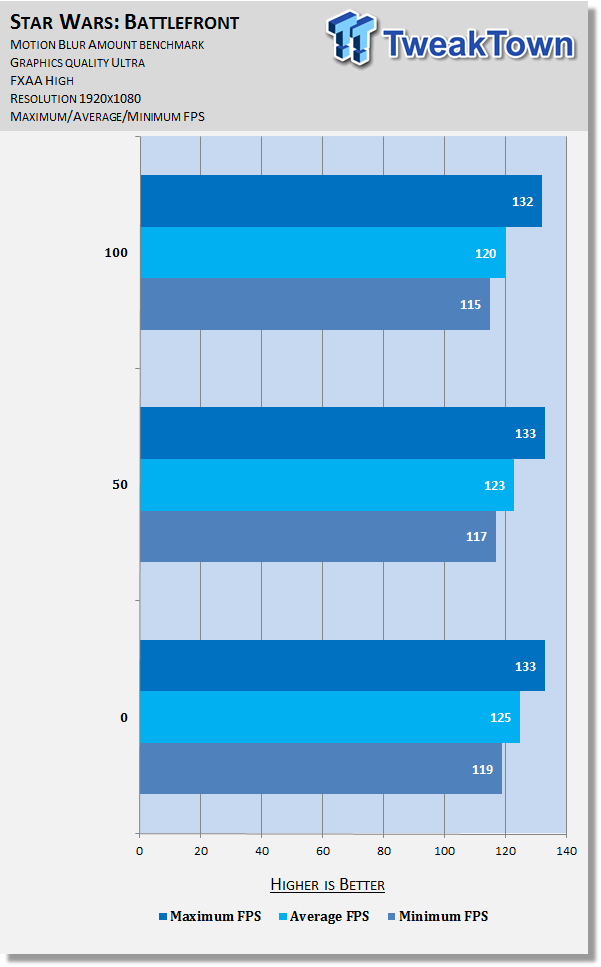
The benchmark shows a consistent, small increase to average and minimum FPS when decreasing this setting, with no change to maximum FPS. It's not really noticeable in typical gameplay, and many prefer to have it off, so most should set this to 0 for a small boost to performance.
Resolution Scale, Graphics Quality, Texture Quality, & Texture Filtering
Resolution Scale
This setting allows you to render the game at a higher resolution than you monitor natively supports, then downsample it to your native resolution through a process referred to as supersampling, thereby producing a sharper quality image. Alternately, you can downsample to a lower resolution, then upsample it for improved performance at the cost of image quality.
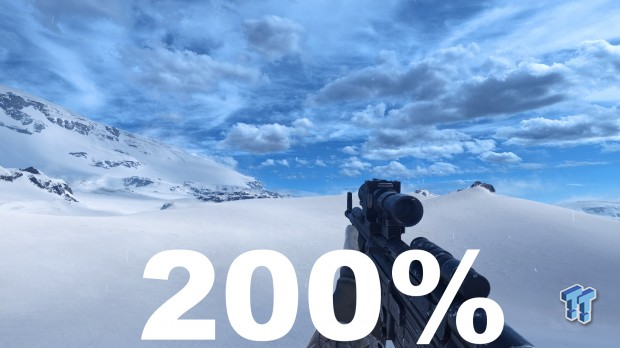
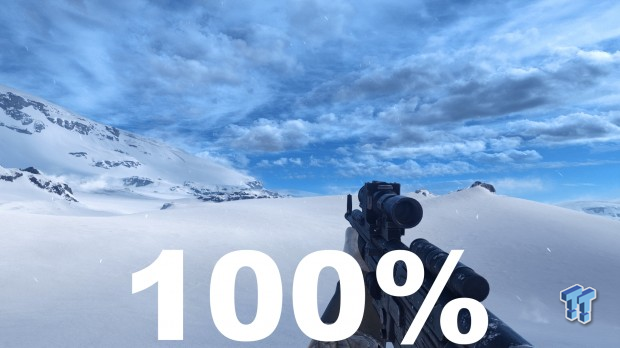
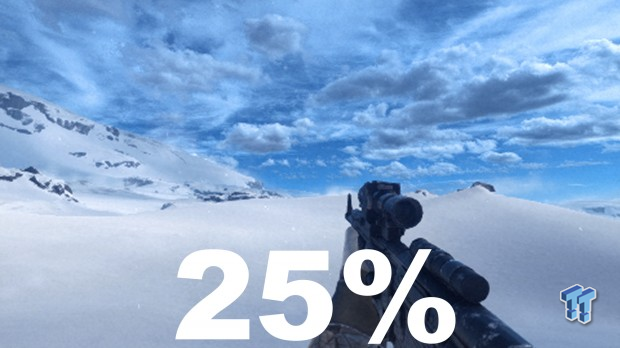
As you can see here, the 25% setting effectively takes the game back to the 90s; 100% gives you what you're used to, and 200% offers a moderately sharper image: note the rock textures in the distance, and the gun model.
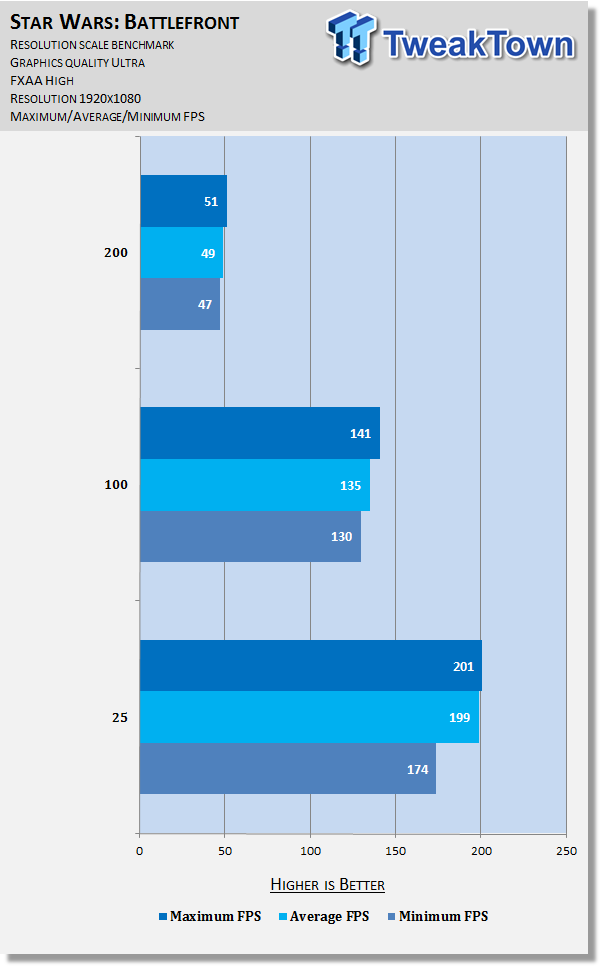
While the quality difference is definitely appreciable, it, unfortunately, comes at the biggest performance cost of all settings by far. When going from 100% to 200%, framerate is cut by approximately 90 FPS across the board. Conversely, going from 100% to 25% increases it by approximately 60 FPS. If you have a multi-GPU setup, and your performance is already great, this is one to look at to get some extra mileage out of your hardware, but otherwise, keep it at 100%, or even decrease it some if you still need a boost after trying all other settings.
Graphics Quality
The presets allow for easy changes in visual fidelity in performance by affecting all graphics settings. They are imprecise and don't cater to individual preferences, however, so it's very unlikely you'll see the optimal result by playing with these. In any case, it's interesting to observe what happens when you change multiple settings at once.
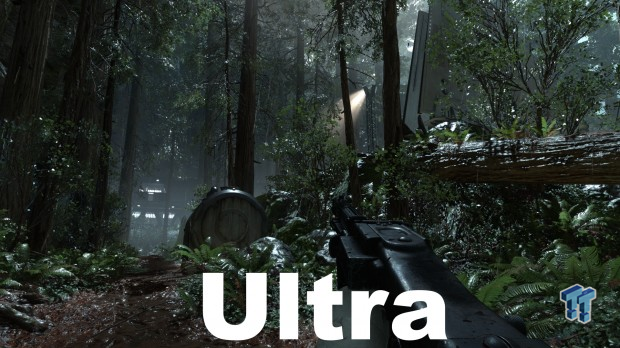
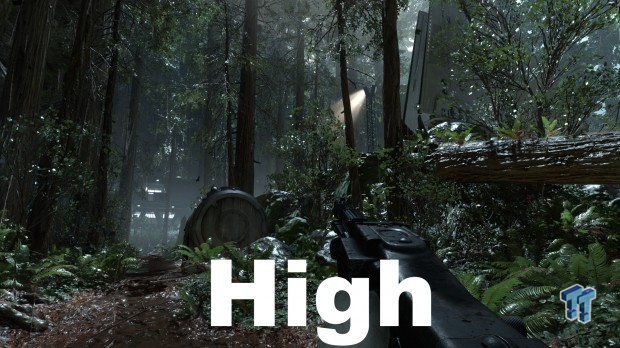
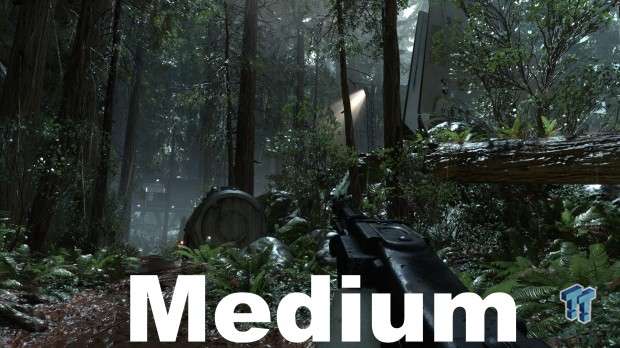
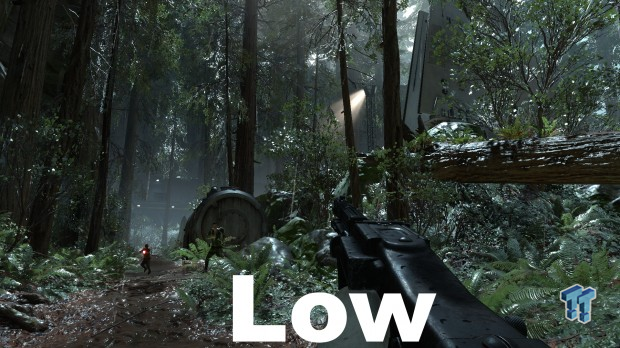
Battlefront's lack of great scaling is evident here: the screenshots show a major difference in vegetation and shadow quality when moving from Low to Medium, improved use of Ambient Occlusion when moving from High to Ultra, and...that's about it. These results are pretty consistent across different maps.
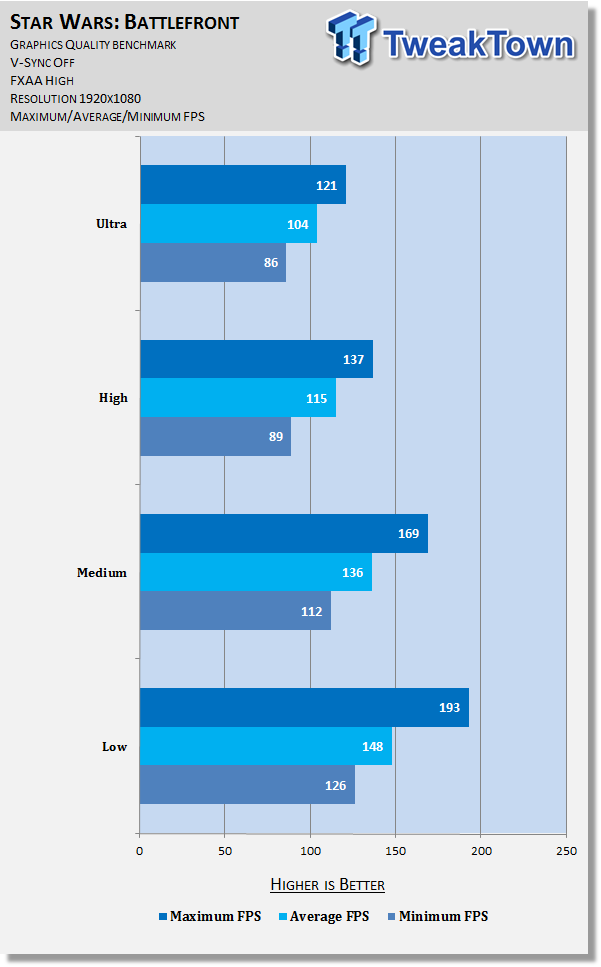
Testing tells us that although there's not much visual scaling going on overall, there's plenty of performance scaling. A major FPS increase is observed at all levels for all settings, with the sole exception of minimum FPS when moving from Ultra to High. If you're really lazy and just want a quick, massive performance boost, use the Medium preset, or if you're truly hurting for it, Low. Otherwise, I recommend reading through the rest of the guide to find the most optimal balance.
Texture Quality
This is normally one of the settings that affect graphics and performance in the most obvious way, but in Battlefront there it only shows itself with very select textures, and even then the difference is minor.
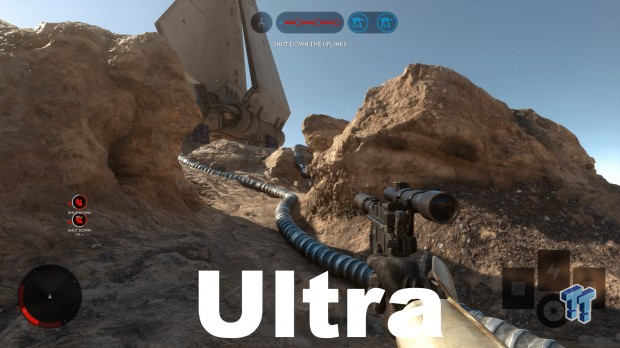
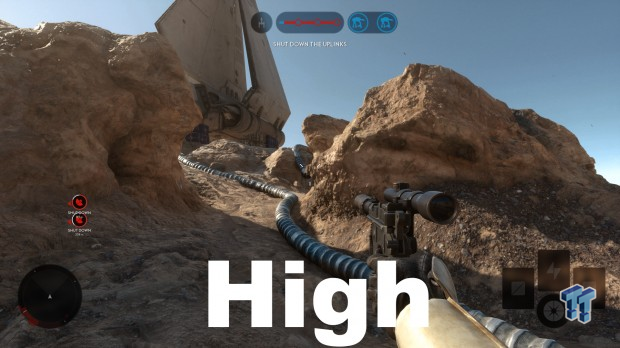
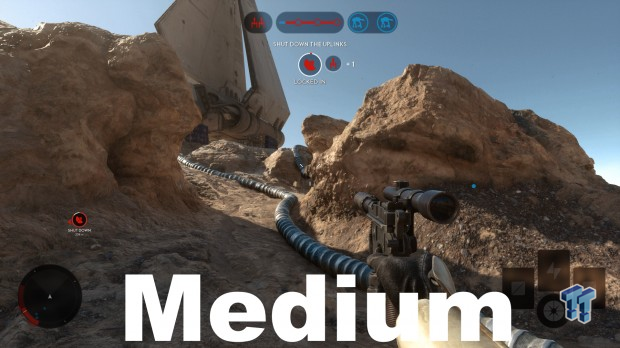
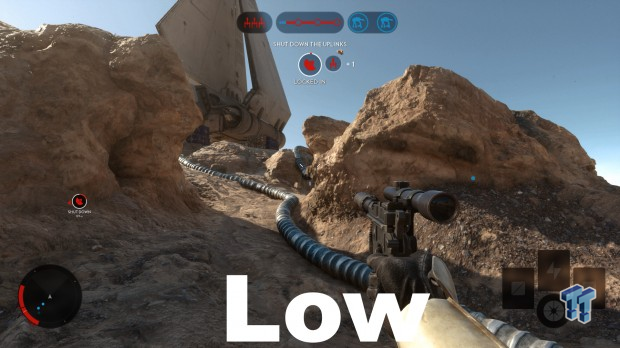
Curiously, it doesn't seem to actually affect the quality of textures themselves either, but rather the shadows on them. Note especially the gun and hand model in the images below, as well as the vehicle in the top part of the image. These kinds of very subtle differences you'd struggle to appreciate in-game.
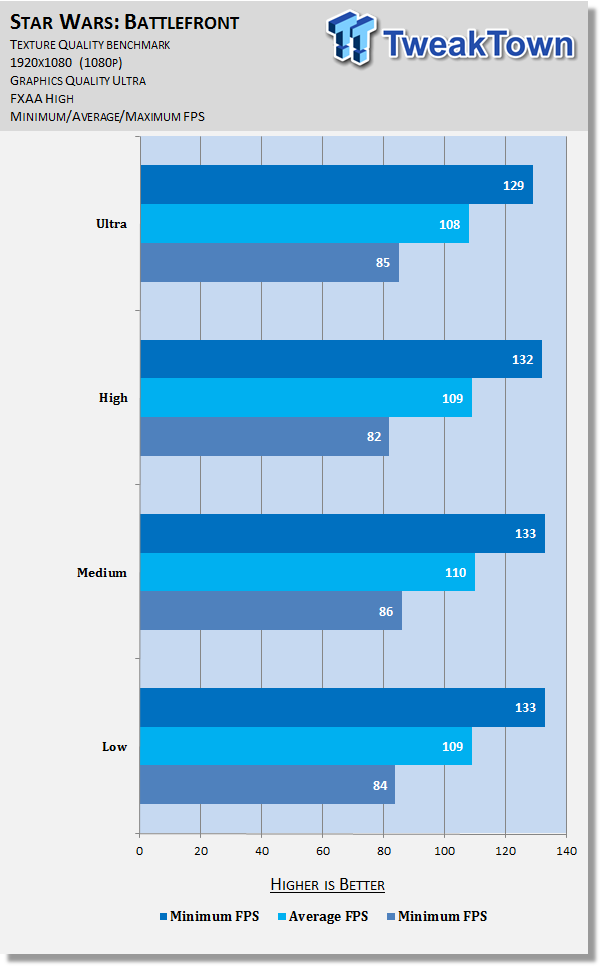
Even across multiple tests, results show no definitive decrease seen from tweaking this setting. Given that and the slight increase in visual fidelity, most should keep it at the maximum.
Texture Filtering
This setting alters the sharpness of textures, namely when they are viewed at a distance or an angle.
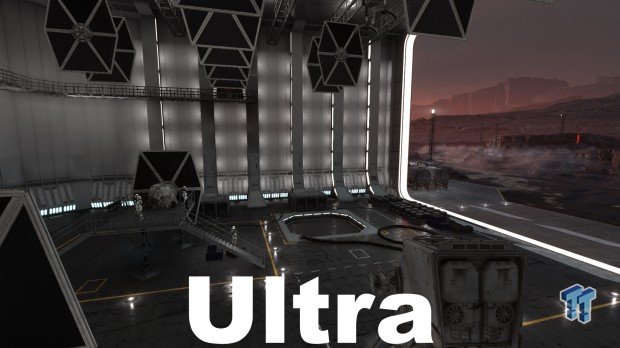
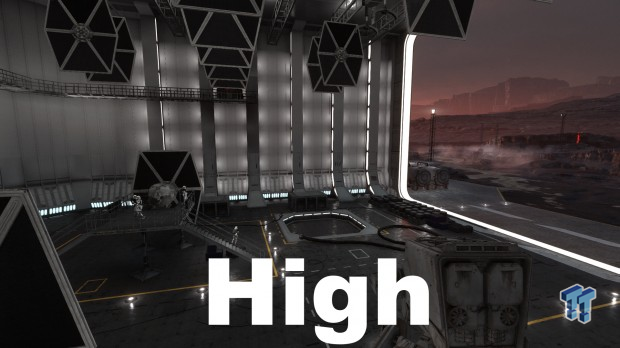
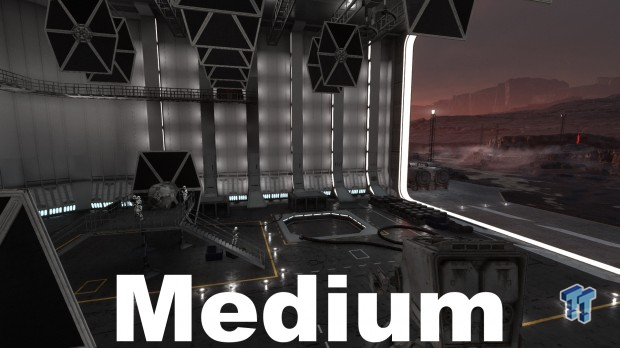
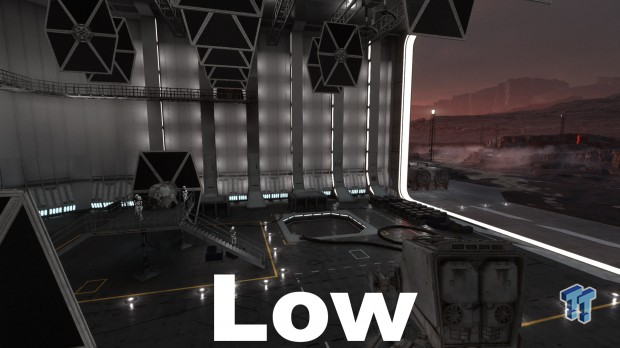
Looking closely at the screenshots above, you can best observe the difference Texture Filtering makes on the yellow and white lines on the ground, both those close to the player and those at a distance: there is a steady increase in thickness and detail for each, and they are rendered more sharply.
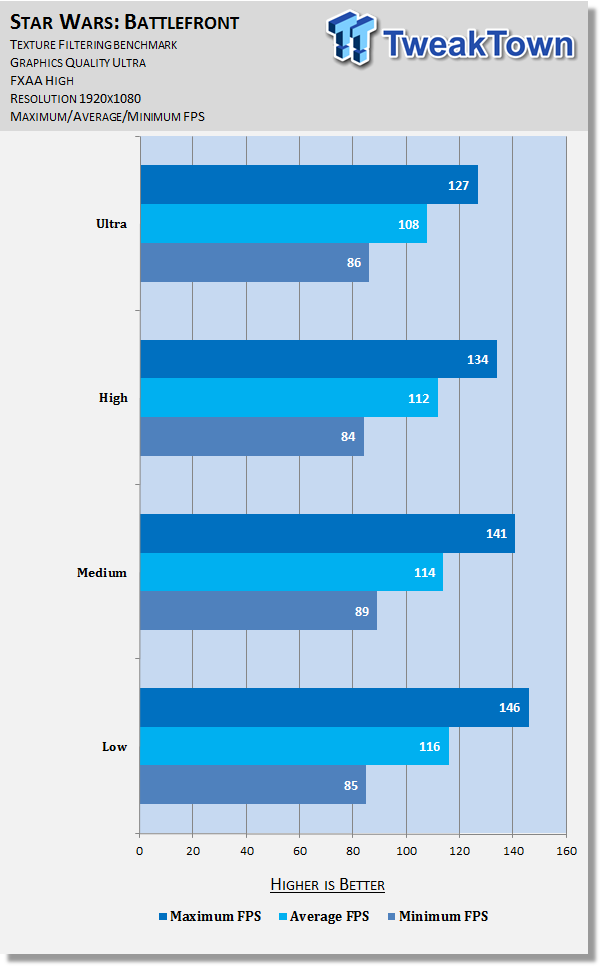
The benchmark shows Filtering has a moderate impact on minimum and average FPS across all settings; the effect on maximum FPS is inconsistent, even across multiple tests. You're likely to notice Texture Filtering little in-game, so feel free to lower it to suit your performance needs, as it does offer a decent boost. Medium is a happy compromise, though if you're feeling bold, you could even go Low.
Lighting Quality, Shadow Quality, Effects Quality, & Post Process Quality
Lighting Quality
Affects the quality of lighting, including "dynamic environment maps" and subsurface scattering (light penetration of translucent objects).
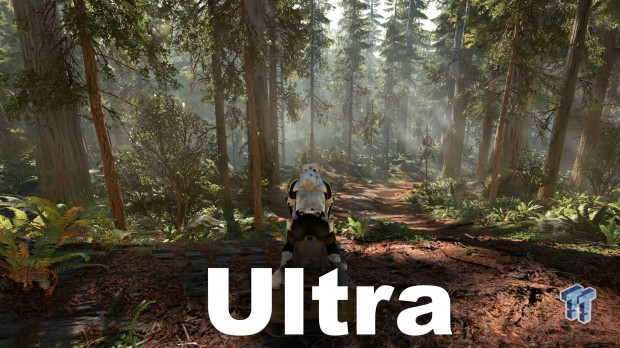
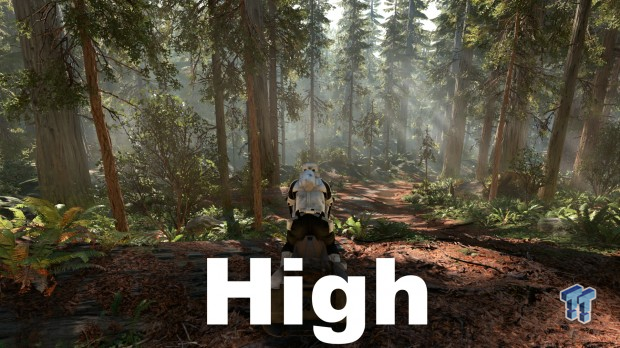
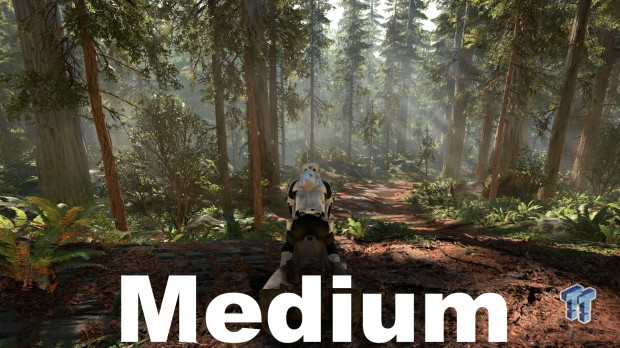
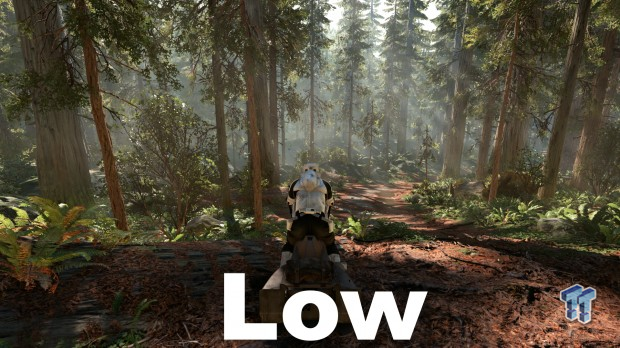
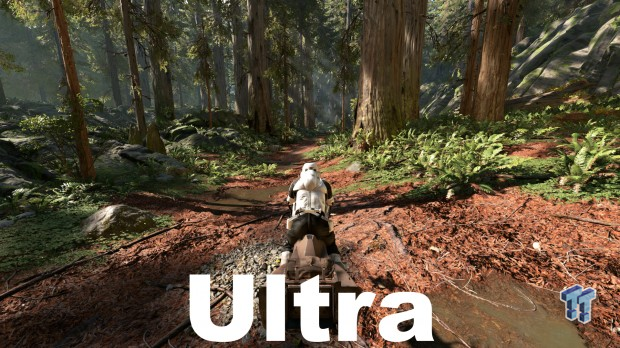
In practice, it's difficult to describe any setting as strictly worse or better, except Low, which suffers from sparse light shafts and a lack of coverage on foliage and ground surfaces. Even then, it's fairly subtle.
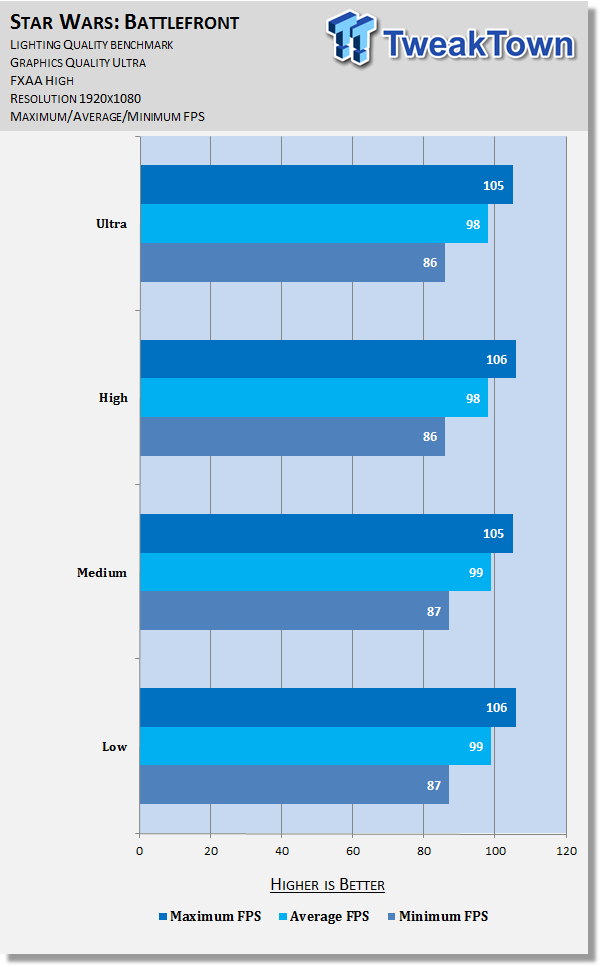
Testing reveals the slightest possible impact on average and minimum FPS and no definitive impact on minimum FPS. Keep this setting at Ultra.
Shadow Quality
This setting affects the quality, distance, and resolution of shadows.
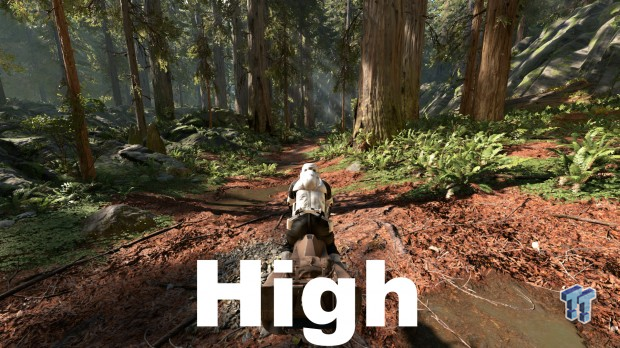
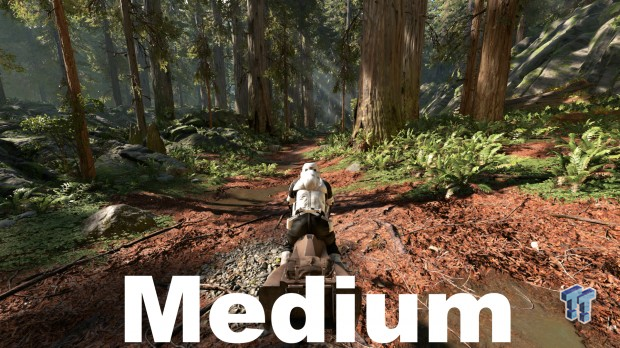
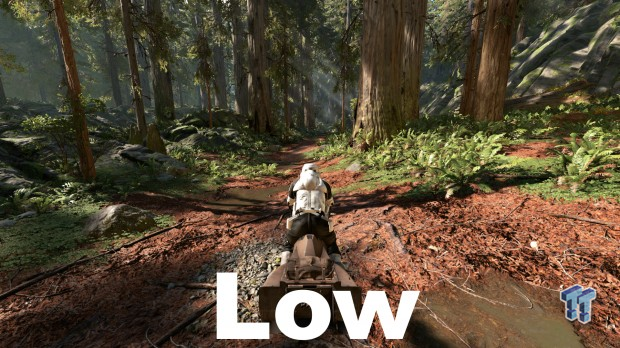
In practice, you can observe progressively more detail and depth of shadows at all distances as you increase this setting. This is mostly easily seen on foliage and the shadows cast by the trees nearest to the player in the screenshots above. The effect is subtle but definitely present.
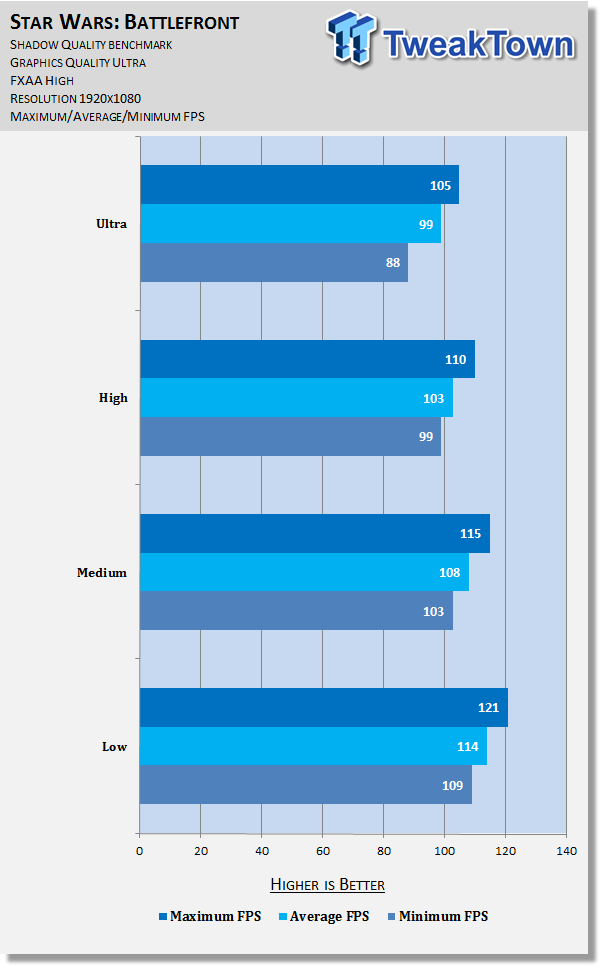
Benchmarking tells us Shadow Quality has a consistent and significant impact on performance across all settings at all levels. Given the overall subtle visual changes seen with this setting, it's a great choice for tweaking. Low does hurt visuals quite a bit, but Medium and High offer a good balance between visuals and performance, so if you need some extra frames, try both and find what suits you best.
Effects Quality
This setting is said to alter the quality, resolution, and maximum number of effects. I could find no examples of the effect of this setting in-game, so screenshots have been left out of this section.
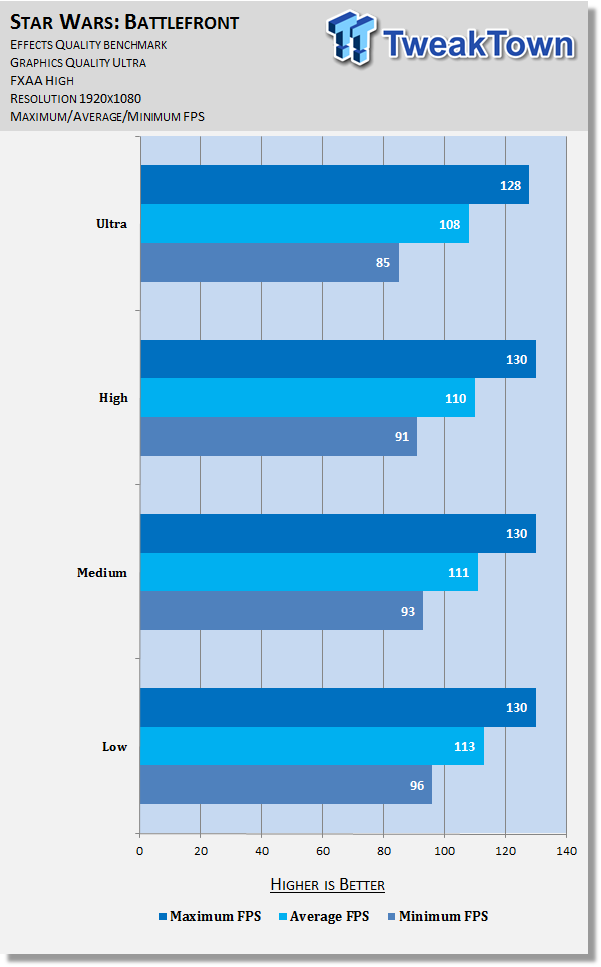
Testing shows Effects Quality has a consistently small but appreciable impact on framerate, namely average and minimum values. Given how difficult it is to notice the effect of it in-game, this is a good choice for tweaking. I recommend starting with the Low setting and increasing it only if you find yourself bothered by any lacking effects in-game.
Post Process Quality
This setting controls the quality of various post processing effects including motion blur, distortion, high-definition range (HDR), and depth of field.
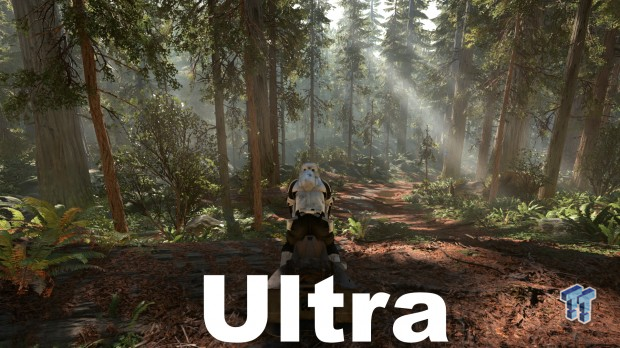
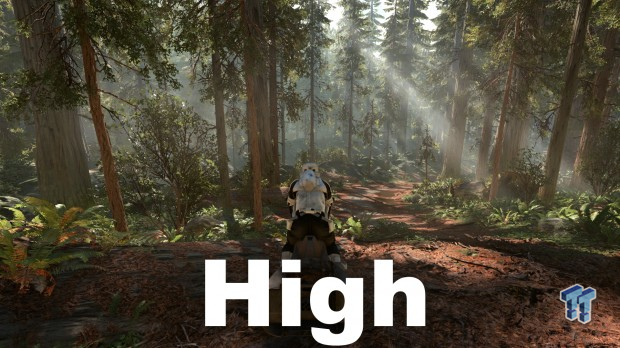
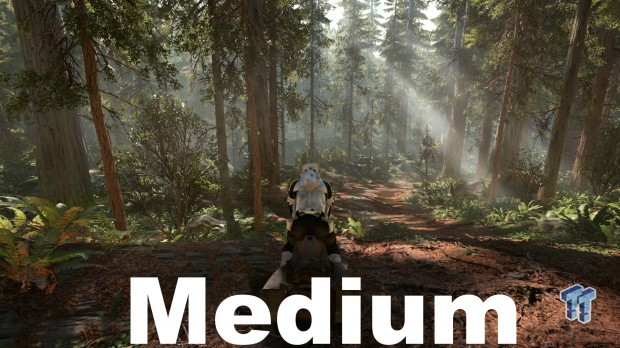
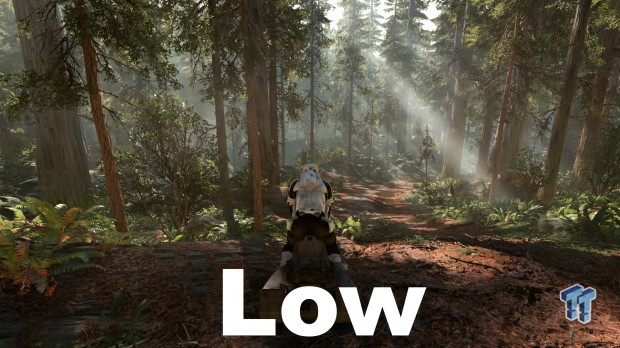
I focused on HDR when looking to contrast the different Post Process Quality settings as it's by far the most noticeable effect. It's difficult to observe the differences when moving from setting up or down to another, but if you compare Low to Ultra, it's more apparent: as HDR is known for, virtually every aspect of the scene looks richer thanks to the more realistic lighting and added detail.
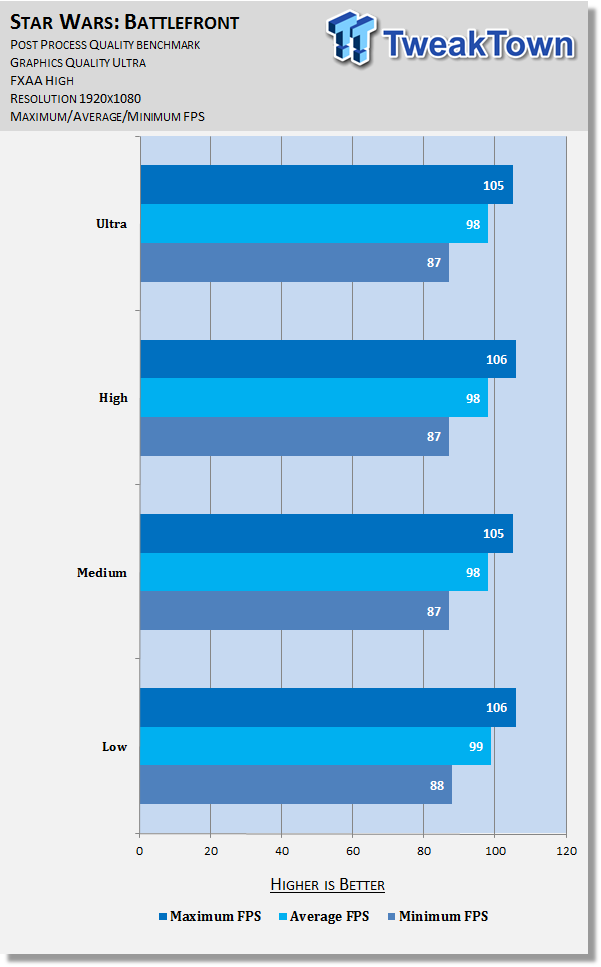
Testing shows Post Process Quality has no definitive impact on framerate. This should apply (more or less) to scenes or moments that employ the other aforementioned effects, too. As such, you're free to keep this one at Ultra and enjoy the sights better for it.
Mesh Quality, Terrain Quality, & Terrain Groundcover
Mesh Quality
Alters the quality of tessellation, reflection, simulations, and level of detail (LOD) distances for meshes (the collective components of given objects).
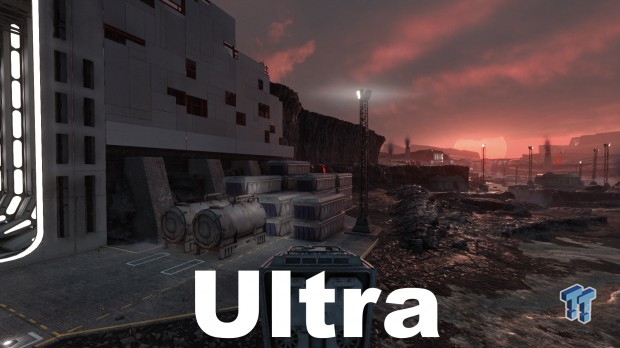
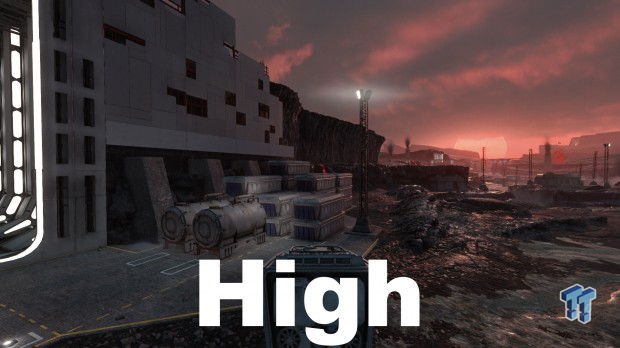
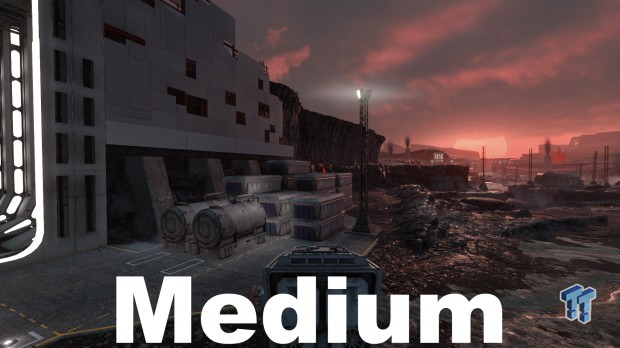
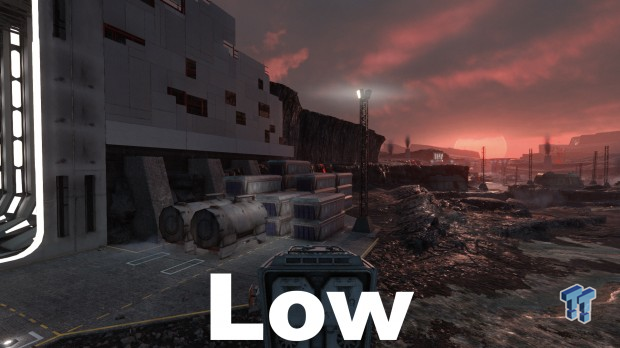
As you've seen, many of the settings in Battlefront make for very subtle changes in visuals when tweaking; Mesh Quality is one of the few settings where a marked difference is easily observed. In the screenshots here, note especially the difference in quality and detail of rocks, containers, gas tanks, and the wall. And while the difference is drastic from Low to Medium, it's still significant when moving from each other level to the next.
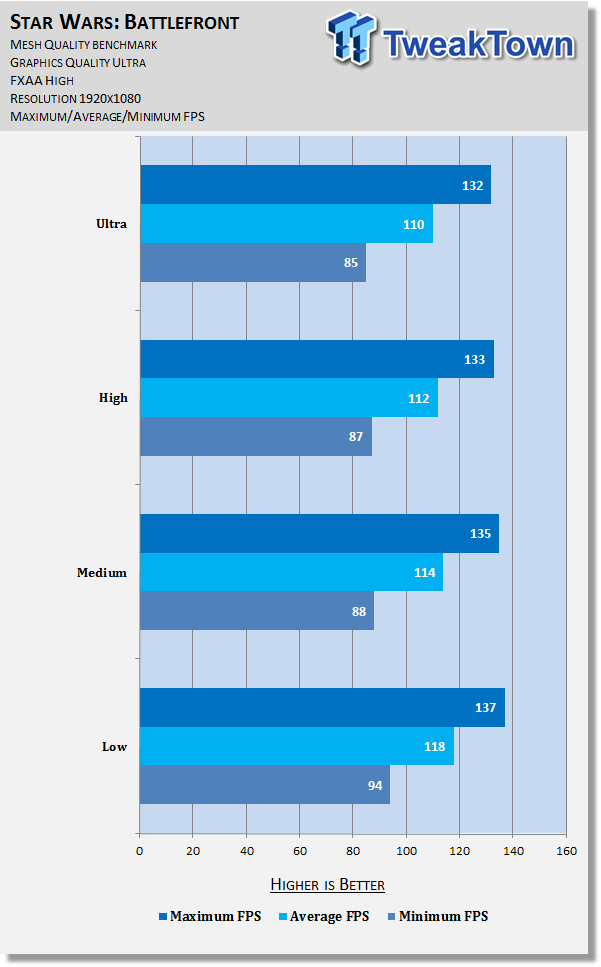
Benchmarking is line with the visual comparison, which is to say the Low setting has the biggest impact. Switching to it nets you nearly 10 FPS in some cases. However, it should be used as a last resort due to the huge drop-off in visual quality. Most everyone should keep this setting as high as possible.
Terrain Quality
Controls the mesh quality, displacement quality, and LOD distance of terrain.
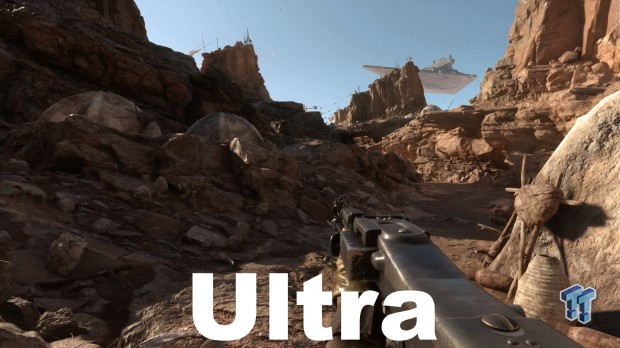
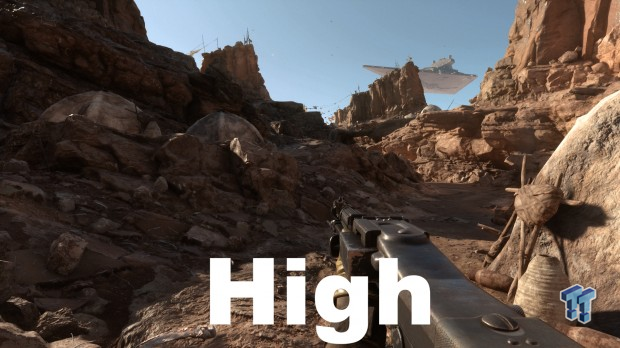
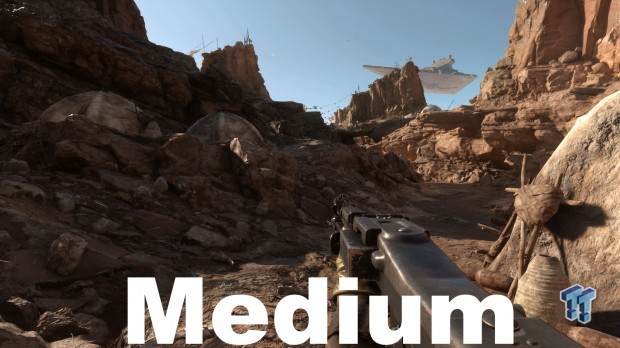
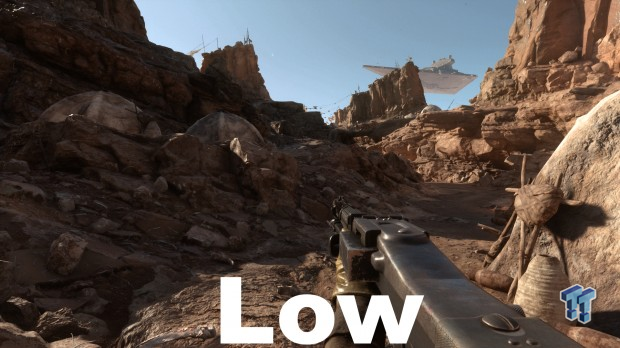
This is easily one of the least visually important settings, altering the detail of terrain across all kinds of maps in about the subtlest fashion possible. Here you can see only really the Ultra setting makes any notable difference, and even then it's not much.
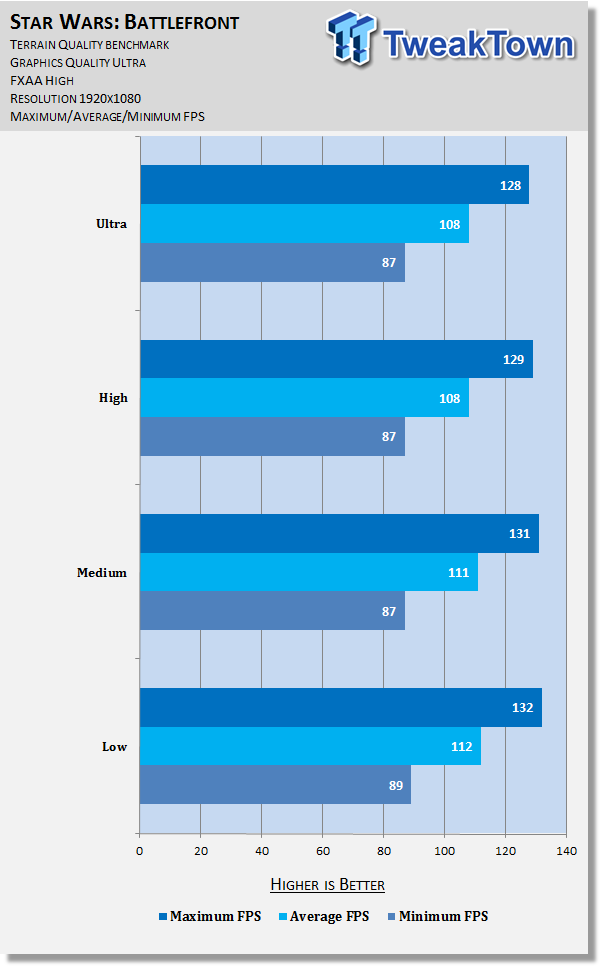
Corresponding to the minute graphics differences, there's a very slight improvement to framerate seen the more you lower this setting. If you have the frames to spare, Ultra is a welcome enhancement to visuals, but otherwise, you can safely drop to Low for a needed boost to performance.
Terrain Groundcover
Changes the quality, density, and distances of meshes covering terrain, including groundcover, undergrowth, and rocks.
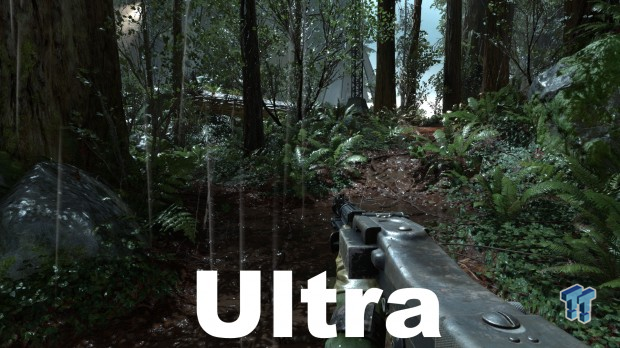
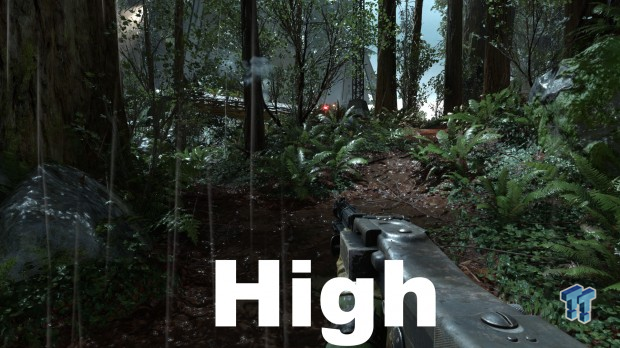
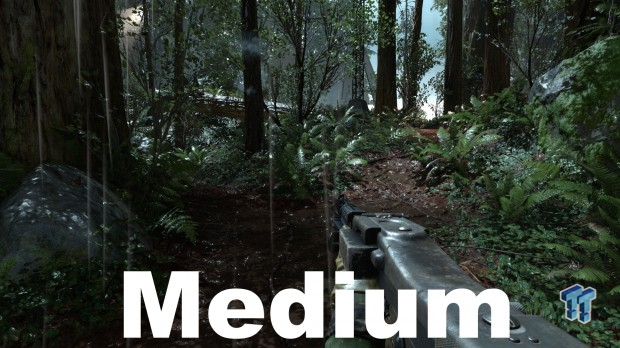
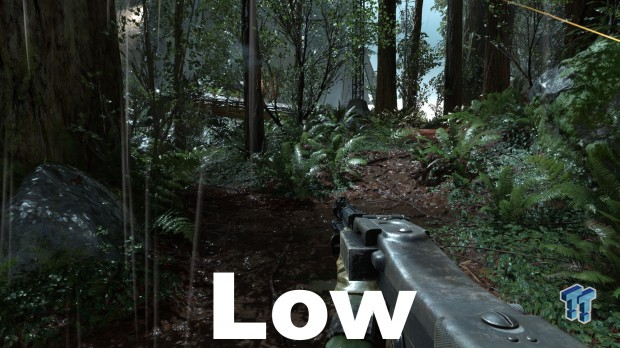
Visual contrast is only really noticeable in-game between the Low setting and any other setting. At that level, plants and trees look flat and dull, lacking shadowing and detail.
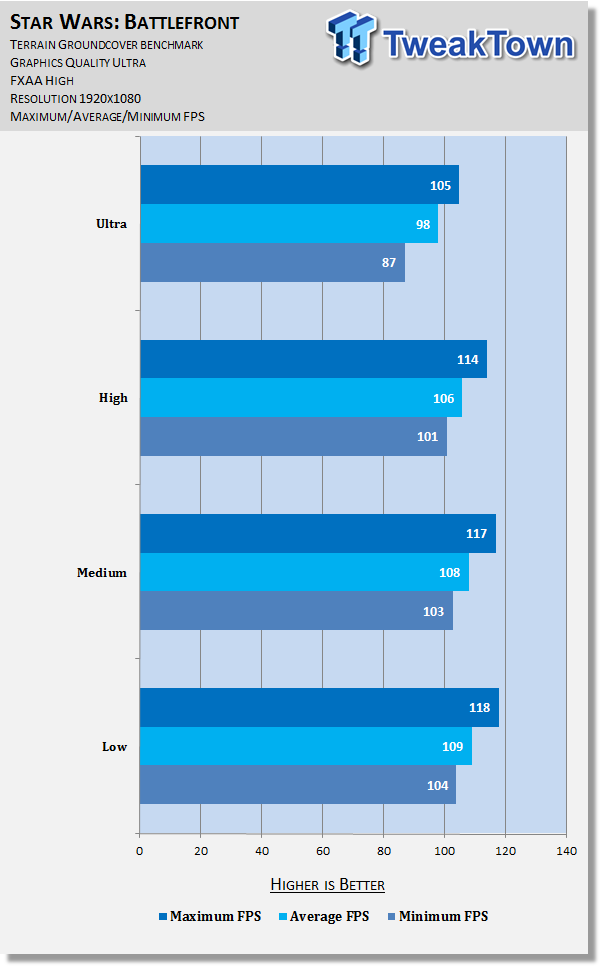
Testing doesn't correspond to our visual comparison: the Ultra setting knocks off about 10 FPS versus High, with only a 1-3 FPS difference between the remaining settings. Most use should use the Medium setting for a big boost to FPS with little or no visual impact.
Anti-aliasing, Ambient Occlusion, & Final Thoughts
Anti-aliasing
This ever important option controls the appearance of jagged edges (jaggies) seen on various surfaces throughout the game.
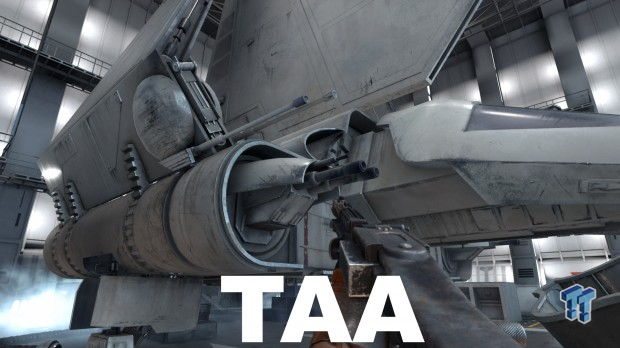
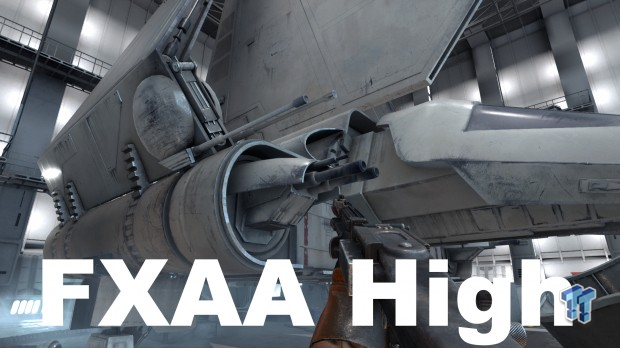
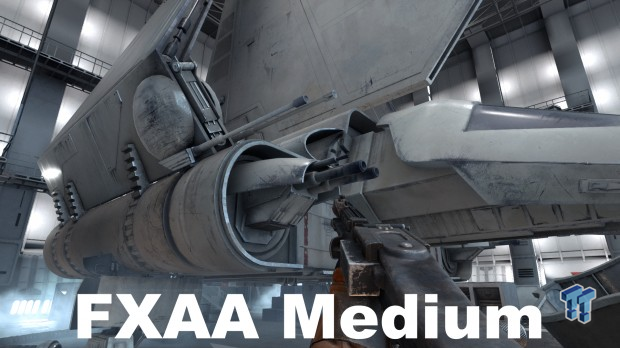
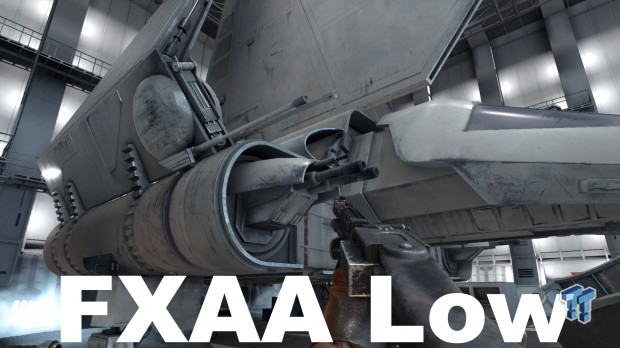
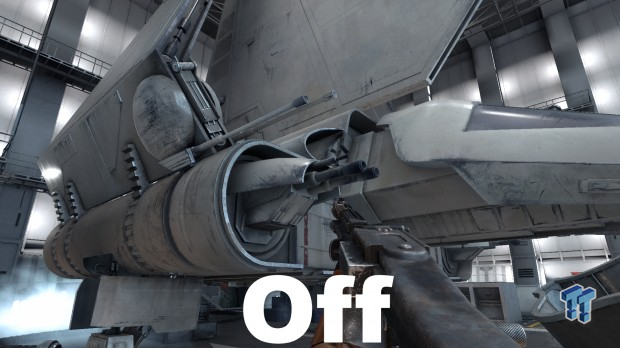
TAA offers great coverage here but massively blurs the image. Its unique advantage, as always, is it alleviates aliasing objects in motion better than other forms of AA. FXAA High and Medium are extremely similar, with Medium offering slightly more detail (mostly noticeable on the gun model); FXAA Low is close to Medium except with slightly more blur and slightly worse coverage; Off of course displays very distracting jaggies.
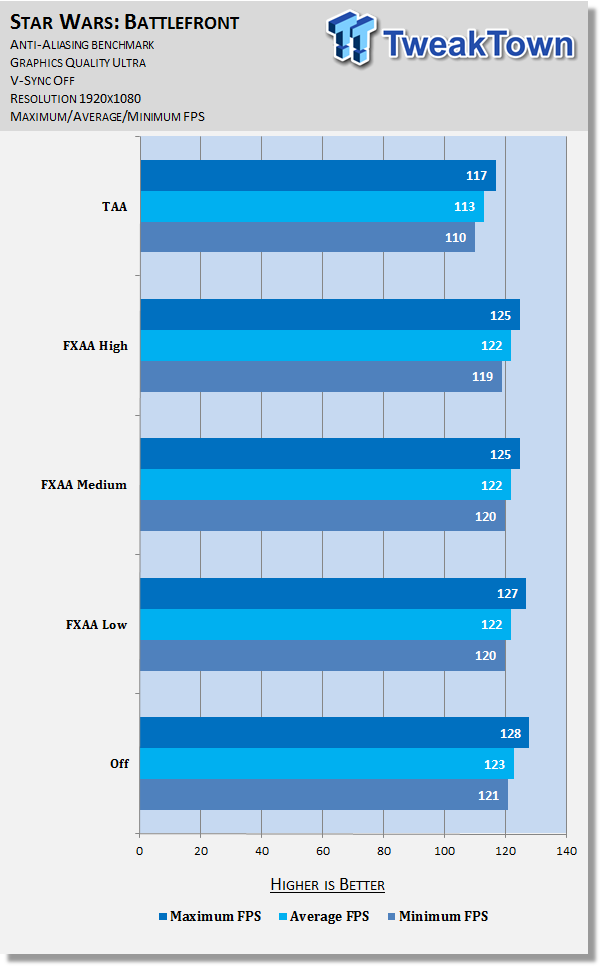
Testing reveals little performance effect from any of the settings except for TAA, which hurts FPS quite a lot. If you're truly dying for an extra couple of frames, you can disable AA, but otherwise, use FXAA High.
Ambient Occlusion
Changes the quality and method of Ambient Occlusion, which in turn determines how realistic and rich shadows are in-game.
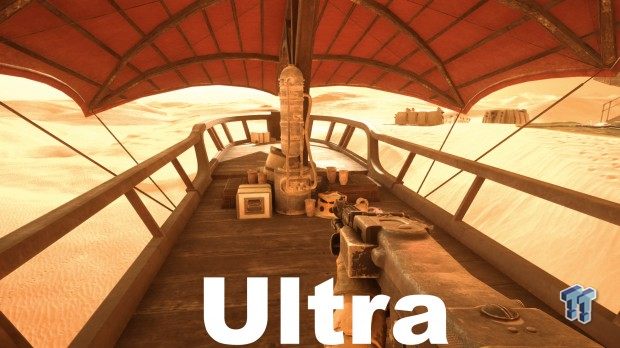
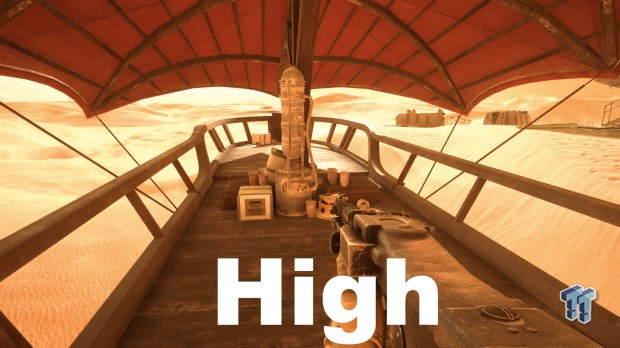
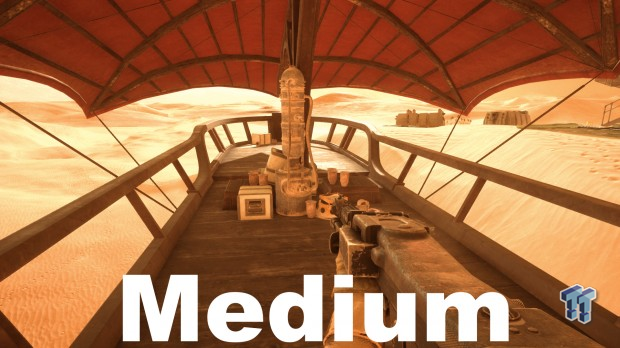
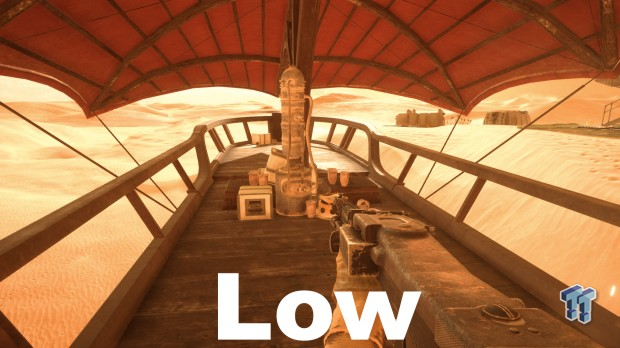
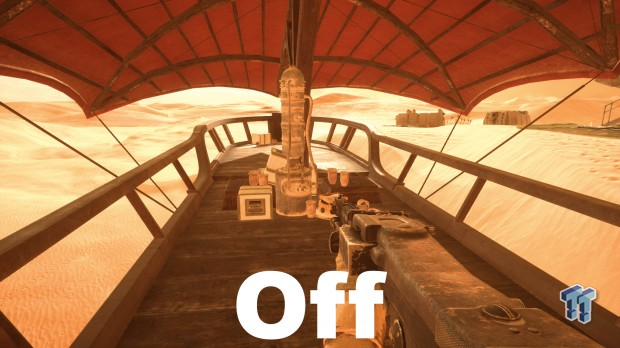
Battlefront benefits quite a bit from various AO methods, although perhaps not quite as much as you're likely used to in other games. The biggest contrast is observed when comparing Off to Low, as you might think, with moderate contrast observed between Low and Medium and Medium and High; Ultra offers a subtle extra depth.
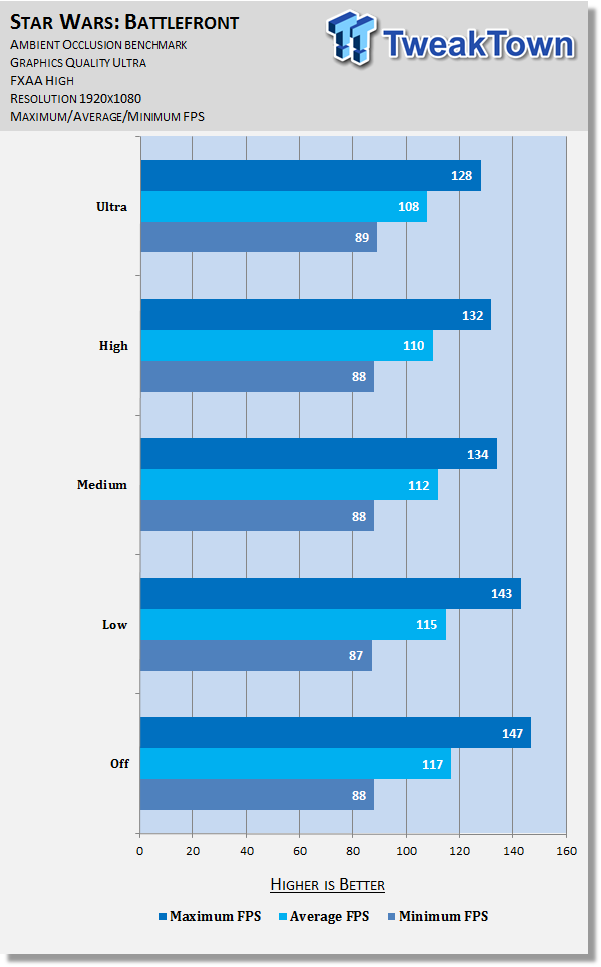
The benchmark tells us AO has an overall moderate impact on framerate as it's increased, although curiously, only to maximum and average values – no definitive change to minimum values are seen. I recommend keeping this setting at Low or higher; if you're happy with your minimum framerate, feel free to max it out.
Final Thoughts
Star Wars: Battlefront doesn't have many settings that scale well visually or performance-wise, but there are a few big ticket items that do, and then a lot of little ones. The main ones to focus on are Shadow Quality, Terrain Groundcover, and Anti-Aliasing. If after tweaking those you're still not satisfied with the performance, be sure to look through this tweak guide for numerous opportunities for small boosts that add up.
Happy tweaking!


 United
States: Find other tech and computer products like this
over at
  United
Kingdom: Find other tech and computer products like this
over at
  Australia:
Find other tech and computer products like this over at
  Canada:
Find other tech and computer products like this over at
  Deutschland:
Finde andere Technik- und Computerprodukte wie dieses auf