


Our Verdict
Introduction, Specifications, and Pricing

Gamerstorm, may not be a brand you are intimately familiar with, and this is for a good reason. For a long while, Gamerstorm was a series under the Deepcool name, which denoted their gamer-focused products. Now, Deepcool has split off Gamerstorm as a division or brand within the Deepcool umbrella, it seems. Gamerstorm now has its dot com, which is a sign they are separating the Deepcool branding from the gamer brand in ways to ensure they have a more gamer-centric focus.
The Macube series of chassis tend to be targeted at more mainstream designs with lower cost, with expansive feature sets being the ultimate target for the series. We have seen several try this approach, and there are always concessions to be made, and this is why I am assessing this specific chassis, we will judge whether the features and capabilities will merit the Macube 310P a recommendation.
Key features pulled from the Amazon listing for the Macube 310P is as follows:
- Tinted, tempered glass panel, tasteful and sturdy.
- The front intake channels remain concealed while providing more-than-sufficient ventilation.
- The exhaust is maxed out at the mesh top panel, no heat loitering in the case.
- Magnetic side panels, easy to maintain, or upgrade hardware. Child safety lock on both magnetic panels, protecting your loved ones.
- An abundance of accessories are installed on the motherboard tray to keep everything neat and safe.
This for a chassis in the $80 price level can be good, but note I say "can" as there's lots of apprehension with marketing claims, which is why we do this to explain what is good. I think its time we dig into the specs and see what the Macube 310P offers for your buck.
Best Deals: Gamerstorm Macube 310P Mid-Tower Chassis
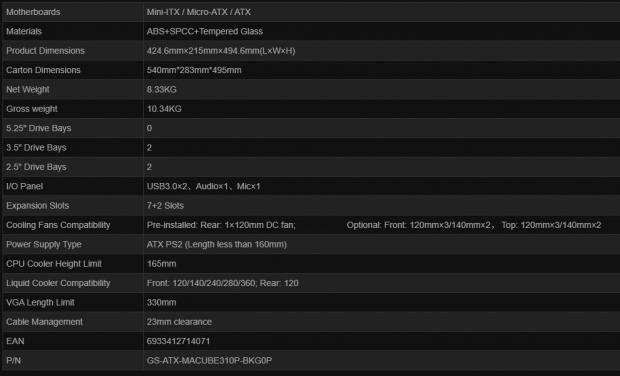
Name of chassis, MPN if necessary, measurements
The Chassis is the Macube 310P, and the part number is GS-ATX-MACUBE310P-BKG0P, and I do believe the white version is similar, but the suffix changes from BK to WH. We must assume this as the Gamerstorm and Deepcool website went down during the writing and discovery portion of this review, so we have to extrapolate data where we can. The Macube 310P measures in at 494.6mm in height, with 424.6mm in depth and 215mm in width. There is also a less performance-centric version called the Macube 310, so we assume the P stands for performance.
Motherboard fitment is from ITX to ATX. 3.5" and 2.5" storage mounting is up to two each, and there does not appear to be other places to mount more trays, so I would assume that's a hard limit. The PSU fitment is a standard ATX style at less than 160mm, which means you will need a smaller supply to fit here. The PSU does have a full-length shroud to hide cabling and the HDD cage, which we will take a look at later in the review.
Our Latest Mid-Tower Cases Review Coverage
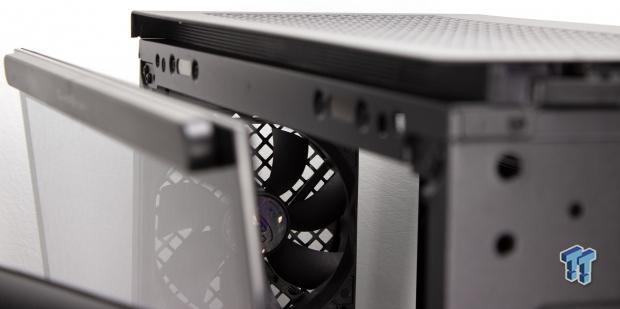
Cooling fitment for the 310P up to triple 120mm up front or dual 140mm. The same fitment up top with a single 120mm rear mount. The rear mount comes with a standard 120mm DC controlled fan in place, and it has a 3-pin DC connector with a pigtail to a 4-pin PATA (Molex) connector so that you can plug directly into the PSU should you want it 100% all the time. Radiator fitment is 120mm based up front up to 360mm, or 140mm based up to 280mm, while the rear mount is a single 120mm. The top mounting is not listed as liquid cooling capable, but the room up top seems to accommodate it so that we will give that a shot. If you opt for an air cooler, your clearance is up to 165mm high, which covers a large variety of high-end air coolers.
The Macube 310P is available on the market at the time of writing for $79.99, and this places the Macube in a very competitive space. Potential contenders would be the Eclipse P400 from Phanteks, The Meshify C from Fractal Design, and the SPEC-Delta RGB from Corsair. These are all either at the same price level precisely or within $5 - $7 form the Macube 310P. So let's dig in and see if the Macube 310P can pass muster among this competitive crowd.
Shannon's Chassis Test System Specifications
- Motherboard: ASUS ROG Maximus XI Hero (Wi-Fi) Z390 (buy from Amazon)
- CPU: Intel Core i7 8700K (buy from Amazon)
- Cooler: Corsair Hydro Series H60 (buy from Amazon)
- Memory: Corsair Vengeance Pro RGB CMW32GX4M4C3000C15 (buy from Amazon)
- Video Card: MSI GeForce RTX 2060 Gaming Z (buy from Amazon)
- Storage: Sandisk M.2 256GB
- Power Supply: SilverStone Strider Platinum 1000W (buy from Amazon)
- OS: Microsoft Windows 10 Home 64-bit (buy from Amazon)
Packaging
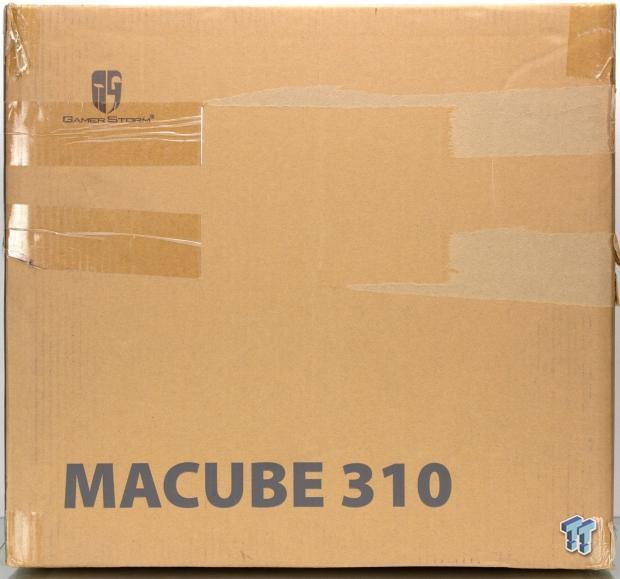
The front of the packaging is relatively straight forward with the Gamerstorm logo at the top left, and the bottom flanked by the Macube 310 name. Besides the excessive tape from shipping, there is nothing else to see here.
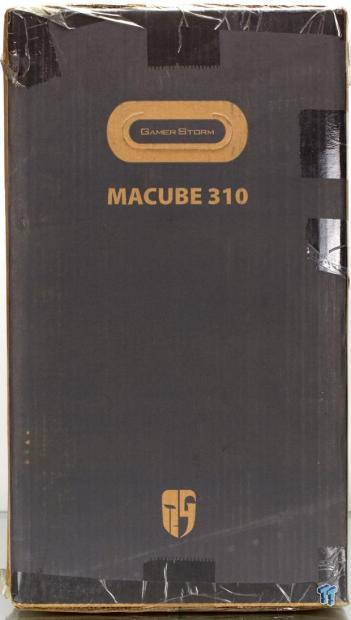
Spinning the package ninety degrees shows us the first thin side of the packaging, and it's rather clean as well, although being primarily printed solid black. The negative space is how we get the Gamerstorm name, logo, and Macube naming on the package as you can see a lot more packing tape as well again.
The large opposing side of the box is where we peer next, and there's a bit more stylization going on here. The elongated oval design mimics the handle used for opening the tempered glass main panel on the Macube 310P. The Macube name adorns the lower of the box on this side.
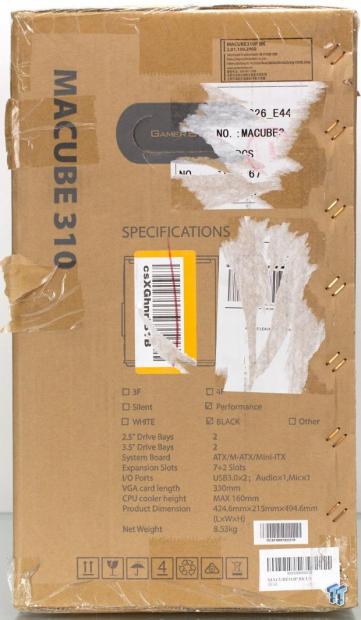
Spin the package the final ninety degrees, and we are greeted with labels. Yay, so sorry for this one, most of the time they can be removed cleanly, but there was no luck here, so we will make the best of what we can here. This end of the package houses most of the data for the entire package, which is a spec sheet along with a basic line drawing of the chassis. We also see the inventory control labels here and some compliance and safety icons along the bottom edge.
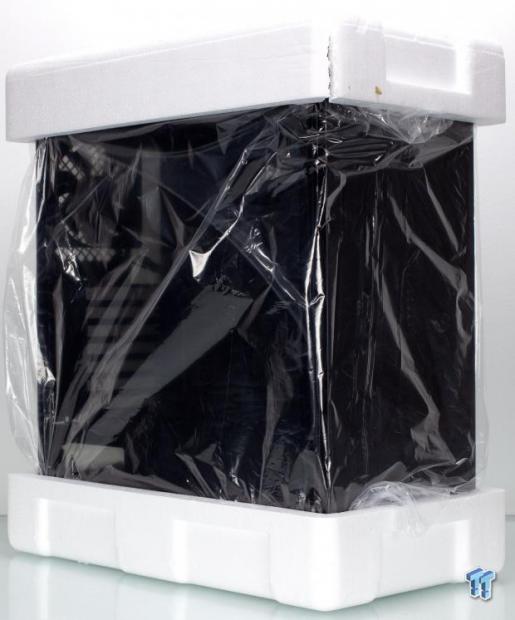
Pulling the Macube 310P form the packaging, and we see that the chassis comes wrapped in a plastic bag to protect against abrasion damage when shipping. The outer edge shells encapsulate the chassis in hard Styrofoam end caps, which help to absorb shock. However, here is something I have noted in several reviews, and now I can show it clearly. Here we see that the top end cap is cracked severely, and this is why I like the squishy foam used on chassis as it absorbs shock without fracturing in such a way that it loses its structural integrity or capability to protect the product.
Gamerstorm Macube 310P Mid-Tower Chassis
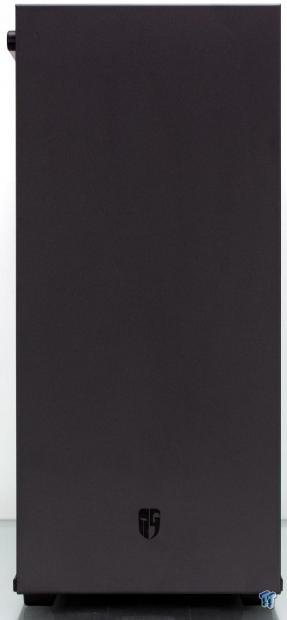
Here we have unwrapped the Macube 310P and take a look at the front. The front panel is a metal plate and painted with a textured black, and a glossy dark black Gamerstorm logo adorns the lower middle of the front panel. If you take a look at the top left, you can see the handle I mentioned earlier, which is used to open the main glass panel.
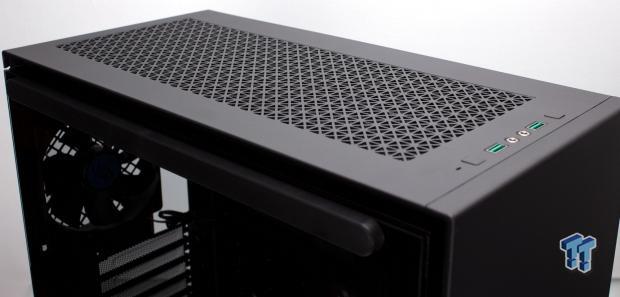
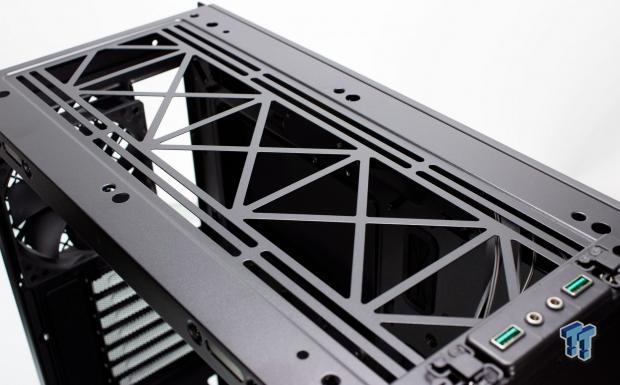
The top is a metal panel once again, but this time its textured paint surface is broken up by a triangular mesh array, which allows for the top to flow air with fans placed up top. The I/O is also found up here and what we will look at now.
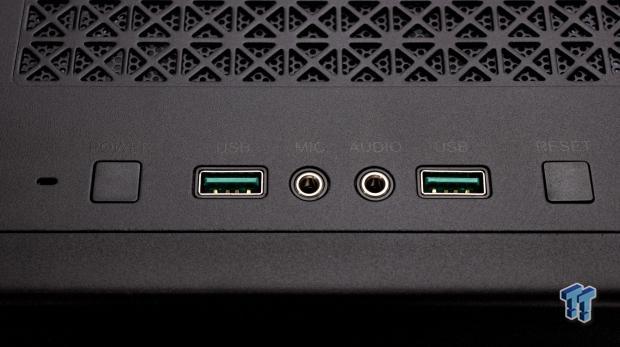
Here we take a peek at the I/O and it is outfitted as follows:
- Power LED
- Power button
- 2x USB 3.2 Gen 1 Type-A ports
- Microphone and Headphone 3.5mm jacks
- Reset switch
This is a usable I/O, but I must say that this price point is starting to see the adoption of more stout I/O options, so Deepcool/Gamerstorm is going to have to start upping the game here if they want to stay competitive.
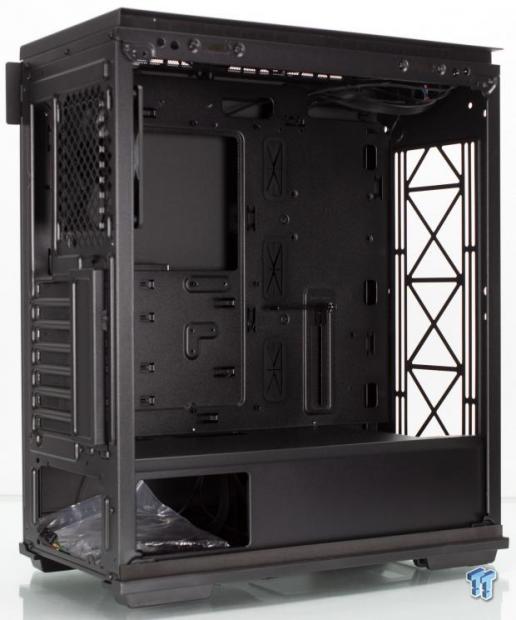
Now we peer into the main panel side, which we see a lightly tinted main glass panel. Across the top, we see the elongated oval handle we had mentioned previously. Around the front and top, we see a mesh opening, which is how the chassis breathes through the front, so any fans or radiators placed up there may struggle a bit depending on the CFM of your airflow installation. The main glass panel does have a blacked-out border which hides the underlying chassis, and this is good as that's typically not something you want to look at.
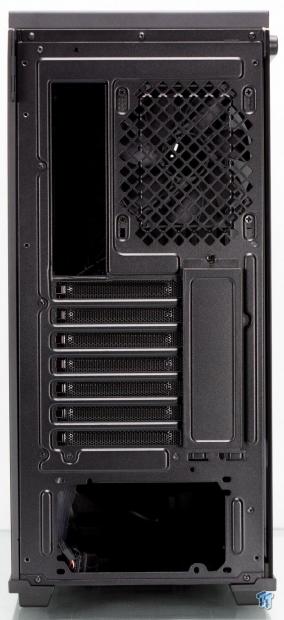
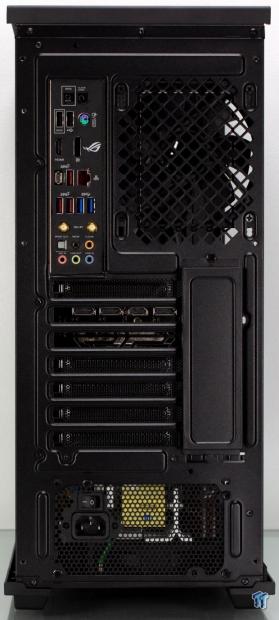
The rear I/O is standard, the expansion slots are externally accessible, and the cover seen here is retained with a single Philips head fastener. The 120mm fan mount has a notched mounting for five levels of adjustment for the fan mount. The area above the I/O shield cutout is decently sizable for a chassis at this price point, and something even more expensive cases sometimes misses. Also, note the gap between the I/O shield and the cable management panel, which signifies it has usable room for cable management.
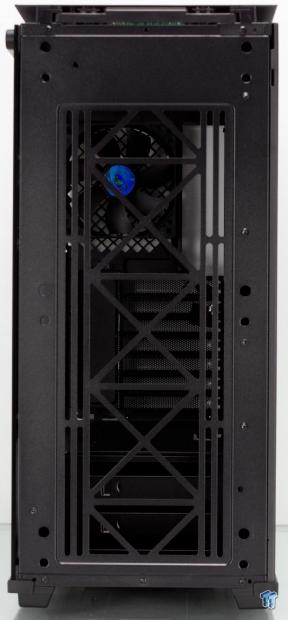
The cable management panel is solid steel, and no, therefore, no worries here of having your cable management judged due to a glass panel here. However, at the top rear side, you will notice the tab labeled "open," which signifies that these two panels are magnetically retained and can be removed by pulling the panel. Gamerstorm does include brackets to lock the panels so that they cannot be removed without pulling a screw, but overall the chassis can be toolless opening. Note the same ventilation for the front panel along with the extra side ventilation at the top. This is how the Macube 310 non-P version breathes.
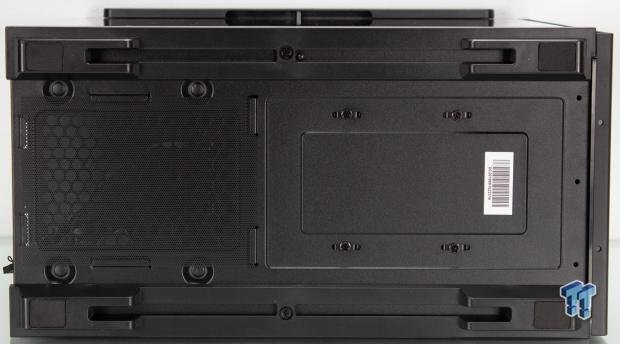
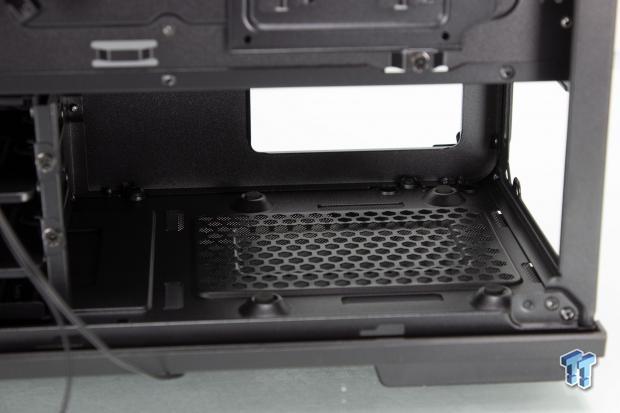
The bottom of the Macube 310P is standard for a chassis at this price point. The PSU fan filter is nothing special and requires accessing the bottom of the chassis just to remove it since it's a cheaper thin sheet option which is retained by tabs on all four corners. The HDD cage internally has four screws here, which appears to offer a small amount of adjustment to the cage position. The four corner feet are part of larger plastic fixtures that jut out from the bottom as they approach the corners with small square rubberized foam pads on each to help avoid the chassis sliding or skidding on a desk surface.
Inside the Macube 310P
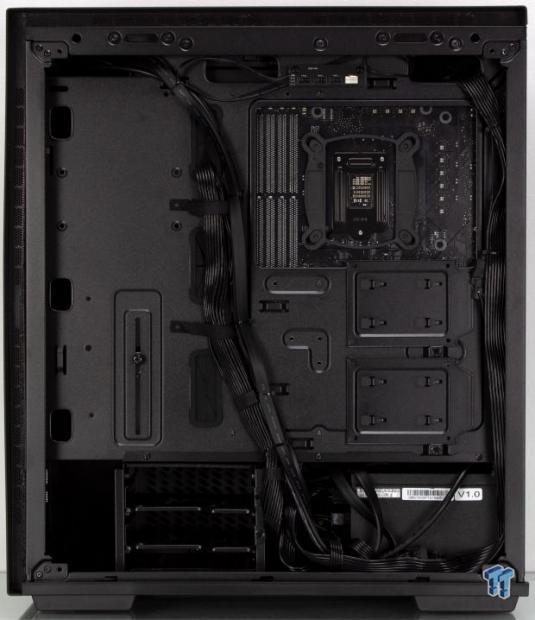
Three plastic friction fit pegs retain the front panel. They are quite challenging to remove, to the point that I was concerned I was going to permanently bend the front metal panel pulling it off, but they did give with enough firm pulls. Once removed, we are exposed to slotted mounting for fans or radiators. This metal is quite thin and can flex with the press of a finger, and this is common for cheaper cases and is apparent here.
The side glass panel mounting is what we see here. The dual recessed ovals are the locations of the magnets which retain the panel, and it pivots in a groove at the bottom of the chassis. The top ensures proper position when mounting with two pegs that jut out from the metal strip and work as dowels to align with two round openings in the chassis.
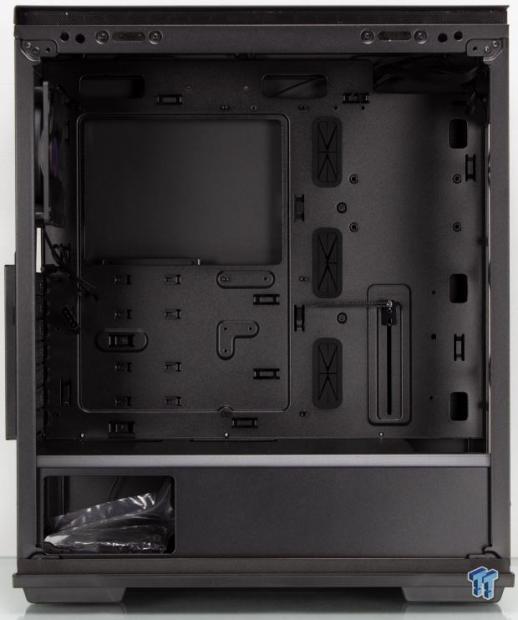
The main chamber of the Macube 310/310P is an open expanse with a large portion up toward the front panel, mostly unused. Gamerstorm opted for this area to hold a sliding metal GPU support bracket, which can be adjusted to match your GPU unless yours is too short, as we found with our RTX 2060 test GPU. The CPU cutout is generous and should support any CPU cooler backplate. There are several cable passthrough which is welcome and several with grommets, but the passthrough is quite small, so expect a bit of a headache getting a 24-pin through and having to reseat the grommet.
Here we get an inside look at the front fan mounting. One thing I like here is the three small openings directly adjacent, which can be used for optimizing fan cable management as they can leave a fan and go straight through the opening into the cable management area, and it will disappear.
The top chassis panel is just as tough to remove, I applaud Gamerstorm for their assurance that the panels will not fall off, but they may need to back off a bit on the pressure required as the panel came close to being warped from removal. The top mounting is very similar to the front being largely slotted, and another trait is showing here is the flexible steel, which is simply thin and therefore has the consistency bordering on a semi-firm noodle. When trying to mount an AIO radiator up front or top just to test, the metal sagged and even tried to separate around the screw head as it was tightened.
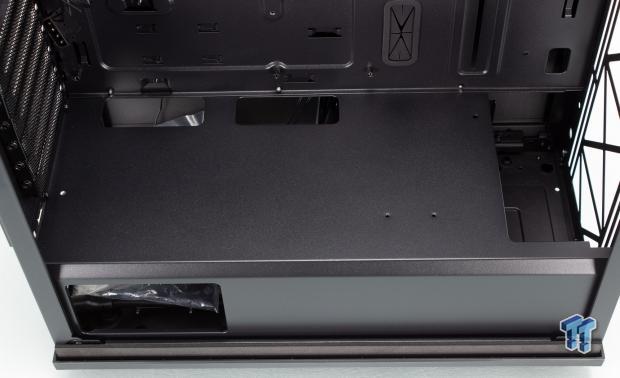
Here we get to the PSU shroud, which we mentioned previously. It is standard fare and has two large cable passthrough for front panel connections along with GPU cable passthrough. I would like to see one partially outboard toward the glass panel so cables can pass more cleanly to GPUs. Overall it does its job and even has a window in the PSU shroud so you can see your PSU. This is a double-edged sword as some PSUs are not particularly attractive, and you will see whatever is down there, so hopefully, you like how it looks.
Inside the Macube 310P Continued
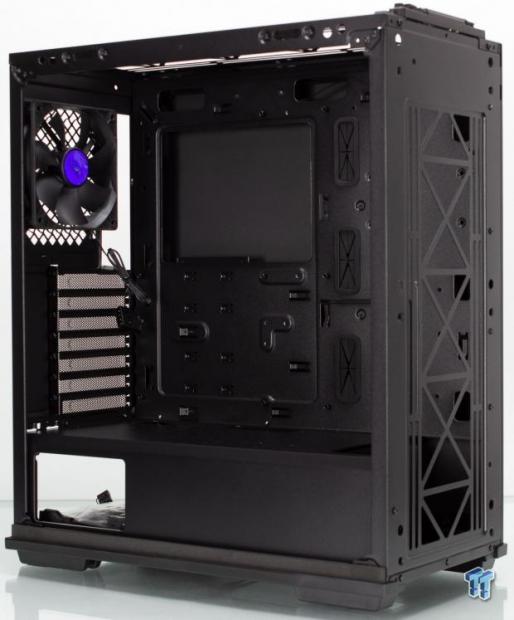
Here we see the singular preinstalled fan for the Macube 310P and its associated 3-pin DC cable and PATA pigtail. This fan is ok, and while I would love a removable PATA adapter, this is what you get. The seven expansion slots are externally accessible, but Gamerstorm did equip some good slot covers, which should allow a reasonable amount of airflow through while prohibiting larger dust bunnies' entrance.
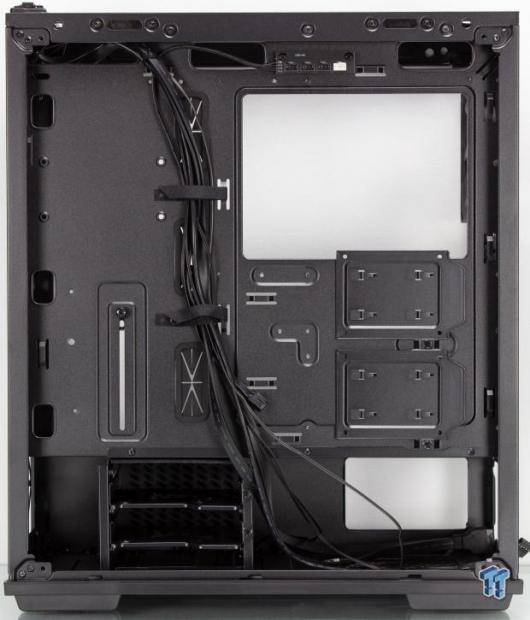
The cable management area is quite good with several tie-down locations. This is probably the area I would be most proud of the Macube 310P as it houses two Velcro cable management strips that are fixed to the chassis along with several loops for zip ties. The two SSD trays are well placed, and the pass-through areas are placed where needed to make management possible. The top-mounted fan hub is an exciting inclusion and helps to better manage connectivity, especially for more substantial builds where the motherboard may not have enough fan headers.
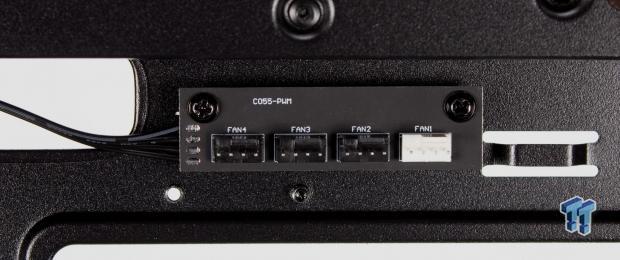
Here we have the fan hub, which supports up to four fans from a single header. The hub is powered by the port and not a supplementary SATA or PATA connector; you will need to mind the limits of your motherboard fan headers. To ensure you do not overload it if you happen to install four fans with high amperage draw.
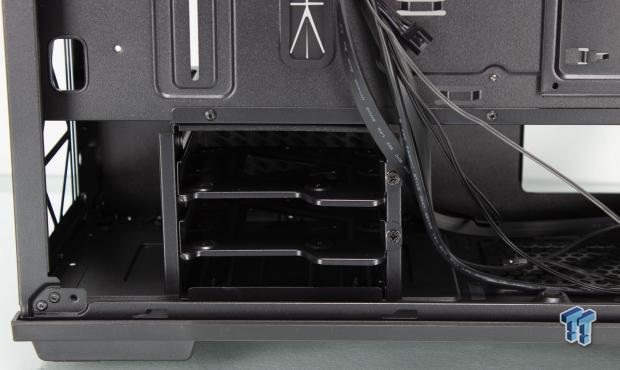
Here we have the dual HDD trays in their cage; they are retained to the cage with a single screw on this edge. The HDD tray can support either 2.5" or 3.5" drives depending upon your needs. The HDD cage, while I would love for it to be removable, is not. The lower lip of the chassis retains the cage within the chassis. Even if you do not have spinners or need for them, they are yours. I would like to see this better managed to make the cage removable so you could have more cable management and hiding space with the cage removed.
The PSU location is up next, and we see a standard layout with rubberized foam pads for the PSU to rest on when installed. The space is admittedly cramped being 160mm or lower per Gamerstorm specs, and with a removable HDD cage, this would be a non-issue, but I digress. The limit is a hard limit without some creative modification, so keep that in mind when planning your build as you will want a 140mm based PSU for maximum space for tucking excess cables away.
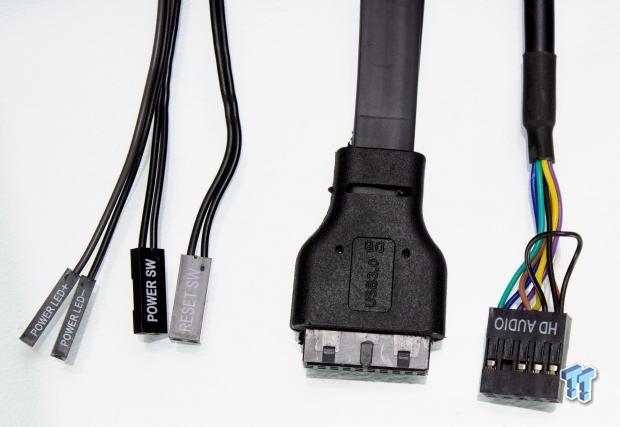
The front panel cable array is as follows:
- Power, Reset, and Power LED connectors
- USB 3.2 Gen 1 20-pin connector
- HD audio connector
This cabling is sufficient for what we have offered on the Macube 310P, as I mentioned previously. The I/O expanding a bit would be welcome, even if it is not Type-C, but maybe a couple of USB 2.0 ports would be appreciated just to have a more appealing I/O interface. In this tight competition at this price level, its no longer a battle of scale, but more of millimeters, and small changes like this can be a game-changer for consumer adoption.
Hardware & Documentation

The fastener array is vast and offered as listed below:
- 11x Zip ties
- 2x brackets for securing magnetic panels closed
- 3x foam pads for brackets and GPU support
- Warranty card with QC stamp
- 12x fan screws
- 2x thumb screws
- 6x PSU screws
- 22x motherboard and 2.5" drive screws
- 11x HDD coarse screws
- 4x standoffs
This fastener arrangement offers everything you should need for the chassis; however, it is worth noting that the manual does not list the fasteners. Users are left to their own devices as far as knowing what each fastener's purpose may be. Also, a warranty card which has fields you fill out by writing is very 90's/early 2000's, I'm not sure if this is required for warranty, but if it is we need to modernize a few things from Gamerstorm/Deepcool's side. If Deepcool/Gamerstorm replies with if this is required, we will add it to the manufacturer's "right to reply" section on this review.
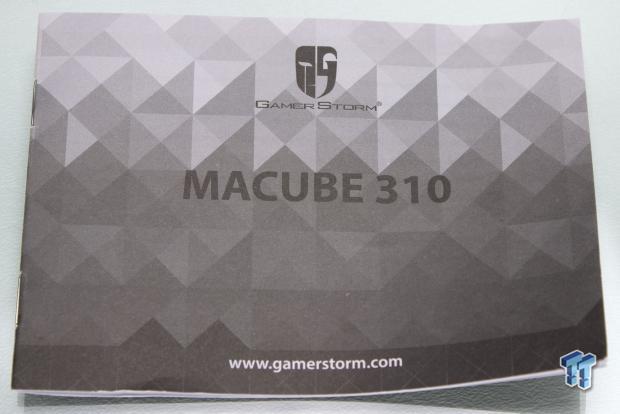
The manual is a booklet style for the Macube 310 series. It is twelve pages in total and has basic images to cover many installation queries while avoiding any wording to help prevent the mass amount of translation they would want for the various markets the Macube 310P will be sold within.
Case Build & Finished Product
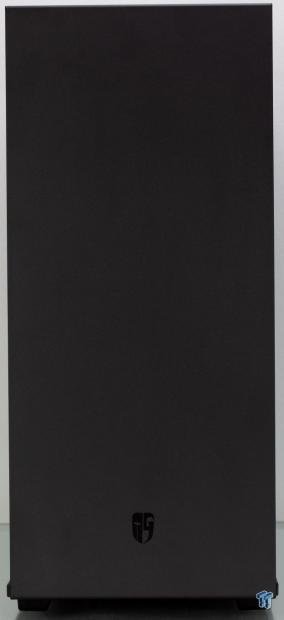
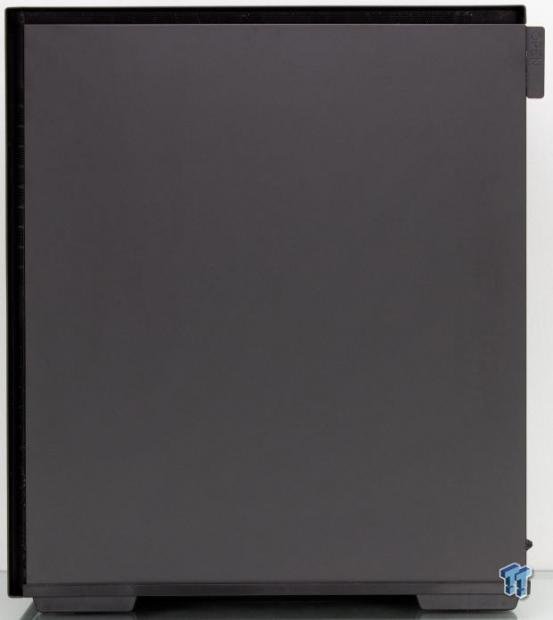
The front being a solid panel has nothing to show post-build. It looks the same when new versus when built.
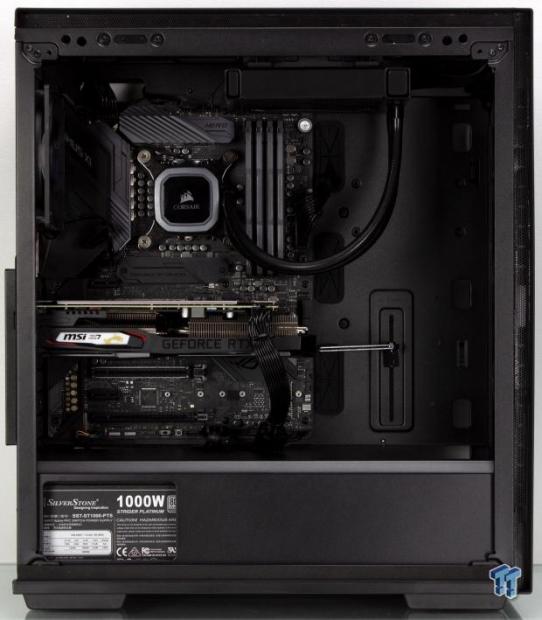
Looking through the main chamber and we see that everything fills in quite well. The test build goes in without an issue, and here we also show that a 120mm AIO can mount in the top possibly even a 240mm AIO. However, the previously mentioned structural integrity, means it may be a bit shaky. Overall the cable management in the Macube 310 does an excellent job of making a great looking main chamber overall. One thing to note is that the GPU support was too short to reach our GPU or even slightly too short to reach its elongated shroud. The grommets were a hassle with the 24-pin cable and had to be reseated once the cable was installed.
The rear filled in as expected, and the outer cover does an excellent job of hiding the expansion slots mounting.
The cable management area once again is where I feel the Macube 310P makes up for some of the previously mentioned shortcomings. As you can see, the multitude of tie-downs and generous width to the area allows for tucking away of excess cabling while also enabling side by side runs of cables fastened to the chassis for an overall neat appearance. This cable management capability makes me much more pleased with the Macube overall as the discovered abilities enriched the build experience.
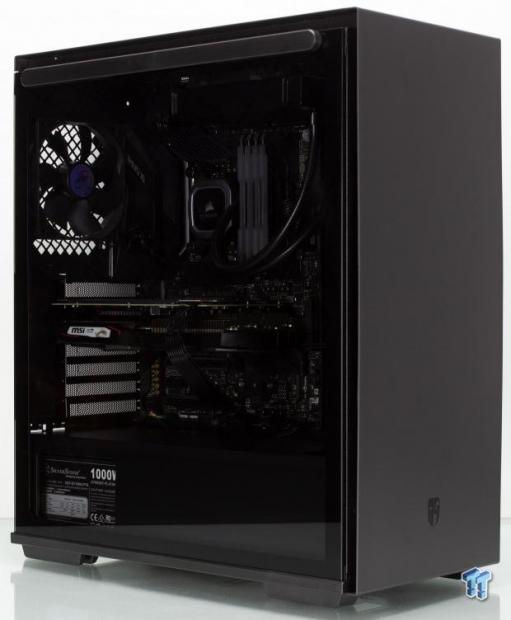
With the chassis built entirely, you can see that the tinted glass helps mask any internal cable management blemishes you may have with the system powered off. However, when it is lit, all bets are off if you have any form of internal lighting.
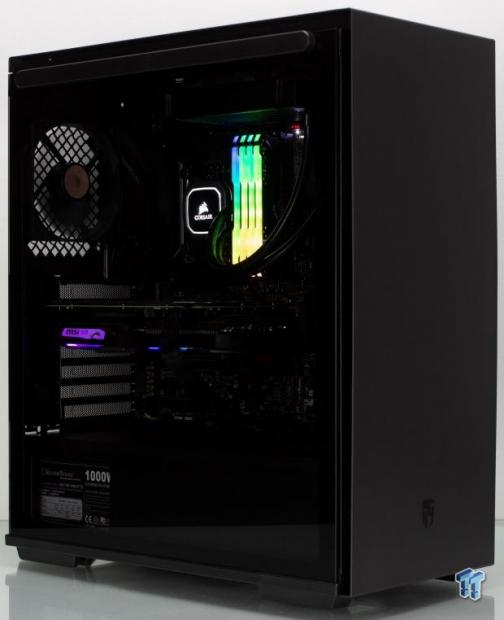
Turn the key on your rig, and the RGB glows, here we now had to shorten our exposure time a bit to give a more relevant look at what the system looked like to my eyes. The tinted glass works well to make the lit components jump out at you while the rest fades into a semi shrouded background to the party, almost like a digital mullet. The RGB party up front, while the darker non-lit components fade to the background where they do the work. Welp, not quite the business in the front party in the back of a traditional mullet, but I still feel a reverse digital mullet is applicable.
Final Thoughts
When I first was told I would be receiving the Macube and its price point, I tried to temper my expectations based on the price point and feature set. The initial impressions were a bit of a let down as the material quality with the thin steel on the fan mounts and the smaller grommet pass-through holes. However, with the build experience and the capability of the cable management redeemed the Macube 310P's relevance in the category. It's not perfect, but it got some good things going for it.
During testing, we observed a measured ambient of 21.3C, with an RH of 40%. The CPU showed an average delta over ambient of 51.2C, while the GPU showed an average delta of 39.3C. These results are quite good considering the only ventilation is the rear exhaust fan, which was DC controlled rather than full speed via the PATA connection. The Macube 310P would have likely done better had I locked the fan at 100% via the adapter, but I wanted to show what it could do with motherboard control and less noise.
Overall, I am impressed with how the chassis performed for being a defined value option. This chassis for comparison runs better thermally than the Define 7 with its front door closed, and that's a pretty strong statement.
What we like
If you read everything this far, I'm sure you can extrapolate from the data provided, that I loved the cable management for a value chassis. Add to this the fact that while flimsy in some areas, it does hold a significant amount of hardware; it is primed to be a great valuer contender. The inclusion of a fan hub is an excellent value-add for those looking to build an extensive system on a budget. The aesthetic is clean and can somewhat mimic a much higher priced option simply based on the lack of exterior plastic. The magnetic closure of the panels is excellent as it makes access and maintenance truly toolless.
What do we think could be better?
The elephant in the room must now dance.
That is, of course, the absolute lack of rigidity in the fan mounting at the top and front. If you are going to use super-thin steel at least roll the edge, so it gains some rigidity, or you run the risk of being compared to a soggy burrito. The other significant niggle I have with the Macube 310P is the force required to remove the top and front panels. The energy required was strong enough that I was legitimately concerned I was going to bend and damage the panels as I removed them. The ability to remove the HDD cage should not be omitted as this would give users the option to use a more extensive array of PSU options.
At the price point that the Macube 310P demands, I cannot give it an editor's choice level recommendation, but I am tied between value or a performance-based recommendation. One end of the spectrum, we have the fact that the chassis offers an aesthetic and performance comparable to higher-priced options. But then we have the fact that even with a single fan, the chassis performed very well, and we can hypothesize that the performance will be better as you increase the cooling efficiency with more cooling fans installed.
Shannon's Chassis Test System Specifications
- Motherboard: ASUS ROG Maximus XI Hero (Wi-Fi) Z390 (buy from Amazon)
- CPU: Intel Core i7 8700K (buy from Amazon)
- Cooler: Corsair Hydro Series H60 (buy from Amazon)
- Memory: Corsair Vengeance Pro RGB CMW32GX4M4C3000C15 (buy from Amazon)
- Video Card: MSI GeForce RTX 2060 Gaming Z (buy from Amazon)
- Storage: Sandisk M.2 256GB
- Power Supply: SilverStone Strider Platinum 1000W (buy from Amazon)
- OS: Microsoft Windows 10 Home 64-bit (buy from Amazon)
 Lian Li B4-mATX Review: a compact mATX SFF case with excellent airflow and premium features
 Ocypus Sigma F36 BK ARGB Cooling Fan Review: high airflow and unified design in one frame
 PCCooler CPS RZ820 Display Review: a flagship-level CPU air cooler with an LCD screen
 MOAIPLAY ORA PRO G1 850W ATX 3.1 PSU Review: high efficiency and 10-year warranty for $119.99
 NZXT H6 RGB+ Compact Dual-Chamber Chassis Review
 Assassin's Creed Black Flag Resynced sells over 5 times more copies than AC Shadows on Steam
 Obsidian to make a new Fallout game led by New Vegas director
 Even DDR4 RAM is not safe from the RAMpocalypse, prices rose over 50% in Q3 2026
 PlayStation Disc Phaseout Saga: What You Need to Know
 Samsung's first PCIe 6.0 SSD is now in mass production with ridiculous speeds
 Xbox's Elder Scrolls 6 strategy looks shakier after Bethesda layoffs
 The dreaded Steam Machine 'Red Line of Death' was fixed after a simple CMOS reset
 Samsung confirms next-gen Snapdragon power for its new foldable phones
 Apple's foldable iPhone may finally be ready for prime time in 2026
 Earth could escape being swallowed by the dying Sun, scientists say
 MOZA MGX1000 Instrument Panel Review: a realistic Garmin G1000 replica for immersive flight sims
 Simagic Zeus Formula Steering Wheel Review: premium build and advanced inputs for F1 racing
 GIGABYTE X870E Aero X3D Dark Wood Review - A woody goody
 The Super Mario Galaxy Movie (2026) 4K Ultra HD Blu-ray Review
 KTC H49S66 5K2K (5120x1440) 49-inch 180Hz Gaming Monitor Review
 HighPoint Rocket 1604L Gen5 x16 NVMe Software RAID AIC Review: half the price with full 59 GB/s speed
 Next Level Racing ERS3 Haptic Seat Review: immersive sim racing comfort with integrated haptics
 ASUS TUF Gaming X870-Pro WiFi7 W NEO Review - Tuffed up
 GIGABYTE GO27Q24G Gaming Monitor Review: Glossy OLED Gaming at 240Hz
 Don't sell your Windows laptop until you do these things
 6 PC cleaning mistakes to avoid for safer hardware maintenance
 Phison and Intel Take Aim at Local AI's Memory Wall with aiDAPTIV
 How to Remap Keyboard Keys in Windows using Microsoft PowerToys
 7 tips to organize your Windows files for faster, easier access
 Intel Arc G3 Extreme first impressions with MSI's Claw 8 EX AI+ - Incredible power for an extreme price
 How to fix Wi-Fi Adapter Not Working on Windows laptops: troubleshooting tips
 Hisense U7SG 4K TV: Modern Entertainment for the New Age
 6 underrated Microsoft Word features worth using to boost your productivity
 Level Up Your PC Gaming with these Fantastic ASUS Prime Day Deals on GPUs, Motherboards, and More