


Introduction

Lynnfield is now starting to really make its mark on the motherboard world. Intel now holds all the cards when it comes to performance computing. Taking the crown back from AMD's Athlon 64 and moving it to the newest processor line, the Core i5 and the Core i7 8xx series designed for the new LGA 1156 platform have proven to be extremely successful.
We have been lucky enough to get early previews, but until we got our hands on any Lynnfield processors it's been a nightmare because they look so good. But getting to test them, that's the big question. We have already put one LGA 1156 board through its paces here, the P7P55D Deluxe from ASUS, but now it's time to start ramping out at full speed.
Today's candidate is a high-end board for the mainstream market from the good people at GIGABYTE. The P55-UD6 is one of the latest boards to run on the P55 single chip solution from Intel. Aimed for a more high-end market in the mainstream, this board comes in at just under $250USD over at Newegg which isn't a great deal more than the ASUS offering. Will it match up in performance and features? We shall endeavour to answer this question.
The Box and What's Inside
Package and Contents

GIGABYTE's usual colour scheme for its boxes remains the same. The background is primarily white with blue and orange writing along with some fancy artwork. The chipset label and the supported hardware logos are all displayed on the front. In all, quite attractive.

On the back of the box GIGABYTE has gone to quite a bit of trouble with some marketing info on the boards features such as DES2, SMART6 and the 2 ounce copper PCB that is layered in between the PCB layers for better cooling and EMI shielding. A big bonus here is the inclusion of a colour photo of the board on the back along with box out explanations of the features the board supports.

Opening up and delving inside, we get to see what documentation of software is included. GIGABYTE includes two user manuals. The first manual is your standard motherboard user manual which explains the hardware and software overviews, location and setup of the major hardware components, BIOS setup and details setup, installation and using the included software supplied.
The second user manual is for the new SMART6 feature set that the board supports which is quite impressive. We saw a demonstration of this at Computex 2009 and were quite pleased with the features as well as the way it is stored. We covered SMART6 in our Computex 2009 coverage if you want to have a look at what these features are.
The included software DVD contains drivers and software for XP, Vista and now Windows 7 since it's officially on the market. It's great to see Windows 7 getting this early support.

moving along to the accessories included, GIGABYTE has given us a rather good accessory bundle. There are four SATA data cables for connecting up your SATA-II HDD and ATAPI devices, along with a single IDE cable to connect IDE HDD's and ATAPI devices. If you're planning to go for an SLI setup, GIGABYTE gives you a single SLI bridge cable.

While this board contains eSATA ports on the rear I/O ports, GIGABYTE decided to give us even more. There's a PCI cover bracket with two eSATA ports which have SATA cables to connect to two of the 10 internal SATA ports to give extra eSATA ports.
The Motherboard
The Board
Moving right along, it's to the board. in true GIGABYTE style the PCB comes in the usual attractive blue that GIGABYTE has been using for quite some time. In fact, this has to be my favourite colour PCB, especially under UV black light as it does glow a bit more than the traditional black and brown PCB's.
As usual from GIGABYTE, the layout is extremely clean and practical. The 24-pin ATX power connector is located behind the DDR3 memory slots on the left hand side of the board, while the 8/4 pin power connector is located between the Mosfet heatsinks and the rear I/O ports at the top left of the board.

For a P55 board, GIGABYTE has actually got six DDR3 memory slots here. Now, this may sound wield considering that the board only has dual channel DDR3 memory support, but this is done in an old cheating way, similar to how i815 motherboards used to have three SDRAM slots.
There are four blue slots and 2 white slots. If you want to populate all four blue slots, you can only use single sided DDR3 memory modules. This limits the size that channel A can contain. The white slots are setup as normal.
Cooling the board's onboard components is handled by a heatpipe system that channels heat away from the Mosfets, the single chip P55 chipset and the two SATA-II RAID controllers. Yes, this board does look like it has a Southbridge, but in point of fact the bottom section is just cooling the RAID chips.

Want almost endless storage? GIGABYTE has this covered. In total there are 10 SATA ports; six blue and four white. The blue ports are controlled by the P55 chipset and support the usual RAID functions. The white slots are connected to two JMicron 368 controller chips that use a Silicon Image bridge chip to allow all four white drives to be setup in a massive RAID array. In all, an extremely impressive setup.

It's rear I/O time and GIGABYTE has made a slight change to its layout. First off, there is only a single PS/2 port that can either operate as a keyboard or mouse port. Above it there are two USB ports. What is of major design is the USB/eSATA port setup. In the third and fourth towers at the bottom are combo ports. They have both eSATA and USB functions. When you plug a USB port device into the port it goes to USB mode. If a eSATA drive is plugged in it runs as eSATA thanks to a clever setup of placing the eSATA connectors upside down to the USB ones. It's just simple engineering and it saves space.

Expansion slots on the board are pretty impressive. Using the P55 chipset, you get SLI and Crossfire certification, but only using the 8/8 configuration. This is how Intel keeps the X58 chipset on top for full speed Crossfire and SLI.
Now, you may notice that there are three PCIe x16 slots on the board. The top most slot runs at full 16 lanes for single card configurations. If a second graphics card or any other PCIe card is inserted into the middle slot, the first slot loses eight lanes which are diverted to the middle slot. These slots are also run off the CPU itself since Lynnfield processors moved the primary PCI Express controller onto the integrated Northbridge that runs the on-chip memory controller.
The third or bottom x16 slot is electrically x4 compatible, so if you place a graphics card into it or any card greater than x4 speeds, it will only run at x4 mode. This slot runs off four of the six PCIe lanes that the P55 chipset supports. You will also notice there are two PCIe x1 white slots for x1 cards and two PCI slots for legacy cards. Depending on what video cards you use you will lose a few slots, especially if you're using double height PCIe graphics cards.
BIOS and Overclocking
BIOS

GIGAYBTE's familiar BIOS welcome screen is seen here. The AWARD 6 blue screen is as familiar to us as coming back to our cozy home. The MB Intelligent Tweaker (M.I.T) menu contains all of the overclocking features, but the look has completely changed.

The new look M.I.T menu simplifies things, making options easier to find. The first menu called M.I.T Current Status gives you a complete overview of the clocks and voltages that the board is currently running. It's information only; no tweaking or overclocking there.

The Advanced Frequency menu gives you access to the BCLK, PCIe Clock, memory ratio, CPU frequency ratio as well as the QPI dividers.

The Advanced Memory menu gives you access to additional memory tweaking options like XMP, ratio dividers and manual control of the memory timing.

The Advanced Voltage menu gives you access to many voltage tweaks.
Overclocking
Overclocking with GIGABYTE's P55-UD6 was nothing short of flawless. While we didn't go for massive FSB's, we are more so looking at pushing the CPU to its limits on the board. We managed to hit a 160MHz FSB stable with a 22x multiplier to make the CPU totally stable at 3.52GHz using only a few voltage tweaks. With more time to overclock we could possibly get higher; that's for our extreme overclocker Deanzo.
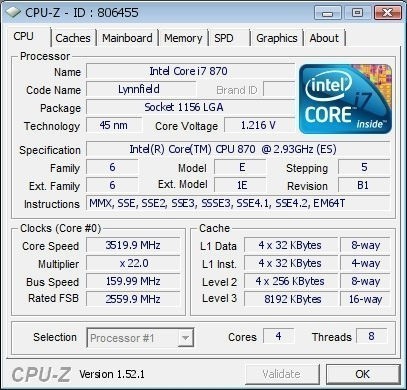
You can see the validation here.
As all overclocking results are dependent on the hardware you use, your results may vary. Results of our overclocking tests are included in the performance section with the stock scores.
Important Editor Note: Our maximum overclocking result is the best result we managed in our limited time of testing the motherboard. Due to time constraints we weren't able to tweak the motherboard to the absolute maximum and find the highest possible FSB, as this could take days to find properly. We do however spend at least a few hours overclocking every motherboard to try and find the highest possible overclock in that time frame. You may or may not be able to overclock higher if you spend more time tweaking or as new BIOS updates are released. "Burn-in" time might also come into play if you believe in that.
Test System Setup and Comments
Test System
Processor: Intel Core i7 870 (2.93GHz)
Memory: 2GB Kingston KHX12800D3T1K3/3GX (Supplied by Kingston)
Hard Disk: Intel X25-M 80GB SSD (Supplied by Kingston)
Graphics Card: GIGABYTE GTX 285 1GB (Supplied by GIGABYTE)
Cooling: Cooler Master Hyper 212 (with an extra fan) (Supplied by Cooler Master)
Operating System: Microsoft Windows 7 Ultimate x64 RTM
Drivers: Intel INF 9.1.0.1007, ForceWare 190.38
GIGABYTE's P55-UD6 board gave us no problems with compatibility during our testing. We didn't have a whole bunch of single sided DDR3 modules to test how the board would function with all six slots populated; in fact, those modules are pretty rare to come by. However, we had no issues with our dual channel setups.
The one thing we did find was that when swapping out the CPU, this caused a problem as the board would power up and show nothing on the screen. It would then power off and go all over again. It took about five to six attempts at this to make it detect a different CPU. Apart from that, overclocking was seamless and stable right through all our overclocking and stability tests.
Synthetic Tests - Part I
With any system you will want to see a combination of synthetic testing and real-world. Synthetics give you a static, easily repeatable testing method that can be compared across multiple platforms. For our synthetic tests we use Sisoft Sandra, Futuremark's 3DMark Vantage and PCMark Vantage, CINEBENCH as well as HyperPi. Each of these covers a different aspect of performance or a different angle of a certain type of performance.
Memory Bandwidth
Memory is a big part of current system performance. In most systems slow or flakey memory performance will impact almost every type of application you run.
To test memory we use a combination of Sisoft Sandra and HyperPi 0.99.
SiSoft Sandra
Version and / or Patch Used: 2009 SP3c
Developer Homepage: http://www.sisoftware.net
Product Homepage: http://www.sisoftware.net
Buy It Here
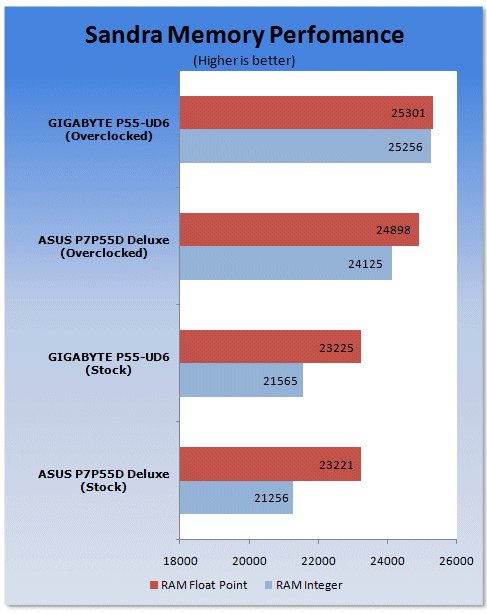
Looking at synthetic memory performance at stock speeds, the GIGABYTE board and ASUS P7P55D are near identical. However, overclocking gives GIGABYTE a higher clock rate thanks to increased BLCK and memory frequency.
HyperPi 0.99
Version and / or Patch Used: 0.99
Developer Homepage: www.virgilioborges.com.br
Product Homepage: www.virgilioborges.com.br
Download It Here
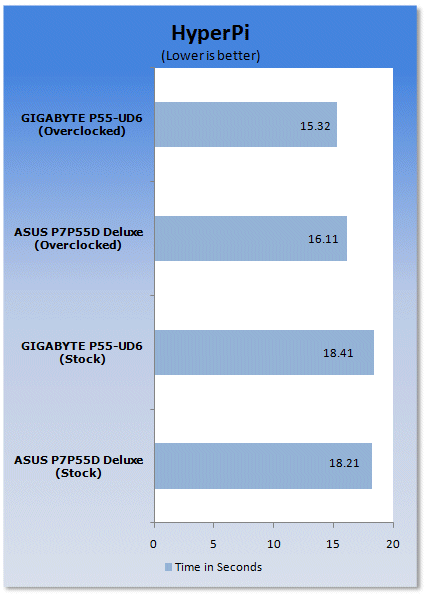
HyperPi is a front end for SuperPi that allows for multiple concurrent instances of SuperPi to be run on each core recognized by the system. It is very dependent on CPU to memory to HDD speed. The faster these components, the faster it is able to figure out the number Pi to the selected length.
For our testing we use the 32M run. This means that each of the cores on the Core i7 870 is trying to calculate the number Pi out to 32 million decimal places. Each "run" is a comparative to ensure accuracy and any stability or performance issues in the loop mentioned above will cause errors in calculation.
Synthetic Tests - Part II
Disk Drive Controller
The system drive controller is an important part of system performance. In most modern boards your drive controller will run off of the PCI-e bus. The PCI-e bus performance can be affected by poor trace layout as well as many other design choices that show up on different boards.
For testing we used Sisoft's Sandra.
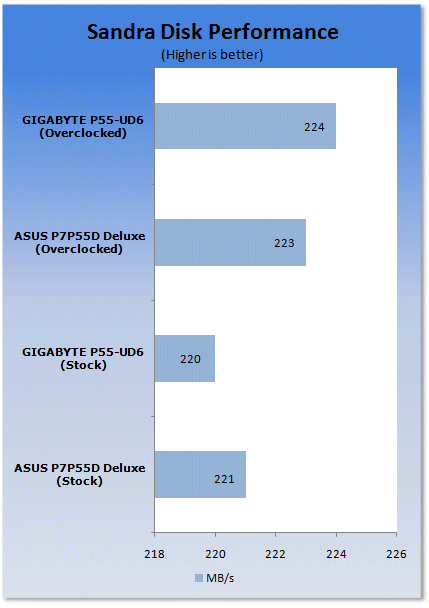
The HDD controller on both boards is identical and overclocking doesn't do anything for performance here.
Synthetic Tests - Part III
Overall System performance and Gaming
Here is where we dig out the FutureMark tests.
PCMark Vantage
Version and / or Patch Used: 1.0.0.0
Developer Homepage: http://www.futuremark.com/
Product Homepage: www.futuremark.com
Buy It Here
For overall system performance we use PCMark Vantage. This is run in both x86 and x64 mode to give the best indication of performance.
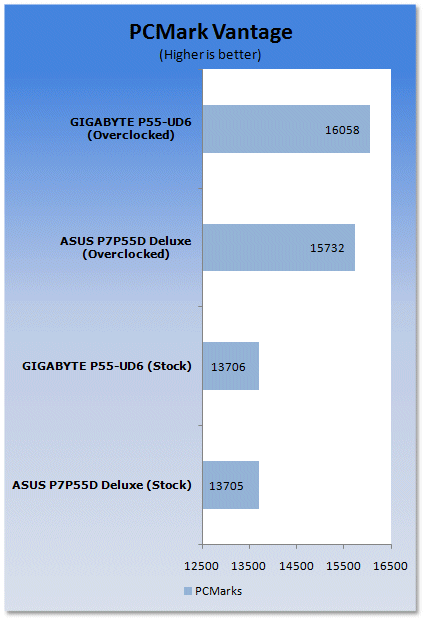
In terms of overall (general) usage, GIGABYTE manages to creep ahead of the ASUS board when overclocked. At stock speeds there is no difference between the two boards.
3DMark Vantage
Version and / or Patch Used: 1.0.1
Developer Homepage: http://www.futuremark.com/
Product Homepage: www.futuremark.com
Buy It Here
For synthetic gaming tests we used the industry standard and overlockers bragging tool 3DMark Vantage. This is a test that strives to mimic the impact modern games have on a system. FutureMark went a long way to change from the early days of graphics driven tests to a broader approach including physics, AI and more advanced graphics simulations.
3DMark Vantage uses the DX10 API in addition to having support for PhysX. Due to the PhysX support and our use of an NVIDIA GPU, we run with PhysX enabled and disabled to give you the best indication of real system performance. For testing we use the Performance test run.
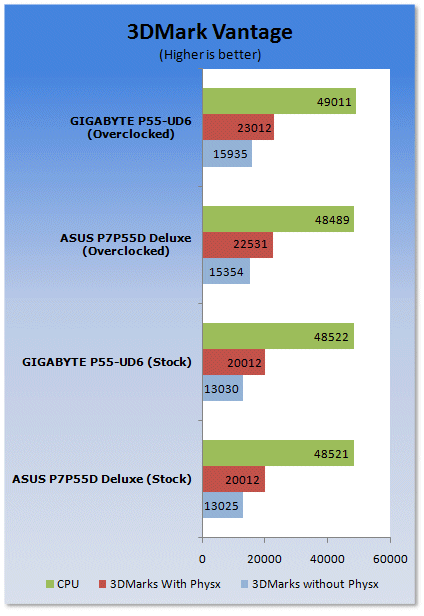
3DMark Vantage shows a similar setup; ASUS and GIGABYTE at stock are almost identical. However, when overclocking comes into play GIGABYTE gets a slight boost.
CINEBENCH R10 x64
Version and / or Patch Used: R10
Developer Homepage: http://www.maxon.net/
Product Homepage: www.maxon.net
Download It Here
CINEBENCH is a synthetic rendering tool developed by Maxon. Maxon is the same company that developed Cinema4D, another industry leading 3D animation application. CINEBENCH R10 tests your system's ability to render across single and multiple CPU cores. It also tests your system's ability to process OpenGL information.
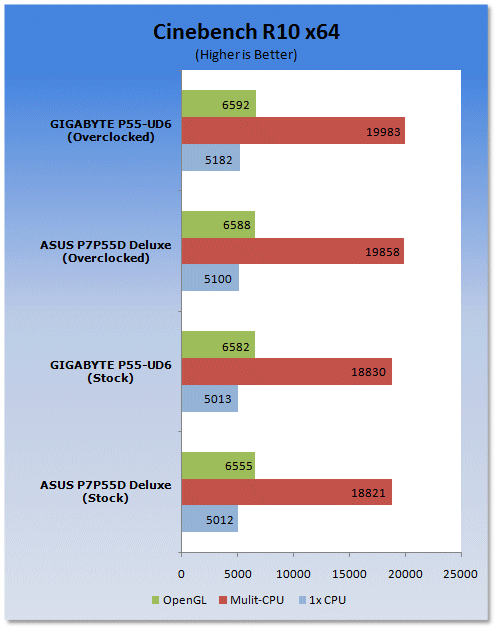
Into our synthetic rendering and we see that overclocking helps give quite a bit of performance gain as the more clock cycles you can get through, the better the performance.
Real-World Tests Part I
Real-world testing allows us to see how well a product will perform when used in the same manner as it would be in your house or office. It is an important side to performance testing as it can uncover hidden glitches in the way a product performs.
It is especially true when testing a mainboard; there are so many components of a board that have to interact that any problems between parts can cause a failure of the whole.
For real-world testing we use some common applications and functions. We test with LightWave 3D for rendering performance, AutoGK for transcoding from DVD to AVI and two games for gaming testing.
Rendering
Rendering of 3D animation is a system intensive endeavor. You need a good CPU, memory and HDD speed to get good rendering times. For our testing we use LightWave 3D. This software from Newtek is an industry standard and has several pre-loaded scenes for us to use.
LightWave 3D
Version and / or Patch Used: 9.6
Developer Homepage: http://www.newtek.com
Product Homepage: http://www.newtek.com/lightwave/
Buy It Here

Onto real world rendering tests and we see that overclocking helps even more here than in our synthetic tests.
AutoGK
Version and / or Patch Used: 2.55
Developer Homepage: http://www.autogk.me.uk/
Product Homepage: http://www.autogk.me.uk/
Download It Here
AutoGK stands for Auto Gordian Knot; it is a suite of transcoding tools that are compiled into and easy to install and use utility. It allows you to transcode non-protected DVDs and other media to Xvid or DivX format. For our testing purposes we use a non-DRM restricted movie that is roughly two hours in length. This is transcoded to a single Xvid AVI at 100% quality.
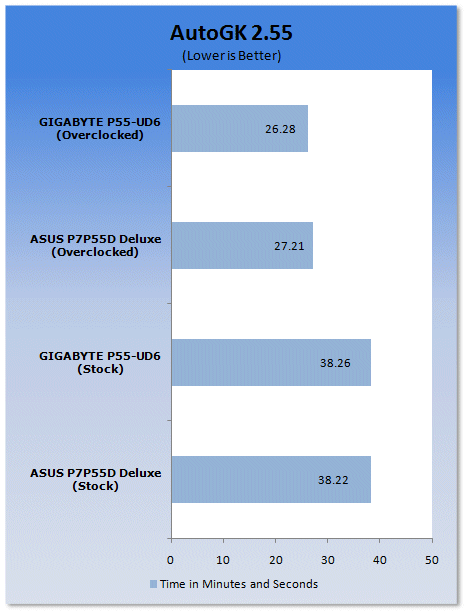
AutoGK doesn't give as much ground to GIGABYTE's overclocked setup as we would have expected.
Real-World Tests Part II
Here we have our real gaming tests. Each of the games we choose uses multiple cores and GPUs. They are able to stress the system through use of good AI. Both have decent positional audio that adds impact to the sound subsystem of the board. We ran each game through the level or parts listed and recorded frames per second using FRAPS. This brings the whole game into play.
Cryostasis: Sleep of Reason
Version and / or Patch Used: 1.0
Timedemo or Level Used: From Ship Entry until third Spirit Journey
Developer Homepage: http://www.505games.co.uk
Product Homepage: http://cryostasis-game.com
Buy It Here
Cryostasis : Sleep of Reason is an interesting game. It is heavy on PhysX so to play it properly you will really want an NVIDIA GPU. However, with that aside, it can be immersive. Imagine Myst with guns and monsters.
One of the cool concepts is the spirit journeys. These allow you to enter the past of lost souls. You have to change their past to change your future. Each one makes for a nice diversion and requires you to think about what you are doing and how it will affect the outcome of the game. The settings we used are shown below.

Far Cry 2
Version and / or Patch Used: V1.00
Timedemo or Level Used: Clearing the Safe house through to the Rescue
Developer Homepage: http://www.ubi.com
Product Homepage: http://farcry.us.ubi.com
Buy It Here
Far Cry 2 is a large sandbox style game. There are no levels here, so as you move about the island you are on you do not have to wait for the "loading" sign to go away. It is mission driven so each mission is what you would normally think of as the next "level".
In the game you take the role of a mercenary who has been sent to kill the Jackal. Unfortunately your malaria kicks in and you end up being found by him. Long story short, you become the errand boy for a local militia leader and run all over the island doing his bidding. The settings we used for testing are shown below.


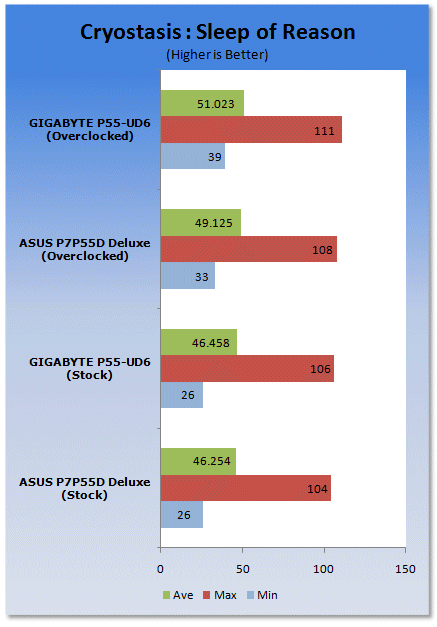
In both games overclocking does help, but it's not quite as impressive as we'd really hoped.
Power Usage and Heat Tests
Power Consumption
We are now able to find out what kind of power is being used by our test system and the associated graphics cards installed. Keep in mind; it tests the complete system (minus LCD monitor, which is plugged directly into an AC wall socket).
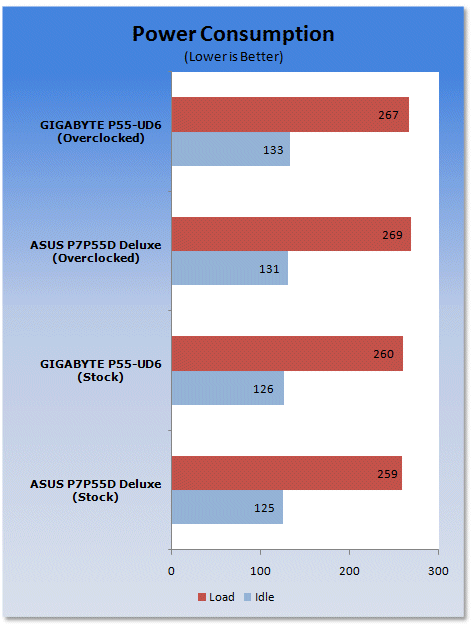
ASUS and GIGABYTE put a lot of emphasis on their new power management technology, With each company saying it has the edge, in reality both are almost identical.
Heat Generation
As a new measure, we are now monitoring the heat generation from the key components on the motherboards, this being the Northbridge, Southbridge (if it contains one) as well as the Mosfets around the CPU. The results are recorded at idle and load during the power consumption tests.
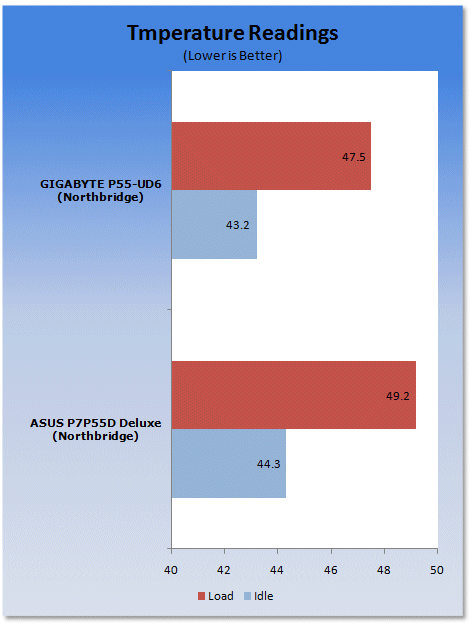
Both boards do a fantastic job at keeping things cool. GIGABYTE wins out by a few degrees here.
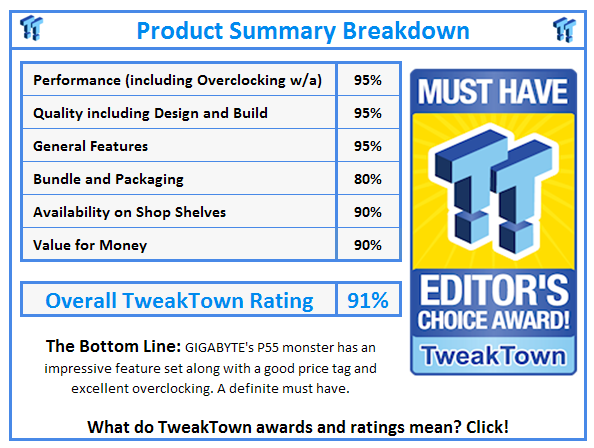
Final Thoughts
Another day, another Lynnfield down. GIGABYTE's adaptation of a mainstream chipset for high-end applications is extremely impressive. First off, the layout of the board was extremely clean. Component placement is as expected from GIGABYTE; clean, crisp and functional.
The Lynnfield/P55 combination is extremely useful; it's finally good to see an affordable replacement for the Core 2 Duo and with the amount of power Core i5 and i7 800 series have under the hood, it's no wonder AMD has a long journey ahead of them and it's definitely good to see the chase happen.
As for GIGABYTE's P55-UD6, this is one board we would recommend without any hesitations, a simply fantastic board.
 ASRock Z890 Taichi Aqua Motherboard Review - Flagship features without the flagship price
 GIGABYTE Z890I AORUS Ultra Motherboard Review - Mini-ITX with surprisingly good thermals
 GIGABYTE Z890 AORUS Elite WiFi7 Plus Motherboard Review - Right in the sweet spot
 ASUS ROG Strix X870E-E Gaming WiFi7 NEO - A Crosshair by any other name
 MSI MAG B850 Tomahawk Max WiFi II Motherboard Review - Leveling up
 Nintendo is locking Switch 2 multi-language sales in Japan behind 50 hours of Switch playtime to stop scalpers
 Epic reveals gen AI is used to make new Fortnite concept designs
 Lenovo Yoga Pro 9n with NVIDIA RTX Spark and haptic trackpad pictured ahead of fall launch
 AMD's Zen 6 Olympic Ridge reportedly drops the iGPU entirely in exchange for a dedicated NPU
 DSX v3.2 Beta adds native PlayStation DualSense haptic feedback over Bluetooth on PC
 NVIDIA fixes frame pacing issues with G-Sync monitors and RTX 40 series GPUs with GeForce driver 610.62
 Steam Machine benchmarks spotted on Geekbench, as early reviews might be underway
 EU delivers verdict on Stop Killing Games initiative
 'Welcome to the Internot' - Commodore launches anti-doom-scrolling Callback flip phone that ditches social media and browsers
 Panther Lake Arc B390 iGPU on SO-DIMM memory performs worse compared to using LPDDR5X, 16% slower in 3DMark
 Speed Racer (2008) 4K Ultra HD Blu-ray Review: a stunning remaster of the cult classic
 MOAIPLAY ORA PRO G1 850W ATX 3.1 PSU Review: high efficiency and 10-year warranty for $119.99
 Navman MiVue Smart True 4K Surround Dashcam Review - Seeing In All Directions At Once
 IQUNIX Magi96 Pro Aluminum Low Profile Mechanical Keyboard Review - Premium Build, Satisfying Sound
 Asetek Forte S-Series Racing Simulator Bundle Review
 Razer Pro Type Ergo Wireless Split Ergonomic Keyboard Review - Built for Comfort and Support
 ASUS ROG Strix Morph 96 Wireless Gaming Keyboard Review - Great Performance, More Affordable
 SAPPHIRE Radeon RX 9070 GRE PULSE OC Review - A New 1440p Challenger Has Arrived
 NZXT H6 RGB+ Compact Dual-Chamber Chassis Review
 ASRock Radeon RX 9070 GRE Steel Legend Review - The RDNA 4 Mid-Range Reshuffle
 Low Sound Volume on Windows 11? How to fix audio issues and restore normal volume
 8 Critical Warning Signs You Should Never Ignore in Windows 11
 This Windows security feature protects Documents from ransomware, but it is off by default
 Windows 11 already has a voice typing tool, and it is the one most people are not using
 Quick Assist is the only remote-support tool I open when a relative calls about their PC
 The PowerToys utilities I keep enabled on every Windows 11 PC, and the ones I turned off within a week
 TweakTown's Best of Computex 2026 Awards - The Best Hardware, Gaming Gear, and AI
 Phison E37T SSD Controller Exclusive Preview - The Fastest DRAMless SSD Platform Yet
 USB Ports Not Working in Windows 11? Try These Fixes
 ASUS WiFi Routers and Networking Solutions Deliver Long-term Security and Reliability with No Additional Cost