


Introduction to Overclocking, and The Flow Chart, and Video
Overclocking GIGABYTE Z390
Today we will be describing in detail how to easily overclock the new 9th generation hexa and octa-core Intel CPUs on GIGABYTE Z390 motherboards. GIGABYTE specifically redesigned their motherboard line up to support the new CPUs, as they pull significantly more power than their predecessors do, all up and down their Aorus Gaming lineup.

Overclocking the motherboard through GIGABYTE's UEFI is pretty easy, but we will make it even easier for you by telling you exactly what to change to get the results you want. We think most everyone should be able to hit 5GHz, as long as they have sufficient cooling.
The Flow Chart
Overclocking is simple; you set a multiplier and a voltage, then you run a test, if that test fails you either add more voltage, reduce frequency, or increase cooling. There are some other tricks this round, such as adjusting up Tjmax (Intel added this for Z390 specifically to increase thermal throttle point) and increasing power limits. The hardest part of overclocking for most people might just be finding a good starting point.
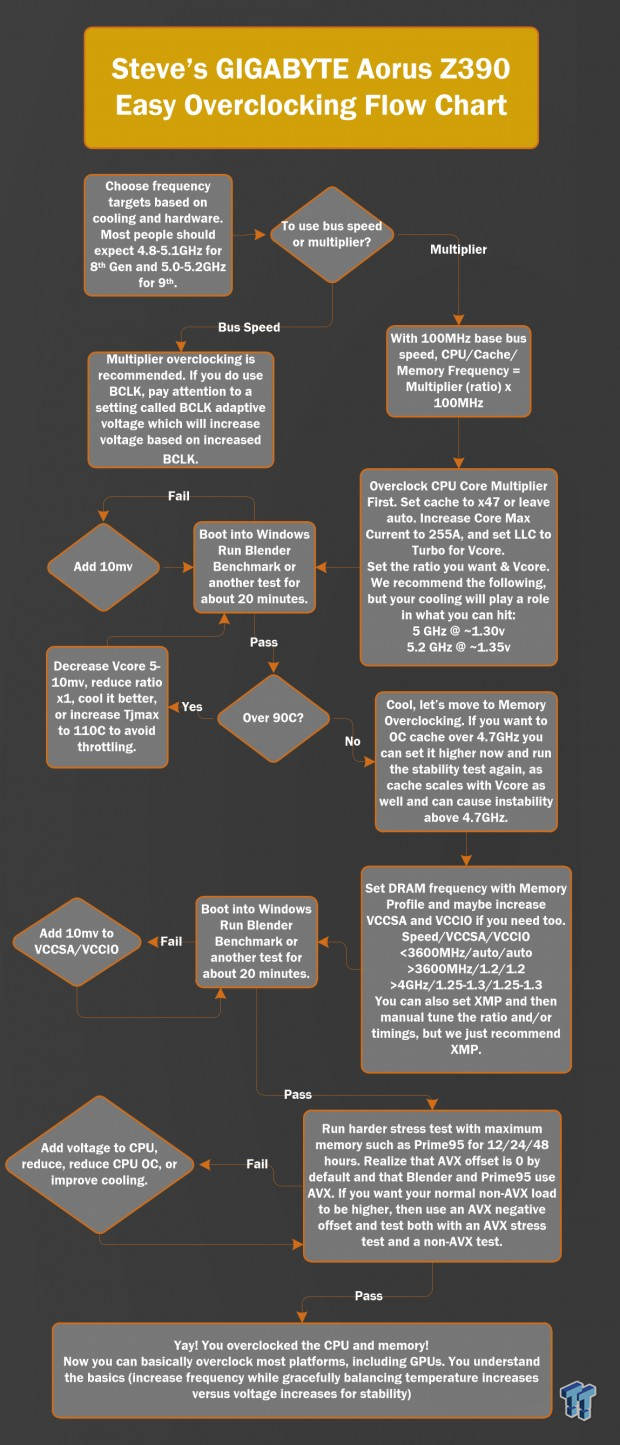
Our CPU is capable of 5GHz AVX and 5.2GHz non-AVX (can call it SSE) under very stressful conditions, and our CPU can even run benchmarks such as the Blender Benchmark and programs like Handbrake, both of which use AVX, at 5.2GHz. However, Prime95 won't run at 5.2GHz. You might want to use that as some sort of guide point for what you might expect. Now, we will use the 9900K as our example in this guide, and by default all core Turbo of the 9900K is 4.7GHz, meaning all cores can operate at 4.7GHz all the time. GIGABYTE's Z390 motherboards fully support this, not all do, and so you should aim for 5GHz stable if you have watercooling.
You can start VCore at 1.25v at 5GHz, but you will probably find you need bumps towards 1.3v to run Prime95 with AVX. We don't really recommend taking VCCSA or VCCIO over 1.3v, we like 1.25v each as maximum, but you can go higher. We also found that VCore over 1.3v was a bit tough to cool and might require a Tjmax set to like 110C to avoid throttling. Intel obviously added in this feature because they knew the CPUs run on the hot side, so they are letting people move the throttle point up. We are not saying it's 100% safe, just that you can.
The Video
Many users prefer videos, so we made a video for those people describing how to overclock with this motherboard.
Disclaimer and Before You Begin Overclocking
Disclaimer Overclocking your CPU technically voids your warranty. However, if you want to overclock and still be covered, Intel does provide an aftermarket overclocking warranty for about $50 located here: (PTPP). However, as of now, we don't see any 9000 series CPUs listed, we have contacted Intel for comment. Overclocking can also damage your CPU, especially if done incorrectly. This guide is about how to overclock, but neither TweakTown Pty. Ltd. nor GIGA-BYTE Technology Co., Ltd take responsibility for damages that could occur; you bare sole responsibility for any damages that may arise.
Have you Overclocked Before?
If you have overclocked before and understand hardware selection and the basics of overclocking, you should skip to the next page, but we will warn you the 9900K is a special beast. The first part of this guide is for those who want to know what to do before overclocking.
Where do I start?
GIGABYTE Z390 Overclocking Guide Systems
CPU: You will need a "K-SKU" CPU such as the 8086K or 9900K.
Motherboard: While you can buy a GIGABYTE Z370 motherboard, we highly suggest you buy a Z390 motherboard from GIGABYTE. While you are probably here because you bought a GIGABYTE Z390 motherboard, we just want to put this out there because of spec changes to the power supply design guide. Intel increased power supply requirements 70W under sustained load to 213W stock and over 100W peak at stock. After the PSU feeds the motherboard VRM, the VRM then changes that voltage from 12v to something like 1.25v for the CPU, and that is where Z370 motherboards generally fall short (except high-end). GIGABYTE has designed all of their Aorus Gaming Z390 motherboard to handle the increased requirements.
DRAM: If you go to GIGABYTE's website you will find a tab under "Support" for "Support List". Under that you will be able to download individual lists for each motherboard, such as the Memory Support List for the Z390 Aorus Master. We recommend a 3200MHz-3600MHz kit. Something around 3600MHz with tight (lower) timings is very good for many things.
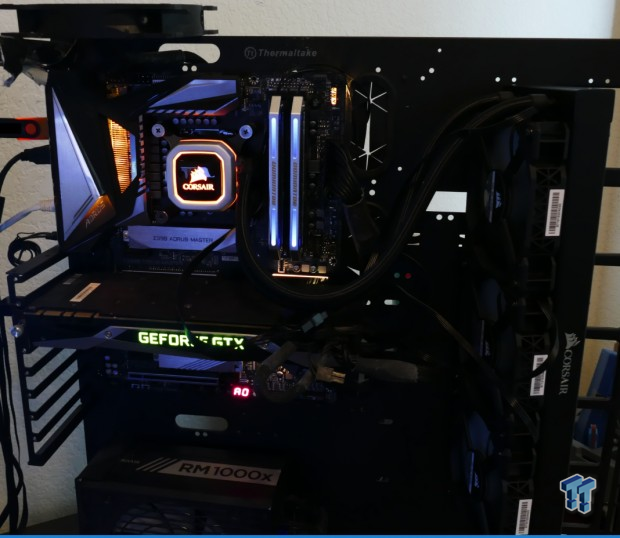
Cooler: We strongly recommend the best watercooling you can buy if you are going to overclock Intel's new octa-core 9900K. We used a Corsair H150i Pro, but we felt it was at its limits at 5GHz with 1.275v. Custom water-cooling should do better, even the kits where you put the cooler together should be slightly better, but they will be much more expensive.
PSU: Intel has changed their power supply design guide as recently as June 2018. When buying a PSU look for PSUs that offer at least 29A on the 12v rail for the CPU, which is about 350W. That is the maximum peak power draw at stock for the 9900K, so take into account overclocking and the amount of power things like your GPU will use.
Using GIGABYTE's UEFI and Configuring Your CPU
Navigating GIGABYTE's Z390 UEFI
You enter the BIOS/UEFI by hitting the "delete" button, when you see the postcode "b2"(or "62"), or when your keyboard's "number lock" light turns on. Once in the BIOS, hit "F2" to switch from Easy Mode to Advanced Mode. Once in the advanced mode, go to the "MIT" menu by hitting the right arrow key once. It's easier to navigate the UEFI through the keyboard, and to enter in a multiplier you can type it in, same as voltages. The UEFI does offer mouse control, but some mice might not move the cursor quickly. GIGABYTE has a "Mouse Sensitivity" option under the "BIOS" menu. Try a setting of x4.
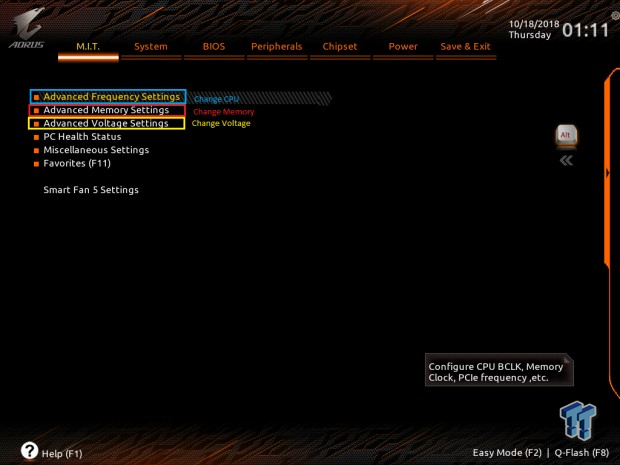
You will notice three menus in the MIT menu; one for CPU, one for memory, and one for voltages. You probably won't need to enter the memory menu since setting XMP can be done through the Frequency menu. You might notice that there is a Smart Fan 5 settings menu in the MIT menu; that is where you control the fans. You can move in and out of menus by pressing "enter" and "esc," and you load optimized default by pressing "F7" and save and exit the BIOS by pressing "F10". You can also save and load BIOS profiles (settings) in the save and exit menu.
CPU Multipliers
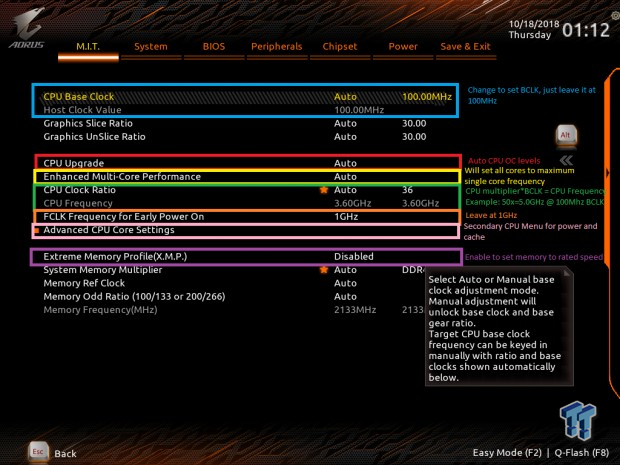
You can change the BCLK by typing in a value for CPU Base Clock, but we don't recommend changing it from default 100MHz. CPU Upgrade options are available, and these are presets GIGABYTE's engineers have devised, but we find that they overcompensate in voltage because they need to support all CPUs at those frequencies. If you want all cores to 5GHz, then you can enable Enhanced Multi-Core Performance, which takes all cores to maximum single-core Turbo (5Ghz on 9900K), but we don't recommend it since it will take your voltage too high in most cases.
Instead, you will type your CPU ratio into CPU Clock Ratio, we typed 50 for 5GHz. FCLK is at 1GHz by default, just leave it there. We can also enable XMP for our memory here, we always do, and that way you don't need to enter the DRAM menu or DRAM voltage menu. After you set your clock and enable XMP, you should hit the "enter" key on the Advanced CPU Core Settings.
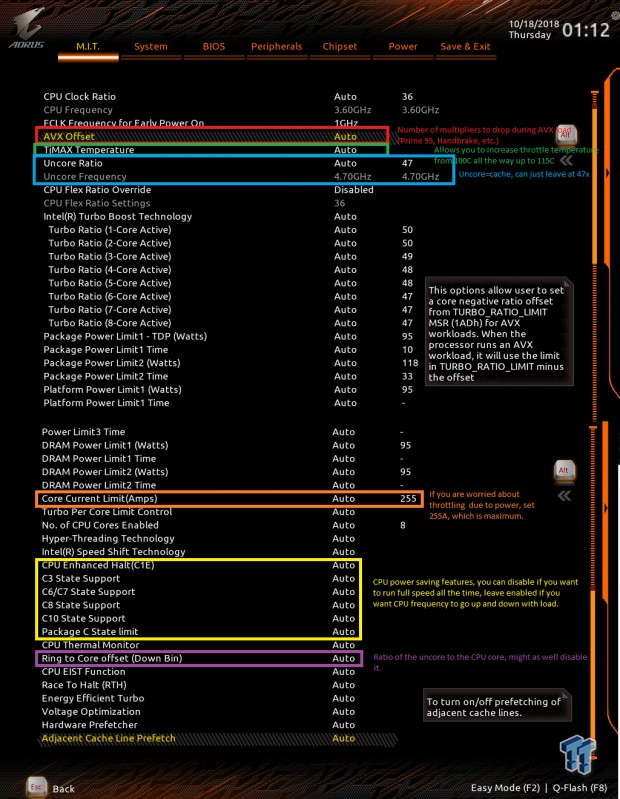
The first thing we need to decide when overclocking is if we want to use an AVX offset, by default it's 0. If we set 2, then our CPU core frequency we set earlier will go from 50 to 48 (4.8GHz) when a program uses AVX units in the CPU. Most stability tests use AVX, as do programs like HandBrake and Blender. We opted not to use an offset. Default cache/uncore frequency is 4.7GHz on this motherboard, we will leave it be so we don't need to pump extra volts into the VCore, you can lower this or make it go higher, but there is not much need.
Then we want to jump down to Core Current Limit, and set this to 255 just to be safe. Don't bother with the wattage settings here, they are unlocked when you overclock. Now, you can disable all the Intel features like Speed Shift and Race to Halt, but we find it doesn't make much difference. At this point in time, you will want to disable the settings boxed in yellow, as these will take your CPU ratio down when idle and can cause instability.
Voltage, DRAM, and Stability Testing
Voltage Settings
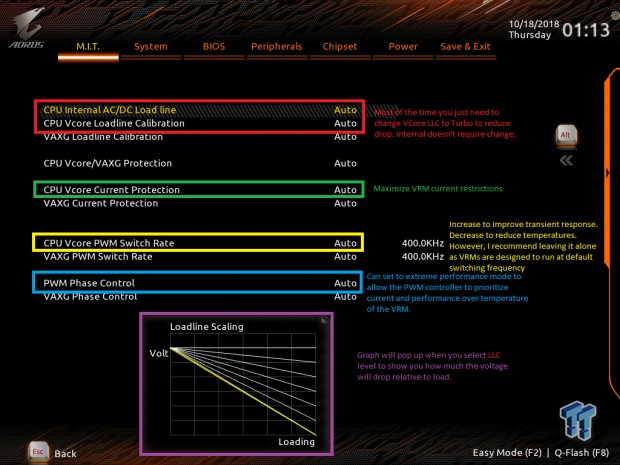
We then go to the first menu under the Advanced Voltage Menu, which leads us to our voltage regulator's (changes 12v to ~1.25v VCore) PWM controller settings menu. GIGABYTE is using an advanced digital PWM controller, and that is why you have all of these options. On some other motherboards, you might have fewer settings, but there will always be some sort of Loadline Calibration. We set Loadline Calibration to Turbo (two levels below more aggressive level), and you can see by the graph what the different levels will do with VCore when the CPU is being loaded. We want the CPU to get a steady VCore, so we selected Turbo; some of the stronger settings can actually increase voltage under load.
There is also an "Internal LLC" setting which we will not touch and leave auto, but if your VCore is dropping too much under you might want to also set internal to turbo to see if it gets better. Then you can maximize CPU VCore current protection, but we believe GIGABYTE has an auto rule to maximize this when overclocking. Don't bother changing the PWM switch rate, as each VRM is optimized at different rates and you won't really do much other than decrease performance or increase temperatures by changing this. The PWM Phase control option can be set to eXtreme Perf, which will optimize the voltage regulator to favor performance over thermals.
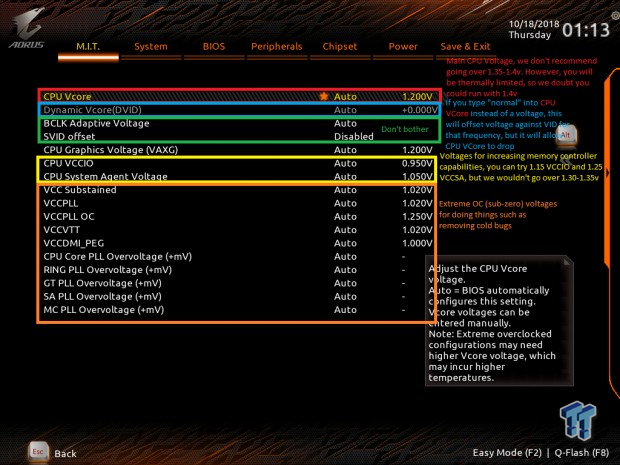
We are going to set our voltage to 1.275v, you can just type it in. However, later on, if you want your CPU's VCore to drop while the CPU load is low, then you can type in "normal" and that allows you to set a DVID offset. If you do type in normal, you will want to enable those advanced CPU settings in the yellow box we discussed on the last page. After you reboot your CPU VCore will be running on VID tables, so it might take you to something like 1.325v at 5.0GHz, and in that case, you will want to type "-0.160" into the DVID offset setting, so the resulting voltage at 5GHz will be 1.265v again.
Next, we have SVID offset and BCLK adaptive voltage, don't bother with these as we aren't going to need to change them. If you are facing memory instability, you will want to increase VCCIO and VCCSA to anywhere from 1.15 to 1.3v, but we didn't need to with our dual-rank 3200MHz kit. The other voltages are for extreme overclocking, and you don't need to fiddle around with them. DRAM voltage is on another page under the Advanced Voltage Menu, but we set XMP, so DRAM voltage has been set for us. Most DDR4 kits run at 1.35v at XMP, while some overclockers push things to 1.5v when increasing memory bandwidth above XMP or lowering timings to reduce latency.
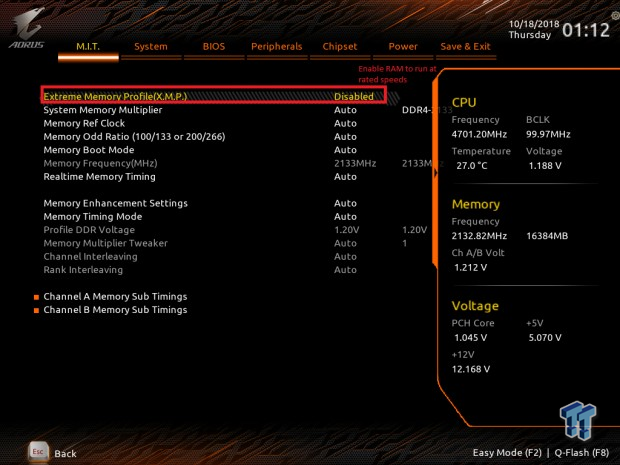
The DRAM menu can be used to do many things, but setting XMP is easy to do and changes pretty much everything for you. XMP enabled will result in the proper DRAM multiplier being set, but you can change that by changing the System Memory Multiplier. If you want to change the sub-timings you can find them for each channel in their own sub-menus, "Advanced Manual" allows you to change timings independently for each channel.
If you want to control if the motherboard boots memory through long or short training, you can control that under Memory Boot Mode. Training is like sending a signal to the DRAM and seeing how long it takes so it can calibrate signals to improve memory signaling, which then improves overclocking. The Memory Enhancement Settings allows you to maximize or minimize the aggressiveness of the timings, more aggressive results in lower latency and less aggressiveness can result in higher bandwidth. Most users should not mess with these settings.
Stability Testing
We recommend you use Blender Benchmark or Handbrake for quick testing at different stages, they both use AVX and push the CPU cores hard. However, while they are real-world tests and reflect normal usage some users still prefer total stability, and for that something like Prime95 needs to be used.
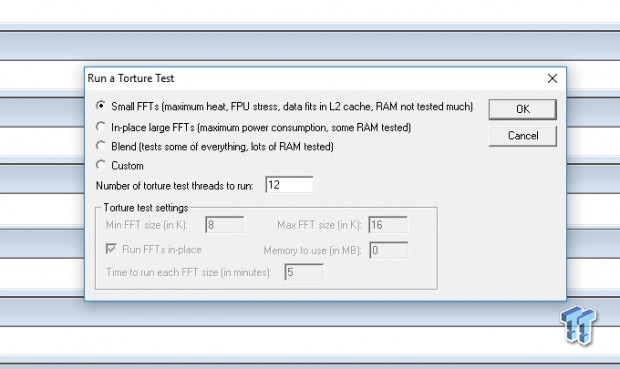
The blend test will test many things including RAM, but we used SmallFFTs, as those work the CPU the hardest. Now, there are many out there who still use older versions of Prime95, mainly because older versions didn't utilize the AVX. If AVX is crashing your system because it is overly intensive, you should use an AVX offset, that is what it is there for. However, if you do that you should also use an older version of Prime95 or another stress test without AVX so that you can also test out your maximum multiplier.
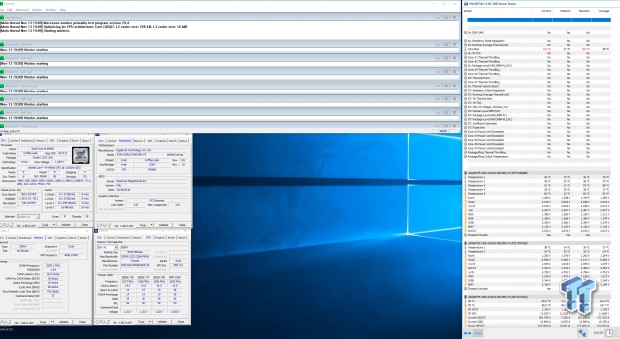
Here are our results after running Prime95 for 2 hours. We increased TjMax so the CPU wouldn't throttle as it was going towards 100C, which is default TjMax. Temperature 5 in the HWInfo application for GIGABYTE Z390 motherboard is the VRM temperature sensor and it basically perfectly matched our thermal camera.
Why VRM Matters for Z390
The CPU voltage regulator module on the motherboard is responsible for taking in 12v from the main PSU and then reducing it to anywhere from 1.2-2.0v for the CPU to utilize. With the Z390 chipset, most motherboard vendors improved their power delivery and some did not make any changes. GIGABYTE significantly improved power delivery on their motherboards. The VRM from boards as affordable as the Aorus Elite up to the Aorus Xtreme all use integrated power stages.
However, the Z390 Aorus Master and Z390 Aorus Xtreme use VRMs that cost more than twice as much as the VRMs found on the Pro and Elite series motherboard, which already have pricey high performance VRMs. The VRMs on these two boards utilize the latest in digital PWM technology from Infineon/IR and use power stages that are much smarter, with features such as internal current detection. They are also doubled up from base PWM channels to improve performance in high load situations. Why would GIGABYTE do this for their Z390 motherboards?
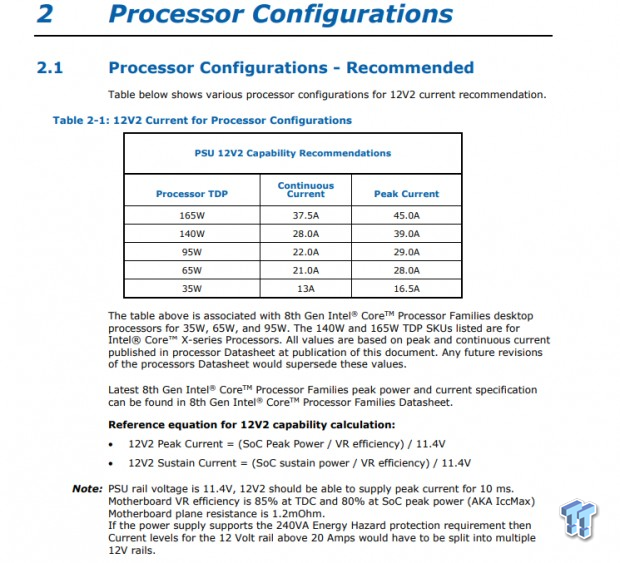
In Semptember 2017, before Z370 launch time, Intel released Power Supply Design Guide version 1.41. Then in June 2018, right before Z390 launch, Intel published version 1.42. We can clearly see that the 95W SKUs have had a large increase in 12v current. Calculating "SoC" (CPU) power using Intel's VRM efficiency and minimum 12v rail voltage plugged into the equation we can find the changes. They increase sustained current from 16A to 22A and peak current from 18A to 29A. Doing the math using the provided equation and operating conditions, sustained "SoC" power draw went from 155W to 210W. Peak SoC power went from 174W to 280W, which would make sense because the 9900K compared to the 8086K has two more cores, a 400MHz higher all core turbo, while it sports a base clock 400MHz lower (TDP basically). The CPU isn't magic, it's science. Now, you might be asking yourself, maybe Intel was describing overclocked CPUs?
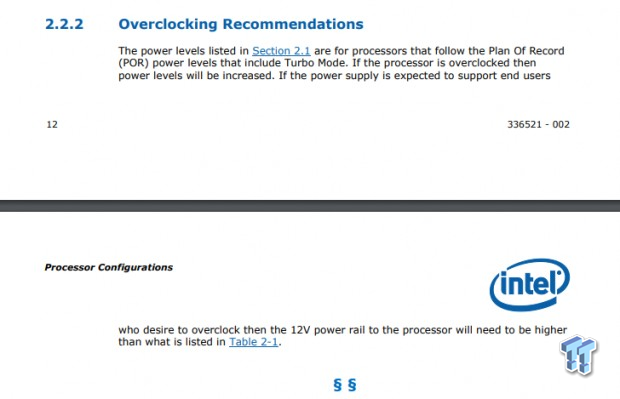
Nah, they even went ahead and added in a section to the new power supply design guide, telling vendors that those numbers from that table above are not for overclocking, and that they will need to overdesign to support overclocking. Now, while this is all about the power supply in your case and not really about your VRM or CPU, Intel did indicate something in the 9900K's data sheet.
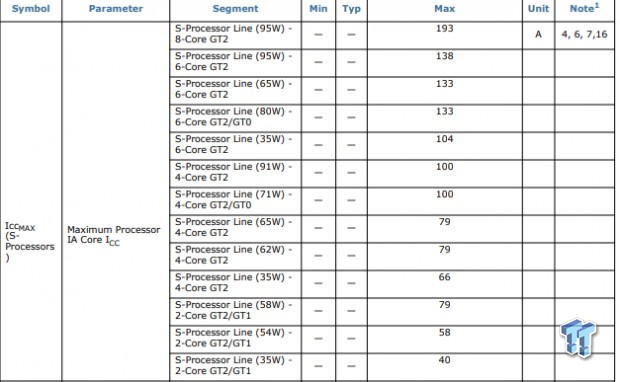
In the IA core ICC Max section (max current), they increased current from 138A to 193A for the 9900K, that's almost 200A, which hasn't even been multiplied by voltage to get voltage in our simplistic Ohm's law equation. So let us say my CPU runs at 1.15v at stock, the VRM would be expected to provide roughly 220W to the CPU, which matches the increased "SoC" power numbers in the power supply design document. Bottom line; the new 9th generation of CPUs are very fast, powerful, and can run on the warmer side of things, but if you want it to play nice, you need a strong VRM now more than ever. It's almost like the X299 fiasco with throttling VRMs, but to a slightly lesser extent. GIGABYTE asked us to toss its board against a very popular competitor motherboard that costs the same and is the GIGABYTE Z390 Aorus Master's direct competitor. So, we present the thermal battle at $289.
VRM Thermal Tests
While thermals aren't the only measure of VRM performance, but they are one of the most important. While Intel has design minimums for things like ripple tolerance and transient response, they don't tightly regulate VRM thermals. That's why we see issue like early X299 motherboard VRMs overheating. Also, the performance of the VRM goes down when the VRM is heated up. Beyond the VRM throttle argument, MOSFETs have thermal derating curves, and ripple will also go up as the temperature of the capacitors and inductors increases.
We decided to test in controlled conditions and allow our thermal camera to record video, so you can see real-time results. We ran both Prime95 with AVX and then the Blender Benchmark (with AVX) both at stock and at a 5GHz standardized OC, and at the same time, we recorded power consumption and Blender times just to triple check one board wasn't being power limited and that settings were similar enough for direct comparison. The specifications for each test are listed in the first 10 seconds, and to be honest some of these videos are long, so we suggest you just skip to the end if you want. We should mention this test is done with a 120mm fan (low speed/noise) powered by a Molex connector blowing air at the top of the motherboard, it's about 2-3 inches above the VRM heat sink to mimic case airflow.
Stock Prime 95 w/AVX:
The first thing you might notice are the higher temps below the CPU socket on the competitor board at the beginning of the test. These are secondary VRMs for VCCSA and VCCIO, and as the CPU VRM heats up the thermal camera will reduce its color and pinpoint the new highest temperature on the CPU VCore VRM. We can see right out of the gate that the GIGABYTE board has a lead (lower is better of course). Both VRMs are balancing current well, we see the center of the VRM have the highest temperature, and this is normal as all the power is funneled to the CPU and all its surrounding copper is being influenced by other phases, while the same might not apply to outside phases. By the end of the test, we see the Master's lead is about 11-13 degrees on the surface.
5GHz Prime 95 w/AVX:
Now, we can see the difference towards the end is roughly 10C, but we should also notice the importance of letting you know that these are surface temperatures, and that the temperature inside the MOSFETs is much higher, slowly climbing to throttle point for most models.
Stock Blender:
The results here once again show the Z390 Aorus Master doing better than the equally priced competitor.
Here we see what is the general purpose of this VRM section of the OC guide, at the same price point as the other motherboard, the GIGABYTE Z390 Aorus Master has a VRM designed to run cooler than its competitions' under strenuous loads that will be encountered while using the new 9th generation CPUs. GIGABYTE's Z390 Aorus Master has a VRM, PCB (increased copper helps), and VRM heat sink put into a package that is designed to fully support and overclock the 9900K without restriction. It is not the first time people have compared the VRMs of these two motherboards, but watching it live with a thermal camera is a different experience.
 Elon Musk is the world's first trillionaire - enough to spend $1 million a day for nearly 3,000 years
 Anthropic's latest AI model 'Fable' was so powerful the US government banned the world from it
 Xbox prioritizes Elder Scrolls VI, Fallout, and Halo in new strategy shift
 Xbox exec wants to use ads to open up new access points, not just to collect money
 Redditor buys RTX 2080 Ti Super engineering sample on eBay, has the same number of cores as an RTX Titan but half the VRAM
 Report: Xbox may be spun off into subsidiary or joint venture with another company
 Microsoft is reportedly cutting hundreds of Azure jobs in China for the third time in two years
 The Trump Mobile T1 teardown reveals it's basically an HTC phone wearing gold paint
 Game Pass is subsidizing parts of Xbox's business, subscriber loss caused major damage
 Framework delays first Laptop 13 Pro shipments by a month over touchpad and display issues
 MOAIPLAY ORA PRO G1 850W ATX 3.1 PSU Review: high efficiency and 10-year warranty for $119.99
 Navman MiVue Smart True 4K Surround Dashcam Review - Seeing In All Directions At Once
 IQUNIX Magi96 Pro Aluminum Low Profile Mechanical Keyboard Review - Premium Build, Satisfying Sound
 Asetek Forte S-Series Racing Simulator Bundle Review
 Razer Pro Type Ergo Wireless Split Ergonomic Keyboard Review - Built for Comfort and Support
 ASUS ROG Strix Morph 96 Wireless Gaming Keyboard Review - Great Performance, More Affordable
 SAPPHIRE Radeon RX 9070 GRE PULSE OC Review - A New 1440p Challenger Has Arrived
 NZXT H6 RGB+ Compact Dual-Chamber Chassis Review
 ASRock Radeon RX 9070 GRE Steel Legend Review - The RDNA 4 Mid-Range Reshuffle
 ASRock Z890 Taichi Aqua Motherboard Review - Flagship features without the flagship price
 Windows 11 already has a voice typing tool, and it is the one most people are not using
 Quick Assist is the only remote-support tool I open when a relative calls about their PC
 The PowerToys utilities I keep enabled on every Windows 11 PC, and the ones I turned off within a week
 TweakTown's Best of Computex 2026 Awards - The Best Hardware, Gaming Gear, and AI
 Phison E37T SSD Controller Exclusive Preview - The Fastest DRAMless SSD Platform Yet
 USB Ports Not Working in Windows 11? Try These Fixes
 ASUS WiFi Routers and Networking Solutions Deliver Long-term Security and Reliability with No Additional Cost
 Second Monitor Not Detected in Windows 11? Try These Fixes
 Turn Your Old Smartphone Into a Dedicated Webcam for Your Windows PC
 The Send To menu is the right-click feature on Windows 11 that nobody bothers to customize