Introduction

Veteran computer enthusiasts generally have steps they follow when installing Windows on a PC. Following certain steps and procedures insures a successful install that delivers every drop of performance your computer has to give, while maintaining 24/7 reliability. We are going to document the steps we take when we install Windows, the settings we use, and the tools we use to protect our operating systems and data from disaster. You want to be the boss? Well, here you go.
Today, most of the excitement in performance computing comes through exponentially increasing non-volatile storage (Hard Disk Drive) performance. This is simply because a computer is only as fast as its non-volatile storage. Currently, CPUs and DRAM can process data exponentially faster than the fastest non-volatile storage device can deliver it. This is why exponentially increasing the performance of the non-volatile storage your Windows volume resides on has a truly transformational effect on your entire computing experience.
Today's power-user/enthusiast, by definition, will be installing their Windows operating system on a Solid-State Drive, or SSD. Solid state storage is the most important performance component found in a modern PC today; without it, you do not even have a performance system. Power-users will typically utilize a single SSD for their Windows volume. Enthusiasts that want the most performance from their storage will run RAID 0 with multiple SSD devices striped together.
Whether you use a single SSD, or an array of SSDs for your Windows volume, there are certain do's and don'ts associated with solid state storage devices. Technically, there is nothing that a user absolutely has to do any differently when installing an SSD, as opposed to a traditional spinning hard drive, but there are steps you can take, and settings you can implement that will deliver increased performance and reliability.
As a professional storage reviewer, I rely on a test-bed that is setup for ease of use and maximum performance. I image SSDs and SSD arrays back and forth several times a day. There are certain steps and settings I implement which insure my setup performs to its maximum potential. This TweakTown guide is designed to make it easy for anyone to install Windows on a single SSD, or an array of SSDs, like a professional. We are going to cover what we feel are the essentials for anyone from the n00b, to the power-user, to the seasoned enthusiast, in detailed and easy-to-follow sections.
SSD Secure Erase (SE)
A Secure Erase (SE) command completely cleans and resets your SSD (Solid-State Drive) to a factory-fresh state of performance.
Secure erasing is where an enthusiast begins anytime they are not starting with a new SSD. Secure erasing involves sending a charge of sufficient voltage to reset all of the bits. After a successful Secure Erase there is no data left on the drive; there is no address table. This state is what we call an FOB state (Fresh Out of Box).
An enthusiast always begins with a Secure Erase; however, the casual user would be fine with a quick format. Executing a quick format, TRIM's (cleans) your SSD without resetting the drive's address table. For formatting instructions, see the "Partitioning" section of this guide.
These days, there is very little reason for an optical drive on your computer, so what we need is an easy way to perform a Secure Erase without resorting to pulling out an optical drive to do it. Certain motherboards have a built-in capability to perform a Secure Erase. However, most motherboards do not have this capability, so we will look to the Secure Erase tool of choice, Parted Magic, to issue the Secure Erase command to our SSDs.
Parted Magic is a Linux-based tool that boots into DRAM, creating a temporary OS environment operating outside of Windows. You can perform a multitude of tasks within the Parted Magic environment, one of which is to issue a Secure Erase (SE) command that will reset your SSD to a FOB state.
First, we will create a bootable USB drive that will allow us to boot into Parted Magic without the need of an optical drive to do it. There are three items we need to create a bootable Parted Magic thumb drive. Of course, the first thing you will need is an unused thumb drive. Just about any thumb drive will work; although, in rare cases, the software will not detect your thumb drive, and you will need to try another thumb drive. The second and third items we need are an ISO of Parted Magic, and the software that creates a bootable thumb drive from the Parted Magic ISO; this software is called UNetbootin.
Both files can be downloaded by clicking HERE.
To create a bootable Parted Magic USB thumb drive, extract the files you just downloaded to your desktop. Insert a thumb drive into a USB port. Right click on the unetbootin-windows-585 file, and run as administrator.
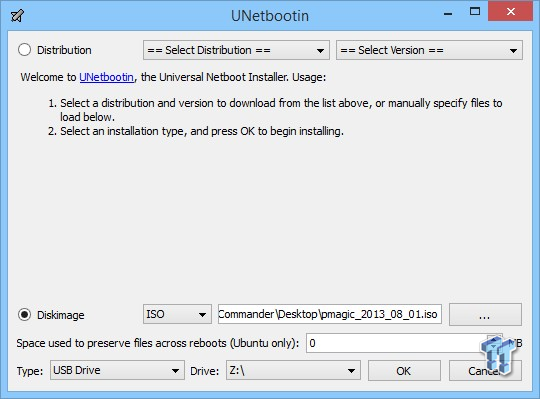
Select Diskimage, ISO, and browse to the "pmagic_2013_08_01.iso" file on your desktop. "Type:" should read USB Drive. "Drive:" should show the thumb drive you intend to use; if not, select your thumb drive. Click "OK".
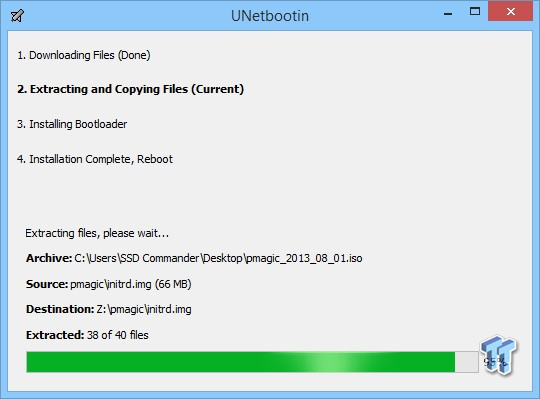
UNetbootin, will do the rest. When this notice pops-up:

Select "Yes to All". When install is complete, select "Exit."

Now we are ready to boot to Parted Magic and Secure Erase (SE) the attached SSD(s). Reboot your computer, and select the boot device (the thumb drive with Parted Magic)

At this screen:

Push "enter," and Parted Magic will finish loading.

Now you need to momentarily unplug and re-plug the power cable to the SSD(s) you intend to Secure Erase. If you do not hot-plug the drive(s) you intend to Secure Erase, it/they will be inaccessible to Secure Erase, and locked in a frozen state.

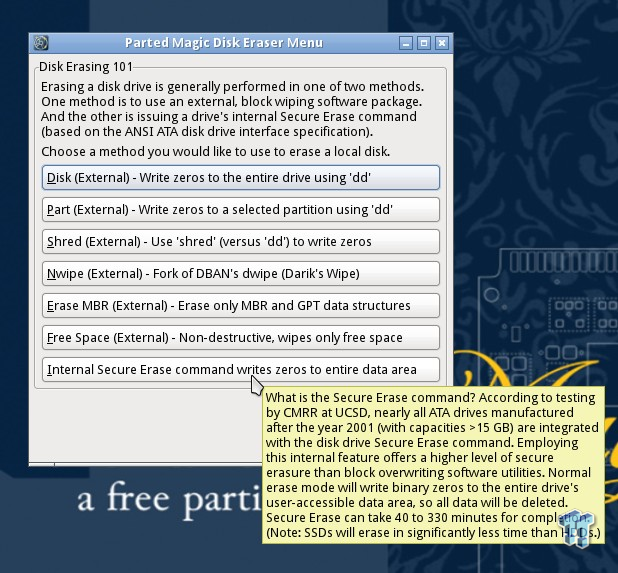
Double-click the eraser icon on the desktop. Select "Internal Secure Erase command writes zero's to entire data area" (I know it says it is going to write zeros across the drive, but that's not what happens):
Select the SSD:

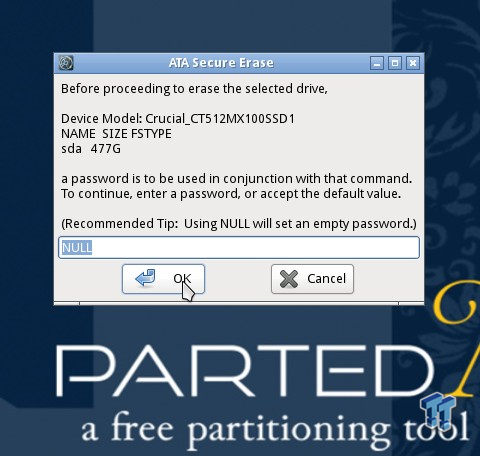
Select the default password by pressing "OK."
Select yes to move forward with the Secure Erase.

If your drive is capable of an enhanced Secure Erase, the following screen will pop-up:

Select "No." A standard Secure Erase is better. Depending on the SSD, the Secure Erase will take between one second and two minutes. The estimated time given is never accurate. When the command is complete, the following notice of completion is given:

That's it; you're all done. Your SSD is now in a factory fresh performance state, and is ready to load up Windows. There are other methods/toolboxes out there that will Secure Erase a SSD, but none are as universal and easy to use as Parted Magic. The Parted Magic version we are using for this guide is the latest free version available. We know this version works up to Z87 chipsets. There is a newer, paid version of Parted Magic available that works with chipsets up to X99. Click HERE to purchase.
The paid version works in the same way the free version we demonstrated works. You can use the same version of UNetbootin to create a bootable USB drive.
The procedure on the paid version is as follows:

Momentarily unplug and re-plug the power cable to the SSD you are going Secure Erase. Double-click the eraser icon on the Parted Magic Desktop, and the window above will open. Click the ATA Secure Erase button, and the following window will pop up:

Select your device or devices (the only device(s) not frozen), and click continue. Do NOT select "Enhanced" if it is available. Proceed to the following window:

In the window above, check the "I allow this utility to erase the listed device(s)" box, and then click the "Start Erase" button. The Secure Erase will run for between one second and two minutes.

When the Secure Erase has completed, this notice of completion is given:

Now your SSD is in a FOB state of performance, and is ready to partition. One of the nice things about Parted Magic is it allows you to erase multiple devices at the same time, which is something that BIOS utilities and toolboxes do not allow.
Partitioning, MBR & GPT, and Windows Installation
MBR (Master Boot Record) Partitions
Master Boot Record (MBR) is the standard partition upon which most of us will install our Windows operating system. Master Boot Record has its limitations; you can only have three primary partitions on the same disk, and only 2048GB is addressable on the same partition. The only reason I advocate MBR partitions over GPT for Windows installation is performance. I have extensively tested MBR vs. GPT, and have come to find that MBR partitions have slightly better performance.
When you install Windows on your computer (unless you are installing as boot UEFI only, set in your motherboard's BIOS), Windows will automatically create two MBR partitions. The first will be a boot partition that is 100MB - 350MB in size. The second will be the Windows "C" partition up to 2048GB. Ninety percent of you reading this are currently running this setup.
Personally, I do not care for the separate boot partition that Windows creates on its own when installing. If you want to install Windows on an MBR partition like a boss, the boot partition that Windows creates can be incorporated into your Windows OS Partition. It will be streamlined, like you see here:

Notice how there is no boot partition. Everything is contained within one partition. This allows me to create two more primary partitions on the same MBR disk, instead of only one, should I desire to do so. I commonly create a data partition and a system image partition on an OS SSD, both of which belong on a primary partition. An additional benefit of having everything on a single partition is that imaging is simplified.
The key to getting everything on a single partition is to pre-format your SSD or array volume. The easiest way to accomplish this is to format the SSD/array on another system. Alternatively, you can pre-format your OS Volume with Parted Magic. When there is a single partition that encompasses the entire volume, there is no space for Windows to create a separate boot partition; that forces Windows to move boot information to a folder on your Windows install, instead of creating a separate boot partition.
Here is how you pre-partition your freshly Secure Erased SSD/array using Windows:

Select MBR, then hit "OK."

Right click on the disk you want to format, then select "New Simple Volume."

Select "Do not assign a drive letter or drive path."

Make sure "Perform a quick format" is selected, and then click "next."

If you just let Windows installer format the drive, it will always create the boot partition. I like to use a MBR partition for my OS volume because it gives me slightly better performance than GPT. GPT partitions have the advantage over MBR Partitions in that you can utilize single partitions that exceed 2048GB.

When a MBR disk has a capacity that exceeds 2048GB (as shown above), Windows will create a primary partition of 2048GB, and the rest will be unallocated. You can create up to two more primary partitions with a capacity of 2048GB; with a MBR partitioned disk provided, you have everything on a single partition.
Note: To insure you get everything on a single partition, you need to make sure you are installing Windows with only the SSD/array that Windows is to reside on attached to the motherboard. It's possible that Windows installer will try and create a boot partition on another disk should one be attached.
Alternatively, you can completely skip this step, and just install Windows without pre-partitioning if you do not mind having the boot partition.
When you are installing Windows on an MBR partition, you need to be sure you do NOT boot Windows installer from UEFI.

I also recommend installing Windows 8.1 without an internet connection attached to your PC. With no active internet connection available, Windows 8.1 will not ask you for your email to create a user account.
If your needs exceed what can be done with a MBR partition, then it's time to move to a GPT (GUID Partition Table (GPT) partition.
GPT (GUID Partition Table) Partitions
GUID Partition Table (GPT) is a standard for the layout of the partition table on a physical hard disk, using globally unique identifiers (GUID). GPT Volumes have several advantages over MBR. There is no practical size limit for a partition; you can create as many primary partitions on a disk as you desire, and GPT is more secure than MBR.
This is the standard layout of a GPT partition:
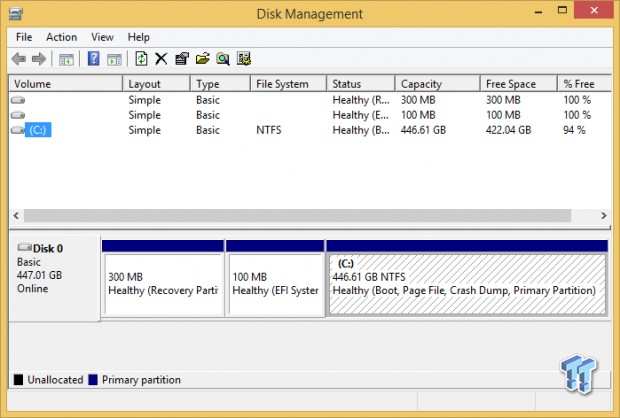
Ideally, when you install a GPT partition, you will be doing so utilizing an FOB or freshly Secure Erased SSD/array. There is no pre-partitioning involved with a GPT install; it provides no advantage. Step one when installing Windows on a GPT partition is to boot your Windows installer from UEFI, as shown below:

Windows installer is booting from a thumb drive that I created using the technique described in this guide. The same thumb drive shows up in my boot loader twice. If you intend to install using a GPT partition, you must boot Windows installer from UEFI.
If you are installing to an uninitialized disk/array, you will have no problems, and you simply install as normal. However, if you cannot install as GPT, it is because your disk is already initialized. If your disk has already initialized, then cleaning and initializing your disk/array for a GPT install is a simple matter.
From inside Windows setup, press Shift+F10 to open a command prompt window. Open the Diskpart tool by typing "diskpart," and hitting "enter."

At the DISKPART command prompt, type "list disk," and any attached disks will be listed, as shown here:

Select the drive to convert by typing "select disk disk number," and then press "enter." Once we have selected the correct disk, we need to clean it.

Type "clean" at the command prompt, press "enter." Now we need to convert our disk/array to GPT.

At the command prompt type "convert gpt," hit "enter," and your disk/array will convert to GPT, and you can proceed with a normal install. Exit the diskpart tool by typing "exit," then close the command prompt window, and continue the Windows Setup installation. When choosing the installation type, select custom. The drive will appear as a single area of unallocated space, as you can see below:

Select the unallocated space, and click "next." Windows begins the installation. That's it! You have successfully installed Windows on a GPT partition. Here is an example of a typical GPT Windows partition exceeding 2048GB:

Windows installed on a GPT disk will have three partitions on it, a recovery partition, an EFI system partition, and a Windows "C" partition. A GPT volume will boot slightly faster than a MBR volume, and now there are no limits to the number or size of primary partitions that can be created on the same volume.
Creating a Bootable Windows Thumb Drive
Windows Installer on a Thumb Drive
Optical drives are going the way of the floppy disk; many newer systems do not feature optical drives. Optical drives are bulky, and offer nothing that cannot be done better with a USB thumb drive. Systems that do not have an optical drive install Windows from a USB drive, instead of the Microsoft DVD.
There are advantages and disadvantages to installing Windows from a thumb drive as opposed to an optical drive. The main advantage of using a USB drive instead of a DVD is that Windows installs many times faster from a thumb drive than it does from a DVD. Other than that, it's just more convenient to have a thumb drive laying around than a DVD that can easily be scratched or otherwise damaged.
There is only one disadvantage to using a USB flash drive instead of a DVD: data retention. A commercial flash device must retain data on a non-powered device for the period of one year to meet JDEC specifications. What this means is you need to plug your thumb drive into a powered on USB port at least once a year to be certain all the data on your thumb drive continues to be retained.
You cannot just copy the files from your installation DVD onto a USB drive and expect it to be bootable. In order to get a bootable Windows USB drive, you have to use a tool that makes Windows setup bootable from a USB flash drive.
There are numerous tools available that can accomplish this. Microsoft has a free tool called Windows 7 USB DVD Downloader that can be used to create a bootable USB drive.

I personally do not like that tool because it will not work with all versions of Windows, it will not work with upgrade versions, or OEM versions of Windows. As you can see, the Windows tool requires an ISO (image file) of Windows to work. An ISO of your Windows Install Disk is an exact digital copy of Windows. If you purchase your copy of Windows online, you will be able to download a Windows ISO; if you have the actual Windows DVD, then you will need to create an ISO from that DVD.
I am not going to get into specifics of how to create your ISO file, but I will direct you to a simple to use (and free) tool that I personally use. There is a great free tool called ImgBurn available for download HERE. You can use ImgBurn to create an ISO file from your Windows install DVD.
I prefer using eZe Bootable USB. It will create a bootable USB drive of any version of Windows from Vista to the most current versions. You can download the file HERE. Insert the USB flash drive you intend to use to create a bootable Windows Installer on, extract the file, right click, and run as administrator.
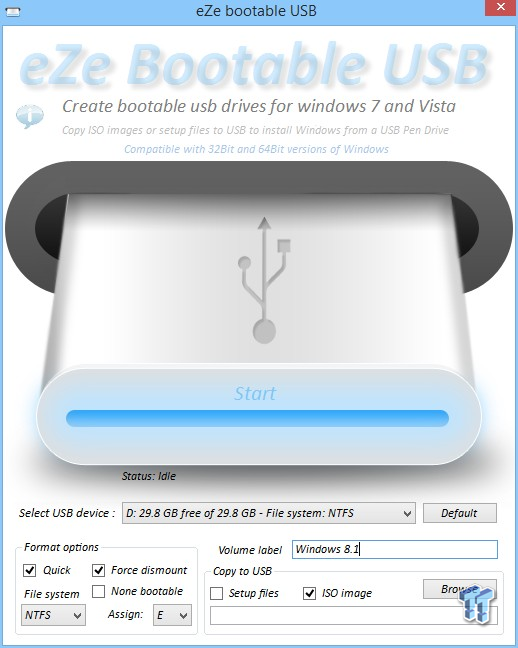
Select the USB device you want to make bootable. The thumb drive needs to be a minimum of 4GB in capacity. Make sure format options "Quick" and "Force Dismount" are both selected. Then, give your volume a label, and select the type of file to copy to the USB drive. In this case, we are going to select an ISO image by browsing to it. There is an option to select setup files in a non-ISO format, so I imagine you can could just browse to your Windows DVD, and copy directly from there, as opposed to creating an ISO. I have never tried it to be sure, so I am just assuming it would work.

Once you have selected the ISO or setup files you intend to copy to the USB drive, hit "Start," and then hit "OK."
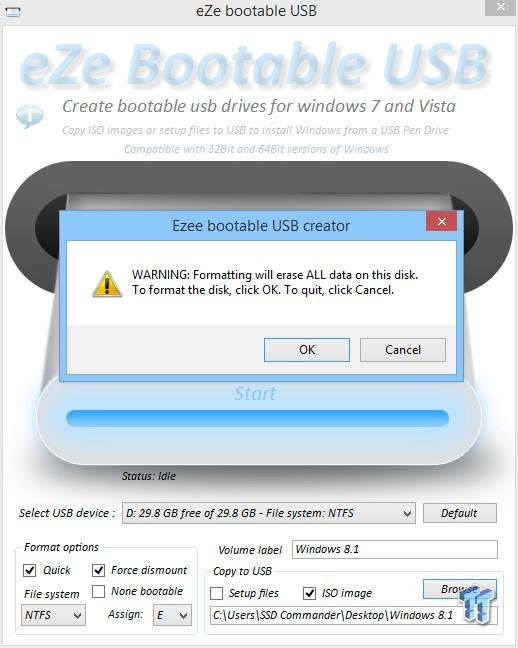
The tool will then extract the ISO or copy the files to your USB drive.

This will take up to 15 minutes, depending on your USB devices write capabilities. When the tool has finished creating your bootable USB drive, the tool issues a notice of completion.

Now you are ready to install Windows from your bootable thumb drive. If you used a USB 3.0 thumb drive, and you use a USB 3.0 port to install Windows, installation will take as few as three or four minutes. Once you try installing Windows from a bootable thumb drive, you will never want to use a DVD again. The only thing you need to remember to do is plug your thumb drive in once a year to maintain the integrity of its data.
Imaging
Imaging with Acronis True Image
Imaging is your ultimate insurance plan against disaster. Imaging allows you to recover your computer to the exact state it was in when you created the image. It's like a factory restore, but so much better. A factory restore allows you to restore your computer to a like-new state in the event your OS volume becomes corrupt, or you get a virus, or some other catastrophic event renders your computer unusable.
The problem with a factory restore is that it returns your computer to the exact state it was in when you first powered it on. This means everything you installed on your computer will be gone when you do a factory restore. As you can imagine, it could take you many hours to re-install the software you had installed, and you will also have to endure all the hassle of finding product keys, and getting all your settings to where they should be.
Most of you reading this guide build your own computers, so a factory restore is not an option. Power users and enthusiasts rely on having a complete image of their finalized installation that includes everything they have installed, along with all the settings they use in place. This way, when we need or want to re-do our Windows installation, it will just take a few minutes to re-image our complete installation, software, settings, and all.
Windows has built-in imaging software, but it is very limited. So limited, in fact, that we consider it worthless. For our imaging purposes, we turn to one piece of software that we consider absolutely essential, Acronis True Image. If you do not own this software, you need to buy it, but it will be the best $50 you've ever spent.
There are many functions that Acronis True Image can perform, but the most important thing Acronis does is it allows you to image to any capacity drive(s), provided the drive(s) capacity is at least as large as the amount of data contained on your volume. What this means is, for example, if you have a 500GB drive that contains 49GB of data, you can restore your image to a drive as small as 50GB. If you create an image with Windows, you will have restore it to a drive that has a minimum capacity of 500GB.
There are countless other functions that Acronis can perform, and we are not going to get into all of them because we are not trying to write a book here. However, we are going to cover the basics of creating and restoring a system image.
Before we start, we want to make something clear: you do not want to clone a drive, you want to create an image, and then restore that image. If you want to replace your disk, do not clone it to another drive, make an image, and restore it to the new drive.
First, we will want to create a system image as soon as we have everything we want loaded on our system and set the way we want it. There are two ways of accomplishing this; the first is with Acronis running from within a Windows environment.

In this case, I am imaging my laptop. My laptop only has one drive, so I am going to backup (image) my entire PC. If you have several drives attached to your PC, you can pick the drive(s) you want to image. Select the destination drive or partition for the image you will create:

If you want to, you can hit "options," and select the type of backup you want to make.

I like to use single version scheme. The single version scheme is a standalone image that is not incrementally updated. Hit "OK."

Acronis will create a system image on your selected drive. The image is a compressed .tib file. If you look at the first screen shot, you can see that my 256GB drive contains 70GB of data. In the following screen shot, you can see Acronis has compressed that 70GB into a 45GB file:

Now your system is completely safe. You can restore it at any time to the very moment you took that image. Instead of hours or even days of re-installing everything on your computer, you can simply restore it in a few minutes from a secondary or external drive, or separate partition on the same drive. Acronis allows you to save and restore from NAS appliances, or cloud drives if you prefer, but those alternatives take hours to create images and restore them, so I do not recommend using them.
So, you need to restore an image to your system drive, or a different drive. Again, there are two ways to accomplish this; the first is from within a Windows environment, as seen in the following image:

On the backup screen, choose the "RECOVER PC" tab. You can either choose a recovery point...

... or you can hit the "RECOVER DISKS" tab, as seen here:

Hitting the "RECOVER DISKS" tab will give you options as to what and where you want to recover the image to. Hit the "RECOVER NOW" tab, and your PC will restart, and Acronis will restore the image to the drive you selected.
The first method we covered is imaging and restoring from within a Windows environment. However, what if you cannot boot into Windows to run Acronis? Well, Acronis has you covered. Acronis can be run from bootable media outside of a Windows environment. In order to do this, we first need to create an Acronis rescue media bootable device. You can create either a bootable DVD, or a bootable USB thumb drive. To create this bootable media device, click on the "Tools" tab of your Acronis interface.

Next, choose "RESCUE MEDIA BUILDER," and then choose "Acronis bootable rescue media."

Now choose the media you want to utilize.

In this case, I want to install the bootable rescue media on a USB flash drive. Hit the proceed tab...

...and Acronis will create your bootable rescue media.

The real gold is the bootable media because it allows you to create and restore images on any PC. It doesn't matter if Acronis has been installed or not.
Now, let's take a look at how to image and restore from our rescue media. The thing to remember is: if you created an image from a MBR partition, do not boot the rescue media as UEFI, boot it as USB, as shown below:

The opposite is true if you imaged a GPT partition; in that case, do not boot the rescue media as USB, boot it as UEFI.

After booting to the Acronis rescue media, you can both create and restore images. To create an image, select "Back Up," and "My Disks" from the "Home" screen.

Next, select what you want to back up.

In this case, I am selecting the entire disk, which is typically what you will want to do. DO NOT select "Back up sector-by-sector"; there is no reason to use it. Next, make sure "Create new backup archive" is selected.

Then browse to where you want to save your image. Give your image a unique name so it is easy to identify later when you need it.

Hit "okay," then hit "proceed"...

...and your image will be created.

That's it, you have created a complete image without ever booting into Windows.
Recovering a partition from your Acronis rescue media is very similar. Again, if you are recovering an MBR partition, DO NOT boot from UEFI. If you are recovering a GPT partition, you MUST boot from UEFI. You can recover the image to any disk you want; it doesn't matter as long as the disk you are imaging to is larger than the amount of uncompressed data that the image was made from.
At the "Home" screen, select "Recover," "My Disks."

Next, browse to the location of the image you want to recover.

Select the drive your image is located on, then select the image you want to recover.

Hit "OK," then choose recovery method (Recover whole disks and partitions).

Next, choose items to recover.

Choose the whole disk. Next, choose the destination.

Choose the disk you want to restore the image to, then hit next.

Hit "Proceed," and Acronis will restore the image.

That's it; after Acronis is finished, you can boot from your freshly imaged disk, and everything will be as it was when you took the image. The only settings that may need to be re-enabled will be Write caching on an array, and to turn off Windows buffer flushing if you desire. This may seem like it is an involved process, but it's really not at all. After you have done it once, it's a very fast and easy procedure.
Enthusiast BIOS Settings
High Performance BIOS Settings
Certain settings in your BIOS can have a dramatic effect on your SSD's performance. Not all BIOS have the same settings, so we will just cover a few of the basics that will be available to most of you that have a modern motherboard.
Typically, the idea is to supply full power to your storage and CPU to achieve the best performance. As a power user/enthusiast, this should be your goal for any scenario. Things like CPU throttling, speed stepping, and reduced power consumption, are for people running their OEM store bought computers.
Those of us that pay the premium for high performance components typically try to squeeze all the performance we can get from our computers. With this in mind, it's absolutely counter intuitive to buy a 3.5GHZ processor, overclock it to 4.5GHZ, and then bump around in Windows at 1.6GHZ most of the time to save 50 cents worth of power per month.
This statement is likely to raise a few eyebrows from a whole host of timid so-called "experts" in the review community; however, this is TweakTown and as the name implies, this is not your grandmother's review site. We believe in extracting the all performance your computer is capable of delivering.
When it comes to storage performance, delivering full power at all times is the only way to fly. High performance storage is all about random performance, but what we typically see is an emphasis on sequential performance. This is very misleading, and would lead you to believe that all SSDs are created equal when, in fact, they are not.
The most important metric to overall system performance is great 4k QD1 performance with incompressible data. The prevailing theory is that there is an 80/20 or a 70/30 read to write ratio. However, when we closely examine what is actually happening, we find that over 50% of the time, small random 4k data is being written to your storage device. What this means is the most important metric you should be looking at is 4k QD1 write performance.
Achieving the best 4k QD1 performance, both read and write, is the avenue to superior overall system performance. SSDs that have superior 4k QD1 incompressible write performance tend to deliver the best all-around system performance.
Settings in your BIOS have a dramatic effect on every SSD's 4k QD1 random write performance. Here is a good example:
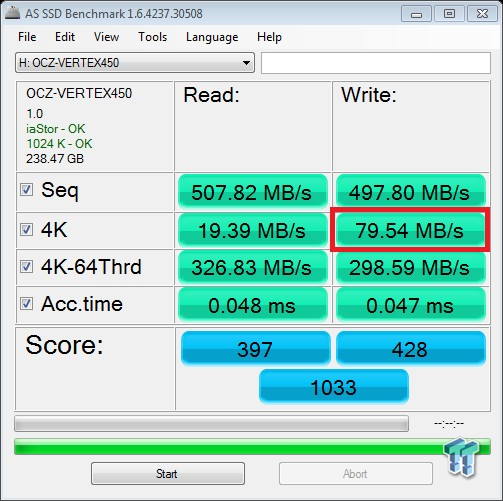
This is a Vertex 450 256GB SSD, running on a system with power saving features enabled. Notice the 4k QD1 write performance of 79.54 MB/s. (This image was publicly available, and taken from the internet). Here is an identical Vertex 450 256GB SSD, benched utilizing the settings in this guide:

We are able to achieve a 4k QD1 write speed of 165.25 MB/s with the very same hardware. This is an example of how much of a difference proper settings can make on the same piece of hardware. Settings available in most BIOS are responsible for the majority of the difference you see. There are settings in in Windows, as well as a choice of the proper driver, that also contribute in a lesser fashion to the massive difference in performance illustrated by these examples. We will cover those settings further along in this guide.
Let's examine a few basic BIOS settings that will not only contribute to superior storage performance, but superior overall system performance as well. There are two main settings that affect SSD performance. The first and most important setting we need to disable is CPU C State Support.

Disabling C States provides a dramatic increase in random 4k QD1 performance; increasing 4k QD1 random performance has a dramatic impact on overall system performance. The second most important setting we need to disable is Intel SpeedStep Technology, also known as EIST.

Disabling these two settings allows your CPU to run at full speed, and allows for full power delivery to your SSD. Next on the list is disabling SATA Aggressive Link Power Management.

Disabling keeps your SSD from going in and out of low power states. This is important for consistently high performance at all times.
There is also a setting that, as far as I know, is only found on ASRock motherboards. This setting is accessed by double-clicking on individual SATA ports in the list. I am showing you this because it is a setting that is not easy to find if you do not know it's there. Personally, I use and recommend ASRock motherboards, and if you own one, this becomes a very important setting that has a very significant impact on SSD performance. The Default setting is set at HDD.

Change the setting to Solid-State Drive for maximum performance on your ASRock based system. At the same time, you can enable Hot Plugging, which allows you to plug in SATA drives, and have them immediately detected by your running system, instead of having to restart your system before they are detected.
SATA Mode Selection should be set to AHCI, or RAID mode, prior to installing Windows.

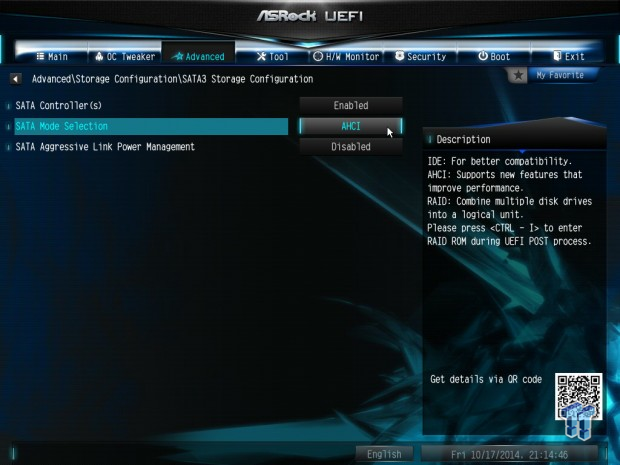
AHCI mode is most commonly utilized, and like most common practices, it is the wrong way of doing things in the enthusiast world. Most people think that RAID mode is only used for multiple drive arrays. RAID mode can be utilized with a single drive, or multiple drives striped into an array. Installing Windows in RAID mode, even with a single drive, gives you all the features and performance of AHCI, but with the flexibility to easily add drives to your OS Volume if you desire higher storage performance and larger capacity.
In addition, you can image back and forth from a single drive to an array without issue. It should be noted that caching software like RAPID or PlexTurbo will not work in RAID mode; it's AHCI only. IMO caching software is completely useless, and nothing more than a mirage anyway, so it is something that I do not use, or advise using. Install in RAID mode for the best performance, and the most flexibility.
The following settings don't have much of a direct impact on SSD performance, but they do allow you to overclock better, and better allocate system resources where they are needed. Some of these settings are particular to current Intel based motherboards, and some are available to all motherboards. Disable Spread Spectrum:

This will allow for better overclocking capabilities, which will result in higher storage performance. Enable High BCLK Mode:

This will allow for better overclocking capabilities, which will result in higher storage performance. Set CPU Load-Line Calibration to the highest performance mode, which is typically Level 1:

This will allow for better overclocking capabilities, which will result in higher storage performance. To save system resources, it is a good idea to disable features that you are not utilizing.


Enabling your System, and SSD's, to deliver every bit of performance available begins with your motherboards BIOS. BIOS settings are only part of the picture, so we also need to compliment these settings by implementing settings in Windows, which we will cover in the next section.
Enthusiast Windows Settings and Drivers
High Performance Windows Settings and Drivers
After setting up our BIOS for maximum performance, we need to do the same in Windows. As I said before, delivering constant full power to your system is the key to high performance. Streamlining your Windows installation is also in order. The first step after installing Windows is to adjust power settings. Windows auto defaults to a balanced power setting, which is fine for your laptop, but it's not what we are looking for on our enthusiast class computers.
The first thing we want to do is to enable the high performance power plan in Windows. This prevents your computer from bouncing in and out of low power states, which is a major drag on performance, especially your SSD's performance. Browse to your control panels' Power Options, and select the High performance power setting from the drop down list.

Then hit "Change plan settings" on your high performance selection, expand the "Turn off hard disk after" tab.

Enter an amount of minutes that are sufficient to keep your hard disk from turning off during a computing session.
Next, we want to let Windows know that we are running a solid state drive. Once Windows knows there is solid state storage on board, Windows will make some internal adjustments such as automatically issuing TRIM commands. Open an administrative command prompt, and type "winsat disk."

Press "enter," and Windows will run an assessment of your disk's performance.

Now Windows recognizes that it is running on solid state storage, as shown here in the "Optimize Drives" console. This console allows you to manually execute TRIM commands on your solid state devices, including Intel IRST based arrays.

Optimizations and Drivers for Single SSDs
Utilizing the correct storage driver has a large impact on how well your SSD performs on your Intel based system. For a single drive, this is an evolving metric; generally, you will get the best performance from the latest IRST (Intel Rapid Storage Technology) driver. Currently, we are using Intel's 12.9 series driver, and it delivers great performance; in fact, it's slightly better than the most current 13 series driver.
For your convenience, you can download the IRST driver we are using at the moment by clicking HERE. After installing IRST driver, there are two settings that we need to disable; the first is Windows buffer flushing.
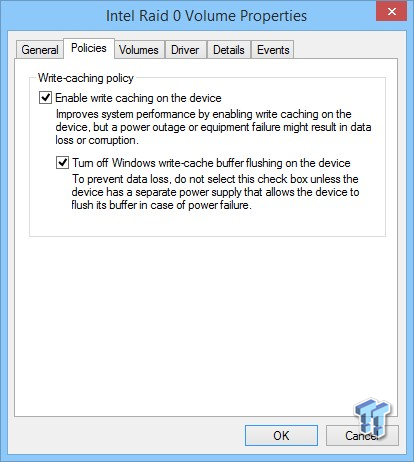
This is an old setting that was relevant to HDDs, and is no longer relevant to SSDs. Here's why it is not relevant to SSDs: When write caching is enabled, data is cached and held in volatile memory until your slow spinning HDD has time to write it. SSDs are so speedy that data is basically immediately written to non-volatile memory, so there is nothing buffered to flush. Disabling Windows buffer flushing results in a nice bump in performance.
The next thing we want to do is disable Link Power Management in the IRST control panel. Link power management increases I/O latency, resulting in lower performance, which is why we want to disable this feature. Link Power Management is found by clicking the performance tab in IRST control panel.

After disabling, you must restart your system for the change to take effect.
Optimizations and Drivers for Intel RST RAID 0 Arrays
The driver you choose to utilize for your Intel motherboard based array has a huge impact on array performance. For maximum array performance, one driver shines above the rest. Intel's 11.2 IRST driver provides such superior RAID 0 performance in comparison to newer drivers that it's all we use. This driver is compatible with all versions of Windows from XP to Windows 10 technical preview. It will work with P67, Z68, Z77, Z87, Z97, and X99 chipsets.
For your convenience, you can download the IRST 11.2 driver by clicking HERE. It should be noted that .NET Framework 3.5 should be installed prior to installing IRST 11.2. The easiest way to get what you need is to go to "Turn Windows features on or off," and select ".NET Framework 3.5 (includes .NET 2.0 and 3.0)."
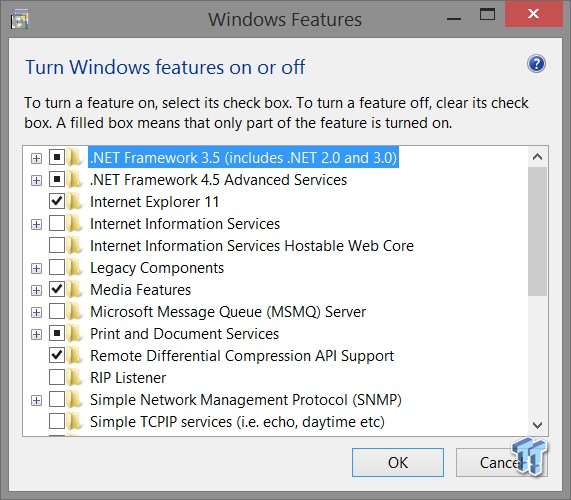
Hit "OK," and allow the files to download from Windows update. After .NET 3.5 finishes installing, you will need to restart your computer to apply the changes.
In addition to disabling Windows buffer flushing, the most important setting for maximum performance is to enable write caching in IRST control panel. This is different than Windows write caching. To enable write caching on your array, open up your IRST control panel, and hit the manage tab as shown here:

Click "Advanced," and you will have the option to enable write-back cache.
Note: Optimal stripe size is 64 KB for two and three drive arrays; 32 KB for four to six drive arrays. This is different than the suggested stripe size given by 12 and 13 series drivers.
If you choose to utilize 12 or 13 series drivers for your array, Windows buffer flushing must be disabled before you will have the option to enable the write-back caching policy.


I highly recommend you run RAID 0 for your OS Volume; the performance RAID 0 delivers is really second to none. As with any setup, keeping a current image of your OS volume is a good practice. Personally, I have never once experienced a system failure with a RAID volume; however, there is technically a higher chance of failure when you run RAID 0, but SSDs are so reliable that the likelihood of a failure is very, very low.
The drivers and settings given above are mandatory if you desire maximum performance. There are additional settings that do not have as huge of an impact on system performance, but nevertheless, do contribute to overall system performance and streamlining of your Operating System. Let's take a look at some of them.
So, you turned off your hibernation file, because why would you use one? The thing is, it's still there taking up as much space as you have RAM. To streamline your OS and reclaim that space, open an Administrator command prompt and type "powercfg -h off".

Press "enter," and when you restart, you will have reclaimed all that dead space on your SSD.
If you have 8GB or more of DRAM, you can turn off your paging file. This will allow for faster startup, shut down, and it will reclaim some unused space on your SSD.

As you can see, 5GB of my SSDs space is used for a paging file.

To turn off the paging file, uncheck the automatic management box and select "no paging file," then hit "yes," and "okay."

After a restart, there will be no paging file.
When you take system images, there is no reason to have System Restore enabled. It does not provide much in the way of protection; a system image provides real protection.

This is the actual size of a streamlined Windows install with all drivers installed:

You need a little more? Let's take a look at some advanced power settings in the next section.
Advanced Power Settings
These settings will assure that your CPU is giving all it is capable of by preventing throttling and core parking. This also boosts SSD performance. Depending on your setup, these registry settings can deliver as much as a ten percent increase in storage performance. Some will see an increase, and some may not; it really depends on how your particular BIOS is setup.
For your convenience, we have these registry settings available for download. You can download them by clicking HERE.
By merging these registry entries, we get advanced power settings that were previously unavailable. After you have downloaded the registry entries, you need to merge them into your registry. Begin by right clicking on a registry file.

Select "Merge," and hit "enter."

A warning will pop-up; select "yes."

A confirmation notice that the values have been successfully entered into the registry will be issued. Repeat the procedure with the remaining five registry entries.
Now when we browse to advanced power settings, and expand "Processor power management"...

... we have a bunch of power settings that were previously unavailable. Go down the list, and set everything to 100 percent:
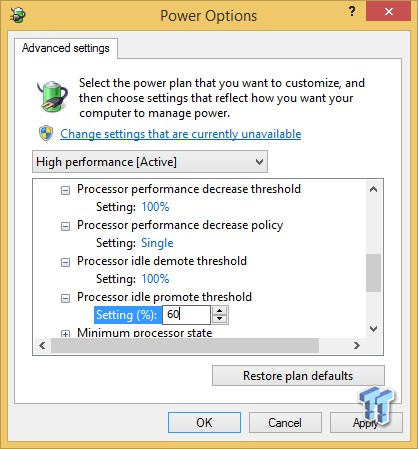
Keep "Processor performance decrease policy" set at "Single." Hit "apply" and "exit". Note: Windows 7 users may need to do a restart before all the policies are listed.
To insure core parking is completely disabled, we can manually turn it off. Open an administrator command prompt and paste this line: "powercfg -setacvalueindex scheme_current sub_processor 0cc5b647-c1df-4637-891a-dec35c318583 100" (without the quote marks of course).

Hit "enter," and do a restart. Now you have assurance that power is being delivered consistently, and that Windows cannot park cores, or throttle your CPU.
Creating Arrays with Intel Option ROM
Creating Arrays using Intel OROM Utility
Either you can create arrays using the IRST control panel in Windows or, you can create an array utilizing Intel's Option ROM utility built into your motherboards BIOS. I recommend creating your array for the first time by using the Windows utility, and preformatting the partition prior to installing Windows, so you can get rid of the boot partition. Here is an example of my dual boot array's disk layout:

I have removed disk access to the other OS partition, and from the USB drives I only want to access via a boot menu. After you have an Image with everything on a single partition (no boot partition created), there is no need to preformat when you re-image to a drive or an array to prevent the boot partitions from being created.
Almost immediately after powering on your computer, hit "Ctrl" and "I" simultaneously, and you will enter Intel's Option ROM control panel.

Here you can create arrays without needing to do it from within a Windows environment. Select one "Create RAID Volume" by hitting "enter" when it is highlighted. Give your volume a name if desired, then hit "enter." Select the RAID level you want to create, RAID 0, and hit "enter."

Now use the spacebar to select the disks you want to use for your array.

Press "enter" when you have finished selecting the disks for your array. Next, select the stripe size you want. For two and three drive arrays, select a 64KB stripe size; for four to six drive arrays, select a 32KB stripe size.

Selection of proper stripe size has a great deal of impact on overall array performance, so it is important that you utilize the stripe sizes listed above. We have extensively tested which stripe sizes perform the best, so you don't have to experiment on your own. Next, select the capacity of your array; it's just best to use the entire capacity available, and shrink it later in Windows if you want to create another partition, or use unallocated space for overprovisioning purposes. Hit "Y," and then "enter" to create your array.
Exit the utility by hitting "Y".

Now you have created an array that is ready to receive an image or install Windows, without ever entering Windows.
Changing Storage Modes without Reinstalling Windows
AHCI to RAID or RAID to AHCI
So, you've decided that you want to change storage modes for one reason or another. You go into your BIOS, and change your storage mode from AHCI to RAID, or RAID to AHCI, and reboot only to be greeted with a BSOD. Looks like you will have to reinstall Windows, which sucks because you have a million programs installed and running just right.
Well, there is an easy way. A quick couple of registry changes, and you will be able to boot into Windows in the storage mode of your choice. Make these registry changes, and Windows will boot up with the appropriate driver for the storage mode you want to change, without having to reinstall Windows and all that software.
Typically, users want to change from AHCI mode to RAID mode after learning how much better storage performance and flexibility RAID has to offer. Let's cover that scenario first. The first step is to open Windows registry editor. In your search bar, type "regedit,"then right click on the icon that pops up, and select "run as administrator."
Windows 8 users, navigate to:
HKEY_LOCAL_MACHINE System CurrentControlSet Services storahci.
Right click on the "Start" parameter, hit "modify," and edit the value data, changing the zero to a three. Entering a three disables the startup of a driver, and we want to disable the startup of the AHCI driver, and load the RAID driver instead.

Windows 7 users, navigate to:
HKEY_LOCAL_MACHINE System CurrentControlSet Services msahci.
Right click on the "Start" parameter, hit "modify," and edit the value data, changing the zero to a three.
Next, we need to enable the RAID driver to start up at boot.
Windows 8 users, navigate to: HKEY_LOCAL_MACHINE System CurrentControlSet Services iaStorV StartOverride.
Right click on "REG_DWORD," and change the value data from three to zero.

Windows 7 users, navigate to:
HKEY_LOCAL_MACHINE System CurrentControlSet Services iaStorV.
Right click on the "Start" parameter, hit "modify," and edit the value data, changing the three to a zero. Hit "OK," and exit the Registry Editor.
Now, reboot, enter your motherboards BIOS, and change SATA Mode from AHCI to RAID. Reboot again, and Windows will load with the built-in Windows RAID driver.
At this point, if you were running an IRST storage driver, you will need to uninstall it, and then re-install it for functionality.
If you want to be able to switch from AHCI to RAID, and back again, then you can just leave both registry entries set at zero. If you are running an IRST driver, and want to have the capability to switch modes at will, then you need to change one more registry entry from three to zero.
Windows 8 users, navigate to: HKEY_LOCAL_MACHINE System CurrentControlSet Services iaStorAV StartOverride.
Right click on "REG_DWORD," and change the value data from three to zero.

Windows 7 users, navigate to:
HKEY_LOCAL_MACHINE System CurrentControlSet Services iaStorAV.
Right click on the "Start" parameter, hit "modify," and edit the value data, changing the three to a zero. Hit "OK," and exit the Registry Editor.
Now you can change from RAID to AHCI. There is really no reason I can think of to do this maneuver, unless you want to run a single drive and enable caching software that only functions in AHCI mode. To go backward, as it were, just do the exact opposite:
Windows 8 users, navigate to:
HKEY_LOCAL_MACHINE System CurrentControlSet Services storahci.
Right click on the "Start" parameter, hit "modify," and edit the value data, changing the three to a zero.
Windows 7 users, navigate to:
HKEY_LOCAL_MACHINE System CurrentControlSet Services msahci.
Right click on the "Start" parameter, hit "modify," and edit the value data, changing the three to a zero.
Next, disable RAID driver.
Windows 8 users, navigate to: HKEY_LOCAL_MACHINE System CurrentControlSet Services iaStorV StartOverride.
Right click on "REG_DWORD," and change the value data from zero to three.

Windows 7 users, navigate to:
HKEY_LOCAL_MACHINE System CurrentControlSet Services iaStorV.
Right click on the "Start" parameter, hit "modify," and edit the value data, changing the zero to a three.
You may want to disable the IRST RAID driver as well.
Windows 8 users, navigate to: HKEY_LOCAL_MACHINE System CurrentControlSet Services iaStorAV StartOverride.
Right click on "REG_DWORD," and change the value data from zero to three.
Windows 7 users, navigate to:
HKEY_LOCAL_MACHINE System CurrentControlSet Services iaStorAV.
Right click on the "Start" parameter, hit "modify," and edit the value data, changing the zero to a three. Hit "OK," and exit the Registry Editor.
Now, reboot, enter your motherboards BIOS, and change SATA Mode from RAID to AHCI. Reboot again, and now Windows will load with the built-in Windows AHCI driver.
At this point, if you were running an IRST storage driver, then you will need to uninstall it, and then re-install it for functionality.
Clean Installing an Upgrade
One thing that is frustrating to enthusiasts is clean installing from an upgrade. For some unknown reason, Microsoft wants you to install your upgrade over an existing install. This is an absolute no-no for an enthusiast. We want everything installed in a clean and streamlined manner.
To accomplish clean installing an upgrade, we need to trick Windows into thinking it was upgraded with an existing install in place.
Clean installing a Windows 7 or 8 upgrade:
Step one is, of course, having an install upgrade disc, or a bootable USB drive with a Windows 7 or Windows 8 upgrade loaded on it.
Install your Windows 7 or 8 upgrade just as you would a normal install. Windows 7 users: do not enter your serial. Type "regedit" into the search bar on your start menu. Right click on the icon, and run as administrator.
Navigate to: HKEY_LOCAL_MACHINE/Software/Microsoft/Windows/CurrentVersion/Setup/OOBE/
Change MediaBootInstall from one to zero
Exit Windows Registry Editor
Type "cmd" into the search bar on your start menu. Right click on the icon, and run as administrator.
Type "slmgr /rearm" (without quotes, and there is a space between slmgr and the forward slash). Then hit "enter."
Reboot Windows.
Windows 7 users, run activation utility, and enter your product key to activate.
Windows will activate itself. If it does not for some reason, then run the activation utility, and if necessary, activate by following the instructions to activate over the phone. Even if it says you cannot use the key you used, just call the phone activation, and follow the instructions. When you are asked the question "How many computers have been installed with this copy of Windows?" you answer "one," and then you will be given a number that will complete the activation once entered.
Now you have installed your Windows 7 or Windows 8 upgrade as a clean install.
Clean installing a Windows 8.1 upgrade.
Clean installing a Windows 8.1 upgrade is a little different. First, you need to get a copy of Windows 8.1 upgrade in an ISO format. Getting the upgrade ISO is the hard part. You can Google how to get it using your Windows 8 key. I had success getting mine a while back, so I have an ISO saved. But now, when I go to get it using the same procedure, I can't make it work. Microsoft, being the jerks that they are, only want you to be able to upgrade from 8 to 8.1 by using their store, which kills the prospect of doing a clean install of an upgrade.
Anyway, if you manage to get your hands-on the 8.1 upgrade ISO, the trick is install Windows 8.1 using a generic Windows 8.1 key that can be easily found online by googling it. This generic key allows the installation to move forward so afterwards you can replace the generic key with your legitimate Windows 8 key and you will have an activated clean install of a Windows 8.1 upgrade.
I recommend installing the upgrade without internet access to your PC. This also allows you to skip the annoying prompt for an email account when logging in the first time.
After clean installing the upgrade, we need to replace the generic Windows 8.1 key we used to install the upgrade with your own legitimate Windows 8 key and here's how it's done:
Type "cmd" into the search bar on your start menu. Right click on the icon, and run as administrator.
Type "slmgr -ipk" (without quotes, and there is a space between slmgr and the -ipk), then hit the space bar, and type your legitimate Windows 8 key, using the dashes.

Hit "enter," and a notification that your key has been successfully installed will pop up.

Hit "OK," connect your PC to the internet, and reboot your PC.
Windows will activate itself. If it does not for some reason, run the activation utility, and if necessary, activate by following the instructions to activate over the phone. Even if it says you cannot use the key you used, just call the phone activation and follow the instructions. When you are asked the question "How many computers have been installed with this copy of Windows?" you answer "one," and then you will be given a number that will complete the activation once entered.
Final Thoughts

Solid state storage is the most important performance component found in a modern system today. Without solid state storage, you do not even have a performance system.
Whether you are a casual user, or an enthusiast, there is only one component that truly brings performance that becomes an absolute necessity once experienced. Solid state storage has revolutionized the personal computing experience like nothing else. I build systems for people in the community where I live, and the same thing always happens. After their first SSD, every computer they own must be upgraded with a SSD; they can no longer live life in the slow lane.
When SSDs first started appearing on the scene, there was a lot of black magic associated with them; they were the most exotic and expensive component you could buy. There were so many settings and tweaks involved with owning a SSD, and keeping it running in an optimal fashion, that only committed enthusiasts were willing to invest the time and money necessary to experience SSD bliss.
Today, SSDs are becoming mainstream. Prices have become affordable, and there is no need to be a tech guru to install one and have it run reliably. As it stands, there is nothing whatsoever a user needs do other than just installing their SSD and using it just like any HDD. However, if you are an enthusiast looking to get the most from your SSD, then this guide is for you. The settings and techniques that are outlined in this guide can take your SSD, and your entire system for that matter, to the next level of cutting-edge performance, while maintaining 24/7 reliability.
You wanted to know how the pros do it, and now you know.

