


Our Verdict
Introduction, Specifications, and Pricing
XPG is a newcomer to offering chassis as it has branched away from its parent company ADATA. Originally XPG was a series of gaming memory and SSD's from ADATA, but now they have been split as a separate virtual entity. We recently had the opportunity to check out the XPG Invader chassis, and it did well but had some minor issues which we pointed out. Since this chassis is from a similar range and timeframe of the new chassis offerings from XPG, we imagine they still have a bit of learning, so there will likely be things that can be improved with the XPG Battlecruiser we are looking at today.
According to XPG, the Battlecruiser is "Built for the ultimate gamer," and it is listed as a super mid-tower. This, to me, means that they built in most everything that an enthusiast's gamer would desire, so let's see if that's the case.
Key features pulled directly from the XPG Webpage are as follows:
- Metal Construction with Glass Panels
- XPG PRIME ARGB Combo Controller
- Efficient Air-Flow Cooling Design
- Modular Tool-Less Design
- Magnetic Dust-Filter, and Front Panels
- Smart Cable Management
- Excellent Interior Space for Setup and Upgrades
- Versatile I/O Ports Selection
All of the above features look prime for an enthusiast-class chassis, so we will have to dig in and see how they stack versus what is out there.

Best Deals: XPG Battlecruiser Super Mid-Tower Chassis
Prices last scanned 4 hours and 19 minutes ago
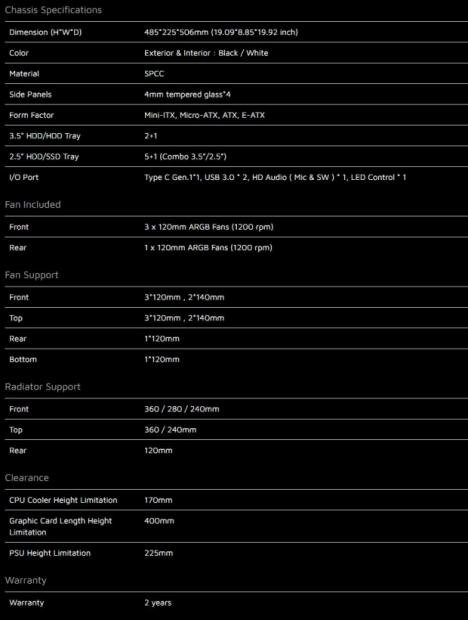
The part number for the XPG Battlecruiser is BATTLECRUISER-BKCWW, which is a black chassis with tempered glass. There is also the suffix WHCWW, which is the white version of the Battlecruiser. The battlecruiser measures in at 485mm high, 506mm deep, and 225mm wide. The width is a bit troubling as that is one of the determining factors if a radiator can fit up top with taller RGB RAM modules. We will check that out when we build in it.
Motherboard fitment is from ITX up to E-ATX, and when looking at the motherboard tray in the chassis, I believe it. 3.5" HDD's can mount up to two with one extra from the plate on the PSU shroud. 2.5" drives can mount five on the rear of the motherboard tray area while one more can be put on top of the PSU tray should you opt for that versus an HDD. PSU clearance is up to 225mm, which is plenty for most any consumer supply. The PSU shroud in the chassis is vented on the top and adorned with the XPG logo outward-facing and is most of the length of the frame. The HDD cage is separate but similarly shaped, so it looks like a continuation of the PSU shroud.
Cooling fitment is quite expansive, with triple 120mm fans upfront and top, or two 140mm. The bottom can fit up to a single 120mm along with the rear. Included fans are quad ARGB 120mm models with three upfront as intake and one back for exhaust. They are all DC models with three-pin ARGB headers. The radiator fitment is similar, with up to 360mm in the front, while the top can support up to 360 or 240 but omits 140mm based due to clearance. Rear and bottom can fit single 120mm based units. The air cooler height limit is 170mm. As previously mentioned, the radiator fitment up top can be problematic, as the tray is rather close to the RAM, and taller modules such as our Vengeance Pro RGB do not fit with a top-mounted AIO and fan combo.
Our Latest Mid-Tower Cases Review Coverage
The Battlecruiser is available as of the time of writing at $179.99, and one thing I have to say right out of the gate is that this will be a fierce battle for the Battlecruiser. Competitors of note would be the Vector RS from Fractal Design, the Evolv X from Phanteks, and the Dark Base 700 from Be Quiet. There are many others, but let's dig in and see how the new XPG Battlecruiser stacks up.
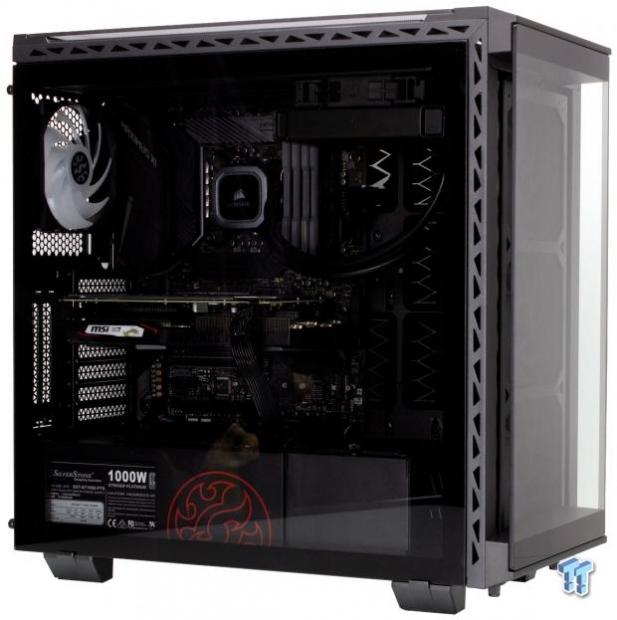
Shannon's Chassis Test System Specifications
- Motherboard: ASUS ROG Maximus XI Hero (Wi-Fi) Z390 (buy from Amazon)
- CPU: Intel Core i7 8700K (buy from Amazon)
- Cooler: Corsair H100i Pro RGB (buy from Amazon)
- Memory: Corsair Vengeance Pro RGB CMW32GX4M4C3000C15 (buy from Amazon)
- Video Card: MSI GeForce RTX 2060 Gaming Z (buy from Amazon)
- Storage: Sandisk M.2 256GB
- Power Supply: SilverStone Strider Platinum 1000W (buy from Amazon)
- OS: Microsoft Windows 10 Home 64-bit (buy from Amazon)
Packaging
The packaging is standard fare and similar to what we saw with the Invader. The line drawing flanked by three feature highlight icons. The thing that caught my attention is the listing on the box as a "Super mid-tower PC chassis," so that is odd as there is no such thing as super mid-tower. However, all of their documentation I see on their webpage and materials calls it mid-tower. I can only assume this was an overzealous marketing person trying to add some nice buzzword hype for the Battlecruiser.
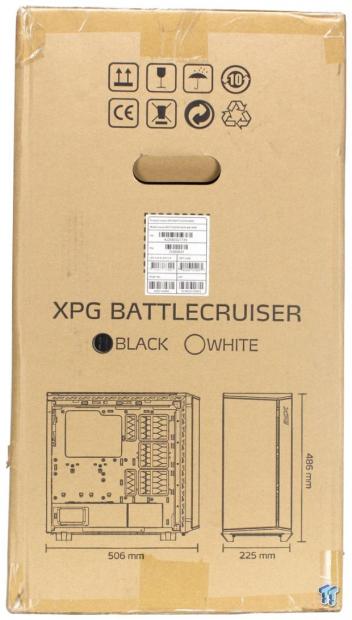
Spinning the package ninety degrees, we now see the first of the smaller sides. This one starts at the top with safety and compliance iconography along with an inventory control label. Then we have the chassis name and a color identifier. Lastly, we have a line drawing with measurements to show you the size of the Battlecruiser.
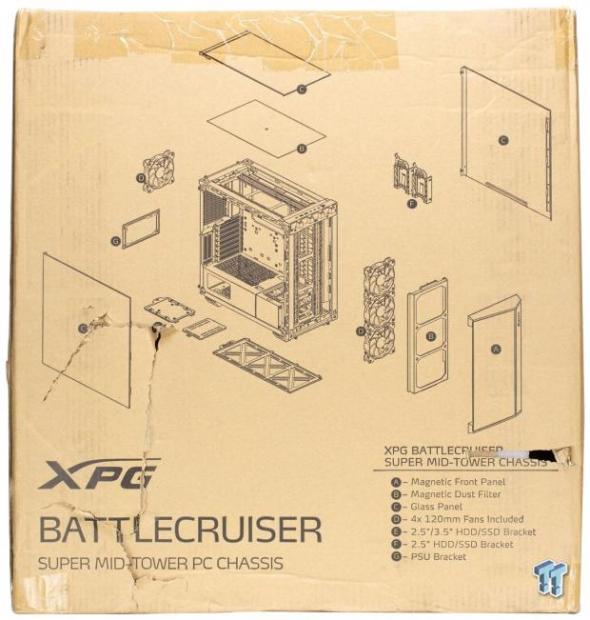
Spinning the package another ninety degrees, and we have the broad opposing side of the packaging. Here we have a line drawing of the Battlecruiser chassis exploded to show all the main components. Speaking of exploded, the box has seen better days, so it will be interesting to see if this warehousing/shipping damage reached the chassis internally. For full transparency, I did have to pull the caved in part outward so that I could photograph the design and show you guys what's on the box. The items have a numbered legend at the lower right corner, which covers what each of the items is from the blown-up image.
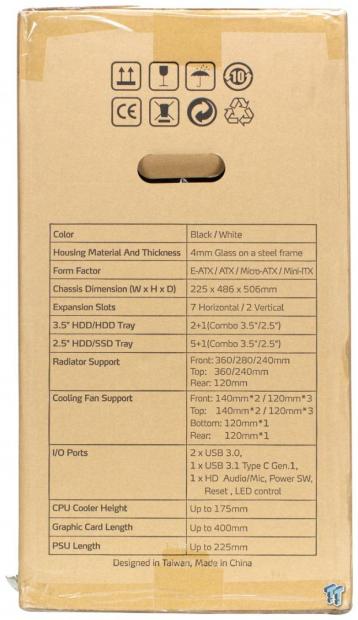
Rotating the final ninety degrees, and we have the last small side of the packaging. Here we have the full spec table like the one on the opening page of this review. If you happen to find this chassis at a brick and mortar, you can see what the chassis supports. The same compliance/regulatory icons are across the top here again.
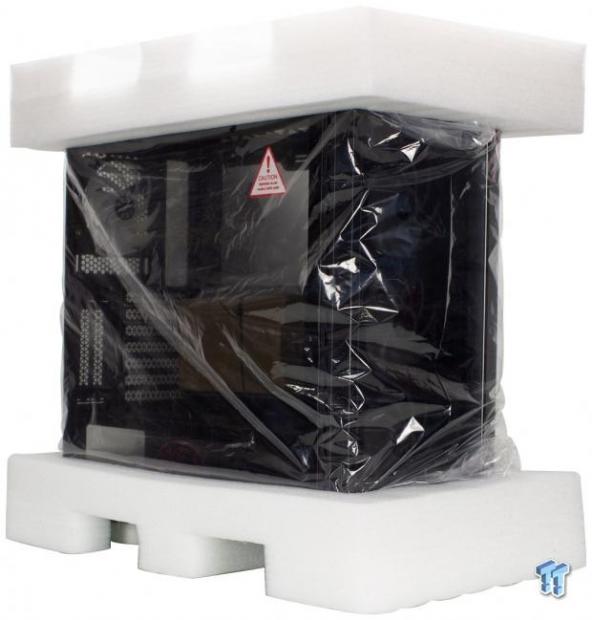
Pulling the Battlecruiser form the package and we see that the soft polystyrene style endcaps are used here and help avoid any significant shock during shipping. The chassis also has a plastic outer bag which envelops the chassis to help prevent abrasion. Lastly, all the glass panels have a plastic film that helps avoid scrapes or abrasions. I would recommend removing the plastic early in your build as I found the film when being removed built up a ton of static, and I would rather see users avoid jolts to a fully built system by removing the film post-build.
XPG Battlecruiser Mid-Tower Chassis
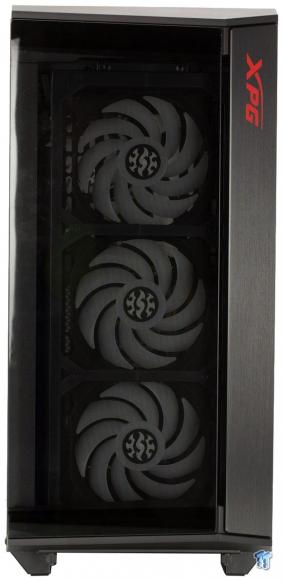
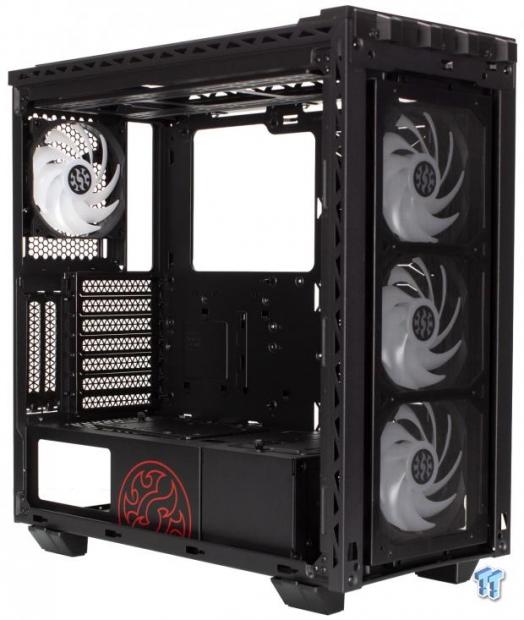
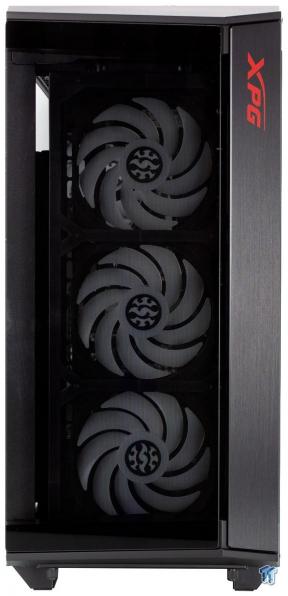
Looking head-on with the Battlecruiser and we have a mostly tempered glass front. This allows for a clear view of the front preinstalled ARGB 120mm fans, along with a brushed metallic strip running up the right flank. Looking below the front panel and we see two thumbscrews at the bottom, which is how the front panel is affixed to the chassis.
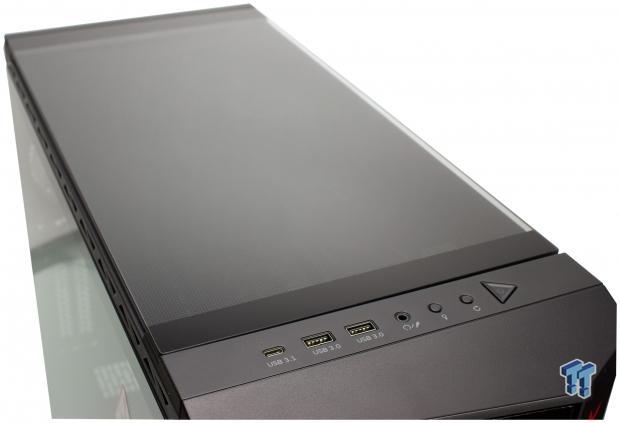
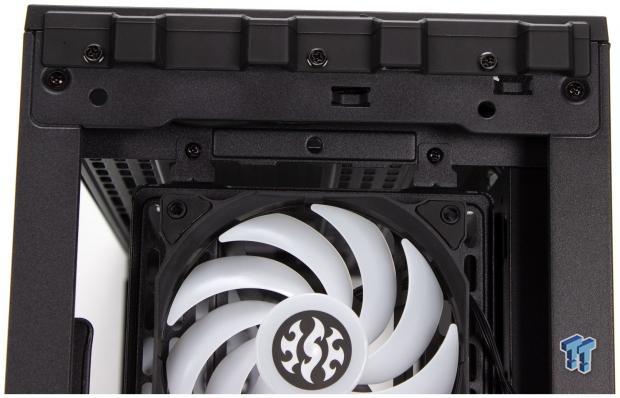
Looking up top, we find that the Battlecruiser has a solid panel of glass here with a filter below it. The gap between the glass and the filter surface is approximately 5mm, which allows a reasonable gap for it to breathe. Still, we found that the sides of the metal of the chassis are also cutout with triangular openings that omit the filter entirely. We will look at that later as we tear into the chassis. Upfront, we also have the I/O, which we will move to now.
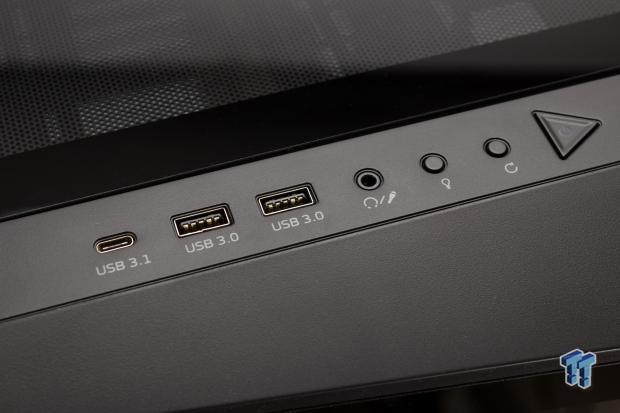
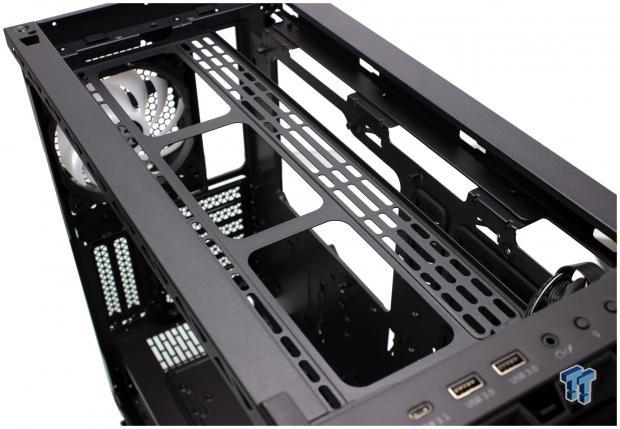
The I/O is across the top front of the chassis and is permanently fixed into the chassis. The arrangement is as follows:
- USB Type-C port (Fed by USB 3.2 Gen 1 header)
- 2x USB Type-A ports (Fed by USB 3.2 Gen 1 header)
- Combo headphone and microphone 3.5mm jack
- LED control button (Controls preinstalled fans)
- Reset button with integrated HDD LED
- Power button with integrated power LED
The I/O is stout enough, at least on the surface; however, one pet peeve of mine is the wastefulness and misleading nature of having a Type-C port but using a USB 3.0/USB 3.1/USB 3.2 gen 1 port which limits the potential of the Type-C connector. This is something I have called out a few manufacturers for, and XPG will not get away without a scathing for this as well. Users tend to expect next-gen I/O to run at and have the next-gen capabilities. Using a 20-pin USB 3.2 Gen 1 header means you cap out at those speeds and power delivery capabilities. You can buy add-in cards to give full performance, but as many boards have only a single 20-pin header, this port may go unused for several users. I hope companies can start using the native USB 3.2 Gen 2 port on all type-C connections soon so that we avoid this issue entirely.
Looking at the glass main component side panel, we find it is optically clear with maybe the most minor tinting, but I think it is truly clear. Here we can see everything inside, including the well-secured accessory box. Here we also see the triangular openings in the metal of the chassis, which are found spanning the front and top.
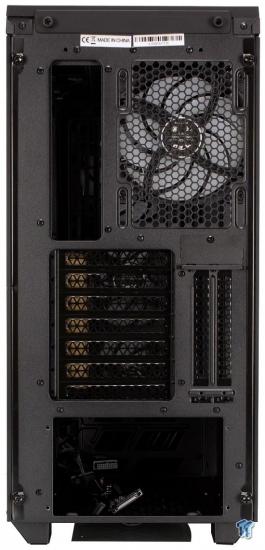
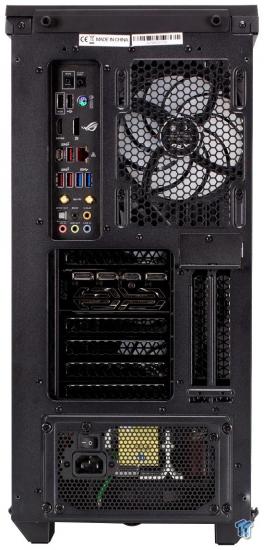
The rear of the Battlecruiser is well outfitted with what we would expect from a mid-tower chassis. The top shows a bit of a gap, which means a bit more room up top to potentially fit cooling. The rear fan mount is 120mm and slotted to allow flexible fan positioning to match your needs. The standard seven expansion slot layout along with two verticals are present. I have not seen a commercially available vertical GPU bracket for this chassis yet, which means you may opt for vertically mounting a GPU, and the rear I/O supports it, and a standard PCIe ribbon could be used. However, I cannot be sure as to sag depending upon the GPU installed. The PSU has a separate bracket as it inserts from the rear. The top glass panel notches into the top and fastens into place with two thumbscrews, as you can see at the top.
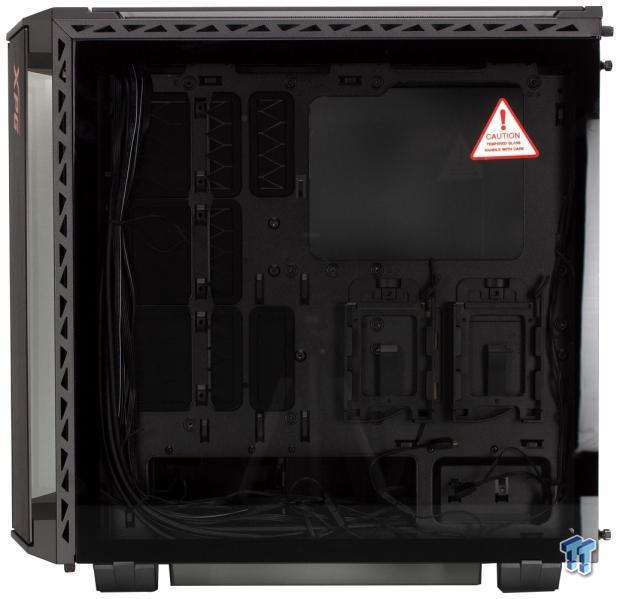
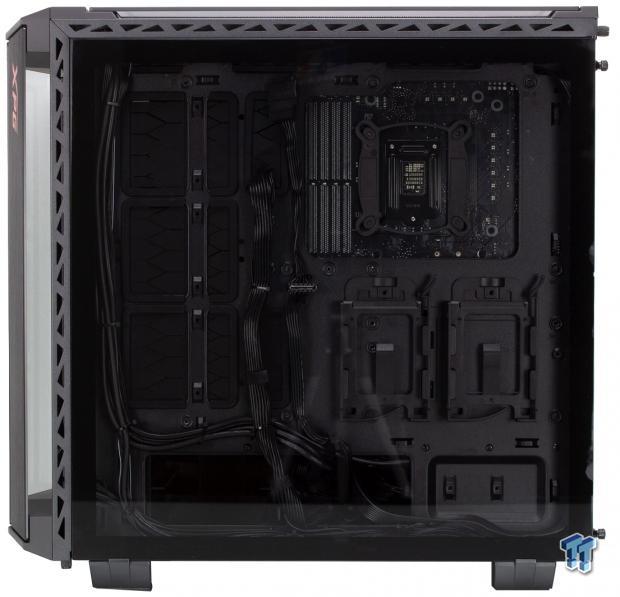
Now we spin the Battlecruiser ninety degrees and peek at the cable management side, and much to my dismay XPG opted for a clear panel here as well. This is not necessarily the end of the world, but it does mean that if you care about what you see, you will want to have a focus on cable management here. I do not necessarily love endless cable management, so therefore I prefer a masked panel or even cable covers back here as it makes it easier to make them disappear. Here we also see the triangular cutouts in place the same as we saw on the other side, which can help with the airflow.
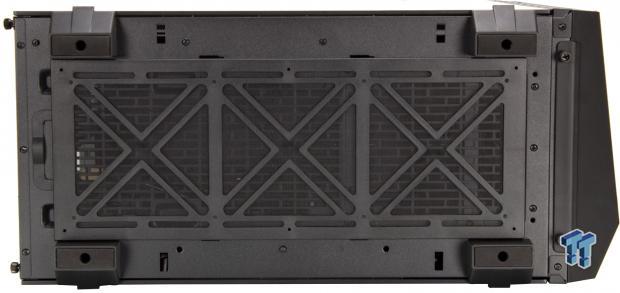
A sizeable full-length dust filter mostly covers the bottom of the Battlecruiser. This filter removes from the rear and covers both the PSU along with the lower fan mounting or HDD cages depending upon your application. There are also rectangular plastic feet that have rubber pads for the chassis to rest upon. The rubber pads as always help avoid the chassis sliding or skidding across a smooth desk surface or floor.
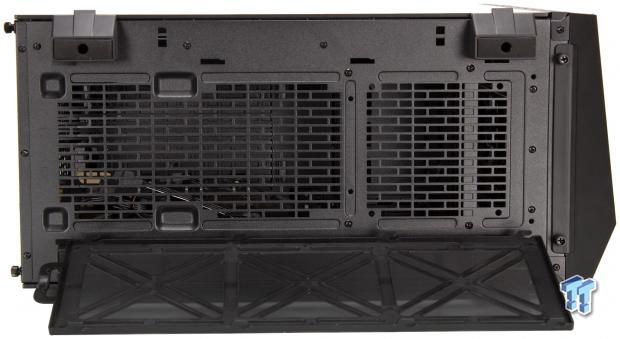
Here we removed the filter, and we see the large vented area at the bottom of the Battlecruiser. I must give credit where due and XPG tried very hard to make sure airflow was available around the entire chassis.
Inside the XPG Battlecruiser

Pulling the front panel was as simple as removing the bottom-mounted thumbscrews and pulling the panel forward, which then released the panel, and you can pull it up and away. Below the panel, we find the removable dust filter, which is held on by strong magnets.
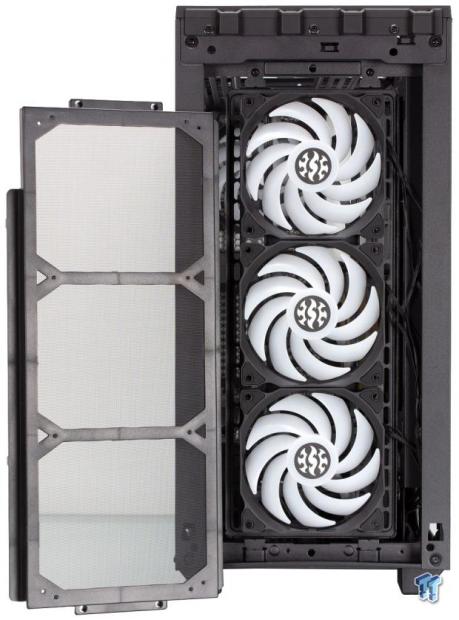
Pulling the filter and we see the removable fan bracket, which comes with three 120mm ARGB fans preinstalled. The fans can be replaced with other fans or radiators, and with four screws, the entire bracket can be removed to make the installation of fans or radiators easier.
Here we take a closer look at the removable fan/radiator bracket. As you can see, there is a centrally located hole that aligns the magnetically affixed fan filter.
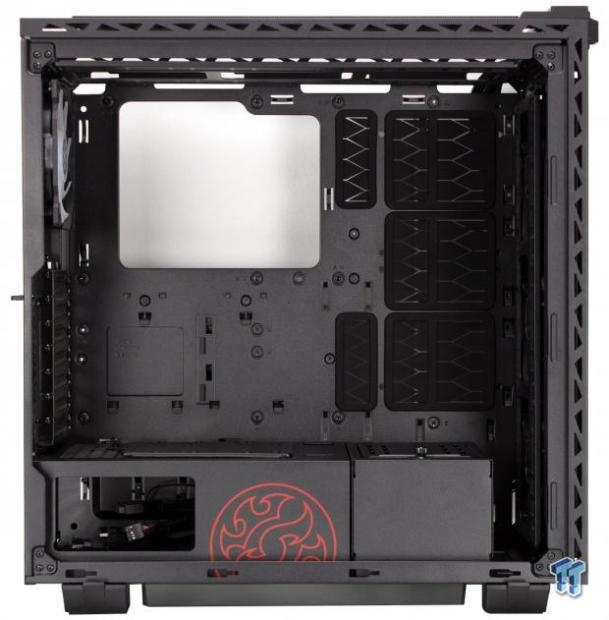
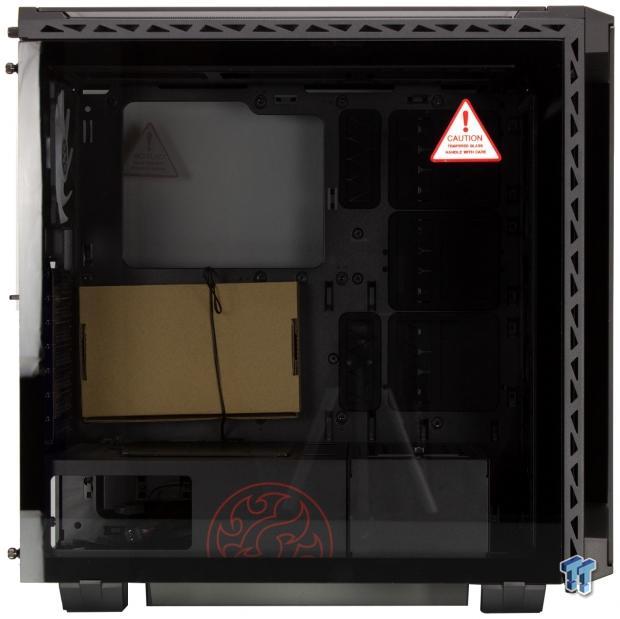
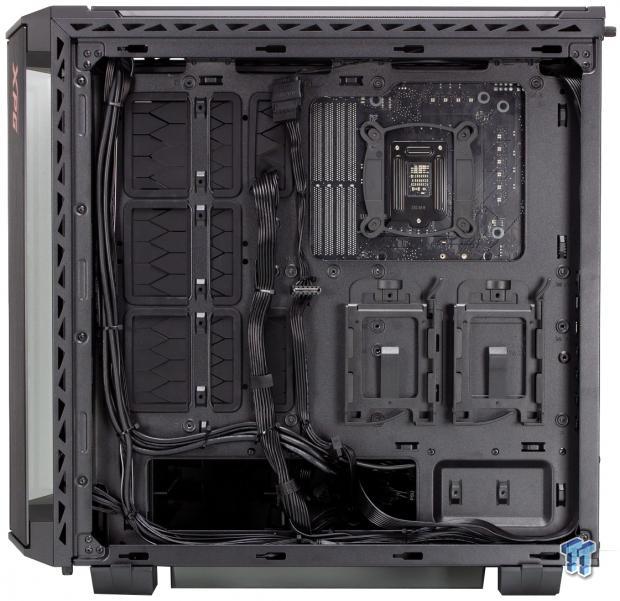
Peeking inside the Battlecruiser, we see the main chamber is a massive expanse that could fit virtually anything. There are several cable management pockets at varying distances from the motherboard tray to meet any cabling needs, whether it be for liquid cooling or main ATX cables for an up to EATX board. The PSU shroud is also here and shows a red XPG logo peeking up from the bottom. The apparent extension of the PSU shroud is where the HDD cages reside, and on top of that, a removable bracket that can be used for what I can assume would be pump mounting or anything else applicable. Unfortunately, XPG does not cover what these devices can be used for very well, so you have a bit of creativity available to you.
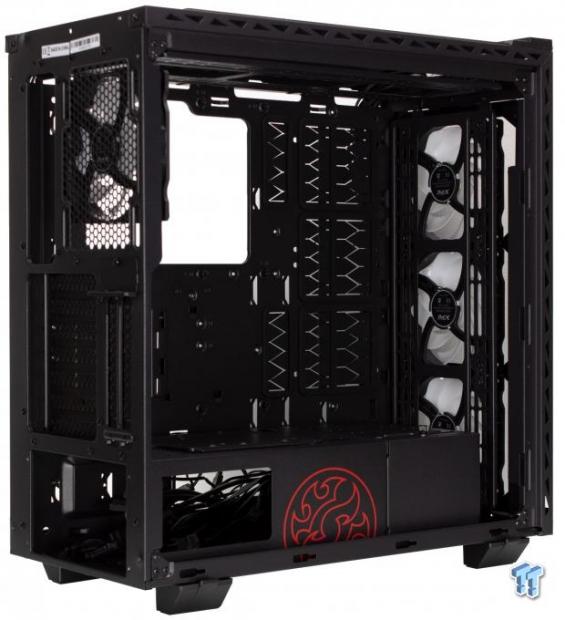
Looking inside the front of the chassis, we see the installed fans along with the removable bracket. As you can see, if you plan on installing a thicker radiator and fan combo, you will likely want to remove the HDD cage portion of the PSU shroud to give adequate clearance. We can see the slotted mounting on the bracket here as well; this allows flexibility to mounting.

Here we pulled the glass panel, but I felt it necessary to point out something here. The top fan filter covers part of the area. Still, unfortunately, thanks to the triangular cutouts, air can bypass this entirely if you are configuring your chassis as a positive pressure setup. These triangular pass-throughs are not filtered, and since the fans sit so far from the dust filter, it is easy to see how the air can take the past of least resistance, which also happens to be unfiltered.
Removing the filter, we find the removable top tray like the front. The tray can be flipped over to give more vertical clearance for radiators or fans, but keep in mind that this is not covered in any way in the manual, and therefore it just took us playing with the chassis. Even with the bracket flipped here, we find that the Battlecruiser still cannot clear our Corsair Vengeance Pro RGB memory with the 240mm AIO in place. So you will either relegate the top to fans only, or opt for shorter RAM, but be warned.
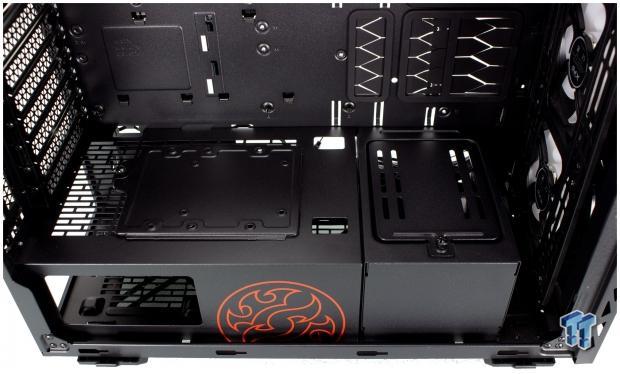
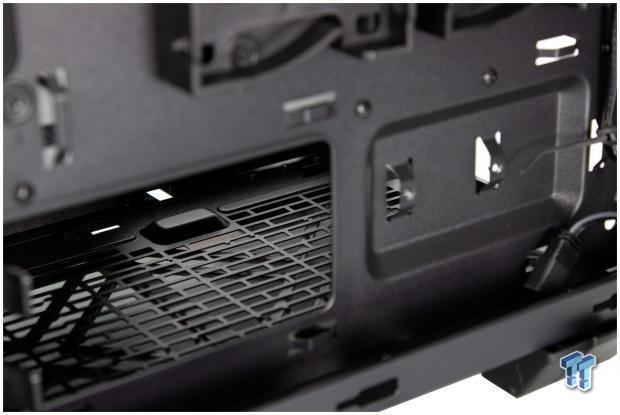
The PSU shroud is mainly toward the rear PSU area and has an HDD/SSD tray on top so you can choose to display your storage should you have something you want to exhibit. Otherwise, the PSU shroud is well vented when not covered by the tray. There are two cable pass-throughs close to the lower motherboard edge, which we will use for front panel cables and the HD Audio. There is one further outboard which we will use for PCIe power cables to our GPU. There is also a window in the shroud side to view your PSU when installed. The extension chamber to the right of the primary PSU shroud is the HDD cage and can be removed. The top of the HDD cage has a bracket that would work well for various mounting, including liquid cooling pump/reservoirs.
Inside the XPG Battlecruiser Continued
In the rear, we see the semi-opaque ARGB 120mm fan here on its slotted mounting. We also see the internally accessible expansion slots. The vertical slots are externally accessible. The CPU cutout we can see adjacent to the rear is enormous and should support any cooler mounting hardware or backplate you may need to access.
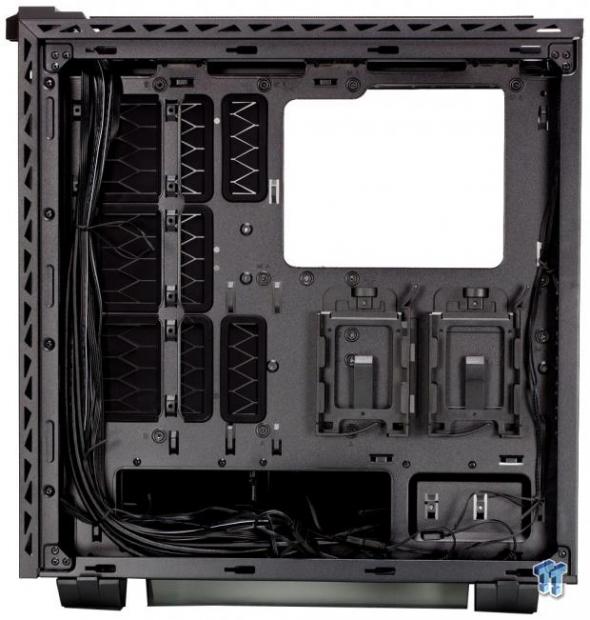
Peeking in the cable management section of the chassis, we find that there is a ton of cable tie-downs here. There are five visible SSD mounts along with the two bottom-mounted HDD trays for 3.5" drives. The XPG Battlecruiser has enough areas to passthrough cables and to tie them down that I can almost forgive the transparent panel. One cool point to note is that the cable pockets we see to the left are single pieces, so you do not see the vertical bar separating them as you likely noticed from the in chamber shot earlier.
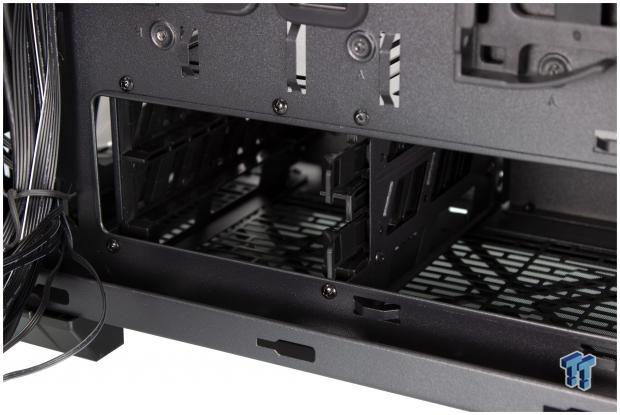
Here at the lower edge of the cable management area, we have access to the HDD cage, which has two 3.5"/2.5" trays. This entire assembly is separate from the PSU shroud as noted before and removable by just pulling a few screws and sliding the compartment out, which will enable thicker radiator fitment.
Here we move toward the rear, and we have a somewhat obscured view of where the PSU resides. Being the PSU slides in from the back, this area does not need to be completely open. The PSU has four raised metal pads to sit upon when installed. The pads typically have a rubberized pad, which helps with harmonics and abrasion of the two metals contacting, but this is omitted in the Battlecruiser.
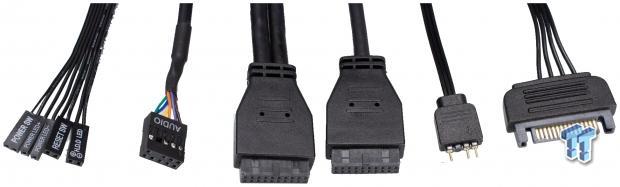
The cable array for the Battlecruiser is interesting and as follows:
- Power, Reset, Power LED, and HDD LED connectors
- HD audio connector
- USB 3.2 Gen 1 20-pin header for two Type-A ports
- USB 3.2 Gen 1 20-pin header for one Type-C port
- 3-pin ARGB connector which feeds the ARGB fans from the internal controller
- SATA power for ARGB controller
The use of the 20-pin header for the Type-C should be admonished, and I think I have beaten that one enough in this review. The 3-pin ARGB connector hooks to the fans, which then daisy chain off of each other. If you wanted, you technically could connect the fans to the motherboard header, and it should work, but once again, this was not covered in any way in the manual.
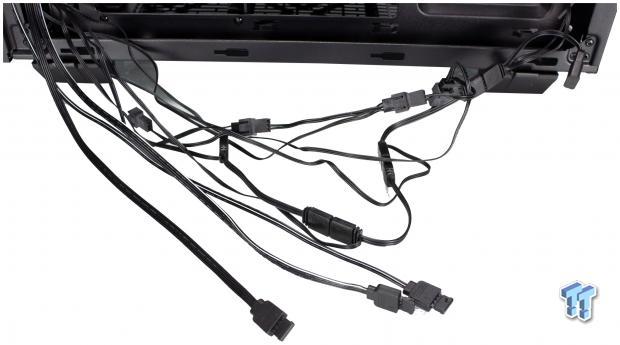
The RGB cabling is another thing that is always a nightmare, as this must be managed somehow back here with a clear window. This is one of those moments where you will be happy to have the chassis lip, as you see at the top of this image. Most of this RGB mess was able to be moved to that lip recession, where it could be tied away mostly out of sight. Do note that the onboard RGB controller has three extra leads, which are standard 4-pin 5050 RGB and can be used for light strips or other non-addressable devices. However, I could not say the LED limit as this is once again in no way covered in the included materials.
Hardware & Documentation

The fastener array included with the Battlecruiser is vast as shown below:
- 23x motherboard/HDD screws
- 12x fan screws
- 12x 2.5" SSD screws
- 8x PSU screws
- 2x standoffs
This covers most anything you would want to install in the Battlecruiser. There's nothing notably missing or left wanting here.

For cable management, we have two included Velcro strips, along with four zip ties.
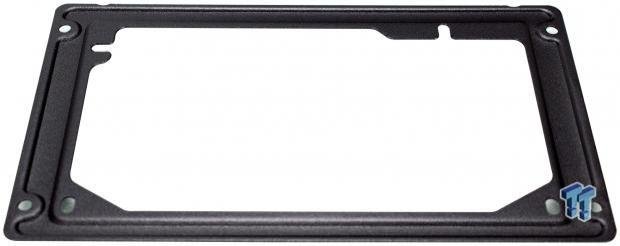
Here we have the last hardware piece included, which is the PSU mounting bracket.
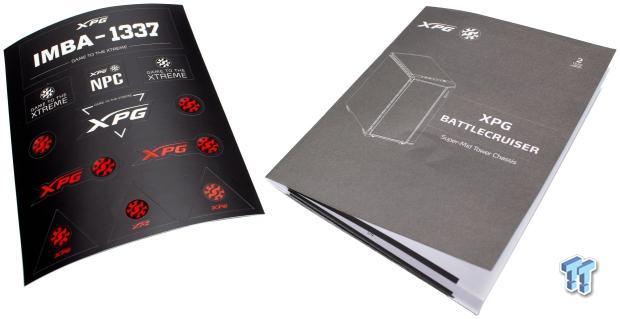
The paperwork includes a sticker set from XPG along with the manual. The manual is a multi-page booklet numbering 38 pages; however, I found an unfortunate amount of missing information from the booklet. The manual is an excellent resource for a basic build. Still, when looking at any of the various features, I believe this is a disjointed effort since there are several obvious things the Battlecruiser can do. Yet, they are either glazed over or omitted entirely.
Case Build & Finished Product
The front of the chassis, when built within in stock configuration, has no change in appearance. If you look closely, you can see some parts inside past the fans, but overall it seems the same, which is not a bad thing as the Battlecruiser is a nice-looking chassis.
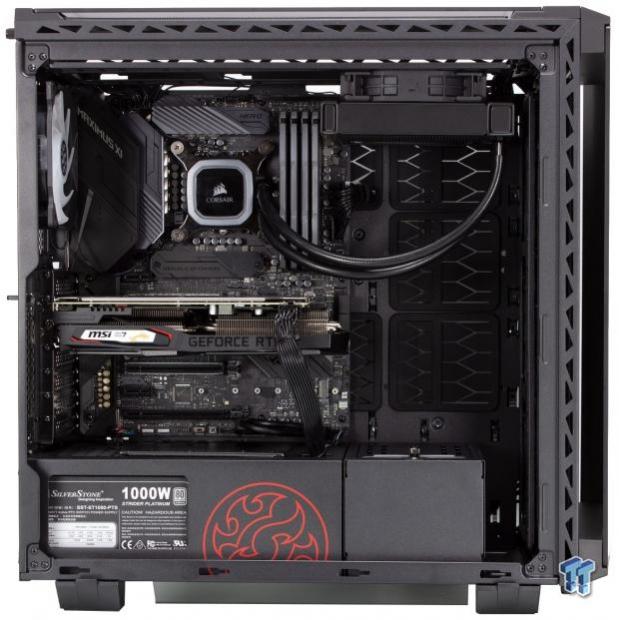
Since the Battlecruiser has quad ARGB fans, I opted to install the 120mm AIO up top in the front. We could not fit our H110i Pro up top due to the conflict with the memory. The massive space allotted within this chamber means that everything went in without issue and installation, especially with the top offering free access, went rather smoothly.
The rear I/O area fills in as you would expect. Nothing was difficult to navigate or install; it simply worked as expected.
The cable management took a bit longer than usual as there were so many options for where to mount cables. Looking at the lower area, you can see the large bundle of RGB cabling, which I tied down there in hopes of keeping a tidier feel. Even though I don't like the mass of RGB cabling, I think it turned out rather well. Do note that the SSD mounting toward the front I used as cable tie-downs for the stock chassis harness to run; this would need to be adjusted if you install SSD's in this area.
Here we fixed the panel to show how easily you can see your cabling. This is why I mentioned that you have to spend some time on this unless you don't care how it looks.
Here we have the built system with all the glass panels attached. As you can see, the view is mostly unchanged as the glass is clear, and therefore you can see your rig even with the system powered off.
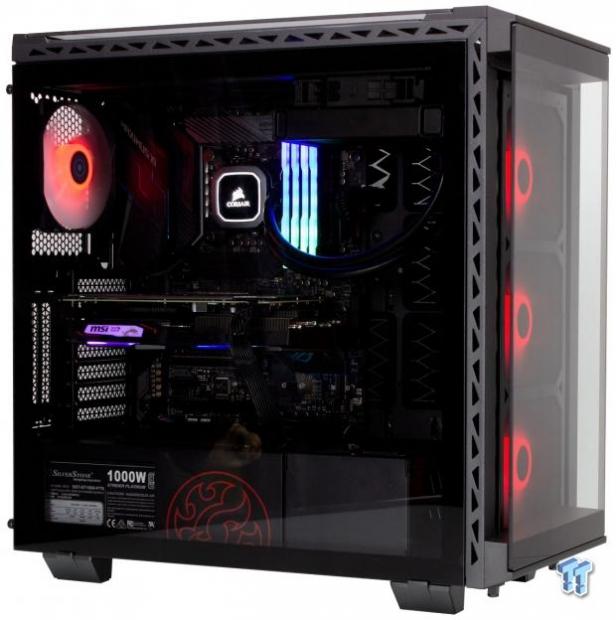
When powering the rig on, the fans can use 14 total color options. The first eight are static color options; then, there are four varying rainbow modes. The thirteenth option is the LEDs off, and a long press of the button enters "music mode." The default mode 1 is solid red, as you see here.
Final Thoughts
When ADATA/XPG reached out to check this chassis out, it was at a similar timeframe to the Invader. This chassis is a lot more involved than the Invader, and this is a good thing. The Battlecruiser has tons of options to explore, but you will have to discover several as I did, on your own as their documentation does not do an adequate job of educating users.
During testing, the recorded ambient was 22.4C, with an RH of 46%. The CPU in our test build shows an average delta over ambient of 46.4C, which falls roughly in line with what I would expect from the hardware installed. The GPU was a bit of a surprise as it showed a delta of 37.8C, which places it within the top 25% of chassis I have tested to date. Overall, I would say this is an easy passing score for the Battlecruiser, even if it is not the absolute best we have tested to date.
What we like
The Battlecruiser is a solid base for a chassis and comes with four ARGB right out of the box. The Battlecruiser also has several things the frame can do that are not well documented, so the more you adjust things, the more you will discover. The proposed cooling fitment is good, and with the removal of the HDD cage, you can fit some monster setups.
What do we think could be better?
Documentation, first and foremost, the manual does not cover several adjustments that the chassis can do, such as flipping the fan brackets 180 degrees to move the fans outward away from the component chamber for more clearance. The way the ARGB fans are handled is strange, and I do wish the controller could plug into the motherboard and have a sync mode. The top and front triangular ventilation can bypass filtration rendering it pointless.
The USB type-C being connected via 20-pin should be abhorred as many motherboards don't have dual 20-pin headers, but do have the proper USB 3.2 Gen 2 header. The top fitment for radiators omits larger memory sticks, which for any regular reader of my reviews, knows I have great disdain for.
At the $179.99 price, the Battlecruiser demands presently; I cannot help but feel like XPG missed the mark here. Between the lack of confidence in the filtration capabilities, to the surprising lack of clear information on chassis features form the included manual, I feel like there are better options. I do like that XPG swung for the fences here, and I hope they continue to find new suppliers and take some of the harsh criticisms to the drawing board and that we can see a far more favorable chassis design in the future.
XPG was ambitious with the Battlecruiser, and like Icarus, they flew a bit too close to the sun, and the resulting burns are apparent.
Shannon's Chassis Test System Specifications
- Motherboard: ASUS ROG Maximus XI Hero (Wi-Fi) Z390 (buy from Amazon)
- CPU: Intel Core i7 8700K (buy from Amazon)
- Cooler: Corsair H100i Pro RGB (buy from Amazon)
- Memory: Corsair Vengeance Pro RGB CMW32GX4M4C3000C15 (buy from Amazon)
- Video Card: MSI GeForce RTX 2060 Gaming Z (buy from Amazon)
- Storage: Sandisk M.2 256GB
- Power Supply: SilverStone Strider Platinum 1000W (buy from Amazon)
- OS: Microsoft Windows 10 Home 64-bit (buy from Amazon)
 MOAIPLAY ORA PRO G1 850W ATX 3.1 PSU Review: high efficiency and 10-year warranty for $119.99
 NZXT H6 RGB+ Compact Dual-Chamber Chassis Review
 Lian Li HYDROSHIFT II 360P OLED Curved Liquid CPU Cooler Review
 ID-Cooling FROZN A620 SLK CPU Cooler Review
 GAMDIAS Atlas P6 CG Dual Chamber Mid-Tower Chassis Review
 AMD plans to increase the price of its graphics cards by 10-15% in the second half of 2026
 Black Myth Wukong mirrors GTA V success with 30 million copies sold in less than 2 years
 Steam Controller supply can't keep up with demand, Valve pushes orders to 2027
 Steam Machine shipments spotted, as Valve is rumored to launch the gaming PC next week
 HDMI 2.2 products are coming in 2027 as chip makers begin sampling FRL2 silicon this year
 Solo dev tries to make his own GTA 6 with AI, as he got tired of waiting for Rockstar
 Repair channel buys ASUS RTX 4090 for $222 and finds plastic die with fake NVIDIA markings
 Epic's gen AI use deters partners, Vampire Survivors x Fortnite might get cancelled
 Sony seems to confirm singleplayer first-party PlayStation games will remain console exclusive
 Speed Racer (2008) 4K Ultra HD Blu-ray Review: a stunning remaster of the cult classic
 Navman MiVue Smart True 4K Surround Dashcam Review - Seeing In All Directions At Once
 IQUNIX Magi96 Pro Aluminum Low Profile Mechanical Keyboard Review - Premium Build, Satisfying Sound
 Asetek Forte S-Series Racing Simulator Bundle Review
 Razer Pro Type Ergo Wireless Split Ergonomic Keyboard Review - Built for Comfort and Support
 ASUS ROG Strix Morph 96 Wireless Gaming Keyboard Review - Great Performance, More Affordable
 SAPPHIRE Radeon RX 9070 GRE PULSE OC Review - A New 1440p Challenger Has Arrived
 I read the Windows Backup app screen carefully, and it does not back up what most people think
 Low Sound Volume on Windows 11? How to fix audio issues and restore normal volume
 8 Critical Warning Signs You Should Never Ignore in Windows 11
 This Windows security feature protects Documents from ransomware, but it is off by default
 Windows 11 already has a voice typing tool, and it is the one most people are not using
 Quick Assist is the only remote-support tool I open when a relative calls about their PC
 The PowerToys utilities I keep enabled on every Windows 11 PC, and the ones I turned off within a week
 TweakTown's Best of Computex 2026 Awards - The Best Hardware, Gaming Gear, and AI
 Phison E37T SSD Controller Exclusive Preview - The Fastest DRAMless SSD Platform Yet