


Our Verdict
Introduction, Specifications, and Pricing
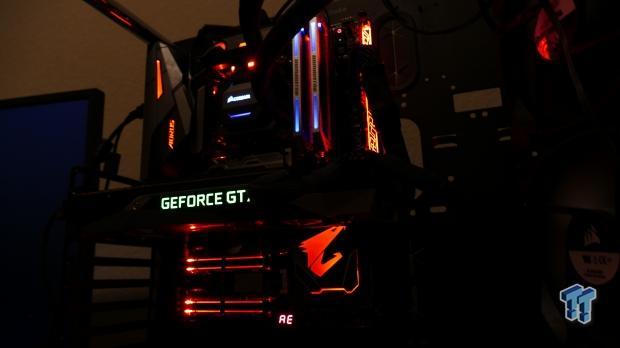
Intel's recent launch of their Coffee Lake 8th Generation Core processors has brought about demand for Z370 motherboards, as it's the only chipset currently available that will support the new 6-core beasts, such as the 8700K. While we can't speculate on the future of Intel's 8th generation or 9th generation processor offerings, we can examine their current Z370 chipset motherboards, such as the GIGABYTE Z370 AORUS Gaming 7 we have in for review today.
The Z370 AORUS Gaming 7 is the highest model Z370 motherboard we currently see from GIGABYTE, and it is designed to fully support the new processors, provide great overclocking, and it's also loaded with features.
Let's take a look at what GIGABYTE has to offer.
Specifications

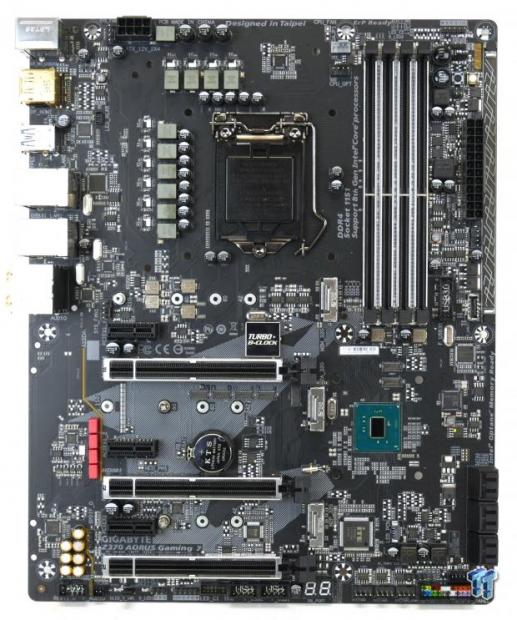
The Z370 AORUS Gaming 7 offers three M.2 slots, USB 3.1 on the rear IO and through an internal header, USB 3.0, SATA6Gb/s, and even two NICs (one Intel and one Killer).
Pricing
The Z370 AORUS Gaming 7 costs $249.99.
Packaging and Z370 AORUS Gaming 7 Overview
Packaging and Overview


The box for the Z370 AORUS Gaming 7 uses similar box art as GIGABYTE's Z270 AORUS products. Packaging is done well; the motherboard sits in a separate box, so it's well protected during shipment.
The accessory package includes four SATA6Gb/s cables, IO shield, two temperature probes, RGBW extension cable, G-Connector, IO shield, AORUS Velcro cable straps, M.2 screw kit, SLI HB bridge, driver DVD, and manual.
Our Latest Socket LGA 1150/1151 Review Coverage


The Z370 AORUS Gaming 7 has a whopping eight fan headers, all of which are hybrid PWM/DC mode headers. GIGABYTE didn't state the current capability of all headers; I assume it's 1A or 1.5A per each header. However, we know that the header circled in yellow is a H_AMP header and supports up to 3A. All headers can use any of the built-in temperature sensors around the motherboard as a reference, and that includes the two external temperature headers (you get the temperature probes in the package), I circled the headers in green.
While we do get eight headers on this motherboard, one of them is already occupied, and that header is circled in orange and is connected to the VRM cooling fan that kicks in around 90C (so it almost never comes on). The back of the motherboard is clear of any components other than some doublers we see on the rear of the VRM section. GIGABYTE's aesthetics are a bit different this round, there are touches of white and black, and many of the "silver" seems to be panels of brushed aluminum material.
The rear IO panel features PS/2 Keyboard/Mouse, five USB 3.0 ports (two yellow are DAC-UP ports), USB 3.1 type-A, USB 3.1 type-C, HDMI, DisplayPort, Intel LAN, Killer LAN, and 7.1 channel gold plated audio jacks with S/PDIF out. We can also get a glimpse of the VRM cooling fan, and the included IO shield has vents to supply air to the fan.


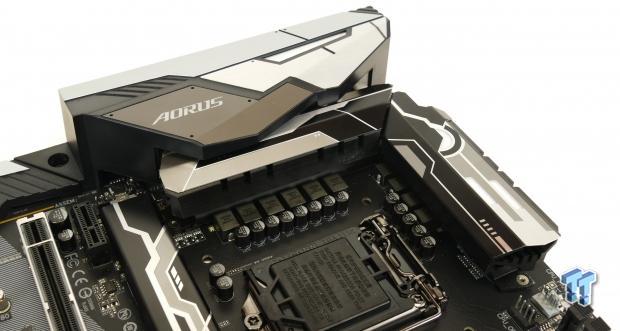
The PCI-E layout is simple, the first two large reinforced and RGB infused PCI-E x16 slots operate at x16/x0 or x8/x8. The bottom x16 slot gets its bandwidth from the PCH and shares bandwidth with the bottommost M.2 slot (M2P_32G). There are three PCI-E 3.0 x1 slots, the bottommost slot shares bandwidth with the SATA3_1 SATA connector. The motherboard has three M.2 slots; the top slot has an M.2 cooling shield attached to it.


There are two other M.2 slots found on the motherboard, and they have some sort of shield reinforcing them. There are six SATA6Gb/s ports. I went ahead and mapped out on my own, how all 28 HSIO ports of the PCH are being utilized, and I came up with this: 12 (M2, x4 slot included) + 2(NICs) + 6 (SATA and one x1 slot) + 6 (USB -5 rear (no hub) 2 internal (through 1:2 hub)) + 2 (x1 slots).


We find an internal USB 3.1 type-C header and a USB 3.0 internal header sitting right next to each other, right below the 24-pin connector. The VRM uses a single 8-pin power connector, and we can see the single Sys_Fan_2 port is occupied by the VRM fan. The VRM fan never turned on during my testing, as it's designed to only operate at temperature above 90C (as per GIGABYTE). I am sure you could customize it if you want.


Overclocking features are present, including clear CMOS button, reset button, power button, and an OC button. However, at the top of the motherboard, we also get some tasty RGB LED headers. Both a dual voltage (jumper voltage selection) digital RGB LED header and an RGBW header are found on the top right corner of the motherboard. We also get a diffusion panel on the right edge of the motherboard and can be customized with many different patterns.


In the lower right corner of the motherboard, we find a ThunderBolt 3 GPIO header, clear CMOS header, EC temperature input header, front panel headers, and three system fan headers. A POST code display can be found on the bottom of the motherboard header two USB 2.0 internal headers and a TPM header.


We also get a 12v/5v (jumper selection) digital RGB LED header near an RGBW header for LED strips located at the bottom of the motherboard. The heat sinks and the IO panel shield all have built-in RGB LEDs. The VRM heat sink is designed well for our uses, and we can see the small VRM fan when we remove the shield over the IO panel.
GIGABYTE Z370 AORUS Gaming 7 Circuit Analysis
Circuit Analysis
The Z370 AORUS Gaming 7 reveals its secrets when the heat sinks and shields come off.


The VRM on this motherboard uses Intersil's new digital PWM and Smart Power Stages. The CPU VRM is in an 8+2 phase configuration for the CPU core and iGPU. The Intersil ISL69128 is part of Intersil's brand new fully digital PWM controller line and offers up to 7 phases in mixed rail operation, in this case, the PWM outputs 4+2 PWM rails. The iGPU uses two Intersil's ISL99227FRZ-T 60A Smart Power Stages while the CPU core uses eight ISL99227BFRZ-T 60A Smart Power Stages.
These power stages have internal current and temperature monitoring as well as double-sided cooling, meaning they are cooled by the solder contacts to the PCH and by the metal section on the top of the IC package. From what I understand, these power stages are quite expensive, so it's great to see them used here. The inductors are the same 76A inductors we see on GIGABYTE's X299 motherboards.


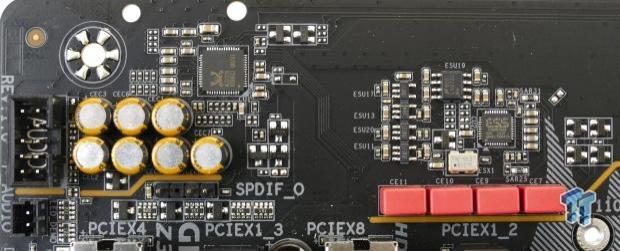
The PWM controller outputs 4 phases for the CPU VCore, and those PWM channels each goto one of the ISL6617 phase doublers on the back of the PCB, which then output to two power stages each, and we get a total of 8 VRM phases for the core. The VCCSA and VCCIO each use a single phase VRM controlled by a Richtek RT8120D single-phase PWM controller with integrated driver.


The memory VRM uses a single phase Richtek RT8120D along with two low-side PowerPAKs (4C06N) and one high-side PowerPAK (4C06N). GIGABYTE's DAC-UP feature uses a 3A RT8288 step-down converter to control the 5V voltage rail of the yellow USB 3.0 ports on the rear IO.
GIGABYTE Z370 AORUS Gaming 7 Circuit Analysis Continued
GIGABYTE uses the Realtek ALC1220, which offers up to 120dB SNR for the headphone output and has an integrated headphone amplifier. A LME49720 chip is used to provide the audio circuit with its own dedicated analog power source. The ESS Sabre DAC, the SABRE ES9018 with 121dB DNR, is used to compliment the ALC1220. WIMA film capacitors and Nichicon Fine Gold capacitors are used to improve audio quality.


The Killer e2500 NIC is used as one of the Gbit NICs, while an Intel i219v is used to provide the second Gbit NIC. The rear IO's USB 3.1 comes from an ASMedia ASM3142 USB 3.1 controller, and a Texas Instruments type-C switch, the HD3220 is used to switch the type-C port pins for reversible connector capability.


A second ASMedia ASM3142 is used to provide the internal type-C header with USB 3.1 capabilities. A Realtek RTS5411 is used as a USB 3.0 hub; it receives a single USB 3.0 port from the PCH and then outputs two USB 3.0 ports to the internal USB 3.0 header.


The ITE IT8295FN microcontroller is used to control all the RGB LEDs and provides the digital RGB capabilities on the motherboard. The IT8795E is used as an embedded controller, and it provides extra fan control support.


The nuvoTon NCT8686E is used as the SuperIO chip on the motherboard and provides temperature and voltage monitoring as well as the PS/2 port on the rear IO panel. The motherboard features two 128Mbit BIOS ROMs for redundancy.


The ASMedia ASM1442K is used as the display digital video level shifter and is used to provide the HDMI port video. We do find multiple ASMedia ASM1480 PCI-E 3.0 quick switches on board; they are used for switching around PCI-E.
BIOS and Software
BIOS
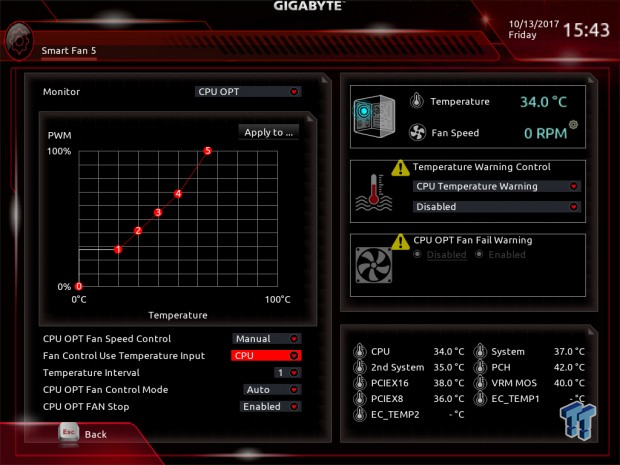
GIGABYTE's Z370 UEFI is extremely similar to their Z270 UEFI. The settings are in the same places, but there are some differences. Since this is the first time GIGABYTE is using Intersil's new PWM controller on a LGA1151 motherboard (or really any GBT board), our advanced PWM options only include load line calibration (LLC).
However, GIGABYTE included both external VRM and internal VRM LLC, which is awesome, since we have seen vdroop issues on some other boards, but GIGABYTE is able to overcome them with these two settings. Overall, fan control is very well done, but you only get a GUI and not text-based input menu. There are two modes for the UEFI, although you will default into the advanced mode.


Software
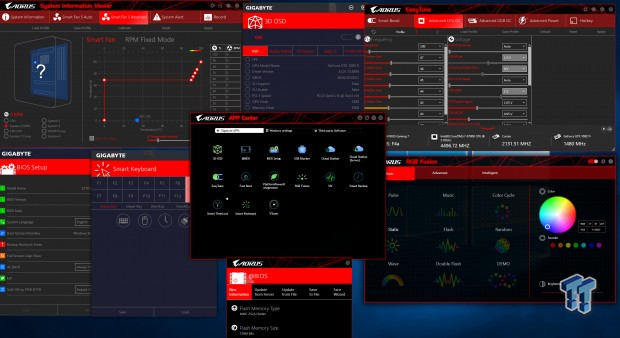
GIGABYTE includes Creative Sound Blaster 720, APP Center, 3D OSC, @BIOS, BIOS Setup, USB Blocker, Cloud Station, EasyTune, Fast Boot, PlatformPowerManagment, RGB Fusion, SIV, Smart Backup, Smart TimeLock, Smart Keyboard, and VTuner.
Test System Setup
Steven's Motherboard Test System Specifications
- Motherboard: GIGABYTE Z370 AORUS Gaming 7
- CPU: Intel Core i7 8700K
- Cooler: Corsair H115i GT - Buy from Amazon
- Memory: Corsair Dominator Platinum (2x8GB) 3200MHz
- Video Card: NVIDIA GeForce GTX 980 - Buy from Amazon / Read our review
- Storage - Boot Drive: Samsung 950 Pro 256GB - Buy from Amazon / Read our review
- Storage - SATA6G Drive: Corsair Force LS 240GB - Buy from Amazon / Read our review
- Storage - M.2 Drive: Intel 750 400GB U.2
- Storage - USB Drive: Corsair Voyager GS 64GB - Buy from Amazon / Read our review
- Case: Corsair Obsidian 900D - Buy from Amazon / Read our review
- Power Supply: Corsair RM1000 - Buy from Amazon / Read our review
- OS: Microsoft Windows 10 - Buy from Amazon
- Monitor: GIGABYTE PA328 ProArt 32" 4K - Buy from Amazon
- Keyboard: Corsair K70 LUX - Buy from Amazon
- Mouse: Corsair M65 PRO RGB - Buy from Amazon / Read our review
- Headset: Corsair VOID RGB Wireless - Buy from Amazon / Read our review
- BIOS: F4a


The Z370 AORUS Gaming 7 features some reworked RGB LED features compared to the Z270 Gaming 7. For starters, the included accent strip features a new style, and it can be replaced.
The same goes for the PCH overlay, which can be replaced with other styles. The PCI-E slots get RGBs, just like GIGABYTE's X299 boards. The VRM and IO shield also get new styles and move away from RGBs-in-you-face in the VRM area.
Overclocking
Overclocking Results
CPU Overclocking
He Z370 AORUS Gaming 7 is one of the best Z370 overclocking motherboards I have worked with so far. Is easily increased voltage, with strong LLC levels (probably due to the presence of Internal LLC), and I was able to set 1.29v with both LLCs on level Turbo.
The motherboard can actually do 5GHz stable on the 8700K, but our tests are aimed at figuring out what settings get us to 4.9GHz, as not all boards can do 5GHz because of the current LLC fiasco, so we wanted to standardize things. You might also notice none of the cores went into the red throttle zone.
Compatible Memory Overclocking Kits
In this section, I overclock four memory kits only using XMP, if the kit works then the results are below. I welcome memory vendors to send in their kits to be tested on each motherboard.
Corsair Dominator Platinum 3200MHz C16 8GBx2


The board easily overclocked the Dominator Platinum RAM to 3200MHz.
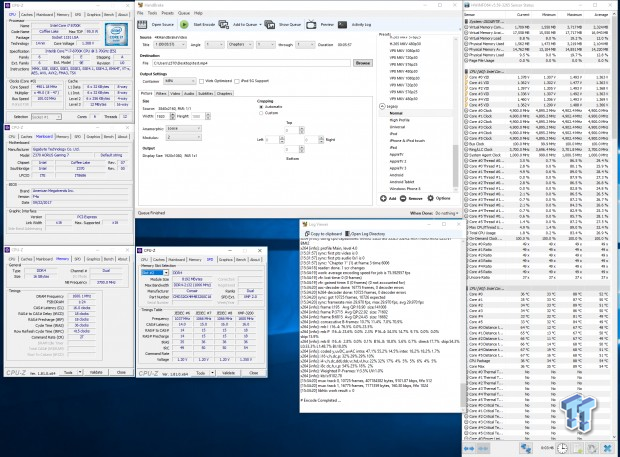
CPU, Memory, and System Benchmarks
CINEBENCH 11.5

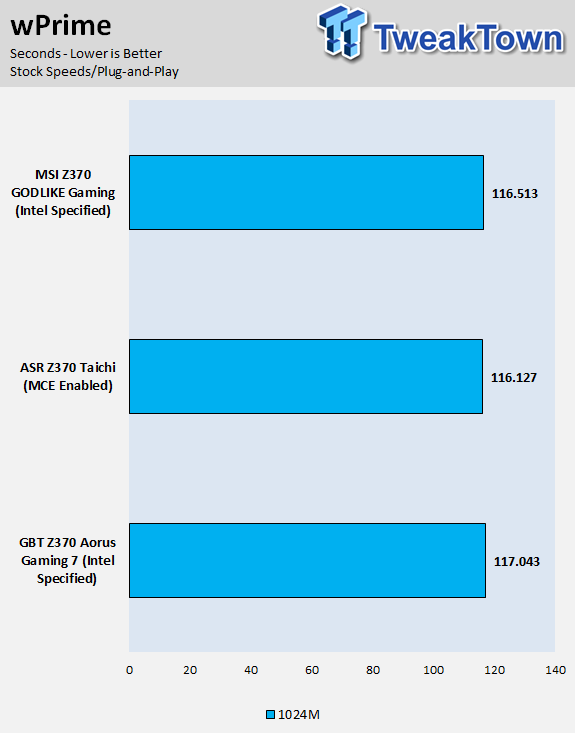
wPrime
AIDA64 FLOPS and IOPS

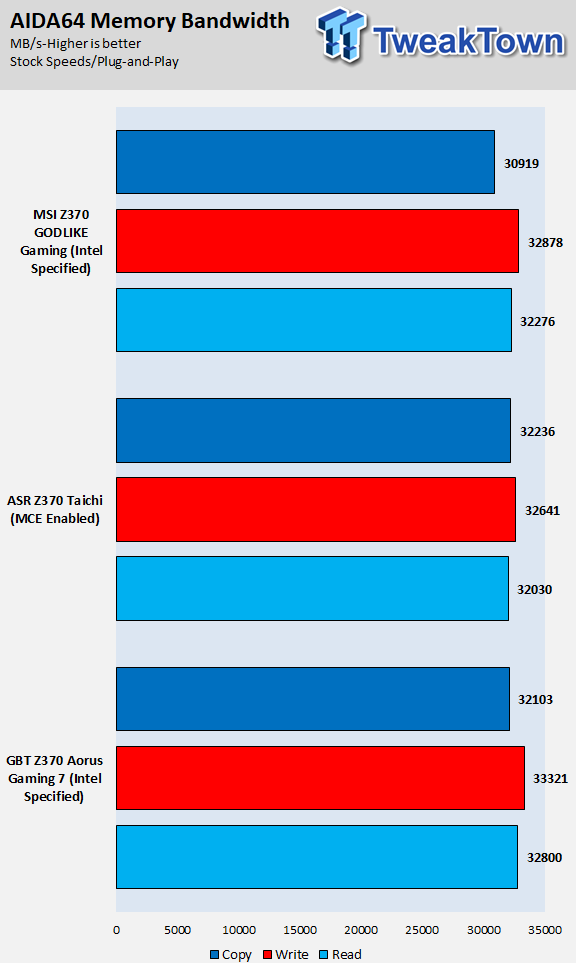
AIDA64 Memory
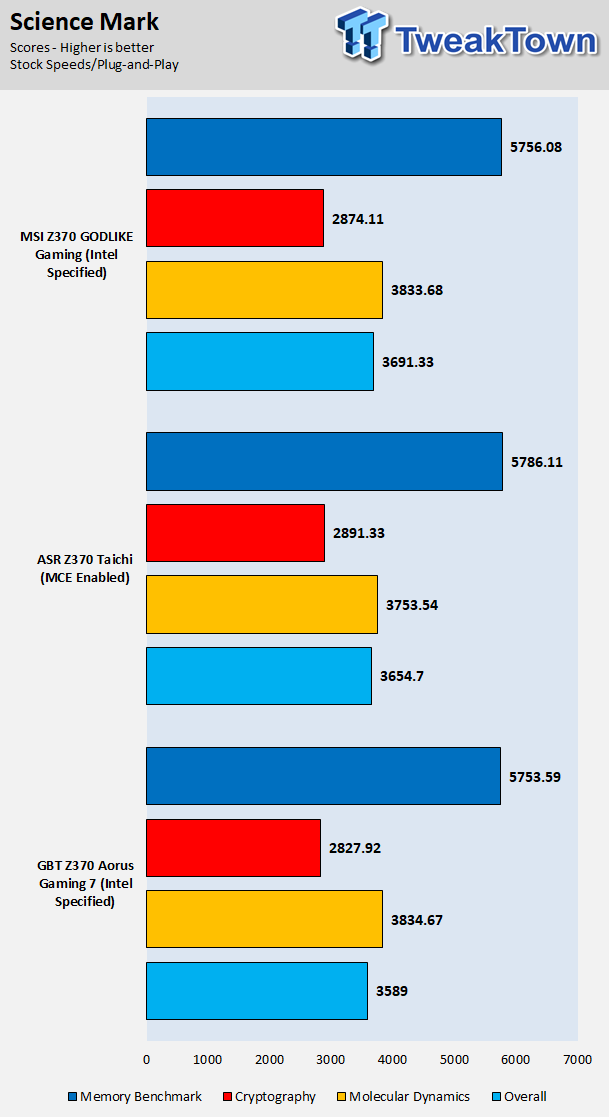
ScienceMark
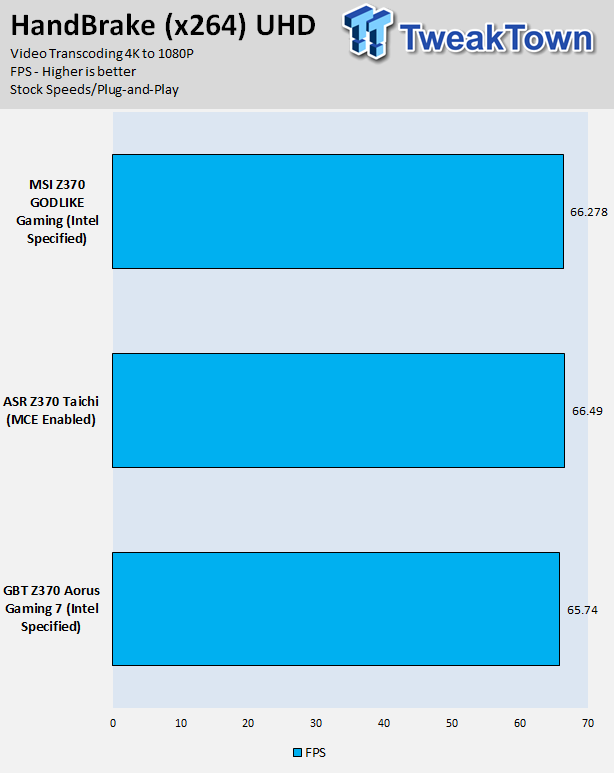
HandBrake
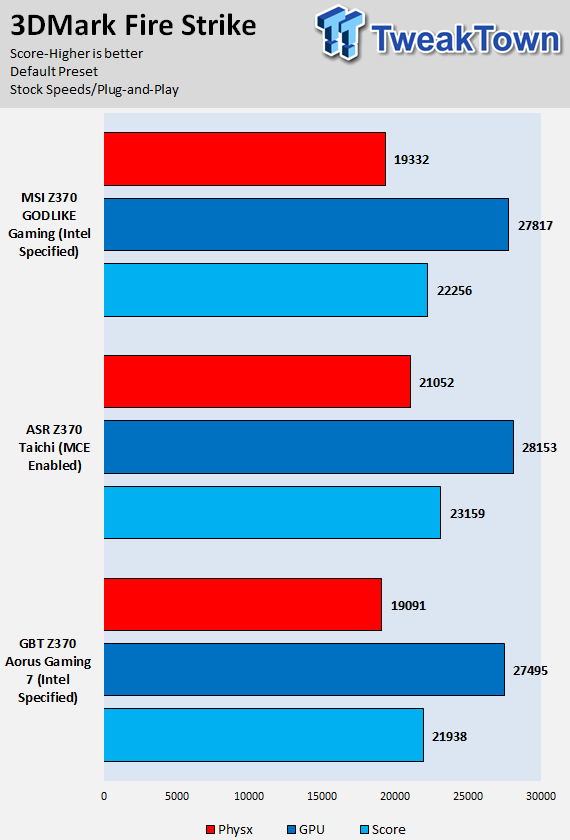
3DMark: Fire Strike
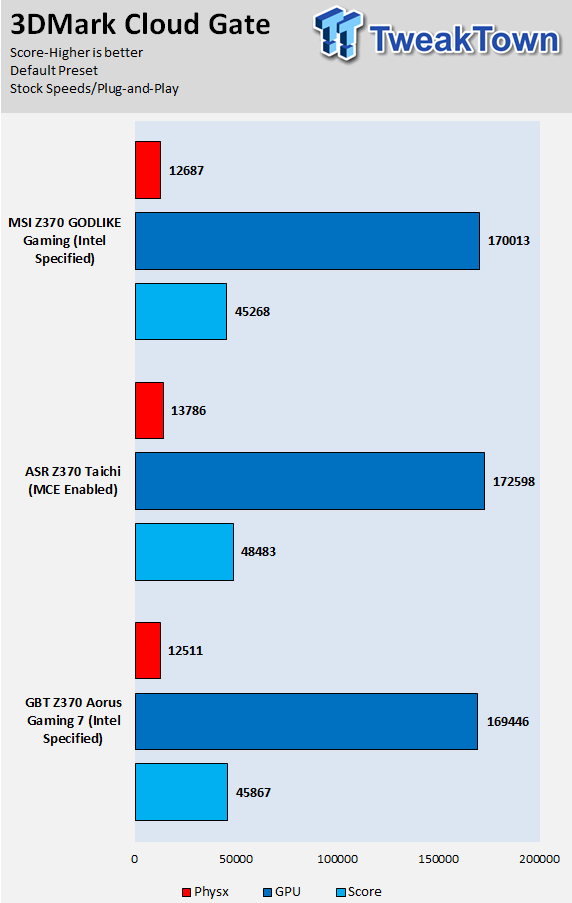
3DMark: Cloud Gate
ResidentEvil 6
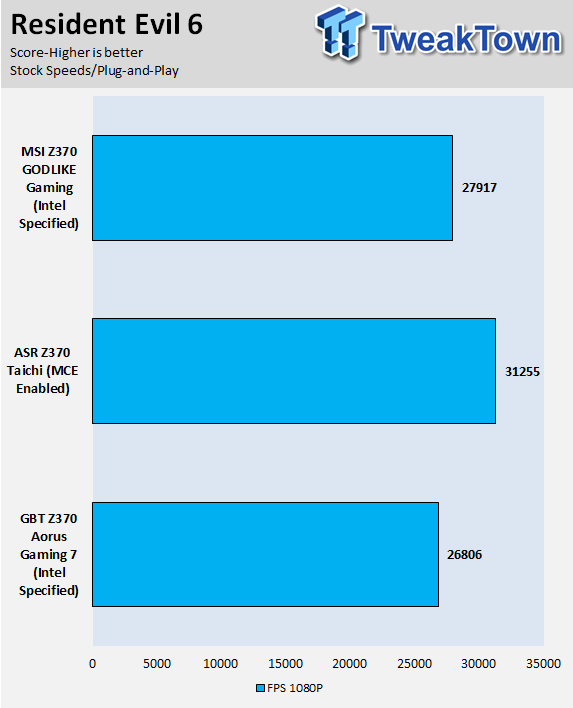
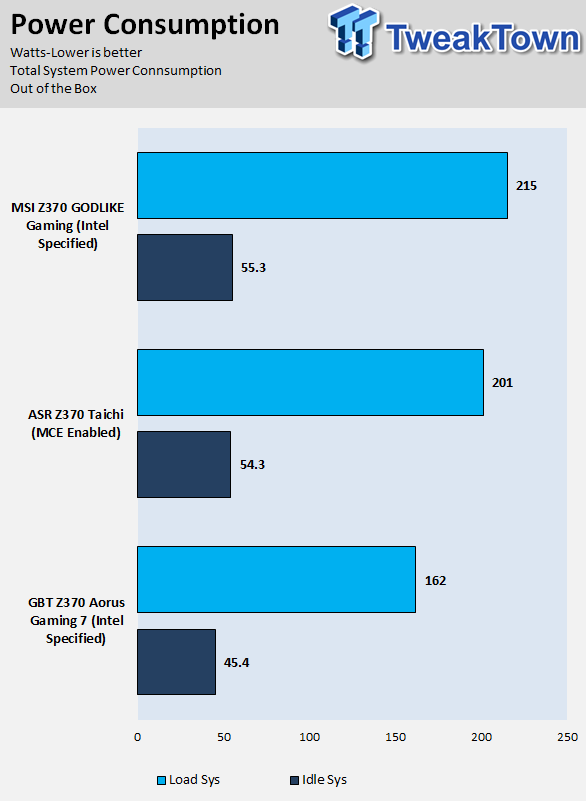
These tests are done out of the box, so I have decided to include whether or not the vendor has implemented some type of default overclocking, such as multi-core enhancement. Multi-core enhancement is when the motherboard vendor pushes all cores to maximum turbo speeds instead of just one or two.
MCE as I will call it, can cause instability if your CPU isn't great, and we would hope vendors would have it off by default, but it does offer a free performance boost out of the box. Some motherboards also might increase the BCLK a bit over stock to score higher, and some might even mess with the turbo boost table. If we standardize settings, then most motherboards should perform the same, but in this case, we haven't.
Overall, the Z370 AORUS Gaming 7 is doing just fine, as it follows Intel's specifications, and we will see the benefit of this in the power consumption table, where it uses roughly 50W less than the other systems. Overall, I didn't find any performance issues with the Z370 AORUS Gaming 7; we actually used it for our Coffee Lake review.
System IO Benchmarks
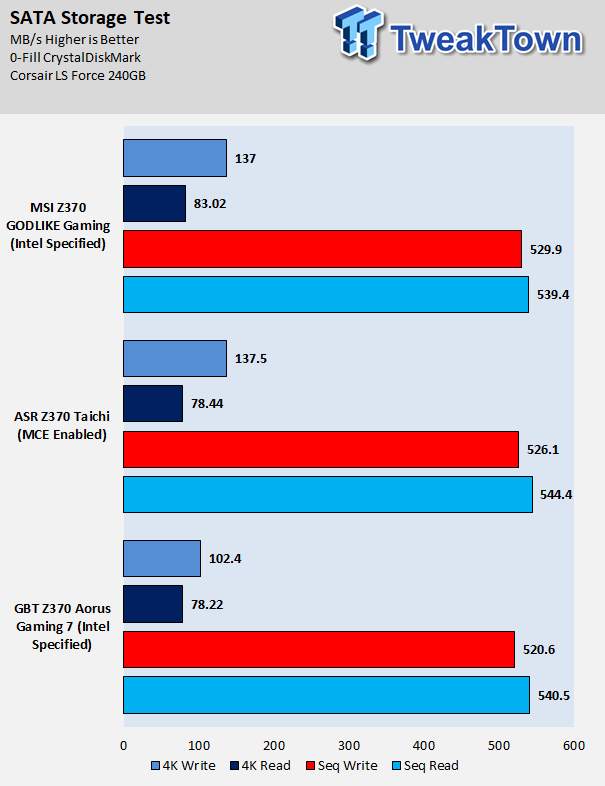
CrystalDiskMark SATA6G:
CrystalDiskMark M.2:

ixChariot Network Throughput:
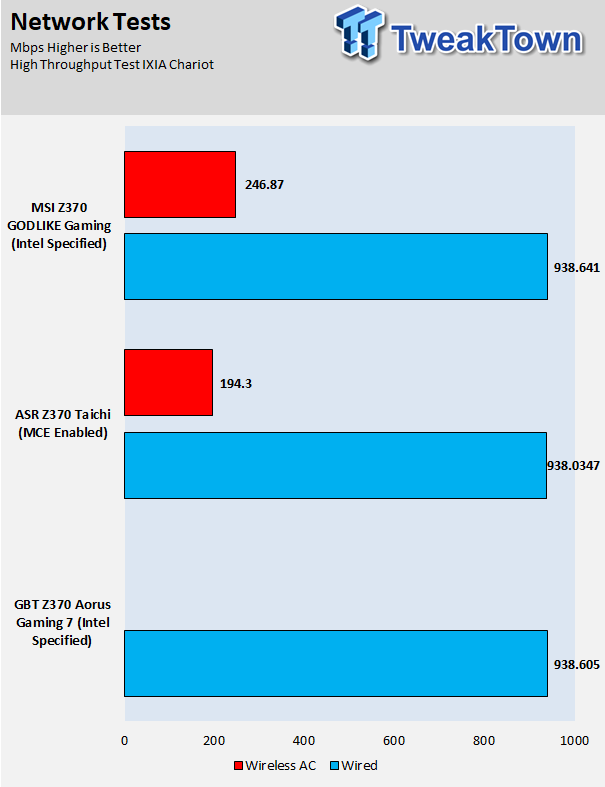
The Z370 AORUS Gaming 7's M.2 and SATA performance is solid all around, and its GBit LAN controller is performing as it should.
Audio RMAA 5.5:
I disable all audio features, set the correct bitrates, and then test the audio with a loopback test.
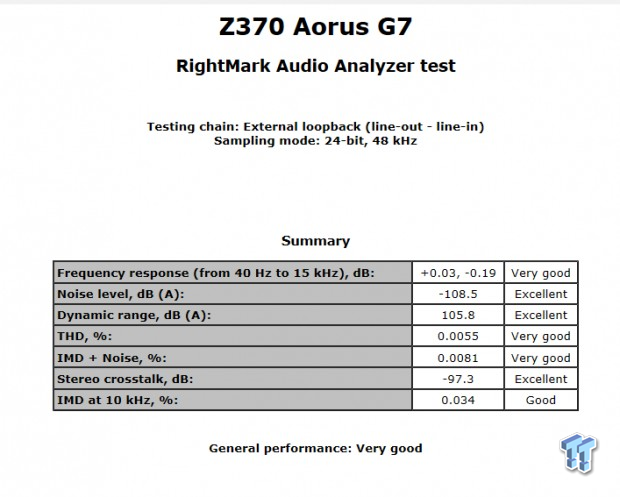
Sound Judgment by Ear: Excellent, however after installing the drivers for audio the scores went all funky on this motherboard. It's probably the combination of the ESS SABRE DAC and the software drivers that mess with RMAA. There are five ratings for audio: 1. Problems, 2. Okay, 3. Acceptable, 4. Very good, 5. Excellent
Thermal Imaging and Power Consumption
System power is measured at the wall with an AC power meter.
Note on Thermal Images: In the temperature section, we use our Seek thermal imaging camera to capture the surface temperatures of major components on the board. I look at the VRM and then all other things that light up the screen. If there is something to worry about, then I will state it. Otherwise, I will just show the hotter running parts of the board for fun. Unless some component is over 80-90C, then there isn't anything to worry about.
All systems will act differently, so I will look for commonalities, such as how far from the VRM the heat spreads through the PCB and the difference in temperature between the front side and backside of the PCB. Keep in mind, the majority of the heat from the VRM goes into the PCB as it is a giant soldered on copper heat sink. A larger difference in temperature between the back and front of the PCB points towards a more effective heat sink.
Thermal Testing at Stock Speeds:
The image on the left is always at idle, and the image on the right is at load. During ALL TESTS, fans to the right of the motherboard from the (Corsair H110i) radiator are left on automatic mode (ramps with internal block temperature). Additionally, a 120mm fan is situated right above the VRM, and it blows down at a medium rate (very quiet). Thermal Images are taken at loop 15 of Intel Burn Test


Full frontal.


Up-close of the front of the VRM.


Up-close of the back of the VRM.
Thermal Testing at 4.9GHz/1.3v Overclocked Speeds:
The image on the left is always at idle, and the image on the right is at load. During ALL TESTS, fans to the right of the motherboard from the (Corsair H110i) radiator are left on automatic mode (ramps with internal block temperature). Additionally, a 120mm fan is situated right above the VRM, and it blows down at a medium rate (very quiet). We standardize this test with a 4.9GHz on all cores with 1.3V real under load and take pictures at the 80% mark of HandBrake rendering a 4K video.


Up-close of the front and back of the VRM.
The Z370 AORUS Gaming 7's thermal performance is excellent, and that's partially due to the new power stages and high-quality inductors. Each of the smart power stages has internal current and temperature monitoring, and the new PWM works with each phase to balance load and turn on just enough phases to get the job done.
Under our controlled testing environment, the motherboard has one of the cooler running VRMs. The motherboard also has a small fan under the IO shield, but it only turns on when the VRMs hit 90C, which didn't happen during our testing.
Anything under 60C is great, 60-80C is acceptable, and anything above 80C is a bit worrisome (if at stock).
What's Hot, What's Not & Final Thoughts
Here are key points about the GIGABYTE Z370 AORUS Gaming 7.
What's Hot
VRM Quality and Overclocking: I was surprised to find that GIGABYTE implemented Intersil's brand new 60A Smart Power Stages, 76A inductors, and the new digital PWM. Together, they create a solid, high-quality VRM capable of easily taking the 8700K to its max. The LLC built into the BIOS is also very well-tuned, allowing us to tune both external and internal LLC, which results in overclocks with low volts.
RGB Lighting and Aesthetics: The motherboard's shields and PCH heat sink have paneling that resembles brushed aluminum, but the lights that turn on when the motherboard is powered on are really impressive. GIGABYTE has done a fine job with them this round, but that's not where it ends. We get an RGBW header at the top and bottom of the motherboard, as well as a digital RGB header at the top and bottom of the motherboard. We also get the ability to switch between 5v and 12v for the digital header.
Audio: The addition of the ESS SABRE 9018 to compliment the ALC1220, as well as the WIMA audio caps and Nichicon Gold Series electrolytics, produces great sounding audio. You also get Sound Blaster audio software if you want to mess with audio effects.
Fans: The motherboard comes with a total of eight hybrid PWM/DC mode fans that can reference one of many built-in sensors and two external sensors. You also0 get a 3A high amperage header. GIGABYTE also includes two temperature probes for the external temperature sensors. There is also a fan to cool down the heat sinks hidden under the IO sectional shield.
What's Not
Low Internal USB Count: While six type-A ports on the rear IO panel is typical of most Z370 motherboards, this motherboard only has a single USB 3.0 header and only two USB 2.0 internal headers, lower than other Z370 motherboards around this price point I have looked at.
Final Thoughts
The GIGABYTE Z370 AORUS Gaming 7 is a solid motherboard. It offers a healthy number of features, stellar looks, and excellent quality. The biggest surprise was finding Intersil's new Smart Power Stages and digital PWM along with the 76A inductors. These VRM components are typically only found on high-end X299 motherboards, but you get them with this motherboard. GIGABYTE has also made an effort to maximize overclocking by adding physical features such as buttons and a POST code display as well adding in BIOS features to make things easier.
While there is talk about other vendors having issues with LLC, we find no such issues with this motherboard. Quality throughout the motherboard is also quite high both externally and on the PCB. The heat sinks are solid, ports and slots are reinforced, and there is even a VRM fan. On the PCB we find excellent quality power delivery, dedicated circuitry to control USB power, and hardware additions and improvements to the audio section to name a few enhancements.
If you are looking for a solid Z370 motherboard with a healthy serving of features matched with quality parts, the Z370 AORUS Gaming 7 is worth a look.
 GIGABYTE X870E Aero X3D Dark Wood Review - A woody goody
 ASUS TUF Gaming X870-Pro WiFi7 W NEO Review - Tuffed up
 ASRock Z890 Taichi Aqua Motherboard Review - Flagship features without the flagship price
 GIGABYTE Z890I AORUS Ultra Motherboard Review - Mini-ITX with surprisingly good thermals
 GIGABYTE Z890 AORUS Elite WiFi7 Plus Motherboard Review - Right in the sweet spot
 Samsung is holding your health data hostage to train its AI
 ASUS unveils the new ROG Gjallar Gaming Soundbar with wireless subwoofer
 AMD is prepping FSR Multi Frame Generation with an 8X mode
 Patriot's Viper Steel 5 Infinite DDR5 memory features never-before-seen 3D Lighting, also hits speeds of 8000 MT/s
 LIAN LI launches new fans with integrated 1.8-inch LCD screens
 ASUS's ROG Raikiri II Pro PC controller supports 8K polling and instant actuation buttons
 Ryse: Son of Rome was supposed to be Xbox's Assassin's Creed but nobody bought it
 Lenovo lists its first Wildcat Lake ThinkPad laptops with Core 7 and Core 5 SKUs
 Modders upgrade the original PlayStation's RAM from 2MB to 16MB
 ZeniMax's ESO studio is still big enough to deliver new content
 Micron 6600 ION 245.76TB Enterprise SSD Review - Best in Class Programming Speeds
 MOZA MA3F EFCM Flight Control Module Review: authentic Airbus A320 autopilot panel for simulators
 Turtle Beach Stealth Pro II Wireless Gaming Headset Review - Premium Sound, Fantastic Features
 MOZA MGX1000 Instrument Panel Review: a realistic Garmin G1000 replica for immersive flight sims
 Simagic Zeus Formula Steering Wheel Review: premium build and advanced inputs for F1 racing
 The Super Mario Galaxy Movie (2026) 4K Ultra HD Blu-ray Review
 KTC H49S66 5K2K (5120x1440) 49-inch 180Hz Gaming Monitor Review
 HighPoint Rocket 1604L Gen5 x16 NVMe Software RAID AIC Review: half the price with full 59 GB/s speed
 Next Level Racing ERS3 Haptic Seat Review: immersive sim racing comfort with integrated haptics
 I stopped digging through Windows menus after I set up this one folder
 Don't sell your Windows laptop until you do these things
 6 PC cleaning mistakes to avoid for safer hardware maintenance
 Phison and Intel Take Aim at Local AI's Memory Wall with aiDAPTIV
 How to Remap Keyboard Keys in Windows using Microsoft PowerToys
 7 tips to organize your Windows files for faster, easier access
 Intel Arc G3 Extreme first impressions with MSI's Claw 8 EX AI+ - Incredible power for an extreme price
 How to fix Wi-Fi Adapter Not Working on Windows laptops: troubleshooting tips
 Hisense U7SG 4K TV: Modern Entertainment for the New Age
 6 underrated Microsoft Word features worth using to boost your productivity