The Bottom Line
Introduction, Specifications, and Pricing
In our time reviewing, there have not been that many submissions from Enermax when it comes to cases. Out of the sixteen cases they are offering currently, and of the sixteen cases that have been entered into the legacy category, it is in the latter section that our previous four submissions lie now. Of the designs we did see, we started off with the very basic designs like the Staray, with its exposed metal innards, and cubic external aesthetic. After that, we saw a trio of cases relatively at the same time, and we saw an evolution in their design where it appeared they were stepping up their game when it came to cases. Since it seems like forever since we have seen a chassis from them, hopefully, we see a similar jump in their designs allowing Enermax to gain better traction in this massive market.
The Internal layout is one of the top two things that sell cases. There needs to be room for all of your gear, modularity is a big player in chassis design, and there needs to be good wire management for that professional finished look we are all after. Of course, aesthetics plays into the decision when buying cases as well, and is one area that Enermax is not shy to try out new things with. This leads us to the main feature of the chassis we are about to discuss, as Enermax paid a lot of attention to lighting and color matching of the interior to attempt to sway your hard earned dollars.
The Enermax Ostrog ADV mid-tower chassis we bring you today is one of three versions offered. In these designs, Enermax offers a huge mesh panel in the front, rounded corners, easy access removable panels, and a lighting scheme that we have not seen before. As to the choices of colors, you can select a blue version, a green version, or the red variant we are about to show you. Along with painting the motherboard tray to match the chassis LED rings on the top and the front of the case, Enermax also incorporates a pair of Vegas LED fans which will play along with the case lighting in one of six modes. If lighting and internal coloration of the chassis is a huge selling point to you, the Enermax Ostrog ADV LED Gaming Fortress mid-tower may very well be the chassis for you.
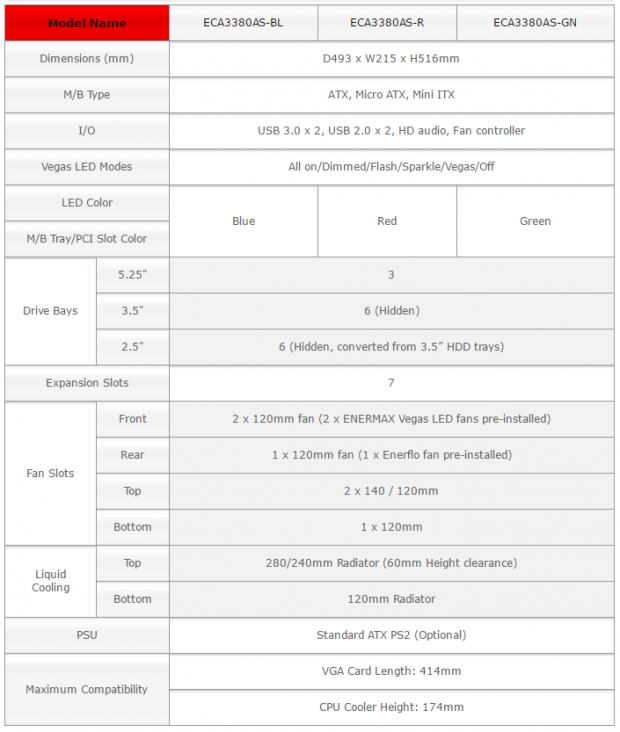
At the top of the chart, we are shown the trio of options with the model numbers posted across the chart. It is a pretty easy system to follow, where the ECA3380AS-BL is the blue one, R is for red, and the GN is the green version. All of them are 493mm deep, they are 215mm in width, and all of them stand 516mm tall, weighing in at 7.2 kilograms. They are capable of housing ATX, Micro-ATX or Mini-ITX motherboards, and the front I/O panel offers a pair of USB 3.0 ports, a pair for USB 2.0 as well, HD Audio jacks, a fan controller, and a button to change the LED modes. As for these modes, both the fans and the chassis lighting works in sync to provide the options for all on, dimmed, a flash mode, a sparkle mode, Vegas mode, and you can also turn them off. As we mentioned earlier, depending on the color of the chassis option, both the fans and the chassis LEDs will match the motherboard tray paint color.
As for drive bays, we are offered three 5.25" bays, and what they refer to hidden bays means that they are internal bays, not hidden. There we find a rack comprised of two cages, each cage containing three drive trays. In these trays, you can fit them with either a 3.5" drive or a 2.5" drive for storage concerns. In the back of the chassis there are seven expansion slots, and in the front is where you will locate the pair of pre-installed Vegas LED 120mm fans. The rear of the chassis also sports a 120mm fan, but it is an Enerflo model without LEDs.
For expandability to the factory cooling options, the top of the chassis offers a raised support allowing a pair of 140mm fans or 120mm fans to be installed there, leaving one spot in the bottom of the chassis for the last possible fan to be placed inside. There is also a section on liquid cooling, where we see room for a 240mm or 280mm radiator at the top, and room for a single 120mm in the back. At the bottom of the chart, we see that there are some limitations, where the video cards can be no longer than 414m in length, and the CPU cooler is limited to 174mm in height.
Since this Ostrog ADV chassis was released at CES this past winter, we would have assumed that it would be more readily available on this side of the pond, but in all, we found only three locations carrying this chassis. Fry's seems to be the place to go if you want to choose from all three designs, and they are the only location that currently offers all three versions. No matter the color choice, you will find the Ostrog ADV cases listed at $119.99. Newegg does offer the blue and the green versions, but for some reason does not show a listing for the red one. In our time looking for this chassis there, we saw that the pricing is set at $114.99, said to be in stock now, but have no image available to go with the ad, so you must look at the model numbers closely to be certain you are grabbing the version you want. We still feel that $100 is the sweet spot for a fully loaded mid-tower chassis, and Enermax is just above that mark. Let's get down to business, and see just what the Ostrog ADV mid-tower has to offer, and see if the pricing is indeed justified.
Chad's Chassis Test System Specifications
- Motherboard: GIGABYTE GA-Z68X-UD4-B3
- CPU: Intel Core i7 2600K (buy from Amazon)
- Cooler: Corsair H80i GT (buy from Amazon)
- Memory: G.Skill Ripjaws F3-12800CL6D-4GBXH
- Video Card: ZOTAC GeForce GTX 970 AMP. Extreme Edition (buy from Amazon)
- Storage: SuperSpeed 128GB SSD
- Power Supply: SilverStone SST-ST85F-G (buy from Amazon)
- OS: Microsoft Windows 7 Ultimate 64-bit (buy from Amazon)
Packaging

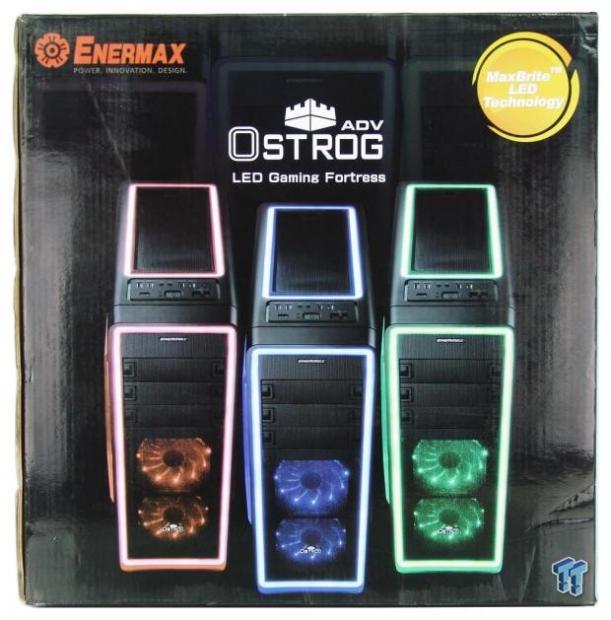
All three versions of the Ostrog ADV LED Gaming Fortress cases are shown front and center, and larger versions of them are ghosted into the background. We also see a notation to MaxBright LED technology which aims to offer a solid coloration to the light strips rather than most spotty LED offerings.
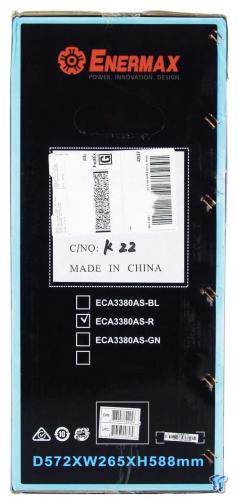
The side panel is an attempt to look like the front of the chassis with the ring of color around the edge. At the top is the Enermax name and logo, a large area for the shipping labels to be applied to, and a notation near the bottom showing which version of the Ostrog ADV is inside.
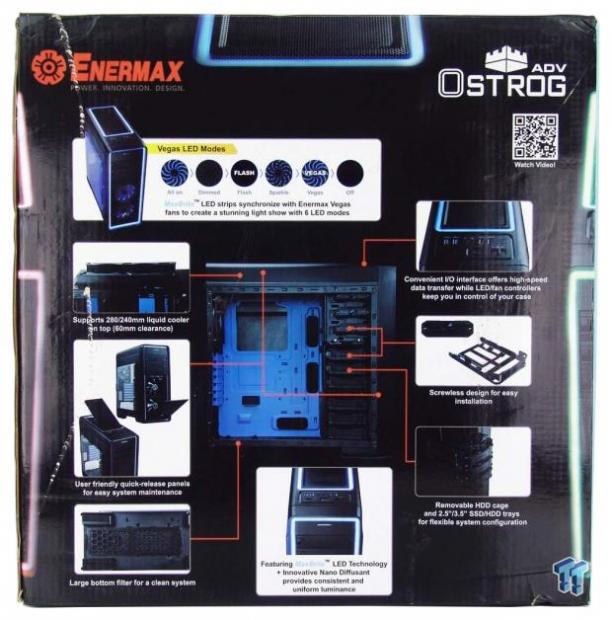
The back offers images explaining the main features of the chassis such as the lighting, liquid cooling support, dust filter locations, as well as that the inside of the case is color matched to the LEDs. There is also a QR code near the top which will allow potential buyers to go right to the product page for full details.
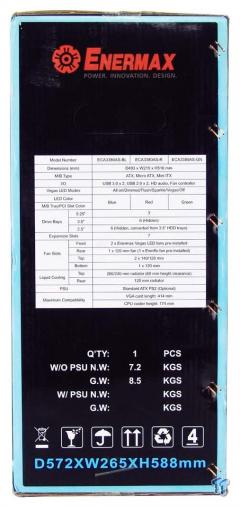
The last of the panels is similar to the opposite side, where the color ring is found around the edge. However, rather than wasting most of this side for a sticker, there is a specifications chart, weights below that, and like the other side, there are also measurements for this chassis at the bottom.
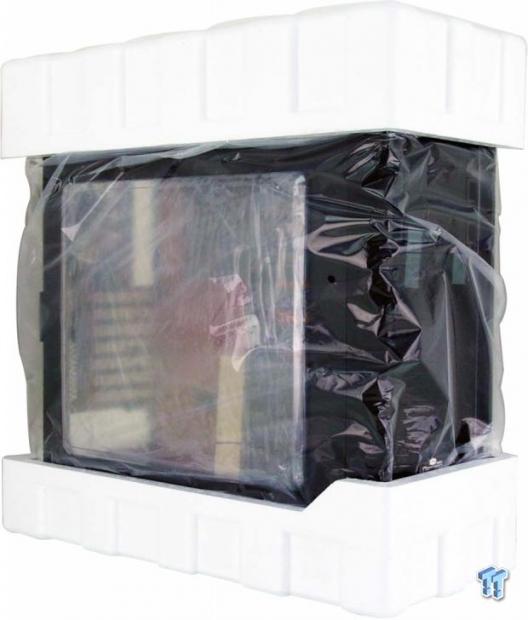
Inside of the box, we find the Ostrog ADV supported and protected by thick Styrofoam end caps at the top and the bottom of the chassis. Inside of that, there is a plastic liner to protect the paint and plastics. Going one level deeper, there is plastic on the outside of the window, and tape placed on the ends of the removable panels so that they do not come loose in transit. This "tried and true" system works again, as this Ostrog ADV chassis has not a single mark or blemish on it.
Ostrog ADV LED Gaming Fortress Mid-Tower Chassis
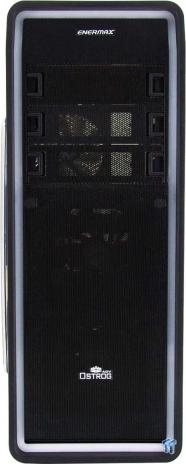
The front bezels frame is made of ABS plastic, and as it curves around the corners, it is molded in black. The white line you see running just inside of that is the LED ring, and the entire center section of this bezel is made of steel mesh. There is naming at the top and bottom of the mesh panel, and while the top allows for the bay covers to be removed, the lower section is one solid panel.
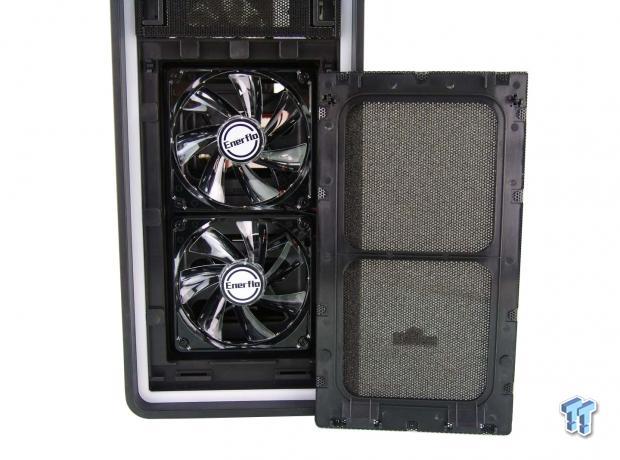
The lower solid section is also removable, for two reasons. One reason is that it is the dust filter for the intake, and the second reason is that it allows access to the fans without the need to remove the entire panel.
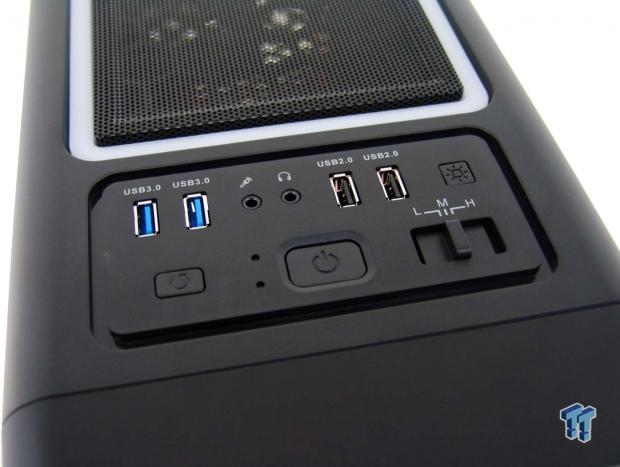
Behind the front bezel, at the top of the Ostrog ADV, we immediately run into the front I/O panel. The top row offers USB 3.0 ports, HD Audio jacks, USB 2.0 ports, and the light switch to cycle through the modes. The lower row provides the reset button, power and HDD LEDs, a large power button, and a three position fan switch to the right.
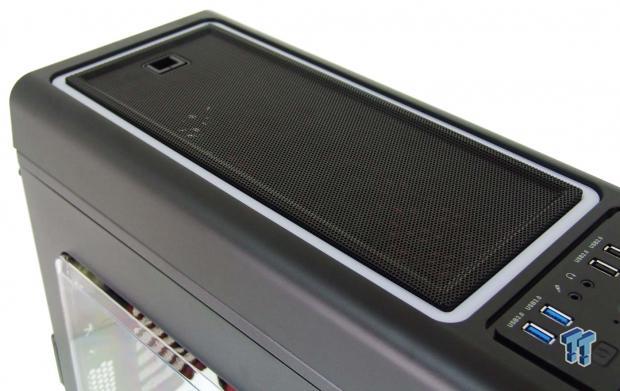
Behind the I/O panel is a section of steel mesh ringed with the white LED section, mimicking what we saw on the front of this chassis. The mesh insert is also removable with the finger grip at the back, and allows access to fans or liquid cooling below it, again eliminating the need to pull the entire section off.
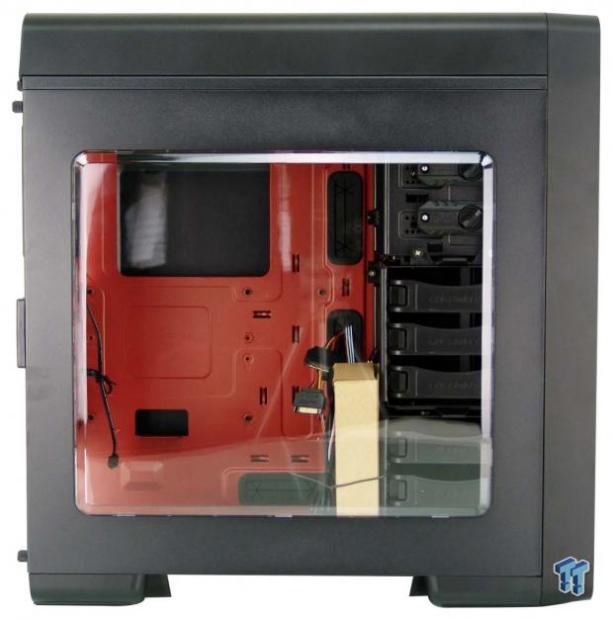
From the left side, the chassis looks chunky with the thick top section and bulky feet supporting it at the bottom. The panel aligns well to the frame of the chassis, and the window is clear, beveled around the edge, and quite large.
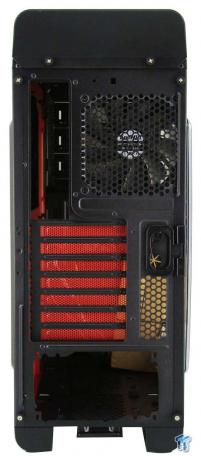
At the back, under the thick top cover, there is room for the motherboard dust shield next to the 120mm exhaust fan. Below that, there are seven colored slot covers which match the theme, and next to it are holes for external water cooling under the side panel handle, just above the mesh, leaving room for the PSU at the bottom.
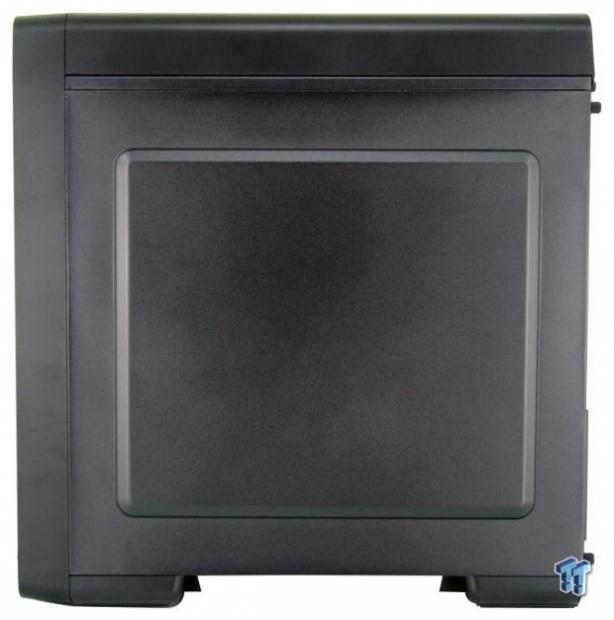
The right side of the chassis is an identical match to the left side. The only thing that changes in this panel is that the window is left out of the panel, but the steel has been shaped outward and placed in the same location. This time rather than a view, the expanded section of steel offers more room for wiring behind it.
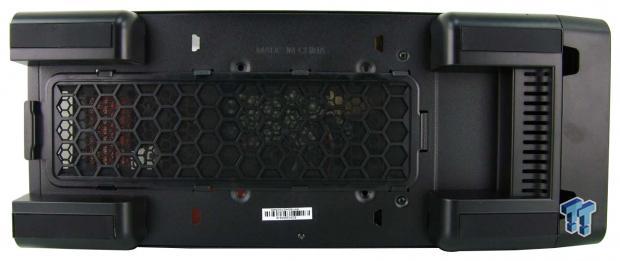
Under the Ostrog ADV chassis, we see a long dust filter for the PSU and optional fan, which is slid out the back of the case. The large feet have large rubber pads to ensure a solid footing, and we see some venting near the front and finger holes for removal of the bezel if needed.
Inside the Ostrog ADV
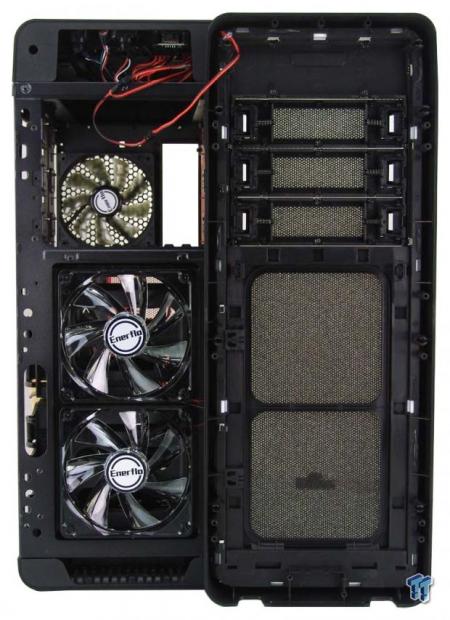
The front bezel does indeed come off of the chassis and fully exposes the Vegas LED fans sporting the Enerflo stickers on them. However, one must be very careful here, as the wiring to light the LED ring in the panel is hard wired, and does not offer a lot of slack.
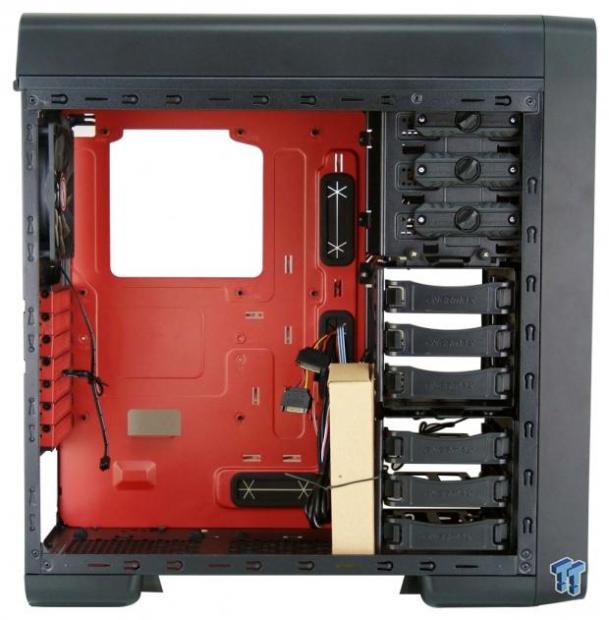
The inside of the chassis looks nice with the bright red motherboard tray, but the layout is a bit old-school. It is the tool-free ODD bays and the wall of HDD trays that gives it this feel, with not many upgrades to the expected standards of today.
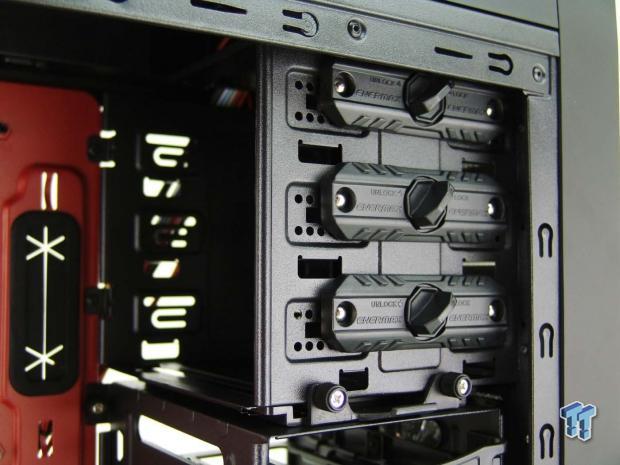
The 5.25" bays use twist lock mechanisms to secure devices on this side, yet requires screws on the other side. These locks are sufficient to hold things in place but help to deliver that older feel to the interior.
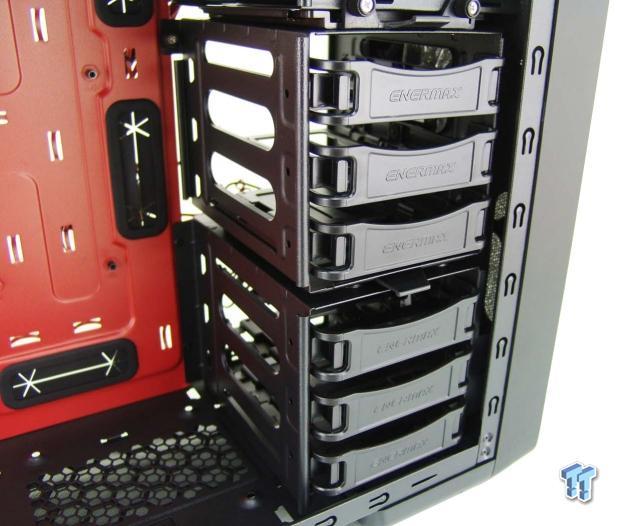
This rack is where six storage drives can be placed. Each tray is held into place with tabs near the front and is made to hold a 3.5" drive by flexing the tray around it, or by using the holes in them to mount a 2.5" drive.
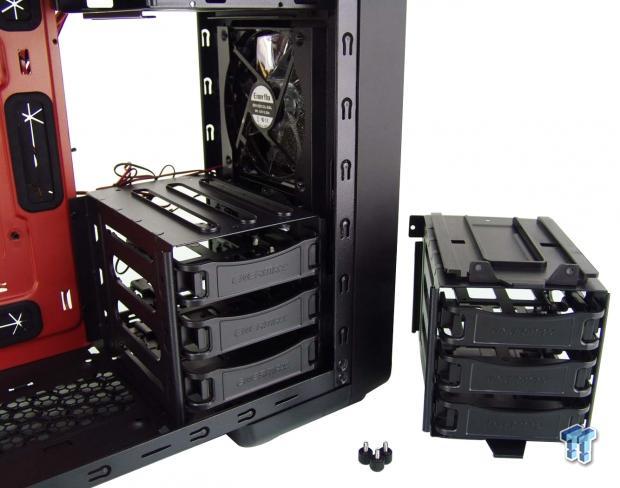
If you remove the pair of thumbscrews along the top of the cages, as well as removing one from the motherboard tray, the top section of the HDD rack will come out. This allows for a bit more airflow from the top front fan and also adds room for longer video cards to inhabit.
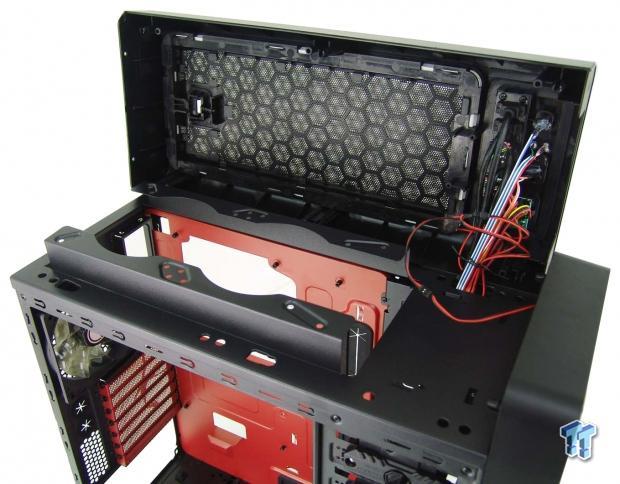
This is the reason that there is a removable mesh panel in the top of the Ostrog ADV; the wiring. This does expose the raised rails where the fans and water cooling can be placed, but with all that wiring, you will not want to take the chance of damaging them from the weight of the panel pulling on it.
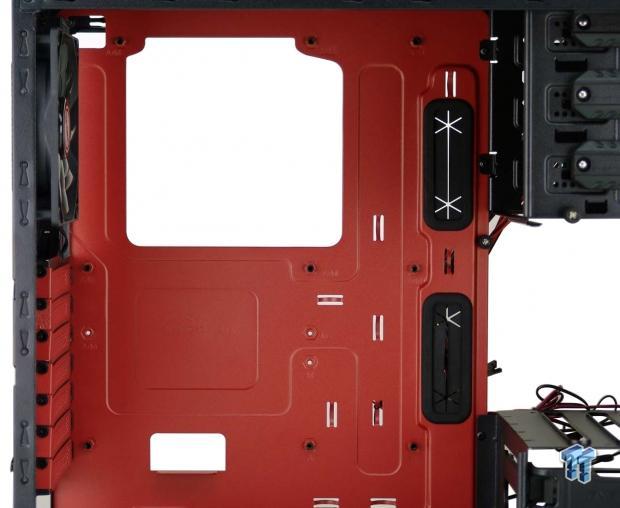
The motherboard tray is bright red, offers a decent sized access hole for back plates, delivers three holes for wiring, and nine tie points to help keep it managed. All of the brass standoffs are in place, but if you do need to move them for smaller motherboards, the tray is clearly marked as to which need to be used.
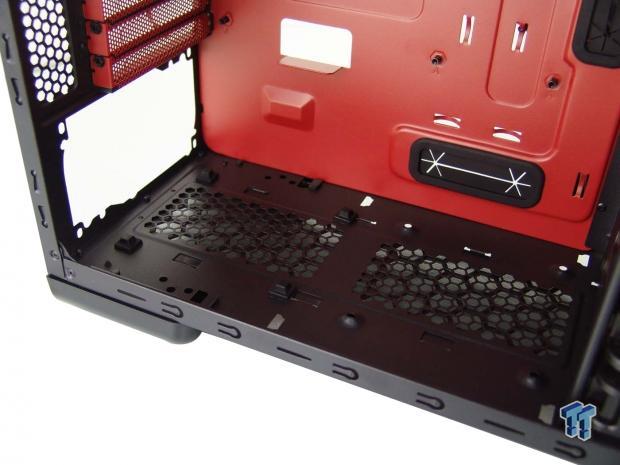
The floor of the chassis is open in two sections, one with rubber pads around it to set the PSU on top of, and the one in front for an optional fan if the PSU is short enough to allow it. We also see another hole to send the PSU wires behind the tray and an additional tie point just to the right of it.
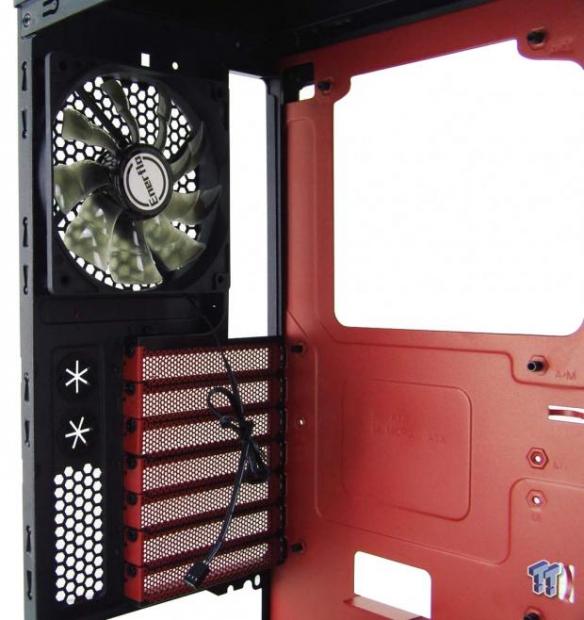
The rear fan uses a black frame and translucent green blades, unlike the pair up front that are clear, nor does it offer LEDs when powered via the 3-pin connection. As for the expansion slot covers, rather than using thumbscrews like the cage up front does, Enermax opted for hex-head screws here.
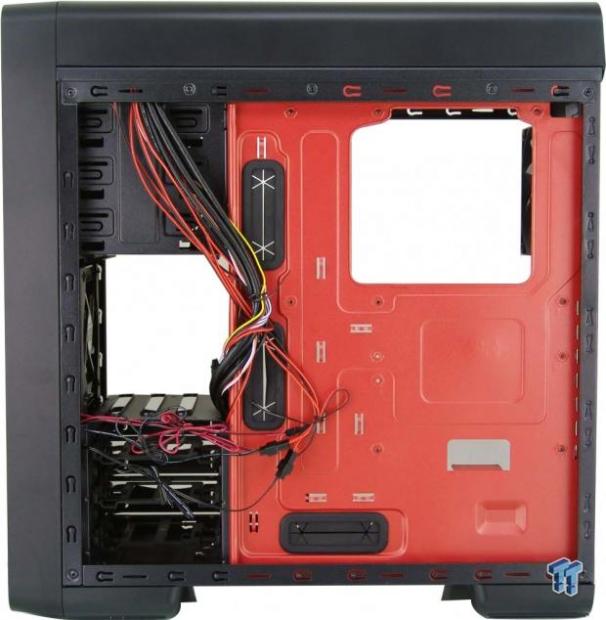
Behind the motherboard tray, there is nearly 15mm of space for wiring or whatever else you want to try to fit back here. Keep in mind, the bump in the door is an additional 5mm, so there is sufficient room to be had.
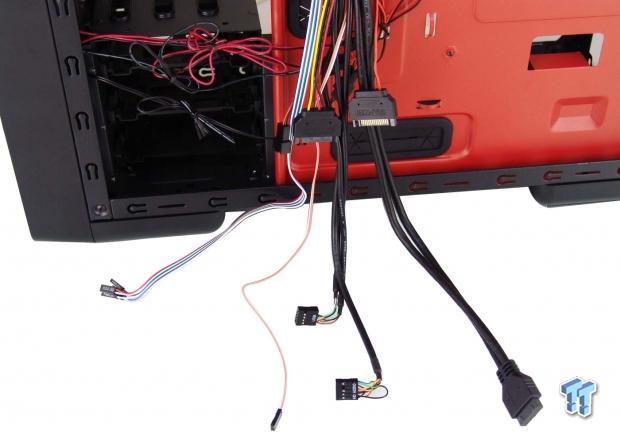
The wiring is offered, some black, but mostly a rainbow assortment of wiring. Three fan leads come from the fan controller, and both the fan controller and the LED system use SATA power connections. The switch and LED wiring from the front I/O is colorful, while the USB 2.0, HD Audio, and native USB 3.0 connections are all provided black.
Hardware & Documentation
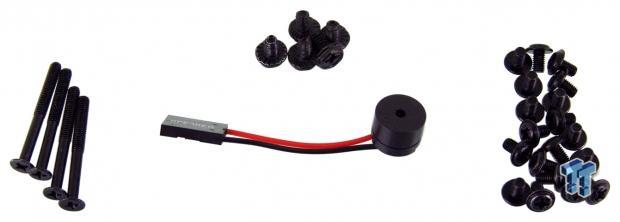
As part of the hardware shipped with the Ostrog ADV, we find a set of four long screws to be used for mounting a fan on the floor of the chassis. There are also five hex-head screws, but only four are used for mounting the PSU. Keeping things simple, they opted to use M3 screws for mounting 2.5" drives as well as the motherboard to help eliminate potential issues. We also find that this chassis ships with a motherboard post speaker, placed in the middle of this photo.
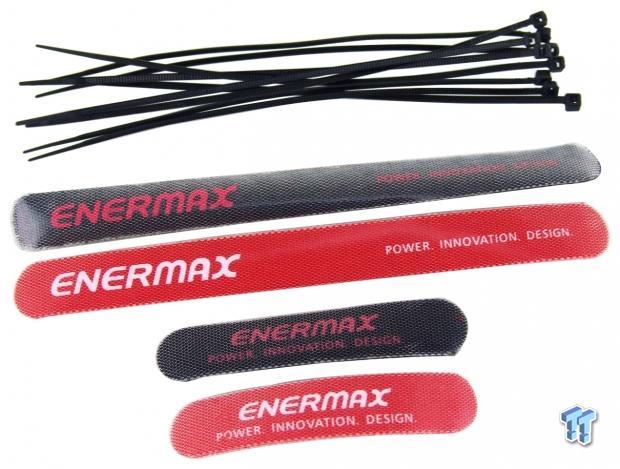
To maintain the wiring, wherever it is you want to run it, Enermax provides us with ten zip-ties. They also provided us with two larger and two smaller hook and loop straps. These can be used anywhere to bundle wires together, like those for the GPU, or bulky runs behind the motherboard tray where tie points do not exist.
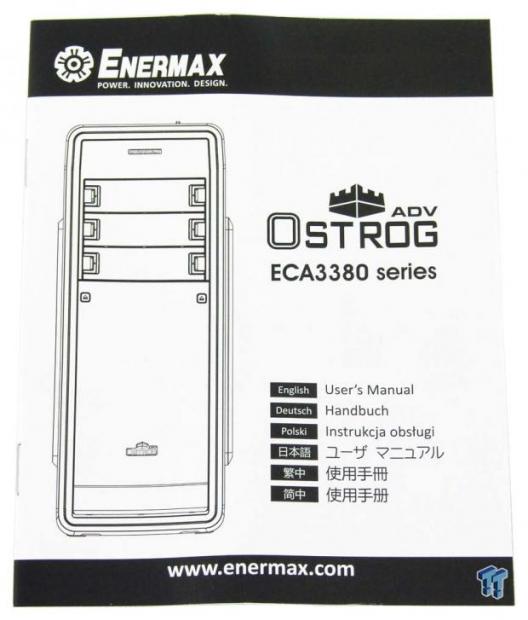
The Ostrog ADV also comes with a user's manual. This is written in a few languages, and due to the amount of detail contained inside, ends up being rather thick. Starting off with a parts list, and taking the build step-by-step allows even the most novice of builders to complete the task.
Case Build & Finished Product
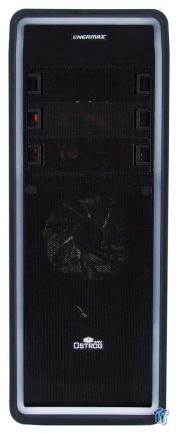
Without the need for an optical device, and no plans to need a bay reservoir or card reader, the front of the Ostrog ADV looks just like when we opened it. It is simple, clean, and once we power it up, about to be bright and fancy.
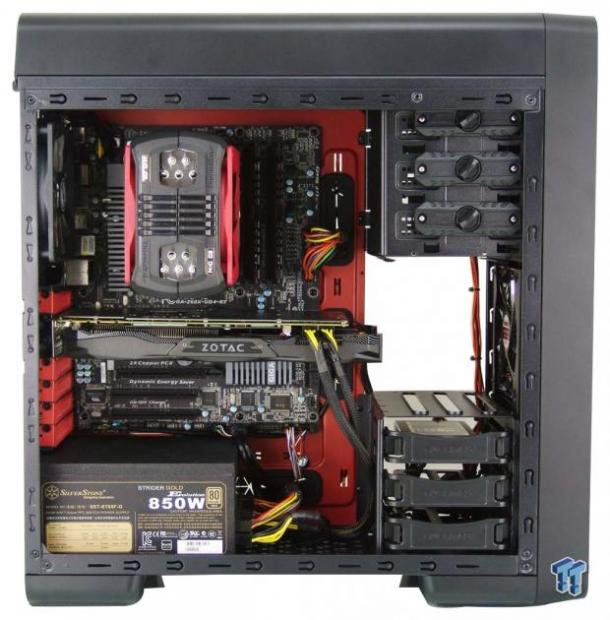
With the top being raised, and the lowered motherboard positioning, fans, and a thin radiator are of no concern at the top. The back of the chassis has the fan too close to the side panel to be of much use for water cooling, and we opted to match the red theme with one of our air coolers on the CPU. We did need to remove the HDD cage to fit this Zotac 970, and our PSU choice left the optional fan location unusable.
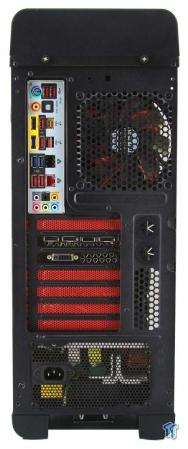
At the back of the Ostrog ADV, during the build, we found nothing needing to be addressed. The I/O shield fit well, the card aligns as it should, and nothing funky happened when we installed the PSU.
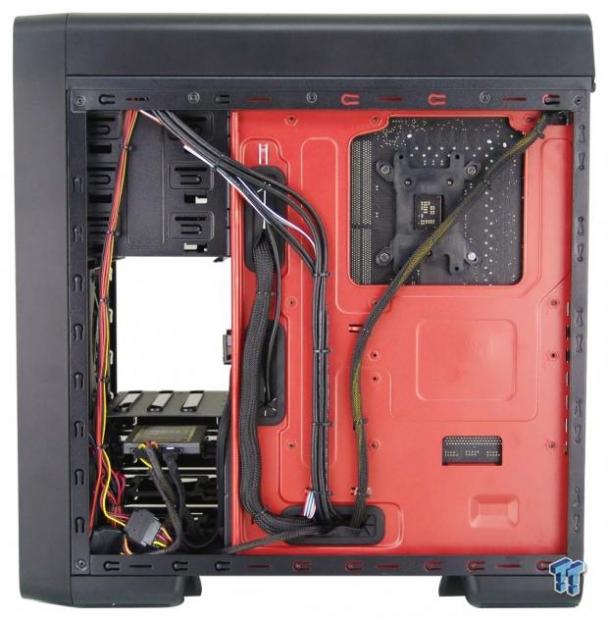
It takes a lot of work to get the wiring this clean, and if you plan to remove the HDD cage, there will be nothing blocking the rat's nest they shipped us. We did manage to get everything routed, and flat against the tray, the front I/O wiring was long enough, but we did end up stuffing some of the wiring into the lower HDD cage to keep it tidy.
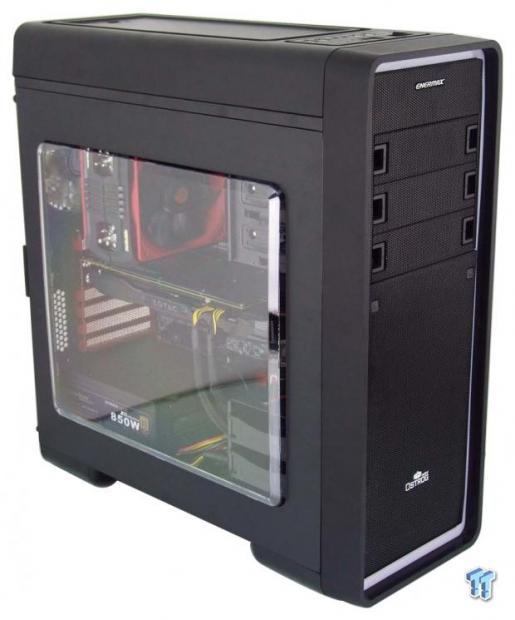
The view through the clear side window is terrific. All of your hardware is on full display, and while we can see a bit of the bays near the front, we didn't mind it all that much. Now all that we have left to do is to power it up and see what happens.
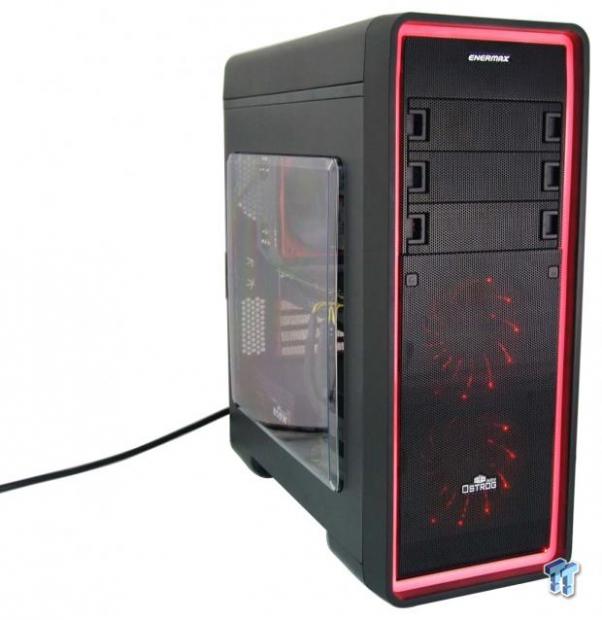
Once powered, the front of the chassis is all a glow. The bright red ring around the outside edge is solid in its light delivery, with no indication of individual LEDs lighting that strip. The Vegas fans also come to life in the front, with their curved LED lighting passing through the mesh.
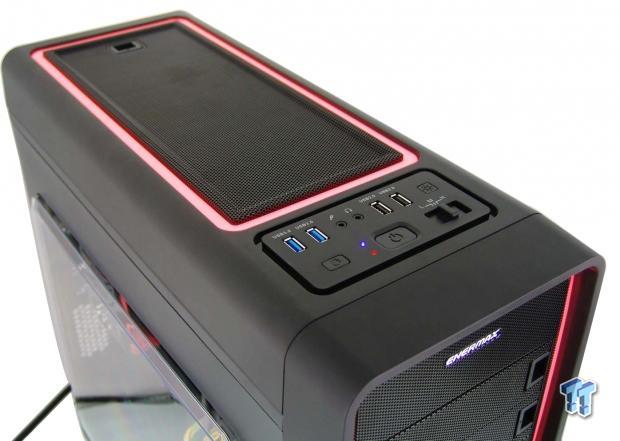
At this time, the top of the chassis is also glowing to match what we saw in the front. At this point, you can dim the light to about half, as well as a few other cool lighting tricks that the Ostrog ADV delivers, which do not address well with images, but Enermax has a video on their site to show them off.
Final Thoughts
When we were asked to look at the Ostrog ADV LED Gaming Fortress, from what we saw in images, we liked the look and idea behind this chassis very much. Once we got it in hand, filled it, and powered it up, we were pleased with the end results. Even when it came down to the fan controller, we found the low setting to be unheard from a foot away, the medium setting delivering 27dB of noise, and the high setting sending out 34dB of fan noise. All of which is tolerable when dealing with a chassis built to keep things inside of it cool in the heat of battle.
The MaxBright LED technology is also a huge success. No matter how hard you look at the chassis, you cannot tell where the individual LEDs under the strips are located. This delivers a solid glow that looks very sharp, and with the various modes for them and the fans, it was a bit of fun messing around with it and enjoying the light show.
However, there were some not-so-great features as well. We did not care for the older generation feel of the tool-free mechanisms on the ODD bays, nor did we like the fact that only one HDD cage is removable. With one less ODD bay and both cages allowed to come out, we would have an option for liquid cooling in the front, not even hitting on the fact that multi-card systems may run into issues with the lower HDD cage as it is. It is nice that there is plenty of room up top for liquid cooling, but it is likely to be an AIO, as there is not much room for a pump inside of the chassis unless it is part of a bay reservoir.
As for the back, you may get lucky with a custom radiator placed there, but the AIOs we see day to day were too wide to be installed in the back. Our PSU blocked the optional fan location on the floor, the chassis is easily flexed with minimal pressure, and things like the side door handle on the left side panel shouldn't be needed if the door was not so tight. Also, since the right side panel is just as tight, you have to use the raised section of the panel to push against, as there is no handle there for easy removal. While we do like the chassis in a few areas, the older layout of the interior, and the ways in which it seems things were not completely thought out for their maximum potential, Enermax is showing they have a long ways before they can compete with the champions of this industry.
It all boils down to what you want to look at with a chassis such as this. The interior being what it is, the lack of black on most of the wiring, the amount of wiring, and the fact that the front bezel and top panel are not easily removed due to said wiring, the list of issues seemingly keeps piling up compared to so many others in this segment. While the front, top, and fan lighting, along with the various modes is an interesting addition, we do not feel that this alone is worth dealing with an aging design on the inside, and especially when Enermax is getting in the $115 to $120 range for this mid-tower chassis.
For the novices out there, this case is likely enough to keep you happy for a couple of years, but for those who know how much you can get for your dollar in mid-tower layouts these days, it is likely you feel the way we do. If these chassis were to shed some weight to the tune of about $40 to $50, then yes, we would be saying it is worth it just for the lighting, but as it sits, we do not feel that this is a chassis that the masses would not pick apart on their own. There are just too many better offerings in this segment to be swayed by what is fantastic lighting but was not enough to carry us through all the way to the end.
Chad's Chassis Test System Specifications
- Motherboard: GIGABYTE GA-Z68X-UD4-B3
- CPU: Intel Core i7 2600K (buy from Amazon)
- Cooler: Corsair H80i GT (buy from Amazon)
- Memory: G.Skill Ripjaws F3-12800CL6D-4GBXH
- Video Card: ZOTAC GeForce GTX 970 AMP. Extreme Edition (buy from Amazon)
- Storage: SuperSpeed 128GB SSD
- Power Supply: SilverStone SST-ST85F-G (buy from Amazon)
- OS: Microsoft Windows 7 Ultimate 64-bit (buy from Amazon)
| Performance | 90% |
| Quality including Design and Build | 78% |
| General Features | 71% |
| Bundle and Packaging | 90% |
| Value for Money | 65% |
| Overall | 79% |
The Bottom Line: We have to give Enermax credit for the Max Bright LED technology as it is stunning, but is not enough to sell a chassis so aged in design. Considering the cost involved, there are many better offerings out there, as long as the lighting is not a deal breaker.
PRICING: You can find products similar to this one for sale below.
 United
States: Find other tech and computer products like this
over at Amazon.com
 United
Kingdom: Find other tech and computer products like this
over at Amazon.co.uk
 Australia:
Find other tech and computer products like this over at Amazon.com.au
 Canada:
Find other tech and computer products like this over at Amazon.ca
 Deutschland:
Finde andere Technik- und Computerprodukte wie dieses auf Amazon.de
What's in Chad's PC?
- CPU: Intel Core i7 13700K
- MOTHERBOARD: ASUS ROG Maximus Z690 Hero Eva
- RAM: TEAM DDR5-7200 32GB
- GPU: ASUS GeForce RTX 3090 Eva
- SSD: addlink m.2 2TB
- OS: Windows 11 Pro
- COOLER: Fractal Lumen S36
- PSU: be quiet! Dark Power Pro 1500W
- KEYBOARD: ASUS ROG Strix Scope TKL Electro Punk
- MOUSE: ASUS ROG Strix Impact Electro Punk
- MONITOR: ASUS ROG Swift OLED PG42UQ
Similar Content
Related Tags

