


Introduction
Keeping in the same mid-tower chassis specification, the Ostrog is reborn. What used to be a sleek, elegant chassis with a solid front panel, windowed option, and while offered in both white and black, there was only one fan installed from the factory. Looking back at the chassis today, it really can compete, as it also offered tool-free features, a twist on the HDD rack, and plenty of room for any ATX system, I can definitely see the family resemblance. Even though there has been a complete changeover, and I mean everything, the motherboard tray, optical bays, HDD bays, layout, aesthetics, it has all changed, but there is one little bit that makes it very easy to see the resemblance.
With the newest Ostrog design, the changes outside delivers customers a familiar front bezel with the outer ring of mesh around the bays and lower section of the bezel. There also is a raised front section on the roof of the chassis that incorporates the front I/O panel, but even this is redesigned. The side panels are different too, as this time they are pressed outward to allow for more space behind the panels. Internally you lose an optical bay drive, but gain an easily removable section of the HDD cage to allow for longer video cards. Really, at every turn, no matter where you look, there are changes to be found with this new design.
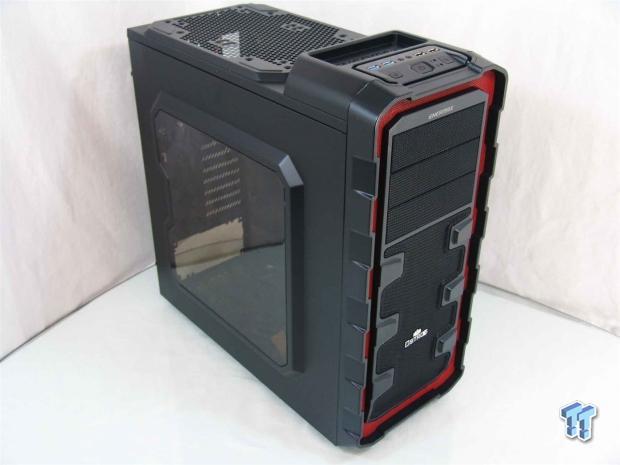
The slightly wider, less elegant, but more aggressive mid tower we are looking at today is the Enermax Ostrog Giant. While it isn't larger in stature, the redesign does take giant steps from the original concept, and offers customers something a bit unexpected. To help out this chassis, that same ring of mesh that stayed in the Ostrog series, well this time you have a color option. You can get a black chassis with a blue mesh ring, and a pair of 140mm blue LED fans in the front to match, or you can get the version we were sent, which is the red mesh ring with complimentary colored LED lighting in the front.
Enermax has been a little hit and miss lately with some of the cases I have seen; it was discussed at CES, and now is my first chance to see if anything was done. So if the introduction image has you intrigued, hang out and continue reading as I dish out what the Enermax Ostrog Giant mid-tower chassis offers in features as well as price.
Specifications, Availability and Pricing

The chassis we will be seeing in the next few pages is the ECA3280A-BR-F, and out of all that it is the R in BR-F that designates we have the red version where the B-F is the blue model. Outside of the chassis things are completely blacked out except for two things. One is the colored mesh outline around the plastic and mesh front panel, and the other is the darkly tinted side window in the left door. The front of the chassis is mostly mesh for excellent ventilation of the front of the chassis, and the outside edges are thick plastic with almost fingers that look to be holding the bezel on with the chunky design there. The inside of the chassis is also painted black and offers three 5.25" bays with tool-free latches, eight 3.5" drives, a pair of 140mm red LED fans, a 120mm fan, offers an 8+1 expansion slot configuration, and can house both ATX and Micro-ATX systems.
The large raised section on the front of the chassis on the outside offers the power and reset buttons, activity and power LED lights, two USB 2.0 ports, two USB 3.0 ports, as well as a pair of HD Audio jacks. Some of this cabling is black, but the thin wires to connect for the LEDs and buttons is a rainbow of colors matched with a white ground wire. Along with being compatible for 412mm worth of video card, there are also optional places for fans. The main section for this is right behind the front I/O panel, and here you can install four different sized fans. The other place for an optional fan is on the inside of the permanent hard drive rack so that you can help the fan that gets blocked in the front of the chassis to help cool the hard drives, as well as getting more air into the main area of the chassis.
When I took my look around to shop for the Ostrog Giant, I found that locations are limited. Straight through Goggle the only hit that pops up is at Newegg with a really reasonable price. I also found the blue version via Amazon, but the price wasn't as good as it is currently at Newegg. Over there they are offering the chassis to customers at $74.99 with free shipping. Considering what I have seen over the years at this price range, it seems that really only the last year or so you can really get a good chassis for this kind of money.
Our Latest Mid-Tower Cases Review Coverage
Is the Ostrog Giant one of those cases? Continue on and see what I think once I get some time behind the wheel of this mid-tower chassis.
Packaging

Saving cost starts with the outer packaging. The use of plain brown cardboard with a single colour of screen printing is about the best way to save it. You still get the company name, you still get the chassis name, along with five thick black lines at the bottom, and there is a rendering of the front of the chassis.

Here we see the company name above the handle of the box, while at the bottom there are two checklists. On the left you have a checkmark for the series of the chassis with the option to include a PSU, and on the right are boxes for blue, red, white or solid black color options.

Cutting a bit more of the cost, Enermax decided to repeat the image from one larger panel to the other. They could have shown the inside of the chassis or maybe listed features, but making another screen for printing costs money, and soon enough we will see what is inside.

This last small panel offers a full list of the chassis specifications and offers all of the information from the chart we just covered from their website. At the bottom it also shows you the net weight of this chassis without a PSU is 7.5 kilograms, or roughly 16.5 pounds.

Inside of the box you will find the chassis in between two Styrofoam caps after being wrapped in a plastic liner. For some additional protection, both inside and the outside of the window have layers of clinging plastic to keep it in pristine shape. Tried and true methods seem to work well, and the Ostrog Giant arrived in perfect shape.
Enermax Ostrog Giant Mid-Tower Chassis

The front bezel of the Ostrog Giant keeps the outer ring of mesh that the original Ostrog had, but this time is it painted red, and surrounds a full mesh center where the older one was a solid panel here. You can also see why I said that this design is aggressive and chunky.

Right behind the bezel at the top of the chassis, you will locate the front I/O panel and the handy little storage tray. The I/O offers a large power button, a light button for the front fans, as well as all the connectivity for USB and audio you need.

Looking at the entire top surface of the chassis, just behind the large plastic bump, you will find room for optional fans to go into this case. You can either use a single 200mm or 230mm fan, a pair of 120mm fans, or a pair of 140mm fans to suit any cooling needs.

Looking at the Ostrog Giants profile, you can see the large bump at the top for the I/O panel as well as a raised area where the fans go in. On the left side of the chassis you get a uniquely shaped bump-out to offer a bit more internal space as well as making a good place to add in the tinted window panel.

Out back you have quite a bit offered. The rear I/O is next to the 120mm exhaust port with a wire pass-through next to a pair of holes for tubing. Below that you have an eight plus one setup of the expansion slots leaving the power supply to install in the bottom of the chassis.

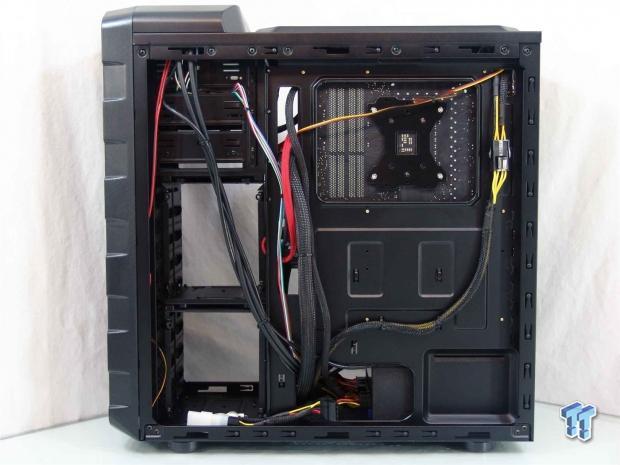
The right side of the chassis matches the left side, sans the window. You can see a reversed press is used to create the same shape on this side, but here it allows for a bunch more wiring to pass behind the motherboard tray.

Under the chassis you have four large round plastic feet that have rubber pads on the bottom of them to give the Ostrog Giant good footing. There is a dust filter that covers both the PSU as well as the area in front of it. The four screws allow you to remove the 2.5" drive rack, while the HDD rack at the front is riveted in.
Inside the Ostrog Giant

With the side panels removed, looking into the chassis you can easily spot the hardware box in the bottom of the HDD rack. You can also see the rear fan wire is tended to as well as the chassis front panel wiring, it is also tied and run to the floor so it doesn't flop around in transit.

There are three 5.25" bays offered in this chassis. On this side of them you have these tool-free locks. To slide in a drive you do nothing but slide in the drive. When you hear the click, the drive is locked in the bay. If you want to, you can add screws to the other side, but these clips do keep the drive secured.

There are also eight 3.5" drive bays behind the pair of 140mm LED fans. The top section is removable simply by grabbing the two tabs and sliding it out. To install drives, there is a ton of clip in sliders for the sides of the drive included with the hardware.

If the video card you want in here is a bit on the long side, remove the four bays at the top and change the length available from what was 286mm to now 412.5mm with it out.

The top of the chassis will support dual radiators with 20mm offset spacing. The real issue is that even with this section being raised, the chance that the fans will run into the PWM heatsink or the memory is quite high.

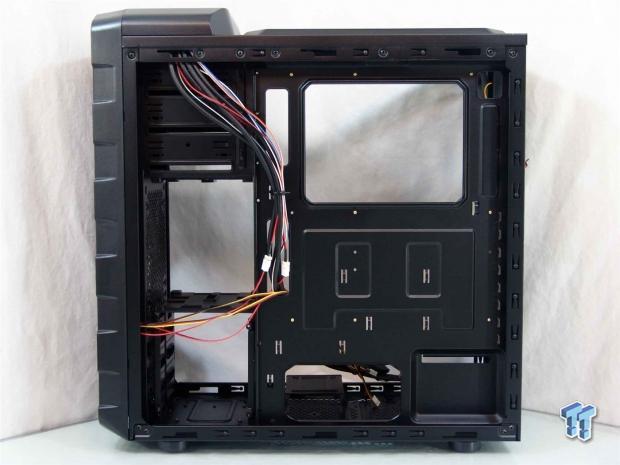
The motherboard tray offers one small, two slightly larger rectangular, and a large square wire management holes in it, as well as offering eight places to tie up the wiring. There is also a very large CPU cooler back plate access hole to allow you to swap coolers without removing the motherboard.

The floor of the chassis offers four rubber pads to set the PSU on, and the area under it is well ventilated to allow the PSU to draw enough air. In front of that there is a two bay 2.5" drive rack that with the screws under the chassis can easily be removed to install the drives or just get it out of the way.

Inside the back of the Ostrog Giant you can see the black 120mm fan installed there, and it is powered with a 3-pin fan connection. The expansion slots are replaceable once used, and they all have hex head screws to secure the cards.
Behind the motherboard tray you can see that Enermax ties up the wiring to get your wiring underway, and the chassis offers 20mm of room from the frame to the tray to stash wiring. The nice plus here is that the door is bumped out to allow for all sort of wiring.

The wiring from the front of the chassis contains a pair of 3-pin fan connections for the 140mm fans there. It also has the power, reset, HDD activity, and power LED wires to the left of the HD Audio, USB 2.0 and native USB 3.0 connectors.
Accessories and Documentation

Starting off the hardware found in the box, you get a pair of Velcro Enermax wire management straps for large bundles of wiring. You also get a standoff socket, three extra standoffs, motherboard and ODD screws, 2.5" drive screws and the PSU screws.

You get five wire tie straps to help manage wiring, you get a pair of 4-pin Molex to 3-pin fan adapters for the front case fans, and then you also get the motherboard speaker.

Fifteen of the sliders are stacked tightly next to each other in the back, but up front I laid one down so you could see the pins that slide into the drives screw holes. Then holding both slides onto the drive, you can slide it all into one of the HDD bays.

Even the manual is printed to save you a bit of money in the end. Simply using one large folded piece of paper with black renderings and text makes it easier to produce. As you can see, this manual covers English, but also covers five other languages as well.

Opening things up to have a look, you can see there are images of the chassis and a specs chart along the top. After that you get into chapters of instructions where the images do show you what needs to be done. This is a good thing too, as the written instructions are very curt.

On the reverse, you finish up the build. You do have a wiring diagram and pin-out for the various connections, but I didn't see any sort of hardware checklist to ensure you have all the screws needed to get the build finished.
The Build and Finished Product

To slide in the optical drive I had to remove the front panel to accomplish this. The three mesh bays covers have to be removed from the inside of the bezel, and I was happy to see that none of the wiring is attached and this whole panel can be removed and rinsed to maintain its cleanliness.

With the drive in place it definitely breaks up the mesh that ran the entire front of this chassis. To be honest though, that bright red ring on the chassis does attract the eyes away from the drive, though.

I had no issues to speak of when installing my components. I got both drives in the ODD rack, but I left both sections of the HDD rack in to show there is plenty of room for most cards out of the box. I also like that I was able to get all of the wiring but the GPU power leads behind the motherboard tray for a clean finished product.

In the back, the rear I/O dust shield popped right into place, the video card slid right in and the screws hold it in securely, and the PSU falls right into place and screws in without a problem.
Behind the motherboard tray I didn't really have to try much at all. The front wiring is just long enough to get to the various parts of the motherboard, so they run where they can. As for the PSU wiring, I left most of it lose and just tied in the 8-pin lead as they offered the tie points right where it has to go.

As I put the panels back on the chassis I figured I would take a peek inside of the window to see what we have a view of. In reality, unless you really light the interior, there is barely a view given since the window is tinted so dark. You do get an idea of what is going on though, so at least there is that.

With the fact that the front chassis lights can be turned off with the switch next to the blue power LED, if you would like, for night time, you can only have this LED to deal with in an otherwise dark room.

With the light switch on, you do get a pretty decent amount of red lighting coming through the face of the chassis, but I don't think that the lighting of these fans is what is going to be annoying to most people.
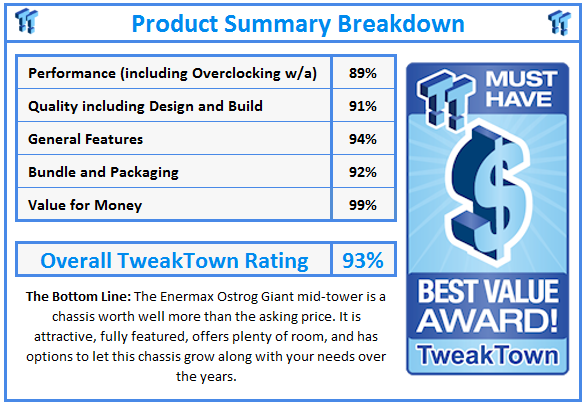
Final Thoughts
Overall the Ostrog Giant is a winner, especially after seeing the Fulmo GT that I almost failed for the fact that it was near impossible to get into. Versus the market, there are a few cases out now under $100 that are worthy of your attention if you are building on a budget, but they aren't as cool to look at as the front of this chassis is. I know aesthetics aren't everything, but most cases are subject to being skimmed over for look long before you look deeper to see if the specifications accommodate your parts. That being said, this chassis is a real looker, and it will be hard to pass up on. Once you consider that it offers things like a wireless front bezel, dust filters in the front and bottom and a removable HDD rack - it has everything you see in a $100 case; just Enermax has lowered the pricing bar a bit with this chassis.
I completely understand with the fully open front design that the Ostrog Giant was designed with air flow in mind. The thing is, they didn't just stop with plenty of locations for fans, and the easy access to air through the front of the case, and they put some fans in this chassis that will almost make your ears bleed when they are run with 12 volts powering them. As I powered up the system for the first time, I actually thought something was wrong, the fans were just screaming that loud. After letting my ears rest for a few minutes, I returned with my audio meter and found that this chassis was showing a reading of 65 dB. Considering the only thing that I can complain about is the noise levels, well that is pretty good, because there are a lot of users still out there that can't afford $30 a fan for ones that can deliver the amount of airflow that this chassis has to offer, just to be able to drop the acoustic level, and will use this chassis as it is shipped with no qualms about it.
What I think is the icing on the cake for the Ostrog Giant; it has to be the price. Like I said, this chassis offers all the same things you will find in $100 solutions, it is just that the box here isn't pretty, and the instructions aren't in Technicolor, so there is a lot of the cost saved right there. I can assure you that there wasn't any thin steel used, or a lack of needed parts to try to cut corners, you even get three fans where the original only came with one. With the simple fact that the Enermax Ostrog Giant being priced at $74.99 with shipping included on that deal, it makes the $50 solutions quiver once shipping gets included with those, and is a solid enough competitor to cases that run 25% higher than this does. If you like what you saw in this review, I strongly urge you to get over to Newegg and pick one up before anyone gets wind of this and raises the price.
I am kidding about anyone raising the price, but this chassis is worth more than the asking price in my opinion, and because of it I am fully behind this design for those building on a budget.
 Lian Li B4-mATX Review: a compact mATX SFF case with excellent airflow and premium features
 Ocypus Sigma F36 BK ARGB Cooling Fan Review: high airflow and unified design in one frame
 PCCooler CPS RZ820 Display Review: a flagship-level CPU air cooler with an LCD screen
 MOAIPLAY ORA PRO G1 850W ATX 3.1 PSU Review: high efficiency and 10-year warranty for $119.99
 NZXT H6 RGB+ Compact Dual-Chamber Chassis Review
 Patriot's Viper Steel 5 Infinite DDR5 memory features never-before-seen 3D Lighting, also hits speeds of 8000 MT/s
 LIAN LI launches new fans with integrated 1.8-inch LCD screens
 ASUS's ROG Raikiri II Pro PC controller supports 8K polling and instant actuation buttons
 Ryse: Son of Rome was supposed to be Xbox's Assassin's Creed but nobody bought it
 Lenovo lists its first Wildcat Lake ThinkPad laptops with Core 7 and Core 5 SKUs
 Modders upgrade the original PlayStation's RAM from 2MB to 16MB
 ZeniMax's ESO studio is still big enough to deliver new content
 id Software not a support studio after layoffs, reportedly working on new Doom project
 Apple sues OpenAI, accusing it of engaging in a 'strategy to extract Apple's confidential information'
 Micron 6600 ION 245.76TB Enterprise SSD Review - Best in Class Programming Speeds
 MOZA MA3F EFCM Flight Control Module Review: authentic Airbus A320 autopilot panel for simulators
 Turtle Beach Stealth Pro II Wireless Gaming Headset Review - Premium Sound, Fantastic Features
 MOZA MGX1000 Instrument Panel Review: a realistic Garmin G1000 replica for immersive flight sims
 Simagic Zeus Formula Steering Wheel Review: premium build and advanced inputs for F1 racing
 GIGABYTE X870E Aero X3D Dark Wood Review - A woody goody
 The Super Mario Galaxy Movie (2026) 4K Ultra HD Blu-ray Review
 KTC H49S66 5K2K (5120x1440) 49-inch 180Hz Gaming Monitor Review
 HighPoint Rocket 1604L Gen5 x16 NVMe Software RAID AIC Review: half the price with full 59 GB/s speed
 Next Level Racing ERS3 Haptic Seat Review: immersive sim racing comfort with integrated haptics
 I stopped digging through Windows menus after I set up this one folder
 Don't sell your Windows laptop until you do these things
 6 PC cleaning mistakes to avoid for safer hardware maintenance
 Phison and Intel Take Aim at Local AI's Memory Wall with aiDAPTIV
 How to Remap Keyboard Keys in Windows using Microsoft PowerToys
 7 tips to organize your Windows files for faster, easier access
 Intel Arc G3 Extreme first impressions with MSI's Claw 8 EX AI+ - Incredible power for an extreme price
 How to fix Wi-Fi Adapter Not Working on Windows laptops: troubleshooting tips
 Hisense U7SG 4K TV: Modern Entertainment for the New Age
 6 underrated Microsoft Word features worth using to boost your productivity