


Introduction and Specific Part Sourcing

Mini-ITX motherboard are some of the most exciting in the enthusiast market, and for the past few generations only one brand has been making Intel high-end desktop (HEDT) mini-ITX motherboards; ASRock. Last generation (X99), ASRock came out with a motherboard that supported all X99 CPUs, two DDR4 DIMMs, one x16 PCI-E 3.0 slot, and one M.2 slot. The issue is that Intel's X99 platform offered much more in the way of memory support and storage support, so ASRock made sure to change things for the X299 platform.

ASRock's X299E-ITX/ac is a special little beast. It provides the ability to run quad channel DDR4, albeit in the form of SO-DIMMs, so it doesn't bottleneck the CPU's memory capabilities. It still provides a single x16 slot, but you can run a riser card that splits the x16 into x8/x8 or even x4/x4/x4/x4 through PCI-E bifurcation, but that still leaves x12 or x28 PCI-E 3.0 lanes from a 28-lane or 44-lane CPU. ASRock decided to take x8 of the remaining PCI-E 3.0 lanes and slap them on two x4 PCI-E M.2 slots on the back of the motherboard, and since Intel added the ability to RAID CPU-connected M.2 slots with a dongle (for pay of course), you could technically RAID the two rear M.2 slots with the PCH-connected x4 PCI-E 3.0 M.2 slot on a daughterboard on the topside of the motherboard. We will cover how everything works when we cover the motherboard on the next page.

Now that we know we have one choice for the motherboard let's talk about how we have many choices for SO-DIMMs, and since ASRock added great OC capabilities to the memory DIMMs, G.Skill decided to up the ante and sent over their unreleased 3800MHz quad channel SO-DIMM kit. While some notebooks have four SO-DIMM slots and support memory overclocking, ASRock's motherboard only supports CPUs that can support up to quad channel, so the kit is basically designed for the motherboard. Intel's X299 CPUs can run 3800MHz, at least most of them can, and this guide will go getting the memory up to speed and even tweaking it a little bit. It's an amazing kit, to say the least, and it should launch later this year.

ASRock decided to up the ante with cooling as well. We all know that one issue with mini-ITX motherboards can be the VRM, and with the high amount of heat Intel's new i9 series CPUs put out, one might imagine overclocking such power-hungry CPUs would be next to impossible on the new platform. That's where Bitspower and their Taiwan-made liquid cooling solutions come in. ASRock worked hand in hand with Bitspower to develop a special custom designed monoblock for the motherboard that would not only cools the CPU and the power packed 6-phase VRM but also integrate with the daughterboard near it and support it.
With all the patents around Asetek's all-in-one liquid coolers, Bitspower has taken a different approach and created an all-in-one that you put together, and it's super effective. You get a 240mm radiator with an attached reservoir and pump as well as two fairly long tubes with compression fittings already installed. All you have to do is screw in the block to the motherboard, install the radiator, screw in the tubes and fill in the water. The best part is that it offers better performance in some cases than an AIO, and it also offers easily upgradability. We decided to go with some baby blue liquid to match our TweakTown logo.
The X299E-ITX/ac and Bitspower Cooler
The X299E-ITX/ac
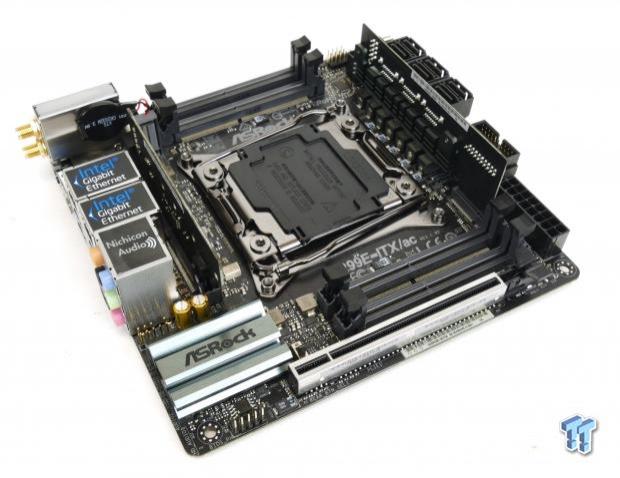
We reviewed the motherboard here. There currently are no other options for a mini-ITX X299 motherboard, and that is because it's a risk for vendors to produce one. Going mini-ITX on the X299 platform negates one of the best parts of the Skylake-X CPU; the ability to run many PCI-E lanes. However, ASRock did include full PCI-E bifurcation so that you can use a breakout card, but you will still only get a total of x16 PCI-E 3.0. The motherboard ONLY supports Skylake-X, Kaby Lake-X CPUs are not supported.


I have marked some of the more impressive features of the motherboard so that you can figure out where and how you will plug everything in. Before buying any M.2 drives for the motherboard, you should know a few things. The two rear M.2 slots are routed to the CPU and do not support SATA based M.2 drives, and they do not support RAID without a VROC key. The good news is that they are directly routed to the CPU so they bypass the DMI and PCH, meaning you can put a Samsung 960 Pro in each of the three M.2 slots, produce RAID 0 with a VROC key, and get full bandwidth without any bottlenecks.
Our Latest TweakTown Guides
- I capped Windows Update's bandwidth with Delivery Optimization, and my downloads stopped choking
- I use this decade-old free tool that finds files faster than Windows Search does
- I install and update most of my apps with this Windows command now, and I stopped downloading sketchy installers
- I stopped digging through Windows menus after I set up this one folder
- Don't sell your Windows laptop until you do these things


The slot that supports both SATA and PCI-E based M.2 drives is on a daughterboard, and I would use this one first as the heat is better contained and less likely to spread too much. The switch to switch the functionality of the rear button is right above the PCI-E x16 slot.


The VRM on the motherboard is top notch; the issue is that the motherboard doesn't have enough space or thermal headroom for more VRM components. These 60A parts are some of the best you will find, but with the single 8-pin connector, so you are limited to about 350W, and that's only with the monoblock. While the specifications say that 300W is the limit for a single 8-pin CPU power connector, the truth is that in real life with solid component quality you can go up a bit higher. The VRM heat sink supplied with the motherboard is too small to be very effective, but if you don't want to go with the monoblock you can still have a fan blow hard at it and still overclock a tiny bit, but probably not too much with HCC (>10C) Core i9 CPUs.
Bitspower Monoblock and AIO


Bitspower has a neat AIO marked as the BP-LXAIO240-RGB and the monoblock marked as BP-WBMASRX299EI. The monoblock has an MSRP of $164.99, the total cooling solution you see costs $349.99. The AIO kit provides everything you need, and the tubes are already attached to the compression fittings. Each tube as one compression fitting that can rotate after it is installed. All you need is to buy liquid for the loop. The block even comes with extra o-rings, lots of thermal pads, and special screws to screw in the VRM portion of the block.


I took the cover off of the block to see how the water flows, and it does seem that the water hits the center of the CPU first, and then flows to the VRM from both outer edges and then back up to the radiator. The monoblock cools both the VRM power stages as well as the inductors, and the cold plate for the CPU is well designed and well made in Taiwan.
Installing the Custom Mini-ITX Cooling System

Now we will go over some of the special precautions we must use when installing the block and putting together the new type of custom AIO cooler.


You must use a knife or scissors to cut the thermal pads and place them on the VRM components. I would use some high-quality thermal grease for the CPU, maybe something like Thermal Grizzly, or whatever high performance paste you can get.


Never forget that the VRM part of the monoblock needs to be screwed down with the special Allen wrench and special screws provided in the block's package. If you do not use these screws, the block will not make contact with the thermal pads on the VRM parts. It's also much easier to remove the USB/SATA daughterboard to install the block, but when you reinstall the card, you need to make sure to screw it to the block (the block is designed to have it screw in).


The block has markings telling you which tub is for water input and which is for the output. You should screw the input to the block to the pump and the output to the radiator. It is very important you have the right inputs and outputs, and that's why I have marked them. You must also mount the radiator/pump/reservoir combo upright, otherwise, you will have many problems as the reservoir won't feed the pump correctly. I mounted the cooler with a makeshift screw and bolt combination on the Open Bench Table (OBT).


You might be wondering what the small solid tube in the fitting is for, and it's to help you fill the system with coolant and then to help you get the bubbles out and trade places with the liquid. It also allows you to fill the system all the way to the brim; you fill up the tube halfway up, let the bubbles out, and then get the remaining liquid in the tube out (you can even use a paper towel). You can see the many bubbles in the system and why you need to get them out, turning the system on and off helps, and you can use the PSU jumper included with the AIO to do that with a PSU switch.


The unit comes with two RGB fans, and a controller is also present, so you don't need to another RGB LED controller. I plugged the monoblock's RGB wire into the motherboard, while I used the controller included with the AIO for the fans. There are another splitters and connectors, and you won't need to buy anything else to make everything work.

The final solution is beautiful. I even got the RGBs in the block (which look awesome) to match the RGBs on the fans, which also match the light blue color in the tubes.
G.Skill 3800MHz 4x8GB SO-DIMM Overclocking

G.Skill showed off the kit in October, and it is slated to be released in December 2017. It has been validated on this motherboard, and while we don't know the price, we do know it is labeled F4-3800C18Q-32GRS. It's a 32GB kit with four 8GB sticks, and it's a beast for a SO-DIMM kit. The motherboard supports quad channel memory, but only because of the SO-DIMMs and their size. There is not much difference between SO-DIMMs and normal DIMMs in regards to performance.


If you just want to set and forget, just set XMP profile. I went ahead and set DDR4 frequency to 3733MHz manually and took the timings down to help decrease latency. The settings you see above are of my preferred profile, which is 3733MHz C16 instead of 3800MHz C18, and that's because of my CPU's internal memory controller (IMC). I set this because it is easier on my CPU's IMC, and most applications I use like latency more than frequency, although games should prefer higher bandwidth. There are some fast boot settings dug deep at the bottom of the memory sub-timings menu, you can mess with them, but they are disabled by default to improve memory support. The motherboard also has built-in memory testing.


Voltages are also important, and while default VCCIO and VCCSA are around 1.1v, the motherboard automatically increases these when setting XMP this high. These auto-rules were developed by ASRock's overclocker (Nick Shih) and engineers to ensure compatibility with this kit. I also went ahead and set DDR4 voltage on each channel to 1.5v. If you want to tweak your IMC a bit more, you can also increase internal system agent offset to 0.4v.


On the left, we have memory overclocked to XMP with the CPU at stock, while on the right we have both the CPU overclocking and memory at XMP. For reference, at stock in quad channel the memory scores around 63-69GB/s, so these are huge increases.


On the left, we have 3733MHz memory speed with tuned down latency. However, watch out for dropped channels when pushing beyond XMP, as you see on the right. The system booted up at 4000MHz with XMP timings, but our bandwidth has dropped significantly, lower than stock. CPU-Z is showing all the memory in quad channel, but that isn't correct. The system is running in dual channel mode, which is why we see slightly lower latency and significantly lower bandwidth. You can see this in the UEFI as it will show only two sticks while CPU-Z shows four. If you see this, it means your internal memory controller (IMC) needs more volts of lower temperatures.
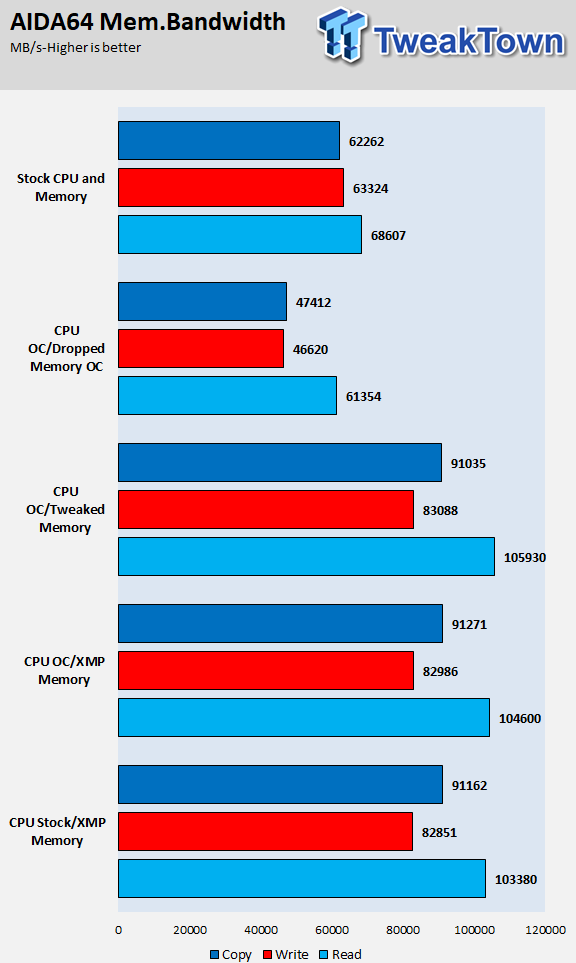
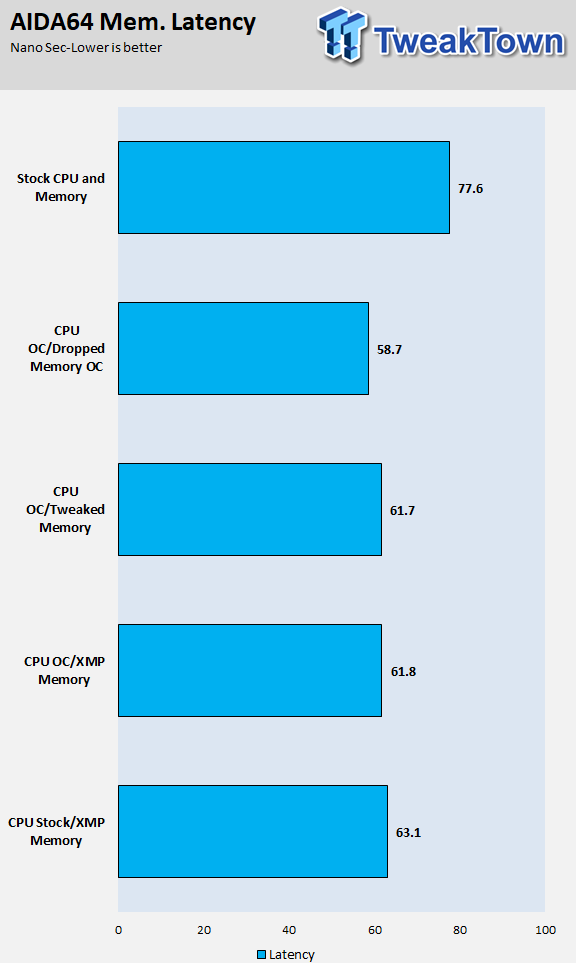
Here we can see how overclocking, even just with XMP, results in HUGE memory gains in both bandwidth and latency.
CPU Overclocking

Since the original BIOS, I found that you needed to increase CPU current limitations to get the most out of the CPU out of the 7960X and 7980XE even at stock. ASRock set current limits low so that the stock VRM cooler could take it, but after I reported the disparity, ASRock added a mode selector. If you use watercooling, you can set the motherboard to Water Cooling Mode, which will unlock these current limits when using the monoblock.


I set the CPU ratio on all frequencies to 44x, as that is the overclock my CPU can take with watercooling. The monoblock and AIO work really well, of course, you can also expand the watercooler and add another radiator if you want. If you want to manually increase current limits you can at the bottom of the CPU Configuration menu. AVX 256 and AVX 512 (AVX 2 and AVX 3) offsets are also present at the bottom, and these will drop the CPU frequency by the amount set when running programs that use AVX. It's very useful if you run these applications sometimes and do other things like play games at other times.


CPU input voltage automatically goes to 2.1v when overclocking the CPU, and LLC will auto set Level 2, which is great. You also need to set VCore to something low if overclocking the HCC CPUs to manage temperatures, I set 1.185v, and it works very well. If you overclock the mesh, you can also use the offset or a manual voltage. If you want the CPU to always run at the selected speed, you can use Override VCore like I do and set your Windows power plan to High Performance.


If you want the CPU frequency and voltage to drop, you need to use Adaptive Mode for VCore, enable C-States, and set power plan to balanced. I use HandBrake for quick stability testing as it uses AVX as well. If you want to make things stable, you will need to run Prime 95 for many hours to test it out.


These shots were taken after 25 loops of Intel Burn Test with a fan blowing at the motherboard and the monoblock and fans working at 100%. Here we can see how thermals go up a lot at the top and bottom of the motherboard, although the M.2 drive on the top side is typically the hottest point. While the hottest part at the back of the motherboard is the CPU VRM area, we also see heat around the PCH area above the PCI-E slot.


These shots were taken after 25 loops of Intel Burn Test with a fan blowing at the motherboard and the monoblock and fans working at 100%. The back of the VRM will typically run hotter than the top, at stock and overclocked, but the VRM block keeps things okay. At stock the topside top temperature is 4C difference and overclocked it's 5C in difference, meaning that the cooler is doing its part.

The purpose of this guide was to provide some basic insight into how to setup and how to overclock the DDR4 SO-DIMMs and HCC CPUs. The motherboard can handle HCC CPUs, but I highly suggest the monoblock if you go with any Core i9, especially if you want to overclock. The memory is crazy impressive, just like the motherboard and CPU, and overclocking it even with XMP is easy and provides a great memory performance boost.
To conclude this guide, I have one thing to say; if you want the highest performance per square inch, this setup will do it with ease.
 I capped Windows Update's bandwidth with Delivery Optimization, and my downloads stopped choking
 I use this decade-old free tool that finds files faster than Windows Search does
 I install and update most of my apps with this Windows command now, and I stopped downloading sketchy installers
 I stopped digging through Windows menus after I set up this one folder
 Don't sell your Windows laptop until you do these things
 NVIDIA confirms the first RTX Spark laptops and when they will release
 You no longer need a Steam account to buy someone a Steam game
 Ubisoft adds 80+ games to the Xbox PC Store without Xbox achievements
 Hacked NVIDIA RTX Spark drivers make an RTX 4060 run on Windows 11 Arm
 Microsoft is changing the classic File Explorer 'right-click' Properties in Windows 11
 iPhone Fold vs Galaxy Z Fold 8: Apple's first foldable could be $600 more
 MSI launches its epic $7,000 Titan 18 HX Dragon Edition Draco Epic gaming laptop
 Young Australians want esports at the Olympics, but that support drops dramatically among older generations
 Global PC shipments decline as the DRAM and supply crisis takes hold
 Reddit and other major publishers are considering blocking Google as AI Overviews continue to hurt their traffic
 Thrustmaster T.Flight HOTAS 5 MSFS Edition Review
 SteelSeries Arctis Nova Pro Omni Wireless Headset Review - One Headset to Rule Them All
 SteelSeries Arctis Nova 7 Wireless Gen 2 Headset Review - New and Improved, But Is It Enough?
 AMD Ryzen 7 7700X3D Review - Days of Future Past
 Samsung 990 2TB SSD Review - Ninth Gen QLC at PCIe Gen4 Speeds
 ASUS ExpertBook Ultra (Panther Lake) 14" Business Laptop Review
 ASUS ROG Raikiri II Xbox Wireless Controller Review - Ready to Take Control
 MOZA FMP18 Panel Bundle Review: authentic F/A-18 Hornet cockpit controls for flight sims
 Micron 6600 ION 245.76TB Enterprise SSD Review - Best in Class Programming Speeds
 MOZA MA3F EFCM Flight Control Module Review: authentic Airbus A320 autopilot panel for simulators
 Hisense U6SF 65-inch MiniLED TV: High Performance Meets Leisurely Convenience
 6 PC cleaning mistakes to avoid for safer hardware maintenance
 Phison and Intel Take Aim at Local AI's Memory Wall with aiDAPTIV
 How to Remap Keyboard Keys in Windows using Microsoft PowerToys
 7 tips to organize your Windows files for faster, easier access