The Bottom Line
Introduction, Specifications, and Pricing
As we mentioned when looking at the MSI Core Frozr L CPU cooler, it is rare that a motherboard manufacturer will come out with a CPU cooler. In the past, this was a trend that quite a few companies got on board with, but as time went on and aftermarket coolers got better and better, motherboard makers found themselves up against great solutions at great prices, which made their efforts to provide CPU air coolers tougher to do and still be competitive. However, when we made mention that MSI was one of the only ones doing this sort of thing, along with the likes of EVGA, it was brought to our attention that GIGABYTE had released a cooler as well.
Reaching out to GIGABYTE to see about availability of their new CPU air cooler, they were more than happy to oblige with our request. What we were sent is a cooler that is much larger than what MSI had produced, and just at a glance, we feel this GIGABYTE solution should stand a good chance of taming out CPU and showing well in our charts. There are some things about this cooler that apparently will help in this quest as well. Initially, we see that this cooler uses a pair of fans, which can do nothing but help its cause. Then we see something we do not recall before. We have seen many variations of CPU air coolers based on a three heat pipe arrangement, but we cannot recall any cooler we have tested to ship with the heat pipes of ten millimeter diameter before. Also, with all of the motherboards GIGABYTE makes, the broad compatibility of this cooler means that no matter what processor you use outside of Ryzen, GIGABYTE has you covered.
Today we are here to talk about the GIGABYTE Xtreme Gaming XTC700 CPU air cooler, and to show you how well it competes against the masses. Not only does this cooler sport what we previously mentioned, but GIGABYTE jumps on the RGB train too. This means they use a shroud on the top of the cooler, and a large section of it is backlit with RGB LEDs and can be controlled via software as well. What you are about to see is an amalgam of many tricks of the trade along with some newer things that we typically do not see on air coolers, which should give GIGABYTE the edge when it comes not only to performance but attractiveness to the customer as well. For anyone using a black GIGABYTE motherboard, and those with orange trim especially, if you love to build themed systems, you may want to pay close attention to what we are about to show you.
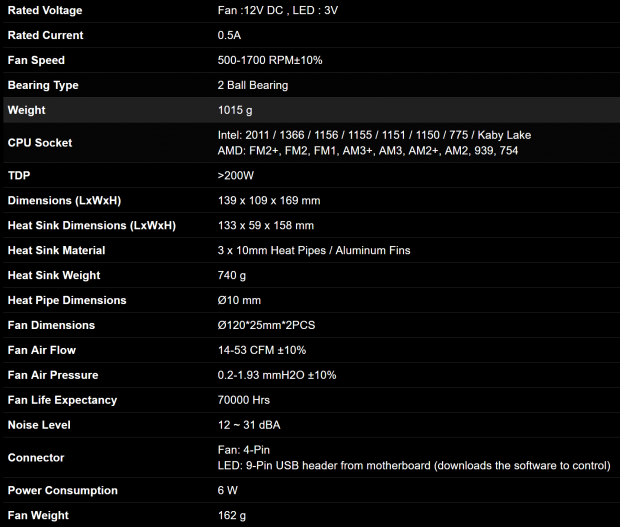
The chart that GIGABYTE provides on their site is a bit all over the place, so we will try to add some flow to what is presented as we go along. The XTC700 is capable of mounting to anything Intel made, since and including LGA775. When it comes to AMD users, we see they go back to Socket 754, and even though there is no mention of AM4, if your motherboard offers AM3 mounting as well, you could use the XTC700 on them, even though support is not technically there for Ryzen. The base of the cooler is made of aluminum, which is what is supporting the three direct contact heat pipes, which are copper, and are 10mm in diameter. Slid over the heat pipes, this tower offers forty-one aluminum fins, and the sides of them have been closed off to trap the airflow within the tower. All told, with the fans included, the tower weighs in at 1015 grams, and measures 139mm in width, it is 109mm thick, and stands 169mm tall. All of this comes together to allow GIGABYTE to feel good about the 200W TDP of this design.
The XTC700 ships with a pair of 120mm fans to cool the tower. Each fan will spin in the range of 500 to 1700RPM, and are supported by a pair of ball bearings for smooth rotation. Each fan is also capable of a maximum of 53 CFM and also sport a 1.93 mmH2) static pressure rating too. These fans should last for 70,000 hours delivering at maximum, 31 dB of noise into the room. These fans do require a 4-pin connection to the motherboard for sensing and PWM functionality, but the fans connect to the PCB as well. Speaking of that PCB, there is also a 9-pin USB 2.0 connection that comes from it and is what allows for software control, and it is neatly routed through the tower as not to look odd when it is mounted to the motherboard.
Since this CPU cooler was released publically back in December, we would have expected to be able to find the Xtreme Gaming XTC700 cooler available somewhere in the wild, but this is not what we find at all. Taking this a step further into the realm of a lack of information, nobody who has posted news, anyone who has done a review, and even GIGABYTE were not willing to provide us with any pricing information at this time. From what we see in this design, with the features and construction in mind, we would expect that this cooler will likely be found eventually somewhere in the $80 to $100 range. This bodes well for what we think of the design, its solid construction, and the features provided with this cooler; it just does not bode so well for your wallet. Remember, we can only guess at the price at this time, as it does not seem to be publically expressed at this time, but if we are sent the pricing information, we are more than happy to update this review with said information, should it become available to us.
Packaging
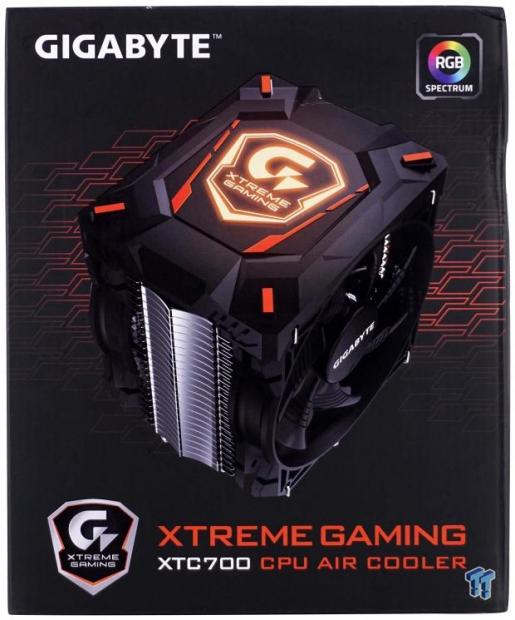
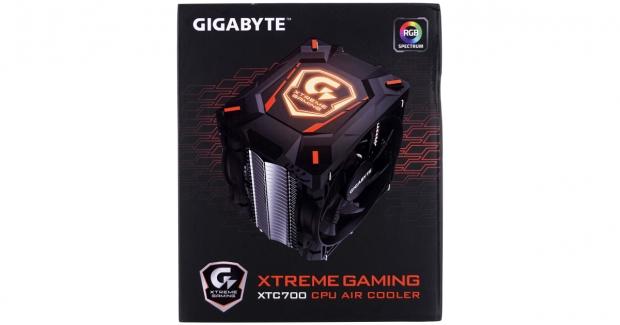
The GIGABYTE name and an indication on the RGB Spectrum lighting are found at the top of this black box. There is an orange pattern applied behind the image of the cooler to attract your eyes there first, while the bottom of this panel displays the Extreme Gaming logo, and provides the name of the XTC700 cooler.
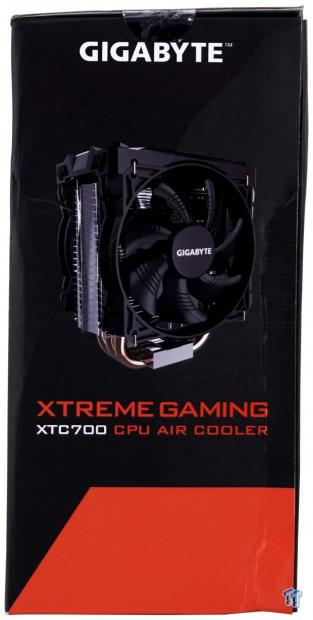
The right side of the box just offers three things. The company name is at the top, an image of the XCT700 is in the middle, and above a large section of orange, we again find the name of the cooler too.
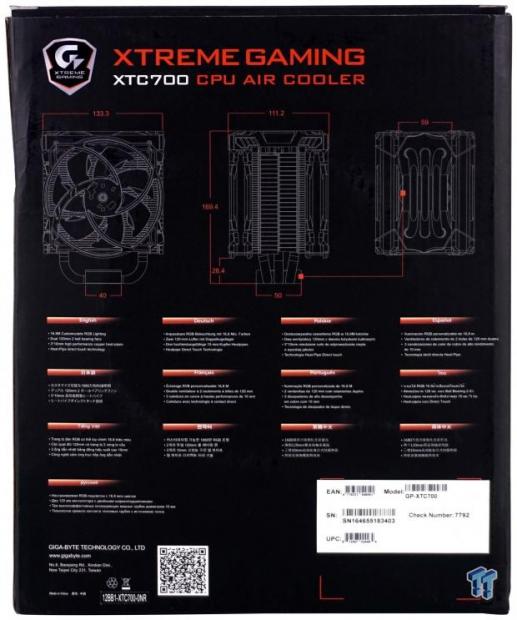
On the back of the box, we start with the logo and coolers name and run immediately into a trio of dimensional renderings of the XTC700. In thirteen languages, GIGABYTE provides a list of features that includes the 16.8 million customizable colors, that is uses a pair of fans, the trio of 10mm heat pipes, and that they make direct contact to the IHS.
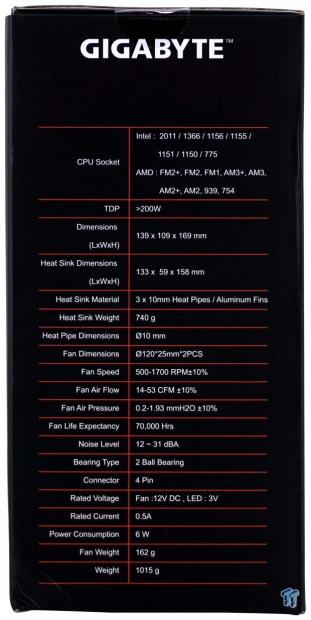
On the left side of the box, naming is kept short with just GIGABYTE found at the top this time. The rest of the panel is used to offer a thorough specifications chart which includes everything we discussed on the page before this.
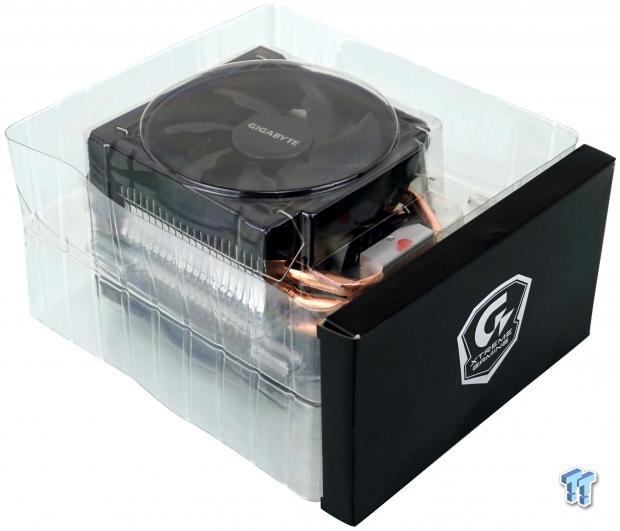
Inside of the box, the tower and fans come assembled and are protected by the two-piece plastic clamshell inner packaging. Even though the external packaging appeared to have a rough trip to our door, the XTC700 inside is in pristine condition, ready to be tested. As for the hardware and extras, they are found in the black box with the Xtreme Gaming logo on it.
GIGABYTE Xtreme Gaming XTC700 CPU Cooler
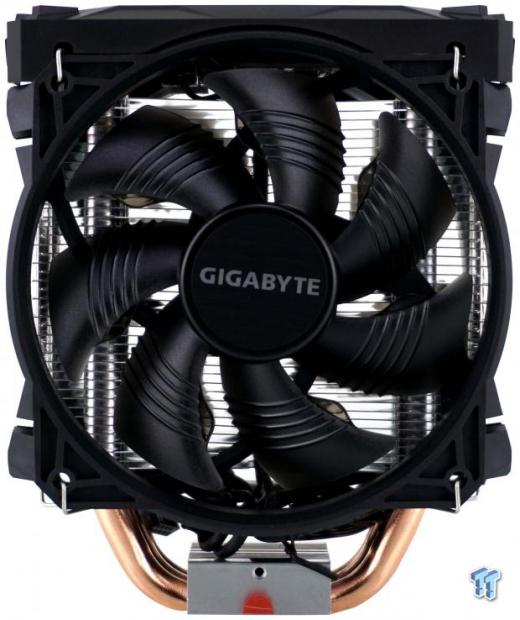
The XTC700 tower is covered well with the all black 120mm fan with metallic hub sticker posting the GIGABYTE name on it. The fans frame is stylized to add appeal, and the shroud covering the top if form fit to the fan frame and while cleaner in appearance, does add height to the design.
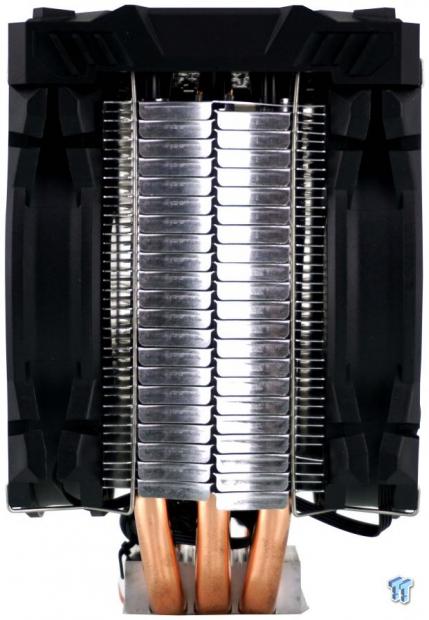
From the side, we can see that this tower is cooled with a pair of matching fans and that the shroud does leave a gap at the top of the fin stack. We also see that every other fin has been bent over on the sides to help trap airflow and force it through the cooler, rather than being lost out the sides of the cooler.
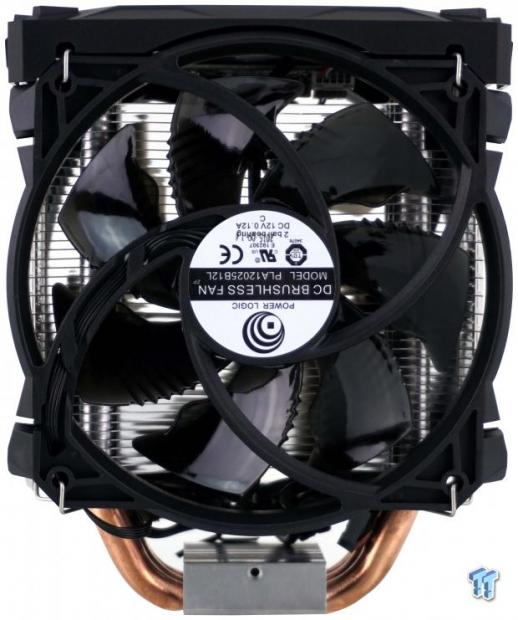
The view of the back of the XTC700 is much the same as what we saw on the front, but this time the fan product sticker is visible. The fan of choice to cool this tower is a Power Logic PLA12025B12L, and is shown to have two ball bearings in each fan, and will draw no more than 0.12A.
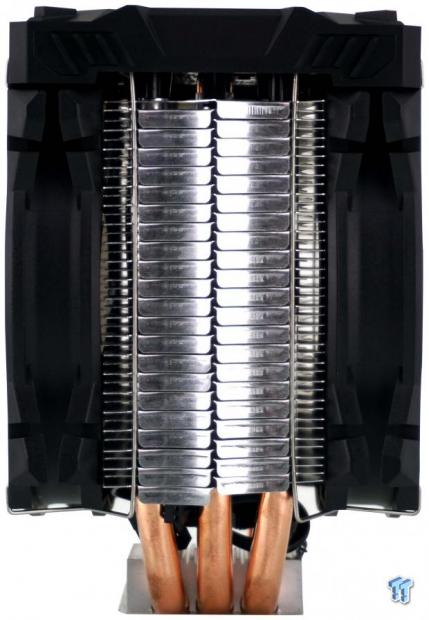
On this side of the cooler, we want to start at the bottom, where we see three fat heat pipes centered in the cooler. This is not an offset design like what most of the market has moved to. We also want to mention that the fans are held in place with wire fan clips, and they seat into the tower on either side of the bent sections of fins.
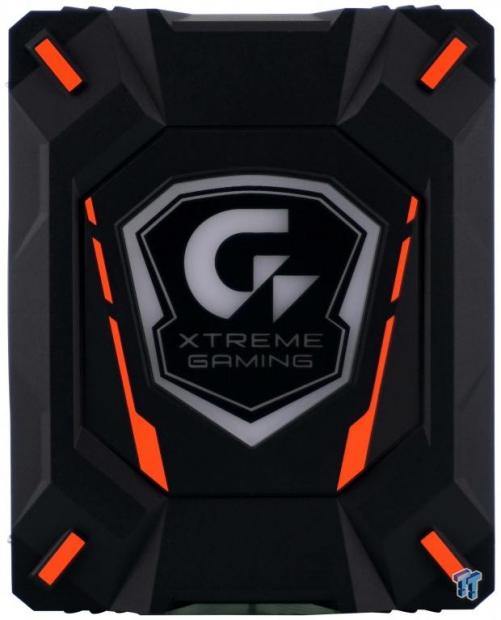
The top of the XTC700 is highly stylized, with many shapes and angles designed into the black cover. GIGABYTE also paints orange on the four corners and to either side of the logo. The center is made of a milky white plastic, and once powered, is where the RGB LEDs will illuminate this tower cooler.
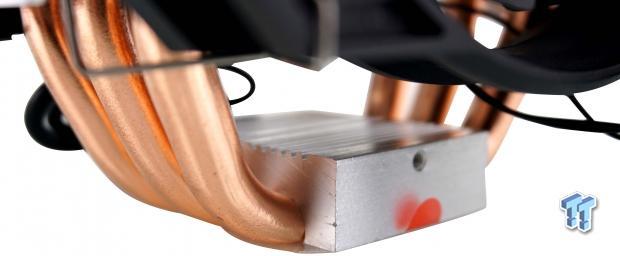
At the complete opposite end of the XTC700, we can see the aluminum base. On two sides you will locate threaded holes to accept the mounting hardware, and we can also see that this thick chunk of aluminum has fins milled into the top of it, so it can also act as a pre-cooler.
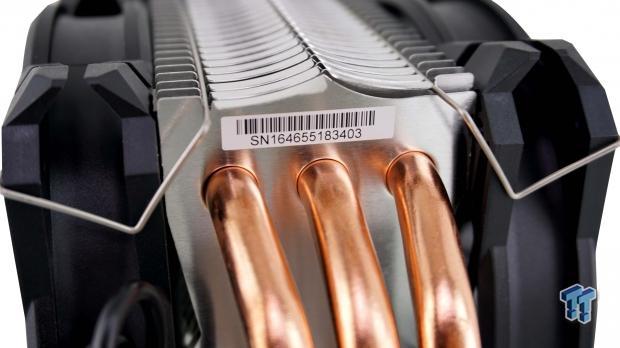
This image serves two purposes. First is the fact that when we look at where the heat pipes enter the fins, we see no signs of solder, as they are pressed onto the pipes. The second thing worth mentioning is that if you do run into an issue, this is the only location to find the serial number if asked to give it with the RMA request.
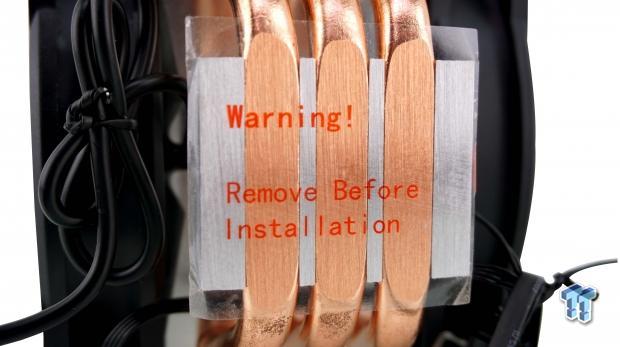
GIGABYTE is also sure to protect the base of the cooler, even if they do only use a thin layer of sticky plastic. Of course, as the warning states, be sure to remove this before you install the cooler.
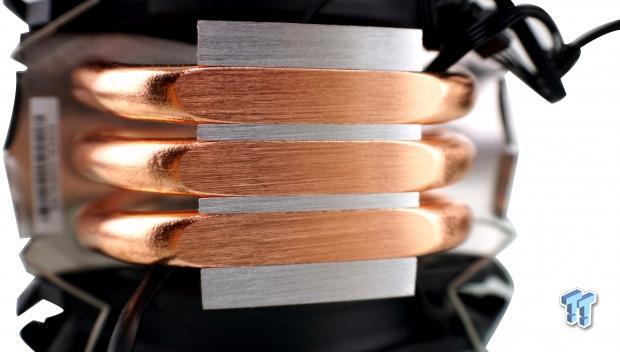
With the sticker removed, we can see the lines left on the pipes and the base from the machining process. We do like that the gaps between copper and aluminum are almost nonexistent, but we do wish the pipes were closer together to make better use of the outer pipes.
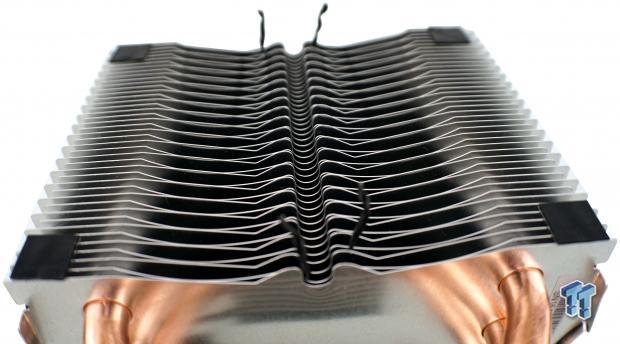
Removing the fans allows us to see the fin arrangement. Each fin is a mirror image of the one next to it, delivering a staggered pattern of fins for the air to blow across. At the corners, we find rubber fan isolation pads, and down the center is a groove which is where the USB 2.0 cable runs.
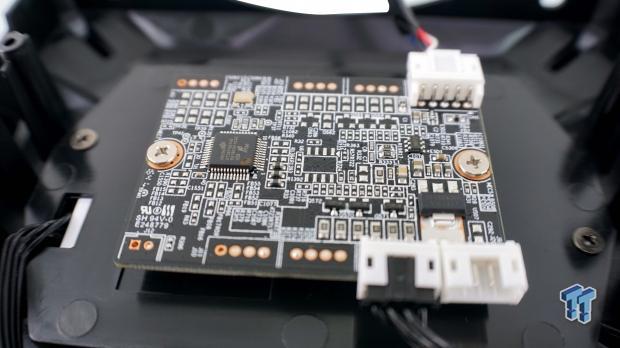
Under the top cover for the tower, we find a PCB which at the top is connected via a 9-pin USB 2.0 cable. That is used for software control, which addresses the Holtek HT32F52342 32-bit MCU. On the near edge of the PCB is a 4-pin connection which drives the LEDs, and there is room for a second setup, but this cooler only uses the one.
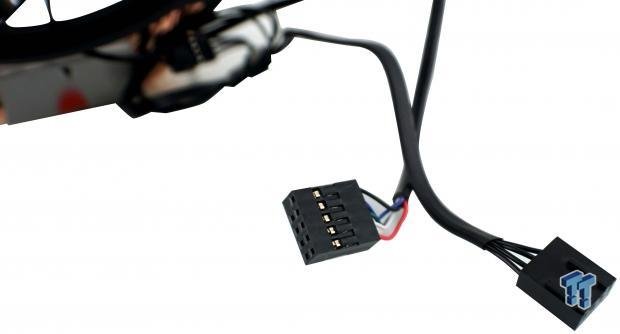
Once the cooler is mounted, you will need to address this pair of connections. There is a single 4-pin PWM fan connector, which leads into a splitter, where both of the fans are connected. The other connection is the USB 2.0, and we found the wire is not long enough to go up and over the motherboard, it has to be routed under the video card and access the port that way.
Accessories and Documentation
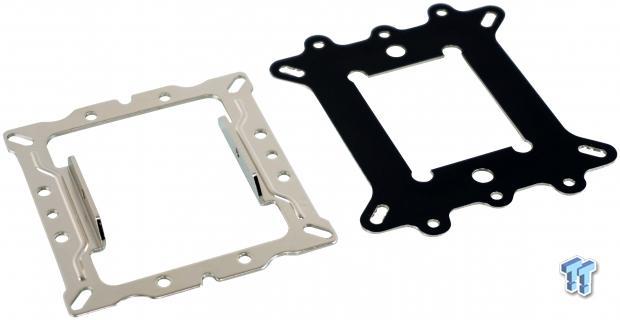
To kick off the hardware, we pulled the mounting bracket and universal backplate out of the box. On the left is the mounting plate which screws onto the base of the cooler, and has holes on the sides for AMD, while the corners are for Intel mounting. The universal backplate comes with isolation material on it, and it cut to fit nearly any direction except for Socket 754 and 939.

We also find four bags of parts to weed through. The "Intel & AMD" bag contains the threaded rods, a set of paper washers, locking nuts, and the mounting screws with springs on them. To the right is the hardware for LGA2011 and 2011-V3 motherboards. In the "For AMD" bag, we find Adapter brackets, larger paper washers, screws, and thin nuts. In the "For Intel" bag, we see more paper washers, a set of metal washers, and yet another set of the thin nuts to lock things down.
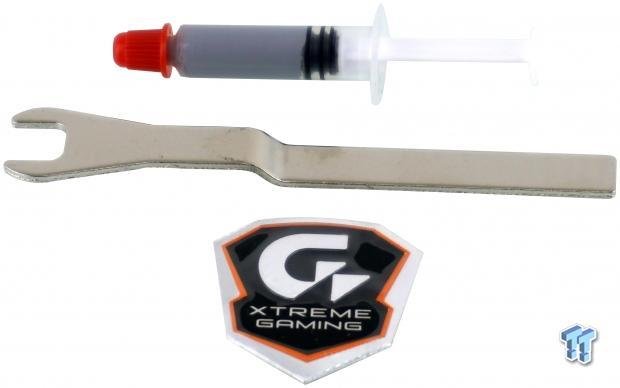
GIGABYTE also provides a tube of non-descript thermal paste, enough for a few mounting attempts. There is also a wrench to help with accessing the spring loaded nuts which lock the cooler down to the rest of the hardware, and we also get a metallic case badge with the GIGABYTE Xtreme Gaming logo on it.
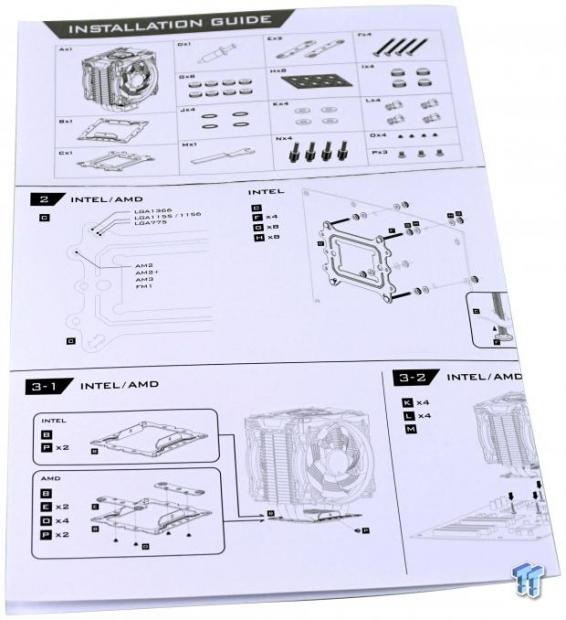
The installation guide starts out with a parts list to ensure you know what parts are being shown in each step that follows. There is very little in the form of text, other than part labeling and basic information, but the renderings provided are done well and will guide you through to completion without much hassle at all.
Installation and Finished Product
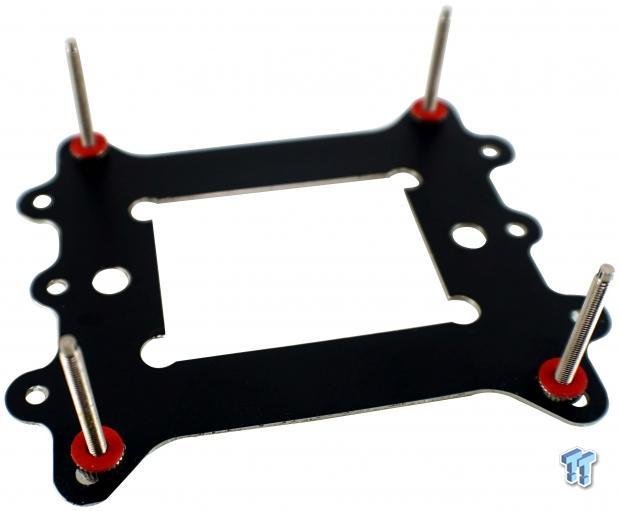
As we were instructed to0 for LGA115X usage, we first assembled the backplate and threaded screws. The manual states that each screw is to be locked down with a thin knurled nut to keep it in place, and this is where the first set of paper washers is installed, on top of each nut.
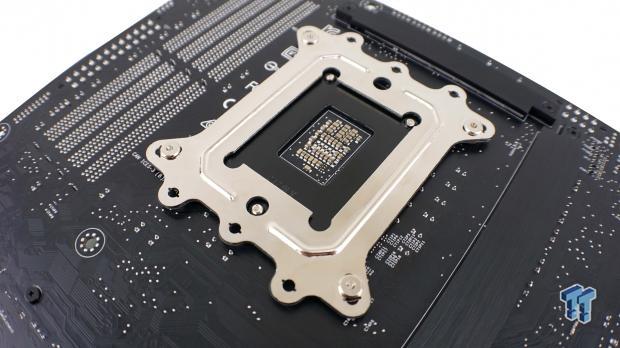
The next step is to install the backplate to the motherboard, and we see no issues with fitment. With AMD and Intel mounts, the backplate can go either way as far as top and bottom are concerned, but it is not equally spaced or drilled to fit on sideways.
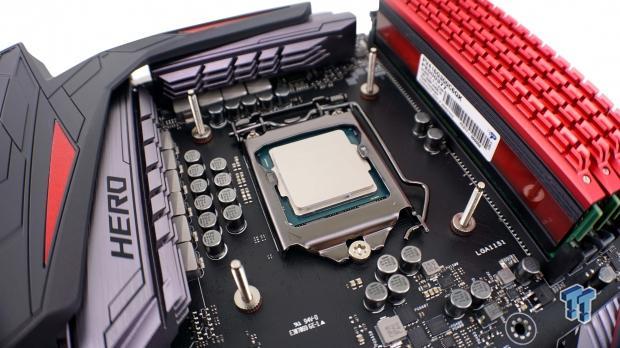
The next step in the patch to mounting the XTC700 is a simple one. You must first drop on the second set of paper washers, and secure everything to the motherboard with the second set of knurled nuts.
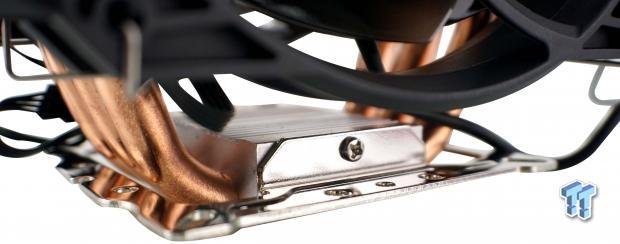
We then move to the cooler, and after removing the protective sticker covering the base, we went ahead and installed the mounting bracket. The fit is snug around the base, and once the holes line up, you simply send a screw into either side to make this all one solid assembly.
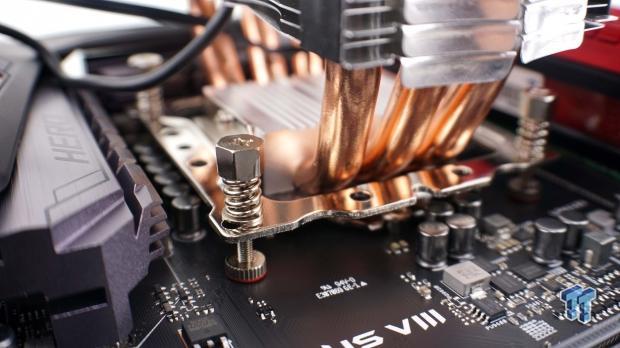
After applying some thermal paste, we set the cooler onto the CPU, making sure the screws went through the bracket. You are then shown to grab the nuts with springs on them and mount the cooler into place. The wrench does help with leverage, but due to heat sinks on the motherboard, use of the wrench could be complicated.
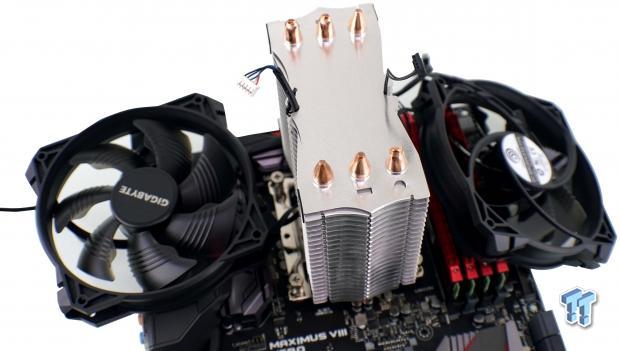
We found it best to remove the shroud and the fans to access the mounting screws with a long screwdriver. This does require quite a bit of effort, disconnecting wires under the shroud, but we left the fans plugged in as getting to the Y-splitter cable is hard to do with the cooler installed.
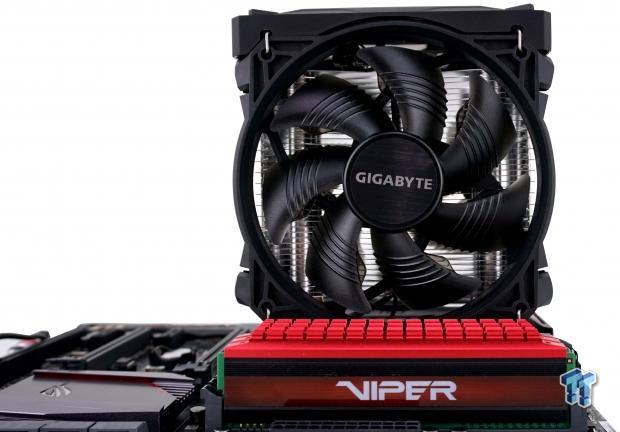
Moving back a bit to take in the XTC700 in all of its mounted glory, we see that the fan sits high on the tower, and from this angle, we see a lot of space above the tower which the fan is cooling very little of the tower. We do like the exaggerated design of the fans from this angle, but many will never see this view after it is put into a case.
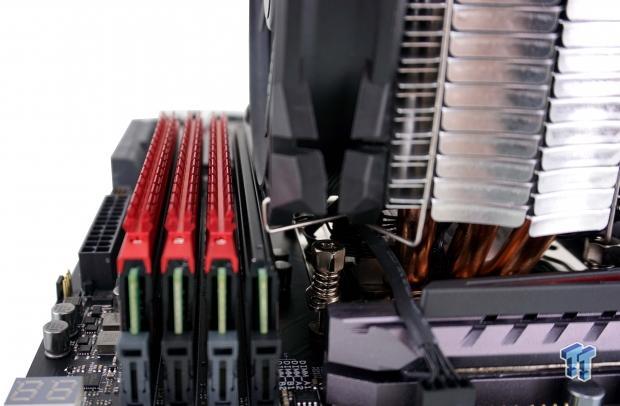
We figured that since this cooler was so tall, it may not cause complications with memory, but we were wrong. With no offset from the base to the fin stack, we were left having to remove the top of the closest RAM stick so that we could properly install the XTC700 with our components.
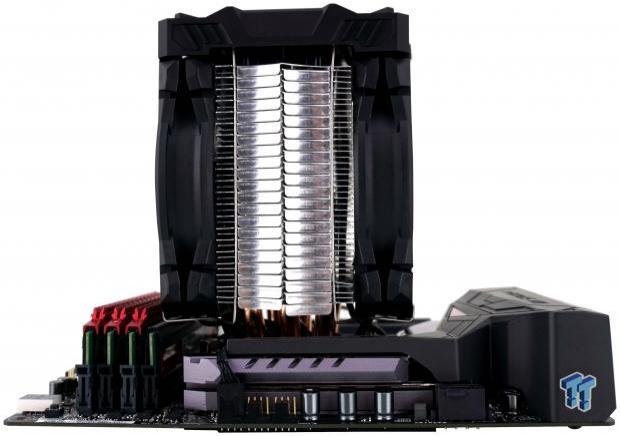
Glancing at the XTC700 from the top, we can see that mounting the fans is not blocked by anything, and we also have enough room to get access to the EPS12V 8-pin connection. There is no denying this is a huge 120mm fan based cooler, and from this angle, it only exaggerates that fact.
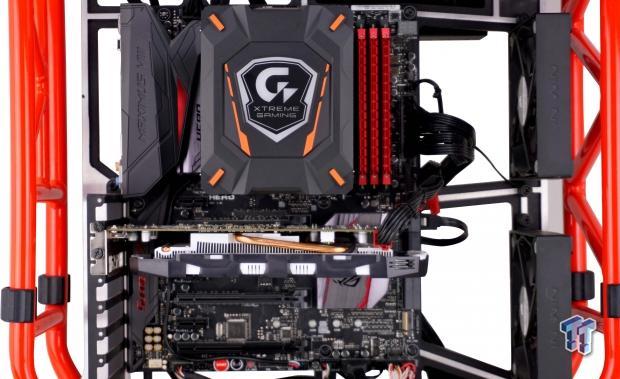
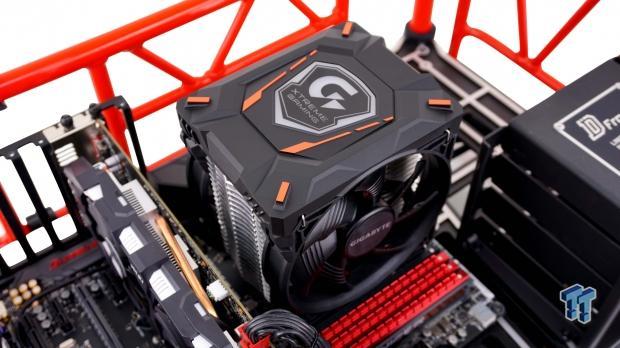
The view that most users will be left with for the majority of using the XTC700 is this one. We do like the cleaner look of the stylized cover on the cooler, but at 169mm you need something like we have in this open-air chassis, as most closed cases top out with 165mm of support.
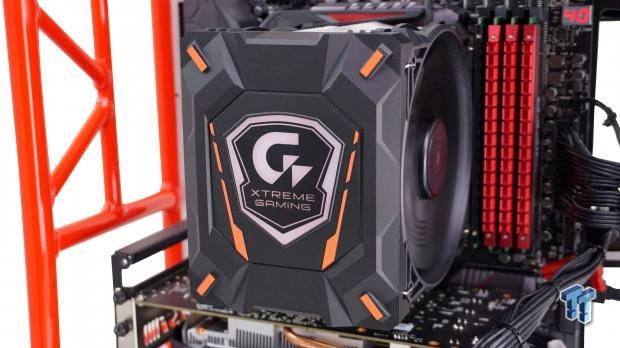
Believe it or not, the Xtreme Gaming logo is currently backlit with orange as the LED color of choice. While one might think that the lights in the photo booth are just making it tough to see, we found that even in a darkened room, the intensity of the included LEDs is not that good, to begin with.
GIGABYTE Xtreme Gaming Software
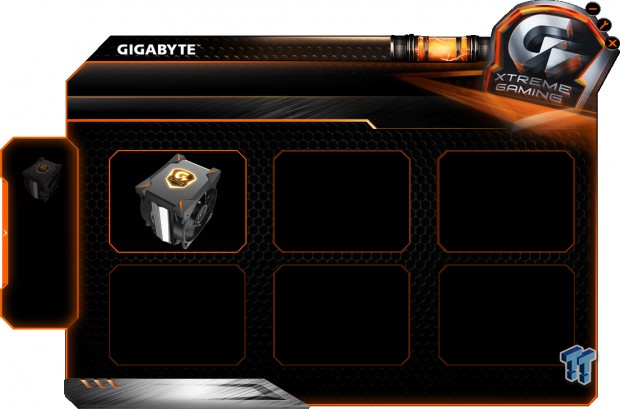
The GIGABYTE Xtreme Gaming software we see in this image shows multiple boxes, as this software covers many products with RGB LED control. Since this was installed just for the use of the XTC700, it is the only product that shows up as addressable.
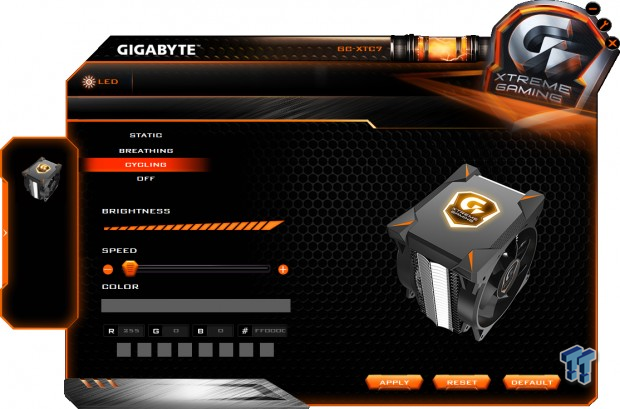
After clicking on the image of the cooler in the last image, we are sent right into the cooler menu. At this time, the cooler is displaying the LEDs in a cycling mode of colors. We have two other modes to choose, as well as the ability to turn them off, and we also are given control of the brightness and speed of the current mode.
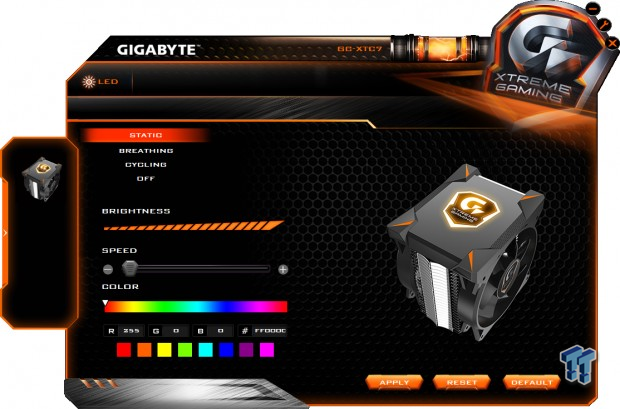
If you select the breathing or static mode of use, the rest of the menu opens up with full access. At this point, we can choose colors by sliding the arrow across the first band of colors, enter in RGB code numbers, or simply choosing one of the eight preset options. As always, be sure to apply and changes made here before exiting the software.
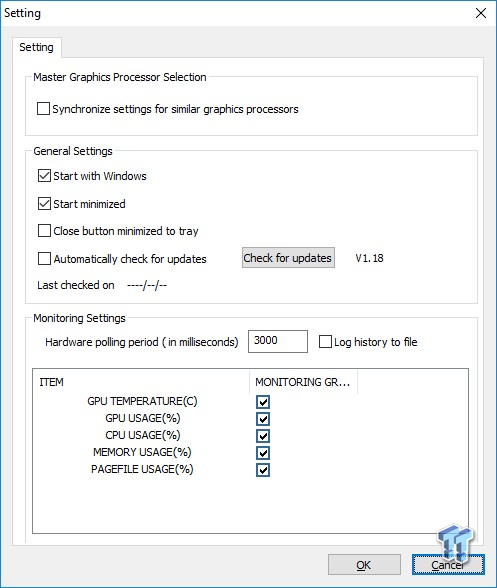
There is also a secondary component to this software that we see here. By clicking on the wrench in the top-right corner of the main menu, you open this window. While not specific to the XTC700, except the general settings section, we thought we would show all aspects of the software anyways.
Test System Setup, Thermal Tests, and Noise Results
Chad's CPU Cooler Test System Specifications
- Motherboard: ASUS ROG Maximus VIII HERO (Intel Z170) - Buy from Amazon / Read our review
- CPU: Intel Core i7 6700K - Buy from Amazon / Read our review
- Memory: Patriot Viper 4 3000MHz 4X4GB - Buy from Amazon / Read our review
- Graphics Card: MSI GeForce GTX 1060 6GB OC - Buy from Amazon / Read our review
- Storage: Corsair Neutron XTi 480GB - Buy from Amazon / Read our review
- Case: INWIN D-Frame - Read our review
- Power Supply: Thermaltake Toughpower DPS 1050W - Buy from Amazon / Read our review
- OS: Microsoft Windows 10 Home 64-bit - Buy from Amazon
- Software: RealTemp 3.70, AIDA64 Engineer 5.75.3900, and CPU-z 1.77.0 x64
To see our testing methodology and to find out what goes into making our charts, please refer to our CPU Cooler Testing and Methodology article (October 2016) for more information.
Thermal Results
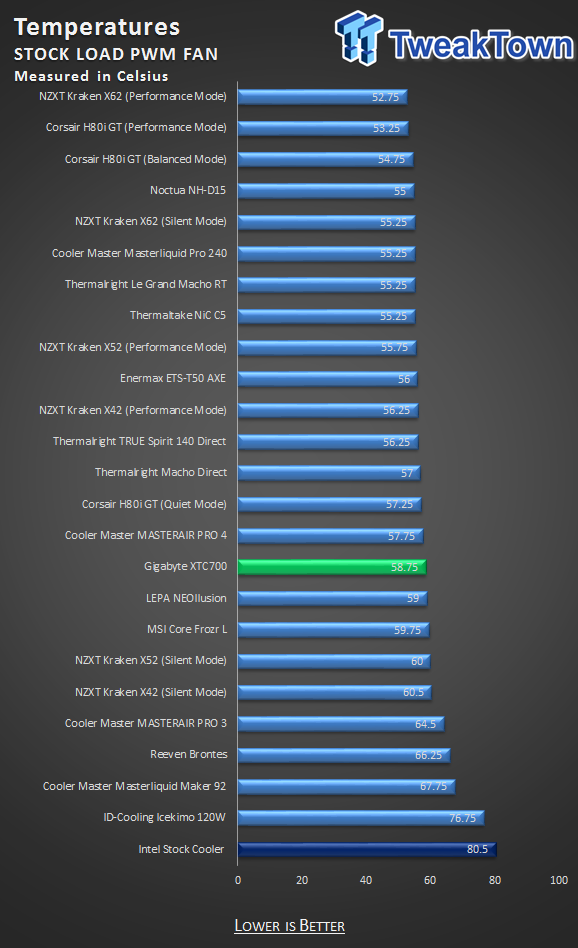
Using our 6700K at default speed, while allowing the motherboard to control the fan speeds, we find the XTC700 to be six degrees out of the top of the chart. This is a strong showing, besting a couple of AIOs at 58.75 degrees, even passing the other two RGB air coolers on the market.
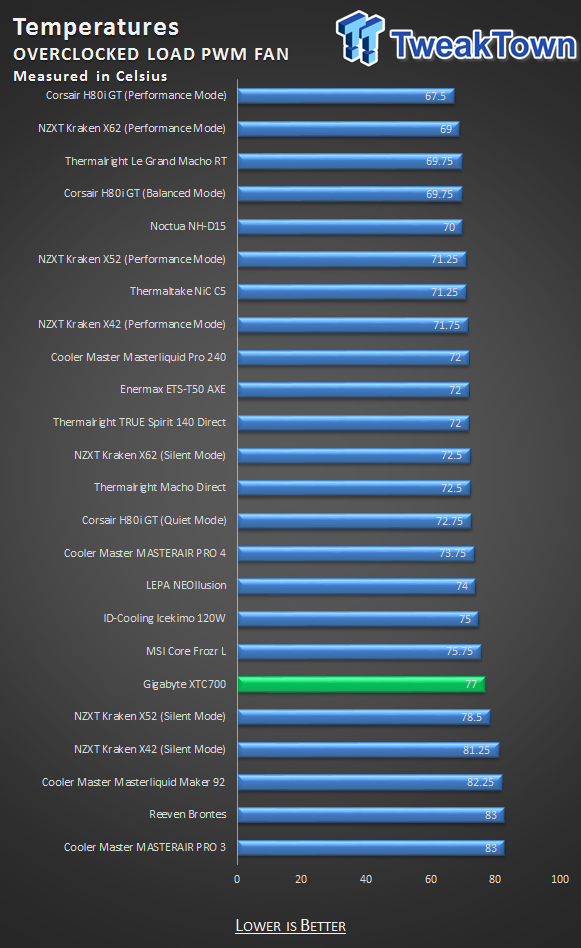
Still allowing the motherboard and fans to do their own thing with the processor now overclocked, we find that the XTC700 loses a bit of ground. While 77 degrees is still decent, it does fall slightly behind the other RGB air cooling selections.
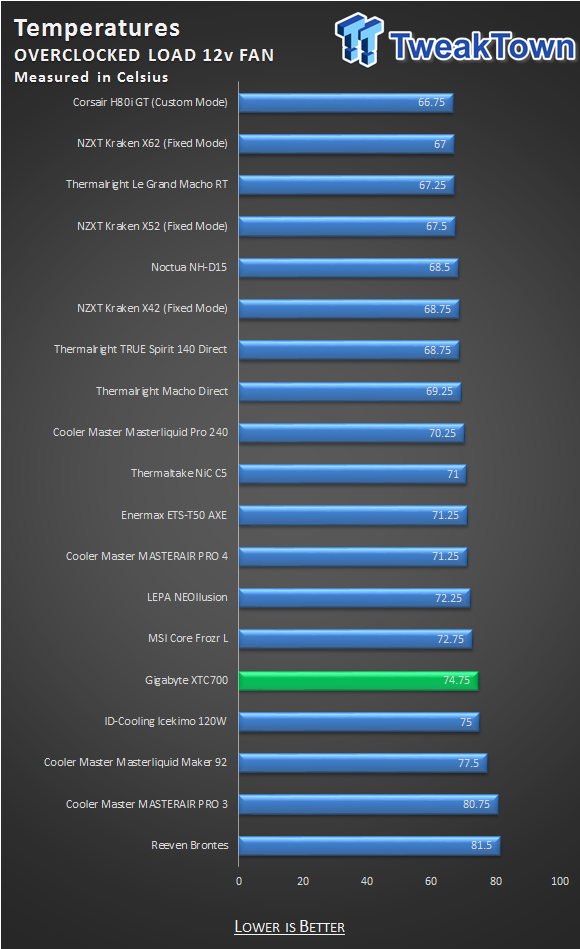
Using manual control over the fans did slightly improve the efficiency of the XTC700, as we can see it is now 3.25 degrees cooler. However, it gains no headway on the chart in places, and is still at the bottom of the three RGB air coolers offered right now.
Noise Level Results
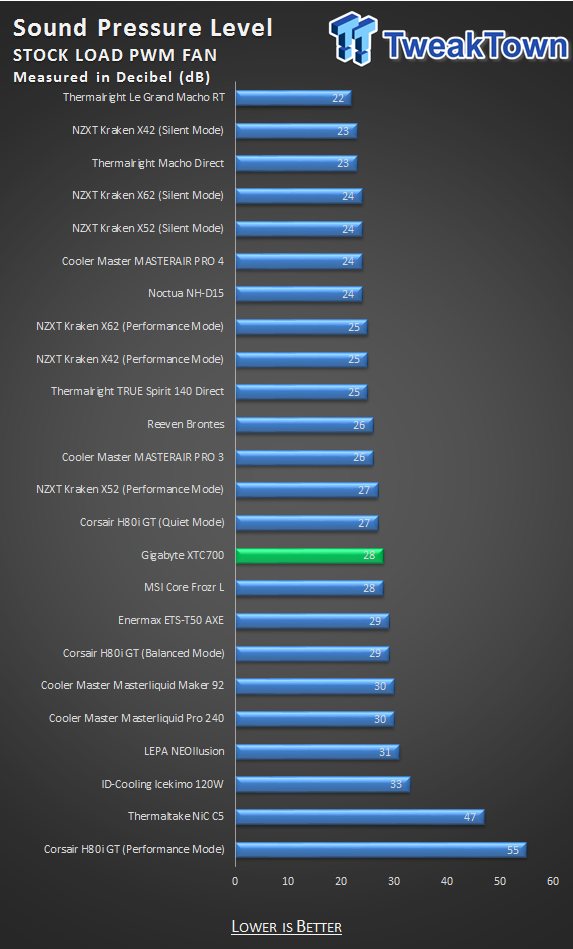
In this chart, we see the results of the maximum fan speed seen during the stock CPU test. 28 dB is near inaudible unless you are right next to the fans, but considering they were only spinning at 860 RPM, we did expect them to be a bit quieter at this point in the game.
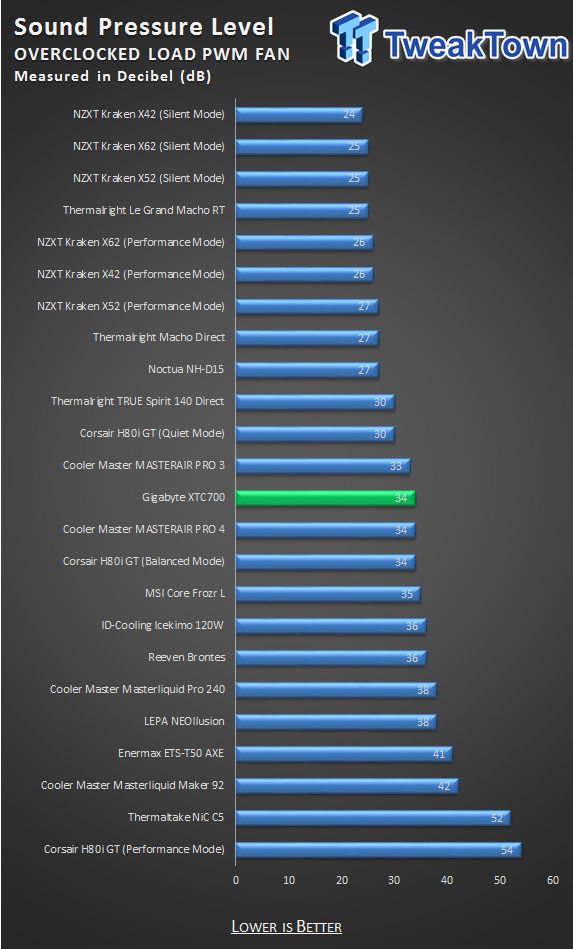
Moving into audible, with the CPU overclocked, yet still allowing PWM functionality to do its thing, we can hear these fans at 34 dB. At this time, the maximum fan speed seen via software was with them turning at 1100RPM at this time.
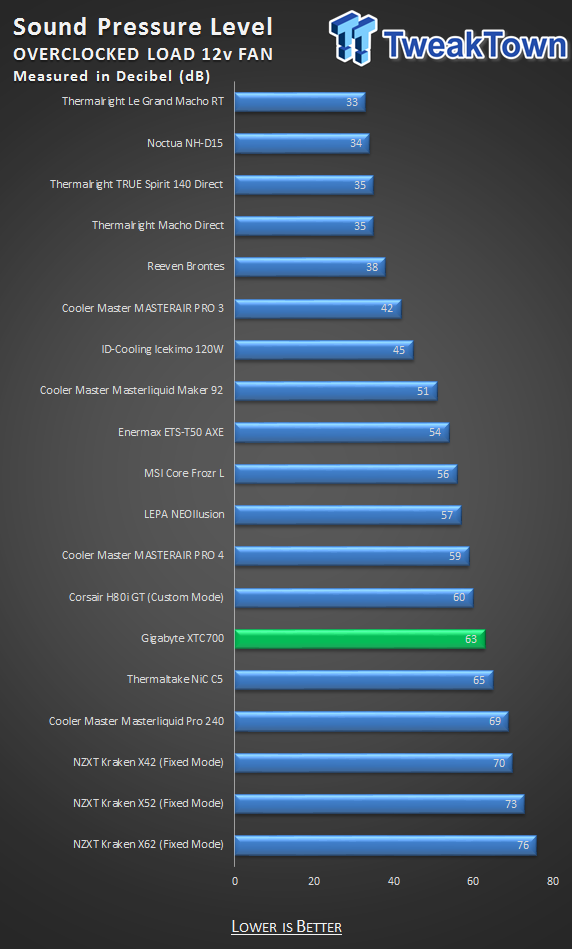
If that last three degrees is that important to you, expect the GIGABYTE Xtreme Gaming XTC700 to bring the noise. With both fans shown to be spinning at 1654 RPM steadily, the noise level jumps to an annoying 63 dB.
Final Thoughts
With this review, we are left torn as to what to think about the Xtreme Gaming XTC700 from GIGABYTE. Initially, everything seemed promising. A cooler that is built like a tank, it comes with two fans, it has a fancy RGB LED backlit logo on the top, and the cover used is intriguing to look at too. The sides of the fins are closed off, GIGABYTE used huge heat pipes that are 10mm in diameter and delivering it with a USB 2.0 cable attached to it, and we knew we would have full access to customize the cooler to anything we wanted it to do within reason. With a 200W TDP, and everything we saw in this design with our own eyes and on paper, we thought it would stand a serious chance of being the best RGB CPU air cooler to get, and while the thermal performance was sufficient, that 's not really how things played out.
The problem, in our opinion, is an overcomplicated design. As it ships out of the box, we had no issues with the design or how tall the cooler was, but once it came time to mount the cooler, we found many things that are overly complicated when they do not need to be. All of the hardware is strong, and mounting the bracket to the base is not even much of an issue, however, when it came to seating the nuts and springs, we did run into complications. First is the fact that on many motherboards, using the supplied wrench will be a long and tedious procedure. Should you choose to use a screwdriver instead, you are left having to remove the fans, the shroud, and making sure to not pull on wiring too hard when trying to disconnect it from the cooler. Then, due to a lack of an offset design, even though this cooler is taller than most cases will allow anyways, we were not able to clear the RAM, and we do not consider the RAM we use to be tall in any way.
While thermal performance was decent, falling behind the LEPA NEOllusin and the MSI Core Frozr L leaves the XTC700 the least favorable option of the bunch if LED lighting on your CPU cooler is a selling point. Of course, for those that love a themed build, there is not a better GIGABYTE cooler to use with your GIGABYTE motherboard. The thing is, though, even if not the best performer on our charts, and with all the potential for high noise levels, the XTC700 is an attractive solution to opt for.
Since our list of issues outweighs the list of things we did like about the XTC700, this does not bode well at all for GIGABYTE and all the effort put into a cooler such as this. With price being another major factor that we are not allowed to know yet, this aspect could make or break the product right out of the gate too. Our initial guess was that this cooler would be found in the $80 to $100 range, and we are not backing down from that statement. Against other RGB LED air coolers, this level of cost just will not do.
While we do realize that the XTC700 does have a stranglehold on the market if you want the cooler to match the motherboard, competing with everything else on the list, we feel a $40 to $45 price is what it will take to compete. This is one time, in which branding and aesthetics superseded form and function. While we do like the look and build quality, when it comes to anyone not using a GIGABYTE motherboard, there are just too many better solutions out there to cool your CPU.

