


Overview and Hardware Specifications
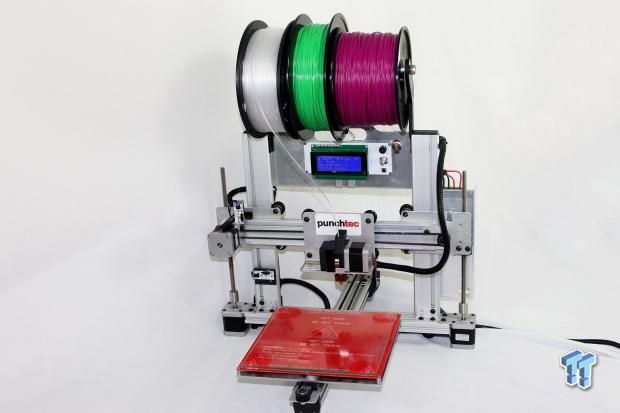
Overview of the Ord Bot Hadron 3D Printer from Punchtec
3D printing has been a passion of mine for the better half of the last decade. Over that time, I have had the opportunity to build and use just about every design of 3D printer that has been released, but the Ord Bot Hadron design is one that has eluded me...until now.
A couple of months back, I decided that the time was right to start writing 3D printer reviews, and the Ord Bot Hadron has the honor of being the first review of its type here at TweakTown. I would like to thank Punchtec for sending in its Ord Bot Hadron in for review as it has completely changed my mind about certain aspects of 3D printing.
The Ord Bot Hadron design is based on a 3-axis design that utilizes MakerSlide structural components for strength, rigidity, and a smooth, uniform surface to guide the axis on. The Punchtec Ord Bot Hadron was designed by Panchy Rivas, an electrical engineer, whose passion for robotics inspired him to create one of the best desktop 3D printers ever made.
The Ord Bot Hadron's design makes it ideal for quick access to multiple colors of PLA filament, and its "Free Floating" platform allows for easy object removal. A build envelope of 8" x 8" x 6" puts it into the same class as a Mendel Max 1.5, Makerbot Replicator 2, or any of the other 200mm-class desktop 3D printers.
One of the key points of the Ord Bot Hadron is the fact that the entire printer is fully open source, something that is very important to me when choosing a 3D printer. Being open source means that the design is ever evolving; the firmware, electronics, and control software are also being updated by the community regularly. It also means that the consumer has access to the source code and can freely modify it to fit their needs without worry of a lawsuit, or breaking any expensive warranties either. However, modifying the Ord Bot without approved changes will most likely break its warranty.
Specifications
- 3D printing out of the box in minutes. It took me just 15 minutes to setup and get my first print going.
- Easy to install software with preconfigured profiles for PLA and ABS. Windows, Mac, and Linux version available for free download.
- Very fast because of its rigid MakerSlide frame, max print speed: 400mm/sec, which is the fastest 3D printer I have ever used.
- Build area 190mm x 190mm x 150mm (8in x 8in x 6in) in a very small footprint.
- Dimensions of printer: 18? x 19? x 15 3/4? (WxDxH) without spool holders, Weight: 5.89kg (13lbs). Very light and can be carried by a single handle on the top of the printer.
- Filament Sizes: standard 1.75mm
- Power Requirements: 110-220 VAC. Can be used with any power in the world. (you may need a plug adapter)
- Fully open source, meaning that you will be on the leading edge of technology through software updates on the site and have the capability to make your contributions to the open source community.
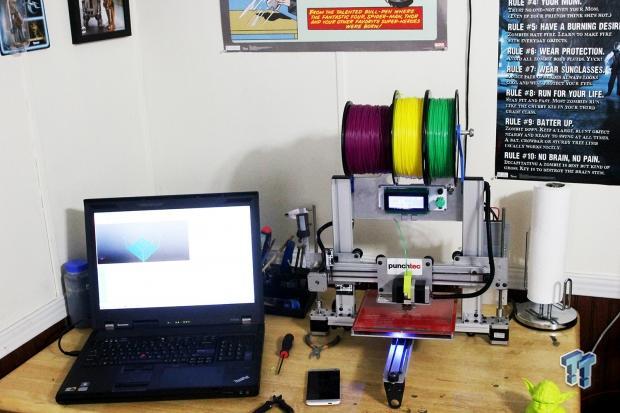
Unboxing and Photos
Unboxing the Ord Bot Hadron is fairly straight forward, but it does include a mountain of pink foam peanuts to contend with. However, the packing peanuts do a very good job of protecting the printer, and I found it to still be suspended mid pile even after its trip from Punchtec.
The peanuts do manage to make their way into every nook and crevasse that the Ord Bot Hadron has. Because of this, I would advise everyone to check for hiding peanuts several times. I checked twice and missed one that was hiding on the hot end of the extruder, but I quickly found it upon heating the nozzle up for the first time.
Our Latest 3D Printers Review Coverage
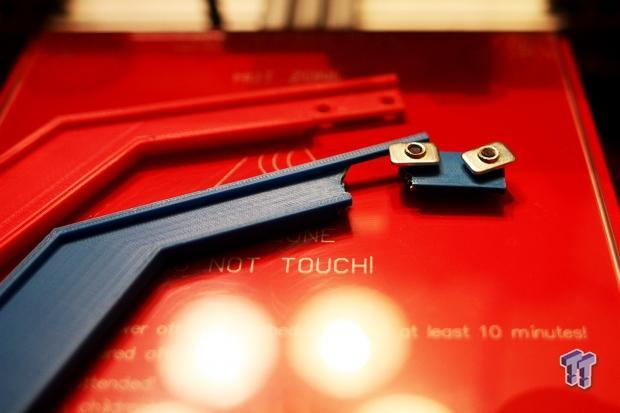
Additionally, I would advise owners to dig deep into the box as the filament spool mounting hardware is tossed in somewhere. I would have liked to see these taped to the chassis or in some sort of bag that made it easier to find and not overlook. Other than that, everything else is secured to the printer.
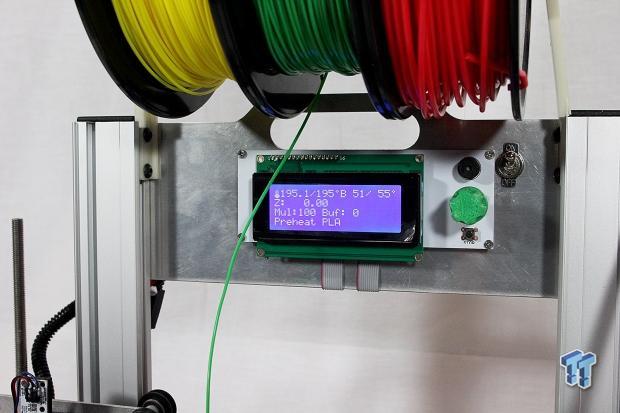
The Ord Bot Hadron's digital display is a pretty common design seen on many 3D printers that utilize RAMPS 1.4 electronics, and can control everything from setting the z-height in the software, as well as pre-heating the printer for PLA or ABS printing. You will notice a green knob over the rotary dial; this was something I added to the printer after it was unboxed. Also seen here is a buzzer and an emergency stop button. The power switch is also pictured here.
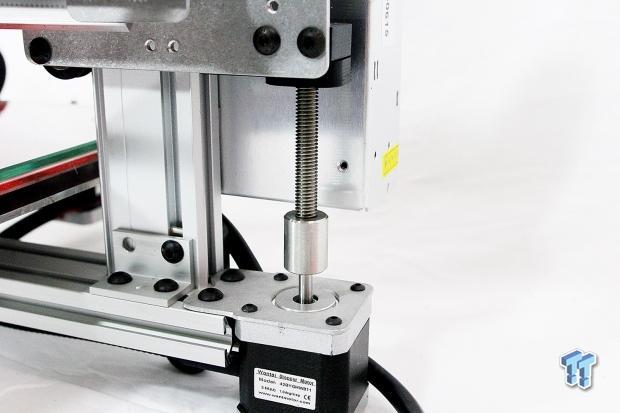
Unlike many of the 3D printers I have owned and had the chance to check out over the years, Punchtec utilizes machined aluminum Z-axis motor couplers. Many other printers use either printed parts or small aquarium plastic tubing for this job. While it is needed on some models to account for inaccuracies in the design or setup, the Ord Bot Hadron is so rigid that solid machined coupler can be used.
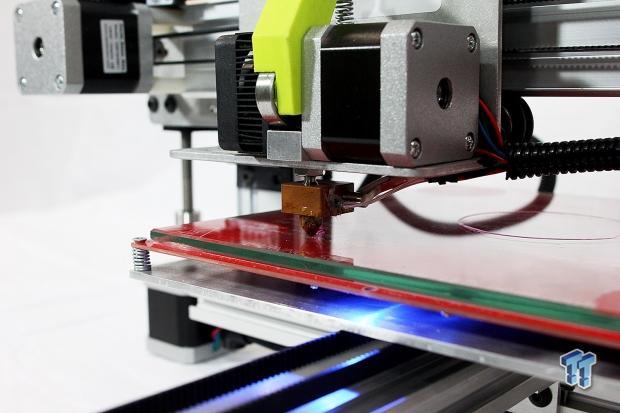
Here we can see the business end of the Ord Bot Hadron, as well as several other key highlights. Obviously, the Ord Bot's hot end is the most prominent, and you can clearly see that it is a heated block design that utilizes a heater core instead of a power resistor. The benefit of this is that the block heats up much faster than it would with the power resistor. The downside is that heater cores are much more expensive to replace than a $0.50 resistor.
You can also see that the hot end utilizes a smaller nozzle than typical 3D printers, which is something I definitely like. I feel that the Ord Bot's hot end has just enough mass to remain thermally stable during high-volume printing, but light enough to heat up quickly. The stock nozzle size is 0.35mm.
We can also see that the Ord Bot Hadron's glass bed is affixed to the heated platform via high-temp silicone, and that the bed can be leveled on all four corners with spring-binding screws. The heated bed also features a blue LED that pulses when optimum printing temperature is reached.
Finally, this is a good image to understand how the tensioner on the extruder works. The green lever pivots on one of the stepper motor's mounting screws, which causes a roller bearing to put tension on the filament against the feed wheel. Tension is achieved by a small spring on the opposite end of the lever.
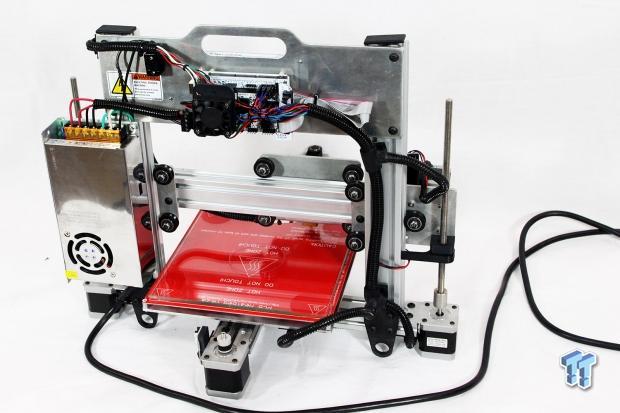
An overall look at the back of the printer show's us Punchtec's commitment to a clean design and how much attention it pays to cable management. All of the wires that snake down the chassis have been bound and secured in wire loom, while the wiring remains neat and orderly where it connects to the RAMPS 1.4 board. Even the wiring entering the PSU has been bent on a 90 degree angle to prevent stress from causing the wires to break.
Here you can also get a good look at how the Z-axis is set up. Instead of the lifting arms being attached to the lead-screw nut, it is allowed to freely float onto and rise as the nut's housing rises and lowers. This is a very ingenious design, and I really hope I see it in other printers in the future.

Just a quick look at the RAMPS 1.4 board shows you how much thought Punchtec put into the cable management, wiring, and cooling that the printer needs to correctly function for hours on end. The small fan that has been mounted above the stepper drivers is something I like to see on printers. Those small Pololu drivers get very warm after hours of use, and even though they have heat sinks mounted on top, a cooling fan ensures that they remain stable even during the longest prints.
Here you can also see how Punchtec has went the extra mile and used a T-Coupling to split off the wiring harness to the Y-axis. This is something I have never seen in a manufactured 3D printer before, and I applaud Punchtec for stepping up and keeping the wiring as clean as possible.
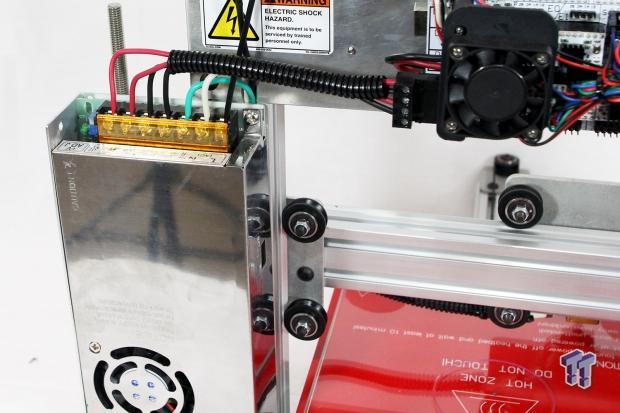
This may just be my favorite part of the entire printer. The fact that Punchtec took the time to find a proper mounting point for the PSU and did not make the footprint any larger speaks volumes to me at how much attention to detail this company puts into its designs. Additionally, properly sized wires were utilized in the wiring of the Ord Bot Hadron, and they may even be slightly oversized, but that means that users will not have to worry about anything heating up and shorting out during prolonged use.
This is also a good shot to point out the V-Rail that is built into the MakerSlide extrusions. Normally 3D Printers must rely on LM8LUU linier slide bearings, but MakerSlide allows the printer to utilize V-Wheels to easily slide along the V-Rail. This makes for a self-aligning design that is very smooth and efficient, and is the main reason the Ord Bot Hadron can achieve 400mm/s print speeds.
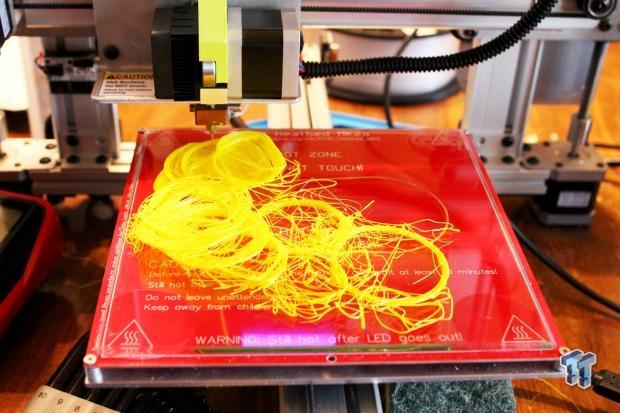
While this image is not relevant to the review, I wanted to include it as it shows why you should always run your printer only when you are home. I started this print and made a quick 30 minute trip to the grocery store. When I returned, I expected the print to be mostly finished, but what I saw was a blob of tangled plastic. This happened because the print broke free of the bed and allowed the nozzle to drag it around while I was gone.
Setup and Use
Setting up the Ord Bot is not that challenging at all, and everything you need has been pre-configured and is easily installable. To get started, users can head over to Punchtec's website that currently recommends downloading and installing Cura. For this review, I used the Repetier Host, Repetier Firmware, and Slic3r combo that was the previously recommended software suite. You can find the Cura download info here (http://www.punchtec.com/software/), or you can download the same package I used here (http://www.punchtec.com/softwareArchives/). Punchtec has a very good getting started video, which walks you through the entire setup process.
I have tried running Cura, and there is a noticeable improvement in quality. Unfortunately Cura was not recommended until after this review was mostly finished, and I was unable to run any prints in time to make the review. However, if there is a demand, I will update the review with the Cura sliced prints.
Once all of the software and drivers have been installed, the bed needs to be leveled. On previous printers, this process has been a real pain in the rear, but Punchtec has made it quite simple. Since the glass surface is permanently attached, all you need to do is move the nozzle to about 1-inch off of each corner and adjust that corners height until a piece of paper can barely slip out from between the nozzle and bed. Double check this on all four corners and in the center of the bed and everything is done.
Now power up the printer and home all axes. Then use the rotary knob to navigate to the Set z-height option, and adjust the Z-axis height so that the nozzle is just touching the piece of paper placed between it and the bed. When the paper feels like it is beginning to get stuck, you have adjusted the Z axis too low. When it's correct, set the z-height.
With everything calibrated and leveled, the printer is now ready for printing and testing. I like to print a few objects before testing so that the printer is "broken in" and giving consistent results. This ensures that any casting flash, blemishes, and oddities have had time to wear in and not produce any false results.
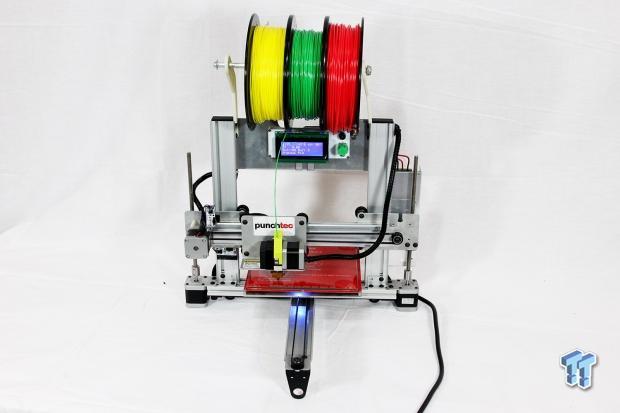
Before you can print, you need to install the filament spool holder and a spool or two of filament. In the image seen above, I have two spools of 1.75mm filament as well as a spool of 3mm filament. While the 3mm filament is incompatible with this printer, I placed it on the rack to show that three spools will safely fit on the rack. I did have some issues with the rack's design, but I will go more in-depth into that later.
Finally, the Ord Bot comes with an SD card that does allow you to print objects straight from Gcode files stored on the SD card. I did test this out, and it does work well, but I feel that printing from a PC with Repetier host running is the better way to print.
Testing Methodology
I have spent several months working with some of the leading people in the desktop 3D printing industry to develop my testing methods. I have more than seven years designing, building, buying, and working with desktop 3D printers, and the following methods were designed to stress a desktop 3D printer far past what I would consider normal use.
Filament Quality
When benchmarking anything, it is always paramount to make sure that the variables are always the same throughout any testing process, and with 3D printing, the filament is one of the major variables that can cause erroneous results. To ensure that all of my test prints stay the same between each review, I have partnered with Voltivo and will use its Excelfil 3D Printing Filament in my testing.
I chose Voltivo's Excelfil because it has proved to be the highest-quality filament, and produces the most consistent results throughout the whole spool and into new spools as well. Voltivo's Excelfil is manufactured from virgin materials, and is laser measured to ensure a uniform diameter throughout the whole spool. Additionally, it is more pigment rich than other brands I have tested, and produces a consistent color throughout the print even during temperature shifts.
Printing Environment
To ensure consistent results, I keep my printing room at a constant 74 Fahrenheit during testing. This helps me ensure that changing ambient temperatures do not contribute to layer cracking, corner lifting, or any other issue that derives from changing ambient temperatures. Additionally, the printing table is located away from air vents and anything that might cause eddies in the air around the printer.
Test Models and Netfabb
I have compiled a cache of 3D objects that I will be printing in each review. These objects are designed to challenge the printer's ability to handle complex curves, straight lines, spheres, small objects, large objects, overhangs, circles, and bridging. Some designs are also included to test printing times on a standard object. This is important because a printer's axis geometry and weight greatly affect how fast it can accelerate that particular axis movement.
All models have been ran through Netfabb's cloud service to ensure that they are perfectly optimized for 3D printing, and that no artifacts are present that may alter the objects printed quality. You can download my full suite of test objects from my personal Thingiverse account, although it does contain a few objects that are not used. (http://www.thingiverse.com/thing:226523).
Finally, I test the printer's ability to heat its nozzle from room temperature to 200F in a timely manner. I perform the same test on the heated bed, but only heat it to 100F. A Type K Thermocouple and multimeter is used alongside a timer on my cellphone to time this. While not the best timing method, it works just fine and is accurate enough for these reviews.
Testing Parameters Specific To This Review
While the Ord Bot Hadron is capable of printing in PLA and ABS, Punchtec recommended PLA as the main printing medium, and as such, that is what I used for this review.
- Filament Utilized: Voltivo Excelfil Leafy Green PLA, and Excelfil Candy Yellow PLA.
- Optimum Printing Temperature: 185C to 195C
- Printing Temperature Used: 190C
- Heated Bed Temperature: 60C
- Room Ambient Temperature: 23.3C
- Slicer Config: Download here (URL Here)
- Printing Software: Repetier Host version 0.95f
- Printer Firmware: Punchtec V0.91d
- Printer Break-in Time: 4-hours 38-minutes
Testing: Small Part Stress Test
While printing a small object may not sound like much of a stress test, it is in fact much harder to accomplish than a larger object. This is because any calibration that is off, including misaligned parts, will show here. On larger-scale objects, the minute flaws may be amplified enough that they actually work themselves out or become so diluted that they are invisible.
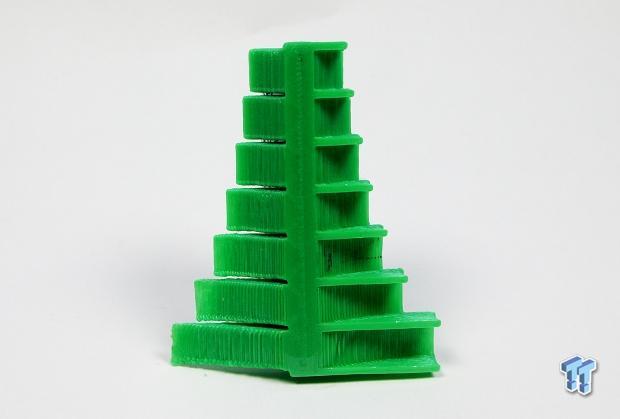
To perform the small-scale test, I like to print the 5mm Calibration Cube. This is a cube that has seemingly been sheered in half on the diagonal in 5mm x 5mm x 5mm steps. This is an excellent print to test consistency on each axis, as well as overall performance on the small scale. The overall size of the cube is 25mm square, but halved.
The second test I perform is the Small Cityscape print. This print features several complex shapes, including a cone, sphere, toroid, and cube. This print gives us key insight into how well the printer performs with very small-scale objects. The overall size of this object is 25mm square by about 13mm high.
Here we can see that the Ord Bot Hadron was able to handle the 5mm Stepped Cube rather nicely. This is a challenging print for PLA as the layers have little time to cool once the cube nears its top. Usually printers need a fan on the nozzle when attempting this print in PLA, but the Ord Bot Hadron fared well. The surface layer is stretched a little thin, but that is quite common on single layer surfaces with PLA. There is a little bulging in areas that stayed a little too warm before the next layer, but the part is functional and very accurate in size.
Here is another angle that shows some slight bulging, but for a 5mm Stepped Cube Print, this is quite good. Surface quality is nice as well. It looks much worse than it actually is due to the image being so large. You can also see that the Ord Bot Hadron managed the 5mm bridge flawlessly.
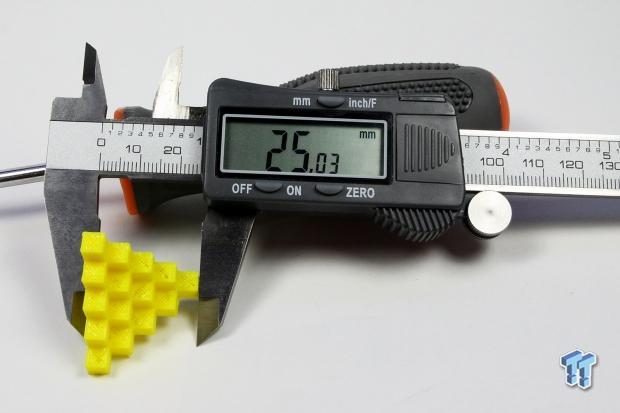
When it comes to accuracy on small parts, the Ord Bot Hadron is spot on, with the 5mm Stepped Cube being only 0.03mm over specified 25mm size. This is one of the most accurate 3D printers I have ever used, with most being within 0.5mm of their targeted dimension.
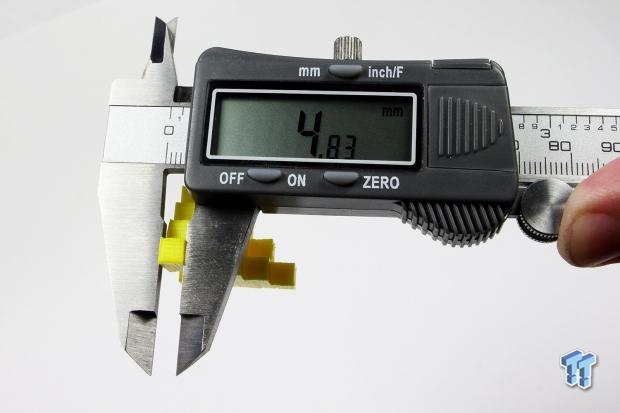
Taking the accuracy even further, when measuring the small cubed steps on the vertical, we find that the Ord Bot Hadron is within 0.17mm of being spot on the desired 5mm height for each step. This is most likely a rounding error in Slic3r that is combined with the layer height limit of 0.20mm that I setup in Slic3r and thus unavoidable.
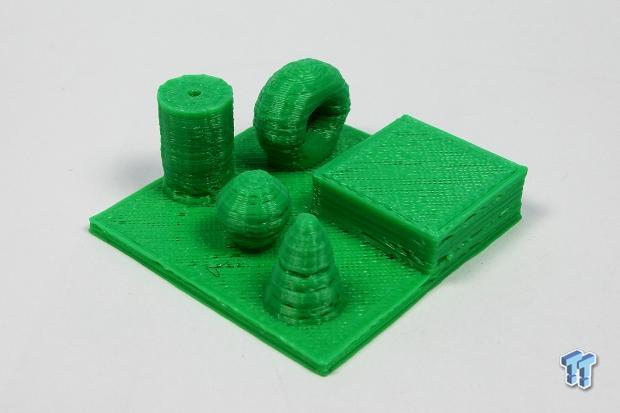
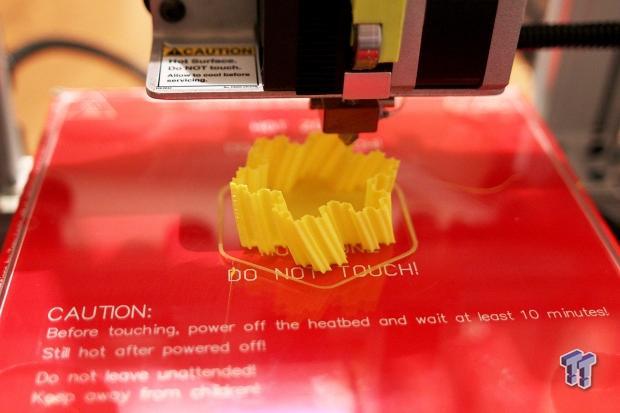
This is where things get a little sloppy, but I consider the Cityscape Print a success. While these objects appear to be messy and full of flaws, this is actually a good print job. I printed this Cityscape with the settings relatively fast for the small size of this object, and for the most part, the Ord Bot Hadron handled the issues well. This was the first print after changing colors, and a lot of the gaps are from air that was trapped in the nozzle at the beginning of the new color.
Keep in mind that the sphere pictured here is about 4mm in diameter and is why you can clearly see the direction changes in the axis appearing on it. The small hole in the top of the cylinder is less than 1mm wide, and the cone taper is uniform and, for the most part, smooth when compared to its small size. Overall, the Ord Bot handles itself well when printing small objects.
Testing: Overhangs and Bridging
Overhangs and Bridging are two of the hardest things to accomplish in desktop 3D printers based on the FFDM process, and the Overhang Print Test, 40mm Cube with holes, and Stepped Pyramid Bridging Test are all designed to test these parameters to the max. This is where the printer will really prove its worth or show to be just another mediocre desktop printer.
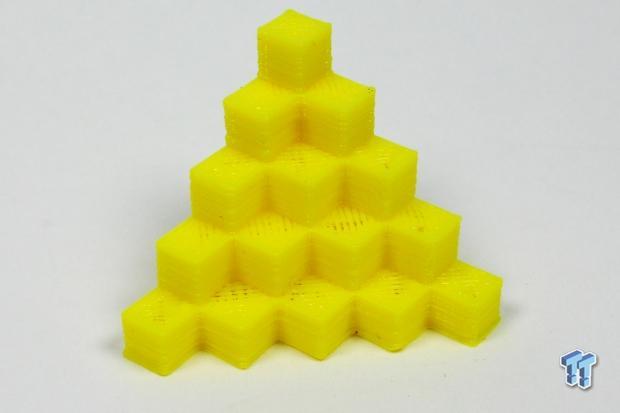
Up first is the Stepped Pyramid Bridging Test, which is designed to test the printer's bridging capabilities over various length spans. This is a really good test and shows just how well the printer handles thin bridging, the hardest bridging to achieve.
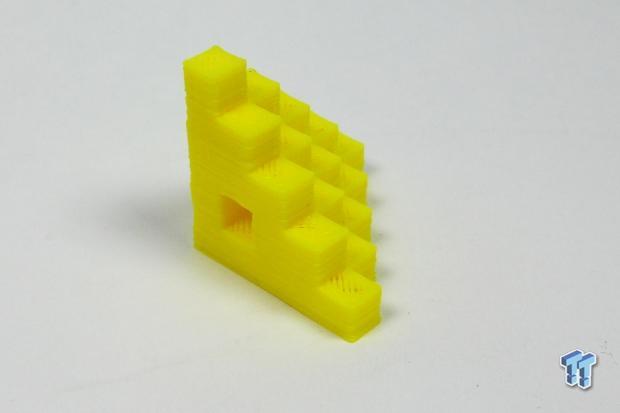
Second, we will test the printer's ability to handle concave overhangs using the 40mm Cube with Holes model. This model is based on a 40mm cube that has had spheres cut out of its side with 9 holes punched through each parabola.
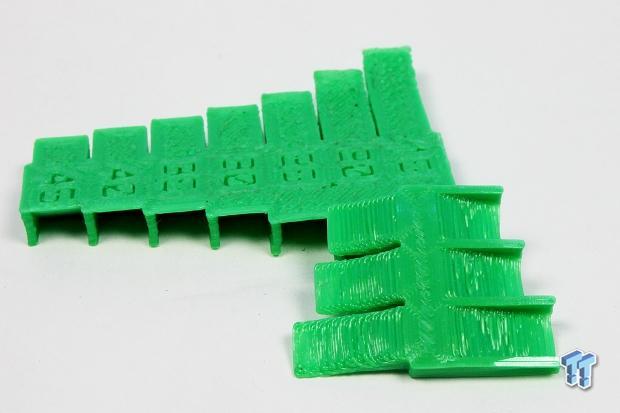
Finally, we will test the printer's ability to tackle overhangs of varying degree using the Overhang Print Test models. These models are designed to test the printer's ability to print overhangs from 12 degrees to 45 degrees with a total of 10 different overhangs.
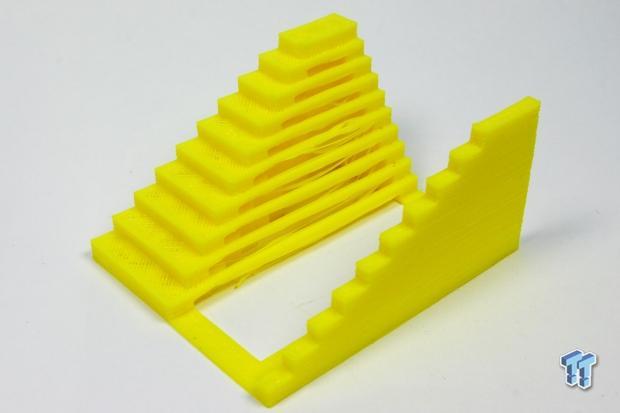
The Stepped Pyramid Bridging Test shows some very good results when it comes to bridging. The longest bridge is 50mm, while the shortest is only 9mm. While the 50mm span showed some sagging, it all but disappeared around the 25mm bridge, and was clear the rest of the way up. Bridging is something that is very finicky, and this could be improved if the user were to spend some time fine tuning the bridging parameters in Slic3r.
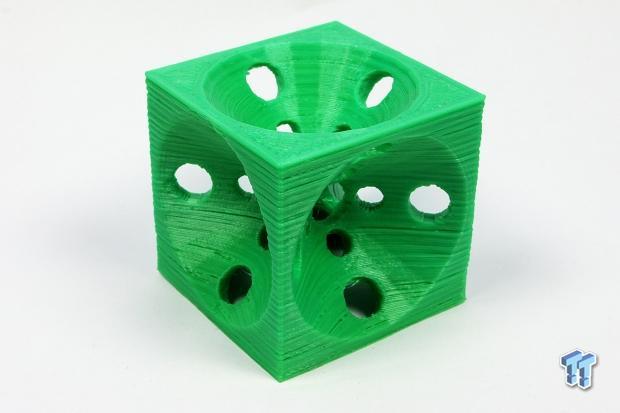
Up next is the 40mm Cube with Holes. This object is one of my favorite to print and show off to students and spectators at outreach events as they are usually mind blown by its complexity. Here you can see that the cube is very square and the concaves look like you took a perfect ice-cream scoop out of each face. I do not have a photo of it, but the cube measured in at 40.02mm, which is consistent with the accuracy we saw on the 5mm Stepped Cube print.
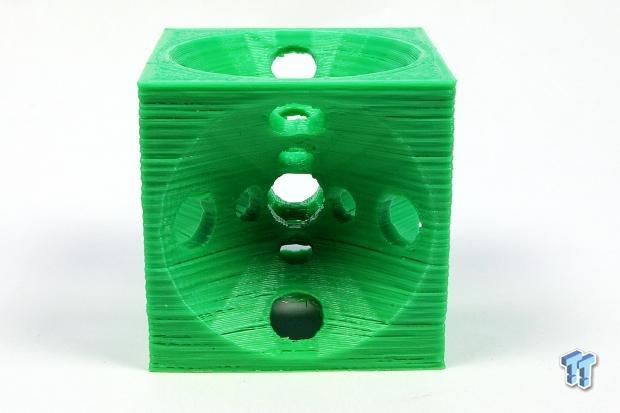
For the most part, the holes are uniform and round as can be when you consider that they are formed by leaving voids in the layer being printed. There is some layer splitting about halfway up the cube, but I attribute this to a temporary drop in the extruder temperature. There is layer banding present in this print as well, and I think it may be a flaw in the model slicing as it is not present in other prints you will see in this review.
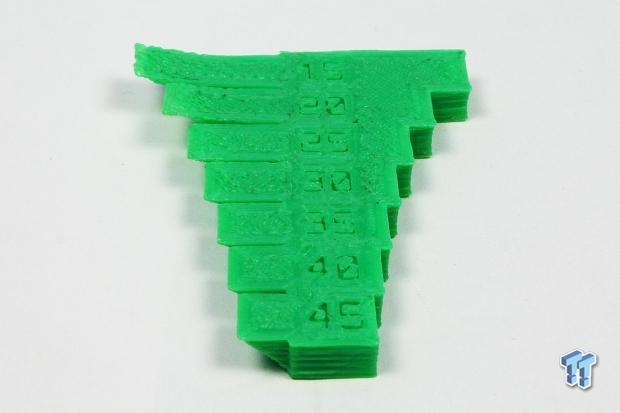
Now we come to the first of two of the Overhang Print Test models. This particular model varies the overhang from 15-degrees to 45-degrees in 5-degree increments. The Ord Bot Hadron appears to handle overhangs up to 25 degrees quite well, with curling beginning to form at the 20-degree and 10-degree levels when unsupported. On the right-hand side, we see that the supported overhangs actually pass the test with flying colors.
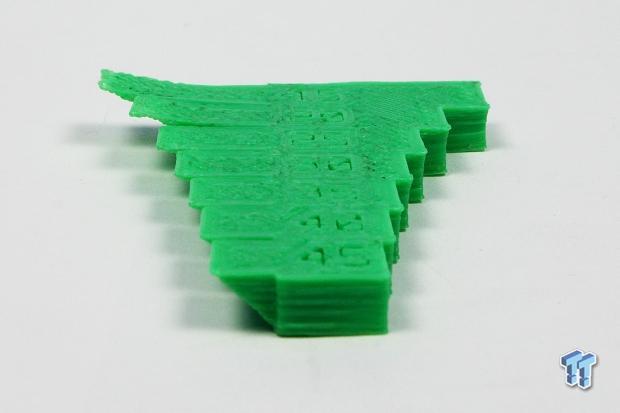
Here is another angle that better illustrates the curling that begins to occur at the 25-degree mark. Also note that the supported side remains flat, but you are able to see some minor lifting of the supports that begins around the 15-degree mark. This was likely due to a hot-spot on the heated bed as PLA actually sticks less to glass the hotter it gets.
Taking a look from the bottom, we can see that the layers were uniform, but the higher overhangs simply stretched them out too thin without enough overlapping to properly prevent curling.
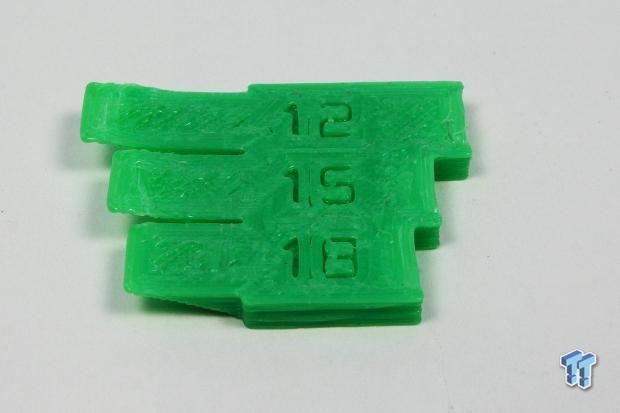
Moving on to the smaller Overhang Print Test model, we can see that the 18-degree level did not curl for some reason, but the 15-degree and 12-degree overhangs were just too thin to resist curling. Just like the larger test, the supported overhangs fared well.
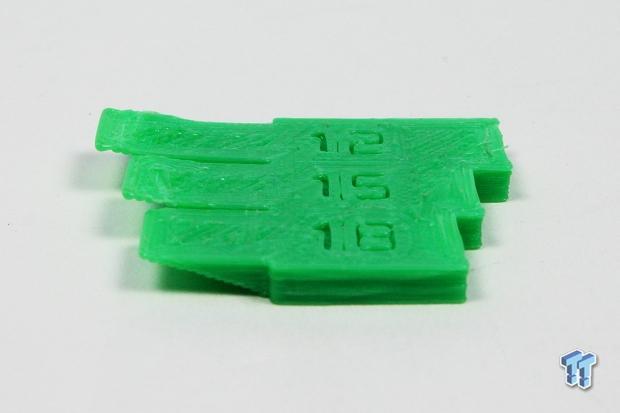
Another angle showing the curling of the 15-degree and 12-degree levels.
From the bottom, we once again see uniform layer thickness, but the longer overhangs curl from a lack of sufficient overlapping of layers.
Testing: Sphere and Complex Surface Quality
Creating a smooth sphere is a complex task for a 3D printer as its axes are positioned on a square frame. This means that the 3D printer must make minute changes in the X and Y axis multiple times per second to maintain a good spherical print. The same applies for surfaces that feature many different curves of varying degrees.
To test the printer's performance on these parameters, I have chosen two objects that have both spherical and complex curves. The Surface Finish Calibration Test and Female Statue Test are both designed to stress the printer's calibration as well as extrusion quality.
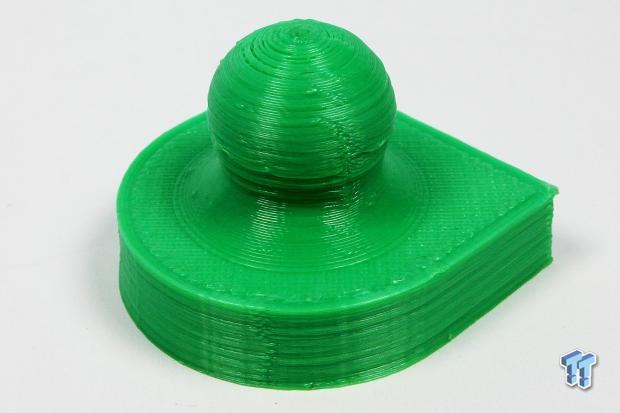
The Surface Finish Calibration Test is one of my favorite objects to print when testing surface finish, spherical quality, and complex curves. Here you can see some seaming created by the print head starting at the same spot for every new layer. The additional flaws are derived from layers not having enough time to passively cool before the next layer is started. This is easily fixable by adding a simple fan to the extruder head. Overall, though, the surface quality is not that bad, and a few minutes with sandpaper would clean it right up.
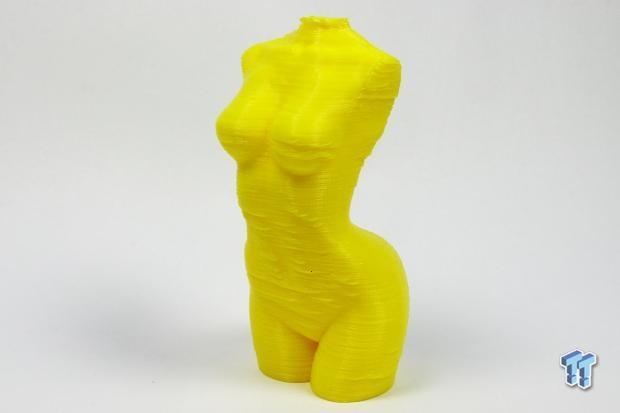
The female form is one of the most complex shapes in nature and includes a multitude of flowing curves and radiuses that can be really tough to print. Unfortunately, as with most PLA printers, cooling time between small layers is not long enough to prevent the distortion seen here. Again, a fan would really improve print quality here. I have printed this model several times in ABS and have not experienced this issue on anything but PLA.
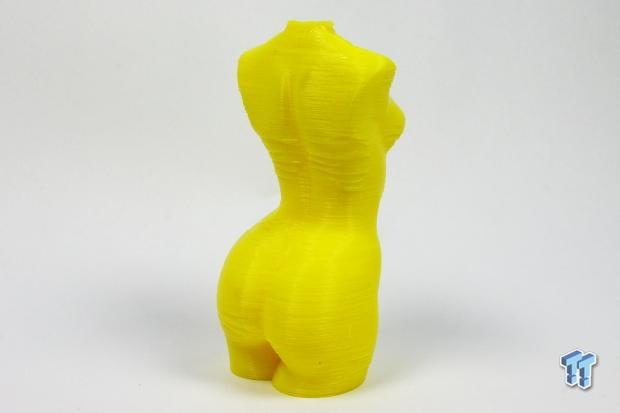
Another angle showing the backside of the model. You can see where the overhang became too great for the still soft plastic to retain its printed shape. You will see that this is not an issue on larger prints that have longer layer print times that allow the PLA to sufficiently cool before the next layer is started.
Testing: Circle Accuracy
Circle Accuracy
One of my biggest pet peeves is 3D printed holes that are not circular or accurate in size. I design a lot of parts that feature pre-formed holes for bolts, rods, and screws, and having to drill these out defeats the purpose of adding them into the model to begin with. I like to use the Nickel Calibration Circle and the Better Nickel Calibration models to test how accurate the printer can print a nickel-sized hole.
While both objects are similar, they each offer unique challenges as one prints a circular object, and the other prints a circular hole that is surrounded by a 90-degree angle and outer arch.
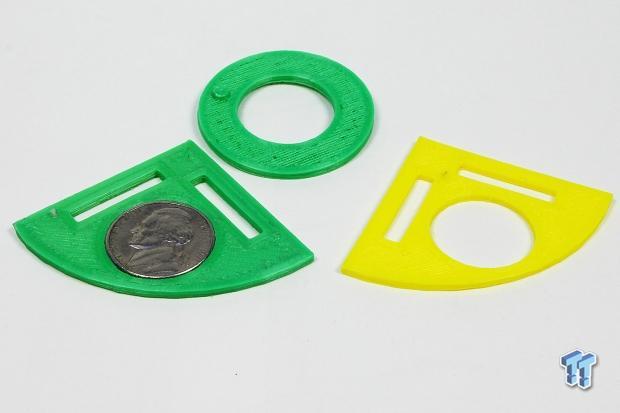
As you can see, the nickel fits nicely into the hole that was printed into the "Better Nickel Calibration" model, and I can confirm that it also fits into the circular print as well. In fact they fit so well that barely any pressure is needed to place the nickel into the hole, and it retains the nickel strong enough to not allow it to fall back out without similar pressure being applied.
Testing: Complex Objects and Time
Printing complex objects on a larger scale is an area where 3D printers really shine, and those that have been designed well can pull away from the pack here. This is where I really like to take into account surface finish, printing time, and point out any flaws that I see. To test these parameters, I have selected the following:
A GoPro camera mount that I have used quite a bit over the last year. Its design allows for attachment to objects using nothing but zip ties. This model will test the printer's ability to print both large surfaces as well as small complex details. I print this model at 100-percent infill, which makes it stronger but causes the model to retain excessive heat during the printing process. This means that the plastic could bulge out at the sides or drupe in the middle. When the print is finished, I test to see if a GoPro case will fit onto the mount.
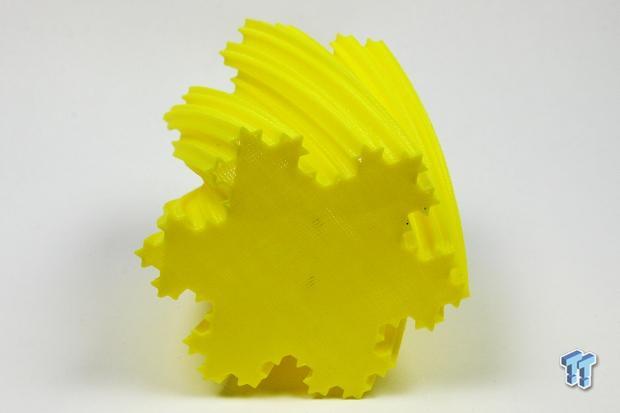
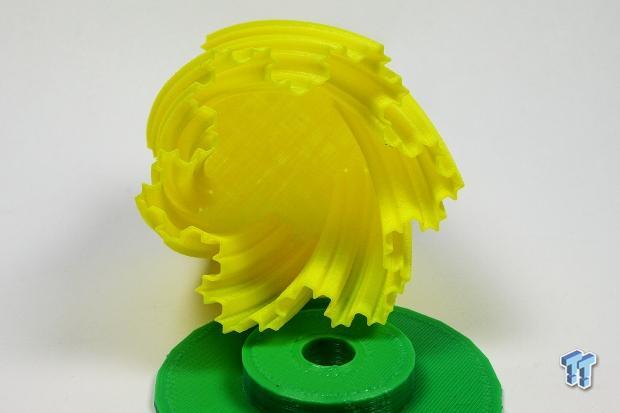
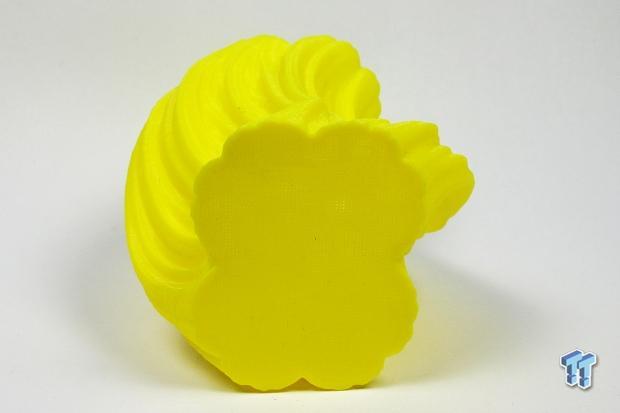
Up next is a single wall vase that is based on a fractal design. This tests the printer's ability to handle very fast paced direction changes as the model features many sharp angles. Additionally, the printer's ability to maintain a single wall thickness while twisting is tested. If no gaps can be seen, then I call this print a success.
The final object in this test section is the Julia Vase #004 AKA "Bloom." This is also a single-walled vase, but it features not only sharp angle changes, but complex curves as well. As far as aesthetics go, this is one of the most beautiful vases on Thingiverse, and really stresses not just a printer's ability to remain consistent, but the filament quality as well.
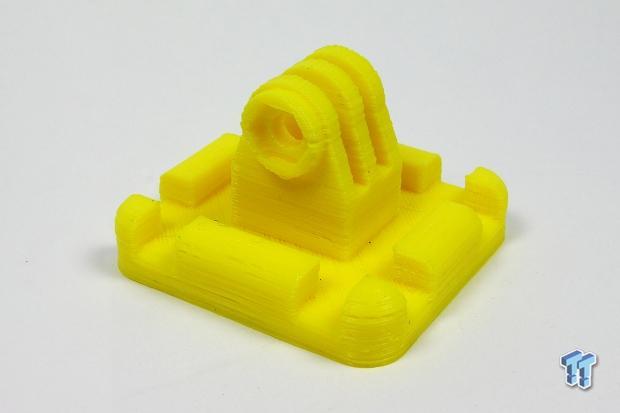
We begin with the GoPro Ziptie Mount 2; here you can see that the PLA did get a little stringy in areas, causing gaps in the layers. Overall, this is a good print for PLA in my opinion. The three "fingers" that grip the GoPro camera's mounting bracket printed well, and even the space for the captive nut turned out well despite a bridge.
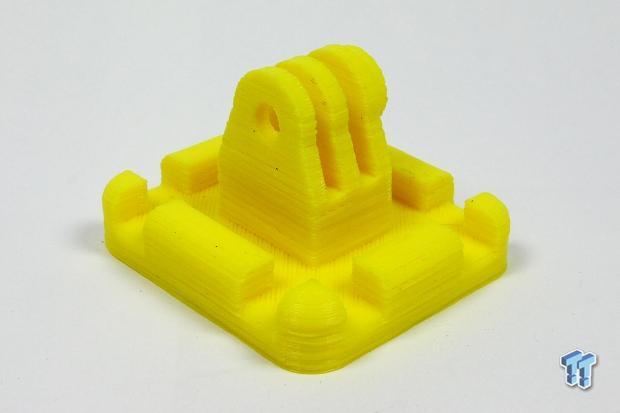
Here is a look from the other side, and you can see that the cable tie slots are nice and uniform and at perfect angles to each other. Overall, this mount was very solid, and I would not hesitate hanging a $400 GoPro camera off of it.
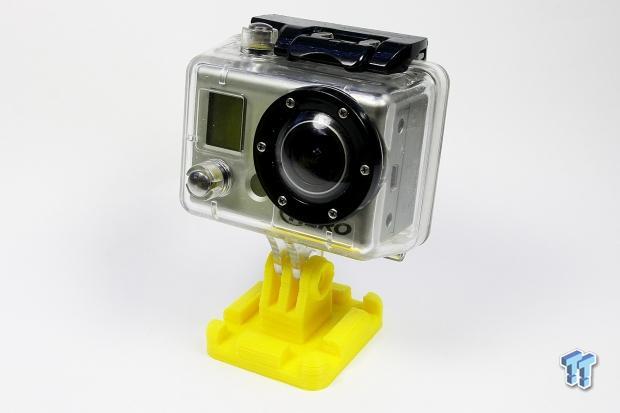
The final fit test turned out well, and the GoPro easily attached to the mount with just the right amount of friction to keep things steady without stressing the fingers. I have printed dozens of these little mounts in ABS over the last year, and this is the first PLA model I have attempted. I am happy to say that it not only surprised me, but did a lot to change my mind on PLA. Overall, this print took 38 minutes at 70mm/sec.
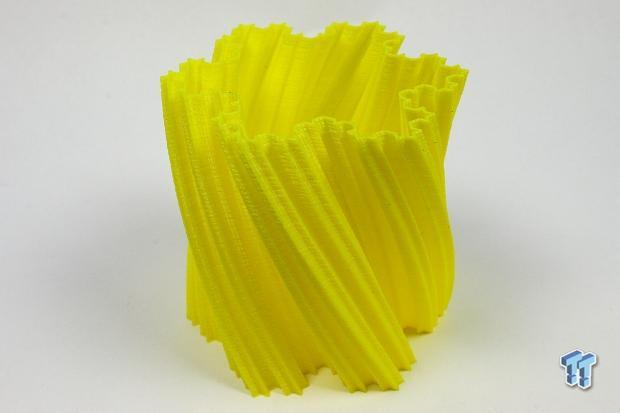
Now we get into the first single walled vase. This is the Koch Snowflake Vase #3, a single-walled vase that showed how well the Ord Bot Hadron really prints. This vase stressed the printer to its limits and took only 1 hour and 8 minutes to print at 40mm/sec. Here you can see the layers neatly stacked on top of each other with a slight offset of each new layer. The walls of this vase are very nicely printed and appear to be watertight.
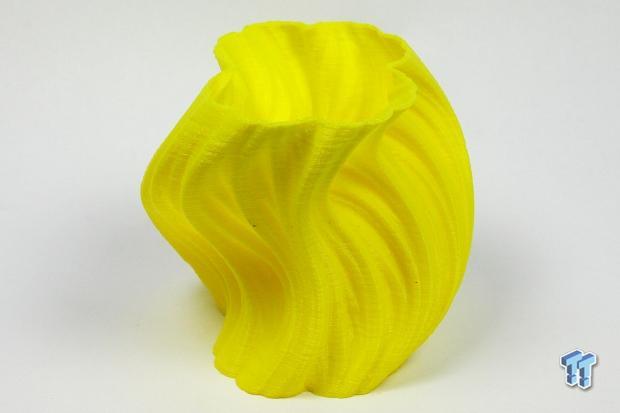
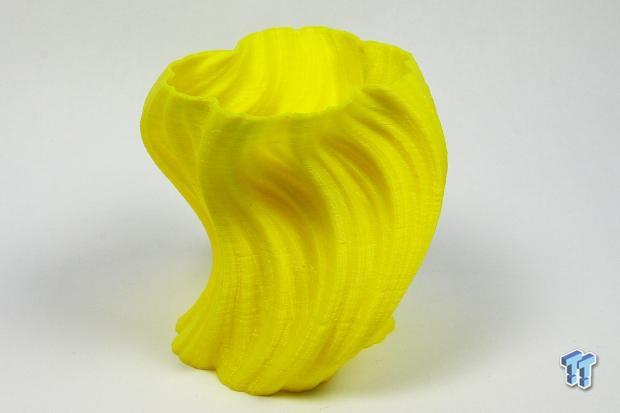
Unfortunately, that water-tight praise can only be applied to the walls as the base has several gaps that can be seen. This can be attributed to the way PLA pulls thin at random points in the print and the single layer that was utilized for the base. I always like to have 3-4 layers for the base, but that is not ideal for testing.
Looking inside the vase, we can see that the walls remain nice and smooth, and that the base is filled with more pinholes that were originally shown in the previous image. Here you can really get a sense of the sharp angle changes the printer had to make, and how well it executed those changes.
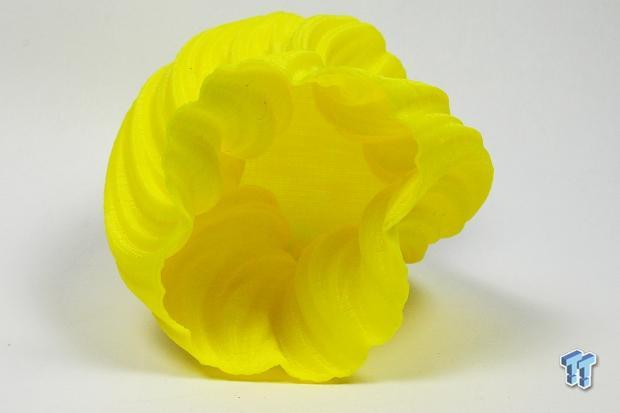
Finally, we arrive at the Julia Vase. This vase reminds me of a painting by Katsushika Hokusai, called The Great Wave of Kanagawa. Its flowing lines and sharp curves make it the most challenging print I have in my test suite. Most of the objects I utilize feature a repeating pattern, but this Julia Vase is ever-changing, layer by layer, with no two the same.
Here you can see that there are some minor flaws in a few layers, but nothing that even remotely affects the overall quality of the print. The single wall print turned out outstanding, and it really surprised me that the PLA was able to print this well. Normally, this is the quality I expect from ABS.
Looking at the bottom, we can see similar pinholes to those we saw in the previous vase's base. Again, I feel that this is indicative to the base being a single layer of PLA. Another layer or two would have surely sealed it up.
Looking inside, we can see that the walls are once again as smooth as the exterior, and no blobbing or stringing is present. The pinholes in the base are better seen here as well.
Heating Performance
While heating performance is not that big of a deal to many 3D Printing Enthusiasts, I find it to be an excellent benchmark of how well a printer's hot end is designed. Printers with too much thermal mass will take a long time to heat up, while printers with too little will heat very fast, but take longer to recover from a long, fast extrusion that saps the heat away quickly.
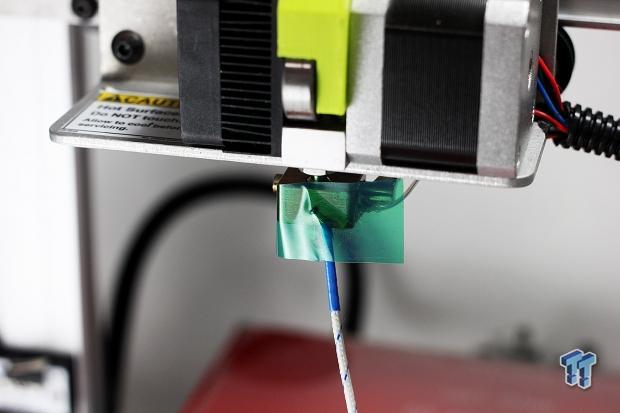
To test heater performance, I place a type K Thermocouple on the heater block opposite of the heater core. The Ord Bot Hadron really shines here with a heating time of 1 minute and 19 seconds to heat from room temperature (23C) to 200C.
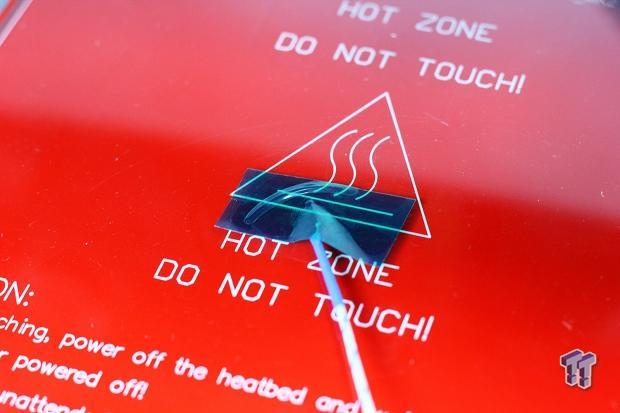
The Ord Bot Hadron utilizes a 12V power supply and a standard 200mm-class heated bed PCB with a standard borosilicate glass top surface permanently attached. It took 4 minutes and 39 seconds to heat from room temperature (23C) to 100C.
Final Thoughts
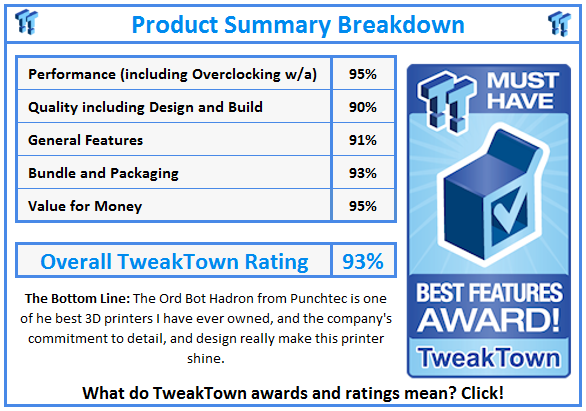
Overall, the Ord Bot Hadron from Punchtec performed very well in my testing. I am quite pleased with the print quality as well as the overall construction quality of the printer itself. Punchtec has taken their time developing what I consider to be one of the best 3D printers that has ever crossed my workbench. Punchtec's attention to detail is second to none. I love the cable management and the clean and well throughout axes paths. This printer is truly an excellent 3D printer that would fit well in any techie's arsenal.
Unfortunately, there are some downsides to the Ord Bot Hadron that I do have to mention. The biggest issue lies within the filament spool holder's design. While I love the design and feel that it is a very handy way to enable quick change-over of filament colors, the utilization of printed arms makes for a very poor implementation. In my 3 months with the printer, I have had these arms crack, break, and bend a total of 6 times. Each time, I would print a new set on either my Lulzbot AO-100 or Lulzbot Taz 3. I printed each set at 100-percent infill and even tried beefing up the design, but the things still managed to break due to stress.
When the axes move, it injects a small amount of vibration into the frame of the Ord Bot Hadron, which is then transferred to the weak plastic spool holder arms. If movements become fast, this vibration causes the printer to gently rock back and forth and side to side if you have 2-3 spools mounted. I have had the entire spool holder assembly break off and crash down to the table's surface, which scared the crap out of me. This issue is easily fixable, though, and simply requires some mounts that have been cut from steel, aluminum, or a stronger plastic such as Delrin. I have ordered a set of laser cut and machined arms from a friend and will update this review once I have them installed.
One other minor issue I have is with the extruder design. While it is fully functional, and has managed to print through more than six pounds of plastic in three months, it is tribally difficult to service. When filament jams happen, the feed wheel's teeth get clogged up with plastic dust, and the entire extruder must be broken down to clean this. The same happens if you happen to get stuck when changing filament. If the piece you are removing breaks or gets stuck, you must disassemble the entire extruder to fix things.
I would have liked to seen a Wades Extruder variation utilized, but as I said, it has printed through more than six pounds of plastic and is still going. The lever design is also something I am not fond of. I would much prefer tensioning screws over a lever and a spring.
With that said, I feel that the Ord Bot Hadron from Punchtec is truly one of the best 3D printers on the market today. It's built solidly like a tank. With a price tag of just $1,395 USD, you will be hard-pressed to find a better printer that is as reliable as the Ord Bot Hadron for any lower price. In the three months that I have had the printer, Punchtec has updated the firmware twice, issued a few update notices, and even chosen to go with a completely new software suite as it results in better prints for its customers.
 M3D Micro 3D Printer Review
 Intel Curie-based Arduino 101 Programmable Microcontroller Review
 Connected Cars: The technology is here, so let's enjoy it
 Future of wearables unknown, but things are looking good
 Virtual reality provides great long-term potential, be excited
 AMD plans to increase the price of its graphics cards by 10-15% in the second half of 2026
 Black Myth Wukong mirrors GTA V success with 30 million copies sold in less than 2 years
 Steam Controller supply can't keep up with demand, Valve pushes orders to 2027
 Steam Machine shipments spotted, as Valve is rumored to launch the gaming PC next week
 HDMI 2.2 products are coming in 2027 as chip makers begin sampling FRL2 silicon this year
 Solo dev tries to make his own GTA 6 with AI, as he got tired of waiting for Rockstar
 Repair channel buys ASUS RTX 4090 for $222 and finds plastic die with fake NVIDIA markings
 Epic's gen AI use deters partners, Vampire Survivors x Fortnite might get cancelled
 Sony seems to confirm singleplayer first-party PlayStation games will remain console exclusive
 Speed Racer (2008) 4K Ultra HD Blu-ray Review: a stunning remaster of the cult classic
 MOAIPLAY ORA PRO G1 850W ATX 3.1 PSU Review: high efficiency and 10-year warranty for $119.99
 Navman MiVue Smart True 4K Surround Dashcam Review - Seeing In All Directions At Once
 IQUNIX Magi96 Pro Aluminum Low Profile Mechanical Keyboard Review - Premium Build, Satisfying Sound
 Asetek Forte S-Series Racing Simulator Bundle Review
 Razer Pro Type Ergo Wireless Split Ergonomic Keyboard Review - Built for Comfort and Support
 ASUS ROG Strix Morph 96 Wireless Gaming Keyboard Review - Great Performance, More Affordable
 SAPPHIRE Radeon RX 9070 GRE PULSE OC Review - A New 1440p Challenger Has Arrived
 NZXT H6 RGB+ Compact Dual-Chamber Chassis Review
 I read the Windows Backup app screen carefully, and it does not back up what most people think
 Low Sound Volume on Windows 11? How to fix audio issues and restore normal volume
 8 Critical Warning Signs You Should Never Ignore in Windows 11
 This Windows security feature protects Documents from ransomware, but it is off by default
 Windows 11 already has a voice typing tool, and it is the one most people are not using
 Quick Assist is the only remote-support tool I open when a relative calls about their PC
 The PowerToys utilities I keep enabled on every Windows 11 PC, and the ones I turned off within a week
 TweakTown's Best of Computex 2026 Awards - The Best Hardware, Gaming Gear, and AI
 Phison E37T SSD Controller Exclusive Preview - The Fastest DRAMless SSD Platform Yet