


Our Verdict
Introduction, Specifications, and Pricing
Be quiet! Is not a brand I feel needs a significant introduction. While we have looked at their cases previously, they have always done rather well in our testing. The same can be said for other be quiet! products we had tested prior. Now to the namesake for the case we are checking out today. The Dark Base Pro left the TweakTown labs with high honors, nearing a perfect score which is in no way easy to pull off.
For those not familiar with the Dark Base Pro 900 Rev. 1 it is a large full-tower, even approaching super-tower based on stature alone. The Dark base pro was made for the distinguished builder who favors not just quality of materials but silence and adjustability and modularity to build a PC that was truly how you want it.
Some of the key features of the Dark Base Pro would be its modularity, adjustability, and silence focused design. One thing that many silence focused cases get wrong is that in favor of silence, they suffocate the internals which is counter-intuitive when having high-end components at the price range this chassis falls into.
The chassis we are working on today is an incremental improvement of the be quiet! Dark Base Pro 900. Aptly names the Dark Base Pro 900 Rev. 2 and it has some key upgrades which may help refresh this aging behemoth. The Dark Base Pro 900 Rev. 2 measures in at 577mm in depth, 243mm wide, and 586mm tall. With that considered I think the behemoth comment earlier is well earned in this case. The Dark Base Pro 900 tips the scales at 14.39kg or 32lb.
Best Deals: be quiet! Dark Base PRO 900 Black Rev. 2
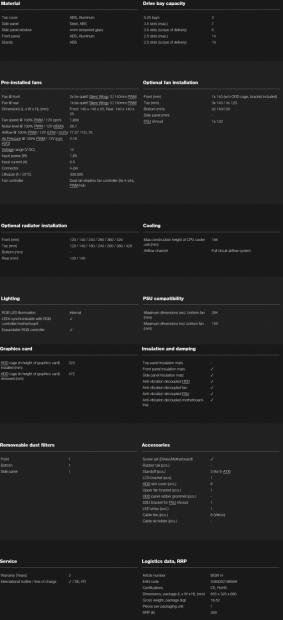
Motherboard fitment is listed for pretty much any forward on the market from Mini-ITX to e-ATX along with even the rare XL-ATX which we don't see much in the consumer market since the prevalence of 4 way SLI configurations have all but died off. But if you happen to have something like the EVGA X58 Classified 4-way, rest assured the Dark Base Pro 900 can fit it.
Drive support in the Dark Base Pro 900 is quite expansive with dual 5.25" slots for card readers, DVD/Blu Ray or even reservoirs depending on your build needs. The 5.25" bays can be removed, and an included fan bracket allows for further fan expansion. 3.5" drives can reach up to five with the included drive trays but can expand to a maximum of seven with purchasing a couple of extra drive trays. 2.5" drive support comes out to 10 with included trays and up to a max of 14 if opting to buy additional trays.
PSU fitment can go to a max length of 285mm while with the installation of bottom fans it would bring that down to a 150mm limit. The PSU now rests under a shroud, which is one of the enhancements that be quiet! added to the Dark Base Pro 900 Rev. 2. The PSU shroud can be broken down with various covers to support even more capabilities which we will dig into later in the review as we tear down the Dark Base Pro 900.
Our Latest Full-Tower Cases Review Coverage
Cooling fitment for the Dark Base Pro 900 Rev 2 is quite expansive similar to the original version. This is because the Rev. 2 version is the same base chassis with upgrades to modernize the case with things used now expect a few years senior of the original chassis. Max CPU cooler height for air cooling will be 185mm so basically look at that as basically any cooler you could fathom should fit here.
The preinstalled fans are numbering three, with dual 140mm Silent Wings 3 model fans and a single of the same fan on the rear for exhaust. The front of the chassis can support up to four 120mm based fans or with the included 5.25" replacement bracket we can add another 140mm. The top of the chassis can support up to four 120mm fans as well and triple 140mm same as the front. The bottom of the case can support dual 120mm or 140mm while the top of the PSU shroud can support a single 120mm as well.
Radiator support is massive with sizes in the front supporting in mm: 120, 140, 240, 280, 360, and 420. Then as we move up top, we see support ranging in mm: 120, 140, 180, 240, 280, 360, and 420. Lastly, the rear supports 120or 140mm radiators. Depending on the thicknesses of radiators and installed fans, adjustment of the motherboard tray may be necessary when installing the radiator in the top. We found this out the hard way and will discuss further in the review as we reach the build.
The Dark Base Pro 900 Rev. 2 come to market at a hefty price of $269.00 so not at all for the faint of heart or those seeking budget options. The competition is stiff in this price range, especially as there are far cheaper cases that do many things very well. Cases that pose potential issues would be Lian Li's PC011, ASUS' new entry the STRIX Helios, and the aging Nanoxia Deep Silence.
Now we must push along in this review and see if enough relevant changes were made to the Dark Base Pro 900 with the Rev. 2 iteration to consider it a modern successor, and has be quiet! done enough to outfit it with the necessary options consumers demand to keep it at one of the top positions in our charts two years later.
Shannon's Chassis Test System Specifications
- Motherboard: MSI MPG Z390 Gaming Edge AC Z390 (buy from Amazon)
- CPU: Intel Core i7 8700K (buy from Amazon)
- Cooler: Corsair H100i Pro RGB (buy from Amazon)
- Memory: GeIL Super Luce RGB GLS416GB3600C16ADC
- Video Card: MSI GeForce RTX 2060 Gaming Z (buy from Amazon)
- Storage: Sandisk M.2 256GB
- Power Supply: Enermax Platimax DF 1050W (buy from Amazon)
- OS: Microsoft Windows 10 Home 64-bit (buy from Amazon)
Packaging

be quiet! is one of the first cases we've seen in a fair bit that employed a color box solution. Usage of a color box adds to the BOM for a product, and I usually frown at this as we all know this passes down to the consumer in many instances. With that point aside the Rev.
2 packaging is simple, showing the case, and having a few bullet points of key features. Silent wings fans, airflow control, noise insulation, and everyone's favorite, RGB! The bottom also gives a short story about the intention of the Dark Base Pro 900 Rev. 2 and its enthusiasts class focus.
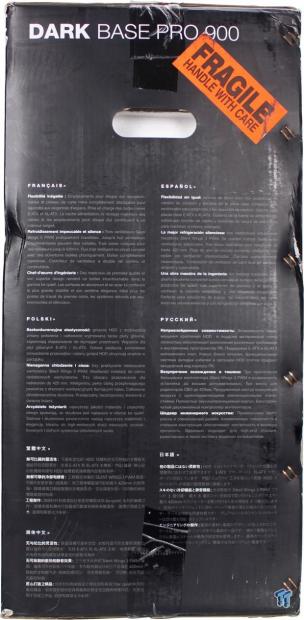
The first skinny side of the box we find multiple language translation of the text we observed on the large side previously. Also, the fragile stickers that seem to be on every side of the box.
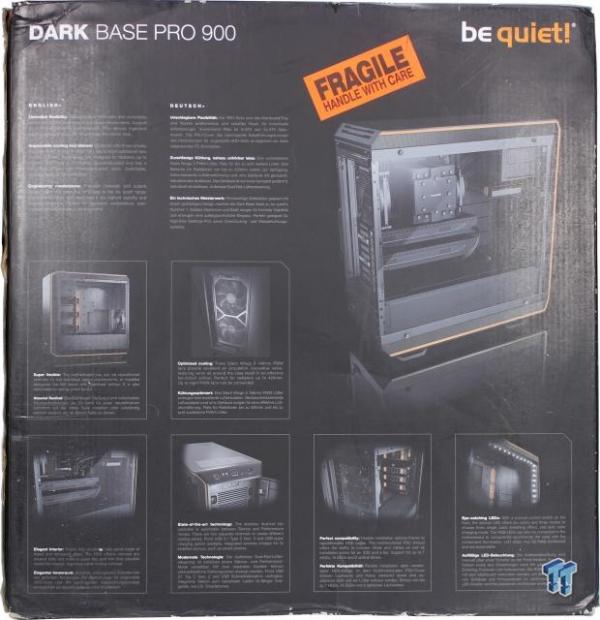
The large opposing side of the box shows a large mockup of an installed dual GPU assumingly enthusiasts rig built in the chassis. There are also smaller images denoting key features that be quiet! wants to showcase to potential customers.
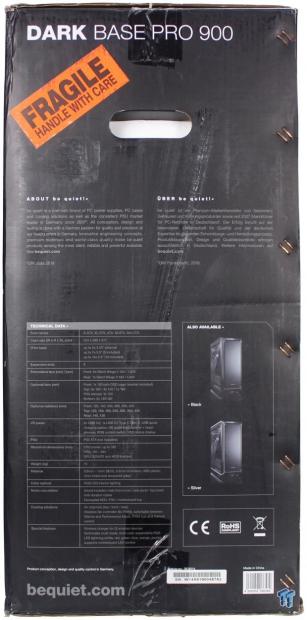
The final skinny side of the packaging starts with a small paragraph explaining who be quiet! is and why they build what they build. Also below this is a spec list albeit much more brief than the one we showed initially. To the right of that, we close out with showcasing the color choices offered. The Dark Base Pro 900 Rev. 2 comes with color options from orange like the one we have today to black or silver to best match the aesthetic you want to accomplish.
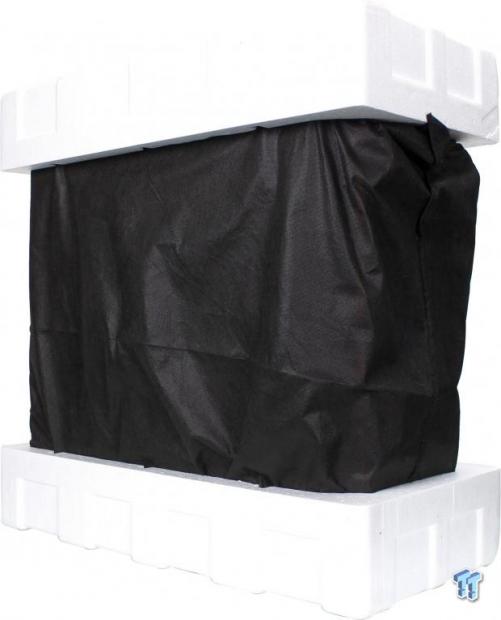
The Dark Base Pro 900 Rev. 2 comes with large polystyrene/Styrofoam end caps enveloping the top and bottom, and the chassis is wrapped in a cloth bag. While many chassis have a film to protect the TG panel, the sample we received did not have any wrapping which I can only assume means that be quiet! did their due diligence to ensure you receive a case that does not have internal bits that may scratch the tempered glass window in transit.
Lastly, when unwrapping the case, we found the manual taped at the bottom of the case, to ensure you see it and have a chance to review it before you start building. Also, the front door of the case has a tape label warning to ensure it is secured if transporting your PC.
be quiet! Dark Base Pro 900 Rev. 2 Full-Tower Chassis

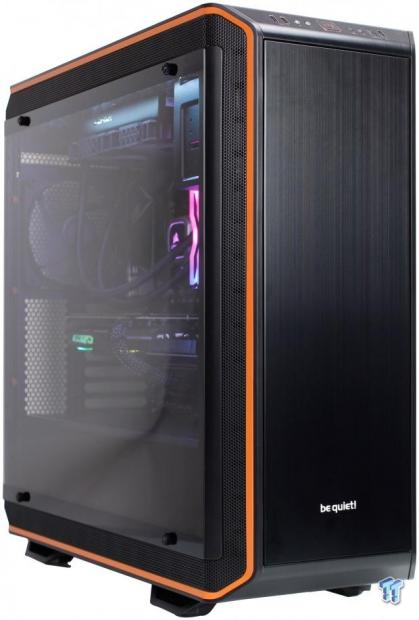
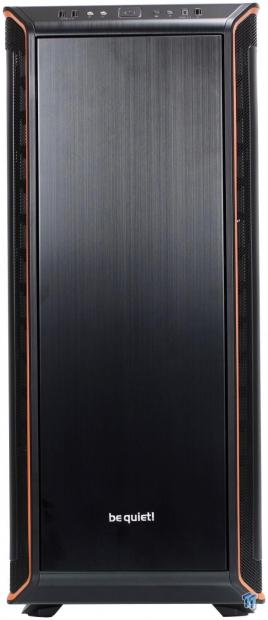
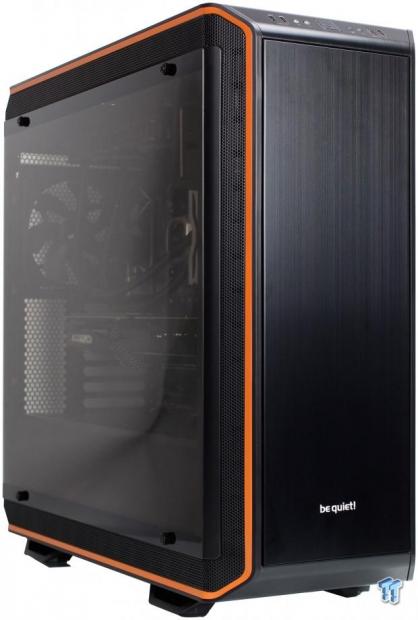
The front of the Dark Base Pro 900 Rev. 2 is a mostly blank slate of a door. Ours arrived with some fingerprints as you can see on the lower door and these wiped away rather easily much to my relief as brushed aluminum surfaces tend to take in fingerprints like a sponge in many instances.
Each side we can see just a bit of the ventilation as the front door being closed would limit airflow if other paths were not available. Above the door, we can make out the front buttons and I/O. Lastly, the door has a small, be quiet! logo affixed and it is a shiny chrome/metal decal. If you look below the front panel you can make out the feet that hold the chassis elevated above the surface it sits upon.
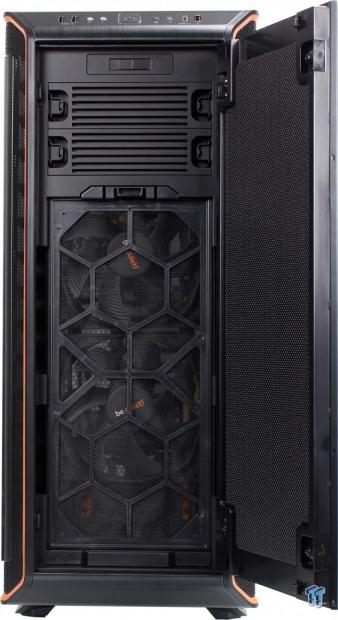
Opening the front door, we now meet the dual 5.25" bay covers which can be removed if 5.25" devices are installed. Below that we see the dual 140mm fans in place and the filter directly in front of them which you press a clip and it pulls off for easy cleaning and maintenance.
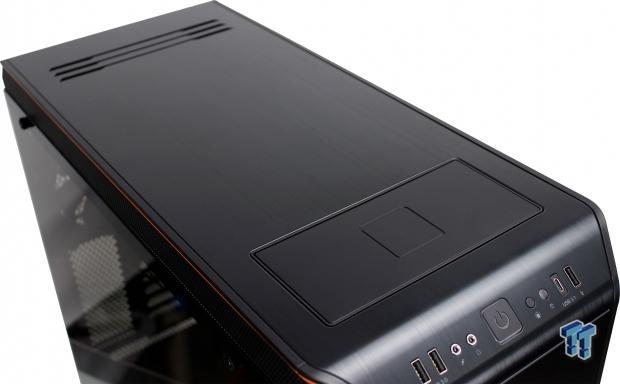
The top of the chassis has a solid brushed panel with the only visible ventilation being the few slits at the rear. However, similar to the front panel the sides are mesh and allow additional airflow should fans or radiators be installed at the top of the chassis. Moving toward the front I/O we find a sizeable matte rectangle which is an embedded qi charger for wirelessly charging qi compliant devices. This means we could not just drop our phone on this pad and charge our device with no need to connect a cable.
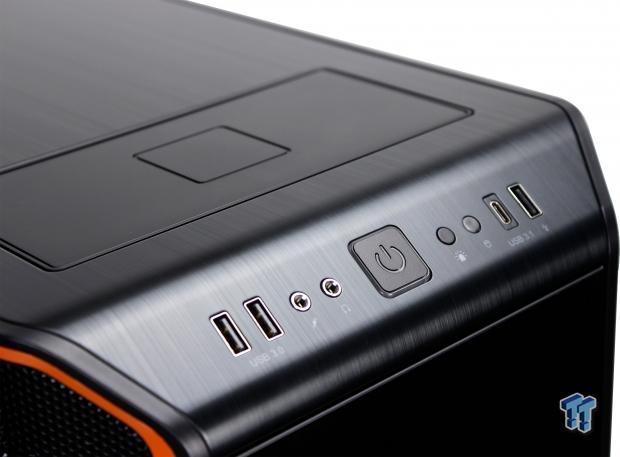
The front I/O is placed at a 45-degree angle between the front panel and the top which I think is a great compromise to allow the I/O to be accessible in both elevated on desk installation along with under desk floor standing installations. From left to right we have dual USB 3.2 Gen 1 Type-C ports. Next, we have dual 3.5mm analog jacks for headphone and microphone. Center of the I/O is the large rectangular power button which has a lit perimeter in orange to signify the system powered on state.
Next, to this, we have a button to control the included RGB LED strips which can also engage motherboard control with a longer 3-second press. The internal controller can also engage with single presses of the button to cycle through various colors and breathing modes for the LEDs. Next up is an HDD LED and then a USB Type-C port which has a full USB 3.2 Gen 2 connector internal to mate to new motherboards.
Do keep in mind that the I/O reads USB 3.1 and this is correct as USB consortium just recently announced the new confusing USB 3.2 naming but I have adopted it for reviews so that as new tech comes with the latest spec, hopefully, our reviews will still make sense.
The last port is another Type-C, but it is not for data as it is only a charge port with a direct SATA internal connection for fast charging support. It is also worth noting that the front I/O is affixed to the chassis itself, so removal of the top panel does not require removal of the I/O or its associated cable array.
Here we now get a view at the main chassis panel which is a solid TG panel held on by four fasteners at the four corners. As we look at the perimeter panels, we can see the aforementioned ventilation mesh, ensuring that even with the clean aesthetic of the brushed panels, the chassis still has ways to breathe.
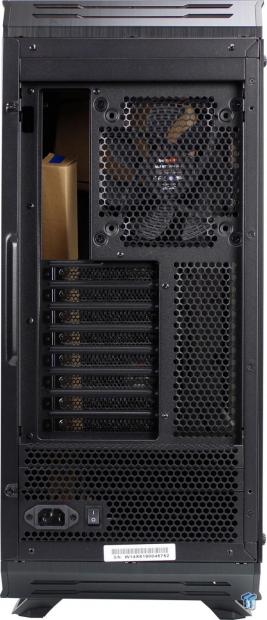
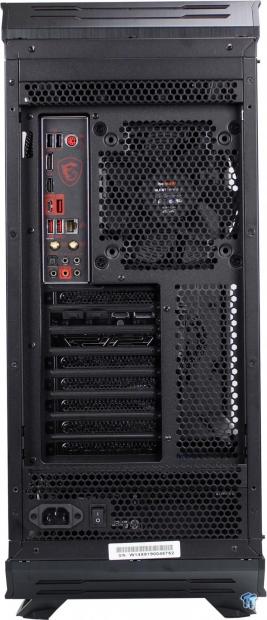
Here is the rear of the Dark Base Pro 900 Rev. 2 and it has some interesting things we must discuss. First up. We can see that the top panel has two more slits for airflow similar to the grouping we mentioned when looking at the top panel below that we have the motherboard I/O cutout and the adjacent 120/140mm fan port. It is already filled with the previously mentioned 140mm silent wings 3 fans. The expansion slots come out to 8 total and adjacent to those is a large hexagonal mesh area to allow air to exit easily and aid the airflow path through.
Below this, there is a single standard 3-pin AC cord port used on most PSU's below 1200W. This omits the standard PSU mounting as the PSU sits inward within the chassis and this is simply a switched pass-through cable connection point. This aids with the cases ability to adjust orientation much easier.
Each of the mesh panels seen in this area is removable and relocatable to key areas to adjust mounting for the motherboard height and location. If you look above the plug location, you can see the hexagonal mesh panels above this are small strips similar to the one you can see above the motherboard I/O and fan port which is a solid plate. These can be moved up or down accordingly to adjust the motherboard position to allow for larger radiators to fit above the motherboard without interfering with RAM or heat sinks.
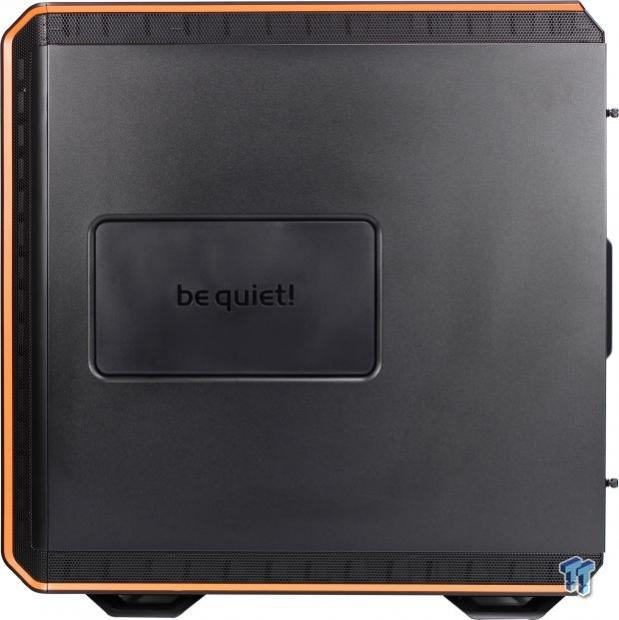
The cable management side panel is solid metal and does not offer a view inside which is ok with us as it allows you to hide cable management here, in case you do not particularly enjoy creating the tidiest cable sets. And it's worth mentioning that once you see the standard wiring soon in the case, the solid panel will likely be a welcome addition to most builders since managing the cables to the LED/fan controller is already capable of being a mess.
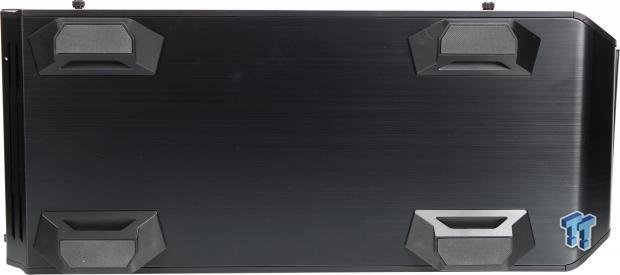
The bottom of the Dark Base Pro 900 Rev. 2 is unbroken brushed aluminum skin over a plastic panel. It gives a sleek aesthetic while also making some question of how your PSU would breathe. Rest assured the same side ventilation is at play here so the PSU can ingest air with no issues while keeping the look going. The feet are large and have large rubber pads as well ensuring a skid-free world for your newly built system.
Inside the Dark Base Pro 900 Rev. 2
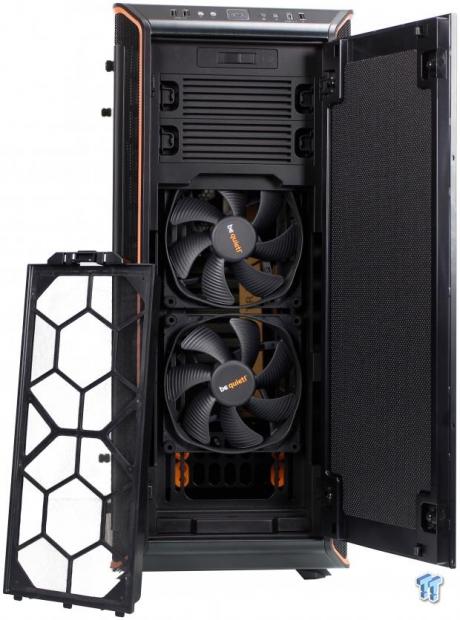
Here we wanted to show you the front panel with the door open and filter removed so you could see how much access you get when cleaning and maintaining your rig from the front. If you wanted to go deeper, you could disengage a long string of clips to remove the entire panel, but it's not necessary as removal of the filter gives you the lion's share of what you would need to clean. Do note that the front panel door has sound deadening to help absorb noise before it can make it out to your serene environment.
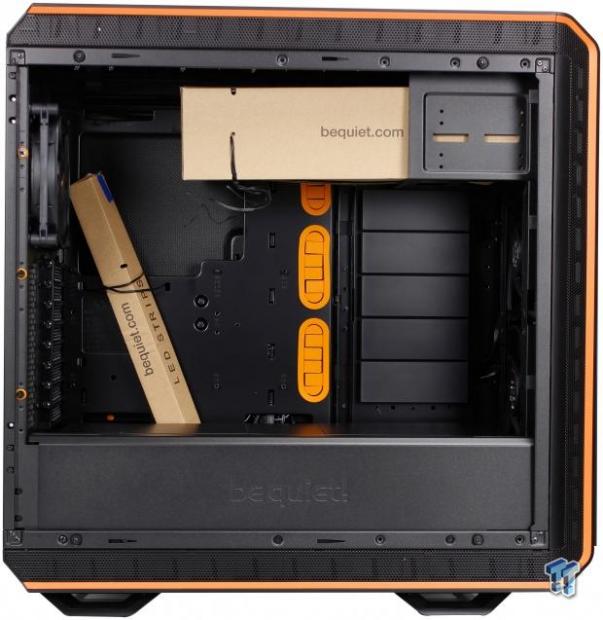
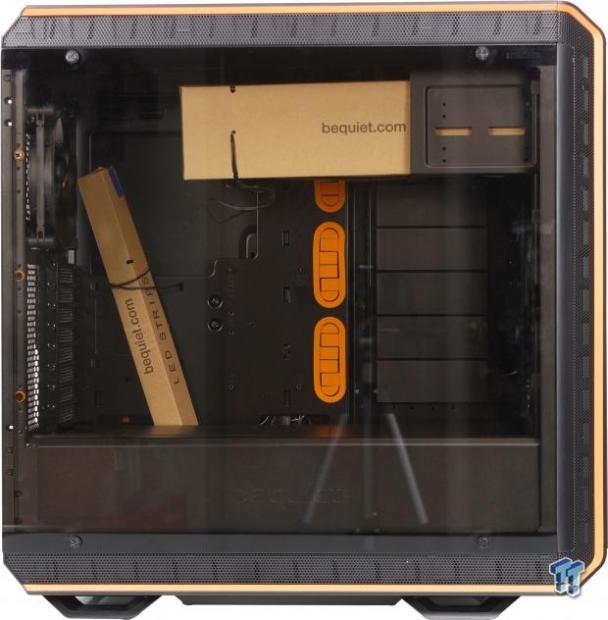
When pulling the glass panel, we can see that be quiet! strapped in the two accessory boxes well with twist ties. The larger box in the 5.25" bay holds a bulk of the accessories while the thinner and longer box hold the hard PCB LED strips. The internal of the chassis has been cleaned up a lot as the original Dark Base Pro 900 had seven drive caddies jutting into the main chassis taking up space that may not have been needed by most builds.
Instead, the Rev. 2 employs covers here, and trays can be added as required. This gives a much cleaner and open feel, and add to this the integrated PSU cover which is removable with four screws. Overall first impressions, the Rev. 2 has done some maturing over the past two years and come back looking like a more modern part while carrying the same popular design.
Up front, we find the two preinstalled 140mm silent wings 3 fans which are improved over the original. The original Dark Base Pro 900 offered silent wings fans which topped out at 1000RPM, while the Rev. 2 model offers up to 1600RPM for more performance when needed.
Up top, we can see the 5.25" bays which can be removed and an included adapter can be installed to install more fans higher up. There is also a mounting plate for reservoir or pumps that can be used in conjunction with an HDD cage to enable custom liquid cooling parts mounting. Up front here we can install a vast array of radiators up to 360 or even 420mm should we opt for 140mm based cooling.
The top comes off rather quickly as soon as we find all of the tabs and press them in succession to release the panel. When removing you will notice the qi charger stays in place and the front panel I/O you can now see in its bare state mounted to the chassis. The top allows for mounting of similar radiators as the front except for the addition of a 180mm based option for a single massive fan, although except for Phobya I have not seen many radiators that size. All fan mounting is slotted to allow more precise component fitment to match your needs.
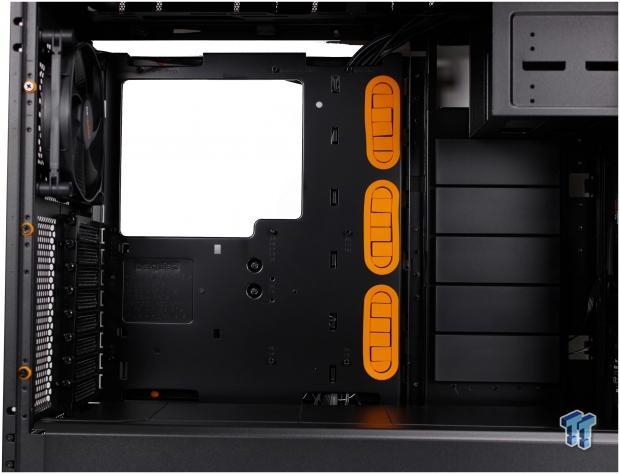
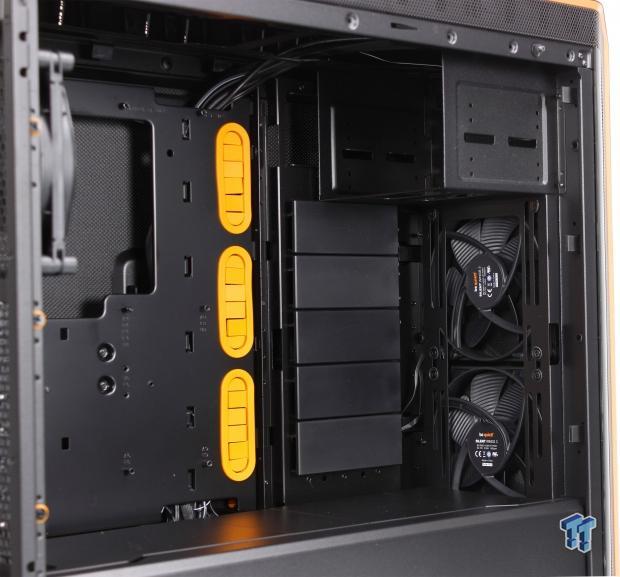
Looking at the motherboard tray area, we can see that with accessory boxes removed, the area is a vast expanse of possibility. To the far right, we see the HDD tray covers that stay in place until needing to be removed so that an HDD tray can be added.
The motherboard support is from ITX as mentioned before up to E-ATX or even XL-ATX, which is why we have eight expansion slot openings. There are three central grommeted cable management holes along with large open areas around the top and bottom to allow easy cable management. The CPU backplate hole is enormous and should allow easy access to any backplate without issues.
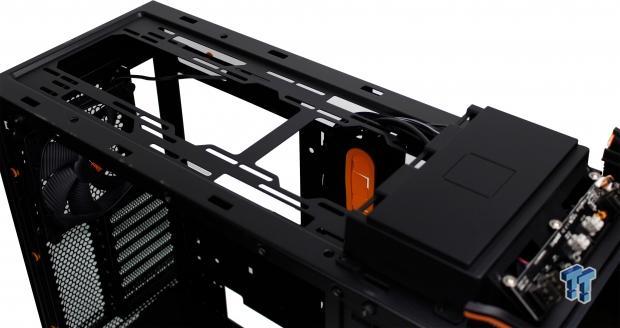
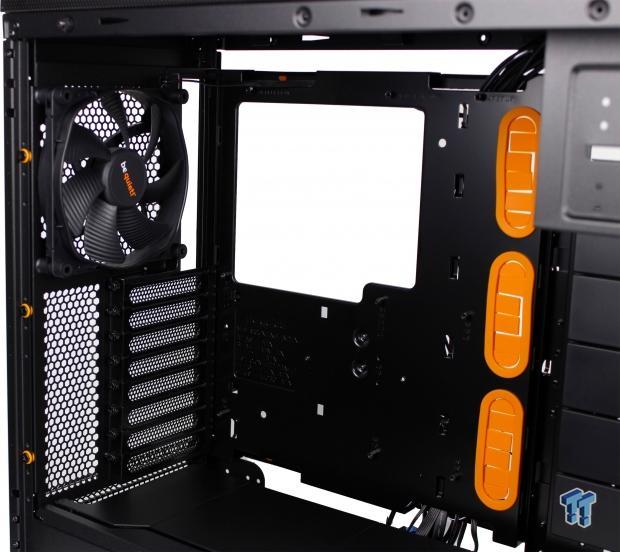
One thing that's of particular note is to the left on the frame we can see three screws with orange rubber washers. These are surrounded by other holes, and while it may be confusing as to their purpose, this is to allow the motherboard tray which is fully removable to be inverted and also height adjusted should you need a large top mount radiator.
This vertical movement allows for fitment of various parts without causing interference with the motherboard or installed components. Default, as you see here, has 40mm of clearance which anyone who knows AIO's knows this will be an issue, something we were not aware of at the time. Moving one of the small panels above the PSU mounting area to the top lowers the motherboard and allows the space to expand to 62mm. Moving both plates to the top can offer up to 84mm of space, which means all but the thickest radiators would fit without issues.
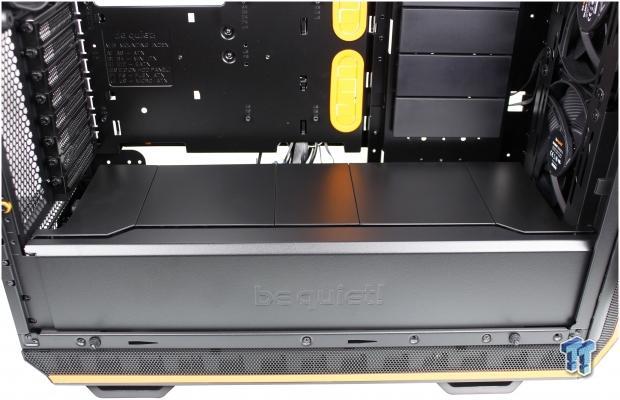
The PSU shroud is a significant aesthetic addition to the Rev. 2 model as the original had the PSU out in the open. The PSU shroud is all metal with removable plastic covers on the top. THE PSU shroud has a stamped be quiet! logo which does not stand out but is visible enough without it being annoying.
As we see here, the PSU shroud does not reach all the way back, instead, offering a decent gap to allow cables to pass through without needing defined holes which may not match precisely with the system configuration. There are multiple separate plates in place which can be removed, and we will look at that next.

Here we removed the PSU shroud and its covers to show what can be done. The large center cutout can use an included bracket to mount an SSD should you want to showcase a particularly good looking or even RGB SSD. Here. There are also fan mounting on the PSU shroud, and as you can see, each panel can be removed independently based on the build needs. For example, the front hook-shaped piece can be removed to fit a thicker radiator in the front of the chassis while retaining the PSU shroud.
Inside the Dark Base Pro 900 Rev. 2 Continued
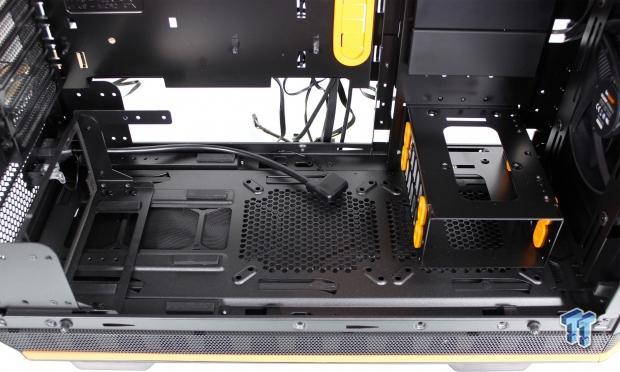
Here we see the lower section which is typically covered with the PSU shroud. Here we can see the modular nature of all of the components, even the PSU mounting which can move to many locations to match the needs of the build. The large two drive tray is also seen here which comes preinstalled while the other trays that can be installed above the PSU shroud come in an accessory box so that if not being used they can be left out for a cleaner finished appearance.
Looking at the rear expansion area, we see the preinstalled 140mm silent wings 3 fan. If replacing the fans are on the bill, the rear can fit either 140mm or 120mm depending on preference. We can also see the eight expansion slots which each have their own cover and mounting screw, so no strange flip mechanisms to hold the installed expansion boards such as GPUs in place. Being that this area is removable as part of the motherboard tray, there is nice gaps top and bottom for routing cables vs. dedicated holes for a fixed tray design. This will allow almost infinite creativity to your cable management adventures or misadventures on my part.

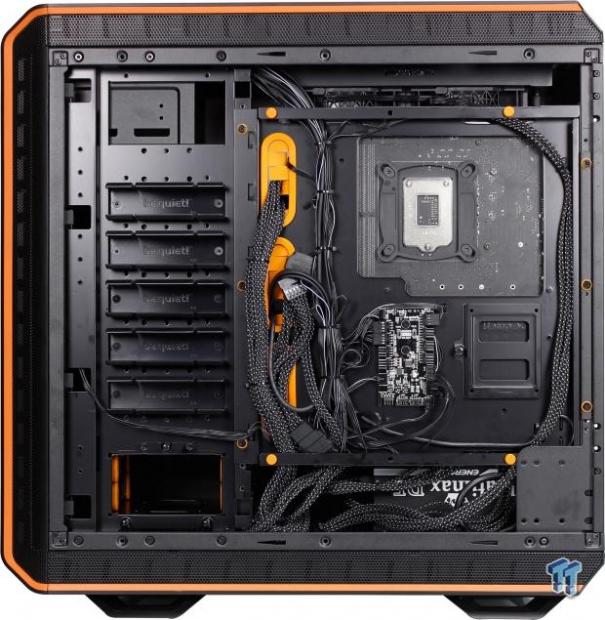
The cable management area is already quite busy, and we have not installed anything yet. Thanks to the included fans, fan controller and RGB controller we have a broad array of cabling already back here which will need to be managed along with the wiring which will be necessary for our built test system. There is a solitary SSD mounting bracket directly adjacent to the fan/LED controller board. Cable management tie downs are plentiful with solutions all around the perimeter of the motherboard tray.
In case it is needed tabs from the HDD bay covers can be snapped off as an alternate method for routing cables so that should a device such as a pump be placed in this area cables can still be hidden which is an excellent option. The 3.5" dual HDD mounting tray below the PSU shroud can be seen here as well on the far left bottom. This can be removed and replaced with a cover like the others should none of them be needed. The other six of the nine total screws required to move or remove the motherboard tray can be seen here each with an orange rubber washer.
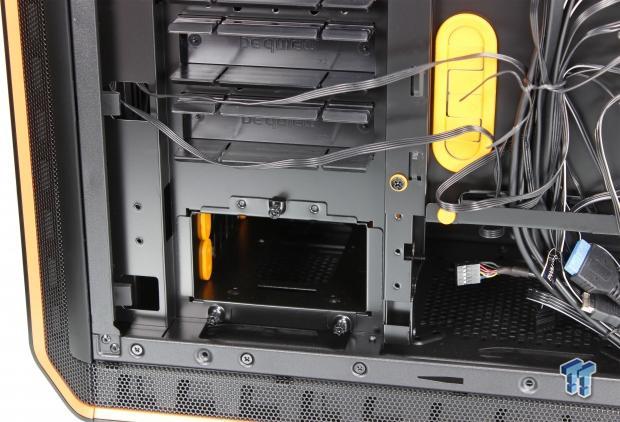
Here is the only preinstalled HDD cage which happens to be dual. This is hidden from view by the PSU cover, and I would only see it is necessary to remove if the build opted for bottom mount fans. The tray is solid steel and affixed with three thumb screws, and with those loosened, the tray can be pulled out of the build entirely.
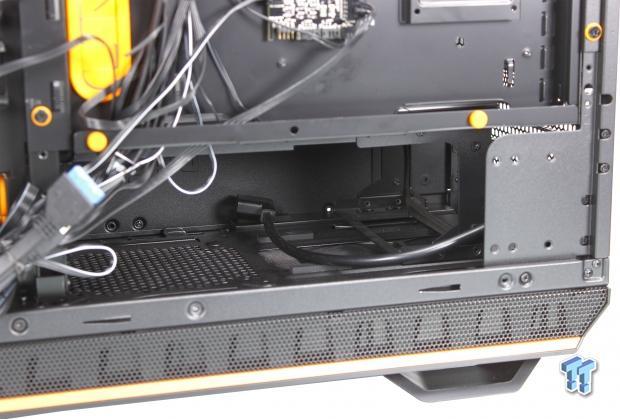
The lower section where the PSU resides below the PSU shroud is the same movable bracket we showed before. The limit if using bottom mount fans is 150mm for the PSU length but when not using lower mount fans that stretches to a massive 284mm which honestly is just obscene. Suffice it to say; your PSU will fit unless it's some strange model I have yet to lay eyes on.
The PSU has a few spongy foam rubber pads it will rest on once fitted into the case. I guess it's worth noting that the PSU shroud MUST be removed to install your PSU as it cannot fit through the cable management side. The only struggle removing the shroud was the sideways facing screw bracket which you access by using a screwdriver in this very area as it is a screw pointing toward the front panel. Yes, I missed it, and you probably would too had you not read this.
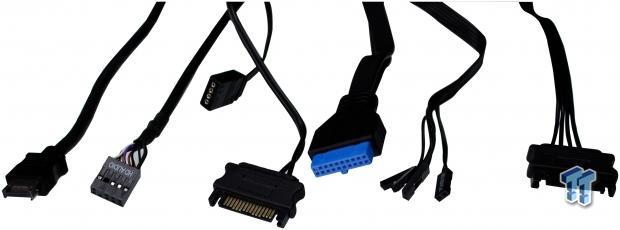
The connectors for the front I/O are plentiful. From left to right: USB 3.2 Gen 2 cable, feeds the front panel USB Type-C connection. The HD audio connector feeds the front audio jacks. The 4-pin LED header can connect to your motherboard or another 4-pin RGB controller, which can then control the included RGB strips. The first SATA connector only has two leads coming from it and is for the front panel Type-C port dubbed 'fast charge' and I believe the top mounted qi charger as well.
The 19-pin USB 3.1 Gen 1 cable feeds the dual Type-C USB 3.1 Gen 1 (USB 3.0) ports on the I/O. The front panel power switch, HDD LED, and power LED cables. Lastly, another SATA power connector, this time with 4-pin connector is used to power the fan hub/RGB controller board. There is one not pictured due to inadequate length to get a good shot; it is the 4-pin PWM header which connects to the motherboard and allows for the motherboard PWM ramping to control the fans connected to the bug, by just sliding the front adjustment slider to the far left.
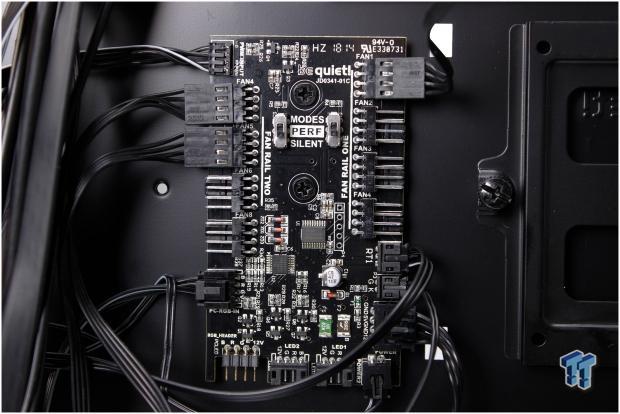
Here we have the RGB and fan controller board. As you can see the controller is split into two zones, and each can be switched via the centrally mounted toggles to enable silent or performance modes. I do not have any spec data for this so I can only assume the silent mode has a ceiling on the RPM levels available whereas the performance mode allows for higher RPM capabilities.
Three of the eight PWM ports are already occupied, but five more fans can be installed to max the controller out. This is also where the LEDs connect as I'm sure you can see from the silk screening on the lower portion of the PCB. To the left of the proprietary connections, there is a standard 5050 style 12V connection for LED strips which means we can add extra 4-pin non-addressable LED strips to the mix.
On that note, before we close this section, I think it is important to note that the LED's in the case are NOT addressable, and this is one area that I think could have been better. We are in an age where a lot of cases and peripherals are embracing ARGB, and the Dark Base Pro 900 Rev. 2 is an only single color which means even if hooking to a motherboard with the rainbow effect it will only show a single color at any moment.
I know ARGB would be a small uptick in the BOM, but I think that is something that could be absorbed into the MSRP without much issue, the major part would be the R&D cost as the PCB for the controller would need to be changed.
Hardware & Documentation
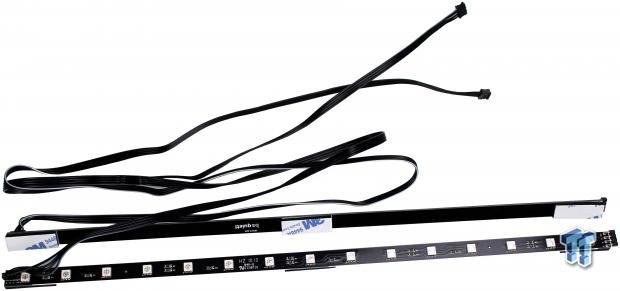
The Included LED strips are semi-solid PCB design. They are thin enough PCB they flex a little but overall they should be affixed to a flat surface as flexing too far can cause the traces to fail and the PCB to break. Each Strip has fifteen LEDs and is backed by three adhesive foam mounting pads which are 3M brand. The leads are plenty long enough to reach even from the far top corner, which is how we installed ours to test this.

The fastener lot is quite extensive. It includes twenty HDD screws fro fixing HDDs to the included trays. Eight SSD screws are included for mounting 2.5" drives. Fourteen 6#32 screws are included for motherboard and SSD tray mounting. Three extended standoffs are included in case they are needed for E-ATX mounting to the far right. Eight thumb screws are included and their defined purpose if to mount an ODD.
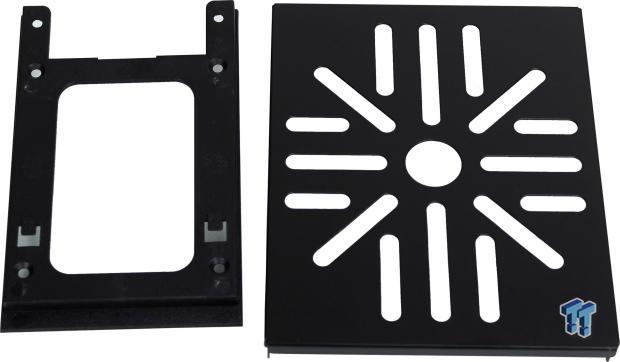
Here we have the SSD bracket which is used on the PSU shroud as mentioned earlier should internal viewable mounting be preferred. The other bracket is for pump/reservoir mounting which has varied slotted holes to ensure the best chance it will line up with your bracket mounting holes. This is used in conjunction with one of the included HDD trays, and it mounts to the top of the tray itself.
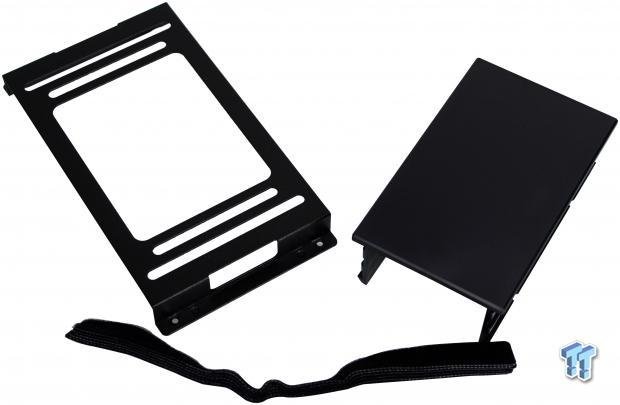
Here we have the front fan bracket which I mentioned before. This is the bracket we would use should we opt out of a 5.25" mount and decide to run full fans up the front. Next, to this we see the block off plate for the lower dual HDD tray should you opt to remove it. Lastly for this one is the included Velcro straps. There are six in total and can be used for cable management if you decide not to go with zip ties.
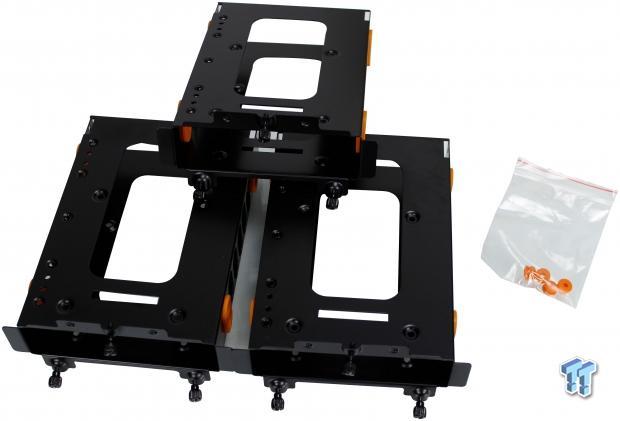
Here we have the three additional HDD trays or cages. These allow for a since HDD to be installed into them or dual SSD as each large opposing side has a 4 point mount for SSDs. The mounting for the 3.5" HDD on these trays is rubber mounting to reduce vibration resonance from the spinning mechanical drives into the rest of the system.
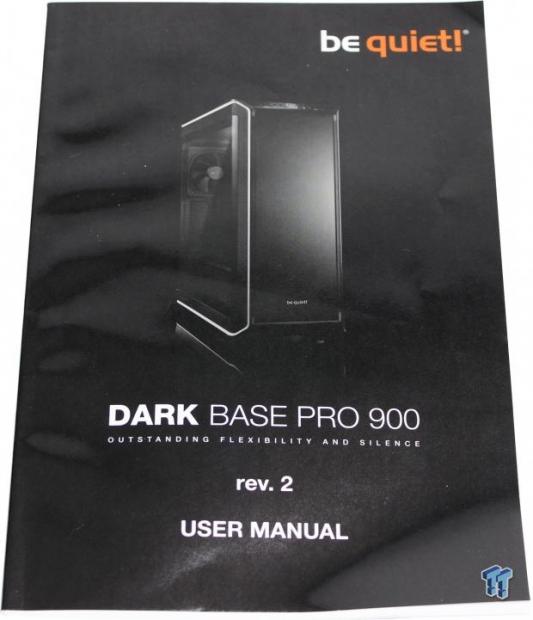
The manual is the final thing we will cover in our accessory package. I will say that the manual is quite thorough as long as you do not mind digging through the initial basic instructions then finding the end of Japanese around page 67 which then you can find the other configuration information about moving the motherboard tray along with many other pages of helpful configuration information.
There are a few things I would like to see better covered here. One being the LED limit for adding additional LEDs to the internal controller. Also, the performance/silent switch on the fan controller, I would like to know what this does. Does it intelligently control the actual PWM signal to limit the fan speed or is it merely a hard voltage limit to keep the fans from going too high of a speed.
Lastly, I would like to see a representation of mounting a fan to the PSU shroud as from what I can tell there are two mounts for fans on the shroud yet, the spec lists as only 1x 120mm can mount to it.
Case Build & Finished Product
The front of the Dark Base Pro 900 Rev. 2 is indistinguishable from the first time we showed it as a built rig looks the same when you have a solid panel out front. Dare I say; the Dark Base Pro is the mullet of cases; it's business up front and a party out back?
Ok, maybe that was funnier in my head, and well mullets are not really cool in today's age, and this chassis is definitely sleek. Hell with it, I'm leaving that one in as it made me smile to find a case I can make this joke about finally. That is of course pending the Editor doesn't chop it out.
Either way, the styling of the Dark Base Pro 900 is undoubtedly docile enough it could fit well in any environment from an office to HTPC or a gaming rig. However, with the inclusions of LEDs and things of the sort, those would likely be disabled in an office environment. Also, to be used in a home theatre environment would be tantamount to picking up the groceries in a Bugatti Chiron. It can do the job, but it's going to be massively out of place.

Now we get to some explaining and the absolute hell that my lack of realization caused. The motherboard, GPU and everything went in without an issue, pulled the shroud and installed PSU. Started routing all cables and got most of the system all wired up. I know from years of experience that many times a top mounted AIO will cover the EPS 8-pin, so I ran all of this and had everything mounted up.
Next comes the AIO a Corsair H100i which subsequently failed even to come close to fitting. This lead to an exhaustive search, discussion with a good friend chad who previously was writing these reviews. Needless and embarrassingly to admit, there was a 2-hour journey of mental anguish as I cursed everything about the build until I realized I should be cursing myself. I'm the type of dude who builds first in most cases and reads the manual after I break something (Joking, kind of).
I finally found the second part of the manual showing that the motherboard can adjust upwards and downwards, not just inversion. So once I made the magical movement of one separator plate downward, as you can see above the AIO went in without issues. Well, almost without problems as the ole ego was bruised a bit. With the personal mea culpa out of the way, let's move forward.
Here we see the rear section post-build. If you look closely, you can see what I was discussing previously with the hexagonal mesh single piece now above the motherboard area whereas two of them were at the lower previously. Everything else looks relatively standard with the exception that the PSU is hidden behind the pass-through section.
Here we see the cable management. Cable management is a massive pain to me, but also a point of pride when you can do it well. Here I would have liked to do better, but the RGB/fan control PCB had so many wires I opted to split groups to ensure everything looked ok once complete.
I did go through about eight cable ties before I was happy swapping cables back and forth. I think overall for a reasonably mainstream rig this went together quite well, now imagine with multi GPU cabling and other internal devices this could require some creative wiring to be effective. The cable tie points, as I mentioned before, were more than enough to satisfy the needs of our build, and some were even left unused.
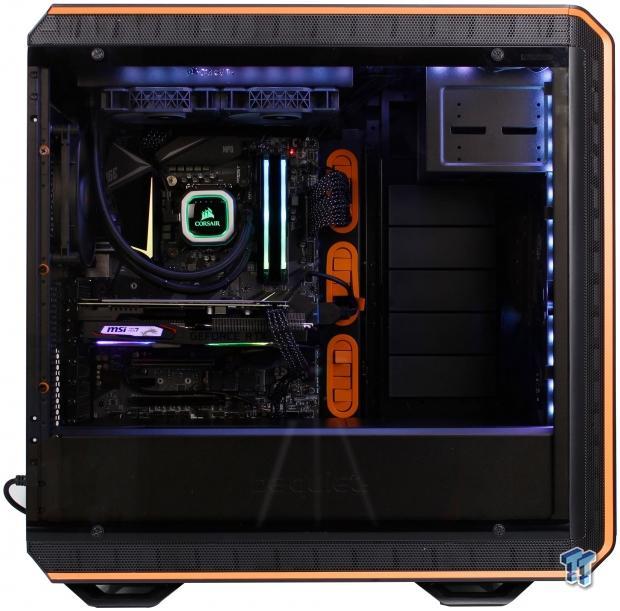
Here we get our first shot of the fully built system with the glass panel installed. The light tint on the panel allows for us to see the hardware but still shrouds it a bit due to lack of internal illumination.
Here we see the full system but now powered on. As you can see the included LED strips really liven up the interior and allows a much more vivid view of the internals. With a press of the front button, you can swap between white, red, green, blue, orange, purple, and color cycle all with breathing modes for each color option.
Pressing the front I/O LED button for 3 seconds switches into sync mode which allows the internal 4-pin cable connected to the motherboard or other LED controller to take charge. This will enable the RGB LEDs to sync with your motherboard color or at least somewhat as the LEDs are not ARGB so they can only display a single color across all connected strips at a single time.
Final Thoughts
When I came into this review, I knew the original Dark Base Pro 900, which this case is the same as at least for the most part. This design is several years old at this point needed some modern features to keep it with the front of the pack as it was at its inception. I feel like after spending time with it, even with the build gripes I had, they were all relatively minor in the grand scheme of things.
As expected, the performance with our test system was excellent with the Dark Base Pro 900 Rev. 2 almost matching my open air thermals for this same test bench. What amazed me was the ability for the chassis to absorb sound from the AIO as I know about what noise to expect from the H100i on this setup and it was relatively inaudible and required to be right on the surface of the case to hear it doing its thing.
The Rev. 2 of this case has brought with it many significant changes such as the PSU shroud. The original had no shroud and scored amazingly and now adding a shroud and some better fan, and RGB controls mean overall across the board it's a better experience. I think one of the things that surprised me the most is the fact that be quiet! equipped much higher speed fans and still managed a full system running that is practically inaudible.
Add to this the insane possible arrangements of motherboard heights and even inverted mounting. The inclusion of a qi charger with many devices now supporting wireless charging is a great inclusion even if it is a holdover from the previous model.
The gripes or complaints I have about the Dark Base Pro 900 Rev. 2 are not substantial and very minor, which is a great thing. As I mentioned previously, I would like to see better instruction or more prominent instruction about AIO fitment. Also notations of how the fan controller manages signaling to the fans in silent vs. performance mode.
I would maybe even suggest be quiet! the default configuration of the case with one of the vented pieces at the top to give room out of the box for an AIO as I did not really see any adverse effects in this position and then there would be no adjustment necessary for most builds. Lastly would be the ARGB aspect where I would like to see addressable strips and controller integrated to better match what is the current trend.
Coming in at $269.00 at the time of this review, I feel like the Dark Base Pro 900 Rev. 2 is definitely still a contender for a top spot. It will suffer a slight amount for the features category for being non-ARGB, but I cannot imagine pulling more than a few points here as the case is simply outstanding.
be quiet! took the existing case and improved on things to make it better, not just reinvent the wheel. I do think there are some well-featured cases that can now come close to or even match the Dark Base Pro 900 Rev. 2 but considering it's based on a few years old design and still is in the upper echelon of our recommendations; you can bet it deserves and Editors Choice!
Shannon's Chassis Test System Specifications
- Motherboard: MSI MPG Z390 Gaming Edge AC Z390 (buy from Amazon)
- CPU: Intel Core i7 8700K (buy from Amazon)
- Cooler: Corsair H100i Pro RGB (buy from Amazon)
- Memory: GeIL Super Luce RGB GLS416GB3600C16ADC
- Video Card: MSI GeForce RTX 2060 Gaming Z (buy from Amazon)
- Storage: Sandisk M.2 256GB
- Power Supply: Enermax Platimax DF 1050W (buy from Amazon)
- OS: Microsoft Windows 10 Home 64-bit (buy from Amazon)
 Lian Li B4-mATX Review: a compact mATX SFF case with excellent airflow and premium features
 Ocypus Sigma F36 BK ARGB Cooling Fan Review: high airflow and unified design in one frame
 PCCooler CPS RZ820 Display Review: a flagship-level CPU air cooler with an LCD screen
 MOAIPLAY ORA PRO G1 850W ATX 3.1 PSU Review: high efficiency and 10-year warranty for $119.99
 NZXT H6 RGB+ Compact Dual-Chamber Chassis Review
 Steve Buscemi to star in new Far Cry anthology TV show
 Assassin's Creed Hexe DLC leaked before the game is even revealed
 100% of Japanese online game developers are using generative AI, reveals new poll
 Windows 11 tested on Steam Machine, provides nearly identical gaming performance to SteamOS
 Starlink V5 is smaller, lighter and uses half the power - but it's also slower
 Rumors claim Logitech already working on G Pro X2 Superstrike 2 with improved magnetic switches
 PS5 emulator boots GTA V on PC as first 3D games begin running
 NVIDIA cuts over half of Asian buyers from AI chip whitelist in China crackdown
 This new smartphone lets you snap on a second display when you actually need it
 Your Wi-Fi router could be helping Russian hackers, confirms US government in new warning
 Samsung 990 2TB SSD Review - Ninth Gen QLC at PCIe Gen4 Speeds
 ASUS ExpertBook Ultra (Panther Lake) 14" Business Laptop Review
 ASUS ROG Raikiri II Xbox Wireless Controller Review - Ready to Take Control
 MOZA FMP18 Panel Bundle Review: authentic F/A-18 Hornet cockpit controls for flight sims
 Micron 6600 ION 245.76TB Enterprise SSD Review - Best in Class Programming Speeds
 MOZA MA3F EFCM Flight Control Module Review: authentic Airbus A320 autopilot panel for simulators
 Turtle Beach Stealth Pro II Wireless Gaming Headset Review - Premium Sound, Fantastic Features
 MOZA MGX1000 Instrument Panel Review: a realistic Garmin G1000 replica for immersive flight sims
 Simagic Zeus Formula Steering Wheel Review: premium build and advanced inputs for F1 racing
 GIGABYTE X870E Aero X3D Dark Wood Review - A woody goody
 I stopped digging through Windows menus after I set up this one folder
 Don't sell your Windows laptop until you do these things
 6 PC cleaning mistakes to avoid for safer hardware maintenance
 Phison and Intel Take Aim at Local AI's Memory Wall with aiDAPTIV
 How to Remap Keyboard Keys in Windows using Microsoft PowerToys
 7 tips to organize your Windows files for faster, easier access
 Intel Arc G3 Extreme first impressions with MSI's Claw 8 EX AI+ - Incredible power for an extreme price
 How to fix Wi-Fi Adapter Not Working on Windows laptops: troubleshooting tips
 Hisense U7SG 4K TV: Modern Entertainment for the New Age
 6 underrated Microsoft Word features worth using to boost your productivity