The Bottom Line
Introduction, Specifications, and Pricing
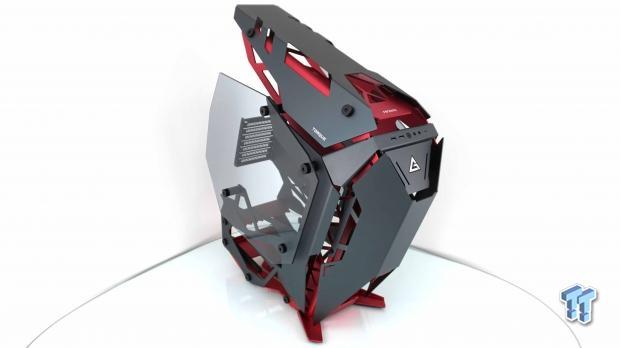
Out of nowhere, we were sent a nondescript package from California, with no company name to be found on the tiny box anywhere to be seen. With a bit of excitement, since we had no idea what was in the box, we tore it open to find a metal tin inside. It was then we knew it was from Antec, as the Antec name and gamer logo along with the name Torque "Be Explosive" were4 all painted on the top. Opening the tin exposed a thumb drive inside, and without any previous knowledge of the Torque name, we thought this was supposed to go to a storage editor. I was not until we connected the drive and looked inside at the video, literature, and images, that we even had the slightest clue about what was going on.
Roughly a week later, a huge red box shows up at the door, and we dragged it indoors. At first glance, our minds did wander to the Cougar chassis we saw in news blasts and from reviews on other sites, upon closer inspection, the Conquer is a vastly different idea. The Conquer is more of a motherboard tray with large feet, where everything is bolted to it, more like a fancy version of a Thermaltake P3 and P5 open frame designs.
However, what is delivered by Antec is more of a chassis than any of the previously mentioned designs. The design is minimalist, where materials are used with functionality in mind, but there is also a keen eye for the artsy side of design as well. We have had many open-air chassis designs to cross our path in the past, and out of all of them, we cannot think of a single option, we have personally reviewed, that blends the feel of a chassis with some of the benefits of a fully open-air chassis.
The Antec Torque mid-tower chassis we are showing off today breaks just about every rule in case designs, some for good, and some that don't pan out so well, but all the same, we deliver it to you in all of its glory. What you are about to venture into is an aluminum chassis with layer upon layer to build out the sides and adding a ton of style. If like us, the black box cases out there do nothing for you when it comes to building a PC that deserves to be shown off, Antec may have the perfect solution. Stick with us as we cover the in's and the out's as well as the good and any issues we ran across along the way, as the Antec Torque is well worth your attention. Even if you may not want it, it shows where the market could go, moving away from the same old boring boxes we see from so many manufacturers.

Following the chart we snipped from the Antec product page, we find all we need to know about the Torque mid-tower. From front to back, the chassis is 621mm, while side to side measures 285mm, and all told, the height is 644mm. These measurements are enormous for a mid-tower chassis, but once you see it, it all becomes clear. All of the bits making up the torque frame are made of aluminum, with steel used in the hardware and the expansion slot covers, while 4mm thick tempered glass flanks both sides. Motherboard compatibility is shown to be for (Mini) ITX, Micro-ATX, ATX, and even some E-ATRX options. Connectivity to the chassis at the front is comprised of a pair of USB 3.0 ports, HD Audio 3.5mm jacks, and this is the second, maybe the third chassis, to ship with native Type-C USB 3.1 connectivity.
At the back of the torque, there are seven expansion slots to fill, but storage options are severely limited. The Torque provides a single 3.5" drive location near a second location specific to 2.5" drives, and both are located on the motherboard tray. Cooling support allows for a trio of fans to be placed in the front of the Torque, as well as the same at the top. As for the radiator support, it follows the fan options, topping out with room for a 360mm radiator in both the front of the chassis as well as the top.
Between the back of the motherboard tray and the glass panel, there is 37mm of room, but not across its entirety. GPUs can be 450mm long, CPU coolers can be an astounding 215mm tall, and when fitting a PSU in the bottom, there is no length restriction given for ATX PSUs. The last things you will need to know is that the Torque comes with a one-year warranty, and fresh out of the box, it weighs in at just under twenty-one pounds.
Being that the Torque is new, the uniqueness of the design, and what it takes to produce said things, we expected this to be on the expensive side out of the gate. Looking around for locations to acquire it, we were left with one place on this side of the pond to get it, and that is at Newegg. However, currently it shows as out of stock, but it does say that more will be in stock and shippable, between two and three weeks of writing this.
What we did not expect was that the price shown for the Torque is $349.99. While we typically hold our tongue on pricing until the end, but we are experiencing a bit of sticker shock with it at the moment. However, we do need to get a much better look at what is going on before we deliver our final verdict on the Antec Torque, so strap in for a look at a chassis like no other has been provided to us before.
Chad's Chassis Test System Specifications
- Motherboard: ASUS Maximus IX Code Z270 (buy from Amazon)
- CPU: Intel Core i7 7700K (buy from Amazon)
- Cooler: NZXT Kraken X62 (buy from Amazon)
- Memory: Team T-Force Night Hawk RGB TF1D48G3000HC16CBK
- Video Card: NVIDIA GeForce GTX 980 (buy from Amazon)
- Storage: Samsung XP941 256GB (buy from Amazon)
- Power Supply: SilverStone SST-ST85F-G (buy from Amazon)
- OS: Microsoft Windows 10 Home 64-bit (buy from Amazon)
Packaging

The top of the box, and where you cut the tape to access the chassis, has quite a bit of information. On the red side, we see the Antec name and the newer logo at the top, and near the bottom are mentions of the tempered glass, the aluminum, open airflow design, that parts are CNC cut, and that it includes not just USB 3.0, but also native Type-C USB 3.1. On the gray panel, there is a caution sticker above the chassis image, where the Torque name gets placed.
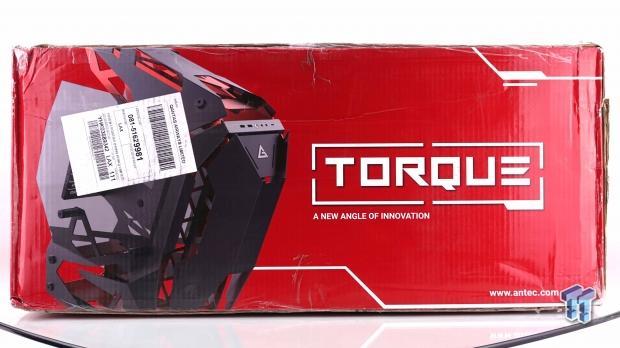
The shorter side panels also offer up things worth looking over. For instance, here we have an image of the majority of the chassis on the left. To the right is the name of the chassis and the tagline, "A New Angle of Innovation." It is also where the site address is presented.

The next panel to the right of the last one delivers eight versions of the specifications. What you find here is identical to the specifications on site, sans the weight and warranty information.
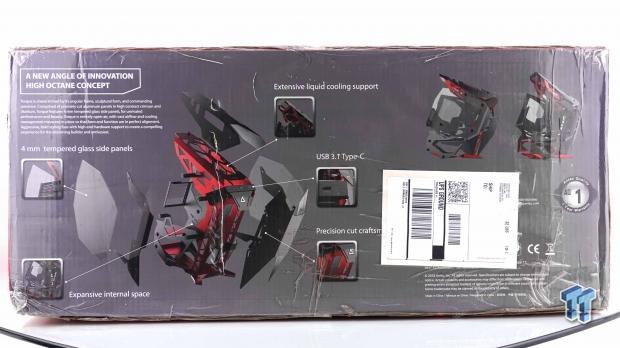
The next panel to follow delivers an explanation of the innovative design concept, while an exploded image of the chassis allowed Antec to point out the five most important features. While the shipping label blocks most of the company information, we not only can see the pair of smaller chassis shots, we can see the icon for the AQ1 one-year warranty.

The last panel with anything to be seen is what we have here. Antec chose to use a red backdrop with white text and design elements to display the name of the chassis, Torque.

Once the top of the box is open, the first thing seen is this dense foam cover. In it, there is a large cut-out where the glass panels reside while in transit. Below that, we see not only the box of hardware, but there are also eight standoffs that get put on the sides of the chassis to support the tempered glass.
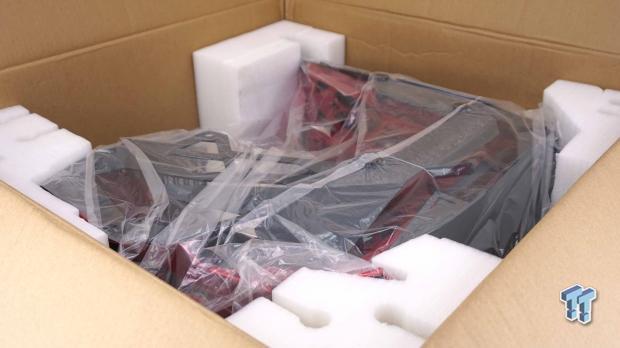
The chassis is resting in dense foam corners, which are attached to a thick cardboard panel covering the right side of the chassis. All told, even though the box looks like it was rolled to my house from California, the chassis inside, as well as all of its components are in perfect condition, although we did find a countersunk screw floating around inside of the box.
Antec Torque Mid-Tower Chassis

The front of the Torque is octagonal, and with the angle of tilt used, you also get a good view of the top of the chassis at the same time. Being open-air in design, there are significant gaps between the panels where air can flow freely. Near the top are the front I/O port and the backlit logo. We can also see that one of the top panel screws has not been screwed in all the way.
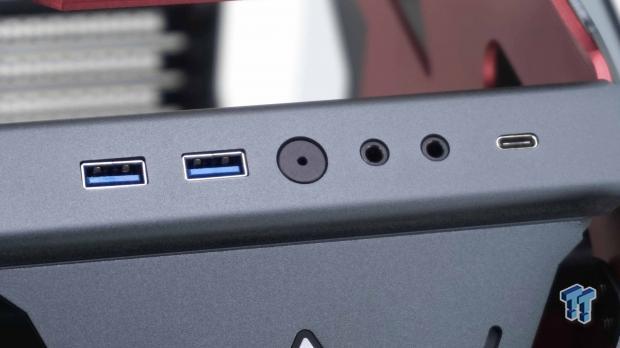
The front I/O panel offers up a pair of USB 3.0 ports on the left, followed up by the backlit power button. To the right are a pair of HD Audio jacks with no designations, and the Type-C USB 3.1 port concludes things.

We did have to install standoffs and grommets to get the chassis to look like this for the image, but we can see it as it is intended to be viewed. All of the angular shapes, the blending of bright red and gunmetal gray, the slight tint of the glass panel, even the large chunky screws, all come together to make something attractive as well as unique.

At the back of the Torque, there are only two points to address. First, we have the set of seven expansion slots, with covers, and the screws are all exposed on the right side of the bracket. The second thing is the red bracket at the bottom which holds the PSU in place. Note it only orients PSUs fan down, but we are more than okay with that call.
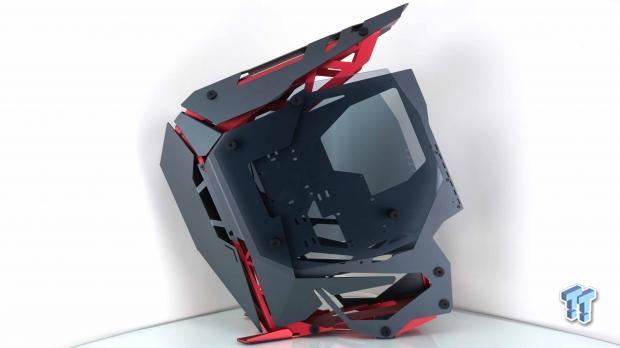
The right side of the Torque looks very much like the left side does, although the motherboard tray is much closer this time, and there is a large section of aluminum not present near the bottom on this side.

Under the chassis, we look at the bottom of the PSU bracket, which has been cut and also folded to form the feet and supporting component for the front and side panels too. Two large openings allow the PSU to obtain air into the fan, and thin rubber pads are used to keep the chassis from moving around. We also noticed this is where the extra screw came from, and while putting it back, we found all three remaining screws to be loose as well.
Inside the Torque
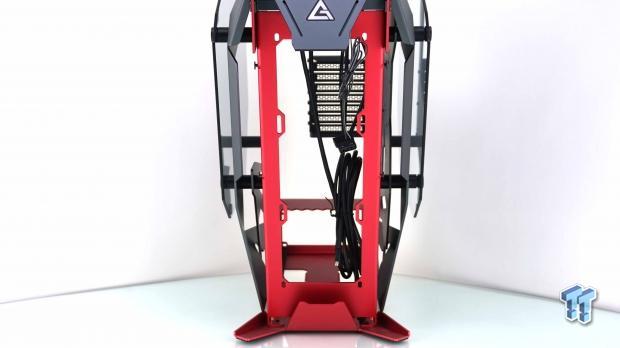
On the right side of the front, gray panel, the bottom screw needs to be removed for it to come off, by sliding off of the remaining three screws. With the cover out of the way, we find three fan locations, which can also hold a 120mm, 240mm or 360mm radiator.

The top of the chassis, under the cover removed by removing the four screws holding it in place, looks much different than the front and has more structure to the panel. We can again use up to three 120mm fan or radiators, but we do wish some 140mm fan/radiator mounting options were found.

Unscrewing four screws allowed the glass to be removed, and we can see a cover plate at the front, as well as a second cover plate, both of which need to be removed to gain full access inside.
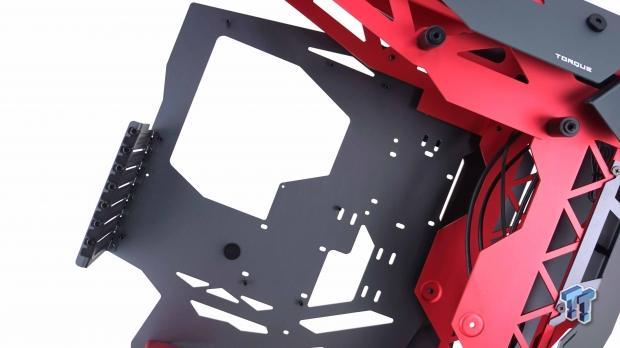
With the pair of covers out of the way, we can now see the motherboard tray in its entirety, where eight of the nine standoffs are installed. There is a large hole to access cooler backplates, and five other cutouts to help with the wire management.
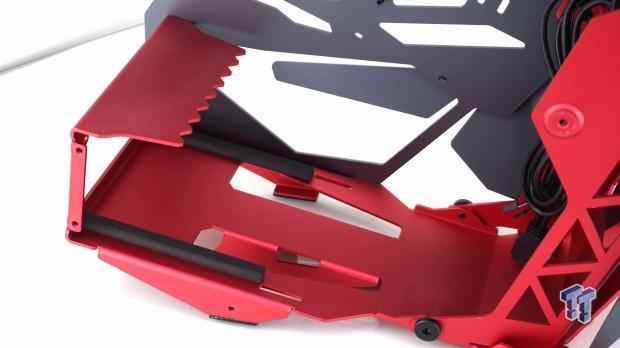
Below the motherboard tray is a vast open area to house a PSU in. With dense foam on the bottom of the chassis to isolate the PSU at the back, the front is wide open for longer power supplies, and any wires that may need bundling.

After removing the glass, there is still one more panel that needs removing. At the front, the gray panel can be removed as well, which allows full access to mounting the storage drives.

The drives are intended to be mounted to this side of the motherboard tray by sending screws through the other side. The cutouts are then used for SATA power and data cable connectivity, where the HDD is at the top and the SSD at the bottom. There are extra holes that can be used for water cooling bits or used to tie wires back as well.

The last things inside of the chassis that we did not cover, are these very long front panel leads. There is the HD Audio cable at the left and the USB 3.0 connection below it. Then, we run into the Type-C USB 3.1 connection, before we see the last of it, the pair of power LED and Power Switch connections.
Hardware & Documentation

In the hardware box, we presented much earlier in this review; you will find all of the screws and such. There is a set of four screws with hex-heads for the PSU, fifteen M3 screws for the motherboard and SSD, and six 6-32 screws for the HDD. Across the bottom, we have three standoffs, one of which still needs to be threaded into the motherboard tray, while the other two are extra, and a set of twelve long fan screws to help populate either the front or the top with radiators.

Also in that box is an Allen wrench to help with the removal of all of the Allen screws used to hold the glass onto the chassis as well as some of the panels. We were also sent a set of fourteen rubber grommets, and while the instructions infer that eight of them be used to isolate the tempered glass panels, only the placement of four of them are shown in the instructions.
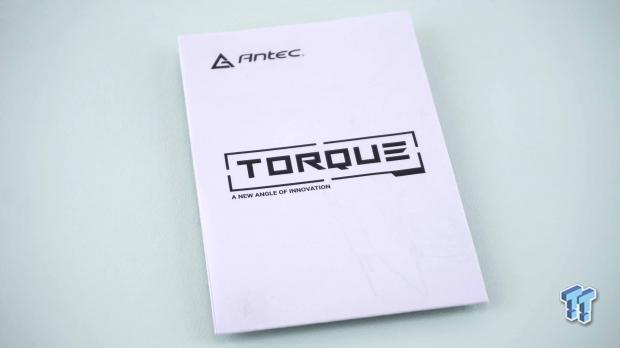
The manual has a parts checklist to ensure you have all of the hardware you are supposed to have with it. Beyond that, there are a series of exploded diagrams where Antec shows how to remove the components of the chassis in a step-by-step fashion. It also shows how to add the standoffs to support the glass, but the renderings are small, and with no text to accompany it, for the amateur or those not so mechanically inclined, it leaves a lot to be desired.
Case Build & Finished Product
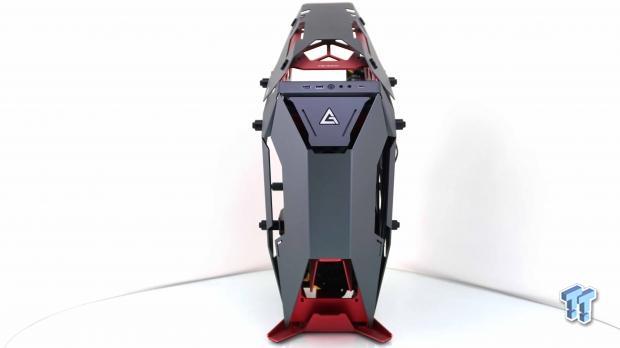
With all of the parts in and the chassis reassembled, from the front, the view does not change much. We cannot see the 240mm radiator we installed in the front, but we do see the gap to the right of the front panel is no blocked off more, due to having to run the cables there.
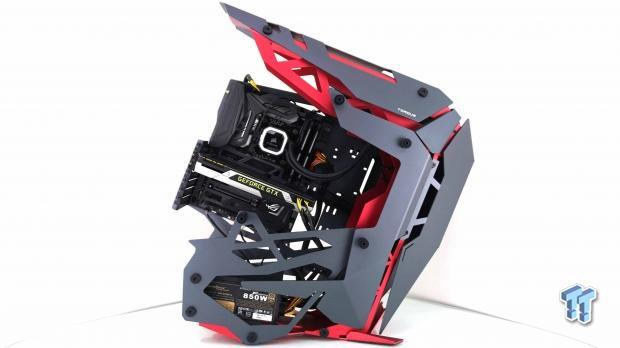
The left side view comes out much cleaner than we had expected with what we consider a complete lack of wire management. We do see some of the leads going to the motherboard, but overall the look is clean, where all of the major components are in view.

The PSU and the video card gave us no issues when it came to mounting them, but there is one thing lacking here we wish we had. We would have liked it if the GPU bracket included a rear I/O panel bracket so that the rear dust shield could be used, allowing its markings to help users down the road.
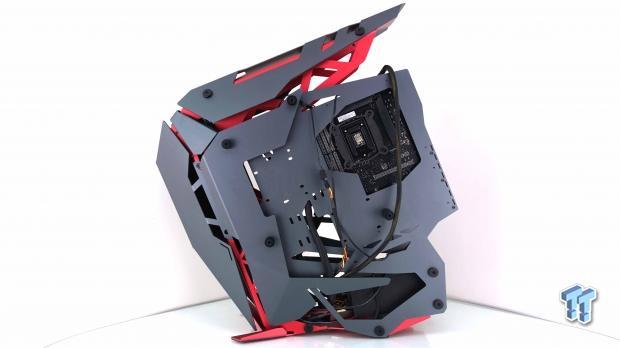
With the system we use, wires are limited, but even so, with no dedicated wire management, wires are left to hang behind the motherboard tray. Had we populated the HDD and SSD mount locations, things would look even worse than they do now, and the glass is not tinted enough to block this from view.

Now that we have the power applied, two lights come on with the Torque. The Antec logo has a red LED behind it which is on any time the system is running, as well as the tiny blue LED in the power button. As for noise and airflow, with the Torque, as shipped, there is none. It is up to you to configure fans and radiators to your liking.
Final Thoughts
While the Antec Torque is not for everyone, it is hard to not applaud them for what they have done. Yes, it is similar to another chassis on the market, at first glance, but once you dig into the both of them, there are defined differences beyond just an angled chassis. The Torque blends red and gray with aluminum and glass, angles all over the place, bends and cutaways, all to deliver one of the most unique open-air designs we have ever seen. For those building a PC without much need for storage, and you want the system to be noticed as soon as someone walks into the room, there is no better option for that currently being offered. Without any fans, there is no noise to speak of, and this is also a plus, as each user can define the amount of cooling, RGB fans, radiators, whatever suits your needs the best.

This is not to say we did not run into anything odd that is worth mentioning, however. Starting with the extra screw in the box, where we did find it, and others were working their way out of the feet. A few turns of the screwdriver seems to have fixed it, but the initial feeling to a customer who sees screws coming out will not be a good one. The chassis, when empty, is front heavy, and care is needed to not accidentally put the chassis on its face while spinning it around and looking at how to build the system. Once populated with gear, this goes away.
Not a single standoff attaching the frame parts was tight out of the box, but again, since the chassis needs disassembled to get the parts into it, there is ample time to grab each of them and tighten them up before finishing the build. The instructions are tough to make out, and you are left to figure things out, which is not so good for the aspiring builder, but with some time, many back and forth glances between the chassis and the instructions, we were able to assume what it is we were supposed to be adding as the chassis is rebuilt. While all of these points are a nod to what you can expect to see with the Antec Torque, none of them were unfixable or addressable to rectify them, but the initial impression of the chassis can and will go downhill fast for those less forgiving than us.
We understand that something new and fancy will cost a bit extra, we do, but we do feel that Antec is stretching things a fair bit with what they are asking for the Torque. With limited storage capabilities, virtually no wire management, and having to see wires behind the back glass, we feel that this chassis should have been in the $200 to $250 range. Asking $349.99 for this chassis is just too much in our opinion.
Yes it is cool to look at, yes the design is attention grabbing and stylish, and yes it will show off all of your hardware, but we feel there is not enough to justify the cost. In the end, we do like what Antec has done, and we like the path of out of the box thinking when designing a chassis. At the same time, we feel they could have done a much better job with this chassis to make the masses feel like they are getting what they pay for with such a high price tag associated with the Antec Torque Mid-tower Chassis.
Chad's Chassis Test System Specifications
- Motherboard: ASUS Maximus IX Code Z270 (buy from Amazon)
- CPU: Intel Core i7 7700K (buy from Amazon)
- Cooler: NZXT Kraken X62 (buy from Amazon)
- Memory: Team T-Force Night Hawk RGB TF1D48G3000HC16CBK
- Video Card: NVIDIA GeForce GTX 980 (buy from Amazon)
- Storage: Samsung XP941 256GB (buy from Amazon)
- Power Supply: SilverStone SST-ST85F-G (buy from Amazon)
- OS: Microsoft Windows 10 Home 64-bit (buy from Amazon)
| Performance | 70% |
| Quality | 80% |
| Features | 85% |
| Value | 75% |
| Overall | 78% |
The Bottom Line: At first glance it looks to be brilliant. However, the deeper you go into the rabbit hole, the more you realize what you are not getting for all of that money. Stylish and attractive, we feel it needs cable management, more storage options, and a better out of the box experience!
PRICING: You can find products similar to this one for sale below.
 United
States: Find other tech and computer products like this
over at Amazon.com
 United
Kingdom: Find other tech and computer products like this
over at Amazon.co.uk
 Australia:
Find other tech and computer products like this over at Amazon.com.au
 Canada:
Find other tech and computer products like this over at Amazon.ca
 Deutschland:
Finde andere Technik- und Computerprodukte wie dieses auf Amazon.de
What's in Chad's PC?
- CPU: Intel Core i7 13700K
- MOTHERBOARD: ASUS ROG Maximus Z690 Hero Eva
- RAM: TEAM DDR5-7200 32GB
- GPU: ASUS GeForce RTX 3090 Eva
- SSD: addlink m.2 2TB
- OS: Windows 11 Pro
- COOLER: Fractal Lumen S36
- PSU: be quiet! Dark Power Pro 1500W
- KEYBOARD: ASUS ROG Strix Scope TKL Electro Punk
- MOUSE: ASUS ROG Strix Impact Electro Punk
- MONITOR: ASUS ROG Swift OLED PG42UQ
Similar Content
Related Tags

