


Introduction and Package
With another video card launch out the way it's time to get back into testing the pile of Z77 motherboards that we've been collecting for the last few months. The latest comes from ASUS and is part of the popular Republic of Gamer series or ROG as most enthusiasts know it as.
The Maximus V GENE is the first of the ROG boards to hit us and carrying the GENE tag means that it's a mATX based model. While we'd normally expect to see a larger size ATX based ROG motherboard from ASUS, the Maximus V Formula was slightly delayed and is due in the coming weeks.
As always, though, there are a few things we need to do before we look at the performance side of things. First we'll start of by checking out the package and take a closer look at the bundle to see what ASUS is offering us with the Maximus V GENE.
Once we've done that we'll move onto the board to see just how the Maximus V GENE looks before we dive into the BIOS and then of course move onto the test system side of things and also the overclocking ability of the board.
Once we've done that it's time to get into the fun stuff to see just what kind of performance we're able to get out of the board at both stock speeds and overclock before we finally wrap everything up. But let's first check out what's going on with the package here today.
Package
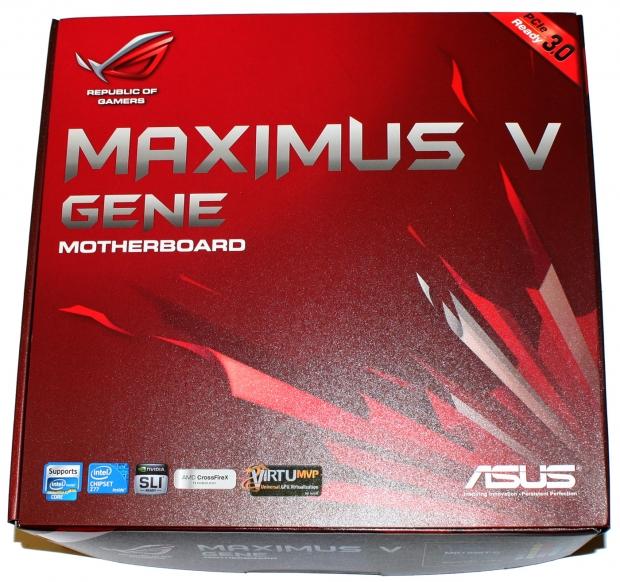
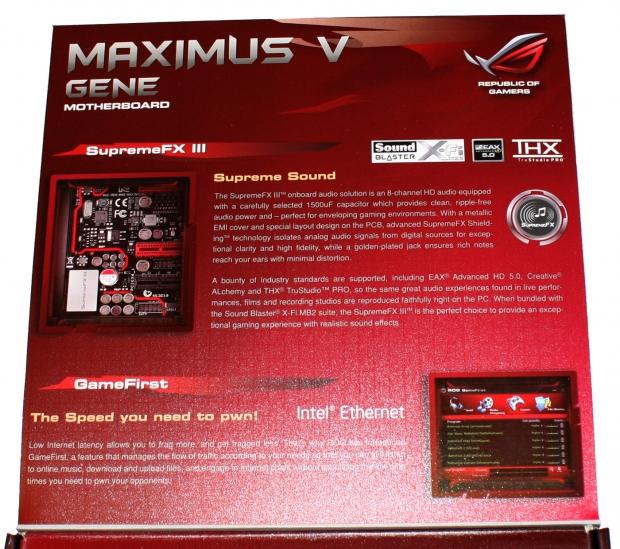
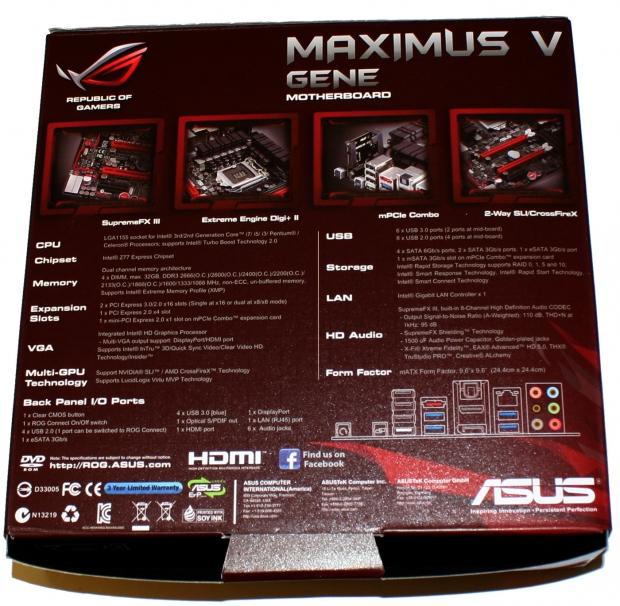
Looking at the box we can see we've got a fairly small one on hand thanks to the mATX style of the board. Opening up the box we also see some of the main features that are on offer and one of the big stands outs is the SurpremeFX III onboard audio solution which is powered by Sound Blaster X-Fi technology.
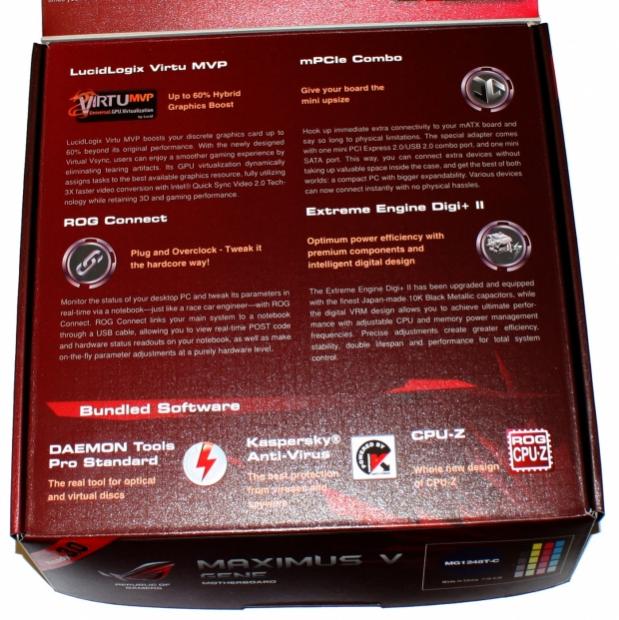
Along with that you can see some of the other major highlights including GameFirst via Intel Ethernet networking, LucidLogix Virtu MVP support, ROG Connect, Extreme Engine Digi+ II and the new mPCIe combo card which we'll look at in just a moment.
Our Latest Socket LGA 1155 Review Coverage
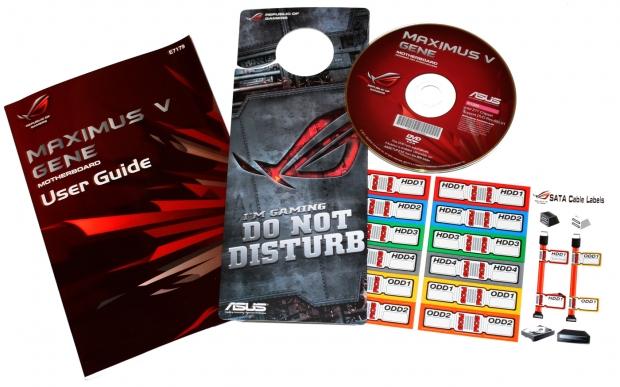
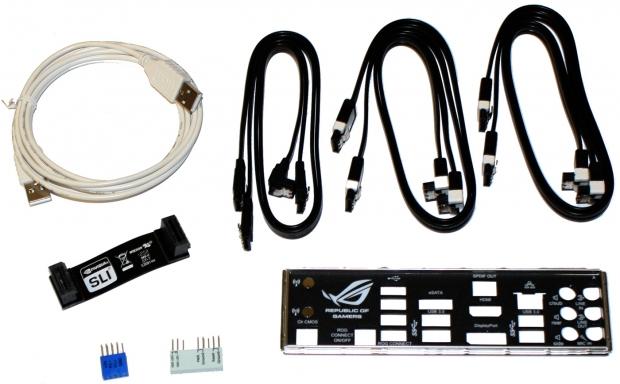
Moving into the package we've got a user manual, driver CD, SATA cable labels and a sign to hang of your door which looks really cool. We've also got a ROG Connect cable, six SATA cables, SLI cable, EZ Connectors and the rear I/O plate.
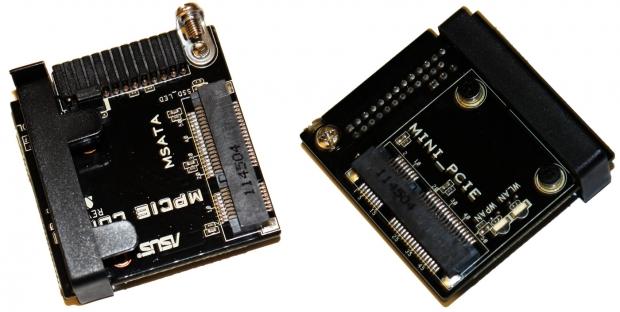
The big extra in the board would be the new mPCIe combo card that ASUS has included. On one side we've got an mSATA connector while the other is a mini PCIe connector that can be used for a wireless card.
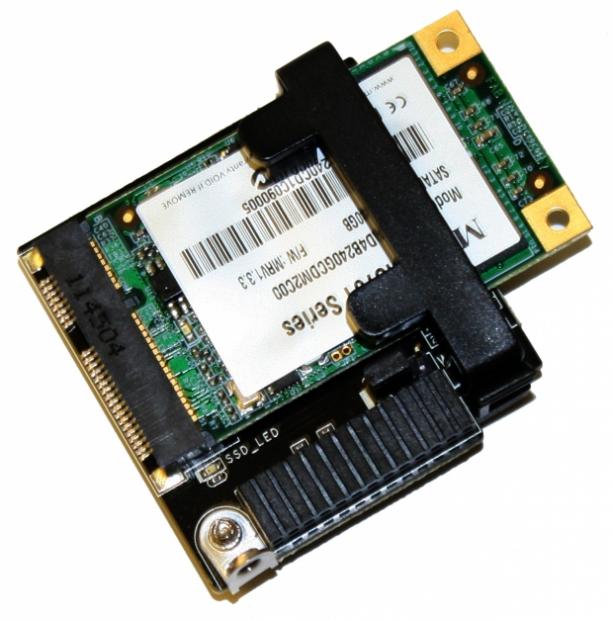
Looking above you can see the mPCIe combo card with our MemoRight mSATA SSD installed. We'll take a closer look at the installation of the mPCIe combo card in the next page when we check out the board. Overall, though, it's a really nice handy extra that adds more to a small board that is normally limited by room.
ASUS P8Z77-V Deluxe Motherboard
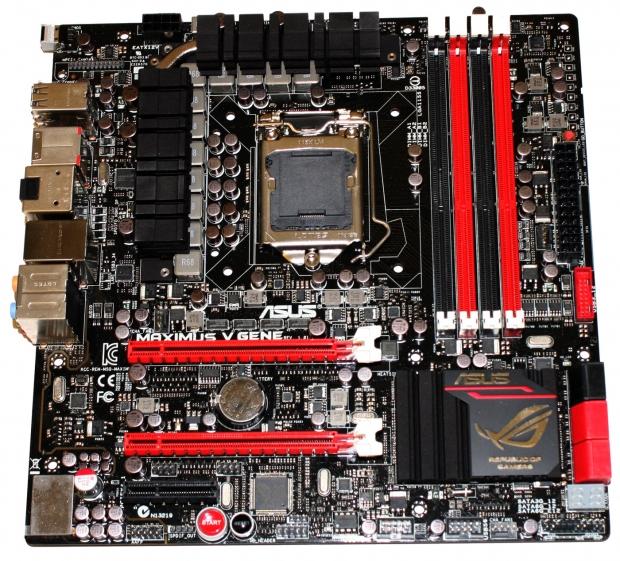
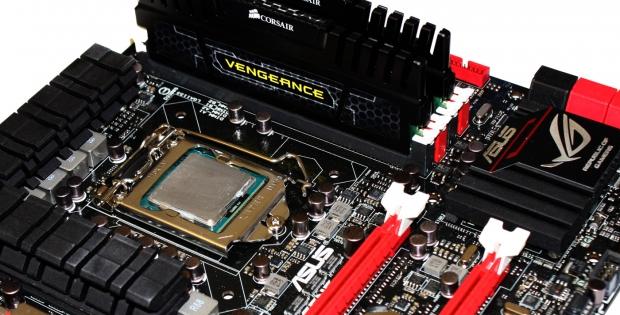
Having a look at the board we can of course notice straight away the square mATX structure of the board. Overall we're able to get a good look at everything, but we'll move in a little closer and cover everything in a bit more detail.
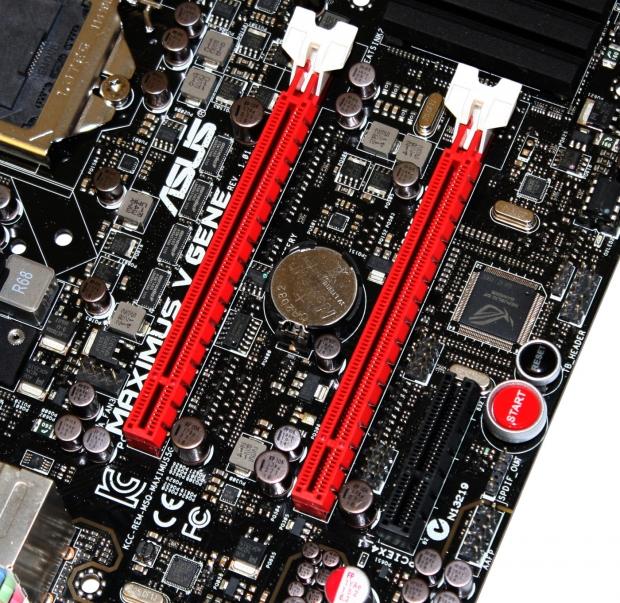
Moving in closer we can see the PCIe setup. We've got a single PCIe 4x slot at the bottom and two PCIe x16 slots. If you're using just one video card that'll run at x16, in the event you're going down the path of SLI or CrossFire, they'll both run at 8x.
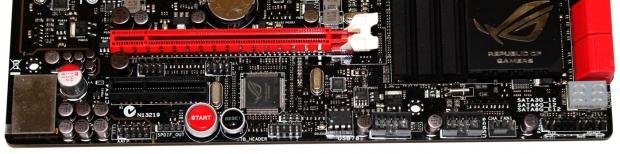
Moving across the bottom of the board you can see we've got the power and reset buttons. Along with that we've also got a couple of USB 2.0 headers, fan header and the main front panel connector.
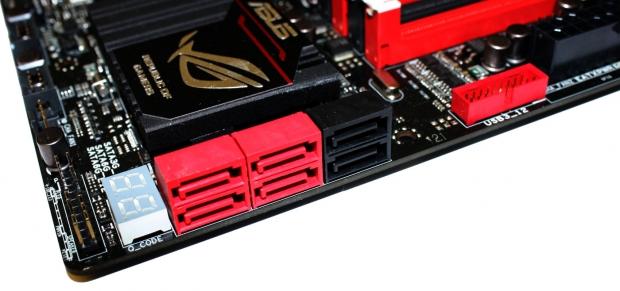
Turning the corner we've got a total of six SATA ports present. The two black ones on the far left are SATA II and run off the Z77 chipset while the two next to that run off the same chipset, but are SATA III. Next to that we've got two more SATA III ports that run off the ASMedia controller. Also here we can see the debug reader that lets us know the status of the board.
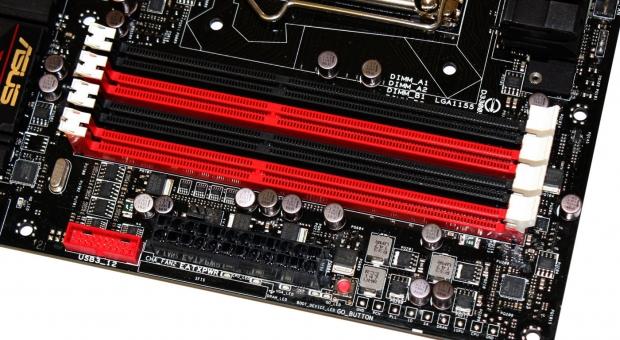
Heading to the top of the board we can see four DIMM slots that support 32GB of DDR3 up to speeds of 2800MHz DDR via overclocking. We can also see the main ATX power connector with a USB 3.0 header on the left and the ASUS GO Button on the right hand side.
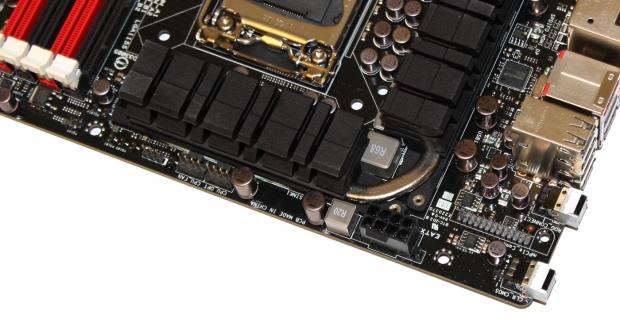

Moving around the top you can see we've got a couple of fan headers and the main 8-pin power connector. Stepping back slightly we can see the CPU area and the heatsink setup, which is strong considering the size of the board. It's typical ASUS ROG quality which is always top notch.

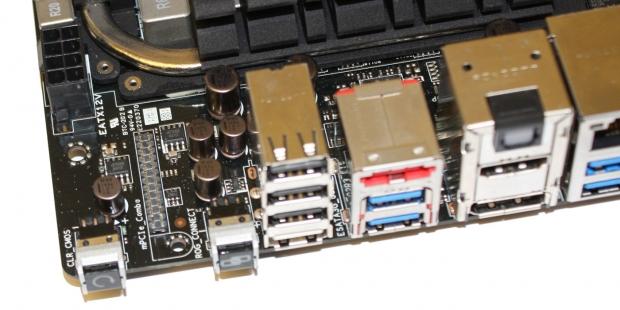
Heading over to the I/O side of things we've got a BIOS reset button and ROG Connect button. Next to that we've got four USB 2.0 ports with the bottom one being the white ROG connect one. Next to that we've got two USB 3.0 ports and an eSATA connector.
Moving across we've got a DisplayPort and HDMI connector for video out and a SPIDF connector at the top. Then there are two more USB 3.0 headers and a Gigabit LAN port running off the Intel controller. Finally we finish up with six auxiliary ports which as we mentioned on the first page run off the SurpremeFX III HD audio codec.
Moving around the I/O area and honing in towards the left we can see the mPCIe Combo connector that sits between the BIOS reset button and ROG connect one.

Above you can see our mPCIe combo card installed sitting nicely. It's a fairly easy installation with a single screw that holds the whole card in place. It's a cool little setup that as we said earlier gives us the ability to expand upon the features with little space.
BIOS

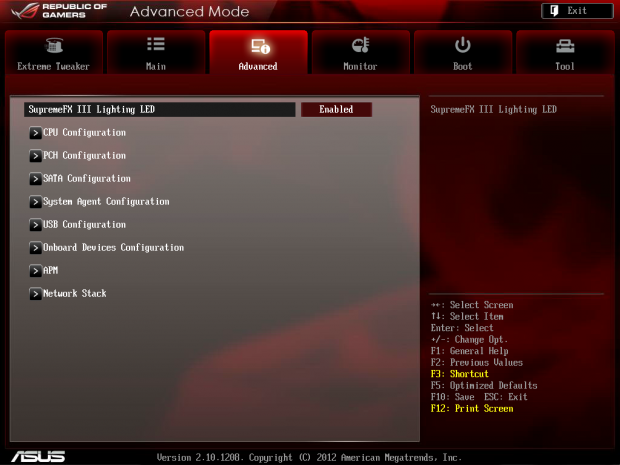
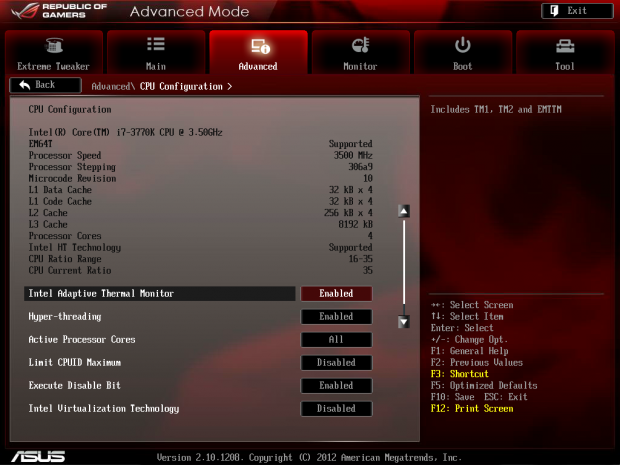
We've got that typical black and red ROG theme that we're used to seeing and if you're in here the chances are you'll want to be hanging out in the Extreme Tweaker section that gives us all our overclocking options. Outside of that area we've got all the normal options you'd expect to see.
Benchmarks - Test System Setup and Overclocking
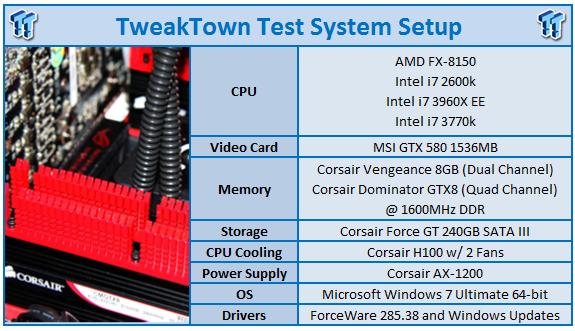
We would like to thank the following companies for supplying and supporting us with our test system hardware and equipment: Intel, ASUS, MSI, Western Digital, MemoRight and Corsair.
Looking above you can see our testbed setup which is pretty typical of our Z77 testing. Before we get into the performance side of things, though, we need to quickly head into the BIOS and check out overclocking.
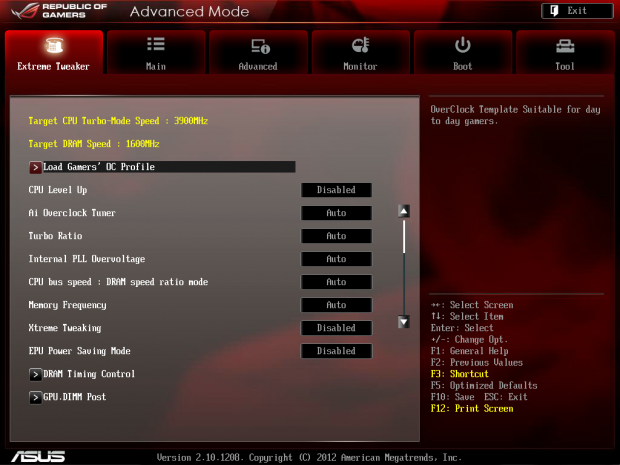
When we went into the BIOS the first thing we did was load the Gamers' OC Profile which sets the multiplier to 48x and bumps the voltages up. To be honest we didn't expect our system to boot since we haven't been able to get our CPU stable at 4.8GHz yet on any other board we'd tested.
While we got into Windows, within 2% of our media encode MediaEspresso crashed. So we headed back into the BIOS and bumped up the voltages a bit across the board. While we got a little further into our encode, MediaEspresso did crash out again.
Instead of moving the voltage up any more we moved our multiplier down to 47x and started to adjust the BCLK. We figured we'd be able to get close to the 4.8GHz mark as our system had no issue getting into Windows and doing a few things.
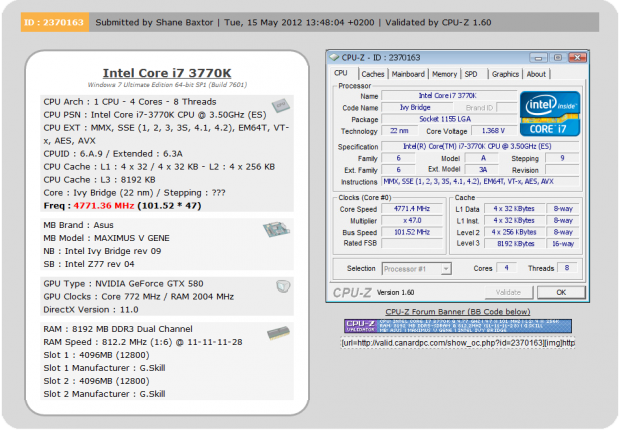
Having a look above you can see we ended up with a 101.5 BCLK alongside our 47x multiplier which brings us in at 4771MHz or 4.77GHz as reflected in our graphs here today. This is slightly up on our other highest overclock to date so far, 4758MHz which was reached on the MSI Z77A-GD65.
Let's get started!
CPU Benchmarks
HyperPi 0.99
Version and / or Patch Used: 0.99
Developer Homepage: www.virgilioborges.com.br
Product Homepage: www.virgilioborges.com.br
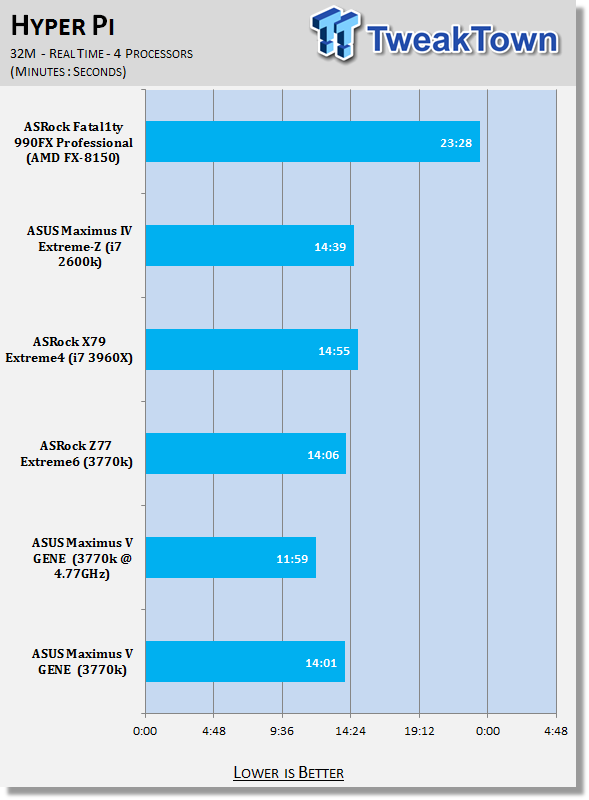
HyperPi is a front end for SuperPi that allows for multiple concurrent instances of SuperPi to be run on each core recognized by the system. It is very dependent on CPU to memory to HDD speed. The faster these components, the faster it is able to figure out the number Pi to the selected length.
For our testing we use the 32M run. This means that each of the four physical and four logical cores for the i7 and the four physical cores of the i5 is trying to calculate the number Pi out to 32 million decimal places. Each "run" is a comparative to ensure accuracy and any stability or performance issues in the loop mentioned above will cause errors in calculation.
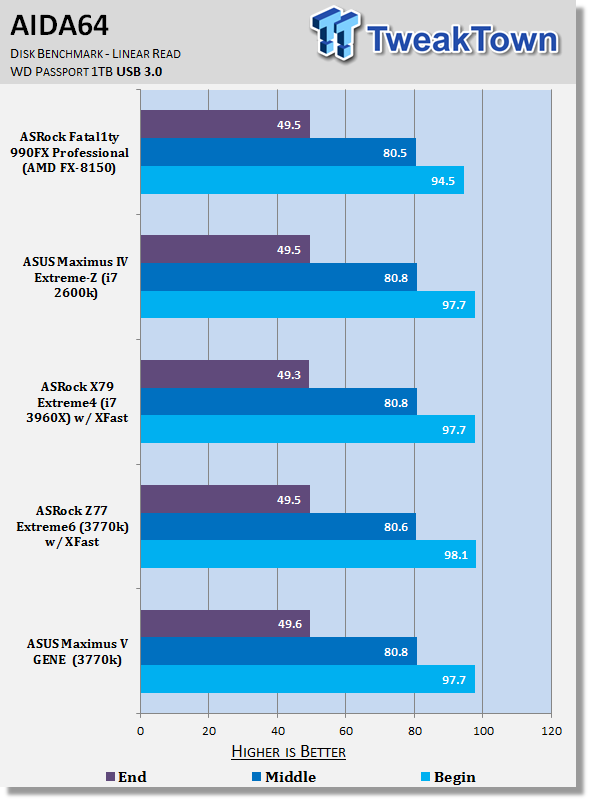
AIDA64
Version and / or Patch Used: 1.00.1035BETA
Developer Homepage: http://www.aida64.com
Product Homepage: http://www.AIDA64.com
Replacing Everest in our labs is AIDA64. This new testing suite is from the core development team from Lavalys and continues that tradition. The guys have thrown in better support for multithreaded CPUs as well as full 64 bit support. We use this to test memory and HDDs for now, but may find ourselves opening this up to other areas of the motherboard.
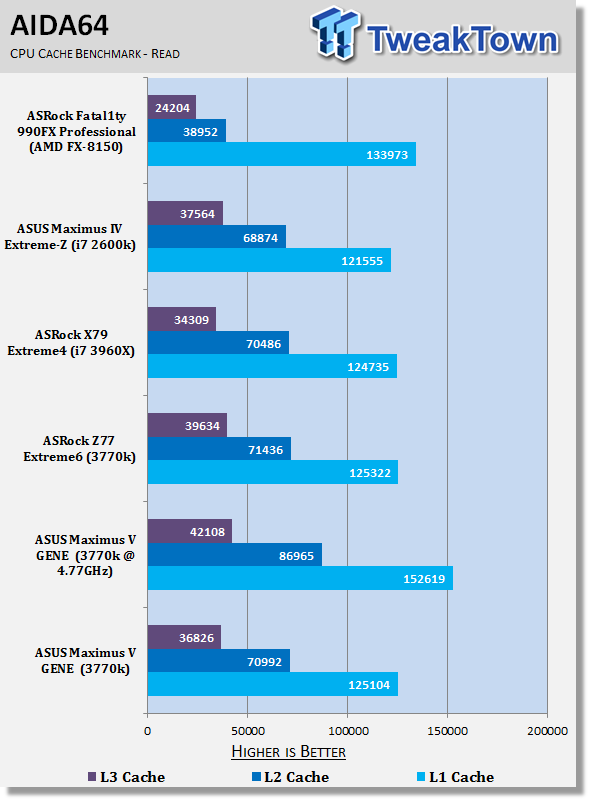
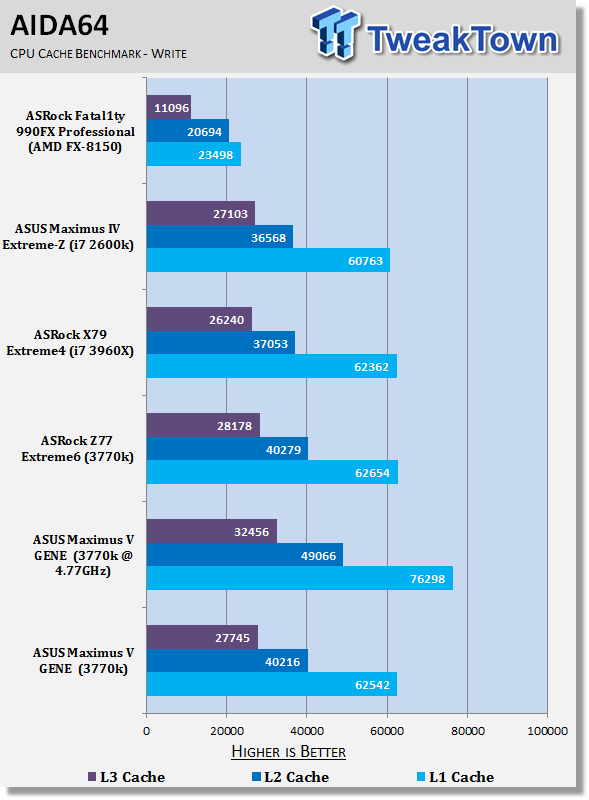
Starting under Hyper Pi we've got some strong performance out the gate with strong performance also being seen under AIDA64. Overclocking, though, as always brings with it a nice boost overall as we see a nice chunk of time removed from our Hyper Pi run.
System Benchmarks
PCMark 7
Version and / or Patch Used: 1.04
Developer Homepage: http://www.pcmark.com
Product Homepage: http://www.pcmark.com
PCMark 7 includes a range of tests that give different views of your system's performance. In the Advanced Edition you can choose which tests to run. The common use and hardware component tests are unavailable in the Basic Edition.
Overall system performance is measured by the PCMark test. This is the only test that returns an official PCMark score. The Lightweight test measures the system capabilities of entry-level systems and mobility platforms unable to run the PCMark test, but it does not generate a PCMark score. Common use performance is measured by the scenario tests - Entertainment, Creativity and Production - each of which results in a scenario score. Hardware component performance is measured by the hardware tests - Computation and Storage - each of which results in a hardware score.
MediaEspresso
Version and / or Patch Used: 6.5
Developer Homepage: http://www.cyberlink.com/
Product Homepage: http://www.cyberlink.com/products/mediaespresso/overview_en_AU.html?fileName=overview&r=1
MediaEspresso is a blazingly fast media universal converter that can transcode your videos, photos and music files and out put them to a huge range of portable devices including mobile phones, portable media players and even game consoles. With technologies like Smart Detect, Direct Sync and CyberLink's TrueTheater™ video enhancements, you can not only forget about complicated format, resolution and output settings, but your converted file will come out the other side looking better than when it went in!
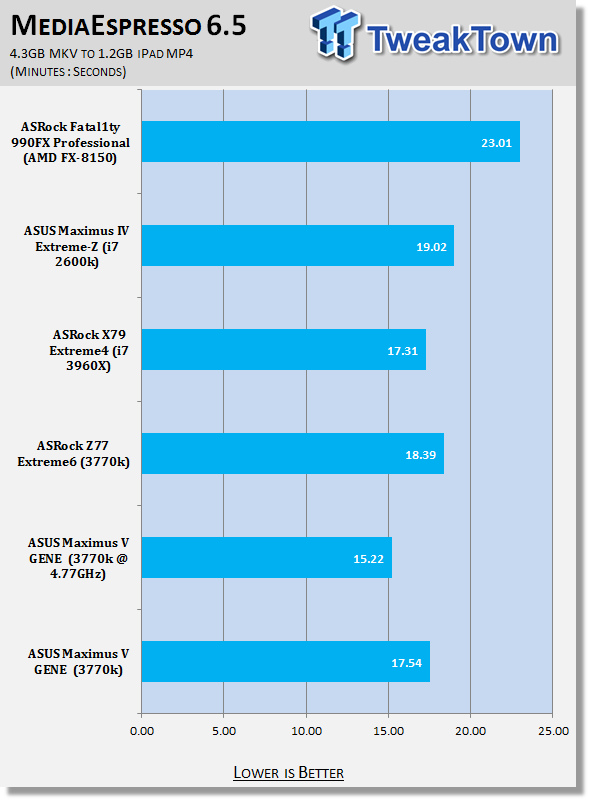
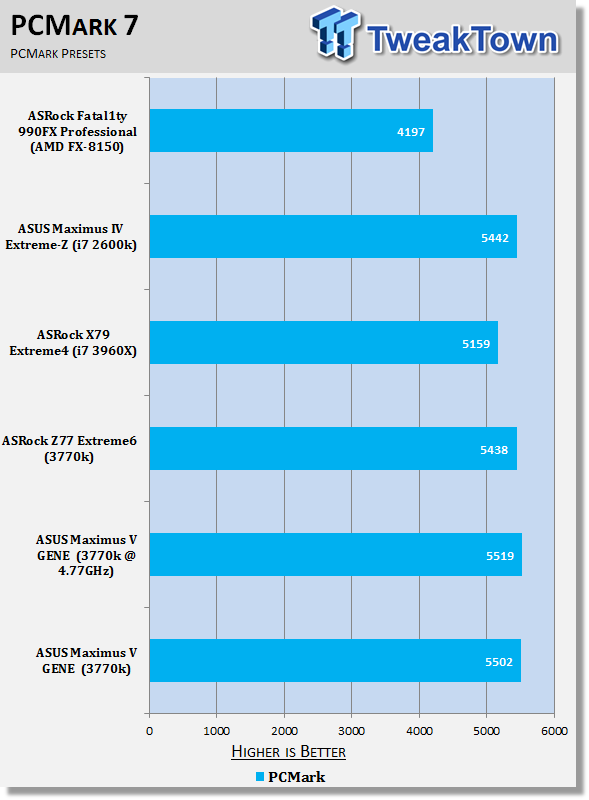
PCMark 7 performance is strong, but overclocking brings with it little gains in this instance, MediaEspresso also sees really good performance with a strong lead over the ASRock Z77 Extreme6 at stock.
Of course overclocking performance is really strong and we see a real-world benefit here thanks to the overclock as a couple of minutes are shaved off the encode process.
USB 2.0 and 3.0 Benchmarks
AIDA64
Version and / or Patch Used: 1.70.1400
Developer Homepage: http://www.aida64.com
Product Homepage: http://www.AIDA64.com
Replacing Everest in our labs is AIDA64. This new testing suite is from the core development team from Lavalys and continues that tradition. The guys have thrown in better support for multithreaded CPUs as well as full 64 bit support. We use this to test memory and HDDs for now, but may find ourselves opening this up to other areas of the motherboard.
Looking at USB 2.0 and USB 3.0 performance we can see typical performance across the board with no real surprises present here.
SSD Benchmarks
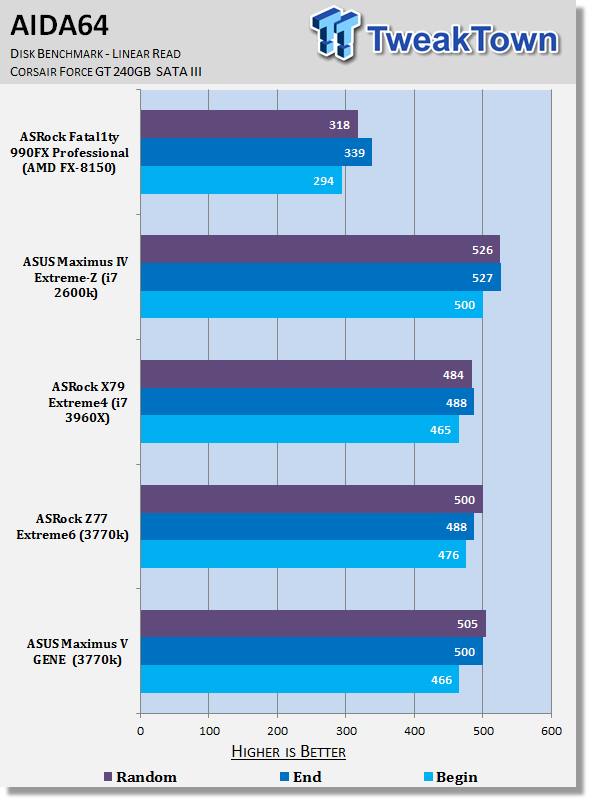
AIDA64
Version and / or Patch Used: 1.70.1400
Developer Homepage: http://www.aida64.com
Product Homepage: http://www.AIDA64.com
Replacing Everest in our labs is AIDA64. This new testing suite is from the core development team from Lavalys and continues that tradition. The guys have thrown in better support for multithreaded CPUs as well as full 64 bit support. We use this to test memory and HDDs for now, but may find ourselves opening this up to other areas of the motherboard.
HD Tune Pro
Version and / or Patch Used: 4.61
Developer Homepage: http://www.hdtune.com
Product Homepage: http://www.hdtune.com
HD Tune Pro gives us accurate read, write and access time results and for the last couple of years has been gaining popularity amongst reviewers. It is now considered a must have application for storage device testing.
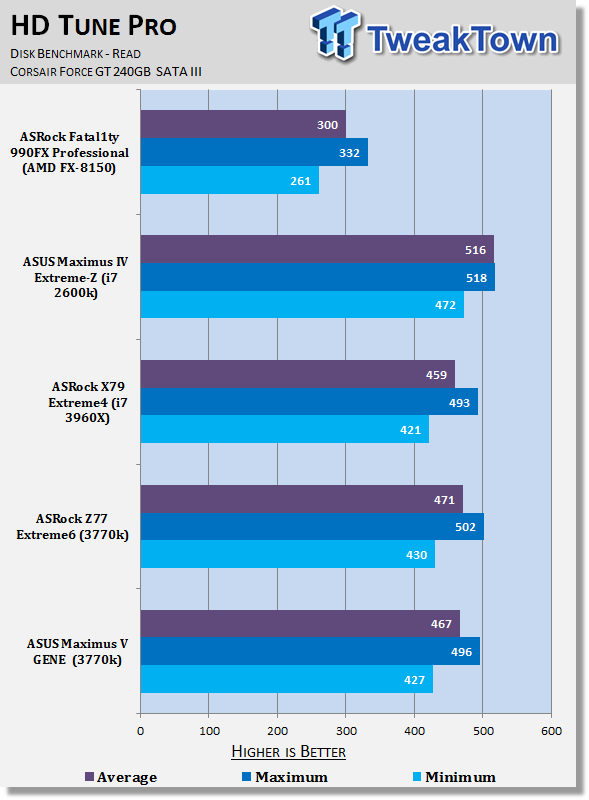
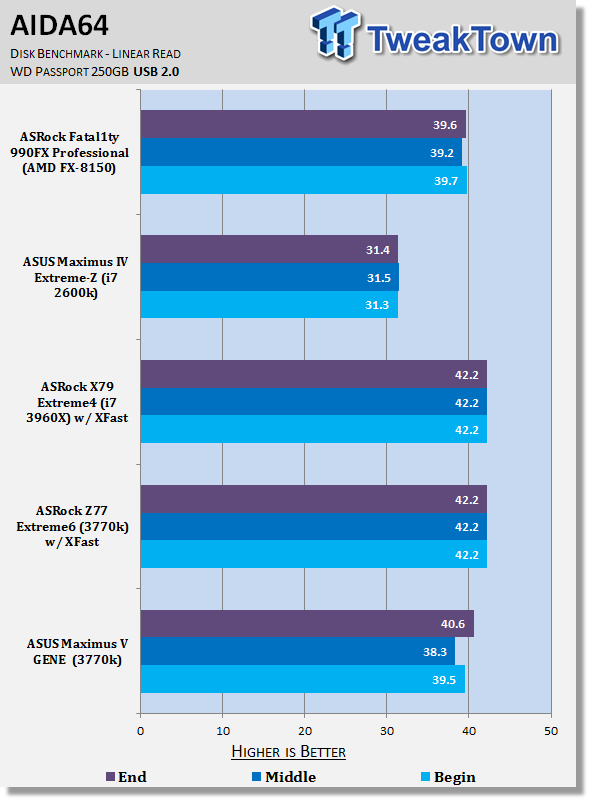
Checking out SSD performance we can see in typical ASUS fashion it's strong under both AIDA64 and HD Tune Pro.
mSATA Benchmarks
HD Tune Pro
Version and / or Patch Used: 4.61
Developer Homepage: http://www.hdtune.com
Product Homepage: http://www.hdtune.com
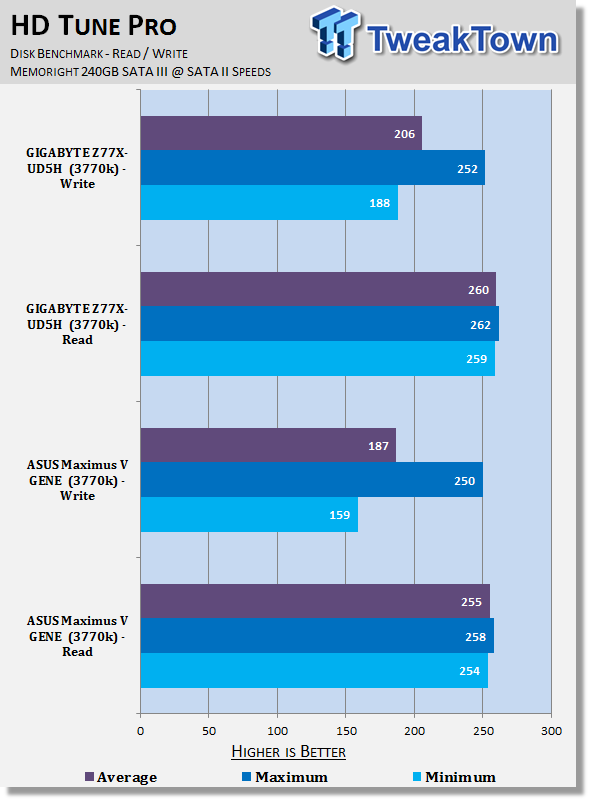
Looking at mSATA performance via the mPCIe combo card we can see that overall mSATA read performance is strong. When it comes to write, though, we can see that mSATA performance is a little lower then when tested on the GIGABYTE Z77X-UD5H.
Memory Benchmarks
AIDA64
Version and / or Patch Used: 1.00.1035BETA
Developer Homepage: http://www.aida64.com
Product Homepage: http://www.AIDA64.com
Replacing Everest in our labs is AIDA64. This new testing suite is from the core development team from Lavalys and continues that tradition. The guys have thrown in better support for multithreaded CPUs as well as full 64 bit support. We use this to test memory and HDDs for now, but may find ourselves opening this up to other areas of the motherboard.
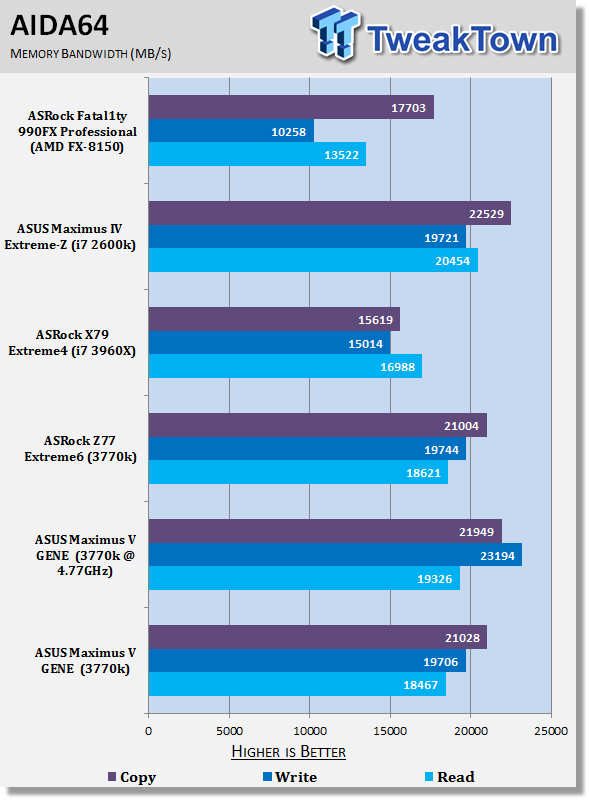
RAM performance is fairly typical out of the box while overclocked we can see a nice boost with the best gains as always being seen in the write department.
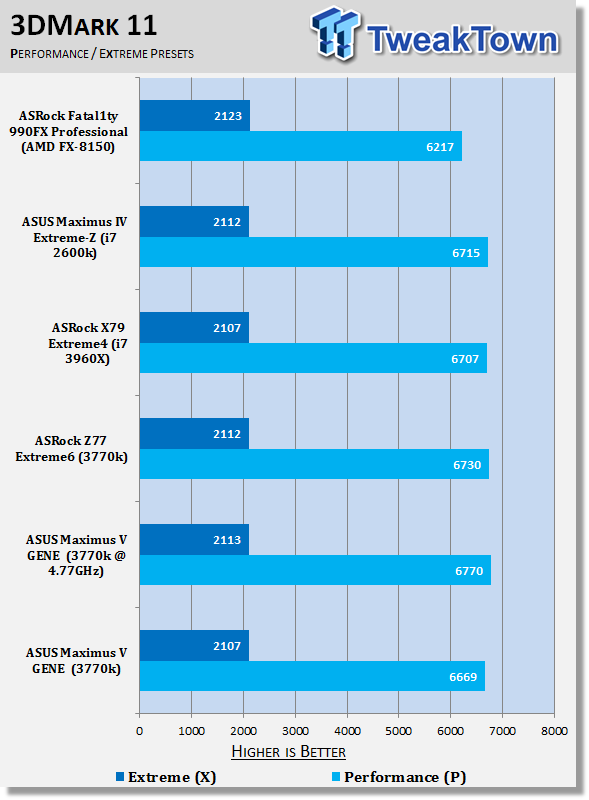
Gaming Benchmarks
3DMark 11
Version and / or Patch Used: 1.0
Developer Homepage: http://www.futuremark.com
Product Homepage: http://www.3dmark.com/3dmark11/
3DMark 11 is the latest version of the world's most popular benchmark. Designed to measure your PC's gaming performance 3DMark 11 makes extensive use of all the new features in DirectX 11 including tessellation, compute shaders and multi-threading. Trusted by gamers worldwide to give accurate and unbiased results, 3DMark 11 is the best way to consistently and reliably test DirectX 11 under game-like loads.
Metro 2033
Version and / or Patch Used: Latest Steam Update
Timedemo or Level Used: Built in Benchmark
Developer Homepage: http://www.4a-games.com//
Product Homepage: http://www.thqnordic.com/
Metro 2033 is an action-oriented video game with a combination of survival horror and first-person shooter elements. The game is based on the novel Metro 2033 by Russian author Dmitry Glukhovsky. It was developed by 4A Games in Ukraine and released in March 2010 for Microsoft Windows and Xbox 360.[3] In March 2006, 4A Games announced a partnership with Glukhovsky to collaborate on the game.[4] The game was announced at the 2009 Games Convention in Leipzig;[5] a first trailer came along with the announcement.[6] A sequel was announced, currently titled Metro: Last Light.
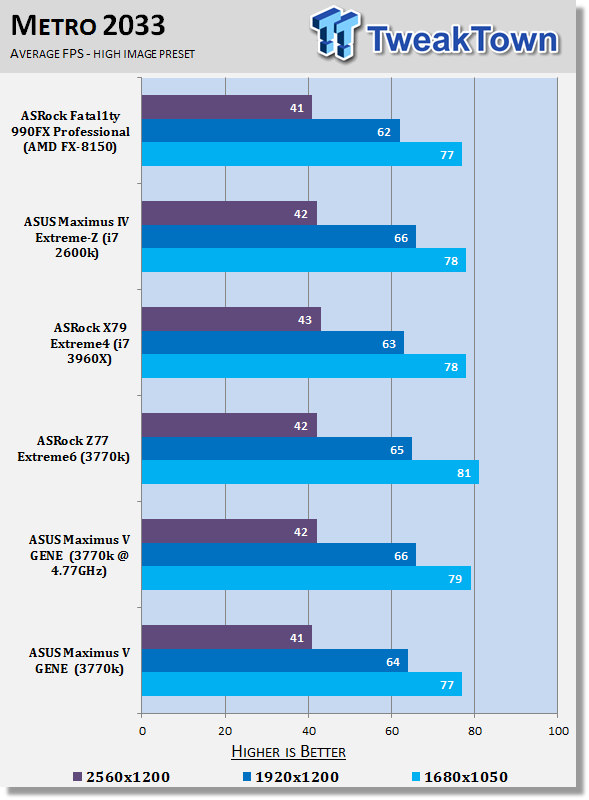
Gaming performance is what you'd expect. We see a bit of a boost in 3DMark 11 performance when overclocked, while Metro 2033 also sees a slight bump at the lower resolutions.
Temperature and Power
Power Consumption
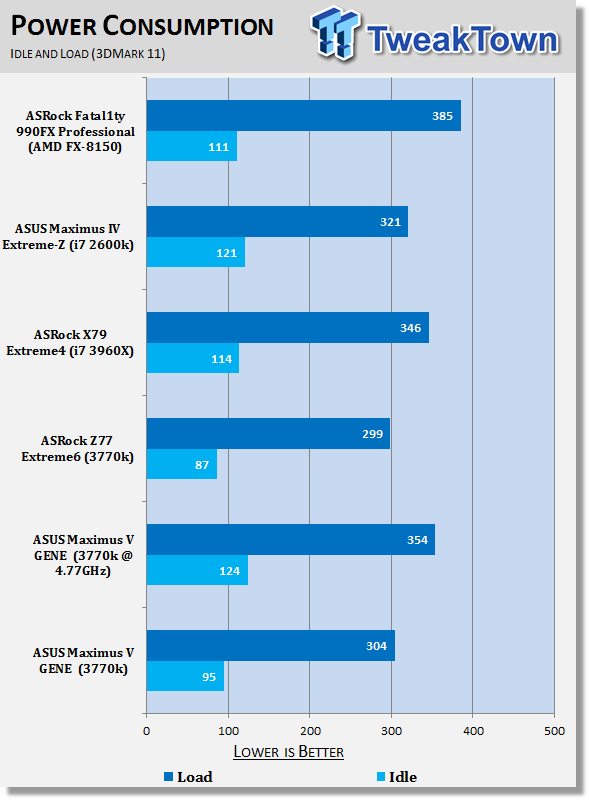
Power draw numbers are a little higher at idle than the ASRock Z77 Extreme6 while overclocking bumps it up even more. Load numbers line up with our other Z77 offering while of course overclocking again increases overall power draw.
Core Temperature
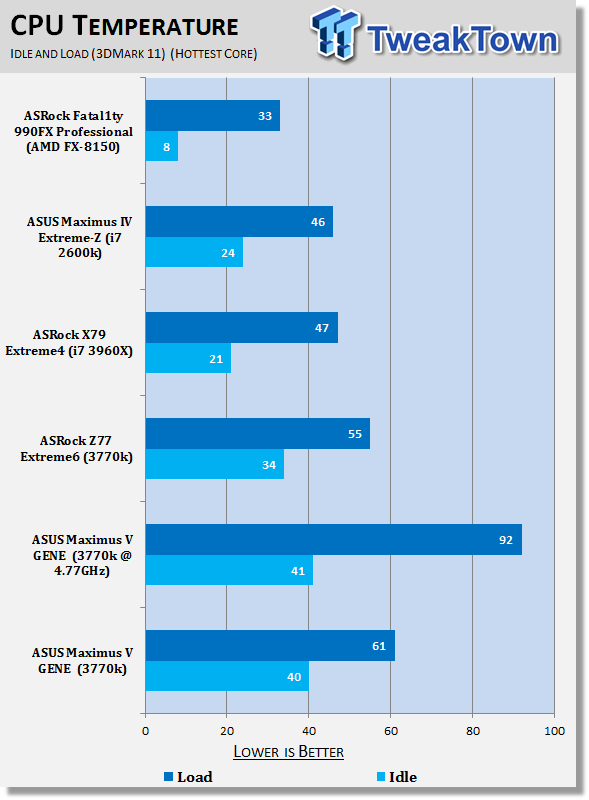
Looking at the temperature of our 3770k we can see our Maximus V GENE runs a little warmer at both idle and stock. Overclocked we can see there's no real change in idle clocks while overclocked we see load temps sky rocket to 92c. This isn't that uncommon on the latest 3770k chips from Intel which we're seeing run warmer and warmer.
Final Thoughts
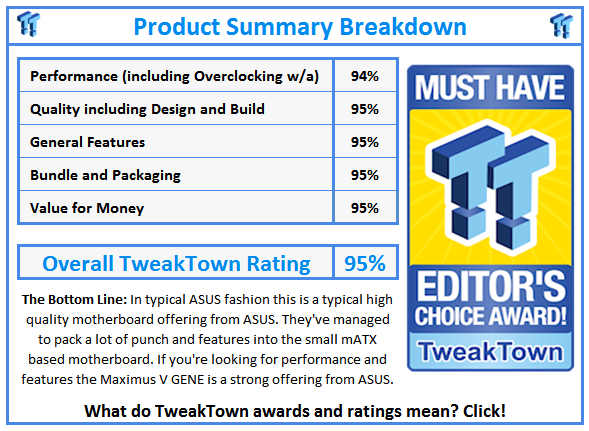
Coming in at $199 the ASUS Maximus V GENE comes in and hits at a really nice price point. While ROG boards tend to be a little bit more expensive than other models, the mATX form factor on offer from ASUS means that the pricing comes in slightly more aggressive and sits very strong against a lot of other models.
Performance as always is very strong and to be honest we'd expect nothing less from an ROG based motherboard. The overclock we managed here today is the strongest we've had out of our Z77 boards that we've tested so far and while it's only a little higher, it's higher none the less.
Outside of the performance we've got a strong feature set on offer and it's awesome to see that ASUS managed to bring mini PCIe and mSATA connectivity to a small mATX based motherboard. Along with that we've got all those other yummy ROG features that makes the board stand out.
Outside of the motherboard we've got a strong bundle with the usual line up you'd expect from an ASUS ROG based motherboard. The big extra is that mPCIe combo card, though, that we've just mentioned and really helps expand the features of the board.
Overall ASUS has put together an awesome motherboard that comes in at a strong price point, offers good performance and comes with a really nice bundle. The mATX form factor from ASUS is as always strong and brings with it an aggressive price tag making for a really strong product.
I think one of the most important things to remember is that while you might have a case that can handle something bigger than a mATX based motherboard, the mATX based Maximus V GENE can still be the perfect option if it offers you the expansion slots you need. Outside of a few less PCIe slots, this ASUS mATX offering still includes a lot of features and in some case more than larger full ATX motherboards thanks to the mPCIe combo card.
 GIGABYTE X870E Aero X3D Dark Wood Review - A woody goody
 ASUS TUF Gaming X870-Pro WiFi7 W NEO Review - Tuffed up
 ASRock Z890 Taichi Aqua Motherboard Review - Flagship features without the flagship price
 GIGABYTE Z890I AORUS Ultra Motherboard Review - Mini-ITX with surprisingly good thermals
 GIGABYTE Z890 AORUS Elite WiFi7 Plus Motherboard Review - Right in the sweet spot
 ZeniMax's ESO studio is still big enough to deliver new content
 id Software not a support studio after layoffs, reportedly working on new Doom project
 Apple sues OpenAI, accusing it of engaging in a 'strategy to extract Apple's confidential information'
 Another RTX 5090 power connector melted, and even ASRock TempGuard failed to save this one
 Reverse scam: Redditor orders a Ryzen 7 7800X3D but gets blessed with a 9800X3D instead
 Colorful iGame Shadow II DDR5 memory with CXMT ICs hits 8600 MT/s
 ASRock says there are no plans to sell its Taichi 10th anniversary concept components
 Sony CEO sells $4.7 million worth of stock days after PlayStation announces disc phase out
 Black Flag Resynced is a win for Ubisoft, pirate remaster achieves 2 million sales in 24 hours
 Micron 6600 ION 245.76TB Enterprise SSD Review - Best in Class Programming Speeds
 MOZA MA3F EFCM Flight Control Module Review: authentic Airbus A320 autopilot panel for simulators
 Turtle Beach Stealth Pro II Wireless Gaming Headset Review - Premium Sound, Fantastic Features
 MOZA MGX1000 Instrument Panel Review: a realistic Garmin G1000 replica for immersive flight sims
 Simagic Zeus Formula Steering Wheel Review: premium build and advanced inputs for F1 racing
 The Super Mario Galaxy Movie (2026) 4K Ultra HD Blu-ray Review
 KTC H49S66 5K2K (5120x1440) 49-inch 180Hz Gaming Monitor Review
 HighPoint Rocket 1604L Gen5 x16 NVMe Software RAID AIC Review: half the price with full 59 GB/s speed
 Next Level Racing ERS3 Haptic Seat Review: immersive sim racing comfort with integrated haptics
 Don't sell your Windows laptop until you do these things
 6 PC cleaning mistakes to avoid for safer hardware maintenance
 Phison and Intel Take Aim at Local AI's Memory Wall with aiDAPTIV
 How to Remap Keyboard Keys in Windows using Microsoft PowerToys
 7 tips to organize your Windows files for faster, easier access
 Intel Arc G3 Extreme first impressions with MSI's Claw 8 EX AI+ - Incredible power for an extreme price
 How to fix Wi-Fi Adapter Not Working on Windows laptops: troubleshooting tips
 Hisense U7SG 4K TV: Modern Entertainment for the New Age
 6 underrated Microsoft Word features worth using to boost your productivity
 Level Up Your PC Gaming with these Fantastic ASUS Prime Day Deals on GPUs, Motherboards, and More