Introduction and Package
Introduction
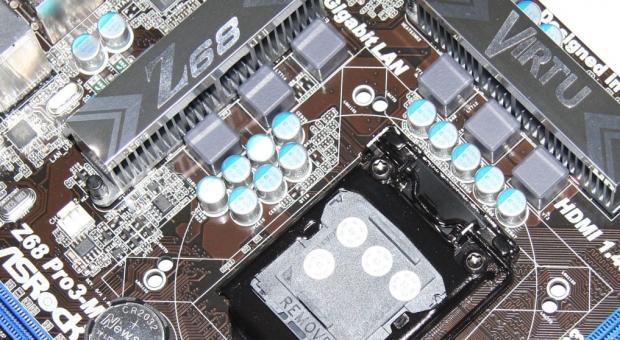
I'm a really big fan of the mATX platform, even more so over the last few years as we've seen that moving to the mATX platform doesn't mean you need to sacrifice the power that most full size ATX boards bring.
The release of the new Z68 chipset means a bunch of new boards from companies and today we'll be looking at our first mATX version of the new chipset. The Z68 Pro3-M from ASRock carries a very similar name to a board we've already looked at, the ASRock Z68 Pro3. Of course, the M in this case means we're dealing with an mATX version.
So, does moving to a smaller board mean we're going to see less performance? What are we missing with the move to a smaller board? Well, to answer that and more, read on. Let's start by looking at the package ASRock have put together; from then we'll move into the motherboard itself before looking at the BIOS. Once that's done we'll discuss how we went with overclocking before getting into the actual performance side of things to see just what exactly this mATX board from ASRock is able to bring to the table.
Fingers crossed we'll enjoy the same strong performance as the Pro3 version we looked at. Before we find out, though, let's get into the package.
The Package
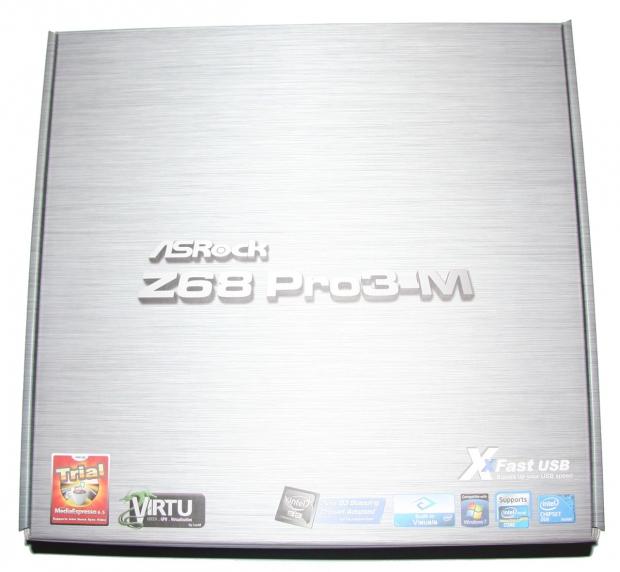
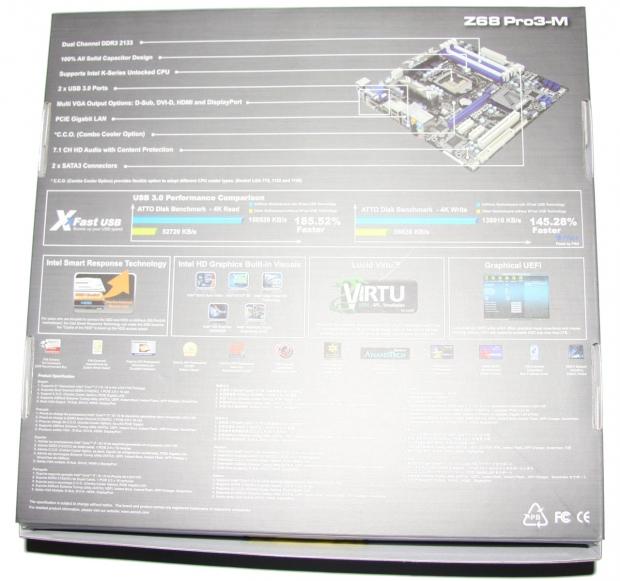
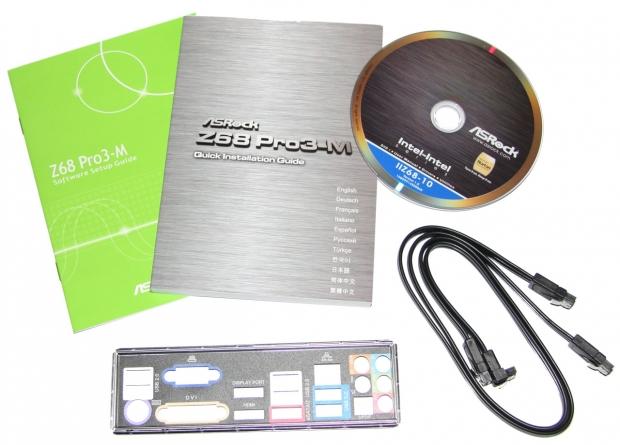
As far as the box size goes, this is the smallest box we've seen so far when compared to other Z68 boards. That's of course due to the smaller stature of the board itself. Inside the package there's not a whole lot going on; we've got software and motherboard guide, driver CD, two SATA cables and our back I/O plate. As far as what's in the box, it's exactly the same as what we saw in the non -M Z68 Pro3.
The Motherboard
Looking straight on, you can get a good idea of exactly what we've got on our hands without the need to really move in much. Being based on the mATX platform it of course comes in at 24.4cm x 24.4cm verse the 30.5cm x 21.1cm setup that's present on the Pro3 model.
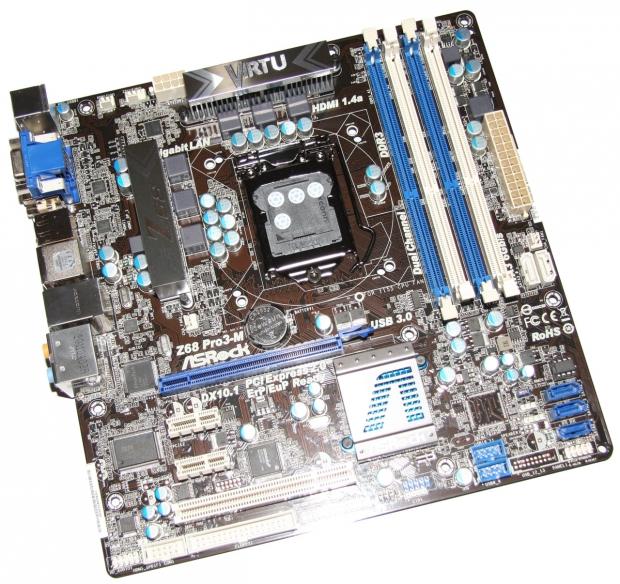
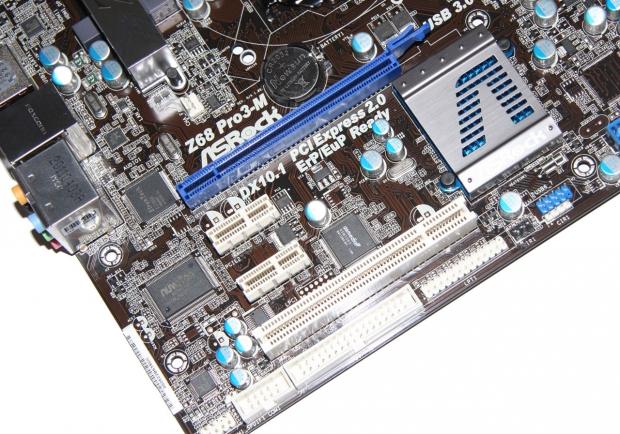
The smaller size means that the biggest impact to extras is the amount of expansion ports we have. Having a closer look, you can see we've got an older legacy PCI port, two PCI-E 1x and a single PCI-E 16x. For a lot of people, though, this will be more than enough expansion as you have the ability to install a good video card and something in the second PCI-E 1x slot; maybe a TV Tuner, Sound Card or something else along those lines.

Moving across to the bottom of the board, we can begin to get a closer look at what's going on. Across here we've got our HD Audio header, COM1, Floppy drive connector, printer port header, IR module header, three USB 2.0 headers and our system panel header.
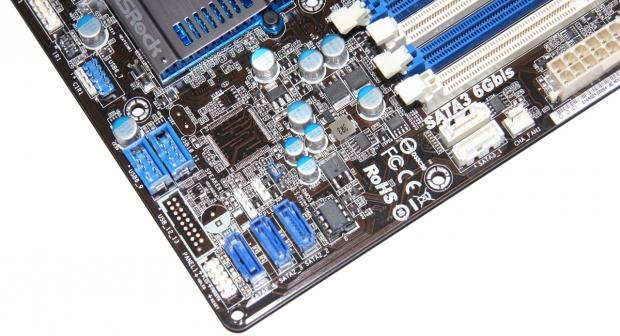
Above our system header you can see we've got three SATA2 ports while if we move a little further up we've got two white SATA3 ports next to a fan header. All these SATA ports run off the Z68 chipset; no other controller is installed.
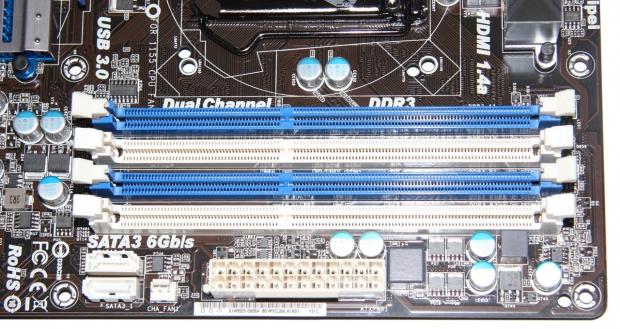
As we move up to the top right corner of the board, you can see next to our SATA3 ports we've got our main 24-Pin ATX power connector and above that we've got our four RAM slots. Here we've got support for up to 32GB of DDR3 RAM at 1066/1333/1600/1866/2133MHz DDR.
The Motherboard Continued
As we start to move around to the other corner of the board, here we're able to see our 8-Pin power connector and next to that we've got another two headers.

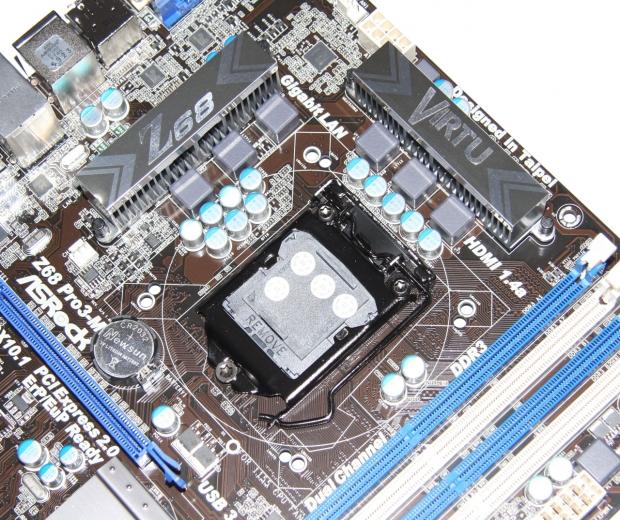
Moving back a little, we can see our CPU socket area and a couple of smaller heatsinks that are present on the motherboard. We've got a fairly clean area and we had no problems installing our Corsair H70 unit. We can also see just above the PCI-E 16x slot we have our BIOS battery.

Before leaving, we can have a quick look at the I/O side of things. Starting from the left, we've got two USB 2.0 ports and a PS/2 keyboard port. Moving across, we've got a VGA, DVI-D, DisplayPort and HDMI for people wanting to make use of the onboard video that's offered by the Z68 platform.
Continuing to move on, we've got two more USB 2.0 ports, eSATA2, Gigabit networking provided by the Realtek RTL8111E, two USB 3.0 ports in blue provided by the Etron EJ168A chip and our audio ports which are backed by the Realtek ALC892 Codec.
BIOS
BIOS & Overclocking
Because the BIOS of the Pro3 and Pro3-M are near identical with really the only difference being that the Pro3-M says Pro3-M in the main windows instead of Pro3, we've just used the same screen shots from our original Pro3 review.
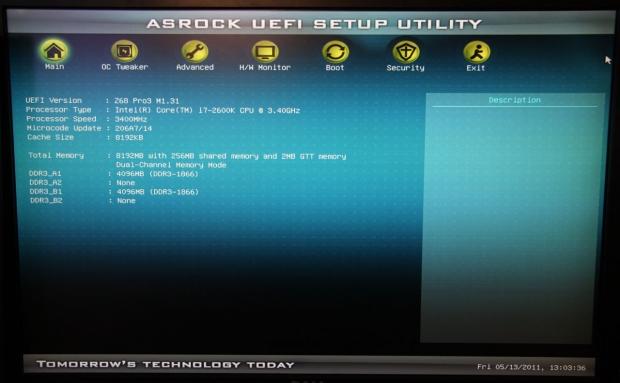
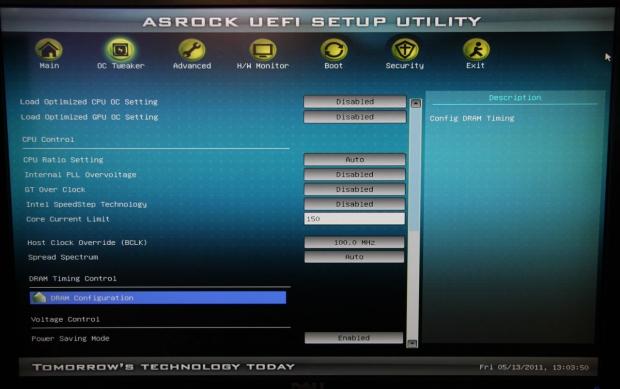
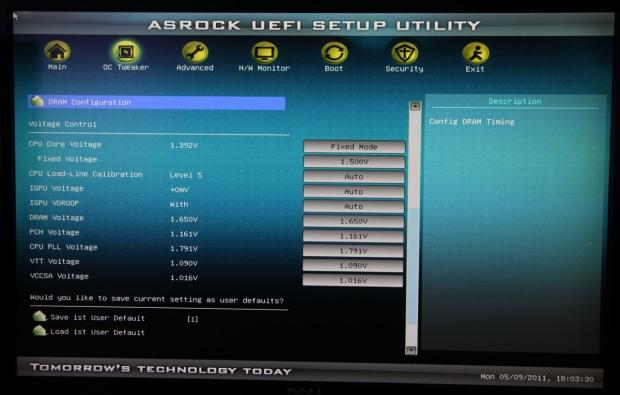

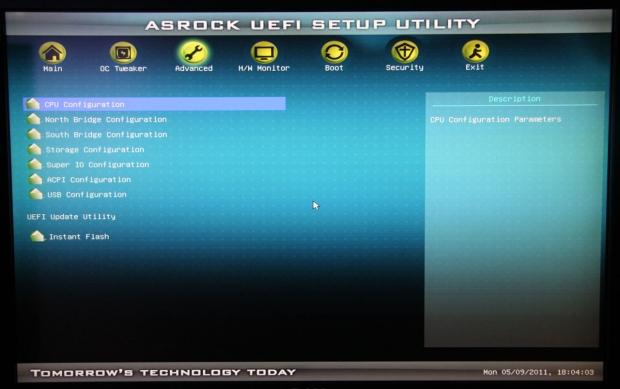
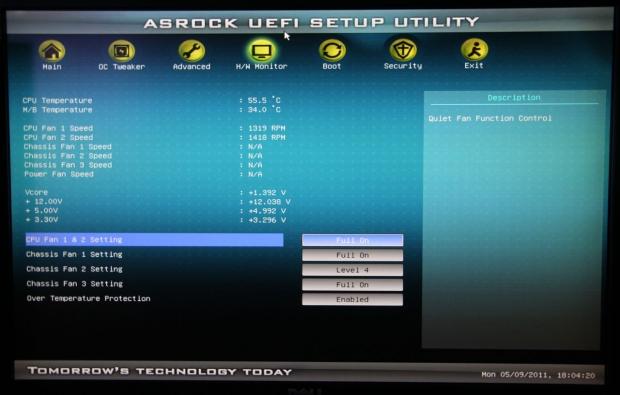
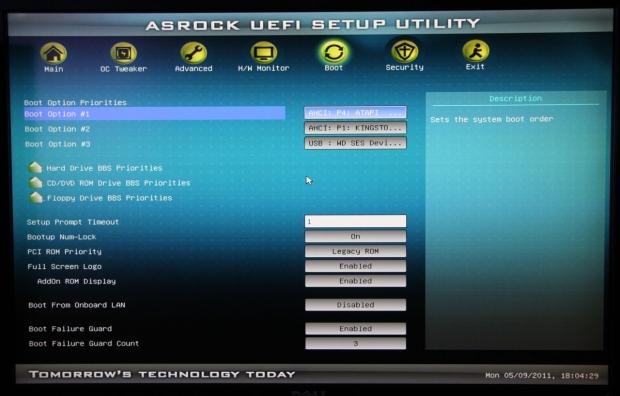
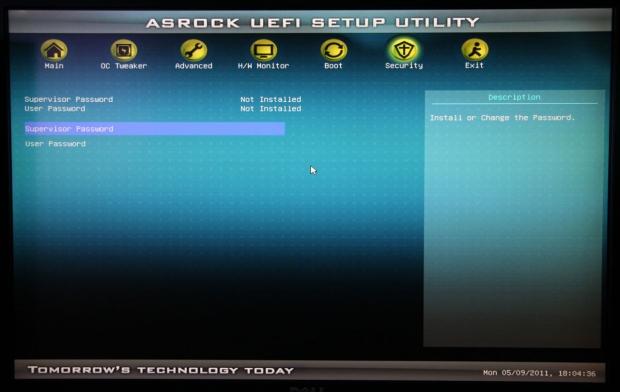
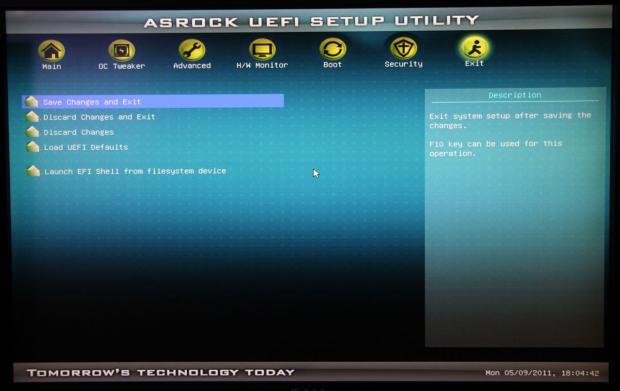
There are no real surprises in the BIOS; it's near identical to previous versions of the UEFI BIOS we've seen from ASRock and is generally pretty easy to get around. Mouse support is of course offered being a UEFI BIOS, but old habits die hard so you'll probably find yourself continuing to use the keyboard to navigate.
Test System Setup and Overclocking
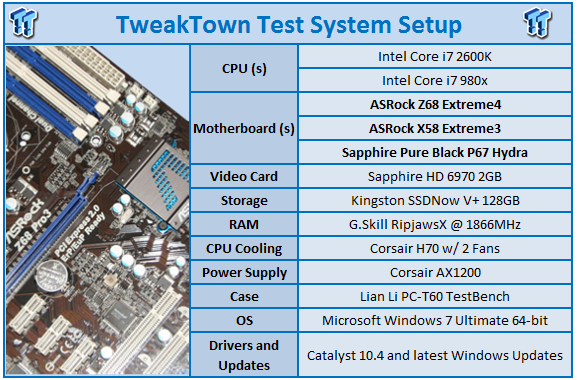
We would like to thank the following companies for supplying and supporting us with our test system hardware and equipment: Intel, ASRock, Kingston, Mittoni, Noctua and Corsair.
When it comes to the lineup of boards we'll be looking at today, there's nothing you haven't really seen in our previous reviews with the ASRock Z68 Pro3 and Extreme4 both being present. We've also got the ASRock X58 Extreme3 and Sapphire Pure Black P67 Hydra for good measure.
When we looked at the Pro3 the main thing we wanted to know was by moving to a cheaper board, were we sacrificing performance or just some features that we maybe didn't really need when compared to the Extreme4. Today we want to know the same thing; by moving to a cheaper board again, and in this case a smaller one, are we just losing some features because of the smaller PCB, or are we also losing some performance?
The other thing we'll be looking at today when we compare the Pro3-M to other boards is the Pro3-M when we overclocked it. One thing we did find with the Pro3 was that our overclocking potential wasn't quite as strong. With smaller heatsinks on the board it didn't come as a surprise. Is moving to an mATX board going to impact out overclocking potential even further, though?
With a bit of optimism I set the multiplier to 50x hoping we could get up and running at 5GHz, which is just above what we achieved out of the Z68 Pro3, but a little lower than what we could get out of the Z68 Extreme4. While we got into Windows, as soon as we started our HyperPI run we got a BSOD a few minutes in.
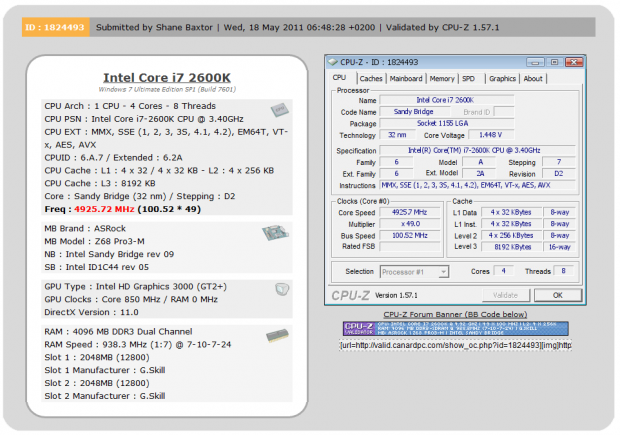
Back to the BIOS, I moved the multiplier to 49x and we ended up again in Windows with no problems. Everything was up and running just fine and it was the overclock we settled on. This brought our CPU to 4.92GHz which was what we achieved on the Z68 Pro3 from ASRock. So with our overclock set and everything running smoothly, it's time to see what kind of performance we can get out of this mATX board.
Let's get started!
CPU Benchmarks
AIDA64
Version and / or Patch Used: 1.00.1035BETA
Developer Homepage: http://www.aida64.com
Product Homepage: http://www.AIDA64.com
Buy It Here
Replacing Everest in our labs is AIDA64. This new testing suite is from the core development team from Lavalys and continues that tradition. The guys have thrown in better support for multithreaded CPUs as well as full 64 bit support. We use this to test memory and HDDs for now, but may find ourselves opening this up to other areas of the motherboard.
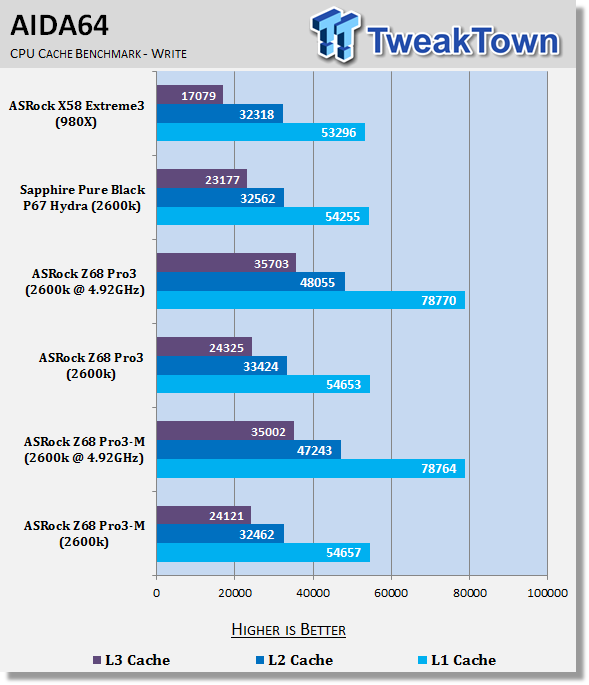
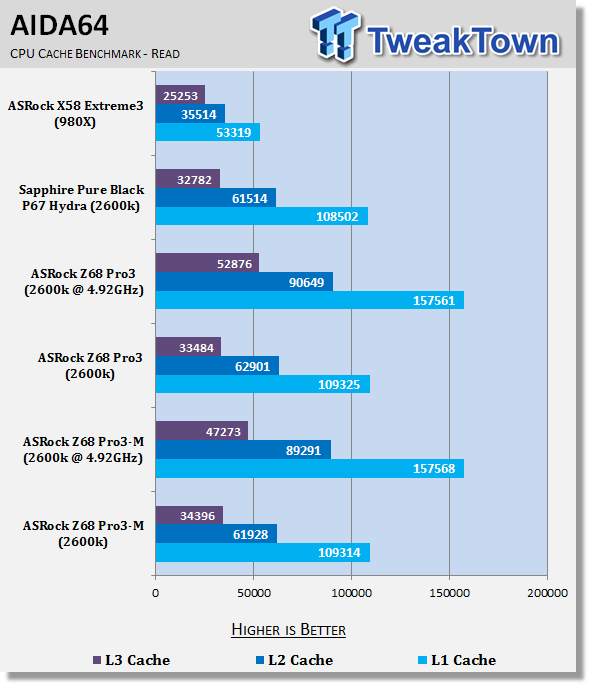
Comparing the Pro3 and Pro3-M boards from ASRock, we can see that performance is nearly identical between them which is exactly what you want.
CPU Benchmarks Continued
HyperPi 0.99
Version and / or Patch Used: 0.99
Developer Homepage: www.virgilioborges.com.br
Product Homepage: www.virgilioborges.com.br
Download It Here
HyperPi is a front end for SuperPi that allows for multiple concurrent instances of SuperPi to be run on each core recognized by the system. It is very dependent on CPU to memory to HDD speed. The faster these components, the faster it is able to figure out the number Pi to the selected length.
For our testing we use the 32M run. This means that each of the four physical and four logical cores for the i7 and the four physical cores of the i5 is trying to calculate the number Pi out to 32 million decimal places. Each "run" is a comparative to ensure accuracy and any stability or performance issues in the loop mentioned above will cause errors in calculation.
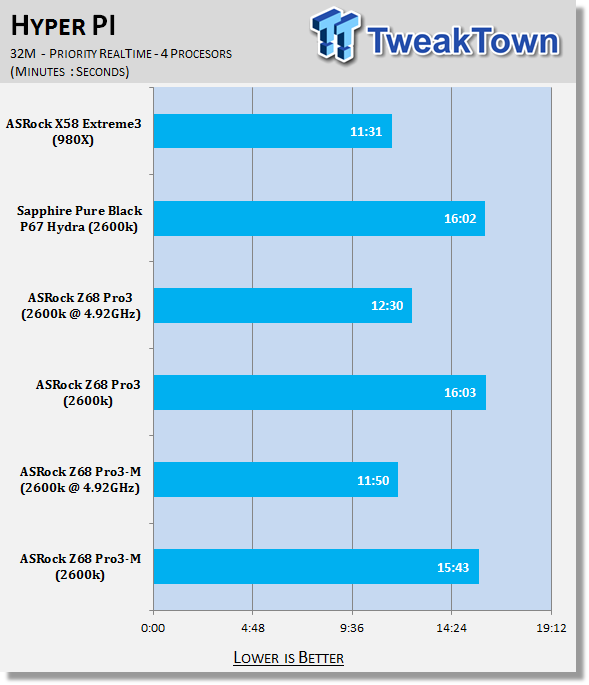
HyperPI performance is exactly where you'd hope it would be with the Pro3-M.
AutoGK
Version and / or Patch Used: 2.55
Developer Homepage: http://www.autogk.me.uk/
Product Homepage: http://www.autogk.me.uk/
Download It Here
AutoGK stands for Auto Gordian Knot; it is a suite of transcoding tools that are compiled into an easy to install and use utility. It allows you to transcode non-protected DVDs and other media to Xvid or Divx format. For our testing purposes we use a non-DRM restricted movie that is roughly 2 hours in length. This is transcoded to a single Xvid AVI at 100% quality.
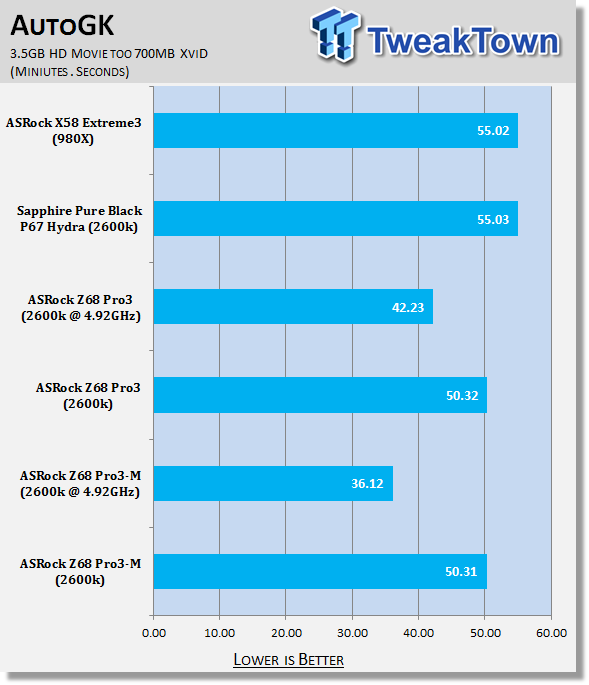
We continue to see that strong performance with the mATX version of the Pro3 when compared to the larger ATX one.
Storage Benchmarks
AIDA64
Version and / or Patch Used: 1.00.1035BETA
Developer Homepage: http://www.aida64.com
Product Homepage: http://www.AIDA64.com
Buy It Here
Replacing Everest in our labs is AIDA64. This new testing suite is from the core development team from Lavalys and continues that tradition. The guys have thrown in better support for multithreaded CPUs as well as full 64 bit support. We use this to test memory and HDDs for now, but may find ourselves opening this up to other areas of the motherboard.
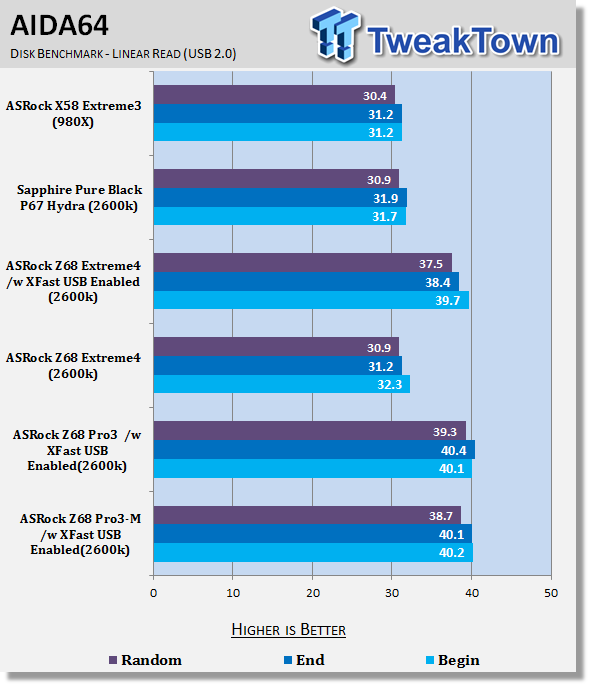
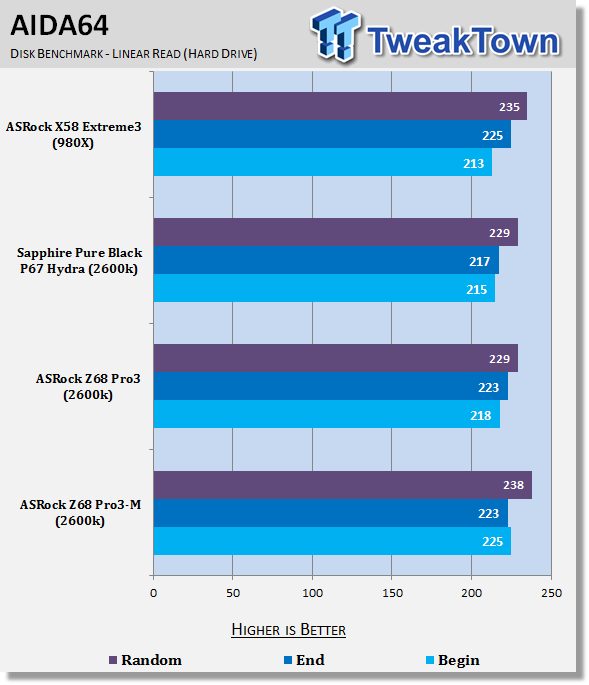
Looking at performance of both our SSD drive and our USB 2.0 drive, we can see it's exactly where we'd expect it to be.
Memory Benchmarks
Sisoft Sandra
Version and / or Patch Used: 2011
Developer Homepage: http://www.sisoftware.net
Product Homepage: http://www.sisoftware.net
Buy It Here
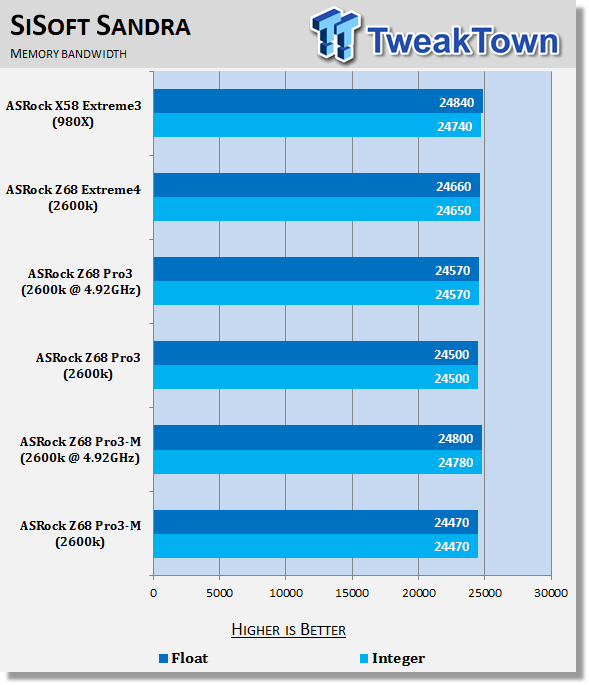
Under Sandra we can see that memory performance across the board is very close to each other.
AIDA64
Version and / or Patch Used: 1.00.1035BETA
Developer Homepage: http://www.aida64.com
Product Homepage: http://www.AIDA64.com
Buy It Here
Replacing Everest in our labs is AIDA64. This new testing suite is from the core development team from Lavalys and continues that tradition. The guys have thrown in better support for multithreaded CPUs as well as full 64 bit support. We use this to test memory and HDDs for now, but may find ourselves opening this up to other areas of the motherboard.
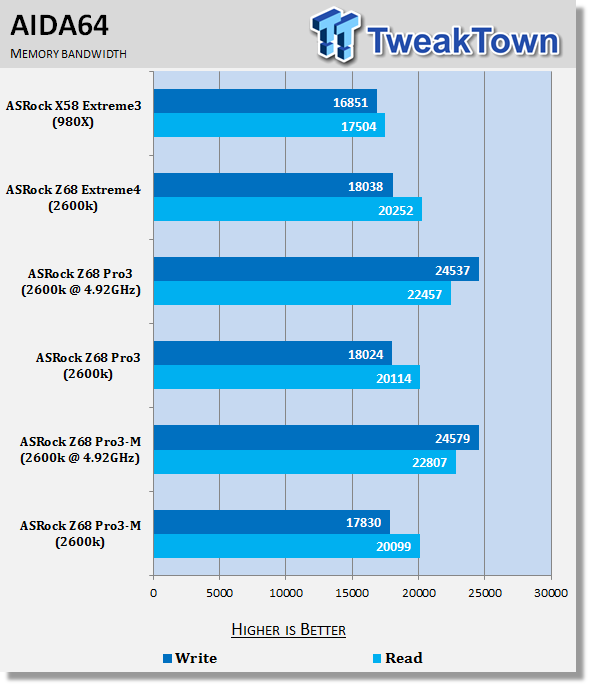
AIDA64 helps separate the systems more than Sandra and we can see that the performance of both Pro3 boards is very similar.
Gaming Benchmarks
3DMark 11
Version and / or Patch Used: 1.0
Developer Homepage: http://www.futuremark.com
Product Homepage: http://www.3dmark.com/3dmark11/
Buy It Here

3DMark 11 is the latest version of the world's most popular benchmark. Designed to measure your PC's gaming performance 3DMark 11 makes extensive use of all the new features in DirectX 11 including tessellation, compute shaders and multi-threading. Trusted by gamers worldwide to give accurate and unbiased results, 3DMark 11 is the best way to consistently and reliably test DirectX 11 under game-like loads.
Aliens vs. Predator
Version and / or Patch Used: Standalone Benchmark
Timedemo or Level Used: Built in Benchmark
Developer Homepage: http://www.rebellion.co.uk/
Product Homepage: http://www.sega.com/games/aliens-vs-predator/

Aliens vs. Predator is a science fiction first-person shooter video game, developed by Rebellion Developments, the team behind the 1999 original PC game, and published by Sega for Microsoft Windows, the PlayStation 3 and the Xbox 360. The game is based on the Alien vs. Predator franchise, a combination of the characters and creatures of the Alien franchise and the Predator franchise. There are three campaigns in the game, one for each race/faction (the Predators, the Aliens and the Colonial Marines), that, while separate in terms of individual plot and gameplay, form one overarching storyline.
Following the storyline of the campaign modes comes the multiplayer aspect of the game. In this Multiplayer section of the game, players face off in various different gametypes in various different ways.
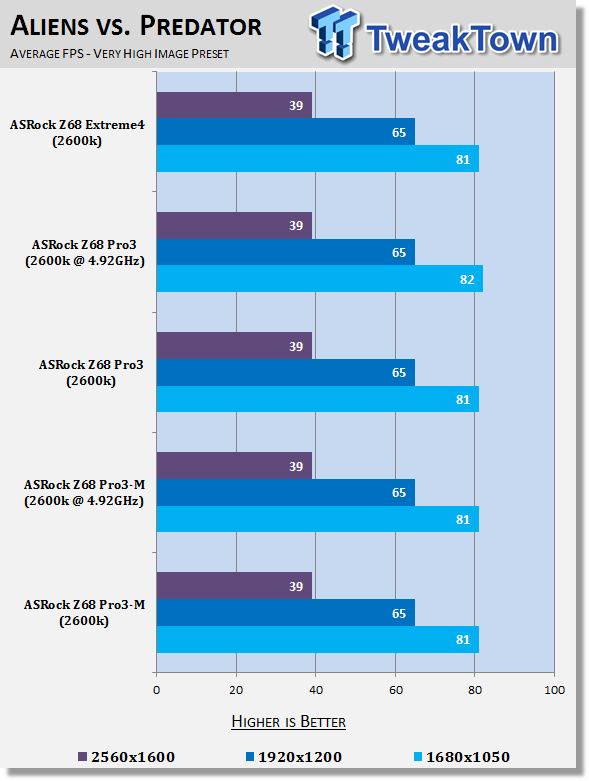
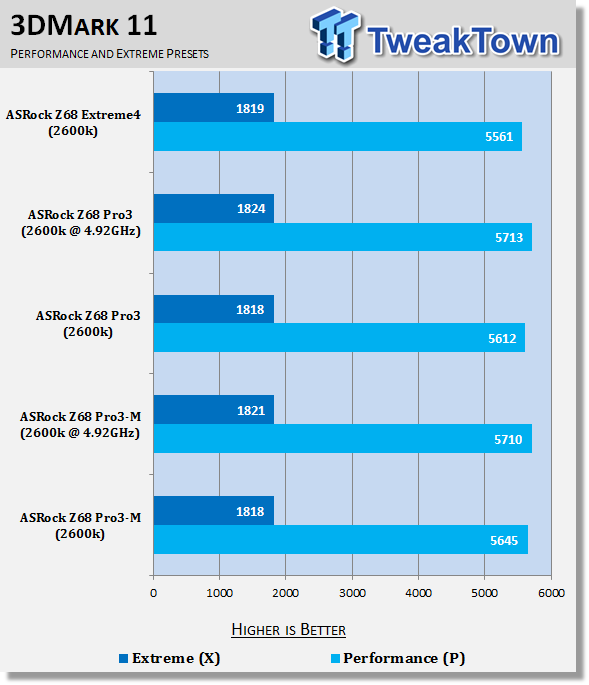
Firing up some 3D applications, you can see that performance is identical between all the systems as we don't have a CPU limitation on the HD 6970. This is great news for people who want to build a mATX gaming machine. Knowing that you're not going to take some big performance hit when gaming is great.
Temperature and Power
Core Temperature
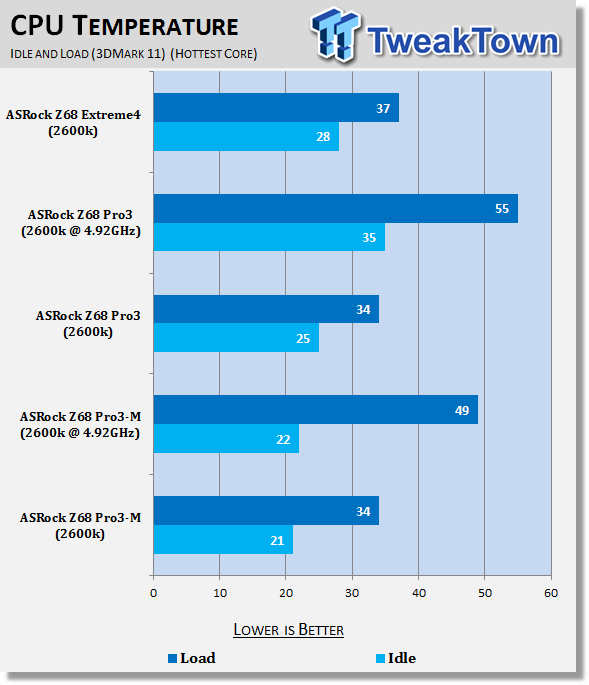
Heat on the Pro3-M is great, there's no additional heat being forced onto the CPU even though it's smaller.
Power Draw Tests
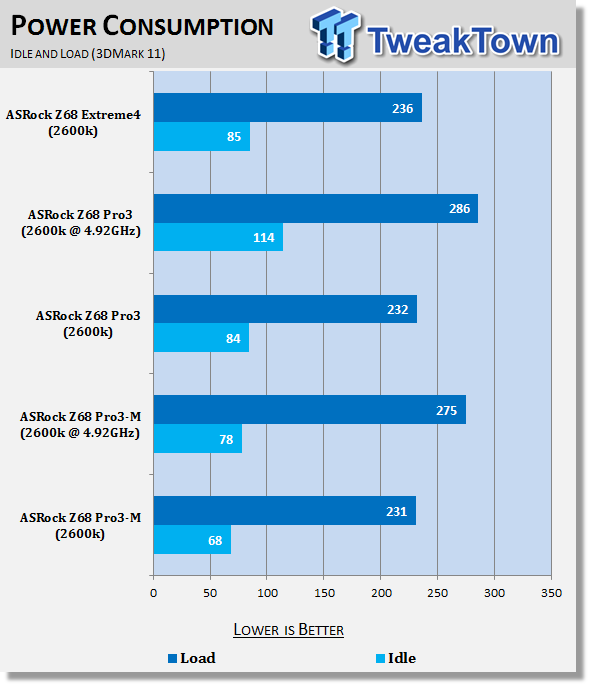
Looking at Power Draw, we see that the idle at stock is a little lower than the other boards. Under load, though, it lines up with everything else as we would expect.
Z68 Specific Tests
Lucid Virtru
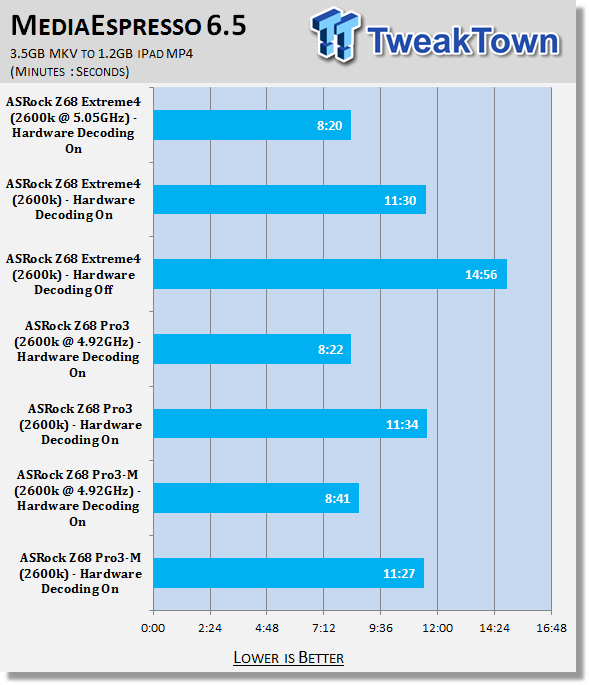
Looking at MediaEspresso, we can see that the Pro3-M is able to rip our movies down to an iPad friendly format just as fast as the other Z68 boards we've looked at.
Final Thoughts
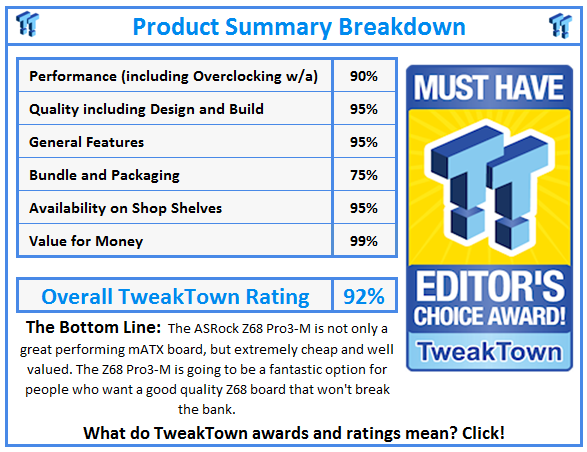
I'm in love with this board. I'm just a real sucker for mATX boards and when they can offer the same kind of performance as their big brothers it makes them even more attractive. The thing is, if that wasn't enough already, the ASRock Z68 Pro3-M comes in at $114.99 US. That's just an amazing price; it's actually the cheapest Z68 board currently listed on Newegg.com.
The Z68 Pro3-M is an attractive option for a lot of people. If you want to get in to the Z68 platform on the cheap, the aggressive price tag is fantastic. If you want to build a nice little LAN box based on the new chipset, this is a great option and it's great you're not paying more for the privilege of having a smaller board.
If you're just looking for something cheap, though, and don't need all the bells and whistles that are present on larger boards, it's also the perfect choice due to the price. ASRock have just done a really good job with the new Z68 platform and been extremely aggressive on the pricing scale, making them a stand out.
The Z68 Pro3-M is going to satisfy the needs of a lot of people and while it might be a little lacking in a big bundle and overclocking might not be as strong as its biggest brother, the Z68 Extreme4, which carriers a much larger heatsink setup, the Pro3-M preforms extremely well at stock and still managed to achieve a 4.9GHz overclock.
Just being that you're buying a cheap board, it doesn't mean you're getting a low quality one, and that's probably the most important thing to know. For $114.99 US you're getting a board that's able to perform just as well as more expensive ones while at the same time giving you the case flexibility thanks to its mATX platform. In the end, if you don't mind the larger ATX size, you can also spend the extra $5 and check out the Z68 Pro3 for $119.9; a board that has come down in price since we reviewed it only days ago.

 United
States: Find other tech and computer products like this
over at
  United
Kingdom: Find other tech and computer products like this
over at
  Australia:
Find other tech and computer products like this over at
  Canada:
Find other tech and computer products like this over at
  Deutschland:
Finde andere Technik- und Computerprodukte wie dieses auf