


Our Verdict
Pros
- Real wood top (rubberwood)
- Tons of space
- Wire management and quiet operation
- Strength and versatility
- Comes with dual monitor arms
Cons
- Price
- Wood finish
- Pressed in logo looks "cheap"
Should you buy it?
Introduction, Specifications, and Pricing
While this may be our first go at reviewing a desk of any sort, with all the time we have spent gaming, moving, setting up an office that can also be tested in, and as things age, we have seen and built our fair share of desks in our time. We have been using box kits from the big boys in the not-really-wood category of desk options. We know that a desk should be easy to assemble and sturdy enough for the purpose, and if it is roomy, that is also a huge plus.
Over the last few years, a bit longer now, as we are still missing a couple of years in our minds, there has been a much bigger push for the standing desk movement. While we get all of the health benefits and can fully appreciate them, it is not why we would opt for a motorized desk. Our desire is more of an exercise in convenience, for instance. When you get a new build to set atop your new desk, raising or lowering the build is convenient to help with the process. Testing is a big part of our day in situations specific to us, and we may need to investigate or problem-solve. Again, the freedom to get things closer to us is a back saver.
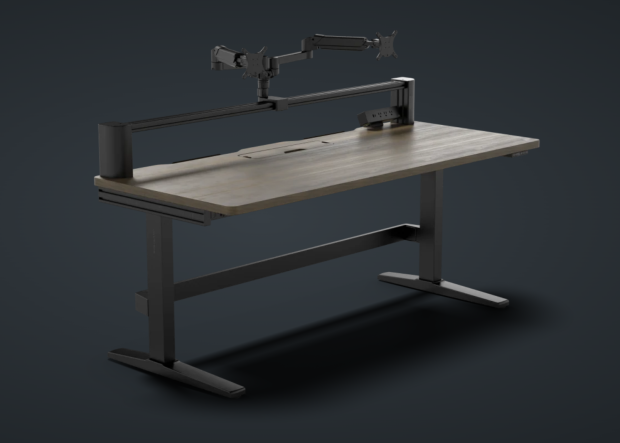
While many options are available to peruse at your leisure, we have one of the better solutions. Granted, all we have seen is in pictures and videos, but we feel Corsair hits a perfect balance between the ordinary slab on some motorized legs and something akin to a shop desk without being nearly as bulky or imposing. Of three variants of the Platform:6 desk from Corsair, the Standard, Elevate, and Creator Edition, the Elevate we have today is all you will likely ever need from a customizable computer desk.
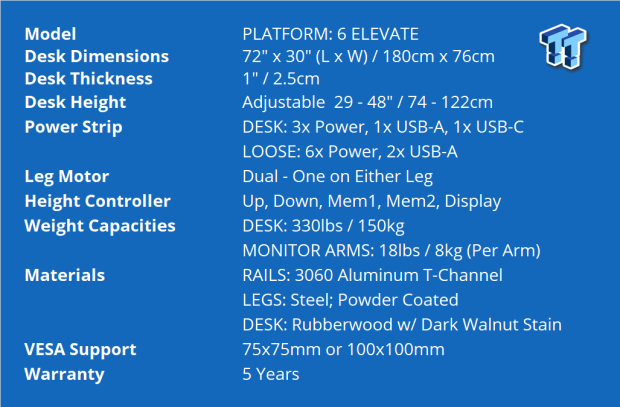
The chart we compiled from the product page is basic, but this is a desk we are dealing with. Starting with the top of the Platform:6 Elevate, we are given a slab of Rubberwood as the desktop surface. In our version, the wood is dark walnut stained and shown to be seventy-two by thirty inches in area while being an inch in thickness. Being a motorized desk, the top can be lowered to twenty-nine inches in height or raised to forty-eight inches high, with half-centimeter increments.

Best Deals: Corsair VOID RGB ELITE Wireless Gaming Headset
Price Trend:
Prices last scanned 9 hours and 1 minute ago
7 days ago: $119.99 USD30 days ago: $91.32 USD
7 days ago: $119.99 USD30 days ago: $119.99 USD
7 days ago: $154.99 CAD30 days ago: $154.99 CAD
7 days ago: $212.62 CAD30 days ago: $203.34 CAD
Two power strips are included with the desk. The first is mountable to the desk in two ways, and it delivers three power outlets along with USB-A and USB-C ports. The second strip is housed below the desk and is something we are all used to seeing. This time, the strip delivers six power outlets and two USB-A ports, one of which powers some ports in the desk cubby.
Corsair designed the Platform:6 Elevate with a pair of motors, one on each leg, powered by a central controller module. The physical controller for these motors allows you to raise or lower the desk. It has two buttons to save height profiles, and the last one activates the display to read out the current height in centimeters.
The last few things in the chart are no less important. Here, we see the Platfiorm:6 Elevate's 330-pound weight capacity, and it comes with a pair of monitor arms capable of holding eighteen pounds on either arm. Corsair uses 3060 aluminum for the extruded rail system, while other parts are powder-coated steel. Back to the monitor arms, we see that VESA support is offered in 75mm or 100mm, and the Platform:6 Elevate is warranted for five years.
Our Latest Office & Gaming Furniture Review Coverage
At this point, like us, you appreciate what Corsair has put together, but here comes the part that will make or break this decision for many out there. While availability is limited to the Corsair store, and we get why, this is huge. However, even going through Corsair to get the mid-range options set as we will show it, the Platform: 6 Elevate comes with a $1449.99 MSRP but is currently on sale for $1349.99, which softens the blow some, but is still a large chunk of change. Even so, Corsair delivers a fair bang-for-the-bush value with this Platform:6 Elevate customizable computer desk.
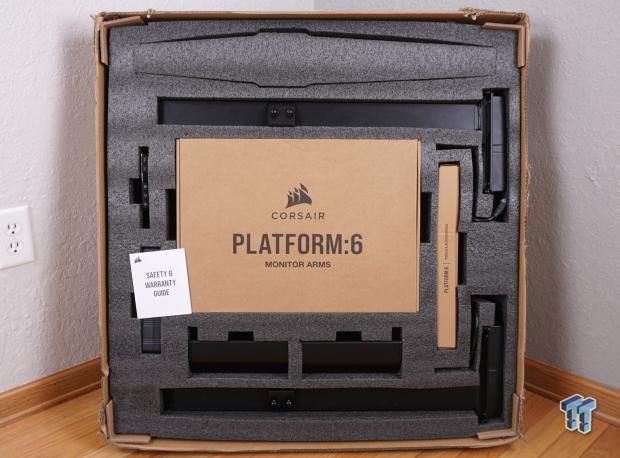
Packaging and Platform:6 Elevate Box 1
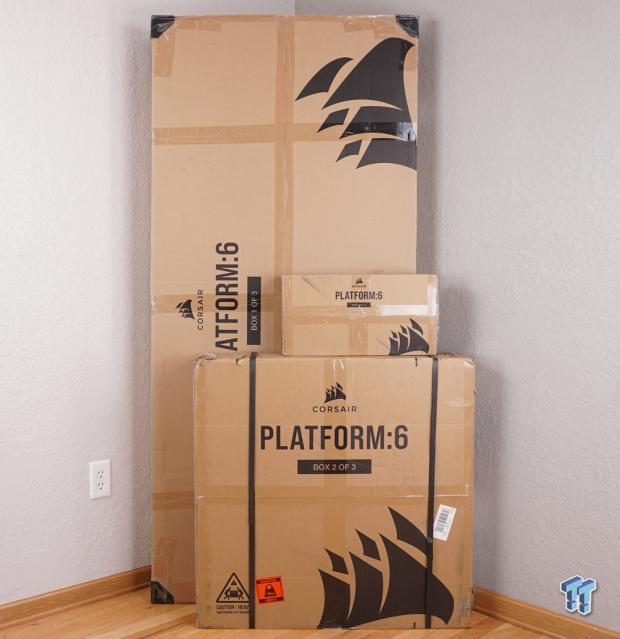
Corsair sent us three separate shipments. The first was Box 3, which was delivered easily enough. Box 2 came on another truck, and we could tell the driver was cursing us as he carried it to the door. The largest, Box 3, was the last to arrive. It came off a twenty-four-foot box truck with a pair of gentlemen who brought that heavy beast into the house.
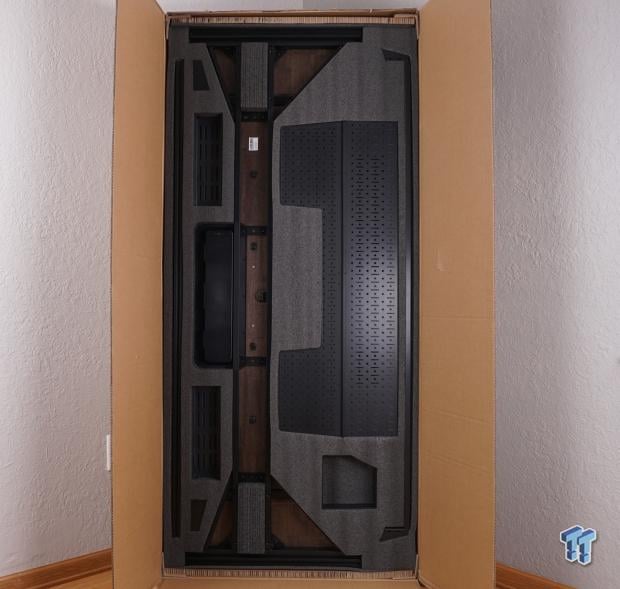
Upon opening box one, we are greeted with some steel pieces sunk into dense black foam. Below the foam is the dark walnut-colored slab of Rubberwood, which is also well-protected from any possible damage.
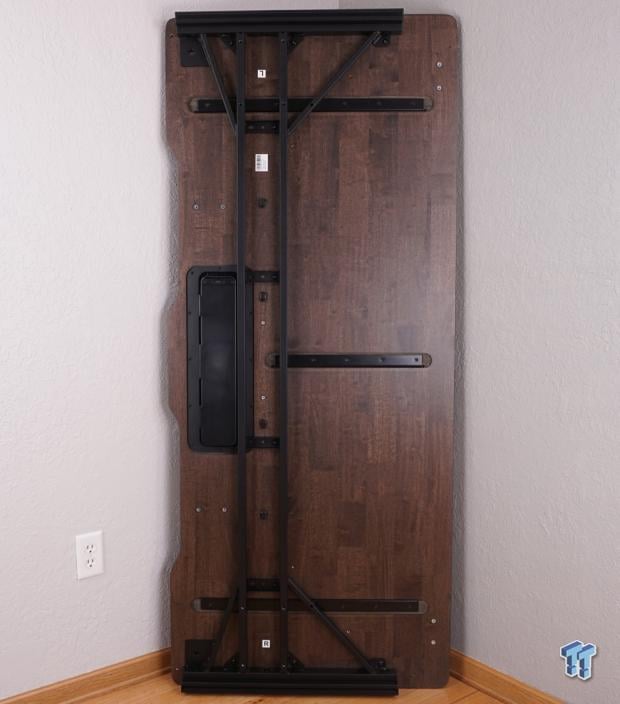
The desktop comes with the steel support already installed under the desk. Grooves cut with steel inserts help bolster support across the thirty-inch depth, and we see many threaded inserts installed where the legs and accessories attach.
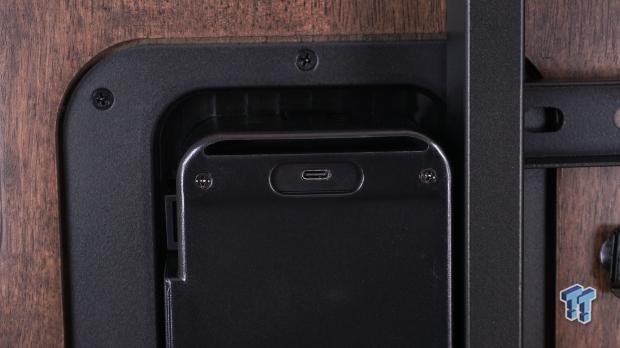
After closer examination, we noticed that there is a plastic addition screwed into the bottom of the desktop, and it appears to be a cubby for something, but we are not certain yet. However, we noticed the USB-C port at the bottom, which will power the ports in this compartment.
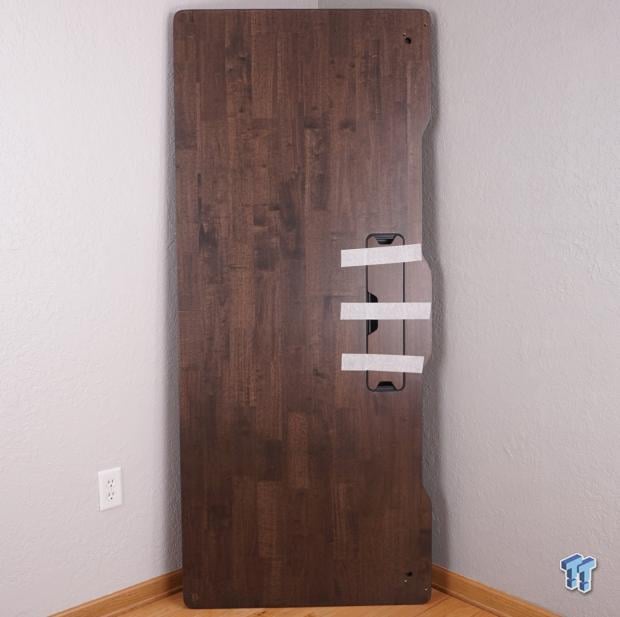
The top of the desk has a dark walnut finish that is matte in appearance. Strips of tape hold a wood cover over the compartment we just looked at from below, and a pair of notches at the back help with wire management.
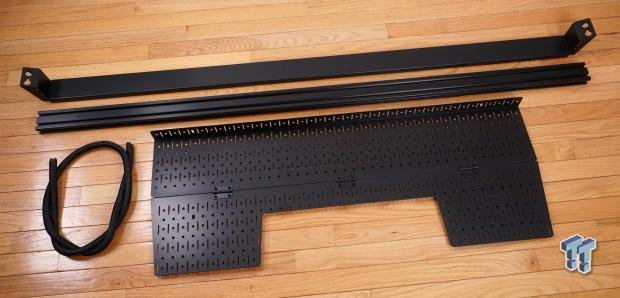
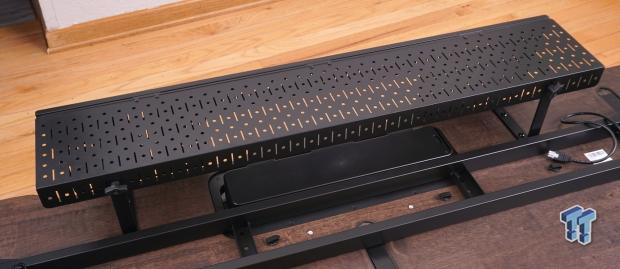
The bits of steel we mentioned when first opening the box are now on display. At the top is the cross support for the legs, and just below that is some extruded aluminum used to hold the monitor arms and other parts. That leaves us with some braided sleeving to help manage cables. The large steel object is folded into a right angle and is the storage compartment under the desk for cables and the power strip.
The last part in the box is much smaller. At the top and bottom, there are what are referred to as wire trays, but they could be parts trays or tool holders, for example. In the center are two steel D-brackets, used with the large steel plate in the storage area. The plastic caps on either side are used with the crossbar support for the legs.
Along with the safety and warranty information insert, Box 1 is where the instructions are packed. This thick book will take you through all the steps needed to finish the Platform:6 Elevate, although one step does require help. The book thoroughly describes the parts needed, how to install them, what it takes to get it done, what tools, parts, etc.
Platform:6 Elevate Box 2
Again, packed very well, with dense black foam ensuring everything arrives in perfect condition, we get the rest of the bits needed to finish the basics of the Platform:6 Elevate. Legs, switches, stands for the rail system, monitor arms, tools, it's all in there.
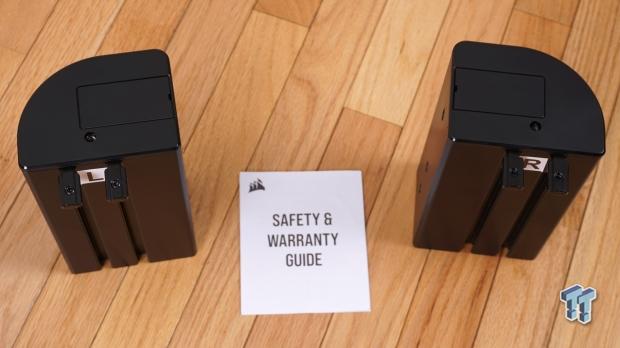
First out were the pair of feet. These are made of steel, long enough to support the desk and the additional weight and come with gray feet, which are adjustable to help level the desk.
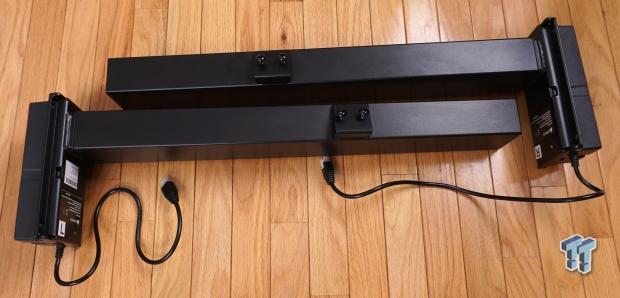
The motorized legs are beefy and self-contained. The small end goes into the feet we just saw, while the larger ends with the GPU 6-pin connectors mount under the desktop. The pair of screws seen on the legs is where the crossbar attaches to keep the legs from spreading or wobbling.
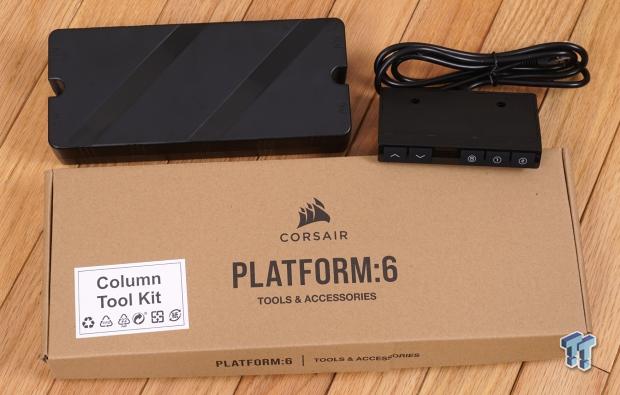
We then grabbed the central controller that everything plugs into, and to the right of it is the switch block. We also pulled out the tools and accessories box, and you will be surprised at the amount of gear Corsair stuffed in there.
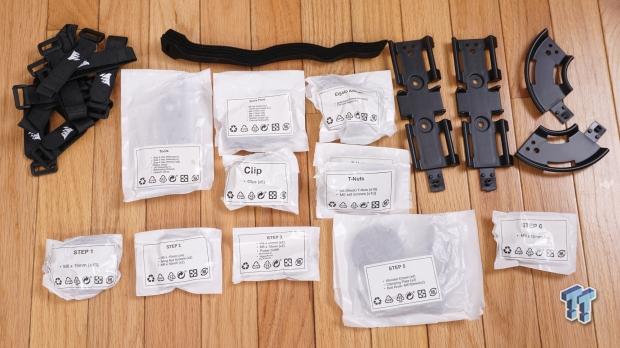
Everything seen here came out of that thin box. There are ten Corsair-marked straps with plastic loops to maintain wiring; if that isn't enough, there are ten more at the top of the picture, and they are willing to do the same. The bag of tools includes four wrenches, one socket wrench, and Phillip's driver next to a bag of spare parts and clips. There is an Elgato mount for cameras or lights, T-nuts, and plastic wire management rails. Beyond that, we find a bag for each manual step across the bottom, helping simplify the hunt for parts during assembly.
The black plastic capped towers work with the thin extruded rail in Box 1. One goes on either side of the tabletop, with the rail between them, and is where the trays and monitor arms are mounted. We also got another safety and warranty insert with this box.

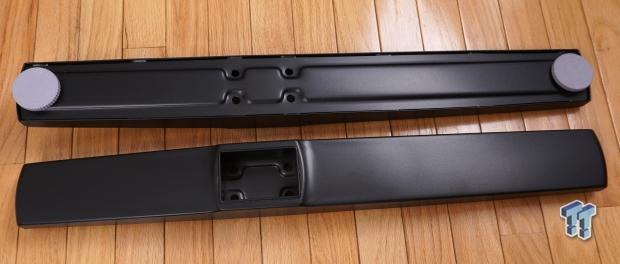
We are leaving all the monitor arm components in the box until we need them. But you can see the arms, the VESA plates, the rail clamp, and everything you need for dual monitor action.
Platform:6 Elevate Box 3
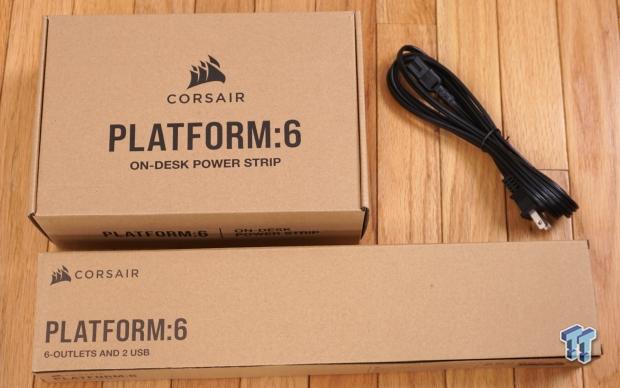
Inside Box 3, we find a pair of boxes and a power cable used with the controller box for the motorized leg portion of the desk. The box at the top has the on-desk power strip, while the box at the bottom has the longer power strip for the bulk of your power needs.
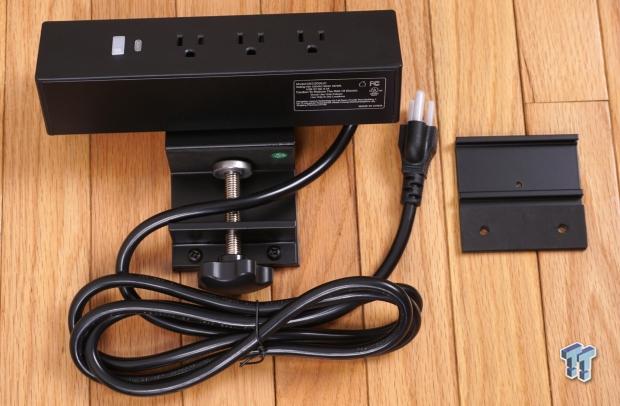
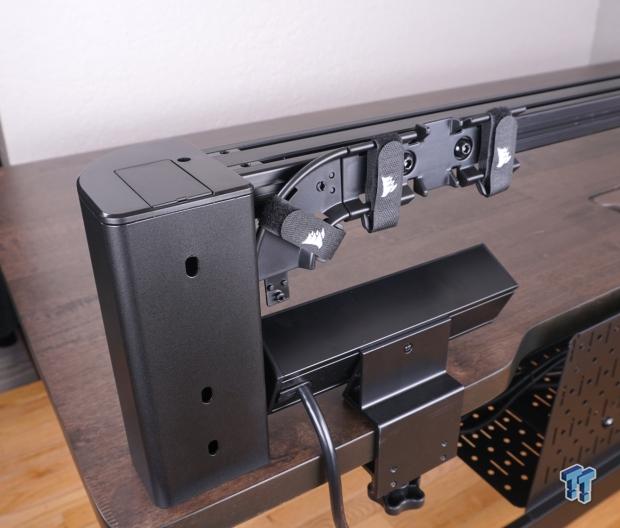
The on-desk module comes attached to a screw clamp and bracket, allowing users to snug it onto the desktop, allowing you power without having to go below the desk. It also offers USB Type-A and USB Type-C ports for device charging. On the right is an optional plate you could use, which allows the power module to be mounted to the extruded rail system.
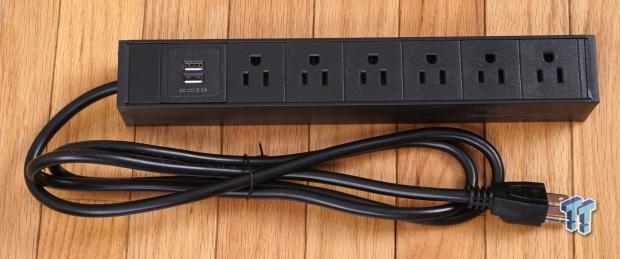
The power strip that rides in a tray under the desk is what we typically find when discussing a power strip. However, just like the smaller version, we get USB Type-A and Type-C charging ports, although the Type-A will be needed to power the cubby in the desktop.
Assembly and Features
Following the manual, it tells us to install the legs into the bottom of the desk with four fat screws, and while also using the same size screws, secure the feet to the bottom of the legs. Of course, this needs to be repeated for both sides.
The manual then tells us to proceed to the storage tray. First, you are shown how to install the D-brackets on the bottom of the desk. Once you have done this, you can attach the hinged steel plates so that you have a wire management tray directly below the cubby in the desk.
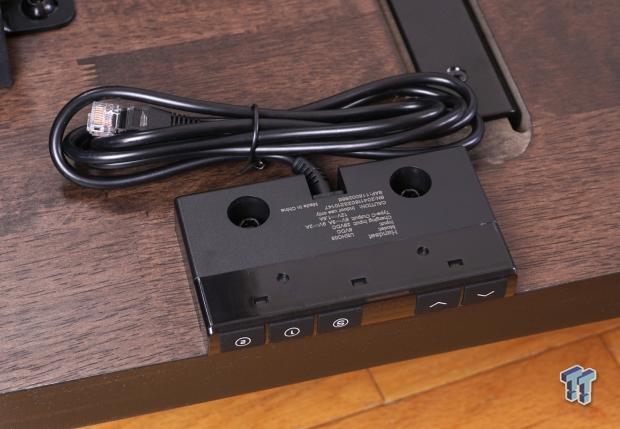
The switch block is mounted next, and it sends a signal through what appears to be a phone line or ethernet cable. Either way, a pair of screws gets the switches secured to the underside of the desk.

Two screws lock the control module into the frame of the desk, and using the black plastic wire clips, run the cables towards the box for connectivity. Motor one and the switch signal go on the left, while motor two and the AC power are on the right.
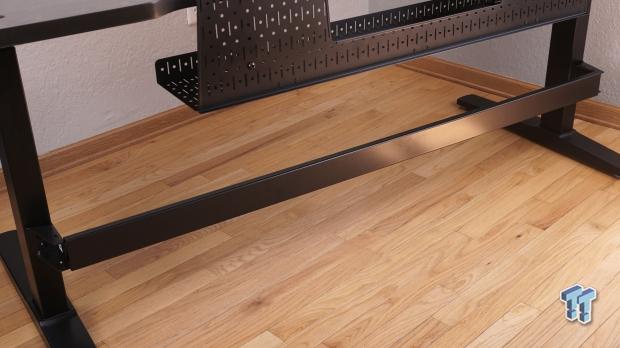
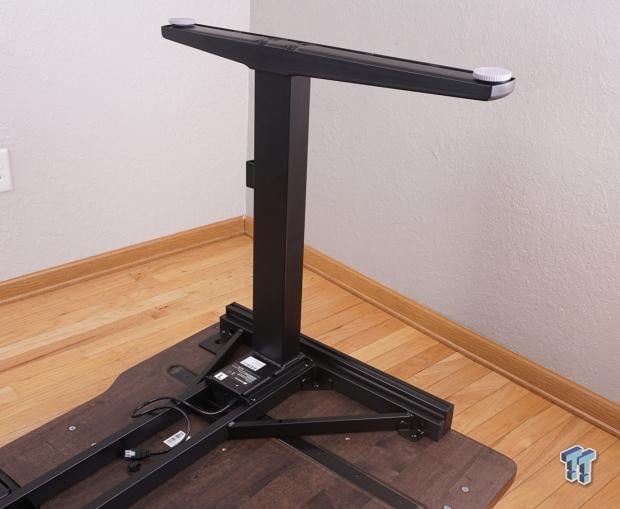
We skipped over the step where Corsair suggested you get help to flip this heavy beast onto its feet. Once that is done, you want to add the crossbar to brace the legs. Not only does this add support to the legs, but it will keep you from putting stress on the screws holding the motors under the desk.
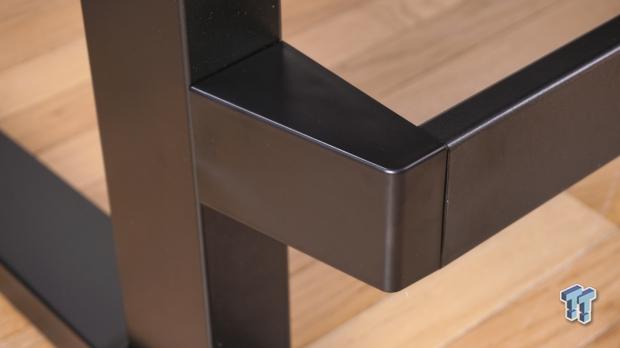
Once the crossbar is bolted down and you are satisfied, go ahead and clip on the black plastic caps that give the desk a finished look; rather than leaving it exposed, Corsair takes a little time to think of even the smallest details.
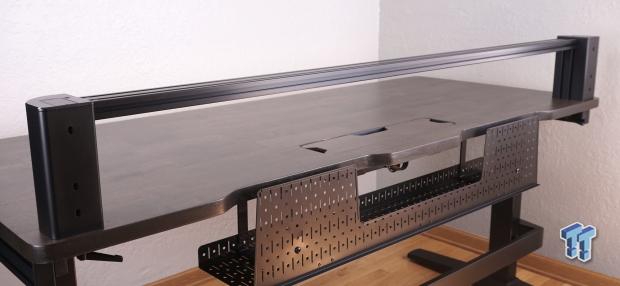
We then added some dowels and set the towers on either end of the desk. We suggest you attach the extruded aluminum bar to the towers before mounting the towers. The instructions show this reversed, but the bar cannot be installed once the towers are tight.
The manual then moves to accessories and using T-nuts in the extruded rail. After putting a pair of T-nuts in the groove, we aligned them so that the wire management bracket could be tightened to the rail. We also clamped the on-desk power strip to the desktop.
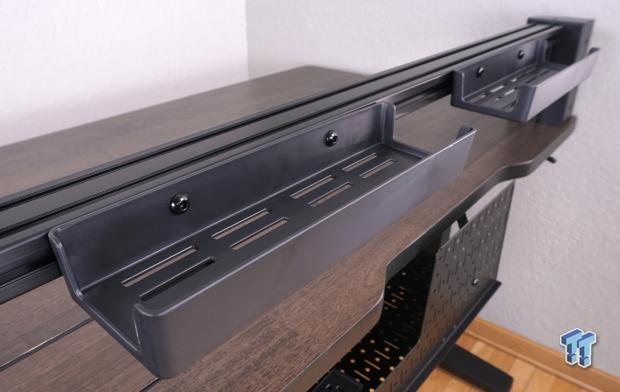
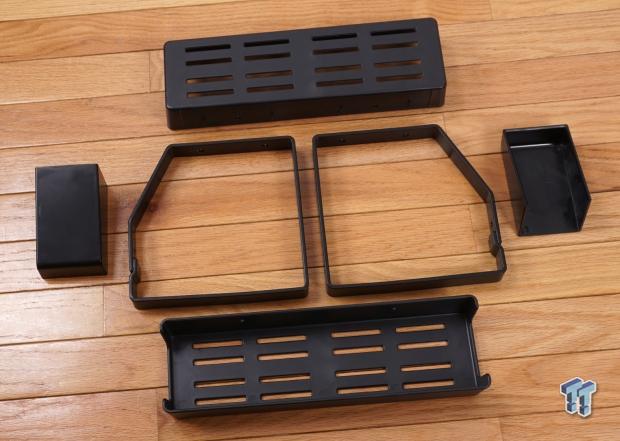
Using the same T-nuts as we did for wire management, Corsair shows how to install these trays behind the rail and use them to help with wire management. However, with all the straps and things Corsair already offers, these are much better suited as parts trays on the front.
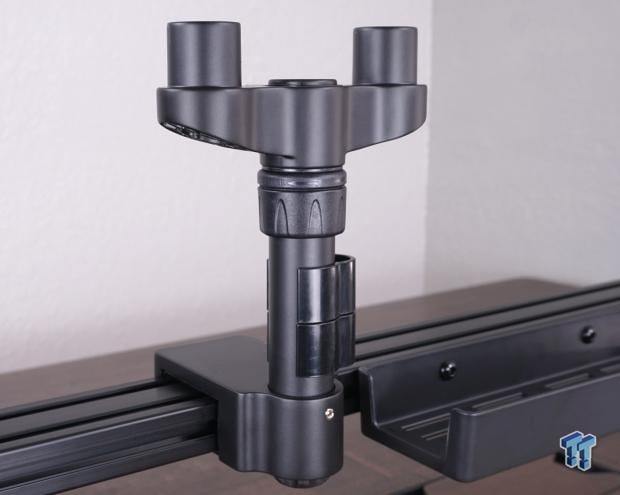
Last on the list is the dual monitor stand and arms. The bracket uses a large hand-turned nut at the back, but the bottom uses a screw that swivels a plate that grabs onto the bottom of the rail system. Once tightened, the mount is immovable, but with the hand-turned nut, you can loosen it and slide the system, although you may scratch the black anodized rail.
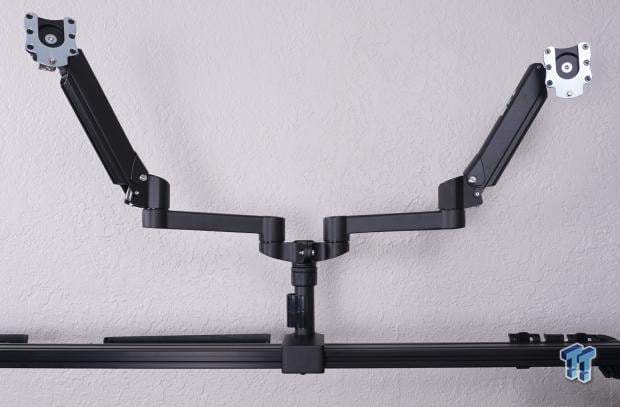
The arms go into the mount with a pair of screws that drop through and tighten to the mount near the center. All you need now is a monitor that is less than eighteen pounds, and you need to mount the VESA plate to it so it can be attached.
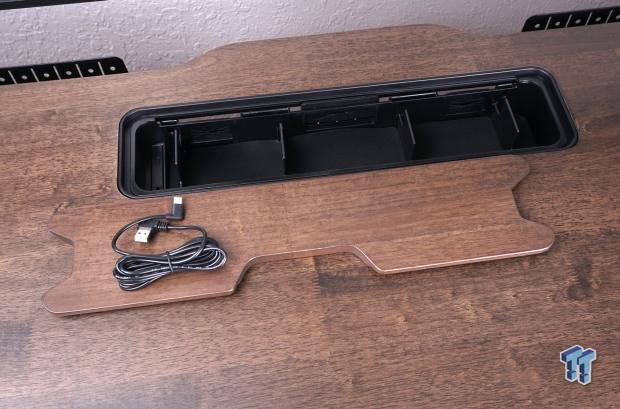
There is a point in the manual that shows the use of a USB Type-A to USB Type-C cable, but we had yet to learn where it was, as we left the cubby taped closed until now. Inside the tray are the cable and four removable slats. This can be used to store excess peripheral cable, hide your phone while charging, set a bag or chips in it, or whatever you come up with. There are grommets at the back to help with cables for mics and whatnot, and even USB Type-A and Type-C charging ports at the left end.
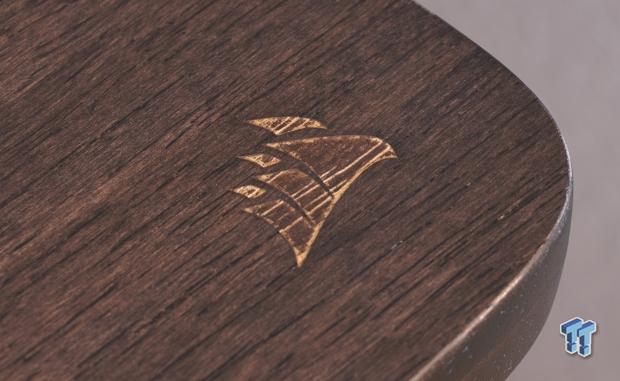
While we like the idea of Corsair putting their mark on the Platform:6 Elevate, this pressed-in logo breaks the visual appeal, as it removes some of the stain when done. If this is the only answer, we would prefer a painted logo or nothing at all.
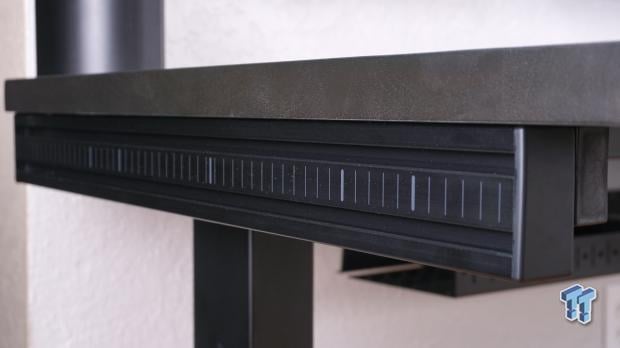
Even the sides of the desk are dressed up slightly. Corsair could have left the side rails anodized like the other aluminum parts, but they added this thin and thick hash design on both side rails.
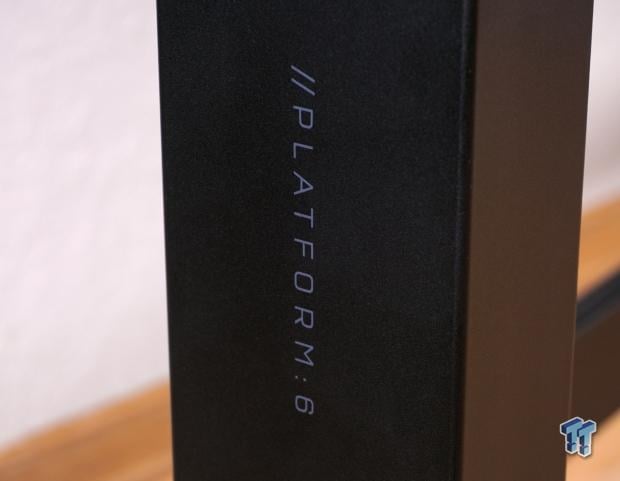
To see the desk's name, you must expose its sides to the room. Otherwise, when slid in between other desks, as in our office, the //Platform:6 painted on the legs gets lost.
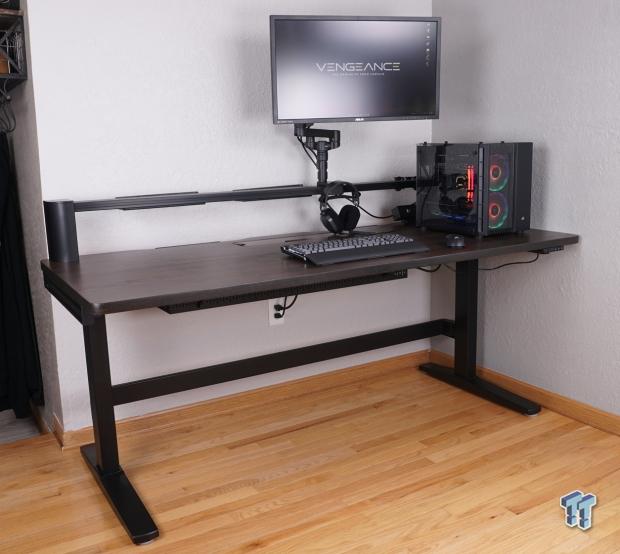
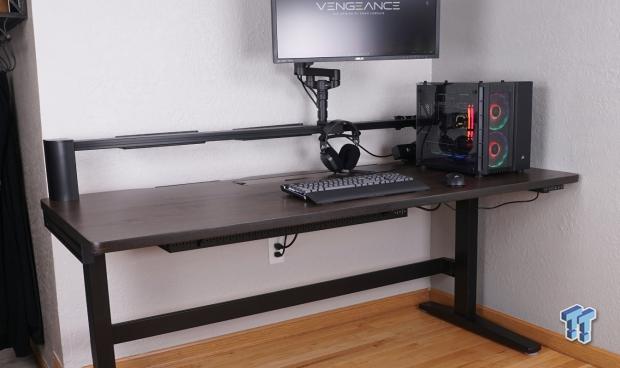
Using our Vengeance system, which we used for peripheral testing, we attempted to show the scale of the Platform:6 Elevate. If we used a lower key-count keyboard, we could have two people gaming side-by-side on this desk.
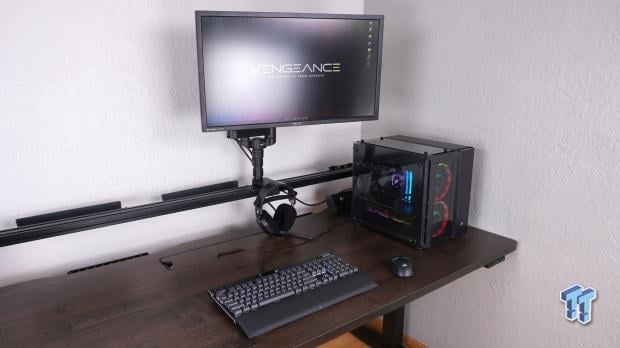
Even with the twenty-seven-inch monitor, the Vengeance system, the K70 MAX, the HS80 MAX, and the Nightsabre, we feel we are not fully utilizing the Platform:6 Elevate's potential. However, in future testing scenarios, and with our work/gaming rig at the left end for day-to-day use, we could not think of a better solution to our usage.
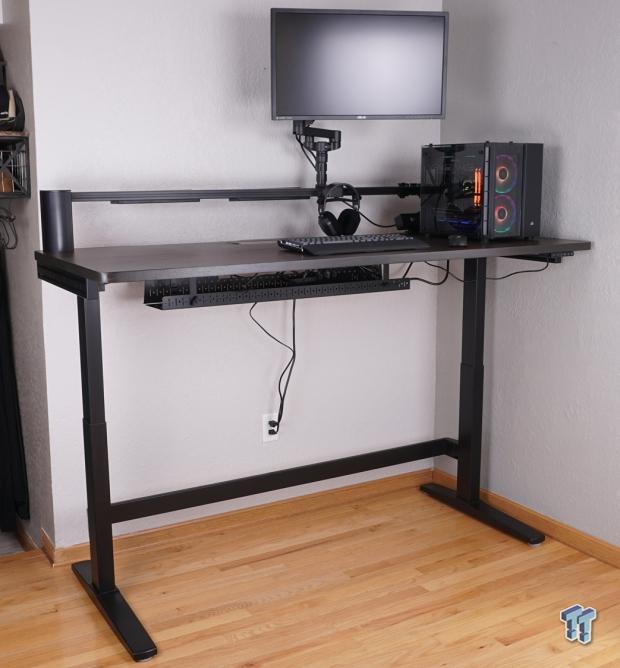
Remember that all the previous images were with the Platform:6 Elevate at its lowest ride height. We raised the desk to the highest allowable once everything was set up with room for the power cables to move. Now, we realize this is a table for giants as it is now armpit high to our five-foot ten-inch frame.
Final Thoughts
As a desk, and only a desk, the Platform:6 is a beast. Everything is built out of strong steel components with solid welds and all the structural integrity you need. The Rubberwood slab is strong and does not bend under normal conditions; even with a few systems on it and both arms holding monitors, you will be hard-pressed to hit that 330-pound limit, and certainly not in one spot. At thirty inches deep, it is deeper than any other desk we have had to date, and we only knew what we were missing once we had it. At six feet in length, it offers all the room one person will need and most of the room two people will need.
The thing is, this isn't just a typical desk. It has motors, controls, and potential for additional pieces that Corsair offers. You can raise and lower the desk according to your needs, but with shelves on the sides to carry a PC, pegboard pieces, hooks, or whatever you need, Corsair likely has an answer in their store. We also made sure to test the specifications. After building it, we immediately verified the weight capacity because we had only one thought. We want to ride that thing. At a little less than 275 pounds, we put our bum in the center of the desk and pressed the beam me up Scotty button. The Platform:6 Elevate took our weight with a slight deflection in the desktop, but without the slightest strain or a creak from the steel components, it took us up and safely back down as it should with such specifications.
We also love the memory buttons on the switch panel. We set our lowest or Mem1 slot to match the height of the desk it butts up against for daily driving. This way, we can seamlessly move from our main corner desk and off onto the Platform:6 Elevate to get results from memory and CPU cooler testing. Mem2 is set to a comfortable height for us, far from as high as it goes. It would take someone seven feet tall to make this desk feel insufficient, and that is why we kept saying it is built for giants, whereas much of the industry stops for much smaller individuals.
Remember, if what you see is too much for your needs and a desk that rises and lowers is not needed, look to the Platform:6 Standard. It comes with much of what you see, and you can add the parts you want as you go. If you want more from the Platform:6, we will say that the Creator Edition offers quite a bit more usable space with the pegboard system and extra shelving. If the walnut color does not fit the theme, there is black to consider.
Starting at around $900 gets you into the Platform:6 series with the Standard Model, and the Creator Edition is getting near $1600 as we write this. Right in the middle is the Platform:6 Elevate, the best mix of gear without going too far or beyond many budgets for a desk. At $1349.99, the cost is a big decision to battle with, but this Elevate is a decade or two worth of investment. Where our vinyl-covered particle board tables are ready for the bin soon, with some care, the Corsair Platform:6 Elevate should last you, well, forever. Even with the small issues like the logo and the lack of what we feel is a bulletproof finish, Corsair still has much to be had from this price point.
 ASUS ROG Raikiri II Xbox Wireless Controller Review - Ready to Take Control
 IQUNIX Magi96 Pro Aluminum Low Profile Mechanical Keyboard Review - Premium Build, Satisfying Sound
 Razer Pro Type Ergo Wireless Split Ergonomic Keyboard Review - Built for Comfort and Support
 ASUS ROG Strix Morph 96 Wireless Gaming Keyboard Review - Great Performance, More Affordable
 Corsair MAKR PRO 75 Hall Effect DIY Keyboard Review - Pre-Built and Ready for Action
 Valve can't catch a break as Snapdragon price hike threatens Steam Frame
 PlayStation gamers plan 'blackout' to hit Sony where they know it will hurt
 Microsoft is using the TPM chip required for Windows 11 to crack down on KMS activation piracy
 PS5 Emulation makes big progress again as it reaches GTA 5 loading screen
 Modders turn the PS Vita into a modern gaming handheld through Xbox Cloud Gaming
 Got a cat? Here's a cat-themed PC case with a power button shaped like a paw
 Xbox testing smart client to boost game download speeds
 NVIDIA CEO Jensen Huang joins X with post backing open-weight AI
 Roku raised prices by up to 60%, citing a memory shortage, despite the CEO calling it great for business just two months ago
 Amazon Gaming boss says next-gen consoles crossing $1,000 is good news
 Thrustmaster T.Flight HOTAS 5 MSFS Edition Review
 SteelSeries Arctis Nova Pro Omni Wireless Headset Review - One Headset to Rule Them All
 SteelSeries Arctis Nova 7 Wireless Gen 2 Headset Review - New and Improved, But Is It Enough?
 AMD Ryzen 7 7700X3D Review - Days of Future Past
 Samsung 990 2TB SSD Review - Ninth Gen QLC at PCIe Gen4 Speeds
 ASUS ExpertBook Ultra (Panther Lake) 14" Business Laptop Review
 MOZA FMP18 Panel Bundle Review: authentic F/A-18 Hornet cockpit controls for flight sims
 Micron 6600 ION 245.76TB Enterprise SSD Review - Best in Class Programming Speeds
 MOZA MA3F EFCM Flight Control Module Review: authentic Airbus A320 autopilot panel for simulators
 Printer Not Working in Windows? How to fix detection, print queues and drivers
 The Ultimate Guide to Personalizing Your Windows 11 Taskbar
 How to Turn Your Windows Laptop Into a Second Monitor with Miracast and Wireless Display in Minutes
 6 Mistakes to Avoid When Buying a Windows Laptop
 I capped Windows Update's bandwidth with Delivery Optimization, and my downloads stopped choking
 I use this decade-old free tool that finds files faster than Windows Search does
 I install and update most of my apps with this Windows command now, and I stopped downloading sketchy installers
 Hisense U6SF 65-inch MiniLED TV: High Performance Meets Leisurely Convenience
 I stopped digging through Windows menus after I set up this one folder
 Don't sell your Windows laptop until you do these things