


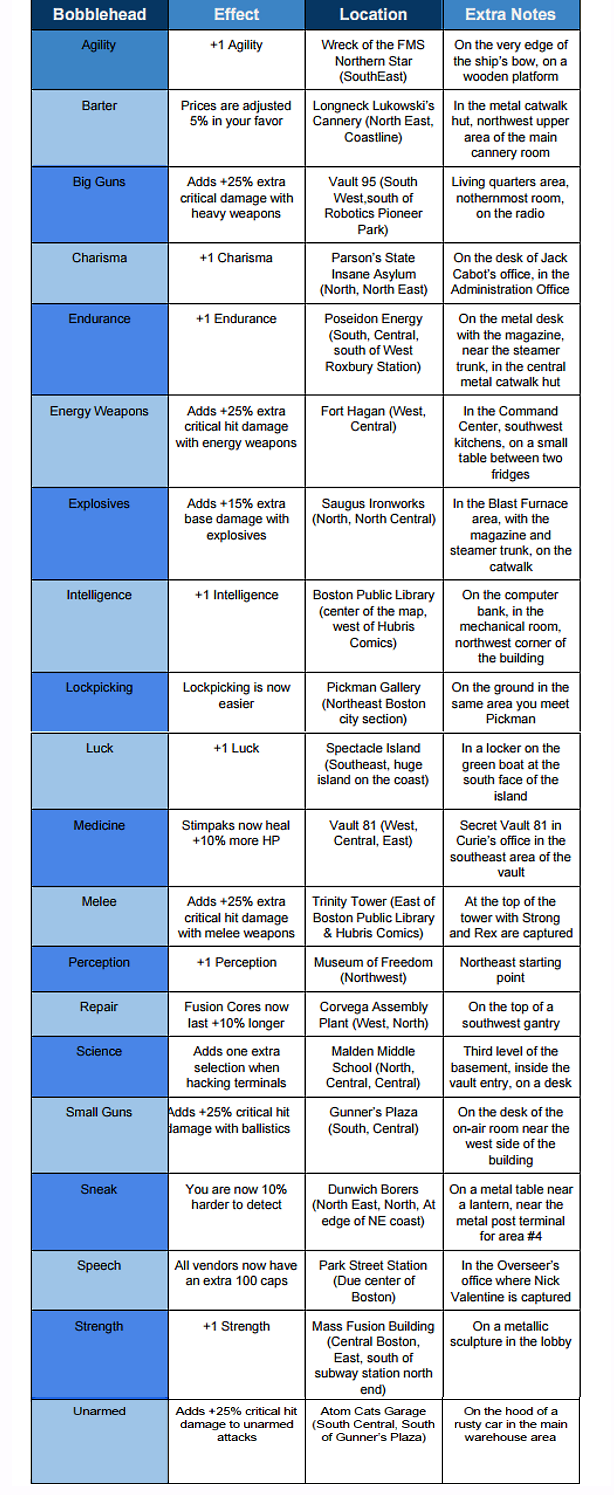
Bethesda has overhauled Fallout 4 in such a way that every SPECIAL stat is fantastic in its own way. Not only does each stat have its own balanced effect in-game, but they are now tied to a dynamic Perk tree, pretty much nixing all chances of being a "jack of all trades".

It used to be that Fallout players could get away with pulling SPECIAL points away from a specific stat to fuel better ones, but Fallout 4 doesn't have a "dump stat" so to speak. Luckily the game still has bobbleheads, which are a must-have to round out and smooth your character's prowess. Whether you've skimped in Agility or pulled a ton of points away from Perception, our bobblehead guide will show you where each of these comical collectibles are hiding so you can shore up those rough edges.
Fallout 4 has 20 bobbleheads this time around, and you'll notice right away that these collectibles are a bit different. The SPECIAL bobbleheads--Strength, Agility, etc--all raise the specified stat point by 1. Bobbleheads like Melee, Repair, Science and Small Guns, however, give you extra perks. You can find the full range of effects and locations in our comprehensive checklist below.

You can also get our bobblehead guide in Google Doc format if you'd rather have a grid-style checklist. We've also separated the bobbleheads by region so you can swoop through and pick them up in one run, rather than running back and forth. Be sure to scroll down below the checklist to find the convenient zone sections for each bobblehead.
Zone 1 Northwest
- 1.12 Perception
Zone 2 North Central
- 2.07 Charisma
- 2.19 Explosives
- 2.23 Science
Zone 3 West Central (south of Zone 1)
- 3.12 Energy Weapons
- 3.22 Medicine
- 3.06 Repair
Zone 4 Northeast
- 4.12 Barter
- 4.03 Sneak
Zone 5 Southwest (south of Zone 3)
- 5.15 Big Guns
Zone 6 Southeast (south of Zone 4)
- 6.30 Agility
- 6.28 Endurance
- 6.31 Luck
- 6.17 Small Guns
- 6.27 Unarmed
Zone 11 Back Bay
- 11.01 Intelligence
- 11.05 Melee
Zone 13 Neighborhood North End
- 13.01 Lockpicking
Zone 14 Boston Common
- 14.05 Speech
Zone 15 Neighborhood Financial District
- 15.01 Strength
For more wasteland content, be sure to check out our basic tips guide and PC console commands guide to set up some insane battles, as well as our official Fallout 4 review.
 Bethesda may release Fallout 4 Anniversary Edition to celebrate 10 years since launch
 Fallout TV show season 2 sparks surge in Fallout game popularity on Steam
 Fallout 4 UI mods will break with new Creations update, Bethesda warns
 Fallout 4 mod storage increases to 100GB on Xbox Series X/S and 15GB on PlayStation consoles
 Fallout 5 takes place in the same world and timeline as Fallout TV show, Bethesda confirms
 ThundeRobot claims the ZERO Air 16 is the world's lightest 16-inch RTX 5070 gaming laptop at just 1.64 kg
 New Steam Machine rival offers a Ryzen 9 CPU and RX 7600 XT for $849, but you have to bring your own RAM
 Assassin's Creed Black Flag Resynced is Steam Deck Verified at launch
 PlayStation CEO mentioned shift to 'true digital platform business' weeks before cutting game discs
 Ubisoft picks 2K Games co-founder to lead Ghost Recon, The Division, and Splinter Cell franchises
 Sony declares AI as core part of future game development at PlayStation
 Security researchers trick AI browsers into revealing passwords using BioShock-inspired prompt injection
 Cyberpunk 2077 sells over 40 million copies, 10 million more than The Witcher 3 in the same time
 PlayStation games out before 2028 can still get disc reprints
 Nintendo may raise Switch 2 prices a second time, company plotting Fiscal Year 2028 with assumption that costs will rise
 KTC H49S66 5K2K (5120x1440) 49-inch 180Hz Gaming Monitor Review
 HighPoint Rocket 1604L Gen5 x16 NVMe SoftRAID AIC Review: half the price with full 59 GB/s speed
 Next Level Racing ERS3 Haptic Seat Review: immersive sim racing comfort with integrated haptics
 ASUS TUF Gaming X870-Pro WiFi7 W NEO Review - Tuffed up
 GIGABYTE GO27Q24G Gaming Monitor Review: Glossy OLED Gaming at 240Hz
 Lian Li B4-mATX Review: a compact mATX SFF case with excellent airflow and premium features
 MSI MPG 322UR QD-OLED X24 Review: A Brighter, Tougher 4K 240Hz QD-OLED for $1099
 UGREEN NASync DXP4800 GT Review: powerful 4-bay NAS with AMD Ryzen and dual 10GbE ports
 Dell XPS 14 (2026) Laptop Review - Premium Quality, Impressive Performance
 Ocypus Sigma F36 BK ARGB Cooling Fan Review: high airflow and unified design in one frame
 How to Remap Keyboard Keys in Windows using Microsoft PowerToys
 7 tips to organize your Windows files for faster, easier access
 Intel Arc G3 Extreme first impressions with MSI's Claw 8 EX AI+ - Incredible power for an extreme price
 How to fix Wi-Fi Adapter Not Working on Windows laptops: troubleshooting tips
 Hisense U7SG 4K TV: Modern Entertainment for the New Age
 6 underrated Microsoft Word features worth using to boost your productivity
 Level Up Your PC Gaming with these Fantastic ASUS Prime Day Deals on GPUs, Motherboards, and More
 GIGABYTE Wants to Kickstart Your New Gaming PC or Upgrade with These Limited-Time Deals
 7 Windows settings to change right after installation for better privacy, security, and performance
 I stopped Windows 11 notifications from interrupting me with Do Not Disturb, Focus, and a priority list