


Introduction to Overclocking, and The Flow Chart, and Video
Overclocking has been a staple of PC enthusiasts almost as long as computers have existed. It started with soldering of crystals and basic tiny jumps of, in some cases, fractions of a megahertz. Today CPUs have crossed the 5GHz barrier, and with that, the ability to overclock to the limit of the hardware is still alive and well. Also, motherboards have come a long way in the capabilities they offer and the level of overclocking you can achieve.
The new Intel Z490 platform has a vast array of motherboards available, and the one we will be testing today is from Supermicro. Supermicro cut their teeth in the PC industry, offering high-performance server products designed to run 24/7, 365 under fully loaded scenarios. Building boards and systems to stand up to that kind of abuse is no easy task, and Supermicro does a great job of it. So, when Supermicro asked us to take a look at their new Z490 performance-based consumer gaming boards overclocking capabilities, we jumped at it.
Supermicro's internal engineering team has already set the world record for Intel's new 10th gen 10900K running liquid nitrogen cooling, running a blistering 7548.15MHz. This is a testament to the capabilities and stability that Supermicro has engineered into their boards with its stout VRM sporting Infineon 90A power stages to feed the new 10th gen deca-core 10900K CPU. In the following guide, we will show you key parts of the UEFI and show how you can overclock your new 10th gen CPU on the Supermicro Z490 platform.
Overclocking Flow Chart
Overclocking has become far more accessible as boards, and their integral UEFI BIOS has improved and been tuned to allow easier overclocking by enthusiasts users. At the same time, the inception of overclocking saw users needing to change either hardware or even as recently as less than ten years ago, a myriad of settings. Now, overclocking primarily consists of adjusting only a few voltages and multipliers and frequencies to achieve their everyday overclock.
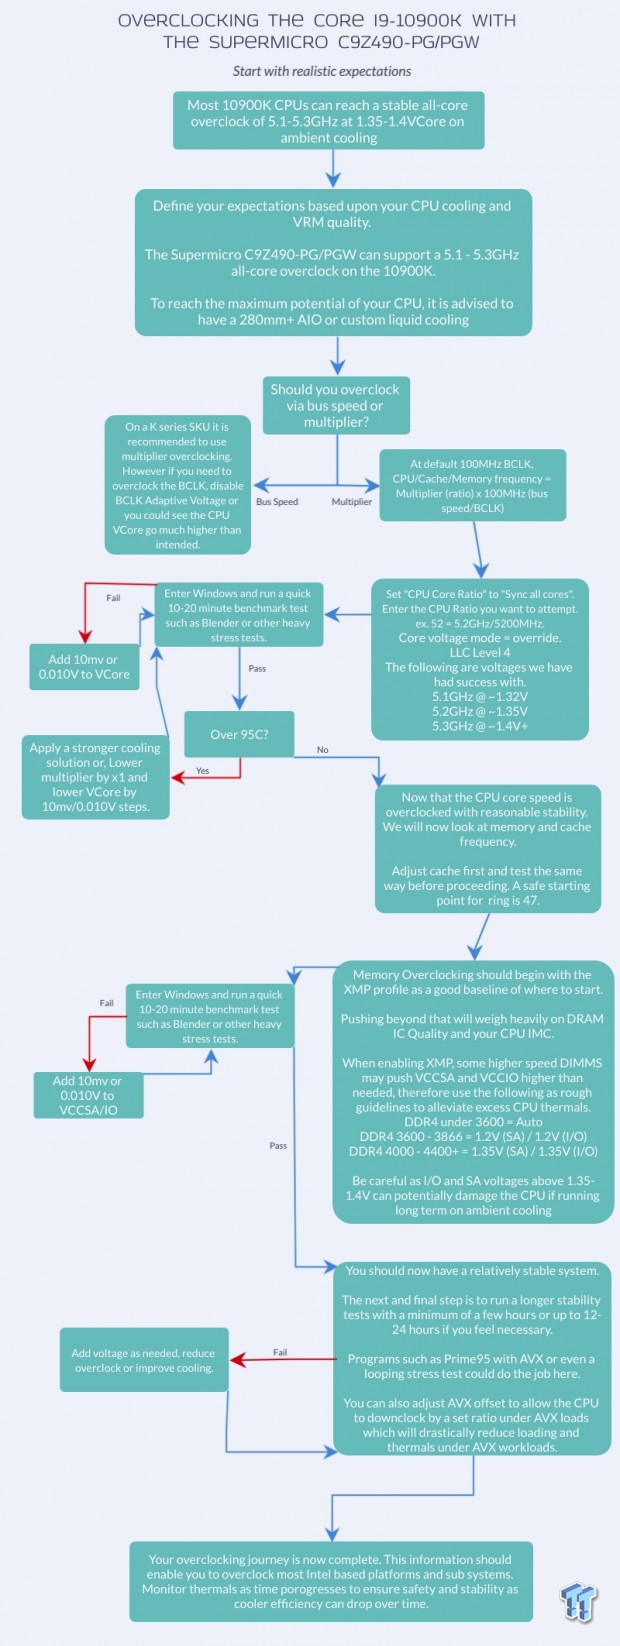
As we have mentioned in the flow chart, most 10900K can perform all core overclocks in the range of 5.1 - 5.3GHz at 1.35-1.4V+. This may seem high, but this is because you are pushing this silicon pretty hard, especially if you are expecting to run AVX loads at that speed. You can reduce the loading under such heavy loads by running an AVX offset multiplier, which will reduce the CPU clock speed multiplier by whatever number you enter. Example being 5.2GHz all-core overclock with a 2 AVX offset will result in a 5.0GHz overclock when pushing an AVX workload.
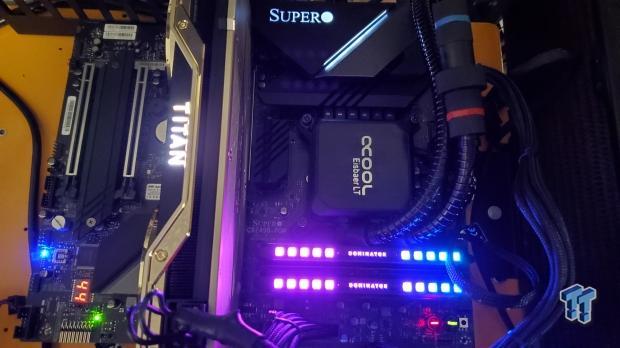
We are somewhat lucky as our 10900K can run up to 5.2GHz at 1.325VCore range with stability on both standard loading scenarios along with AVX. This is better than average as many will require 1.35VCore or higher depending on your luck in the silicon lottery. This is why we suggest this as a starting point. We can always reduce voltage as the CPU is fine-tuned and tested for stability. With the thermal density of the 10900K, we advise using the best thermal solution you can fit if you plan to extract as much performance as possible from the CPU. For our testing, we are using a 360mm liquid cooler from Alphacool.
We have also made an overclocking overview video (above) showing the ease at which you can overclock a 10th gen CPU on the Supermicro C9Z490-PG/PGW.
Disclaimer and Before You Begin Overclocking
Disclaimer Overclocking your CPU technically voids your warranty. However, if you want to overclock and still be covered, Intel does provide an aftermarket overclocking warranty for about $19.99 located here: (PTPP). the price of the protection plan has dropped drastically from the previous $50 to a much more favorable twenty bucks. Overclocking can also damage your CPU, especially if done incorrectly. This guide is about how to overclock, but neither TweakTown nor Super Micro Computer, Inc. take responsibility for damages that could occur; you bear sole responsibility for any damages that may arise.
If you have overclocked before and understand hardware selection and the basics of overclocking, you should skip to the next page. However, be warned that the thermals you have been used to with the previous generation Intel platforms have changed drastically with the rising core count and clock frequencies.
Where to start?
Supermicro C9Z490-PGW Test system component suggestions
CPU: You will need a "K-SKU" CPU such as the Intel Core i9 10900K, which we will be using for the guide.
Motherboard: You can buy a Supermicro Z490 motherboard, and match what we are doing here. All of the settings we show here will be roughly similar to any Z490 motherboard you are using, albeit the UEFI may be laid out differently.
DRAM: If you go to Supermicro's website, you will find a tab under "Tested Memory List." We recommend anything 3200MHz or higher dual-channel kit with the lowest CAS latencies you can get or afford to give you the most overclocking performance and potential headroom.
Cooler: We strongly recommend the best watercooling you can buy if you are going to overclock Intel's new deca-core Intel 10th Gen Core i9. We used an Alphacool Eisbaer 360, and at 1.325-1.35VCore, the CPU still gets quite hot. With that said, we recommend a full custom loop if you want to push for the maximum the 10900K can muster.
PSU: buying a PSU look for PSUs that offer at least 29A on the 12v rail for the CPU, which is about 350W. This will ensure your PSU can supply what the CPU can pull, but ensure you are getting a good quality PSU as well, and if you find one with a higher rated current for the CPU EPS, having more on tap will be better.
Using Supermicro's UEFI and Configuring Your CPU
Simple Setup For a 5.2GHz Overclock
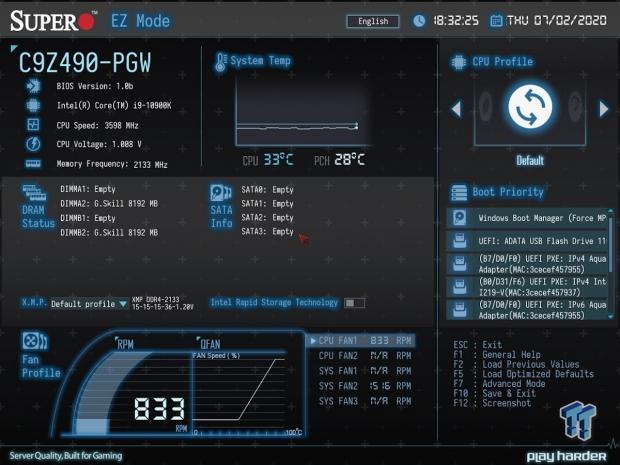
You enter the BIOS/UEFI by hitting the "delete" button when you see the postcode "b2"(or "62"), or when your keyboard's "number lock" or RGB backlighting illuminates.

Once in the BIOS, you will be in the Easy mode and will need to hit "F7" to switch to Advanced Mode. Once in the advanced mode, go to Advanced Settings and change your default boot page to "Advanced Mode," it's a setting at the top of the page above the submenus. If you need to revert to Optimized Defaults, you can press F5, and F10 can be used to save and exit. This will avoid the easy mode and put you into the advanced mode whenever you enter the UEFI.
CPU Ratio and Memory Settings


Entering the advanced mode of the UEFI and Supermicro has updated its UEFI to have far fewer sub-menus to go through. Therefore, we find ourselves right in the thick of things, and as you can see, we put images side by side with the default UEFI settings, and the overclock settings we applied to the right.
The top profile switch if you choose "Performance" it will knock the fan speeds up to 100% along with some other behind the scenes changes, but since we are going for a more favorable everyday overclock. We will leave the profile to default. Next up is how you would like to adjust your CPU Ratio, as "per core" or "sync all cores," we chose the latter. This will give us all cores running at the same frequency.
The cor ratio limit you enter in the 0 columns will auto-fill the remaining cores multiplier to match. We set 52 as our target CPU clock speed is 5.2GHz. The memory profile can also be enabled now, as we want to ensure the memory is running at its rated speed. This is an important step; otherwise, you can push the CPU to the edge, then when enabling the memory profile, it can cause extra stress to the CPU IMC resulting in instability, which then the CPU would have to be tuned again.
Voltage Settings


Next up, we have the default and OC screenshots of the UEFI for the voltage control of the CPU, memory, and other voltages. First up is the LLC or load line calibration. Normally there is a level of built-in VDroop or voltage drop when the CPU is under load, and this would mean setting the static VCore higher to compensate for the reduction under loading. The integration of LLC allows a manual adjustment to offset or reduce VDroop to a level that is more in line with what your system needs for stability. We found that level 4 worked best and dropped only about 4-6mv under loading.
The core voltage mode, we set to override to provide a fixed voltage value for the CPU core voltage. This can also have an offset value, which will then adjust up or down from the motherboards auto voltage. There is also Adaptive voltage, which will provide a boosted turbo value voltage, for those looking to keep the fluctuation of frequency and power under lower load or idle scenarios. We choose the override mode to ensure we have a fixed voltage with minimal deviation for the sake of stability.
SVID needs to be disabled; otherwise, the voltage can adjust upwards based on the SVID communication and what the CPU thinks it may need. Intel makes a very capable CPU, but in this case, we are planning to run well outside of spec and therefore trust our judgment far more than what the CPU will ask for (Which is 1.54V) don't ask how I know this.
CPU voltage we set for 1.35V, which is what we recommend to start tuning in your CPU and see if it runs with some level of stability before tuning further. The memory voltage can also be set for its spec voltage at this time, although the XMP profile will take care of that. Lastly, we have the I/O (VCCIO) and System Agent (VCCSA or SA) voltages, which we mentioned in the flow chart. The XMP profile on our 3600kit puts the VCCSA at 1.35V and VCCIO at 1.22, which from my experience was well above what the board and chip needed. 1.130 IO and 1.248SA are even a bit over what we need at this memory speed, but it gives us a bit of a buffer for stability while reducing the thermals with lower IO and SA voltages.
CPU Settings


Here we get a bit deeper into the UEFI CPU settings for overclocking. Here we have first is the BCLK adaptive voltage, which we recommend leaving alone unless you are pushing the base clock or BCLK. If you are pushing the BCLK, then it is recommended that you disable this to avoid the CPU automatically pushing the voltage up, which will cause more issues than you want to deal with.
The two yellow boxes are automatically adjusted when I set a manual all-core overclock. As you can see, the CPU max OC ratio is now 52. The TJMax offset automatically moves up by 10, which we do not need to adjust unless you want to give yourself more thermal headroom. However, I would advise against this as we are trying for an overclock that will be stable and below the mid-90s under an AVX load.
The AVX ratio is the blue rectangle and is used to offset the CPU overclock when an AVX load is present. Many video and render applications can use AVX instruction, and they place abnormally heavy stress on the CPU. Setting a "2" here would lower our 5.2GHz to 5.0GHz on AVX workloads. This could be helpful if you have a CPU that can do a higher gaming load speed, but AVX its too hot; you can offset it here. We are leaving the AVX offset at zero as our CPU can run 5.2GHz AVX with the settings we are applying.


Under the CPU feature menu, we see three settings again that automatically adjusted behind the scenes as we set our 5.2GHz all-core overclock on our 10900K. The boot performance mode switched from "max non-turbo performance" to "Turbo performance." We also see that Intel's Speed Shift is now disabled along with the C-States. The C-States are the power states where your CPU downclocks when at idle, and we usually disable these when setting an all-core overclock to firm up stability.


The Ring menu is pretty straight forward; we find that just setting 4.7GHz (by setting 47x) is simple and doesn't impede stability. Disabling the ring down bin feature keeps the ring ratio at what we set it at to avoid it trying to adjust automatically. We even went the extra step to set the min and max ring bin to 47 to ensure it will be stable at 47, no matter what the system may think it wants to do.
Overclocking Test and Wrap Up
Testing the final overclock
Now we have completed the Overclock in the UEFI, so now is the time to make sure first it is stable. I use an application like Cinebench to run a quick 1T and nT load as this can trigger a fault quickly before moving to a longer stability test such as Prime95 or AIDA64.
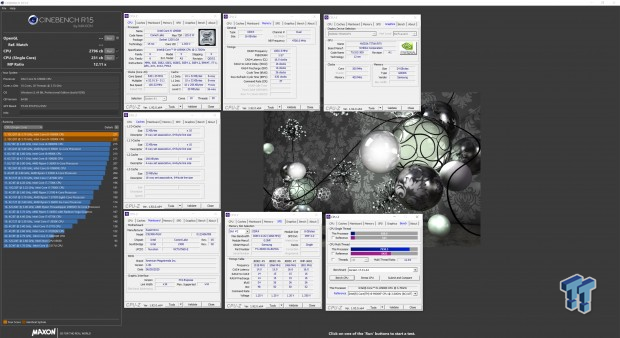
Here we see that the Overclock is stable, and with that, we started tuning down the voltage until we got down to 1.305VCore before we lost stability. Moving up to 1.32VCore gives us the bump we needed to get the 10900K stable on the Cinebench runs along with looping Cinebench R20 for 20 minutes.
Longer stress test runs
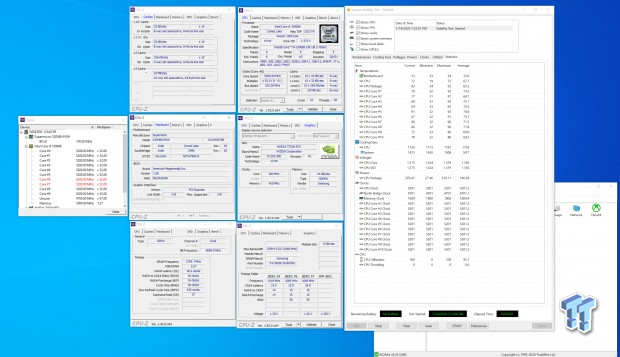
After you achieve stability or a setting, you find to be benchmark stable; we now move to the longer tests. There is a laundry list of tests you can run, including ROG Realbench, Prime95, OCCT, among several other Linpack based or other stress tests. I choose to use AIDA64 as their stability test allows you to enable or disable specific tests.
I usually will test with the CPU and Cache stress to test an overclock, but to show full AVX and platform stability, I am pushing CPU, FPU, cache, and memory. This will provide an intense load, including AVX, on the platform and put as much load as possible into the VRM and the CPU. As you can see, it was stable when we took the screenshot and was still burning away at the time of writing.

Here we have a thermal image of the Supermicro board under the long AVX stress test run, and you can see the VRM cooler is barely in the mid-50s with the inductor line reaching into the 60s. The 6+2 phase VRM with the six 90A power stages feeding the CPU core has no issue putting down the power to the 10900K flagship from Intel and staying cool while it does it.
Now you can see that overclocking the 10900K on the Supermicro C9Z490-PGW is easier than ever. The Supermicro UEFI makes it a five-minute process to get your initial overclock configured; then, it is all about tuning and trimming to find where your specific CPU and memory will work well together.
 PS Plus pre-order charts show gamers lean towards higher-priced editions, suggests new price tolerance threshold
 New RPG The Blood of Dawnwalker is complete on disc, doesn't require download to play
 Gamers jump back on Assassin's Creed Odyssey after watching Christopher Nolan's 'The Odyssey'
 Ayaneo has officially brought high-end gaming PC pricing to handhelds
 Der8auer strips the AIO out of a $7,000 RTX 5090 Lightning and replaces it with a custom loop, achieving 55C at 800W
 Modder straps a 2.5kg heatsink to an RTX 4060 for completely fanless cooling
 Redditor builds his own PS4 handheld, the 'PS4P' has a 1080p screen and a cooling fan from a GTX 750
 Sony's PS6 controller could feature a touchscreen display and fully modular inputs, according to a new patent
 Marathon loses game director as Bungie shifts to PvE model
 SteelSeries Arctis Nova Pro Omni Wireless Headset Review - One Headset to Rule Them All
 SteelSeries Arctis Nova 7 Wireless Gen 2 Headset Review - New and Improved, But Is It Enough?
 AMD Ryzen 7 7700X3D Review - Days of Future Past
 Samsung 990 2TB SSD Review - Ninth Gen QLC at PCIe Gen4 Speeds
 ASUS ExpertBook Ultra (Panther Lake) 14" Business Laptop Review
 ASUS ROG Raikiri II Xbox Wireless Controller Review - Ready to Take Control
 MOZA FMP18 Panel Bundle Review: authentic F/A-18 Hornet cockpit controls for flight sims
 Micron 6600 ION 245.76TB Enterprise SSD Review - Best in Class Programming Speeds
 MOZA MA3F EFCM Flight Control Module Review: authentic Airbus A320 autopilot panel for simulators
 Turtle Beach Stealth Pro II Wireless Gaming Headset Review - Premium Sound, Fantastic Features
 I use this decade-old free tool that finds files faster than Windows Search does
 I install and update most of my apps with this Windows command now, and I stopped downloading sketchy installers
 Hisense U6SF 65-inch MiniLED TV: High Performance Meets Leisurely Convenience
 I stopped digging through Windows menus after I set up this one folder
 Don't sell your Windows laptop until you do these things
 6 PC cleaning mistakes to avoid for safer hardware maintenance
 Phison and Intel Take Aim at Local AI's Memory Wall with aiDAPTIV
 How to Remap Keyboard Keys in Windows using Microsoft PowerToys
 7 tips to organize your Windows files for faster, easier access
 Intel Arc G3 Extreme first impressions with MSI's Claw 8 EX AI+ - Incredible power for an extreme price