


Introduction
Netflix, Hulu, HBO Max, Stan, Disney+, and the rest of the streaming services are convenient ways to access thousands of movies and TV shows. With numerous options now available on the market, content is being passed from platform to platform, meaning most people are subscribed to multiple streaming services at once to watch their favorite shows/movies. In some cases, people are subscribed to all of them.

Since their inception, streaming services have gradually increased in price. Netflix's first plan in 2014 was $7.99/month to access its streaming service, and now, in 2025, that same plan features advertisements, with the standard plan costing $17.99/month. The same applies to the rest of the streaming services, besides a few that have remained relatively consistent, but overall, most are steadily gaining in price.
So, what is the solution? You can become your own Netflix, and while at face value that may sound like a difficult task, it's much easier than you would think. All it requires is a bit of time to learn the ins and outs of the setup process and once-off payment for some shiny new hardware.
The goal of this article is to demonstrate how you can abandon all of the streaming services you are paying for your own home setup that will, in the long run, save you money and, most importantly, provide a higher quality picture than what the streaming services are currently sending to your TV. Yes, that's right, your home setup will be cheaper and look better than Netflix.
What You Will Need
- Network Attached Storage (NAS)
- Ethernet Cables (if they aren't provided with the NAS)
- PLEX account
- Internet router
- Hard Drives (HDDs) / SSDs
- Some time and a degree of patience
UGREEN plans to launch the iDX series AI NAS products in the second half of 2025.
Why do this?
Besides the amount of money you will save over the many months you won't be paying for all of the streaming services, one of the biggest benefits of having your own home streaming service setup is that the content you will be watching will look better than what the streaming services can provide you.
The quality comes down to bitrate, or the amount of data that is transmitted or processed per unit of time within a media file. Bitrates are typically measured in kilobits per second (Kbps) or megabits per second (Mbps). Without getting too into the weeds with the technical jargon, higher the bitrate = better detail.
A simple example of this would be a 4K movie playing at 25 Mbps will look better than the same movie playing at 10 Mbps - if both movies are using the same video codec.
| Service | Max Resolution | Max Video Bitrate | Max Audio Bitrate | Notes |
|---|---|---|---|---|
| Netflix | 4K (2160p) | ~15-17 Mbps (4K HDR) | ~640 kbps (5.1 AAC) | Uses adaptive bitrate and heavy compression. |
| Disney+ | 4K (2160p) | ~15 Mbps (4K HDR) | ~768 kbps (Dolby Atmos) | Very efficient, often lower bitrates than Netflix with similar quality. |
| Amazon Prime Video | 4K (2160p) | ~14-20 Mbps (4K HDR) | ~768 kbps (Dolby Atmos) | Varies a lot by region and title. |
| Apple TV+ | 4K (2160p) | ~25-40 Mbps (4K HDR) | ~768 kbps (Dolby Atmos) | Among the highest quality streams. |
| HBO Max / Max | 4K (2160p) | ~12-16 Mbps (4K HDR) | ~640-768 kbps (Dolby Atmos) | Lower than Apple, higher than Netflix. |
| Hulu | 1080p / some 4K | ~5-8 Mbps (1080p) | ~128-384 kbps | Limited 4K, lower quality compared to others. |
| YouTube | Up to 8K | ~20-50 Mbps (4K VP9/AV1) | ~128-256 kbps (AAC/Opus) | User-uploaded, highly variable. |
| Paramount+ | 4K (2160p) | ~10-15 Mbps (4K HDR) | ~640-768 kbps | Quality varies by content. |
| Peacock | 1080p / some 4K | ~3.5-5 Mbps (1080p) | ~192-384 kbps | Lower end of the spectrum. |
Above is a table of the streaming services and the bitrates they provide. The bitrates vary depending on the plan, with the more expensive plans providing higher-quality streams. However, when compared to the bitrates of Blu-Ray discs or downloaded files, they fall extremely short.
Blu-ray Video Bitrates
| Format | Resolution | Average Bitrate | Max Bitrate | Video Codec |
|---|---|---|---|---|
| Standard Blu-ray | 1080p | ~20-30 Mbps | Up to 40 Mbps | AVC (H.264), MPEG-2 |
| 4K Ultra HD Blu-ray | 2160p (4K HDR) | ~40-60 Mbps | Up to 128 Mbps | HEVC (H.265) |
Blu-ray Audio Bitrates
| Audio Format | Max Bitrate | Notes |
|---|---|---|
| DTS-HD Master Audio | Up to 24.5 Mbps | Lossless, often used for 5.1/7.1 |
| Dolby TrueHD | Up to 18 Mbps | Lossless, often includes Atmos |
| LPCM (Uncompressed) | ~4.6 Mbps (5.1), ~6.9 Mbps (7.1) | Very high quality, no compression |
A quick summary of this would be that the video and audio heard through a streaming service are extremely compressed compared to a Blu-ray file or disc of the same content. A Blu-ray video has a bitrate of anywhere between 20 - 100 Mbps, compared to streaming, which is between 5 - 25 Mbps.
To put it in even simpler terminology, a 1080p Blu-ray movie will have more detail than a streamed 4K movie, even though the 4K movie has more pixels. More pixels don't equal better quality, bitrate does.
Network Attached Storage (NAS)


To begin this process, you will need a NAS or Network Attached Storage, which will be the place where all of your multimedia will be saved. The same end result can be achieved with a spare computer, but for the purpose of this guide, I will be using a NAS. UGREEN has provided the DXP4800, a 4-bay NAS that comes equipped with M.2 SSD slots, 4x HDD slots, an Intel Pentium Gold 8505 12th Gen (Alder Lake) CPU (5 Cores / 6 Threads), 8GB of DDR5 RAM expandable up to 64GB, 1x 2.5GbE and 1x 10GbE LAN ports, USB-C ports, SD card reader, and a max storage capacity of up to 112TB.


While most of those specifications aren't necessary to achieve the setup we are going for they are nice bells and whistles to have. However, if I were to boil it down to what is most necessary when shopping for a NAS, I would recommend the following: High max storage either with SSDs (better) or 3.5"/2.5" SATA drives, at least 1x LAN 1GbE or higher LAN port, and an Intel i5 (8th gen or newer) or AMD Ryzen 5 (3000+ series) CPU for smooth 4K streaming/transcoding.

The DXP4800 achieves all of that and more, and thanks to Seagate for providing four 4TB IronWolf 3.5" SATA drives I was able to utilize all four bays of the DXP4800 for a total of 16TB of storage. More than enough to create my own Netflix.
Specifications
| Specification | Details |
|---|---|
| SKU | 35260 |
| Model | DXP4800 Plus |
| Drive Bays | 4-Bay (SATA) |
| Operating System | UGOS Pro |
| CPU Model | 8505 |
| CPU Brand & Architecture | Intel X86 12th Generation Intel Pentium Gold 5 Cores 6 Threads |
| Memory (RAM) | 8GB DDR5 |
| ODECC | Supported |
| Expandable RAM (max) | 64GB |
| Flash Memory (System Disk) | SSD 128GB |
| SATA Drive Bays | 4 |
| M.2 SSD Drive Slots | 2 |
| RAID | JBOD/Basic/0/1/5/6/10 |
| Maximum Storage | 112TB (4x 24TB + 2x 8TB) |
| LAN Ports (RJ45) | 1x 2.5GbE, 1x 10GbE |
| High-Speed USB Ports (Front Panel) | 1x USB-C, 1x USB-A (both 10Gb/s) |
| High-Speed USB Ports (Rear Panel) | 1x USB-A (5Gb/s) |
| USB 2.0 (Rear Panel) | 2x USB-A (480Mb/s) |
| SD Card Reader | SD 3.0 |
| HDMI | 4K |
| Product Dimensions | L10.14 x W7.01 x H7.01 inches |

Setting Up the NAS
The process of setting up at NAS, while it may appear daunting at first, appears more difficult than it really is as most companies have streamlined the setup process through intuitive software and providing all of the necessary tools/items within the box.


The DXP4800 was easily set up by opening each of the bays, placing the IronWolf drives into their slots, and putting the NAS next to my home internet router. UGREEN provides an ethernet cable in the box to connect the NAS to the router. It should be noted the NAS will need to be connected to the router at all times for it to be discoverable on the home network. I placed the NAS next to the router and plugged it into a spare ethernet port.

Next, connect an ethernet cable from the NAS to the router and an ethernet cable from your computer to the router. Notably, you won't need an ethernet cable from your computer to the router all the time to access the NAS, just for the initial setup. After the NAS has been set up, you will be free to unplug the ethernet and begin using the NAS over WiFi.
Initializing the DXP4800

Once plugged in, go to a web browser and type the following "find.ugnas.com." This will begin scanning your local network for your NAS. Once discovered, click connect and follow the prompts, filling in the necessary fields such as the name of the NAS, a password, automatic updates, etc. Be sure to write down the information within these fields on a piece of paper, as we will need them later on. Once completed, head to Storage Manager, where you will be prompted to create a storage pool.

For the purpose of keeping things simple, I have opted for a RAID 5 setup for the NAS, which provides some level of redundancy if a single drive fails, meaning I won't lose all of my data. There are numerous ways to set up the DXP4800, but for the purpose of this guide, I have decided to go with RAID 5 as that is all that is needed, but feel free to look into the other ways yourself for a more personalized/advanced setup as each RAID number comes with its own positives and negatives.

Continue to follow the prompts, and begin the setup process. This will take some time, especially if you have clicked "yes" to testing the health of the drives, which I do recommend, as you don't want to be writing data to drives that are potentially faulty, even if they are brand new.

Once completed you will want to head to Control Panel > File Service and enable SMB Settings. This will turn on the NAS and make it available as a file service, meaning it's becoming discoverable on PCs connected to the local network such as in Mac's Finder or Windows' File Explorer. Within the SMB settings you will see "How to Use." Make sure to copy down that information for your respective operating system. Mine have been intentionally blurred out, but you will see your respective information here.
Now let's find your NAS within your PC. Since I'm on Windows, I opened up File Explorer, located the address bar at the top of the window, and entered in the following: "THENAMEOFYOURNAS". On Mac, it will be in Finder > Go > Connect to Server. On Windows, the address bar should be filled with and the name you called the NAS during setup. On Mac, it will be smb://THENAMEOFYOURNAS. Once enter is pressed, you will be prompted for a username and password to connect to the NAS. Enter those, and boom you are now connected to your NAS on your PC. It's ready for data transfer.
Dressing the NAS for PLEX
PLEX is going to be the service you are going to use to stream all of your multimedia on your NAS to your TV, and what you are going to need to do first is to prepare the NAS for a PLEX connection. The DXP4800 is a Linux-based NAS, meaning it doesn't natively support a PLEX app. However, we can get around this with an app called Docker. Here's what you need to do first: download the UGREEN NAS software from the UGREEN website for your respective operating system. Once downloaded, sign in to the NAS.

First thing is to locate the App Center on the home screen of the software and download the app Docker. Once Docker is downloaded locate the Image tab and press Image Database. Once here search "PLEX" and download "linuxserver/plex," select the latest version of the software. Once downloaded it will appear in "Local Images".


While that is downloading you can begin setting up your directories for PLEX, which will be the folders in your NAS that PLEX will be accessing to play your movies/TV shows. Head to NAS home screen select Files and Shared Folder. Create a new Shared Folder, name it, and select Volume 1. In here you want to create the following folders: Config, data, transcode, Movies, TV Shows. We will need these later.


Head back to Docker > Image > Local Image and select the "+" symbol next to the downloaded image linuxserver/plex. You can give the container a name, but don't need to. Make sure to select "Yes" to containers being restarted automatically if they are shut down abnormally, as this ensures the PLEX server comes back online if it crashes for whatever reason.

Next we need to link the PLEX container to the folders on the NAS we created earlier. So, we need to enter in the same file names we created previously, but as follows: /Config, /data, /transcode, /movies, /tv shows. Enable each of these to have Read/Write access. Proceed to link each them their respective NAS folders by selecting the "Automatic Distribution" option and locating those folders you created earlier.


Next, change Network Mode to host, and click Done. You will now be in the Advanced tab. From here, you will need to fill out some Environmental Variables. These are hooking PLEX up with the correct signatures and credentials. Create five new Environmental Variables: PUID, PGID, TZ, VERSION, and PLEX_CLAIM.

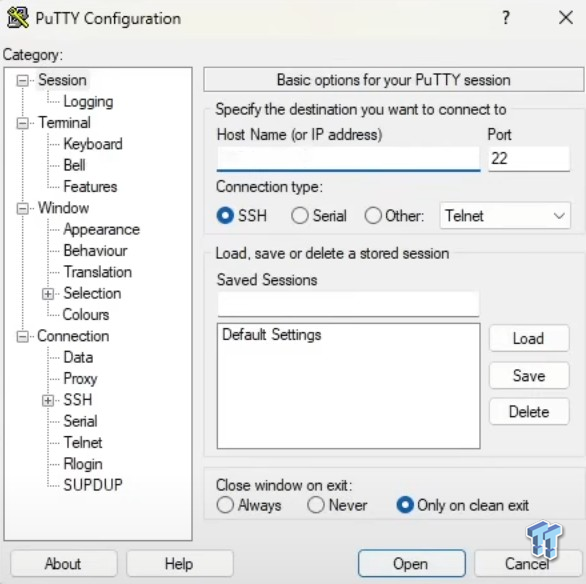
Next, download the program https://www.putty.org/, an open-source program enabling us to grab information for the variables. Once downloaded, head back to the UGREEN app, go to Control Panel > Terminal >, and enable SSH while also taking note of the port number. Once enabled, open up PuTTY, make sure the port number is the same as what it was in Terminal, and enter the IP address for the NAS. If you don't know what the IP for the NAS is, you can find it by heading to Control Panel > About and looking at the right-hand side under Network. It will be a number similar to this "192.785.0.32".

You will be presented with the above window. Enter your user account and password for the NAS. Once completed, you will need to enter in the following "id USERACCOUNT NAME." In my case, it was "id Admin". The numbers you want to be grabbing from here are the "uid" and "gid" numbers. Head back to the Docker window and enter in the "uid" number into the PUID field, and the "gid" number into the PGID field. Close the Terminal by typing "exit" and return to Terminal within the NAS to disable SSH.
In the "TZ" field you will want to find your respective timezone, you can do this by locating your timezone on this list and entering in the TZ Identifier. For example, if you are in the US, "America/Chicago", this could be CDT. Back to Docker, under "Version," enter "docker," and then lastly, the PLEX_CLAIM field. We are going to link your PLEX account to Docker using this claim number. So, go ahead and make a PLEX account now if you haven't already.
Once a PLEX account has been made head to a web browser and type in the following: plex.tv/claim. A claim code will appear and you will need to copy that code into the Docker field. After that click done.
Connecting PLEX to the NAS
We are at the last stretch of the setup here, and you want to begin by typing the following into a web browser: app.plex.tv


Follow the prompts and enter in a sever username. I opted for the same name as the NAS. After pressing Next you want to add a library, which will be telling where PLEX should be pulling data from your NAS.

For example, selecting Films as a library type, then selecting "Browse For Media Folder" you will be presented with a window showing a bunch of directories. Locate "Movies" and add it. Do the same for TV shows. Once you've pressed done PLEX will begin scraping those directories on your NAS for any media.

Notably, you can change the directory for the Movies and TV Shows libraries by simply going to Settings within PLEX, scrolling down to Manage > Libraries > Edit Libraries.
Once these libraries are setup it's now a good time to place a movie or TV show into the respective folder on the NAS and see if it appears on PLEX. If it does, congratulations, you have completed the setup.
Finally Done!

While this setup may be grueling, once it has been done once and works, it won't need to be done again. You are free to begin filling the TV shows and Movie files on the NAS with as many pieces of media as you can, and once the file has been successfully transferred, PLEX will automatically scrape the files and show the media on the TV.
 Gen Z would like esports and professional gaming taught in school, study finds
 OpenAI sued after man says ChatGPT fed his religious delusions before suicide attempt
 First Steam Machine spotted with 'red line of death' after playing No Man's Sky for 20 minutes
 Google unveils Android Halo, the new home for AI agent living in your smartphone
 This $6 indie is the best-selling game of 2026, beating major AAA releases
 Halo CE remake's LASO playlist clarified by Halo Studios
 Hideo Kojima mourns loss of PlayStation game discs, warns of streaming-only future
 ASUS ROG Astral RTX 5090 Edition 20 listing appears in Europe for over $7,400
 NVIDIA RTX 3060 12GB spotted on Newegg for $329, confirming the re-launch
 YouTuber shows Vega GPU running FSR 4 with experimental build of OptiScaler and leaked Proton version of FSR 4.1.1
 The Super Mario Galaxy Movie (2026) 4K Ultra HD Blu-ray Review
 KTC H49S66 5K2K (5120x1440) 49-inch 180Hz Gaming Monitor Review
 HighPoint Rocket 1604L Gen5 x16 NVMe Software RAID AIC Review: half the price with full 59 GB/s speed
 Next Level Racing ERS3 Haptic Seat Review: immersive sim racing comfort with integrated haptics
 ASUS TUF Gaming X870-Pro WiFi7 W NEO Review - Tuffed up
 GIGABYTE GO27Q24G Gaming Monitor Review: Glossy OLED Gaming at 240Hz
 Lian Li B4-mATX Review: a compact mATX SFF case with excellent airflow and premium features
 MSI MPG 322UR QD-OLED X24 Review: A Brighter, Tougher 4K 240Hz QD-OLED for $1099
 UGREEN NASync DXP4800 GT Review: powerful 4-bay NAS with AMD Ryzen and dual 10GbE ports
 Dell XPS 14 (2026) Laptop Review - Premium Quality, Impressive Performance
 How to Remap Keyboard Keys in Windows using Microsoft PowerToys
 7 tips to organize your Windows files for faster, easier access
 Intel Arc G3 Extreme first impressions with MSI's Claw 8 EX AI+ - Incredible power for an extreme price
 How to fix Wi-Fi Adapter Not Working on Windows laptops: troubleshooting tips
 Hisense U7SG 4K TV: Modern Entertainment for the New Age
 6 underrated Microsoft Word features worth using to boost your productivity
 Level Up Your PC Gaming with these Fantastic ASUS Prime Day Deals on GPUs, Motherboards, and More
 GIGABYTE Wants to Kickstart Your New Gaming PC or Upgrade with These Limited-Time Deals
 7 Windows settings to change right after installation for better privacy, security, and performance
 I stopped Windows 11 notifications from interrupting me with Do Not Disturb, Focus, and a priority list