


Introduction

Water cooling isn't for everyone, but for those who do indulge in it, the benefits can be tremendous. I have had some previous water cooling experience with both processors and video cards, but at the time I last water cooled, I was on a strict budget, so for me the DD-TDX series CPU block and a Maze 4 GPU block was the way to go. Times have changed since cooling my 7600GTs or my HD 3870 and components got hotter, while the technology behind block design has gotten more efficient. In my situation, this means that I shouldn't need those same Yate Loon, high speed fans that Chris so elegantly referred to as my vacuum cleaner case.
Being in the review game, I know I have to keep newer products in my PC just so I have parts on hand to be able to test new coolers with. I abused my 9800 GTX+ pretty good over the past year, but it was time to move on to bigger and better things. That in mind, I decided to go with a pair of EVGA GTX 470 SC's to run in SLI. Out of the box these cards were warm and in my pursuit to beat the snot out of them for benchmarks, I soon found the 470 to be nothing less than a nine and a half inch inferno, especially with the BIOS fan profile. Changing the fan profile to a more aggressive slope was some help, but definitely not the solution I needed if I planned to be able to get the last drop out of my cards.
After a couple of emails back and forth with Danger Den, they agreed to send over a pair of their latest creations. I am very pleased to present today's samples, the DD-GTX 470 full coverage water blocks. Danger Den offers two variations on this design. There is a Nickel plated version and the version we have today, a smooth satin, exposed copper finish. From the way I see it, the Nickel is nice, as it adds an oxidation free finish that is a lot easier to clean than the exposed copper, but does little for the effectiveness of the block itself. With that in mind, both versions of the block should perform similarly. It's more of a cosmetic choice.
Let's get a look at these new blocks and get them installed so I can see for myself if the "NVIDIA Inferno" is extinguishable or not.
Specifications, Availability and Pricing

With a water block the specifications are pretty simple for the materials. A copper base material is used and milled to make the contact surfaces and the water channels in the opposing side of the block. To keep the water inside the block, there is a channel routed to accept a rubber washer, then a smoked piece of acrylic is used to seal it off and make for an attractive top. The top is held in place with sixteen screws and washers so there is no question that the pressure can be applied for a leak free installation, but it leaves a lot of room in the middle of the smoked acrylic. Danger Den took this room to etch in a "DD" logo and "GTX 470" for even more flash to your investment.
These blocks are designed to come in full contact with both the GPU die and all of the ten memory IC's. To cool the voltage regulators Danger Den has supplied a large thermal pad to be cut down and placed over them to make the contact between them and the block. Out of the box the DD-GTX 470 blocks arrive with all G1/4 threads and will have two "plugs" installed. The choice of barb size is optional, and for mine, I was supplied with two Danger Den Fat Boy barbs for connectivity. With a few coolers I have tested on air, flex of the PCB became a major concern, not in this cooler, though, as Danger Den designed this block with spacers to add structural support.
Danger Den personally tests each block and seals the edge with a "void if broken" type of sticker. This will insure both any claims to be valid if your block does leak, and also should keep you from needlessly taking it apart. While my samples came, as it seems to me, came straight off the mill, it does state that these blocks are hand lapped. If my blocks are lapped it was strictly for removing burs or obvious defects, as the milling marks are very prominent, as you will soon see. I'm not saying that the finish is bad, but to me "lapped" is a term that means flat and smooth, almost mirror-like.
As I mentioned, I received the "satin copper" blocks, and they can be found directly from Danger Den. Aside from the radiator, full coverage blocks can be the most expensive choice you have to make, so you want to make it an educated one. Currently I am looking at the pricing, and by far, I have seen blocks that require much more than the investment of $119.95 directly from Danger Den. With what I have seen from my 470's I can say it will take a serious cooler to manage the temperatures, and I don't think the typical $40 cooler off the shelf will even attempt to offer the cooling needed to make these cards submit to my kind of punishment. This is also the reason I grabbed the 470 in the first place. If you can offer a solution to tame these, you have a really good cooler; the average coolers will get eaten for lunch by these cards.
Time for me to get down to brass tacks and see what kind of a difference the DD-GTX 470 offers to a guy who loves to punish his hardware, or even to the people who prefer silence with benefits over the stock leaf blower attached to the NVIDIA 4-series cards.
The Danger Den DD-GTX 470 Full Coverage GPU Water Blocks

The DD-GTX 470 water blocks arrived in plain white boxes and Dan was nice enough to include a few of the old stickers to come along with. You will see later I did find a good use for the stickers.

Opening the box, you will find a water block sandwiched between two layers of egg crate foam. In a separate bag, shipped under the bottom layer of foam you will find all of the needed hardware. The instruction sheet is folded up and placed on top of the foam, and was removed for this image.

From the top you can get a look at the satin copper finish and the attractively etched, smoked acrylic. Pro tip to those who plan to buy these, make sure your hands are very clean or wear gloves; you can see on the left side just how easy it is to "print up" the surface.

On the underside, you can see all the milling it takes to make a block of this caliber come to life from a solid block of copper. There are five rectangular protrusions to cool the three sets of RAM and the voltage controllers. The three RAM coolers make direct contact while the power management cooling using a thermal interface material between them and the block. The large spiraled area is the GPU die mating area. As I said, not what I would call lapped, but even with the mill marks, it offers a relatively flat surface to mount to.

From that angle the milling marks look really bad, but once you get it in a different light, you can tell the finish is quite good, and the barb reflects in the memory cooler in the top right. The nine small bumps are to support the PCB and keep it from flexing, and are used in conjunction with factory holes in the card for mounting.

With a razor blade held across all the mounting surfaces, they are true and level with no deviation across them. While they may not be done in a mirror finish, the surface will handle the transfer of heat from the die to the water with no problems.

Danger Den does pre-test these blocks and when done and satisfied, they place this sticker on to keep the end user from taking it apart and damaging it, or screwing up the replacement of the top and blaming it on Danger Dens workmanship. I do not suggest you do what I am about to do. I am doing it so you won't have to with yours.

I removed the sixteen screws to reveal the innards. Around the outside of the water chamber Danger Den uses a flat gasket more than a typical washer to seal this off. Flow inside the chamber is uni-directional, so in my setup, whatever makes it easier to install is going to be the way they flow.

The ten "C" shaped ribs take the heat from the base and expose it directly to the flow of the water for transference to the radiator for removal.
Accessories and Documentation

Included in the bag of hardware you will find the thermal membrane that you have to cut to fit, and the two tubes of included Ceramique surrounding the bag of mounting goods. In there you will find nine screws, washers and o-rings for mounting the block to the PCB.

The instruction sheet is simple to follow. It covers a parts list, the mounting and position of the hardware, and even the layout for the thermal membrane. If these instructions don't answer any questions, Danger Den provides video instructions on their site, so you can watch it done to be sure you have it right.
Installation and Finished Product

The victims; a pair of EVGA GTX 470 SC cards, that don't do that bad in clocking on air so far, but these two cards are some hot samples as you will see in the testing.

Skipping ahead, as you can find how to remove the stock cooler in the Danger Den videos. Here we have one of the 470's completely cleaned with all the IC's cleaned and prepped, ready to accept the DD-GTX 470.

Skipping ahead a little more, I have the IC's and the GPU die prepped with Ceramique. I also cut the membrane and placed it over the voltage regulators. In the video, he states it is much simpler to use one larger piece of material to group the chips than to place little individual pieces on each. I agree, as even getting these larger pieces on right took a bit of patience and a steady hand.

I did a light pressure test fit to be sure that, one, I was getting correct contact, and two, to transfer the pads to the block. As you can see, all the IC's and the core make contact. This is also a good time to check to see if the correct amount of TIM is used.

With the block installed the card takes on a much slimmer profile and I must say is an attractive end product. I ran into no clearance issues or any sort of oddities when placing the block and mounting it.

On the outside edge, the fittings clear the card well. There is plenty of room to get the fittings or barbs in place, get the tubing on, and if needed get a clamp installed. If you weren't aware, the plugs sent in the blocks are reversible to which side they can be used on, the limitations are in the tube routing and fitting choices.

Since my work rig is also what I game on, I lugged my case into the basement so I could get a good image of the cards installed. For those of you thinking the cards are in the wrong slots for 16x lanes, we aren't going for scores here and the x8 lane it uses shows very little, if any loss anyways.

Since I wanted to test the cards by themselves, I needed a way to mock up and secure the loop. I plan to add more to the loop soon, but it wasn't fair to the testing to add it now, so this is what I ended up with.

With everything hooked up and ready to test, I took this image waiting for the loop to bleed out.
Testing and Results
Testing was done with the setup you saw in the previous images. The loop consists of a Swiftech MCR 320, a Swiftech MCP 655 with EK top, a Bitspower POM80 reservoir and some 3/8" white tubing. I mounted it all to a board and covered the radiator with six, Lian Li LI121225BL-4 fans. They were used due to their near silent operation at 60CFM production levels. All testing was done at night so I could allow for a 25 degree Celsius, ambient temperature. I then applied MSI afterburner for clocking and fan control, and used the accompanying Kombustor to load the GPU's for results. This test usually maxes the temperatures quickly, but I allowed for ten minute runs to make sure I hit peak levels.

Out of the box with stock clocks of 625MHz core, 850MHz memory and 1250MHz on the shaders, and a core voltage of 0.950V, we get temperatures of 55 degrees on the coolest idling card, and at load they both settled out at 91 degrees. Another thing to keep an eye on is the PCB temperature. With these settings the PCB loaded at 65 degrees.

Using a tool like AfterBurner gives you the opportunity to change the fan profile to aid in the cooling at the expense of quite a bit of noise. Changing the slope to start at 0% fan speed with 0 degrees on the core, and ending at 100% fan speed at 80 degrees, this is what I got for the effort. Idling the 470 saw 51 degrees at idle and the hottest card only hit 78 degrees at load. The PCB temperature also dropped eight degrees with the fan increase.
Here is where the image of a ten minute run with an overclock of 795/1000/1590 should have been, but at 108 degrees the GPU's went into recovery mode and shut the test down. All I can say is that it failed and I moved on.

With my setting the fans curve, I was able to run not only this bench, but was able to keep them running games like Dirt 2 with no problems. Under Kombustors load, I saw the one card hit 101 degrees, but it was still running. Idling at 54 degrees was no surprise, but when you add the voltage control to the maximum level, you can see it really brings on the heat.

Once the loop was completely installed and bled free of air, I was surprised to see the results. A measily 34 degrees was where the cards idled, and even at load with the stock clocks I just touched 50 degrees.

Fully overclocked and with maximum voltage, the DD-GTX 470 block handles its business. 32 degrees idle temperatures, a full load temperature of 55 degrees, and even the PCB stays cool at a measily 39 degrees. I can't explain the difference in the idle temps other than it must have gotten a touch cooler between tests.

Here we can see all the idle temperatures side by side.

Again, a much more easily discernable load temperature chart. Once grouped like this, all I can say is WoW!
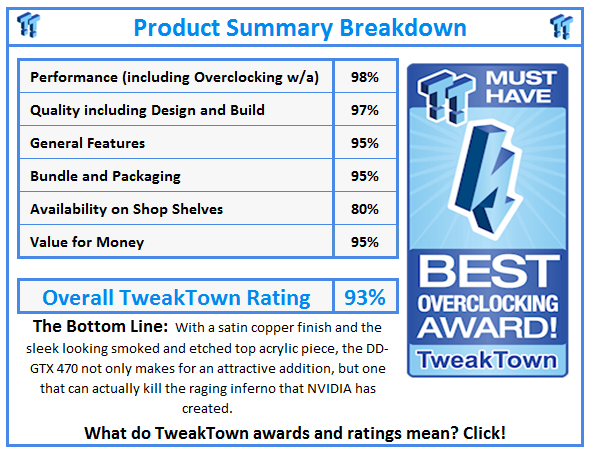
Final Thoughts
With a bit of time and patience you too can get these sorts of results. While water cooling isn't for everyone, whether due to the lack of funds or desire, the temperatures I received for my time, effort and struggle are more than worth it over any excuse I can come up with. I spent more time removing one of the original heatsinks than it took me to prep and install both blocks twice, as I had to verify contact and spread of the TIM on both. In my situation, as my PC sits on a table about three foot from my ear, this was not only a win in the temperature column, but a huge plus in the fact that my ears no longer bleed during intensive gaming sessions.
I mentioned that the surface of the block showed a lot of the milling marks, and even though it isn't lapped to perfection as a few of us tend to do to blocks after we get them, the DD-GTX 470 has no issues with contact of heat transfer. The testing and results section showed us that. With an air cooler my cards weren't able to overclock that much with the stock fan profile, and even when adding my own profile, I still broke 100 degrees Celsius. Adding a pair of the DD-GTX 470 blocks, and using it on just an average loop brings well over a 40 degree drop in temperatures at load, and just more than 20 degrees at idle. What is there not to like about that? When I wasn't trying to break forty thousand in Vantage with these two cards, I turned the clocks and voltage back to a more tame level, and I was really hard pressed to break 50 degrees on a day to day level.
I have seen samples of the 470 that can clock a little better than mine, and I have seen cooler versions, but nothing even close to what I got with my DD-GTX 470 blocks. From what I gathered, my temperature results are still some 20 degrees better than the best 470 results, overclocked or not. If you already have a loop and are planning on getting a GTX 470, I highly advise the DD-GTX470 block as your choice of an easy to install and a seriously "kickass" product. There is no easy way for me to try to pass this onto an avid air cooling guy, as they will say, bang for the buck, it isn't worth it. To me it will cost me at least $50-75 to get an average cooler that may offer only a 10-15 degree drop in loaded temperatures. Whereas not only did I see an incredible difference in temperatures and noise, I also saw the benefits in increased overclocking. Under water I was able to run Vantage at 825/1070/1650. Not a huge increase, but an increase all the same, especially on the memories ability to overclock more.
Now, with water cooling there is more cost to incorporate than just the blocks, but my plan here was to show that even with a three year old pump, a used radiator, and a few parts I picked up from PerformancePC's, I was only into the loop for about $175. As I say, for me I plan to cool even more so I can offset some of that to the CPU and chipset I am about to cool, but for what I got as results, it's still a drop in the hat to me, and well worth every penny. The DD-GTX 470 full cover blocks are currently demanding $119.95 directly from Danger Den, per block, bringing my budget total to just over $400 starting with nothing. Considering I had to spend almost double that to get the cards anyways, it is still a good investment in not only my "epeen" in bench marks, but adds tremendous longevity to my investment as they are running faster on water than air, and at about half of the highest temperature I got air cooling them.
 Lian Li B4-mATX Review: a compact mATX SFF case with excellent airflow and premium features
 Ocypus Sigma F36 BK ARGB Cooling Fan Review: high airflow and unified design in one frame
 PCCooler CPS RZ820 Display Review: a flagship-level CPU air cooler with an LCD screen
 MOAIPLAY ORA PRO G1 850W ATX 3.1 PSU Review: high efficiency and 10-year warranty for $119.99
 NZXT H6 RGB+ Compact Dual-Chamber Chassis Review
 First 'agentic ransomware' run entirely by a large language model discovered
 PlayStation disc phaseout petition hits 120,000 signatures in just four days
 Epic Games settles court case against ex-contractor over Fortnite leaks
 Cyberpunk 2077 hits 100,000 concurrent players on Steam, highest since 2023
 KIOXIA begins sampling 10th-generation BiCS FLASH technology, more efficient and with an impressive 332 layers
 Razer unveils Wuthering Waves collection with a custom keyboard, mouse, and premium gaming chair
 Intel prepping Ryzen X3D rivals with new 22-core Nova Lake-S CPUs with 108MB of cache for PC gaming
 Lenovo starts shipping laptops with Chinese-made YMTC SSDs due to skyrocketing NAND Flash prices
 Gen Z would like esports and professional gaming taught in school, study finds
 OpenAI sued after man says ChatGPT fed his religious delusions before suicide attempt
 The Super Mario Galaxy Movie (2026) 4K Ultra HD Blu-ray Review
 KTC H49S66 5K2K (5120x1440) 49-inch 180Hz Gaming Monitor Review
 HighPoint Rocket 1604L Gen5 x16 NVMe Software RAID AIC Review: half the price with full 59 GB/s speed
 Next Level Racing ERS3 Haptic Seat Review: immersive sim racing comfort with integrated haptics
 ASUS TUF Gaming X870-Pro WiFi7 W NEO Review - Tuffed up
 GIGABYTE GO27Q24G Gaming Monitor Review: Glossy OLED Gaming at 240Hz
 MSI MPG 322UR QD-OLED X24 Review: A Brighter, Tougher 4K 240Hz QD-OLED for $1099
 UGREEN NASync DXP4800 GT Review: powerful 4-bay NAS with AMD Ryzen and dual 10GbE ports
 Dell XPS 14 (2026) Laptop Review - Premium Quality, Impressive Performance
 How to Remap Keyboard Keys in Windows using Microsoft PowerToys
 7 tips to organize your Windows files for faster, easier access
 Intel Arc G3 Extreme first impressions with MSI's Claw 8 EX AI+ - Incredible power for an extreme price
 How to fix Wi-Fi Adapter Not Working on Windows laptops: troubleshooting tips
 Hisense U7SG 4K TV: Modern Entertainment for the New Age
 6 underrated Microsoft Word features worth using to boost your productivity
 Level Up Your PC Gaming with these Fantastic ASUS Prime Day Deals on GPUs, Motherboards, and More
 GIGABYTE Wants to Kickstart Your New Gaming PC or Upgrade with These Limited-Time Deals
 7 Windows settings to change right after installation for better privacy, security, and performance
 I stopped Windows 11 notifications from interrupting me with Do Not Disturb, Focus, and a priority list